KM 3001 we - Food Processor Exquisit - Free user manual and instructions
Find the device manual for free KM 3001 we Exquisit in PDF.
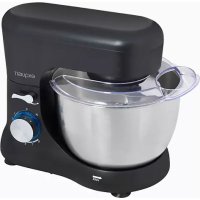
| Product type | Food processor (stand mixer) |
| Brand | Exquisit |
| Model | KM 3001 we |
| Power supply | 220-240 V ~ 50 Hz |
| Speeds | 5 speeds + Turbo function |
| Main functions | Knead, mix, beat |
| Included accessories | 2 dough hooks, 2 whisks, plastic mixing bowl |
| Cleaning | Motor block: damp cloth; accessories: dishwasher |
| Safety | Ejection button, arm lock, child safety |
| Warranty | 24 months |
Frequently Asked Questions - KM 3001 we Exquisit
User questions about KM 3001 we Exquisit
0 question about this device. Answer the ones you know or ask your own.
Ask a new question about this device
Download the instructions for your Food Processor in PDF format for free! Find your manual KM 3001 we - Exquisit and take your electronic device back in hand. On this page are published all the documents necessary for the use of your device. KM 3001 we by Exquisit.
USER MANUAL KM 3001 we Exquisit
natural_image
White kitchen mixer with whisk inside a bowl (no text or symbols visible)
text_image
QR code image containing encoded data, no visible human-readable text21288
text_image
QR code image containing encoded data, no visible human-readable text21288
8.1 Explanation of the safety directions.... 20
8.2 Safety and warning.... 20
8.3 Safety and responsibility 21
8.4 Unpacking the appliance.... 21
8.5 Electrical connection 21
9 Special safety instructions for this appliance 22
10 Before using the appliance for the first time 23
10.1 Speeds 23
Attention 23
10.2 Using the mixing bowl 24
11 Cleaning 24
12 Technische Daten.... 25
13 Disposal 25
14 General Warranty Conditions 26
15 Pour votre sécurité.... 32
text_image
Labeled diagram of a kitchen mixer with numbered parts for identification- Ejector button
- Switch knob
- Turbo button
- Right body
- Left body
- Bracket cover
- Bracket base
- Bracket lock button Arretiertaste
- base lock button
- Base 11. Feet Knethacken
- Quirle B ase cover
- Turntable 14. Bowl base 15. Plastic bowl
- Left dough hook(Beater) 17. Right dough hook(Beater)
natural_image
Line drawings of a hand mixer and its motor, showing blade positioning and upward motion arrows (no text or symbols)Fig.2

natural_image
Line drawing of a hand mixer with two variants of the device, showing internal components and motion arrows (no text or symbols)Fig.3
natural_image
Line drawing of a hand mixer with handle, motor, and coiled cord (no text or symbols)Fig.4

natural_image
Diagram showing a kitchen appliance with a side view before and after assembly, no text or symbols presentFig.5

text_image
TURBO 0 1 2 3 4 5 TURBOFig.

natural_image
Line drawing of a kitchen mixer and bowl with directional arrows indicating motion (no text or symbols)Fiq.

natural_image
Line drawing of a kitchen mixer with a hand mixer and bowl, showing motion arrows (no text or symbols)
natural_image
Line drawing of a handheld device with two accessories and a blue valve, labeled 'Fig.' (no text or symbols on the device itself)Fig.
natural_image
Line drawing of a kitchen mixer with a blue tool inside the bowl (no text or symbols)With QR codes there's fast and easy access to all information
What are QR codes?
QR codes (Quick Response codes) are graphic codes, which are read by means of a Smartphone camera and lead quickly and easily to further information (e.g. see internet site, product video or contact information).
And this is how it works
To scan the QR codes all you need is a Smartphone, a QR code reader app (available free of charge in the App Store) and an internet connection.*
QR CODE
*When reading QR codes additional costs may be incurred for the internet connection depending on the rate you pay.
Dear Customers,
Thank you for purchasing our device.
You have made a good decision. Her exquisite - unit has been built for domestic use and a quality product that meets the highest technical demands with verbindet- useful range of operating convenience as other exquisite - devices also working to the full satisfaction of their owners throughout Europe.
Read the instruction manual carefully before using the unit. This leaflet contains important safety instructions and information regarding the installation, operation and maintenance of the unit. Proper handling contributes to efficient use and minimize energy consumption during operation.
The incorrect use could lead to dangerous situations, especially for children. Keep this booklet for future reference. Enter the instructions on to any future owner of this product. If there is doubt regarding any questions or issues that are not described in detail in this manual, contact your dealer, an authorized technician or go to our homepage www.ggv-service.de
The manufacturer is always working on the development of all types and models. For all types and models are changes to the design, features and equipment subject to change without notice.
Intend use
This hand mixer set is suitable for kneading dough, mixing liquids (e.g. fruit juices) and whipping cream. It is suitable only for food.
text_image
Labeled diagram of a kitchen mixer with numbered parts for identification- Ejector button
- Switch knob
- Turbo button
- Right body
- Left body
- Bracket cover
- Bracket base
- Bracket lockable key
- Base lockable key
- Base 11. Feet
- Beater base cover
- Turntable 14. Bowl base 15. Plastic bowl
- Left dough hook (beater) 17. Right dough hook (beater)
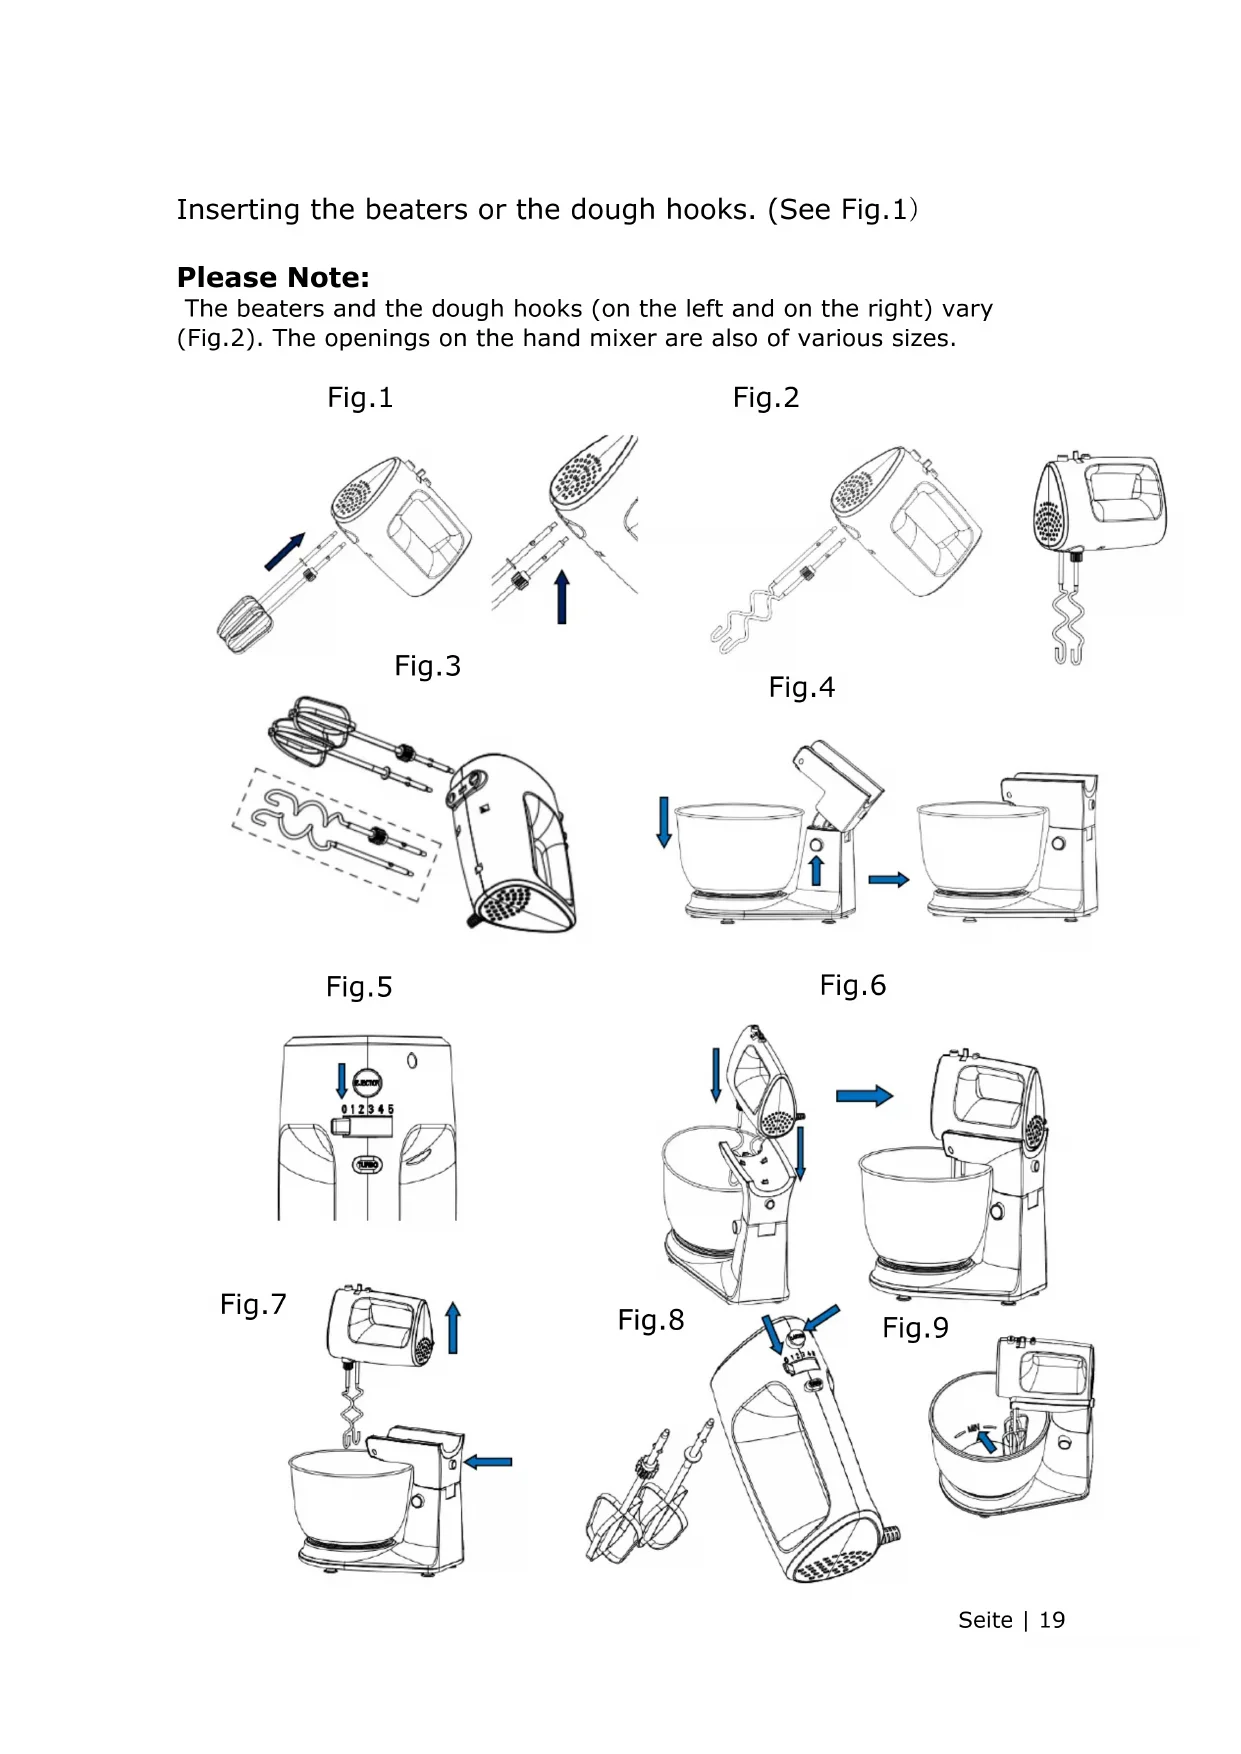
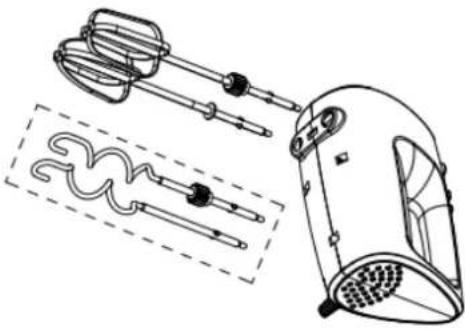
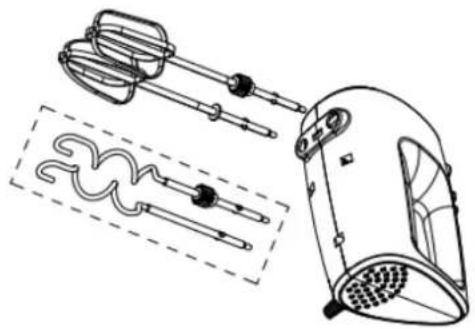
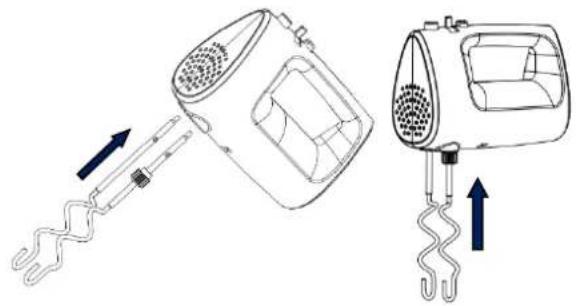
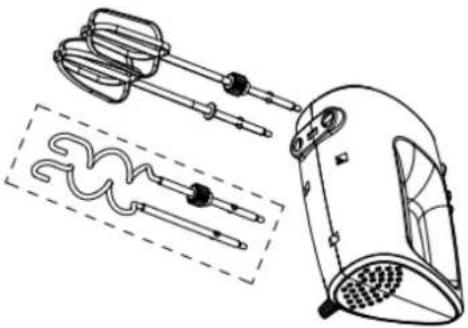
Inserting the beaters or the dough hooks. (See Fig.1)
Please Note:
The beaters and the dough hooks (on the left and on the right) vary (Fig.2). The openings on the hand mixer are also of various sizes.
Fig.1

natural_image
Technical line drawing of a hand tool with two views showing movement of the component (no text or symbols present)Fig.3
Fig.2

natural_image
Line drawings of a hand mixer and its internal components (no text or symbols)Fig.4
natural_image
Line drawing of a hand mixer with handle, blade, and fan components (no text or symbols)Fig.5

natural_image
Diagram showing a kitchen appliance being opened into a bowl, with blue arrows indicating the process (no text or symbols present)Fig.6

text_image
SLICATOR 0 1 2 3 4 5 TURBOFig.7

natural_image
Line drawings of a kitchen mixer and a bowl, showing the side and front views with no text or symbols.Fig.9

natural_image
Line drawing of a kitchen mixer with hand tool and blue directional arrows indicating motion (no text or symbols)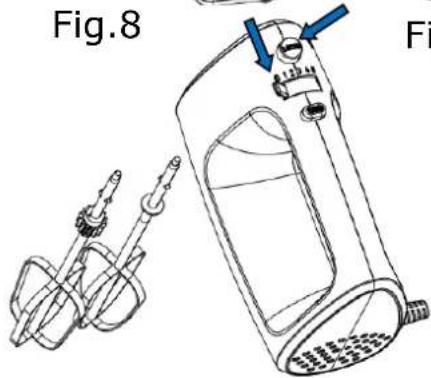
text_image
Fig.8 Fi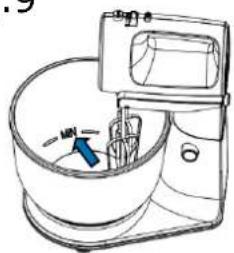
natural_image
Line drawing of a kitchen mixer with a blue tool inside the bowl (no text or symbols)8 For your safety
8.1 Explanation of the safety directions
All of the safety instructions in this manual are identified with a warning symbol. They indicate possible dangers promptly. It is essential to read this information and to adhere to it.
Clarification of the safety instructions
The following symbols and warnings will be featured in this user manual.

WARNING
This refers to a dangerous situation that can lead to death or to a serious injury!

CAUTION
This refers to a dangerous situation that can lead to a minor or moderately serious injury.
IMPORTANT
IMPORTANT
Describes a situation, which can cause substantial damage to property or to the environment.
8.2 Safety and warning
- Avoid injuries and damage, by transporting the equipment only in a package.
- Install and connect the appliance only in accordance with the Instructions in this user manual. The plug must be accessible after assembly. In the event of an emergency unplug the appliance immediately.
- Operate the appliance only on an even work surface.
- Use the appliance only if water is poured into the water tank.
- Do not move the appliance when it is in use.

WARNING
Do not touch the plug and the power supply cord with wet or damp hands when you are connecting or removing them.
Danger of electrocution!

WARNING
The packaging materials (plastic bags, polystyrene, metal clips, etc.) must not be left within the reach of children since they represent possible sources of danger and must be disposed of in accordance with the valid regulations. Danger of suffocation!
8.3 Safety and responsibility

WARNING
The appliance must be stored beyond the reach of animals, children or people, who are incapable of using it. Do not leave the appliance unattended if it is connected to a power source.
Undertake the necessary precautionary measures to prevent children from playing with the appliance.
- The appliance can only be used by children above eight years of age and by people, whose physical, mental or emotional capabilities are limited or impaired, or, who lack experience or knowledge, if they are supervised and after they have received instructions on the safe use of the appliance and understand the risks.
- Cleaning and maintenance, which must be performed by the user, may not be carried out by children if they are not supervised.
8.4 Unpacking the appliance
If you open the packaging imprudently with a sharp knife or another pointed object, the appliance can be damaged.
After removing the packaging check that all appliance components and accessories were delivered. In case of doubt do not use your appliance and contact a qualified technician.
√ Take the appliance out of the package.
√ Examine the delivery for completeness.
√ If the delivery is incomplete or damaged, contact customer service. See the service address ^2 .
√ Remove all protective films.
8.5 Electrical connection

WARNING
Electric shock due to a faulty connection
The appliance must be switched off when it is being attached to the electricity mains.
The switch must be at 0.
√ Examine the mains voltage with the data on the identification plate.
- You will find the data for this on the identification plate on the appliance.
→ Connect the appliance only to a shockproof socket, which has been installed in accordance with the provisions.

WARNING
Danger of injury: • Do not touch the beaters or the kneading hooks when the appliance is in operation. Do not let long hair, scarves or similar items hang over the attachments. • Never attempt to mount attachments with different purposes at the same time Danger due to electrical shock! • The mains cable must never come near or into contact with hot parts of the appliance or other heat sources. Never lay the mains cable on edges or corners.
- Do not bend or crimp the mains cable.
9 Special safety instructions for this appliance

WARNING:
Danger of electrocution!
- The motor housing must not get wet.
- Before replacing accessories or additional parts, switch off the appliance and disconnect it from the electricity mains.
- Disconnect the appliance from the mains when you are assembling or disassembling it.

WARNING
- Have a defective appliance repaired only by an authorized specialist. In order to avoid risks have a defective mains cable replaced with an equivalent cable only by the manufacturer, our customer service department or a similarly qualified person.
• Children must not use the appliance. They could hurt themselves with the blades. - Keep children away from the appliance and its connecting cable.
• Children must not play with the appliance. - Appliances can be used by people with reduced physical, sensory or mental capabilities or a lack of experience and/or knowledge, if they are supervised or instructed in the safe
use of the appliance and understand the hazards involved.
10 Before using the appliance for the first time
PLEASE NOTE:
- The appliance is not suitable for hard foods such as ice cubes, whole nutmeg or large chunks of cooking chocolate. The blade can be destroyed by them!
- Remove all parts from the packaging and check them for damage.
- Clean all parts before using the appliance for the first time. See the chapter on "Cleaning and Storage"
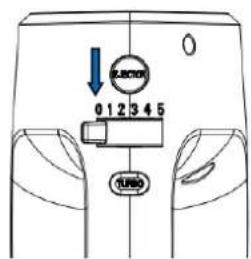
10.1 Speeds
| 0 | The appliance is switched off |
| 1 | Good initial speed for mixing "soft ingredients", like flour, butter, etc. |
| 2-3 | The best speed for mixing liquid ingredientsOptimal for mixing cake batters and bread doughs |
| 4 | For creaming butter and sugar for desserts, etc. |
| 5 | For beating egg whites and icing, whipping cream, etc.Turbo: • This button enables you to have the entire power of your appliance available to you immediately. |
Operating, kneading and beating
Attention
Do not use containers made of glass or other fragile materials. These containers can be damaged and cause injuries.

WARNING
- Do not operate the mixer for longer than 10 minutes at a time. After 10 minutes, take a break until the appliance has cooled down.
√ Clean the attachments (16/17) before using them for the first time.
√ Push the beaters or dough hooks (16/17) into the slots until they click in audibly and reliably:
√ Insert the mains plug into a mains socket.
√ In order to start the mixer slide the speed switch (2) to the desired speed level. In the process you can choose between 5 speeds and the turbo-key (3) as well (See the chapter on "Speeds").
√ Press the eject button (1) in order to release the beaters (16/17) or dough hooks.
Please Note:
For safety reasons, the beaters (16/17) or dough hooks can be released only if the speed switch (2) is at position "0".
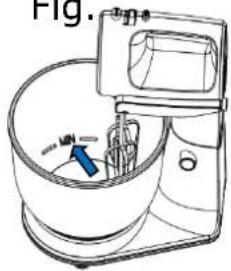
10.2 Using the mixing bowl
- Press the hand mixer lockable key (8) for swivel arm (6) lightly and pull up the swivel arm backwards as far as the stop.
- Set the mixing bowl (15) on the rotating surface of the stand.
- Insert attachments into the appropriate opening of the hand mixer until they click into place.
- Press the hand mixer lockable key (8) and put the hand mixer on the swivel arm and press it downward lightly at the same time.
- Push in the hand mixer lockable key for the swivel arm lightly and bring the swivel arm with the hand mixer into the horizontal working position.
- Insert the mains plug.
- Add the ingredients to the mixing bowl and select an appropriate working stage.
- Unplug the appliance from the mains after use.
- Press the hand mixer lockable key and pull up the swivel arm backwards as far as the stop.
• To remove the hand mixer - Press the hand mixer lockable key (8) inward and remove the hand mixer.
• Take the mixing bowl (15) off the stand. - It can be more convenient to use another suitable
container and not the mixing bowl provided for the preparation of small quantities and for whipping cream.
11 Cleaning
WARNING
Pull out the mains plug (4) every time before cleaning the appliance. There is a danger of electrical shock!
- The hand unit must never be immersed in water or other liquids! In this case life threatening injuries can result from electrical shock if liquid residue comes in contact with live parts when the appliance is in operation.
- Clean the mixer only with a damp cloth and if necessary with a mild cleaning agent.
- You can wash the beater (16/17) or dough hooks under running water or in the dishwasher.
We recommend cleaning the attachments immediately after use. In
12 Technische Daten
| Rated voltage (V) [Hz] | 220-240 ~ 50/60 |
| Power [W] | 300 |
| EAN | 4016572021288 |
We reserve the right to make technical and design changes in the course of constant product development.
CE-Marking
At the time of launch of the product meets the requirements that were laid down in the directive for harmonizing the laws of the Member States relating to electromagnetic compatibility 2014/30 / EU of electrical equipment within certain voltage limits (2014/35 / EU). This product is identified with the CE mark and is supplied with a declaration of conformity for inspection by the market surveillance authority.
* Subject to change *
13 Disposal

This product is marked according to the European Waste Framework Directive 2012/19 / EU. The Directive regulates the proper disposal of the product. The environmentally friendly disposal will prevent possible negative health consequences
caused by incorrect disposal. The symbol on the product or its packaging indicates that this product may not be disposed of with normal household waste. The user must return the product to / at a collection point for the recycling of electrical and electronic equipment.
The disposal must comply with the current local regulations. For more information contact
14 General Warranty Conditions
Warranty conditions
As the purchaser of a Gutfels appliance you are entitled to the legal guarantees from the sales contract with your dealer. In addition, we grant a warranty to you under the following conditions:
Period of indemnification
The warranty shall run for 24 months starting from the purchase date (proof of purchase must be submitted). During the first 6 months defects in the appliance will be eliminated free of charge, provided that the appliance is accessible for repairs without any particular effort. In the further 18 months the buyer undertakes to prove that the defect already existed at the time of delivery of the appliance.
In the case of commercial use (e.g. in hotels or cafeterias), or in the event of community use by several households, the warranty amounts to 12 months starting from the date of purchase (proof of purchase must be submitted). During the first 6 months defects in the appliance will be eliminated free of charge, provided that the appliance is accessible for repairs without any particular effort. In the further 6 months the buyer undertakes to prove that the defect already existed at the time of delivery of the appliance.
If a claim is made on the warranty, the warranty shall not be extended either for the appliance or for the newly incorporated parts.
Scope of the Defect Removal
Within the periods mentioned we will eliminate all defects from the appliance, which are to be demonstrably attributed to unsatisfactory execution or material defects. Replaced parts are transferred to our ownership.
The following are excluded:
Normal wear, deliberate or negligent damage, damage that is caused by non-compliance with the operating instruction, inappropriate setup or installation or due to connection to the wrong mains voltage, damage due to a chemical or an electro-thermal effect or due to other abnormal environmental conditions, glass, lacquer or enamel damage and possibly differences in colour as well as defective bulbs. Likewise, appliance defects
are excluded if they are to be attributed to transport damage. Also, we don't provide any services if work is undertaken on appliances by unauthorized persons at Exquisit or if parts of foreign origin are used without our specific written permission. This restriction does not apply to defect-free work performed by a qualified specialist with our original parts to adjust the appliance to comply with the technical protection regulations of another European Union country.
Area of applicability
Our warranty applies to appliances that were purchased in a country of the European Union and that are in operation in the Federal Republic of Germany or Austria.
For appliances that were purchased in a country of the European Union and brought into another European Union country, services are provided under the customary warranty conditions of the particular country. An obligation to perform under the terms of the warranty only exists if the appliance is in compliance with the technical regulations of the country, in which the warranty claim is enforced.
For repair orders outside of the warranty period, the following shall apply:
If an appliance is repaired, the repair invoices are to be paid immediately without any deduction.
If an appliance is examined and/or a repair that has been started has not been completed, lump sums will be calculated for travel expenses and work. Consultation with our customer advisory service centre shall be free of charge.
text_image
Labeled diagram of a kitchen mixer with numbered parts for identificationnatural_image
Technical line drawing of a hand mixer with two variants and directional arrows indicating motion (no text or symbols)Fig.3
Fig.2

natural_image
Line drawing of a hand mixer with two connected devices and directional arrows indicating motion (no text or symbols)Fig.4

natural_image
Line drawing of a hand mixer with two handles and a coiled spring, shown in two different orientations (no text or symbols)Fig.5

natural_image
Diagram showing a kitchen appliance being opened into a bowl, with blue arrows indicating the process (no text or symbols present)
text_image
LUCERO 0 1 2 3 4 5 TURBOFig.7

natural_image
Line drawing of a kitchen mixer and its side view showing the shift from open to closed (no text or symbols present)
natural_image
Line drawing of a kitchen mixer with a hand tool and blue directional arrows indicating motion (no text or symbols)Fig.9

text_image
Fig.8
text_image
Fig.5 Mntext_image
Labeled diagram of a kitchen mixer with numbered parts for identificationnatural_image
Technical line drawing of a hand mixer with directional arrows indicating motion (no text or symbols)Fig.3
Fig.2
natural_image
Line drawing of a hand mixer with two connected devices and directional arrows indicating motion (no text or symbols)Fig.4
natural_image
Line drawing of a hand mixer with three handles and a handle, shown in two views (no text or symbols)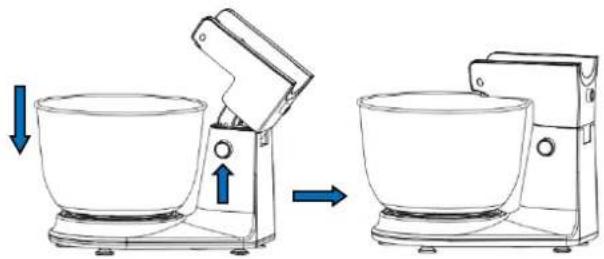
natural_image
Diagram showing a kitchen appliance with a side view before and after assembly, no text or symbols presentFig.6
Fig.5
text_image
TURBO 0 1 2 3 4 5 TURBOFig.7

natural_image
Line drawing of a kitchen mixer with a hand mixer above a bowl, showing motion direction (no text or symbols)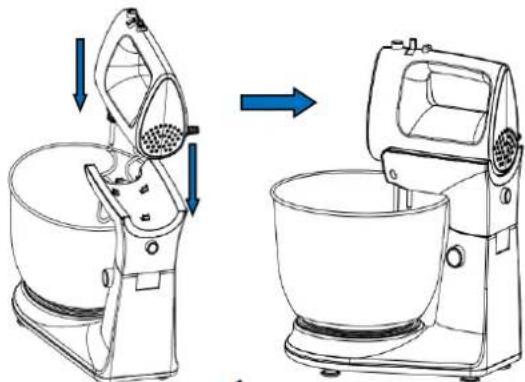
natural_image
Line drawing of a kitchen mixer and its side view showing the shift from open to closed (no text or symbols present)
text_image
Fig.8Fig.9

text_image
Fig.5 MnGGV HANDELSGES. MBH & CO. KG
AUGUST-THYSSEN-STR. 8
D-41564 KAARST
GERMANY
KM3001we_E1.0_Mulitl_2017_12
.docx