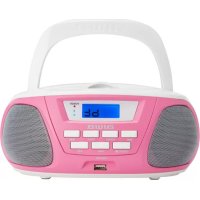
BBTU300 - Cd player/recorder AIWA - Free user manual and instructions
Find the device manual for free BBTU300 AIWA in PDF.


| Product Type | CD Player/Recorder with radio, Bluetooth and USB |
| Brand | Aiwa |
| Model | BBTU-300 |
| Dimensions (W x D x H) | 197 x 230 x 104.5 mm |
| Net Weight | 1300 g |
| Power Supply | AC 230V, 50 Hz mains; DC 9V batteries (6 x LR14/UM-2/C) |
| Power Consumption | 12 W (standby < 0.5 W) |
| Bluetooth Version | 5.0+EDR, A2DP profile |
| Audio Output Power | 2.5 W x 2 (5 W RMS) |
| CD Player | CD, CD-R, CD-RW, MP3; program up to 99 tracks (MP3) or 20 tracks (CD) |
| Radio | FM 88-108 MHz, AM 522-1620 kHz |
| USB Port | Up to 64 GB (FAT/ExFAT); 0.5 A supply for charging |
| Auxiliary Input | 3.5 mm jack socket |
| Headphone Output | 3.5 mm jack socket |
| Display | LCD with white LED backlight |
| Speakers | 2 x 76 mm, 3 W / 4 Ω |
| Included Accessories | Power cord, user manual, warranty card |
| Laser Class | Class 1 |
| Chassis Maintenance | Damp cloth, mild detergent |
| Lens Cleaning | Blower and dry cotton swab |
Frequently Asked Questions - BBTU300 AIWA
User questions about BBTU300 AIWA
0 question about this device. Answer the ones you know or ask your own.
Ask a new question about this device
Download the instructions for your Cd player/recorder in PDF format for free! Find your manual BBTU300 - AIWA and take your electronic device back in hand. On this page are published all the documents necessary for the use of your device. BBTU300 by AIWA.
USER MANUAL BBTU300 AIWA
Read these safety instructions before using your device and store them for possible future reference.
-
If the cord is damaged, have it repaired by the manufacturer, its service or a similarly qualified person in order to avoid any hazard.
-
The power supply must be replaced by a new one in case of malfunction, because this power supply is not repairable.
-
The socket-outlet should be installed near the equipment and should be easily accessible.
-
The product is not intended for use by persons (including children) with reduced physical, sensory or mental capacity. Persons who have not read the manual, unless they have received explanations by a person responsible for their safety and supervision should not use this unit.
-
Children should be monitored to ensure that they do not play with the product.
-
When connected the cord should always be readily accessible.
-
The apparatus should not be exposed to dripping or splashing of water or liquids and no objects filled with liquids such as flowers vases shall be placed on the product.
-
Do not impede the normal ventilation of the product when intended to use.
-
Always leave a minimum distance of 10cm around the unit to ensure sufficient ventilation.
-
Open flame sources, such as candles, should not be placed on top of the device.
-
The device is intended for use only in a temperate climate.
12. CAUTION:
Danger of explosion if battery is incorrectly replaced or not replaced by the same type or equivalent.
-
The battery should not be exposed to excessive heat such as sunshine, fire or similar.
-
Different types of batteries, new and used batteries should not be mixed.
-
The battery must be installed according to the polarity.
-
If the battery is worn, it must be removed from the product.
-
The battery must be disposed off safely. Always use the collection bins provided (check with your dealer) to protect the environment.
Thank you for purchasing BBU-300: Multifunction CD Boombox with Bluetooth, Digital AM/FM tuner, USB compatible.
This is your assurance of quality, performance and value. Our engineers have included many useful and convenient features in this product. Please be sure to read this Instruction Manual completely to make sure you are getting the maximum benefit from each feature.
This product was manufactured using the highest quality components and standards of workmanship. It was tested by inspectors and found to be in perfect working order before it left our factory.
Model: BBTU-300
TO PREVENT FIRE OR SHOCK HAZARD DO NOT EXPOSE THIS APPLIANCE TO RAIN OR MOISTURE.

LIGHTNING FLASH WITH ARROWHEAD SYMBOL
The lightning flash with arrowhead symbol within an equilateral triangle, it is intended to alert the user of the presence of uninsulated dangerous voltage within the products' enclosure that may be of sufficient magnitude to constitute a risk of electric shock to persons.

EXCLAMATION POINT
The exclamation point within an equilateral triangle, is used to indicate that a specific component should be replaced only by the component specified in the literature for safety reasons.
The following label has been affixed to the unit, listing the proper procedure for working with the laser beam:
CLASS 1 LASER PRODUCT PRODUCTO LÁSER CLASE 1 APPAREIL À LASER DE CLASSE 1 KLASSE 1 LASER PRODUKT PRODOTTO LASER DI CLASSE 1 CLASSE DE PRODUTOS LASER 1
CLASS 1 LASER PRODUCT LABEL
You will find a label similar to that of the image indicating that the boombox has a laser component.
Notes:
• The images appearing in this manual are for reference only.
• Due to continual revision and improvement of our products designs and specifications are subject to change without further notice.
SAFETY PRECAUTIONS
1. READ INSTRUCTIONS:
All the safety and operating instructions should be read before the product is operated.
2. RETAIN INSTRUCTIONS:
The safety and operating instructions should be retained for future reference.
3. HEED WARNINGS:
All warnings on the product and in the operating instructions should be adhered.
4. FOLLOW INSTRUCTIONS:
All operating and use instructions should be followed.
5. CLEANING:
- Turn Off the unit if it's On before cleaning. - Unplug the unit from the wall outlet before cleaning. - Do not use liquid cleaners or aerosol cleaners. - Use a damp cloth for cleaning.
6. WATER AND MOISTURE:
Do not use this product near water.
For example:
Near a bath tub, wash bowl, kitchen sink, or laundry tub; in a wet basement; or near a swimming pool; and similar.
7. ACCESSORIES:
Do not place this product on an unstable cart, stand, tripod, bracket, or table. The product may fall, causing serious injury to a child or adult and serious damage to the product.
Use only with a cart, stand, tripod, bracket, or table recommended by the manufacturer, or sold with the product. Any mounting of the product should follow the manufacturer's instructions, and should use a mounting accessory recommended by the manufacturer. A product and cart combination should be moved with care - quick stops, excessive force and uneven surfaces may cause the product and cart combination to overturn
8. VENTILATION:
Slots and openings in the unit are provided for ventilation and to ensure reliable operation of the product and to protect it from overheating, and these openings must not be blocked or covered. The openings should never be blocked by placing the product on a bed, sofa, rug or other similar surface. This product should not be placed in a built-in installation, such as a bookcase or rack, unless proper ventilation is provided or the manufacturer's instructions have been adhered.
9. POWER SOURCES:
This product should be operated only from the type of power source indicated on the marking label. If you are not sure of the type of power supply of your home, consult your product dealer or local power company. For products intended to operate from battery power, or other sources, refer to the operating instructions.
10. POWER-CORD PROTECTION:
Power-supply cords should be routed so that they are not likely to be walked on or pinched by items placed upon or against them, paying particular attention to cords at the power plug and jack plug socket. During movement, please take care of the power cord. For example: Tie up the power cord with a cable tie.
11. NON-USE PERIODS:
The power cord of the product should be unplugged from the outlet when left unused for long periods of time. If the speaker has to be left unused for a long time, please leave the battery fully charged, otherwise it will cause damage to the battery.
12. LIGHTNING:
For added protection of this product during a lightning storm, or when it is left unattended and unused for long periods of time, unplug it from the wall outlet and disconnect the antenna or cable system. This will prevent damage to the product due to lightening and power-line surges.
13. POWER LINES:
An outside antenna system should not be located in the vicinity of overhead power lines or other electric light or power circuit. When installing an outside antenna system, extreme care should be taken to keep it from touching such power lines or circuits as contact with them might be fatal.
14. OVERLOADING:
Do not overload wall outlets and extension cords as this can result in a risk of fire or electric shock.
15. OBJECT AND LIQUID ENTRY:
Never push objects of any kind into this product through the openings as they may touch dangerous voltage points or shoot-out parts that could result in a fire or electric shock. Never spill liquid of any kind on the product.
16. SERVICING:
Do not attempt to repair this product yourself as opening or removing covers may expose you to dangerous voltage or other hazards. Refer all to qualified service personnel.
17. DAMAGES REQUIRING SERVICE:
Unplug this product from the wall outlet and refer to qualified service personnel under the following conditions.
a) When the power-supply cord, battery or plug are damaged.
b) If the product has been exposed to rain or water.
c) If liquid has been spilled, or objects have fallen into the product.
d) If the product does not operate normally by following the operating instructions, adjust only those controls that are covered by the operating instructions, as an improving adjustment of other controls may result in damage and will often require extensive work by a qualified technician to restore the product to its normal operation.
e) When the product exhibits a distinct change in performance it indicates a need for service.
18. REPLACE PARTS:
When parts require to be replaced, be sure the service technician has used official parts specified by the manufacturer or they have the same characteristics as the original parts, unauthorized substitutions may result in fire, electric shock and other hazards.
19. HEAT:
The product should be situated away from heat sources such as radiators, heat registers, stoves or other products that produce heat.
FN 6
PREPARATION FOR USE
Carefully take out all the components from the carton and remove all packaging materials from the components. Make sure that nothing is accidentally discarded with the packing materials.
If possible, save the carton and packaging materials for the unlikely event that the product ever needs to be sent for service. Using the original carton and packing materials is the only proper way to protect the unit from shipping damage.

CD Boombox x1

AC power cord x1

Quick start guide x1

Warranty sheet x1
FEATURES OF THE BOOMBOX
• Top loading CD player with Japanese Optics.
• Audio Output Power: 5 Watts RMS (2.5W x2).
• High Dynamic Range Speaker Drivers with Extended Bass + Treble.
- CD/CDR/RW/MP3 Disc playback with program memory up to 99 tracks.
• Dual Band Radio: AM (MW) and FM Tuners.
- Bluetooth V5.0 for wireless streaming from any mobile device
• USB-MP3 Port for music playback.
• Large LCD Display with LED Backlighting.
- Aux-in jack (3.5mm) to connect external devices.
• Stereo Earphone jack (3.5mm).
- Powered by electricity or batteries.
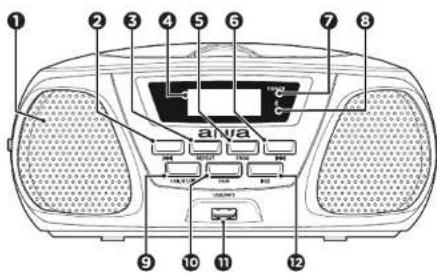
DESCRIPTION OF UNIT AND CONTROLS
FRONT VIEW LEFT SIDE DETAIL
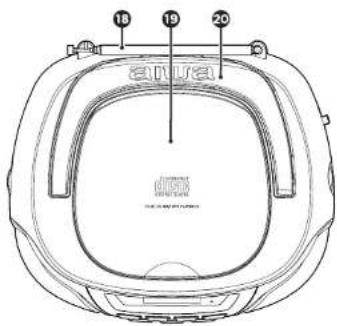
TOP VIEW

RIGHT SIDE DETAIL

REAR DETAIL

1 SPEAKER
② BACKWARD
3 REPEAT
4 DISPLAY
5 PROG (PROGRAM)
6 FORWARD
7 POWER ON INDICATOR
③ BLUETOOTH MODE INDICATOR
9 USB/BT (BLUETOOTH)
10 PAIR
USB PORT
12 PLAY/PAUSE
AUX IN (AUXILIARY INPUT)
14 PHONES (EARPHONES INPUT)
15 VOLUME KNOB
16 TUNER KNOB
17 MODE/BAND SELECTOR
18 TELESCOPIC ANTENNA
19 CD COMPARTMENT LID
20 HANDLE
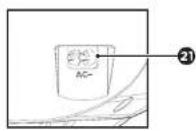
21 AC INPUT
FN 8
DESCRIPTION OF THE DISPLAY
LCD DISPLAY VIEW
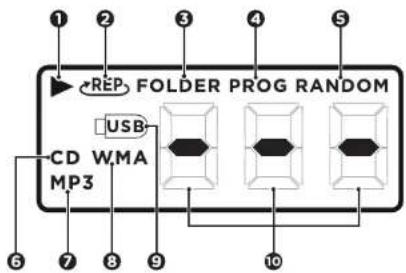
1 PLAYING INDICATOR
② REPEAT FUNCTION INDICATOR
③ REPEAT FOLDER INDICATOR
4 PROGRAM MODE INDICATOR (PROG)
5 RANDOM MODE INDICATOR
⑥ CD MODE INDICATOR
⑦ CD-MP3 MODE INDICATOR
8 CD-WMA MODE INDICATOR
9 USB MODE INDICATOR
10 PLAYBACK TIME / MODE
CONNECTIONS
MAINS CONNECTION
- Check if the power voltage shown on the rating label located on the back of the set, corresponds to your local AC power supply.
- Connect the power cord to the wall outlet.
Notes:
- Unplug the power cord from the wall outlet to protect your set during heavy thunderstorms.
• The power cord is used to switch off the device completely, therefore the cord shall remain always readily accessible.

USB PORT (CHARGING MODE)
Connect an external device (e.g. smartphone, mp3 player) via a USB cable (not provided) to the USB port and enable the USB function mode to start the charge.
Note:
• The boombox cannot access the contents in the connected external device.
BATTERY INSTALLATION
Batteries must be inserted correctly to avoid damage to the boombox. Always remove the batteries when the apparatus is not going to be used for a long period of time as this may cause leakage of the batteries and subsequently damage to your device.
BATTERY INSTALLATION
Slide out the cover of the battery compartment located at the bottom of the unit and insert 6 LR14/UM-2/C TYPE batteries (not included) according to the polarity shown in the battery compartment.

Note:
• Always unplug the power cord from the wall outlet if the boombox is going to be operated with batteries.
BASIC OPERATION
POWER ON
Once the boombox has been plugged into a wall outlet, or charged with batteries, turn on the main power by sliding the MODE switch on the right side of the unit, to any function mode position. The LCD display will turn on showing the current playback mode.
POWER OFF
To turn off the baombox slide the MODE switch to the OFF position. Then you can unplug the device from the wall outlet or remove the batteries safely.
MODE SWITCH
Slide the MODE switch to choose between the function modes: OFF / CD-USB-BT-AUX / FM / AM.
VOLUME LEVEL
Turn the VOLUME KNOB on the left side of the boombox to adjust the volume level.
REPEAT
Press repeatedly the REPEAT button on the front panel to scroll through the following repeating settings:
Repeat One: Press once to repeat the current track.
The REceptor will appear flashing on the screen.
Repeat Folder: Press twice to repeat all the available tracks in the current folder. The FOLDER indicator will appear on the screen.
Repeat All: Press three times to repeat all the available tracks.
The REEDicator will appear and stay on without flashing on the screen.
Random: Press four times to start the random mode. All the available tracks will play randomly.
The RANDOM indicator will appear on the top right of the screen.
Off: Press five times to cancel all the repeat and random modes.
All indicators will disappear from the screen.
You can play your audio CD/CD-MP3 in your boombox.
-
Manually lift the CD COMPARTMENT LID.
-
Insert a CD with the printing side facing up and gently close the disc tray manually.
-
Slide the MODE switch to the CD-USB-BT-AUX position to turn on the unit.
-
Once the MODE switch has been slid to CD-USB-BT-AUX position, the unit will automatically start reading the disc; and the total number of tracks found will be displayed.
The CD MODE INDICATOR will appear on the left side of the display.
-
Press▶p start or resume the playback. Press ▶gain to stop the playback temporarily. When the playback is paused the ▶symbol will flash on the screen.
-
Press the r tons to select a different track number. Press twice to hear the beginning of the current track, and press it twice or more to hear the previous track.
-
Press the button to stop play. The display will show again the total number of tracks.
SEARCH MODE
During playback press and hold 🐎◀◀◀ buttons to find a specific passage within the track and release it at the point you want to listen to.
Note:
- If the disc can't be read or there is no disc inserted, the LCD display will show the message "NOd", and then it will start the USB function mode.
LISTEN TO YOUR TRACKS REPEATEDLY
Press the REPEAT button on the front panel repeatedly to activate the REPEAT FUNCTIONS in the following order:
-
PASHING (repeat the current track)
-
REP FOLDER (repeat all the tracks of the current folder)
-
REP (repeat all the available tracks)
-
RANDOM (play randomly all the available tracks)
-
OFF (cancel the repeat/random function)
CREATING A CD PLAYLIST
The Program feature may be used to save up to 20 tracks for CD and 99 tracks for CD-MP3 in a programmable playlist.
-
While in stop mode only (CD is not playing), press PROG, and the LCD display will show the wording "POT" and the "PROGRAM" indicator.
-
Press the tons to allocate the desired track.
-
Press the PROG button to select and store the track into the memory. The program sequence will change to "P02" to choose the next track.
-
Repeat steps 2 and 3 to select up to 20/99 tracks. Once the last track has been added, the LCD display will automatically show the programmed tracks one by one, starting with the first one that was programmed. If you want to create a playlist with less than 20 or 99 tracks, press twice the PROG button after confirming your last track.
-
To play the selected tracks (In the program mode), press the ▶ button.
-
Press the 🔊 button to hear the previous programmed track or press ▶p hear the next programmed track.
-
To clear the programmed tracks from the memory, press the button twice or open the CD TRAY LID.
Notes:
- All programmed tracks will be played through once.
- "Repeat one" or "repeat all" functions can be activated during a programmed playback.
- If the playlist reaches the maximum number of tracks the display will show the word "FUL" (FULL).
BASIC OPERATION CD/MP3B BASICOPERATED
ABOUT MP3 DISC COMPATIBILITY
This unit is compatible with: Sampling Frequency: 32-48 (MP3)
Bit rate: 32-320kbps (MP3) Do not use special letters such as: / :?< > etc
Even if the total number of files on the disc is more than 1000, it will only show up to 999.
Note:
- Because MP3 discs have a large capacity, disc access times are a little longer,
FM RADIO
RADIO OPERATION
-
Slide the MODE switch to the FM or AM positions, to access the respective radio bands.
-
Turn the TUNING KNOB on the side of the unit to tune to a radio station according to the dial scale. Each turn on the tuning knob will change the frequency up or down by 100 kHz.
TIPS TO IMPROVE THE RECEPTION
FM. For FM, pull out the telescopic antenna. To improve FM Reception incline and turn the antenna, reduce the length, if the FM-signal is too strong. You can also try to relocate the unit near an open window to get a better reception.
AM. For AM, the set is provided with a built-in forrito bar as an antenna, so there is no need to use the telescopic antenna. Relocate or turn the set to find the best position.
Note:
• The screen won't lit up during the FM and AM function modes.
AUXILIARY INPUT FUNCTION MODE
This unit can be used as an active speaker for laptop computers, MP3 and other small audio players following the steps below.
-
Slide the MODE switch to the CD-USB-BT-AUX position to turn on the unit.
-
Connect an auxiliary cable ended with a 3.5mm to the desired external audio device, and connect the other end to the AUX IN socket on the side of the unit. Once the auxiliary cable has been inserted, the word AUX will appear on the display.
-
Start playback on the external audio device. Adjust the volume on the external audio device (do not set the volume to a high level in order to avoid distortion). You may also adjust the volume on the boombox. To control playback function, use the controls on the external audio device.
Notes:
• The boombox cannot access the contents in the connected external device.
- Remove the auxiliary cable from the boombox in order to access to another function mode.
USB MODE
This boombox has been developed using the latest technical advances in the USB field. However, given the wide range of USB storage device types that are currently in the market, we unfortunately cannot guarantee full compatibility with all of them. For this reason, in rare cases, there may be problems playing files from some USB storage devices. This is not due to device malfunction.
- Slide the MODE switch to the CD-USB-BT-AUX position to turn on the unit.
- Press and hold the USB/BT/■ button until the "USB", USB MODE INDICATOR appears flashing on the left of the display.
- Connect a USB storage device directly to the USB/MP3 port. The display briefly shows the number of folders and then the total number of tracks. Playback will automatically start after a few seconds.
- To temporarily stop playback, press the ▶|| button, and press it again to resume playback.
- Press the 🚗️ 🚗️tons to select a different track number. Press and hold the 🚗️ 🚗️tons to find a specific passage within the track and release it at the point you want to listen to.
- Press the button to stop playing
LISTEN TO YOUR TRACKS REPEATEDLY
Press the REPEAT button on the front panel repeatedly to activate the REPEAT FUNCTIONS in the following order:
- PASHING (repeat the current track)
- REP FOLDER (repeat all the tracks of the current USB folder)
- REP (repeat all the available tracks)
- RANDOM (play randomly all the tracks in the USB)
- OFF (cancel the repeat/random function)
CREATING A USB PLAYLIST
The Program feature may be used to program up to 99 tracks for the USB mode too, in a programmable playlist.
- While in stop mode only (no USB playback), press PROG, and the LCD display will show the wording "PO1" and the "PROGRAM" indicator.
- Press the 🔊 🔊 ions to allocate the desired track.
- Press the PROG button to select and store the track into the memory. The program sequence will change to "PO2" to choose the next track.
- Repeat steps 2 and 3 to select up to 99 tracks. Once the last track has been added, the LCD display will automatically show the programmed tracks one by one, starting with the first one that was programmed. If you want to create a playlist with less than 99 tracks, press twice the PROG button after confirming your last track.
- To play the selected tracks (in the program mode), press the ▶ button.
- Press the 🔊 button to hear the previous programmed track or press ➕b hear the next programmed track.
- To clear the programmed tracks from the memory, press the button twice or change to another function mode.
Notes:
- If the USB is not compatible, or there is no USB storage device connected, the display will show the word "NO".
- Because some storage devices have a large capacity, USB access time is a little longer.
- If the playlist reaches the maximum number of tracks the display will show the word "FUL" (FULL).
- Switch the device to a different operating mode before you remove the USB storage device.
• To avoid damaging the boombox or other devices, do not try to charge any external device using the USB port.
BLUETOOTH MODE
BLUETOOTH PAIRING
Prior to using the Bluetooth function, your boombox should be paired first with your Bluetooth device. ("Pairing" means establishing connection between Bluetooth devices such as mobile phones, tablets, pc, etc).
- Slide the MODE switch to the CD-USB-BT-AUX position. (fig. 1)
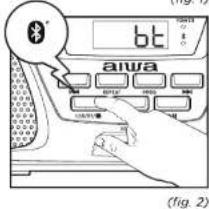
- Press and hold the USB/BT/■ button until the "bt" (Bluetooth) function mode appears on the display. (fig. 2)
- In Bluetooth mode, a voice prompt will announce Bluetooth pairing mode. The BLUETOOTH MODE LED INDICATOR will start flashing in blue. And the boombox will search automatically for Bluetooth devices.
- Turn on the Bluetooth function on your device and make it visible (see your device's instructions to add or setup a Bluetooth device).
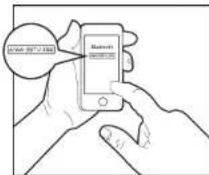
- Search for Bluetooth devices and select AIWA BBTU-300 Enter the code "0000" if needed. (fig. 3)
If the devices are paired successfully, the BLUETOOTH MODE LED INDICATOR will keep bright, and a prompt voice will notify that the Bluetooth device is connected.
Having paired successfully, the device will connect automatically next time.
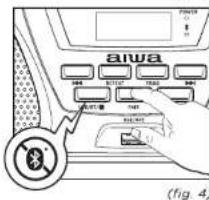
- Press and hold PAIR to disconnect the currently paired Bluetooth device. (fig. 4)
PLAY FROM A BLUETOOTH DEVICE
- Press the ▶||button to play.
- To pause or resume play, press the ▶|| button again.
- Press the 🔊️ btons to select a different track number.

(fig. 1)

(fig. 2)
(fig. 3)

(fig. 4)
EN 14
CARE AND MAINTENANCE
CARE OF COMPACT DISCS

- Treat the disc carefully. Hold the disc only by the edges. Never allow your fingers to touch t shiny, unpainted side of the disc.
- Do not attach adhesive tape, stickers, etc. to the disc label.
- Clean the discs periodically with a soft, lint-free, dry cloth. Never use detergents or abrasive cleaners to clean the disc. If necessary, use a CD cleaning kit. If a disc skips or gets stuck in a specific section of the disc, it is probably dirty or damaged (scratched). When cleaning the disc, wipe it from the centre of the disc to the outer edge of the disc. Never wipe it circular motions.
- This unit is designed to play discs bearing the identification logo as shown here or MP3 format Disc.
Other discs may not conform to the CD standard and may not play properly. - Discs should be stored in their cases after each use to avoid damage.
- Do not expose discs to direct sunlight, high humidity, high temperatures or dust. Prolonged exposure or extreme temperatures can warp the disc.
- Do not stick or write anything on either side of the disc. Sharp writing instruments or the ink may damage the surface.
TO CLEAN THE LENS
If the lens gets dirty, your boombox may skip or may not play a CD:
- Open the CD door.
- Use a camera lens blower/brush to blow on the lens once or twice, brush off the dust particles from the lens and then blow again.
- To remove fingerprints, use a dry cotton swab to wipe from the middle to the outer edge of the lens.
CARE OF THE BOOMBOX
- To prevent fire or shock hazard, remove the batteries, or disconnect your unit from the AC power source when cleaning.
- The outside of your unit may be cleaned with a dusting cloth and taken cared of as any other furniture. Use caution when cleaning and wiping the apertures and narrow spaces.
- To clean the grill of the speaker use a lint roller or a compressed air can. You may also use a vacuum hose brush attachment.
TROUBLE SHOOTING GUIDE
If a fault occurs, first check the points listed below before taking the boombox to repair.
Do not open the boombox as there is a risk of electric shock.
SYMPTOM CAUSE CORRECTION
| General | ||
| No power. | The power cord is not plugged. | Plug in the power cord. |
| Check whether there has been a power failure. | Check the condition by operation of other electronic devices. | |
| No sound. Low or non-existent volume. Increase the main unit, or the external device volume. | ||
| CD | ||
| The unit does not start playback. | An unplayable disc is inserted. | Insert a playable disc. |
| The disc is dirty. Clean the disc. | ||
| Radio | ||
| Radio stations cannot be tuned in. | The antenna is positioned poorly. | Extend the antenna cord at it's full length. |
| Relocate the boombox in another place. | ||
| USB | ||
| The USB does not start the playback. | Incompatible or damaged audio files. | Insert another device with compatible audio files. |
| AUX | ||
| Sound becomes distorted on Auxiliary Input mode. | Volume level is too high. Adjust | the playback volume on the external device to an adequate level. |
| Auxiliary cable is inserted incorrectly. | Insert the auxiliary cable correctly. | |
WARNING!
Under no circumstances should you try to repair the apparatus yourself, as this will invalidate the warranty.
FN 16
TECHNICAL SPECIFICATION
| MODEL: | BBTU-300 |
| Rated voltage: | AC 230V-50Hz |
| DC 9V=(C/UM2/LR14) batteries, x6 | |
| Power consumption: | 12W |
| Standby power consumption: | <0.5W |
| Bluetooth version: | 5.0+EDR, A2DP profile |
| Audio output power (L+R): | 2.5Wx2 (5W RMS) |
RADIO SECTION
| Frequency range | |
| FM | 88-108 MHz |
| AM | 522-1620 kHz |
| USB SECTION | |
| Maximum storage allowed: | 64GB (FAT/ExFAT) |
| USB port power (charging mode): | 0.5A |
| CD PLAYER | |
| Disc compatibility: | CD/CD-MP3 DISC |
| AMPLIFIER | |
| Frequency response: | 300Hz~4kHz |
| Audio S/N: | 50dB |
| ACCESSORIES | |
AC Power cord x1
User manual x1
DIMENSIONS & WEIGHTS
| Dimensions of the speaker drivers: | x2 (O/ 76mm, 3W/4 Ohm) |
| Dimensions of the boombox: | W 197° D 230° H 104.5*mm |
| Net weight: | 1300g (batterles not Included) |
END OF LIFE DISPOSAL
WARNING!
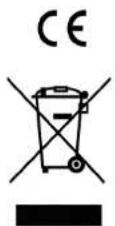
The European directive 2002/96/EC on Waste Electrical and Electronic Equipment (WEEE), requires that old household electrical appliances must not be disposed of in the normal unsorted municipal waste stream.
Old appliances must be collected separately in order to optimize the recovery and recycling of the materials they contain, and reduce the impact on human health and the environment.
The crossed out "wheeled bin" symbol on the product reminds you of your obligation, that when you dispose of the appliance, it must be separately collected.

FS 18
ESPAÑOL
VUE DE DESSUS

DÉTAIL À DROITE


DETALLE POSTERIOR

HAUT-PARLEUR
② ARRIÈRE
3 RÉPÉTITION (REPEAT)
4 ÉCRAN
5 PROGRAMME (PROG)
6 AVANT
7 INDICATEUR DE PUISSANCE
8 INDICATEUR DE MODE BLUETOOTH
9 USB/BT (BLUETOOTH)
10 PAIRE (PAIR)
PORT USB
12 JOUER/PAUSE
13 ENTRÉE AUXILIAIRE (AUX IN)
14 PRISE POUR CASQUE D'ÉCOUTE (PHONES)
15 CADRAN DE VOLUME (VOLUME)
16 CADRAN DU SYNTONISEUR (TUNING)
17 SÉLECTEUR DE BANDE/MODE
18 ANTENNE TÉLESCOPIQUE
19 PLATEAU DE CD
20 POIGNÉE
21 PRISE DE COURANT
FR 40
DESCRIPTION D'ÉCRAN
VUE DE L'ÉCRAN LCD

1 INDICATEUR DE REPRODUCTION
2 INDICATEUR DE FONCTION RÉPÉTITION
3 INDICATEUR DE FONCTION DE RÉPÉTITION DE DOSSIER (FOLDER)
4 INDICATEUR DU MODE DE
PROGRAMMATION (PROG)
5 INDICATEUR DE MODE ALÉATOIRE
(RANDOM)
CONNEXIONS
LIEN PRINCIPAL

ENTRETIEN ET MAINTENANCE
ENTRETIEN DU DISQUE COMPACT
KLASSE 1 LASERPRODUKT
Carefully remove all the components from the carton and remove all packing materials from the components. Make sure that nothing is accidentally discarded with the packing materials.
Anmerkungen:
HÖREN SIE IHRE TITEL WIEDERHOLT AN
Bitrate: 32-320kbps (MP3)
HÖREN SIE IHRE TITEL WIEDERHOLT AN
Having paired successfully, the device will connect automatically next time.
ALTRO DETTAGLIO
1 ALTOPARLANTE
2 INDIETRO
3 RIPETERE (REPEAT)
4 SCHERMO
5 PROGRAMMA (PROG)
6 ANVERNO
7 INDICATORE DI ACCENSIONE
③ INDICATORE DI MODALITÀ BLUETOOTH
9 USB/BT (BLUETOOTH)
10 ACCOPPIAMENTO (PAIR)
PORTA USB
12 RIPRODUCI/PAUSA
INGRESSO AUSILIARIO (AUX IN)
14 PRESA PER CUFFIE (PHONES)
15 VOLUME DIAL (VOLUME)
16 SINTONIZZATORE (TUNING)
17 SELETTORE BANDA/MODALITÀ
18 ANTENNA TELESCOPICA
19 VASSOIO PER CD
20 MANIGLIA
21 PRESA ELETTRICA
SCHERMO DESCRIZIONE
VISTA SCHERMO LCD

PORTA USB (MODALITÀ DI RICARICA)
Nota:
Bit rate: 32-320kbps (MP3)
CURA DEI COMPACT DISC
W 197° D 230° H 104.5°mm
OUVIR UMA OU MAIS FAIXAS
OUVIR UMA OU MAIS FAIXAS


www.eu-aiwa.com
AIWA CO., LTD.
Shinagawa-Ku
Copyright © 2020 AIWA EUROPE S.L.
All Rights Reserved
Printed in P.R.C.

- CAUTION:
- TO PREVENT FIRE OR SHOCK HAZARD DO NOT EXPOSE THIS APPLIANCE TO RAIN OR MOISTURE.
- LIGHTNING FLASH WITH ARROWHEAD SYMBOL
- EXCLAMATION POINT
- The following label has been affixed to the unit, listing the proper procedure for working with the laser beam:
- CLASS 1 LASER PRODUCT LABEL
- Notes:
- SAFETY PRECAUTIONS
- READ INSTRUCTIONS:
- RETAIN INSTRUCTIONS:
- HEED WARNINGS:
- FOLLOW INSTRUCTIONS:
- CLEANING:
- WATER AND MOISTURE:
- For example:
- ACCESSORIES:
- VENTILATION:
- POWER SOURCES:
- POWER-CORD PROTECTION:
- NON-USE PERIODS:
- LIGHTNING:
- POWER LINES:
- OVERLOADING:
- OBJECT AND LIQUID ENTRY:
- SERVICING:
- DAMAGES REQUIRING SERVICE:
- REPLACE PARTS:
- HEAT:
- PREPARATION FOR USE
- FEATURES OF THE BOOMBOX
- DESCRIPTION OF UNIT AND CONTROLS
- DESCRIPTION OF THE DISPLAY
- CONNECTIONS
- BATTERY INSTALLATION
- BASIC OPERATION
- You can play your audio CD/CD-MP3 in your boombox.
- SEARCH MODE
- Note:
- LISTEN TO YOUR TRACKS REPEATEDLY
- CREATING A CD PLAYLIST
- BASIC OPERATION CD/MP3B BASICOPERATED
- ABOUT MP3 DISC COMPATIBILITY
- FM RADIO
- RADIO OPERATION
- TIPS TO IMPROVE THE RECEPTION
- AUXILIARY INPUT FUNCTION MODE
- USB MODE
- CREATING A USB PLAYLIST
- BLUETOOTH MODE
- BLUETOOTH PAIRING
- PLAY FROM A BLUETOOTH DEVICE
- CARE AND MAINTENANCE
- CARE OF COMPACT DISCS
- TO CLEAN THE LENS
- CARE OF THE BOOMBOX
- TROUBLE SHOOTING GUIDE
- WARNING!
- END OF LIFE DISPOSAL
- ESPAÑOL
- DESCRIPTION D'ÉCRAN
- CONNEXIONS
- LIEN PRINCIPAL
- ENTRETIEN ET MAINTENANCE
- ENTRETIEN DU DISQUE COMPACT
- KLASSE 1 LASERPRODUKT
- Anmerkungen:
- HÖREN SIE IHRE TITEL WIEDERHOLT AN
- SCHERMO DESCRIZIONE
- PORTA USB (MODALITÀ DI RICARICA)
- Nota:
- CURA DEI COMPACT DISC
- OUVIR UMA OU MAIS FAIXAS
Brand : AIWA
Model : BBTU300
Category : Cd player/recorder