
CEMF35B4 - Electric oven CONTINENTAL EDISON - Free user manual and instructions
Find the device manual for free CEMF35B4 CONTINENTAL EDISON in PDF.
| Product type | Electric oven |
| Brand | Continental Edison |
| Model | CEMF35B4 |
| Capacity | 35 L |
| Power | 1500 W |
| Voltage / Frequency | 220-240 V~ / 50-60 Hz |
| Temperature range | 90°C - 230°C |
| Timer | 60 minutes, automatic shut-off |
| Cooking functions | Convection, grill, rotisserie, traditional baking, convection+grill, convection+traditional+probe (not detailed) |
| Included accessories | Rack, drip tray, rotisserie spit and forks, rotisserie handle, crumb tray |
| Door | Tempered glass door with cool handle |
| Safety | Automatic shut-off via timer, hot surfaces indicated, keep children under 8 away |
| Cleaning | Rack, drip tray, rotisserie washable with soapy water; removable crumb tray; exterior surface with damp sponge; do not immerse |
| Installation | Free space of at least 12 cm on sides and above; heat-resistant surface |
| Warranty | Manufacturer's warranty (details in manual), does not cover normal wear, improper use, unauthorized modification |
Frequently Asked Questions - CEMF35B4 CONTINENTAL EDISON
User questions about CEMF35B4 CONTINENTAL EDISON
0 question about this device. Answer the ones you know or ask your own.
Ask a new question about this device
Download the instructions for your Electric oven in PDF format for free! Find your manual CEMF35B4 - CONTINENTAL EDISON and take your electronic device back in hand. On this page are published all the documents necessary for the use of your device. CEMF35B4 by CONTINENTAL EDISON.
USER MANUAL CEMF35B4 CONTINENTAL EDISON
natural_image
Black commercial oven with open lid and control knobs (no visible text or symbols)CEMF35B4
- FR (version originale)
- EN (translated from the original)
A. BOUTON DE LA MINUTERIE
B. VOYANT DE CHAUFFE
C. SÉLECTEUR DE FONCTION
D. BOUTON DU THERMOSTAT
E. GRILLE
F. PLAT LECHEFRITE
G. POIGNÉE DU LÈCHEFRITES
H. PORTE EN VERRE
I. POIGNÉE DE PORTE
J. BROCHE ET FOURCHES DE RÔTISSOIRE
K. POIGNÉE DE RÔTISSOIRE
L. PLATEAU A MIETTES
IV. AVANT LA PREMIÈRE UTILISATION
natural_image
Symbolic icon of a person walking with arrows, enclosed in a circle (no text or numbers)IMPORTANT WARNINGS AND SAFETY ADVICE
We encourage you to read this user guide carefully and completely before installing and using your device.
It is important that this user guide is kept with the device for any new consultation. If this unit is to be transferred to another person, make sure that the user guide follows the unit so that the new user can be informed of the operation of the unit.
In this user guide, the following symbols are used:
 | Important information about your personal safety an how to avoid damage to the device |
 | General information and advice |
 | Environmental information |
 | Fire hazard |
 | Risk of electric shock |
 | Hot surfaces |
SAFETY INSTRUCTIONS
- This appliance operates with high temperatures that can cause burns, do not touch exposed metal parts.
- Do not touch hot surfaces without gloves or protection.
- Do not leave the appliance unattended or within the reach of children. This device should be used by responsible adults.
- Do not use an extension cord to connect the unit.
- Place the unit on a stable surface and do not let the line hang down.
- Check that the mains voltage corresponds to that indicated on the device - alternating current only.
- Never use or connect your device if:
- The cord is defective ordamaged, -The camera fell, It shows visible damage or malfunctions.
- Never disassemble the device yourself.
- Do not operate the appliance near flammable materials or near an external heat source such as hotplates or a gas stove.
- This unit is intended for home and domestic use only. Any professional use, inappropriate or not in accordance with the user manual does not engage the responsibility or warranty of the manufacturer and distributor.
- Unplug the unit when not in use or before cleaning.
- Allow the appliance to cool down before cleaning.
- Do not use the appliance outside the house.
- Never move the device during use.
- Use the device with enough space around it. Be sure to leave a free space in front and on the left or right side of the unit.
• Take care not to block the air intakes or the drain holes.
• After using the device, be sure to turn off your device properly after use.
- This appliance must be installed in accordance with the national installation rules.
- The temperature of the door, outer surface, and accessible surfaces may be high while the unit is operating.
- Keep the appliance and cord away from children under 8 years of age.
- This device can be used by children over 8 years old and by people with reduced physical, sensory or mental abilities, or people without experience or knowledge, if they have benefited through a person responsible for their safety, surveillance or prior instructions concerning the use of the device. Never let a child play with the device. Cleaning and maintenance operations should not be performed by
children unless they are older than 8 years of age and remain under supervision.
• Children should be supervised to ensure that they do not play with the appliance.
- This unit is not designed for use with an external timer or remotecontrol system.
- When using the oven, ensure that there is at least 12 cm of empty space around the oven to allow proper air circulation.
- To unplug the unit, turn all the buttons to the off position and unplug the unit from the wall outlet. Always grasp the plug, never pull on the power cord.
- This unit is not intended to be operated by an outdoor timer or by a remote-control system.
- The accessible surface may become hot during operation.

This logo means that the AX part where it is positioned '-' can become very hot during the operation of the device.
- Never immerse the plug or appliance in water or any other liquid.
- Never place the appliance in corners or under easily flammable materials such as
curtains, draperies, cupboards, etc. If the power cable is damaged, it must be replaced by the manufacturer, its after-sales service or similarly qualified Dersons in order to avoid a hazard.
IMPORTANT IF YOUR APPLIANCE FALLS BE EXAMINED BY A PROFESSIONAL BEFORE TURNING IT ON INTERNAL DAMAGE MAY REPRESENT AN ACCIDENT HAZARD.
For installation, handling, cleaning and disposal of the device, refer to the following chapters of the user's guide.
SUMMARY
Important warnings and safety tips
- Description of the device
II. Technical characteristics
III. Installation
IV. Before first use
V. Instructions to use
VI. Maintenance and cleaning
VII. Troubleshooting guide
VIII. Disposal
IX. Warranty
This user guide is available in the following languages:
-FR (original version)
-EN (translated from the original)
Any other translation would be a translation of the original version.
This user guide, any modifications or any new version, is available on our website.
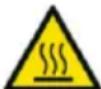
I. DESCRIPTION OF THE DEVICE
A. BUTTON OF THETIMER
B. POWER INDICATOR
C. FUNCTION SELECTOR
D. THERMOSTAT BUTTON
E. GRILL RACK
HANDLE
F. COOKING PLATE
G. LIGHT HANDLE
H. GLASS DOOR
I. DOOR HANDLE
J. ROTISSERIE FORK K. ROTISSERIE
L. CRUMB TRAY
Buttons: Thermostat button, Function selector and Timer button.
Grill: To grill, bake, for conventional cooking in baking dishes, and to load the baking tray.
Cooking plate: For browning and roasting various foods containing water or releasing water or oil during cooking.
Rotisserie Forks: Cooks chicken or roast up to 3.5 kg.
Rotisserie Handle: Pulls out the hot roasting spit out of the oven.
Door handle: Cold handle to avoid burns.
Glass door: Clear tempered glass allows you to easily monitor the cooking.
Crumb tray: Catches food scraps and oil stains and protect the bottom of the oven.
CONTROL PANEL

Thermostat button: The temperature setting range is from 90 ° to 230 ° C. Set the desired temperature according to the cooking.
Function selector: Select the operating mode.

Stop
: Cooking with the Rotating Heat function
Grill Cooking with Rotating Heat Function

Traditional cooking
: Broil cooking with roasting function
: Traditional cooking with Rotating Heat function and Rotisserie
Timer button: The knob should always be set to "0" when the oven is not in use. Turn the knob clockwise to the desired time (60 minutes max.). The count starts automatically.
II. TECHNICAL CHARACTERISTICS
| Mark | Continental Edison |
| Reference | CEMF35B4 (KE35RCLdd) |
| Voltage | 220-240V- |
| Frequency | 50/60HZ |
| Power | 1500W |
| Capacity | 35L |
| Temperature | 90°C - 230°C |
III. INSTALLATION
SETTING UP
Warning! Risk of fire!
-Never place the appliance under cupboards or beside curtains, cabinet walls or other flammable objects.
-Always ensure a minimum distance between the appliance and the suspended cabinets, ceilings, side walls or the like at least 12 cm above the appliance and 12 cm at the sides. For this reason the device can not be used as an example, in closets or similar. Otherwise there is probably insufficient ventilation for the unit, which could lead to fire or damage.

Danger - Electric shock!
Do not place the appliance immediately next to water sources, eg. sinks or basins, or in wet cellar areas. Otherwise, there is a risk of electric shock.
Place the unit on a solid, level and heat-resistant surface (eg stainless steel worktops or natural stone worktops such as granite). Make sure there is sufficient ventilation around the unit.
Push the device against the wall, with its back facing the wall. The spacers on the return must touch the wall. Make sure the wall is made of heat resistant material, eg. tiles, natural stone or granite.
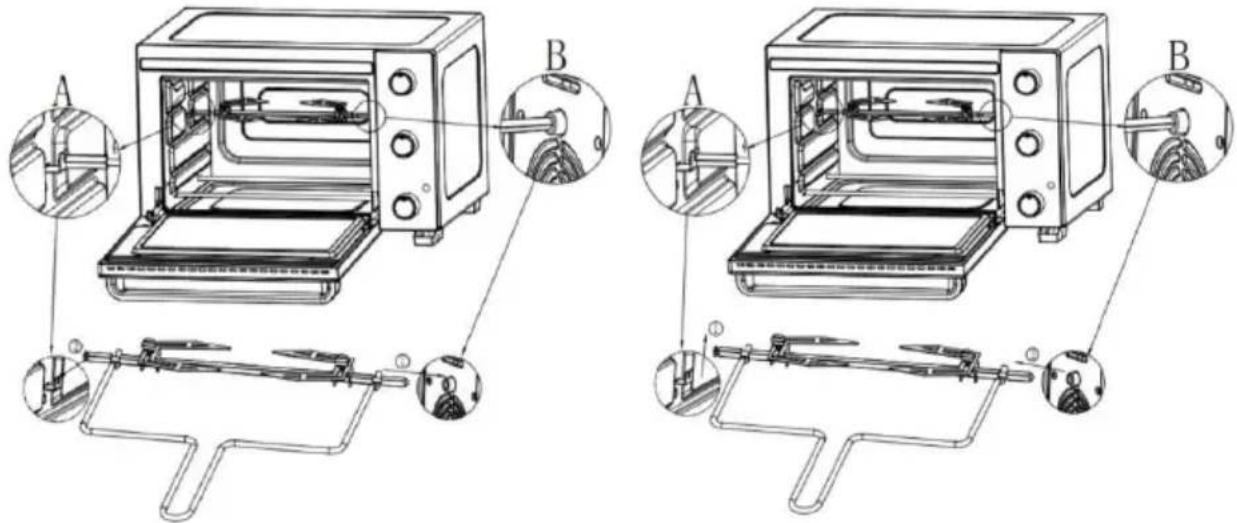
Install the rotisserie in the oven
Put the Rotisserie starting with the B side and finish with the A side. To remove the Rotisserie, first remove Side A then Side B.
IV. EFORE FIRST USE
1. UNPACKING THE APPLIANCE AND DISPOSING OF THE EMBALLAGIC ELEMENTS

Remove all packing material around the appliance and (the protective elements inside the appliance compartments.
2. CLEANING THE DEVICE:
Clean all items in the chest freezer with water and a mild detergent solution. Rinse it thoroughly and dry it with a soft cloth.
Note: The electrical parts of the device can be cleaned only with a dry cloth.
V. INSTRUCTIONS TO USE
BEFORE FIRST USE
-Remove all packing material from the machine.
-Remove all accessories (grill, tray) from the appliance.
-Clean the oven and its accessories with a damp cloth, then dry them.
-Unwind the power cord completely, and then plug it into an electrical outlet.
-Set the function selector to
-Set the thermostat knob to 230 C.
-Set the timer knob for 15 minutes to run the oven empty (without food or accessories) during this time.
CAUTION: The first time the appliance is used, it may emit a slight odor and some smoke. This phenomenon is normal and stops very quickly. Be sure to use the unit in a well-ventilated room.
USE OF YOUR DEVICE
- Tips
To cook or grill, it is best to always preheat the oven to the desired cooking temperature for perfect cooking.
-Place the grease tray under the cooking grate to prevent grease from dripping onto the oven and the bottom of the oven.
-If the food to be cooked is oily or greasy, you can use two sheets of aluminum foil. Place one on the fat tray and cover the food with the other. This prevents oil and grease splashes during cooking.
• Traditional cooking
This function automatically activates the high and low resistance.
-Insert the grill in the low position.
-Set the function selector to
-Set the cooking temperature with the thermostat knob.
-Set the cooking time with the timer button.
- Wait until the oven has reached the set temperature (the heat indicator goes out), then insert the food.
-If cooking is finished before the end of the set cooking time, manually turn the timer knob to "0".
• Broiling spit with roasting function
This method of cooking is ideal for broiling chicken, poultry, pork roasts and veal pieces. In this cooking mode, it is not necessary to preheat the oven.
- Place the piece of meat on the spit, then secure it with the forks (for best results, attach the meat with kitchen string).
- Place the grease tray at the bottom of the resistance and insert the spit into the drive mechanism inside the oven.
- Close the door leaving it ajar (half open).
- Set the function selector to
- Set the cooking temperature with the thermostat knob.
- Set the cooking time with the timer button.
• Cooking with the Rotating Heat function
This function is ideal in addition to using your oven in traditional mode or keeping warm. Indeed, the rotating heat circulates the
heat in the oven and allows to quickly grasp and cook red meat, poultry, fish, while keeping them soft, mellow and juicy.
- Insert the grill in the low position.
- Set the function selector to 📄
- Set the cooking temperature with the thermostat knob.
- Set the cooking time with the timer button.
- Wait until the oven has reached the set temperature (the heat indicator goes out), then insert the food.
- If cooking is finished before the end of the set cooking time, manually turn the timer knob to "0".
VI. MAINTENANCE AND CLEANING
Allow the oven to cool completely before cleaning.
- Unplug the power cord from the wall outlet.
- The grill, the broiler pan and the grease tray can be cleaned with soapy water.
- Always use a damp sponge to clean exterior surfaces. Avoid using abrasive products that could damage the coating. Make sure that water or soap does not get inside the oven through the air vents on the top of the oven.
- Never immerse the oven in water or any other liquid.
- To clean the inner walls, do not use corrosive products (spray detergents) and never scratch the walls with sharp or sharp objects.
- -If the unit is not maintained in a clean condition, its surface could degrade and affect the life of the unit and lead to a dangerous situation.
The oven should be cleaned regularly and any food depot should be removed.
Remove and Clean the fat tray
- Remove the grease tray by pulling on the handle of the grease tray.
- Wash with soapy water and let it dry.
- Never use abrasive products.
- Put the grease tray back in place.
VI. TROUBLESHOOTING GUIDE
| Problem | Possible cause | Corrective action |
| The device does not work. | The power outlet is not connected to the mains supply. | Insert the plug into a power outlet. |
| The power plug is defective. | Use another AC outlet. | |
| The device is defective. | Contact customer service. | |
| The cooking time of the food seems very long | The glass door was often opened to check the progress of cooking. | Do not open the glass door more often than necessary. |
| The wrong temperature level has been set. | Check the temperature settings. | |
| Smoke and odors develop during use. | There is a detergent or food residue on the heating elements. | Remove the food from the appliance and continue the cooking process with the glass door open until the smoke stops. |
For any other problem occurring on your device: contact the After-Sales Service.
VII. DISPOSAL

natural_image
Symbol of a trash bin crossed with no visible text or labelsThis logo affixed to the product means that it is a device whose treatment as waste falls within the framework of the directive 2012/19 / EU of July 4th, 2012, relative to the waste of electrical and electronic equipment (WEEE). This means that this product must be supported by a selective collection system in accordance with the European directive mentioned
Hazardous substances in electrical and electronic equipment can have potentially harmful effects on the environment and human health.
Thus, at the end of the life of this appliance, it must not be disposed of with unsorted municipal waste. Recovery and collection systems are made available to you by local authorities (waste disposal centers) and distributors.
This device must not be thrown on public roads. You have the obligation to use the selective collection systems available to you.
VIII. WARRANTY
Warranty does not cover product wear parts, problems or loads
- superficial damage to the normal wear and tear of the product;
- defects or deterioration due to product contact with liquids and corrosion caused by rust or the presence of insects;
- any incident, misuse, misuse, alteration, disassembly or unauthorized repair;
- any maintenance notin accordance with the instructions for the product or connection to incorrect voltage;
- any use of accessories not supplied or not approved by the manufacturer.

The warranty will be void if the nameplate and / or serial number of the product is removed.
IMPORTÉ PAR :
A.M.C.
123 quai Jules Guesde, CS11584
94400, VITRY SUR SEINE
France
Continental Edison
120-126 Quai de Bacalan
33000 Bordeaux

Continental Edison
www.continentaledison.fr C€


- CEMF35B4
- AVANT LA PREMIÈRE UTILISATION
- IMPORTANT WARNINGS AND SAFETY ADVICE
- SAFETY INSTRUCTIONS
- SUMMARY
- DESCRIPTION OF THE DEVICE
- CONTROL PANEL
- TECHNICAL CHARACTERISTICS
- INSTALLATION
- SETTING UP
- Warning! Risk of fire!
- Danger - Electric shock!
- Install the rotisserie in the oven
- EFORE FIRST USE
- UNPACKING THE APPLIANCE AND DISPOSING OF THE EMBALLAGIC ELEMENTS
- CLEANING THE DEVICE:
- INSTRUCTIONS TO USE
- BEFORE FIRST USE
- USE OF YOUR DEVICE
- - Tips
- • Traditional cooking
- • Broiling spit with roasting function
- • Cooking with the Rotating Heat function
- MAINTENANCE AND CLEANING
- Allow the oven to cool completely before cleaning.
- Remove and Clean the fat tray
- TROUBLESHOOTING GUIDE
- DISPOSAL
- WARRANTY
- Continental Edison
Brand : CONTINENTAL EDISON
Model : CEMF35B4
Category : Electric oven