70743 - Food Processor HAMILTON BEACH - Free user manual and instructions
Find the device manual for free 70743 HAMILTON BEACH in PDF.

User questions about 70743 HAMILTON BEACH
0 question about this device. Answer the ones you know or ask your own.
Ask a new question about this device
Download the instructions for your Food Processor in PDF format for free! Find your manual 70743 - HAMILTON BEACH and take your electronic device back in hand. On this page are published all the documents necessary for the use of your device. 70743 by HAMILTON BEACH.
USER MANUAL 70743 HAMILTON BEACH
Visit www.hamiltonbeach.com for our complete line of products and Use and Care Guides – as well as delicious recipes, tips, and to register your product online.
Questions Please call us – our friendly associates are ready to help. USA: 1.800.851.8900
natural_image
Hamilton Beach kitchen blender with clear glass and black casing, no visible text or symbols on the device itself.Food Processor Robot culinaire Procesador de Alimentos
English 2
Français.... 11
Español 21
IMPORTANT SAFEGUARDS
When using electrical appliances, basic safety precautions should always be followed to reduce the risk of fire, electric shock, and/or injury to persons, including the following:
- Read all instructions.
- This appliance is not intended for use by persons with reduced physical, sensory, or mental capabilities, or lack of experience and knowledge, unless they are closely supervised and instructed concerning use of the appliance by a person responsible for their safety.
- Close supervision is necessary when any appliance is used near children.
- This appliance should not be used by children. Keep the appliance and its cord out of reach of children. Children should be supervised to ensure they do not play with the appliance.
- To protect against risk of electrical shock, do not immerse base, motor, cord, or plug in water or other liquid.
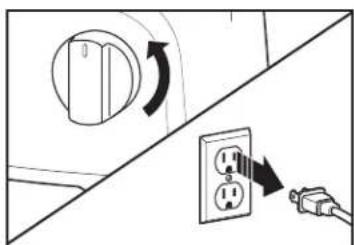
- Turn OFF (▶ then unplug from outlet when not in use, before assembling or dissembling, and before cleaning. To unplug, grasp plug and pull from outlet. Never pull from power cord.
- Avoid contacting moving parts. Keep fingers out of feed chute.
- Do not operate any appliance with a damaged supply cord or plug or after the appliance malfunctions or is dropped or damaged in any manner. Supply cord replacement and repairs must be conducted by the manufacturer, its service agent, or similarly qualified persons in order to avoid a hazard. Call the provided customer service number for information on examination, repair, or adjustment.
- The use of attachments not recommended or sold by the appliance manufacturer may cause fire, electric shock, or injury.
- Do not use your food processor if any part is broken.
- Do not use appliance outdoors.
-
Do not let cord hang over edge of table or counter, or touch hot surfaces.
-
Keep hands and utensils away from moving blade and disc while processing food to reduce the risk of severe personal injury and/or damage to the food processor. A rubber scraper may be used but ONLY when the food processor is not running.
- Blades are sharp. Handle cutting blades carefully when inserting or removing, emptying the bowl, and during cleaning. Store out of reach of children.
- To reduce the risk of injury, never place cutting blade or disc on base without first putting bowl properly in place.
- Be certain lid is securely locked in place before operating appliance.
- Never feed food into food chute by hand. Always use the food pushers.
- Do not attempt to defeat the lid interlock mechanism.
- Make sure the blade or disc has come to a full stop before removing lid.
- To reduce the risk of injury, be sure to insert or remove blade and disc using hubs provided for this purpose. Use caution when removing blade and disc from the bowl, when emptying the bowl, and when cleaning.
- Check that the appliance is OFF (before plugging cord into wall outlet. To disconnect, turn the control to OFF (then remove plug from wall outlet. To unplug, grasp the plug and pull from the outlet. Never pull from the power cord.
- Be sure to turn switch to OFF (position after each use. Always use the pushers to clear the food chute. When this method is not possible, unplug cord from outlet and disassemble unit to remove the remaining food.
-
Never use appliance for a longer period or with a larger amount of ingredients other than that recommended by appliance manufacturer.
-
The maximum rating of this unit is based on using the chopping/mixing blade. Using the slicing/shredding disc may draw significantly less power.
- Do not place on or near a hot gas or electric burner or in a heated oven.
- Do not use appliance for other than intended use.
- Be careful if hot liquid is poured into the food processor as it can be ejected out of the appliance due to a sudden steaming.
-
The appliance is not intended for commercial, professional, or industrial use. It is designed and built exclusively for household use only.
-
Do not fill the bowl above the marked maximum fill line (or rated capacity) to avoid risk of injury due to damage to the cover or bowl.
- CAUTION! In order to avoid a hazard due to inadvertent resetting of the thermal cut-out, this appliance must not be supplied through an external switching device, such as a timer, or connected to a circuit that is regularly switched on and off by the utility.
SAVE THESE INSTRUCTIONS
Other Consumer Safety Information
This product is intended for household use only.
⚠ WARNING Electrical Shock Hazard: This appliance is provided with a polarized plug (one wide blade) to reduce the risk of electric shock. The plug fits only one way into a polarized outlet. Do not defeat the safety purpose of the plug by modifying the plug in any way or by using an adapter. If the plug does not fit fully into the outlet, reverse the plug. If it still does not fit, have an electrician replace the outlet.
The length of the cord used on this appliance was selected to reduce the hazards of becoming tangled in or tripping over a longer cord. If a longer cord is necessary, an approved extension cord may be used. The electrical rating of the extension cord must be equal to or greater than the rating of the appliance. Care must be taken to arrange the extension cord so that it will not drape over the countertop or tabletop where it can be pulled on by children or accidentally tripped over.
To avoid an electrical circuit overload, do not use another high-wattage appliance on the same circuit with this appliance.
Parts and Features
To order parts:
US: 1.800.851.8900
www.hamiltonbeach.com
Canada: 1.800.267.2826
Mexico: 800 71 16 100
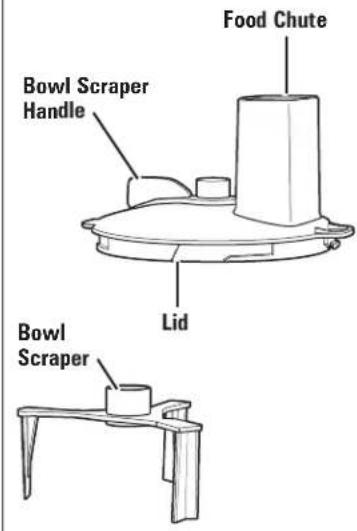
Optional Bowl Scraper and Bowl Scraper Lid (on select models)
text_image
Food Chute Bowl Scraper Handle Lid Bowl ScraperBEFORE FIRST USE: Unpack processor. Handle blade and disc(s) carefully; they are very sharp. Wash all parts except base in hot, soapy water. Rinse; then dry.
text_image
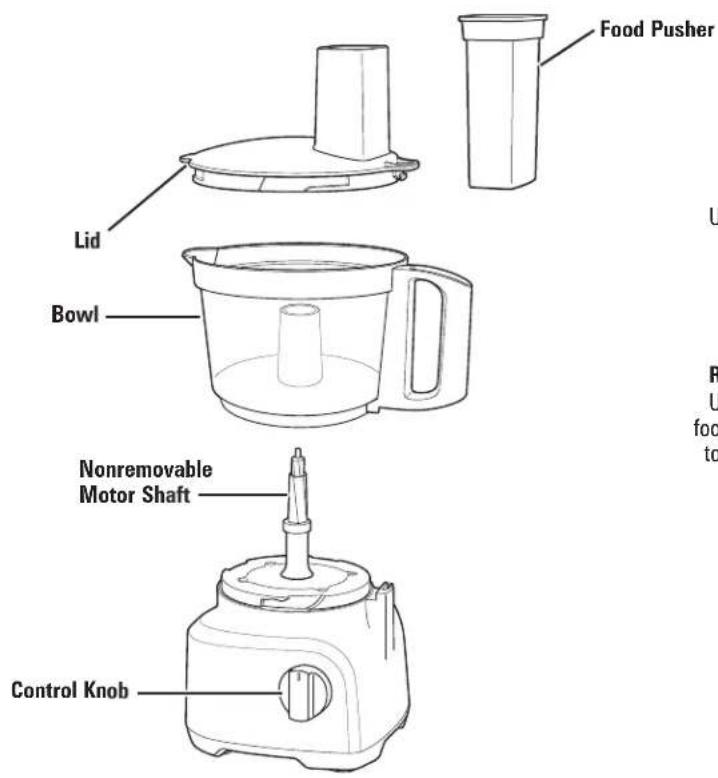
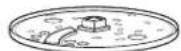
Food Pusher Lid Bowl Nonremovable Motor Shaft Control Knob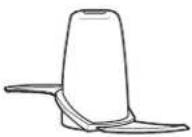
Chopping/Mixing Blade
Use to coarsely chop, grate, mince,
mix, or puree food.
Reversible Slicing/Shredding Disc
Use to shred or to slice a variety of foods (such as cheese, carrots, onions, tomatoes, peppers, and cucumbers).
OPTIONAL ACCESSORY
Crinkle Cut/Fine Shred Disc
How to Use Chopping/Mixing Blade
WARNING Laceration Hazard.
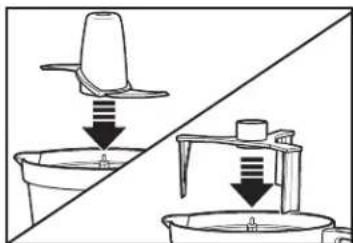
Handle blade carefully; it is very sharp. Make sure control knob is turned to OFF (O) and unit is unplugged. NOTE: Operate using only one blade or disc at a time.

natural_image
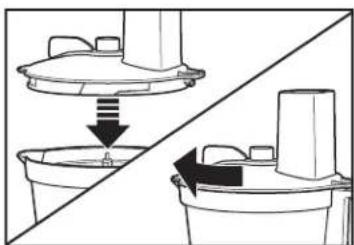
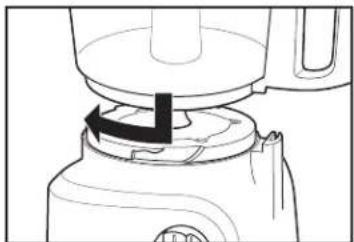
Line drawing of a blender with a black arrow indicating the process (no text or symbols)- Align bowl and base. Turn bowl clockwise to lock into place. NOTE: Unit will not work unless bowl is locked.
natural_image
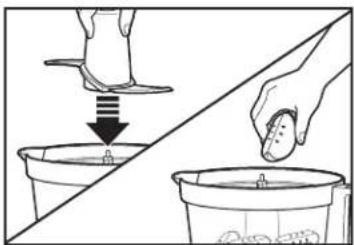
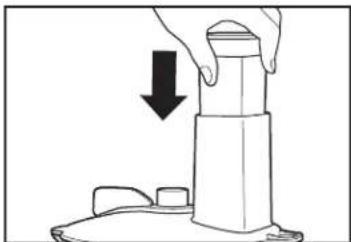
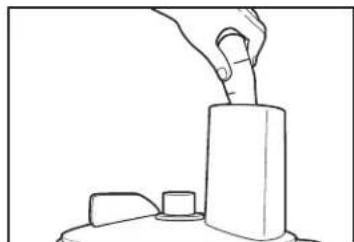
Illustration showing a hand pouring liquid into a bucket and another bucket, with no text or symbols present.- Carefully place blade straight down onto the motor shaft. Add food to bowl. Do not fill above MAX level.
natural_image
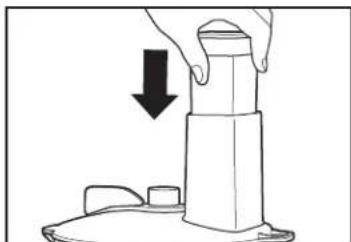
Line drawing of a kitchen appliance with a downward arrow indicating a drop or compression process (no text or symbols)- OPTIONAL: Add bowl scraper.
natural_image
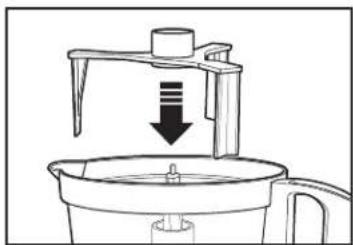
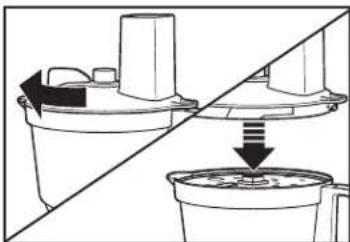
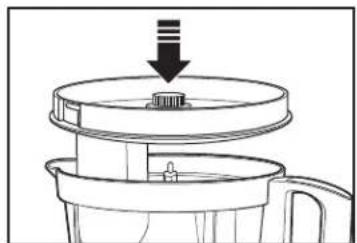
Diagram showing a mechanical assembly with a lid and base, no text or symbols present- Align lid and bowl. Turn lid clockwise to lock into place. NOTE: Unit will not work unless lid is locked.
natural_image
Illustration of a hand pressing down on a mechanical component with a downward arrow indicating compression (no text or symbols)- Place food pusher in food chute.
text_image
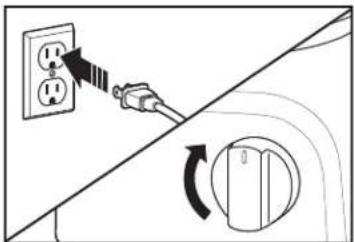
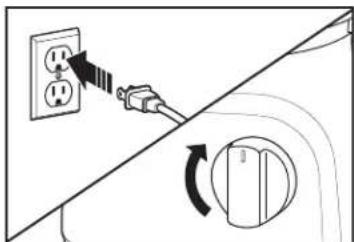
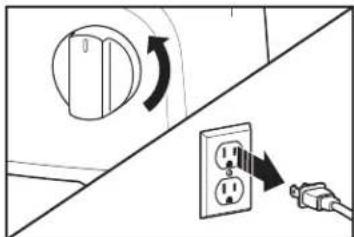
Diagram showing a power plug connecting two outlets to a switch, with a circular component indicating clockwise rotation.- Select 1, 2, or P on control knob. 1 or 2: Processor will run continuously. P (PULSE): For instant on and off control.
natural_image
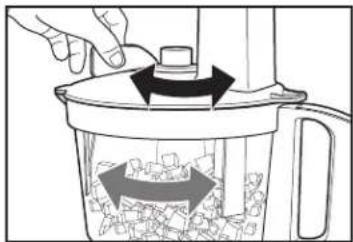
Illustration of a hand pressing down on a kitchen grater with arrows indicating process flow (no text or symbols)- OPTIONAL: Turn bowl scraper handle on top of lid back and forth to remove food from sides of bowl. Bowl scraper can be used when unit is running or when it is OFF.
How to Use Chopping/Mixing Blade (cont.)
natural_image
Diagram showing a switch connected to an electrical outlet with a circular knob and power plug (no text or symbols)- When finished, turn to OFF (○) and unplug.
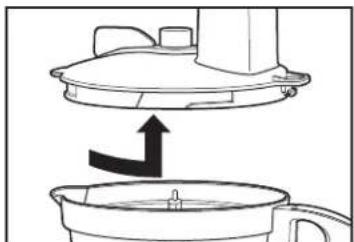
WARNING Laceration Hazard: Always unplug unit before removing lid.
natural_image
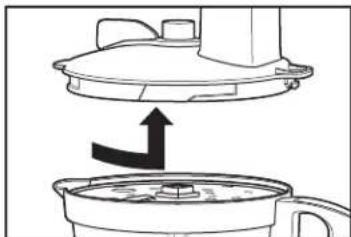
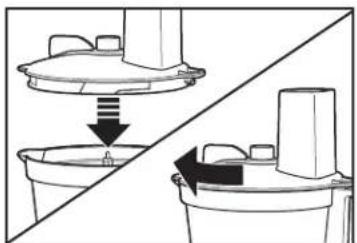
Diagram showing a kitchen appliance with a lid and a side bowl, no text or symbols present- Always remove lid before removing bowl to avoid possible damage to the appliance.
natural_image
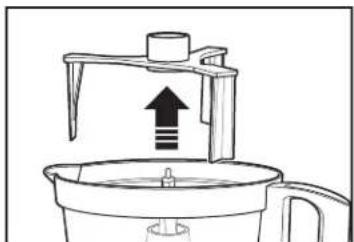
Line drawing of a kitchen appliance with an upward arrow indicating a process (no text or symbols)- Remove bowl scraper, if used.
natural_image
Diagram showing a hand pressing down on a shoe and lifting a cup, with an arrow indicating the process (no text or symbols present)- Carefully remove blade from motor shaft and bowl from base.
How to Use Reversible Slicing/Shredding Disc
WARNING Laceration Hazard.
Handle disc carefully; it is very sharp.
Make sure control knob is turned to OFF (○) and unit is unplugged.
NOTE: Operate using only one blade or disc at a time.
Bowl scraper cannot be used with the reversible slicing/shredding disc.
natural_image
Line drawing of a blender with a black arrow indicating the process (no text or symbols)- Align bowl and base. Turn bowl clockwise to lock into place. NOTE Unit will not work unless bowl is locked.
natural_image
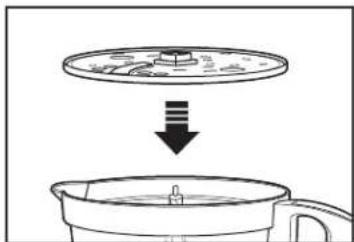
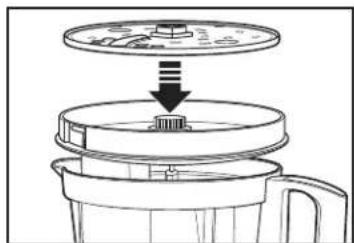
Diagram showing a lid being dropped into a container, with no text or symbols present.- Carefully place disc onto motor shaft with desired side facing UP. ("SLICE" or "SHRED" is stamped on each side of the blade.)
natural_image
Diagram showing a mechanical component being cut off into a container, with no visible text or symbols.- Align lid and bowl. Turn lid clockwise to lock into place. NOTE: Unit will not work unless lid is locked.
How to Use Reversible Slicing/Shredding Disc (cont.)
text_image
Diagram showing a power outlet connected to a switch, with a rotary switch mechanism indicated by an arrow.- Select 1, 2, or P on control knob. 1 or 2: Processor will run continuously. P (PULSE): For instant on and off control.
NOTE: Soft cheese like mozzarella must be placed in the freezer for 30 minutes prior to processing to ensure it is firm enough for shredding.
natural_image
Line drawing of a hand pressing down on a cylindrical object (no text or symbols)- Cut food to fit food chute. Fill chute with food.
natural_image
Illustration of a hand pressing down on a cylindrical object with a downward arrow indicating compression (no text or symbols)- ⚠️ WARNING Laceration Hazard. Always use food pusher to feed food into the chute. NEVER PUSH FOOD THROUGH CHUTE WITH HANDS OR OTHER OBJECTS.
text_image
Diagram showing electrical switch installation with directional arrows and power outlet symbols- When finished, turn OFF (O) and unplug. ⚠ WARNING Laceration Hazard: Always unplug unit before removing lid.
natural_image
Diagram showing a kitchen appliance with a lid and a side panel, no text or symbols present- Always remove lid before removing bowl to avoid possible damage to the appliance.

natural_image
Diagram showing two kitchen utensils with arrows indicating movement or force (no text or symbols)- Carefully remove disc from motor shaft and bowl from base.
Tips and Techniques
- Add the bowl scraper to bowl before processing ingredients that will stick to the sides of the bowl.
- For a more uniform consistency, start with pieces of food that are similar in size. Cut food into 1-inch (2.5-cm) pieces before processing with chopping/mixing blade and leave room in bowl for the food to be tossed around.
- This food processor is excellent to chop, mix, slice, or shred most foods. However, to maintain peak performance, do not use your food processor for the following: grinding grain, coffee beans, or spices; slicing frozen meats; kneading dough; or crushing ice.
- When chopping foods, pulsing on and off will produce the best results.
-
Operating time will depend on quantity of food being processed. Most foods can be sliced, chopped, or shredded in seconds. If unit is operated continuously for an extended period of time, let the processor rest about 4 minutes before continuing.
-
Do not puree or mash starchy vegetables like potatoes as they are easily overprocessed and will become gummy.
- To slice or shred cheese, use only firm cheese like Cheddar or Swiss that has been chilled for at least 30 minutes. Cheese should be processed immediately after being removed from the refrigerator. Soft cheese like mozzarella must be placed in the freezer for 30 minutes prior to processing to ensure it is firm enough for shredding.
- The reversible slicing/shredding disc has a slicing blade on one side and shredding teeth on the other. The name stamped on the blade, facing up, is the function selected. Place on motor shaft with desired cutting edge facing up.
Processing Charts
Disc attachments are reversible and labeled. The label should face up for the desired function. When using disc attachments, do not process past the MAX LEVEL on the bowl.
| ATTACHMENT | FOODS |
| Chopping/Mixing Blade | Chop: nuts, meat, garlic, onions, peppers, celery, herbs, bread (for crumbs), crackersMince/Puree: vegetables, fruitMix: salad dressingsPuree: soups, saucesGrate: cheese, such as Parmesan (chilled) |
| Slicing Disc(slicing side facing UP) | Cucumbers, apples, mushrooms, carrots, potatoes, cabbage, tomatoes, pepperoni, peppers, radishes, firm cheeses (chilled) |
| Shredding Disc(shredding side facing UP) | Cabbage, potatoes, carrots, cheese (chilled) |
For best results do not exceed the following amounts when chopping, mincing, or pureeing with the chopping/mixing blade.
| FOOD | MAXIMUM AMOUNT |
| Fruits and Vegetables | 2 to 3 cups (500 to 750 ml)(cut into 1-in. [2.5-cm] cubes |
| Meats | 0.7 lb. (350 g) (cut into 1-in. [2.5-cm] cubes) |
| Parmesan or Romano | 5 ounces (140 g) (cut into 1-in. [2.5-cm] cubes) |
| Cheddar, Jack, Mozzarella | 8 ounces (226 g) (cut into 1-in. [2.5-cm] cubes) |
| Crackers | 10 cups (2.3 L) (can fill bowl and lid up into chute) |
Cleaning and Care
WARNING
Electrical Shock Hazard. Disconnect power before cleaning. Do not immerse cord, plug, or base in any liquid.
- Unplug from electrical outlet.
- Bowl, lid, food pusher, blade, disc, and bowl scraper are dishwasher-safe on top rack of dishwasher, or hand wash in hot, soapy water. Rinse and dry.
NOTE: DO NOT use the "SANI" setting when washing in the dishwasher. "SANI" cycle temperatures could damage your product. - Wipe base, control knob, and cord with a damp cloth or sponge. If necessary, use a mild nonabrasive cleanser.
Storage (To Keep All Parts Together)
natural_image
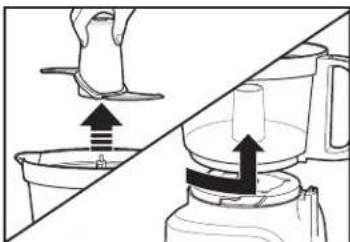
Diagram showing a lid being inserted into a container and then placed on a stand, with arrows indicating the process (no text or symbols present)- Place chopping/mixing blade and then bowl scraper on motor shaft.
natural_image
Diagram of a food processor with a lid and handle, showing a downward arrow indicating compression or lifting (no text or symbols present)- Flip lid upside down and place in bowl. Place food pusher in food chute.
natural_image
Diagram of a food processor with a lid and base, showing internal components (no text or symbols)- Carefully place slicing/shredding disc in lid.
WARNING Laceration Hazard. Store sliding/shredding disc with slicing side down. Handle carefully.
Troubleshooting
1. Unit does not operate on any speed or Pulse.
- Is the unit plugged in? Does the outlet work?
- Are the bowl and lid locked in place? See "How to Use" sections.
2. Food is not sliced or shredded uniformly.
- Packing too much food in the food chute or pushing too hard on the food pusher may cause the processed food to be irregularly sliced or shredded.
3. Unit stops and will not come back on.
- Are the bowl and lid locked in place? They may have moved slightly during processing. See "How to Use" sections.
- Is the outlet still working? Check it by plugging in a working lamp or other appliance. You may have overloaded the circuit and blown a fuse or tripped the circuit breaker.
4. Unit has a burning smell.
- There may be a residue left on the motor from the manufacturing process, causing a slight odor during initial use. This will go away. If a strong odor or any visible smoke appears, unplug unit IMMEDIATELY and call the Customer Service number.
5. Motor seems weak.
- Are you using the recommended food size and quantity to be processed? See "How to Use" sections.
6. It is difficult to remove bowl from base.
- Rub a small amount of vegetable oil on the snaps, located on the base. Do not lock bowl and lid during storage.
7. Cheese is not shredding well.
- Cheese should be processed immediately after being removed from the refrigerator. Soft cheese like mozzarella must be placed in the freezer for 30 minutes prior to processing to ensure it is firm enough for shredding.
8. Vegetables are not shredding or slicing.
- Store vegetables with high water content in the refrigerator prior to processing. Room-temperature vegetables are less firm and do not perform as well.
Limited Warranty
This warranty applies to products purchased and used in the U.S. and Canada. This is the only express warranty for this product and is in lieu of any other warranty or condition.
This product is warranted to be free from defects in material and workmanship for a period of five (5) years from the date of original purchase in Canada and one (1) year from the date of original purchase in the U.S. During this period, your exclusive remedy is repair or replacement of this product or any component found to be defective, at our option; however, you are responsible for all costs associated with returning the product to us and our returning a product or component under this warranty to you. If the product or component is no longer available, we will replace with a similar one of equal or greater value.
This warranty does not cover glass, filters, wear from normal use, use not in conformity with the printed directions, or damage to the product resulting from accident, alteration, abuse, or misuse. This warranty extends only to the original consumer purchaser or gift recipient. Keep the original sales receipt, as proof of purchase is required to make a warranty claim. This warranty is void if the product is used for other than single-family household use or subjected to any voltage and waveform other than as specified on the rating label (e.g., 120 V \~ 60 Hz).
We exclude all claims for special, incidental, and consequential damages caused by breach of express or implied warranty. All liability is limited to the amount of the purchase price. Every implied warranty, including any statutory warranty or condition of merchantability or fitness for a particular purpose, is disclaimed except to the extent prohibited by law, in which case such warranty or condition is limited to the duration of this written warranty. This warranty gives you specific legal rights. You may have other legal rights that vary depending on where you live. Some states or provinces do not allow limitations on implied warranties or special, incidental, or consequential damages, so the foregoing limitations may not apply to you.
To make a warranty claim, do not return this appliance to the store. Please call 1.800.851.8900 in the U.S. or 1.800.267.2826 in Canada or visit hamiltonbeach.com in the U.S. or hamiltonbeach.ca in Canada. For faster service, locate the model, type, and series numbers on your appliance.
PRÉCAUTIONS IMPORTANTES
natural_image
Line drawing of a blender with a black arrow indicating the process (no text or symbols)natural_image
Illustration showing a hand pouring liquid into a bucket and another bucket with a spoon (no text or symbols)natural_image
Line drawing of a kitchen appliance with a downward arrow indicating a drop or reduction (no text or symbols)- FACULTATIF : Installer le racloir de bol.
natural_image
Diagram showing a mechanical assembly with a lid and base, no text or symbols presentnatural_image
Illustration of a hand pressing down on a cylindrical object with a downward arrow indicating compression (no text or symbols)text_image
Diagram showing a power plug connecting two outlets to a rotary switch, with directional arrows indicating electrical movement.natural_image
Illustration of a hand using a tool to press waste into a trash bin with arrows indicating process flow (no text or symbols)text_image
Diagram showing electrical switch installation with directional arrows and component labelsnatural_image
Diagram showing a kitchen appliance with a lid and a side bowl, no text or symbols presentnatural_image
Line drawing of a kitchen appliance with an upward arrow indicating motion (no text or symbols)natural_image
Diagram showing a hand pressing down on a container while another hand moves into a blender (no text or symbols present)natural_image
Line drawing of a blender with a black arrow indicating the process (no text or symbols)natural_image
Diagram showing a lid being dropped into a container with liquid, no text or symbols presentnatural_image
Diagram showing two mechanical components with directional arrows indicating movement or force (no text or symbols)text_image
Diagram showing a power outlet connected to a switch, with a rotary switch mechanism indicated by an arrow.natural_image
Line drawing of a hand pressing down on a cylindrical object (no text or symbols)natural_image
Illustration of a hand pressing down on a cylindrical object with a downward arrow indicating compression (no text or symbols)natural_image
Diagram showing a switch connected to an electrical outlet with a power plug, no text or symbols presentnatural_image
Diagram showing a kitchen appliance with a lid and a side view of its interior (no text or symbols)natural_image
Diagram showing two kitchen utensils with arrows indicating process flow (no text or symbols)natural_image
Diagram showing two containers with downward arrows indicating process or movement (no text or symbols)natural_image
Diagram of a kitchen appliance with a lid and handle, showing a downward arrow indicating a process (no text or symbols present)natural_image
Cross-sectional diagram of a blender with a lid and handle, showing internal components (no text or symbols)natural_image
Line drawing of a blender with a black arrow indicating the process (no text or symbols)natural_image
Illustration showing a hand cleaning a cup with a foot, no text or symbols presentnatural_image
Line drawing of a kitchen appliance with a downward arrow indicating a drop or compression process (no text or symbols)natural_image
Diagram showing a mechanical assembly with a lid and bucket, no text or symbols presentnatural_image
Line drawing of a hand pressing down on a cylindrical object with a downward arrow indicating motion (no text or symbols)text_image
Diagram showing a power outlet connected to a switch with a circular switch, indicating electrical circuit rotation or switch state change.natural_image
Illustration of a hand using a blender to press waste into a container with arrows indicating process flow (no text or symbols)text_image
Diagram showing electrical switch installation with labeled components and directional arrows indicating rotation or adjustment.natural_image
Diagram showing a kitchen appliance with a lid and a side bowl, no text or symbols presentnatural_image
Simple line drawing of a kitchen appliance with an upward arrow indicating motion (no text or symbols)natural_image
Diagram showing a hand pressing down on a shoe and pouring liquid into a container, with no text or symbols present.natural_image
Line drawing of a blender with a black arrow indicating a step, no text or symbols presenttext_image
Diagram showing a cooking step with a lid and downward arrow indicating reduction or removal of a dish, partially enclosed in a container.natural_image
Diagram showing a mechanical assembly with two components and a downward arrow indicating motion (no text or symbols)text_image
Diagram showing a power outlet connected to a switch, with a rotary switch mechanism indicated.natural_image
Line drawing of a hand pressing down on a cylindrical object with a small block nearby (no text or symbols)natural_image
Illustration of a hand pressing down on a cylindrical object with a downward arrow indicating motion (no text or symbols)text_image
Diagram showing electrical switch installation with directional arrows and power outlet symbolsnatural_image
Diagram showing a kitchen appliance with a downward arrow indicating a process or movement (no text or symbols present)natural_image
Diagram showing two kitchen utensils with arrows indicating movement or force (no text or symbols)natural_image
Diagram showing a container being lowered into a machine, with no text or symbols present.natural_image
Diagram of a mechanical device with a downward arrow indicating a process or assembly (no text or symbols present)natural_image
Diagram of a food processor with a lid and base, showing internal components (no text or symbols)Cheddar, Monterey Jack, Mozzarella
8 onzas (226 g) (corte en cubos de 1" [2.5 cm])
Galletas