
200LN - Freezer BARTSCHER - Free user manual and instructions
Find the device manual for free 200LN BARTSCHER in PDF.
| Product type | Freezer cabinet |
| Brand | Bartscher |
| Model | 200LN |
| Net capacity | 196 liters |
| Dimensions (W x D x H) | 600 x 590 x 1450 mm |
| Weight | 53 kg |
| Energy class | A+ |
| Voltage / Frequency | 230 V / 50 Hz |
| Power consumption | 0.165 kW |
| Refrigerant | R600a |
| Ambient temperature range | +16 °C to +32 °C |
| Operating temperature | Down to -18 °C |
| Number of drawers | 4 drawers for frozen products |
| Quick freeze compartments | 2 |
| Maximum freezing capacity / 24h | 12 kg |
| Included accessories | Ice cube tray |
| Door reversibility | Yes, possible |
| Type of defrost | Manual, to be performed at least 2 times per year |
| Cleaning | Warm water and mild detergent; do not use abrasive products |
| Main safety instructions | Unplug before cleaning; do not use extension cord; do not expose to heat sources; do not damage the cooling circuit |
Frequently Asked Questions - 200LN BARTSCHER
User questions about 200LN BARTSCHER
0 question about this device. Answer the ones you know or ask your own.
Ask a new question about this device
Download the instructions for your Freezer in PDF format for free! Find your manual 200LN - BARTSCHER and take your electronic device back in hand. On this page are published all the documents necessary for the use of your device. 200LN by BARTSCHER.
USER MANUAL 200LN BARTSCHER
natural_image
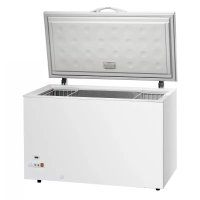
Front view of a white stainless steel refrigerator with open doors and internal shelves (no visible text or symbols)200 LN / 700341
Bedienungsanleitung
Tiefkühlschrank
Seite 1 bis 20
D/A/CH
Instruction manual
Deep freezer
from page 21 to 40
GB/UK
Mode d'emploi
Abb. 1
Aufstellen
natural_image
Illustration of a hand holding a small object over a grid-like structure (no text or symbols)Abb. 8
of the original instruction manual
Read these instructions before using and keep them available at all times!
1. General information 22
1.1 Information about the instruction manual 22
1.2 Key to symbols 22
1.3 Liability and Warrantees.... 23
1.4 Copyright protection 23
1.5 Declaration of conformity.... 23
2.Safety 24
2.1 General information.... 24
2.2 Safety instructions for use of the device 24
2.3 Intended use 25
3. Transport, packaging and storage.... 26
3.1 Delivery check.... 26
3.2 Packaging 26
3.3 Storage....26
4. Technical data 27
4.1 Overview of parts 27
4.2 Technical specification 28
5. Installation and operation.... 29
5.1 Safety instructions....29
5.2 Installation and connection.... 30
5.3 Operation 33
6. Cleaning and maintenance.... 37
6.1 Safety advice.... 37
6.2 Cleaning 37
6.3 Safety instructions for maintenance 38
7. Possible Malfunctions 39
8. Waste disposal 40
Bartscher GmbH
1.1 Information about the instruction manual
This instruction manual contains information about the installation, operation and maintenance of the device and should be consulted as an important source of information and reference guide.
Awareness of the safety instructions and instructions for use in this manual will ensure the safe and correct use of the device.
In addition to the information given here, you should comply with any local Health and safety Controls and generally applicable safety regulations.
The instruction manual forms part of the product and should be kept near the device and easily accessible for anyone carrying out the installation, servicing, maintenance or cleaning.
1.2 Key to symbols
In this manual, symbols are used to highlight important safety instructions and any advice relating to the device. The instructions should be followed very carefully to avoid any risk of accident, personal injury or material damage.

WARNING!
This symbol highlights hazards, which could lead to injury.
Please follow the instructions very carefully and proceed with particular attention in these cases.
DANGER! Electrical hazard!
This symbol draws attention to potential electrical hazards. If you do not follow the safety instructions, you may risk injury or death.

CAUTION!
This symbol highlights instructions, which should be followed to avoid any risk of damage, malfunctioning and/or breakdown of the device.

NOTE!
This symbol highlights tips and information, which have to be followed for an efficient and trouble-free operation of the device.
1.3 Liability and Warrantees
All the information and instructions in this manual take into account standard safety regulations, current levels of technical engineering as well as the expertise and experience we have developed over the years.
The instruction manual was translated with all due care and attention. However, we do not accept liability for any translation errors. The German version of this instruction manual is definitive.
If the delivery consists of a special model, the actual scope of delivery may differ from the descriptions and illustrations in this manual. This is also the case for special orders or when the device has been modified in line with new technology.

NOTE!
Read this manual carefully and thoroughly before any operation of the device, and especially before turning it on!
Manufacturer is not liable for any damages or faults caused by:
- violation of advice concerning operation and cleaning;
- use other than designed;
- alterations made by user;
- use of inadequate spare parts.
We reserve the right to make technical changes for purposes of developing and improving the useful properties.
1.4 Copyright protection
The instruction manual including any texts, drawings, images or other illustrations is copyright. No part of this publication may be reproduced, transmitted or used in any form or by any means without permission in writing from the manufacturer. Any person who commits any unauthorized act in relation to this publication shall be liable to claims for damages. All rights reserved.

NOTE!
The contents, texts, drawings, pictures and any other illustrations are copyright and subject to other protection rights. Any person unlawfully using this publication is liable to criminal prosecution.
1.5 Declaration of conformity

The device complies with the current standards and directives of the EU. We certify this in the EC declaration of conformity. If required we will be glad to send you the according declaration of conformity.
2.Safety
This section provides an overview of all important safety aspects.
In addition every chapter provides precise safety advice for the prevention of dangers which are highlighted by the use of the above mentioned symbols.
Furthermore, attention should be paid to all pictograms, markers and labels on the device, which must be kept in a permanent state of legibility.
By following all the important safety advice you gain an optimal protection against all hazards as well as the assurance of a safe and trouble-free operation.
2.1 General information
This device is designed in accordance with the presently applicable technological standards. However, the device can pose a danger if handled improperly and inappropriately.
Knowing the contents of the instruction manual as well as avoiding mistakes and thus operating this device safely and in a fault-free manner is very essential to protect yourselves from the hazards.
To prevent hazards and to ensure optimum efficiency, no modifications or alterations to the device that are not explicitly approved by the manufacturer may be undertaken.
This device may only be operated in technically proper and safe condition.
2.2 Safety instructions for use of the device
The specifications regarding the industrial safety are based on the Regulations of the European Union applicable at the time of manufacturing the device.
If the device is used commercially, the user is obliged to ensure that the said industrial safety measures concur with the state of the rules and regulations applicable at the time in question for the entire period of use of the device and to comply with the new specifications.
Outside the European Union, the industrial safety laws applicable at the place of installation of the device and the regional territorial provisions must be complied with.
Besides the industrial safety instructions in the instruction manual, the general safety and accident prevention regulations as well as environment protection regulations applicable for area of application of the device must be followed and complied with.
! CAUTION!
The device can be used by children 8 years and up, as well as by people with disabilities and those with limited experience/knowledge as long as they are under supervision or have been instructed on proper use of the device and its possible dangers.
○ Children should not play with the device.
○ Cleaning and maintenance cannot be performed by children younger than 8 years old and must be done under supervision.
○ Children under the age of 8 years old must be kept away from the device and its power cord.
- Please keep these instructions and give them to future owners of the device.
○ All people using the device should follow the instructions and tips contained in these instructions.
○ Only use the device indoors.
2.3 Intended use
Safe operation is only guaranteed when using the device for its intended purpose.
Any technical interventions, as well as assembly and maintenance are to be made by a qualified customer service only.
The device is intended for home use or in similar places such as:
- in kitchens for store or office employees or in other service locations;
- in suburban properties;
- by guests of hotels, motels and other places of accommodation;
- in Bed & Breakfasts.
The deep freezer is intended only for freeing and long-term storage of appropriate food products and for producing ice cubes.

CAUTION!
Any use going beyond the intended purpose and/or any different use of the device is forbidden and is not considered as conventional.
Any claims against the manufacturer or his authorized representative as a consequence of experiencing damages resulting from unconventional use are impossible.
The operator is liable for all damages resulting from inappropriate use.
3. Transport, packaging and storage
3.1 Delivery check
Please check the delivery upon completeness and transport damage immediately after receipt. In case of visible damage do not accept or accept the delivery with reservation only.
Note the extent of damage on the carrier's bill of delivery. Trigger off the complaint. Hidden damages should be reclaimed immediately after notice, as claims for damages can only be asserted within the effective period for complaints.
3.2 Packaging
Please do not throw away the covering carton of your device as it might be useful for storage purposes, when moving or, in case of damages, when the device must be sent back to a repair center. The outer and inner packing material should be removed completely from the device before installation.

NOTE!
If you liked to dispose the packing, consider the regulations applicable in your country. Supply re-usable packing materials to the recycling.
Please inspect the device upon completeness. In case any part is missing please contact our customer service center immediately.
3.3 Storage
Keep the package closed until installation and under consideration of the outside indicated positioning- and storage markings.
Packages should be stored under consideration of the following:
- Do not store outdoors.
- Keep it dry and dust-free.
- Do not expose it to aggressive media.
- Do not expose it to direct sunlight.
- Avoid mechanical shocks and vibration.
- In case of longer storage (> 3 months) make sure you check the state of the packaging and the parts regularly. If required refresh or renew.
4. Technical data
4.1 Overview of parts
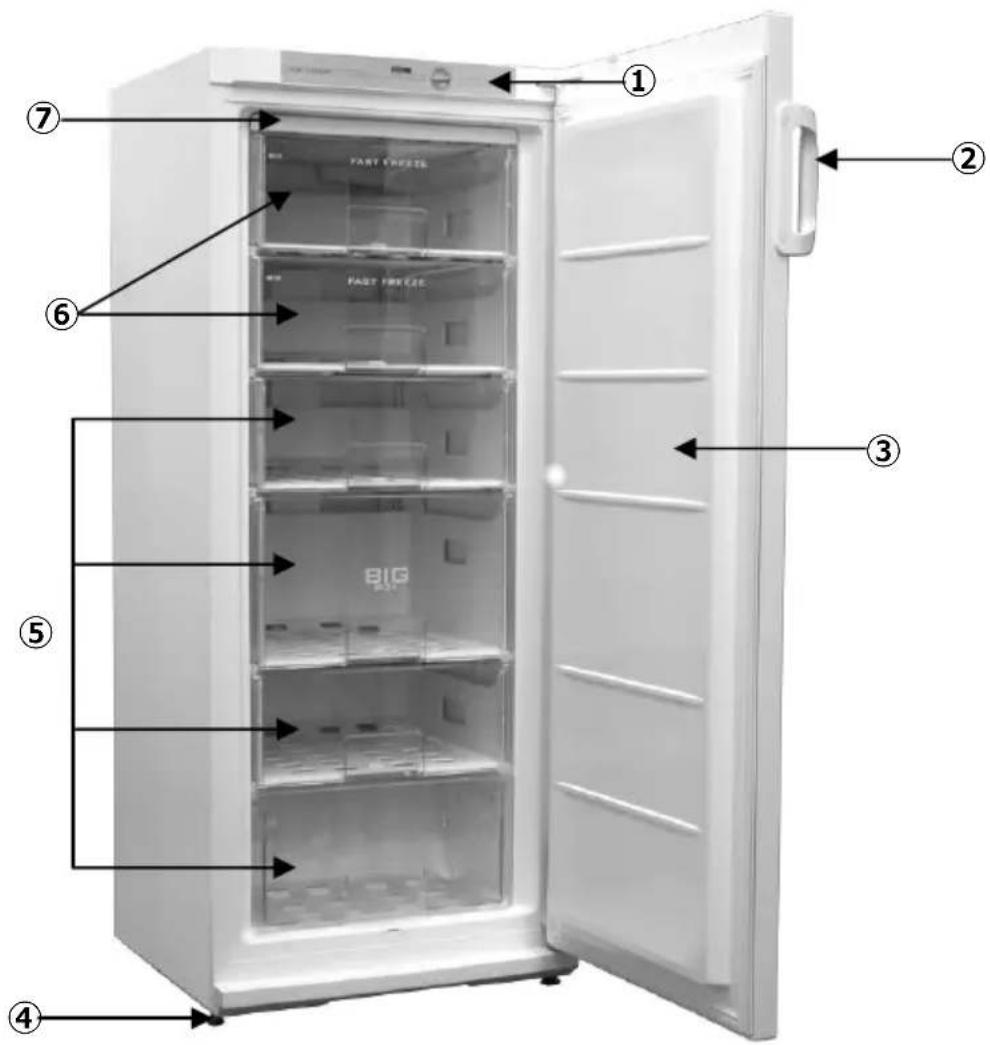
① Control panel and indicators
② Door handle
③ Door
④ Adjustable legs
⑤ Drawers for frozen products (4)
⑥ Flash-freeze chambers (2)
⑦ Ice cube tray
Indicators and controls
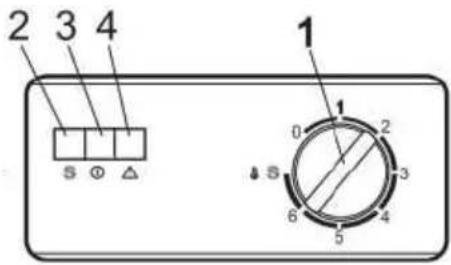
1 Temperature regulator (levels: 0-6, S)
Temperature regulation is deactivated when the dial is set to „0“.
Turning the dial clockwise will reduce the temperature.
2 S Flash-freeze control light (yellow)
When flash-freeze mode is activated the yellow control light will come on (5.3 „Freezing food products“).
3 ① Standby light (green)
This light comes on when the device is connected to a power source.
4 ! Temperature warning light (red)
This light comes on when the temperature inside the device rises above -9^ .
4.2 Technical specification
| Name | Deep freezer 200 LN |
| Code-no.: | 700341 |
| Construction: | Interior white, exterior white, hinges may be placed at either side of door |
| Coolant: R600a | |
| Operating temperature: to -18°C | |
| Ambient temperature: +16°C to +32°C | |
| Energy class: A+ | |
| Net capacity: 196 litres | |
| Power: 0.165 kW / 230 V / 50 Hz | |
| Dimensions: W 600 x D 590 x H 1 450 mm | |
| Weight: 53.0 kg | |
| Accessories: ice cube tray | |
We reserve the right to make technical changes!
5. Installation and operation
5.1 Safety instructions
DANGER! Electrical hazard!
The device must only be connected to a properly installed single socket with protective contact.
Never remove the power cable by pulling the cable itself; always grab the plug housing.
- Never allow the power cable to come into contact with heat sources or sharp edges. The power cable should not hang over the side of the working surface. Ensure that no one can step on or trip over the cable.
- The power cable must not be folded, bent or tangled, and must always remain fully unrolled.
- Never place the device or other objects on the power cable.
- Do not lay the cable over carpets or heat insulations. Do not cover the cable. Keep away the cable from operating range and do not dunk it into water.
- Do not use the device in case it does not function properly, has been damaged or dropped.
- Do not use any accessory or spare parts that have not been recommended by the manufacturer. These can be dangerous for the user or lead to damages of the device or personal injury, and further, the warranty expires.
- Do not store heavy, poisonous or corrosive materials or objects inside the device.
- Do not drill holes in the device and do not mount any objects on it.
- Attention! During transport, protect the device from atmospheric conditions (rain, snow, humidity).
- Do not allow any element of the cooling system (e.g. compressor) to be damaged, as this may lead to leakage of the coolant.

WARNING!
In the event of coolant leakage, disconnect the device from its power source by removing the plug from its socket and contact a service centre.
5.2 Installation and connection
Preparing the device for use
NOTE!
Two people are needed to set the device up!
- Remove packing material from the device.
- Remove the device from its foam base. Remove all packing tape. If there is any Styrofoam between the rear wall of the device and the condenser, remove it as well.
Attention! The deep freezer is equipped with a rotating door handle. To avoid dislodging the handle, do not use it to lift or to move the device.
- During setup, the front portion of the device can be tilted slightly backwards in order to make it easier to transport the device on wheels to another location.
- Remove the red adhesive tape strips which are only necessary during transport.
- Attention: after opening the door a small, red element will fall out – this is only needed during transport.
- All packing materials should be turned over for recycling.
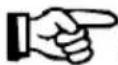
- Remove the two spacers (1) and place them in the guides (2) at the top of the device's rear wall (fig. 1).
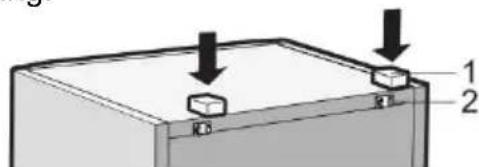
Fig. 1
Setup
- Place the device in a dry area with good ventilation.
- Never place the device on a flammable surface.
- Do not place the device near an open flame, electric oven or other source of heat, as well as in direct sunlight. Heat may damage the device's surface and lead to reduced efficiency.
- To avoid damage to the compressor, during transport and setup do not tilt the deep freezer further than 45^ . Be careful in handling the condenser and door of the device as damage to either element will result in problems using the device.

CAUTION!
Do not place nor use the device in unheated spaces nor on a balcony!
- Do not place the deep freezer in areas with high humidity, as this may damage the device and reduce its cooling output.
- Do not cover or clog the ventilation openings at the top of the device. Ensure free air circulation.

- Maintain a minimum of 10 cm between the top of the device and objects located above it (e.g. cupboards). Failure to do so may result in increased energy use or overheating of the compressor (fig. 2).
- If the device is located in the corner of a room, maintain a minimum of 6 cm at the sides in order to open the door wide enough to enable access to drawers (fig. 3).
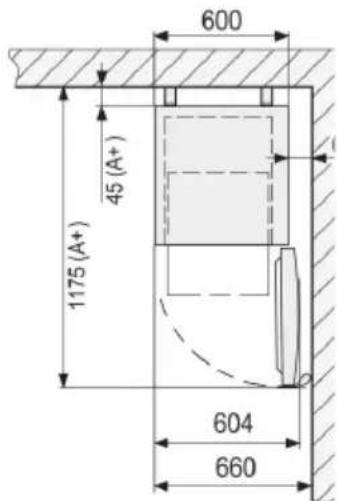
Fig. 3
- Place the device on a flat, level surface; it may not lean against a wall.
- In order for the door to close automatically, adjust the device's legs to make it tilt back slightly. To do this, gently lift the device at its front until the legs are above the floor.
Connecting the device
DANGER! Electrical hazard!
Improper connection of the device to a power source may lead to injury from electric shock!
Before installing, compare the local network's parameters with the rating plate on the device.
Only connect the device to a power source when it is compliant with all parameters. Follow all safety rules!
- Attention! If the device is tilted further than 30^ , wait a minimum of 4 hours before connecting it to a power source. Failure to wait may lead to damage to the compressor.
- The socket and circuit must be secured to a minimum of 16A. Only connect the device to a wall socket, do not use power strips or splitters.
- Locate the device so that the plug is easily accessible in case it is necessary to quickly disconnect the device from its power source.
Changing the door's direction (fig. 4, 5)
- If necessary, the direction in which the door opens can be changed. A size 8 and size 10 wrench is necessary, as well as a Philips screwdriver.
! CAUTION!
When adjusting the door's opening direction, do not set the deep freezer vertically!
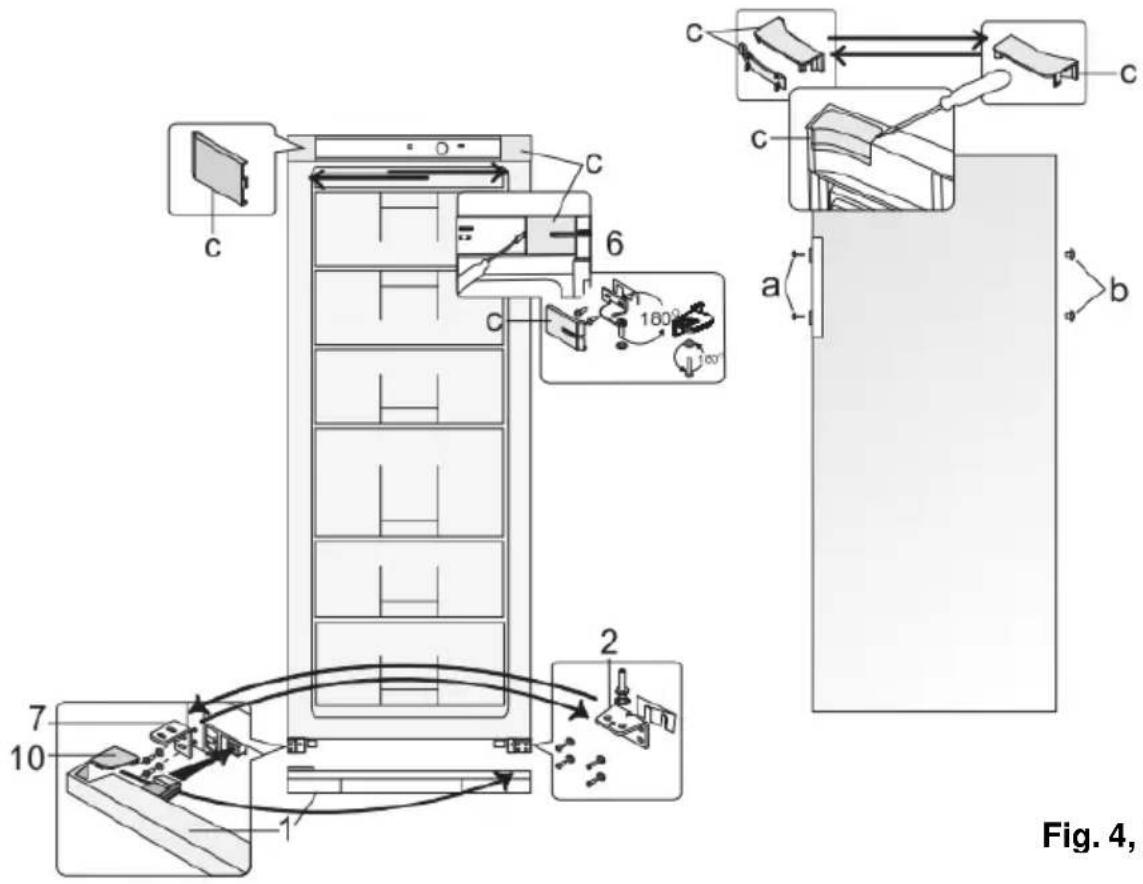
Fig. 4, 5
- Warning! Prior to changing the direction of the door, disconnect the device from its power source by removing the plug from its socket.
• Perform the following steps in the order they are given:
- Open the device's door.
- Remove the four covers (c) located on the housing and at the inside of the door.
- Rotate the cover flap by 180^ and place it at the other side.
-
Unscrew the pin on the inside of the door in area (c)/(6). Attention! Hold on to the door of the device.
-
Remove the door from the device.
- Unscrew the upper fastening (6). Be careful with the plastic plate under the fastening.
- Rotate the fastening (6) and plastic plate 180^ then screw in at the two openings next to each other on the other side of the device.
- Remove the lower shield panel (1).
- Unscrew the fastening with (2) pin.
- Unscrew the pin and washer from the fastening, then screw it into the opening at the other side of the fastening.
- Remove the fastening (7) and replace it with the fastening (2) with pin.
- Place the fastening (7) in the previous location of the fastening (2).
- Place the door on the fastening pin (2). Attention! Hold on to the door.
- Replace the fastening pin (6) in the door.
- Cover the fastening and open holes using the shields (c).
- Remove the shield (10) from the shield panel (1) and place it on the other side.
- Replace the shield panel (1) on the device.
- To mount the handle at the other side of the door, remove the screw caps (a) and plugs (b).
- Unscrew the screws from the door handle. Place the handle on the other side of the door. Insert the plugs into the remaining openings in the door, and place the screw caps on the screw.
5.3 Operation
Before first use!
- Before first use, clean the device (6.2 „Cleaning“).
- Connect the device to a single, grounded outlet.
- The green standby light will come on. The fan will come on and operate without interruption.
Temperature regulation
- The temperature is factory set at -18^ C . The user may regulate the temperature according to his individual needs.
- The temperature can be regulated using the 6-degree dial:
When set to „0“ the compressor is deactivated. The device remains connected to its power source.
Turning the dial clockwise will lower the temperature. The lowest temperature (strongest cooling) is achieved when the dial is set to „6“.
NOTE!
Set the dial to „3“, then adjust in case of excessive cooling to „1-3“ or in case of insufficient cooling to „3-6“.
• After initial activation, wait for around 2-3 hours to place food inside the device so it has time to reach the desired temperature.
Freezing food products
- In order to freeze fresh food products, activate flash freezing mode: turn the temperature dial to the position marked „S“. The yellow flash freezing control light will come on. When this mode is activated the compressor will operate continually.
- Flash freezing chambers are marked with the symbol .
- Place food products intended for freezing into one of the flash freezing chambers, the close the chamber and the door of the freezing cabinet.
• After 24 hours, remove the frozen food products from the flash freezing chamber and place them in one of the drawers located below. - Turn the temperature dial to its original position. The yellow flash freezing control light will go off.

CAUTION!
Flash freezing mode does not deactivate automatically.
Do not leave the device in flash freezing mode for longer than 3 days, as this may result in damage to the compressor!

CAUTION!
Do not exceed the maximum volume of frozen products for a 24 hour period (12 kg).
- Maintain a minimum distance between frozen products of 2.5 ~mm (fig. 6).
Food products that are not yet frozen must not come into contact with products already frozen.
- Freeze only suitable products that can handle low temperatures.
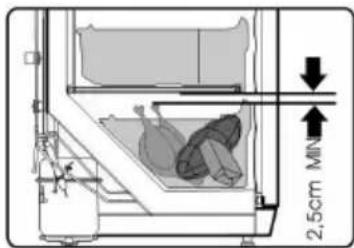
Fig. 6
- Only freeze fresh products.
- Select the appropriate packaging for a given food product. Packaging may not allow air or humidity to escape, as this may result in dried-out products. Plastic and paper bags must be soft and flexible to ensure that they cling to their contents.
Do not place unpacked food products into the deep freezer.
- Do not place glass bottles filled with liquid inside the device. Because liquids expand when frozen, glass bottles may shatter inside the device.
- Do not re-freeze products that have partially or entirely thawed. Such products should be cooked within 24 hours.
- Follow manufacturer's instructions for freezing particular food products.
- For best results, freeze and thaw food products in small portions. This ensures quick and even freezing and thawing. It is recommended to label food products by writing the date and contents on their packaging.
- The device's temperature may briefly rise when freezing a large number of fresh food products. This will not impact previously frozen products.
- Avoid opening the device's door when freezing is in progress.
- Ensure that the proper temperature setting is selected to avoid excess energy consumption.
- In case of a power failure or other malfunction, avoid opening the device's door. This will help delay a rise in temperature inside the device.
Storing frozen food products
- Follow instructions on packaging concerning storage of food products. If no information is given, food products should remain frozen for a maximum of 3 months following purchase.
- Follow these guidelines for storage of freshly frozen food products:
➢ fish and cold cuts not longer than 6 months;
➢ cheese, poultry, pork, veal not longer than 8 months;
- beef, fruits and vegetables not longer than 12 months.
- Storage dates and temperature are given on the packaging of factory-frozen food products. Follow manufacturer's instructions when storing and consuming food products.
- Select only properly packaged products containing precise information and which have been stored in freezers at temperatures not higher than -18°C.
- When purchasing deep-frozen food products, they should be transported in appropriate containers or bags to ensure they remain frozen. Place them in the deep freezer as quickly as possible.
- Do not purchase products covered in a layer of frost, as this means they have already thawed several times.
- Protect food products from thawing, as temperature increases will reduce their storage time and have a negative impact on quality.
- Fully or partially thawed products should be consumed without delay. Cold air preserves food products, but does not kill microorganisms. They quickly reactivate and lead to spoilage. Partial thawing results in reduced nutritional value, particular of fruits and vegetables as well as prepared meals.
- Damage or unusual disfigurement of packaging may indicate improper storage and likely spoilage of the food products contained inside.
Producing ice cubes
- The ice cube tray is used for producing ice cubes. Fill the tray's chambers to 34 with potable water.
- Place the tray in one of the flash freezing chambers.
- Leave the ice cubes in the tray for approx. 5 minutes at room temperature, then place them into the cup.
Defrosting
- The device should be defrosted at least twice a year to ensure that the layer of ice does not exceed 5 mm in thickness.
Attention! Before defrosting, disconnect the device from its power source by removing the plug from its socket.
- Remove all food products from the device. To ensure they do not thaw, wrap them in a heavy cloth or other material and place them in a cool location.
- Remove the plastic water channel, turn it 180° and connect place it in the opening (fig. 7). Place a container to catch water underneath.
- Leave the device's door open. After defrosting, wipe the deep freezer and equipment dry.
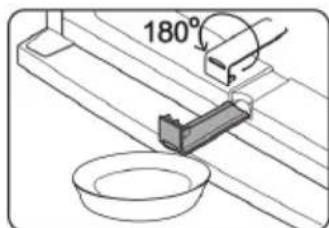
Fig. 7
Attention! Do not use any sharp instruments or other tools to mechanically remove ice!
- Remove the channel, turn it 180° and replace it in its original location.
- Close the device's door. Turn the deep freezer on, and wait for it to reach the required temperature before placing food products back inside.
- In case of an unforeseen power outage, do not open the door more than necessary in order to prevent loss of cool air.
- After a power outage or after the cable is removed from its plug, wait at least 15 min. before connecting the deep freezer to a power source.
- If the device is to remain unused, it should be turned off (set the temperature dial to „0“ and remove the plug from its socket). Defrost the device in the manner described above.
- If the device is to remain unused for a longer period of time, leave its door open.
6. Cleaning and maintenance
6.1 Safety advice
Before beginning with repair or cleaning works make sure the device has been disconnected from power supply.
o Do not use any acid agents and make sure no water ingresses the device.
To protect yourself from electric shock, never immerse the device, its cables and the plug in water or other liquids.

CAUTION!
The device is not suited for direct washing via water jets.
Therefore, you must not use any kind of pressure water jet for cleaning the device!
6.2 Cleaning
- Clean the device regularly.
- Protect the interior surface of the device and all plastic elements from grease, acids and sauces. If they get dirtied, immediately wash the affected areas with warm water and a mild cleaning agent.
Use warm water with a mild cleaning agent to wash the interior and exterior surface of the device. After washing, rinse with clean water. Never use hot water to wash the device! -
Thoroughly wipe dry all washed surfaces.
-
Regularly wash and wipe dry the door seal.
o Regularly wash accessories with warm water (drawers, ice cube tray), wiping them dry before replacing them in the deep freezer.
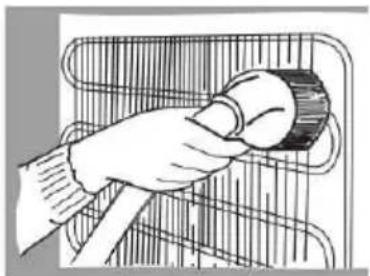
- At least once a year the dust gathered at the rear of the deep freezer and on the compressor.
○ A dirty compressor will negatively impact the device's functioning and increase energy use! Attention! Never wash the compressor with water!
○ Use a soft, dry brush, electrostatic cloth or hoover for cleaning (fig. 8).
natural_image
Illustration of a hand holding a tool over a curved surface (no text or symbols)Fig. 8
- Never use aggressive cleaning materials such as scouring powder, alkaline substances or substances containing alcohol, solvents or petrol, which may damage plastic elements and paint.
- Do not use scouring brushes or sponges with a scratchy surface.
6.3 Safety instructions for maintenance
- Inspect the power cable regularly for damage. Never use the device if the cable is damaged. If the power cable is damaged, have an authorised service center or qualified electrician replace it.
- In case of damage or malfunction, please contact your stockist or our customer service centre. Pay attention to the troubleshooting tips in pt. 7.
○ Only a qualified technician and using original spare parts and accessories should carry out repairs and maintenance of the device. Do not attempt to repair the device yourself.
7. Possible Malfunctions
| Problem Cause | Solution | |
| The device is connec-ted but does not work, the green standby light does not come on. | · The plug is not properly inserted in the socket.· Damaged safety fuse.· Power outage. | · Insert the plug properly into the socket.· Check the power source.· Check the power source. |
| The red temperature light is on. | · The device is turned on for the first time or has been turned off for a long time (e.g. to defrost or following a power outage).· The device's door is open or have been opened and closed often.· The device contains a large amount of fresh products and the temperature inside the device has risen above -9°C. | · Identify the cause and fix it if possible. If the temperature light remains on for over 6 hours, this means that the compressor is either working continually or is not turning on. In this case contact a service centre or sales agent. |
| Temperature inside the device is too high, breaks in the functioning of the compressor are short. | · The device's door is not fully closed or has been left open for too long.· Too many products inside the device.· The products inside the device are too warm. | · Close the door, do not leave it open for too long.· Remove unnecessary products from the device.· Prior to freezing, cool products to room temperature. |
| The device is getting louder. | · The deep freezer is not on a level surface.· The deep freezer is leaning against a wall or other objects. | · Place the deep freezer on an even surface.· Ensure appropriate distance between the device and walls or other objects. |
| When the door is opened the rubber sealing tape comes off | · Dirty seal (e.g. with a sticky product such as syrup, grease). | · Wash the seal and the crevice underneath, dry and replace the seal. |
| The device's surface is frosted over. | · Ambient humidity is over 70%. | · Air out the room, eliminate the cause of the humidity if possible. |
The malfunctions listed in the table above are only for reference purposes and should be considered examples. If the aforementioned or other problems occur, immediately turn the device off and stop using it. If the malfunction cannot be fixed, contact a service centre or sales agent.
The following are neither malfunctions nor defects:
A short, loud whistle or clicking when the device's compressor comes on.
The sound of running water. This sound can be heard when the device is functioning normally – it comes from the flow of coolant.
8. Waste disposal
Discarding old devices
At the end of its service life the discarded device has to be disposed in accordance with the national regulations. It is advisable to contact a company which is specialized in waste disposal, or just contact the local disposal service in your community.

WARNING!
To exclude any abuse and the dangers involved make the waste device unfit for use before disposal. For that purpose disconnect device from mains supply and remove mains connection cable from the device.

NOTE!
For the disposal of the device please consider and act according to the national and local rules and regulations.
Bartscher GmbH
4.2 Indications techniques
Fig. 1
Installation
natural_image
Hand holding a tool inside a cylindrical device (no text or symbols visible)Fig. 8
4. Specifications 67
Afb. 1
Plaatsing
natural_image
Hand holding a tool inside a cylindrical device (no text or symbols visible)Afb. 8
Rys. 1
Ustawienie
natural_image
Illustration of a hand holding a small object over a curved surface (no text or symbols)Rys. 8

- Bedienungsanleitung
- Tiefkühlschrank
- Instruction manual
- Deep freezer
- Mode d'emploi
- Aufstellen
- of the original instruction manual
- Read these instructions before using and keep them available at all times!
- General information 22
- 2.Safety 24
- Transport, packaging and storage.... 26
- Technical data 27
- Installation and operation.... 29
- Cleaning and maintenance.... 37
- Possible Malfunctions 39
- Waste disposal 40
- Information about the instruction manual
- Key to symbols
- WARNING!
- DANGER! Electrical hazard!
- CAUTION!
- NOTE!
- Liability and Warrantees
- Copyright protection
- Declaration of conformity
- 2.Safety
- General information
- Safety instructions for use of the device
- ! CAUTION!
- Intended use
- Transport, packaging and storage
- Delivery check
- Packaging
- Storage
- Technical data
- Overview of parts
- Indicators and controls
- Temperature regulator (levels: 0-6, S)
- S Flash-freeze control light (yellow)
- ① Standby light (green)
- ! Temperature warning light (red)
- Technical specification
- Installation and operation
- Safety instructions
- Installation and connection
- Attention! The deep freezer is equipped with a rotating door handle. To avoid dislodging the handle, do not use it to lift or to move the device.
- Setup
- Connecting the device
- Changing the door's direction (fig. 4, 5)
- Operation
- Before first use!
- Temperature regulation
- Freezing food products
- Do not place unpacked food products into the deep freezer.
- Storing frozen food products
- Producing ice cubes
- Defrosting
- Attention! Before defrosting, disconnect the device from its power source by removing the plug from its socket.
- Attention! Do not use any sharp instruments or other tools to mechanically remove ice!
- Cleaning and maintenance
- Safety advice
- Cleaning
- Safety instructions for maintenance
- Possible Malfunctions
- Waste disposal
- Discarding old devices
- Indications techniques
- Installation
- Specifications 67
- Plaatsing
- Ustawienie
Brand : BARTSCHER
Model : 200LN
Category : Freezer