
Lunaris PT 3011 - Multi-cooker AMICA - Free user manual and instructions
Find the device manual for free Lunaris PT 3011 AMICA in PDF.
| Product type | Multi-function steam cooker |
| Brand | Amica |
| Model | Lunaris PT 3011 |
| Rated voltage | AC 220-240 V ~ 50/60 Hz |
| Rated power | 755-900 W |
| Display screen | LCD |
| Power cord | ~1 m |
| Automatic cooking programs | 7 (Eggs, Fish, Vegetables, Meat, Chicken, Rice, Keep Warm) |
| Timer range | 1-99 min |
| Automatic temperature maintenance | Yes (approx. 20 min) |
| Water level sensor | Yes |
| Overheat protection | Yes |
| Water tank | 1.1 L |
| Number of steam containers | 3 (lower, middle, upper) + drip tray + rice/soup bowl |
| Rice/soup bowl | Yes |
| Cable storage | Yes |
| Automatic shut-off | Yes (after inactivity or end of program) |
| Audible signal | Yes (start, end, alert) |
| Automatic descaling reminder | Yes (after 15 hours of cooking) |
| Maintenance and cleaning | Hand wash with mild detergent; do not immerse the tank; do not wash in dishwasher |
| Safety | Overheat protection, lid with ventilation openings, mandatory grounding |
Frequently Asked Questions - Lunaris PT 3011 AMICA
User questions about Lunaris PT 3011 AMICA
0 question about this device. Answer the ones you know or ask your own.
Ask a new question about this device
Download the instructions for your Multi-cooker in PDF format for free! Find your manual Lunaris PT 3011 - AMICA and take your electronic device back in hand. On this page are published all the documents necessary for the use of your device. Lunaris PT 3011 by AMICA.
USER MANUAL Lunaris PT 3011 AMICA
natural_image
Modern kitchen steamer with digital display and control buttons (no visible text or symbols on main body)PL INSTRUKCJA OBSŁUGI 2
EN USER MANUAL 6
CS NÁVOD K OBSLUZE 10
SK NÁVOD NA OBSLUHU 14
text_image
Exploded diagram of a cooking appliance with numbered parts for identification
text_image
MIN 88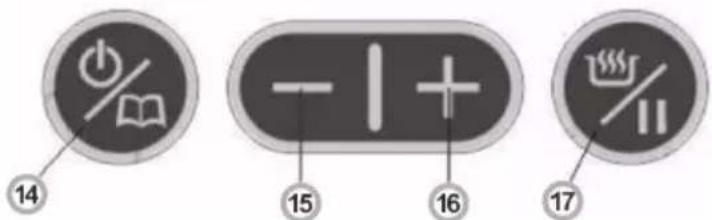
text_image
14 15 16 17PRZED PIERWSZYM UŻYCIEM:
SAFETY INSTRUCTIONS FOR USE
Note! To reduce the risk of fire, electric shock or personal injury, read this manual carefully before using the appliance.
• Children do not realize the dangers that can arise when using electrical appliances; therefore keep the kettle out of reach of children.
- Do not immerse the body of the appliance in water or other liquids. Immersing in water may cause an electric shock.
- If water spills on the external components of the appliance, dry it thoroughly before switching back on.
- Do not use the appliance if it shows any signs of damage to the power cord, or if the appliance has been dropped on the floor.
• After use, always pull out the plug from the socket, and also in case of any malfunction or before cleaning.
- When pulling out the plug from the wall outlet, never pull by the cord, only the plug, holding the socket with your other hand.
- This is a class I electrical shock protection appliance, and therefore power outlet to which it is connected to must be equipped with grounding pin.
- Do not attempt to remove any parts of the housing.
- To prevent damage to the power cord, do not place it over sharp edges or close to hot surfaces.
- Do not expose the appliance to rain or humidity, and do not use it outdoors. Do not operate the appliance with wet hands.
- If the power cord or plug is damaged, it should be replaced by a professional repair shop in order to avoid hazard.
- Never leave the appliance plugged in to power without supervision.
- This appliance is not intended for use by persons (including children) with physical, mental or sensory handicaps, or by persons inexperienced or unfamiliar with the appliance, unless under supervision or in accordance with the instructions as communicated to them by persons responsible for their safety. Children shall not play with the appliance.
- Using attachments that were not supplied with the product may cause damage to the appliance.
- Before use, extend and straighten the power cord.
- Do not use an extension cord which does not meet the applicable electrical standards and regulations.
- Do not attempt to remove any parts of the housing or insert any objects into the appliance.
- Never fill the appliance with water above the maximum level indicated.
- Disconnect the appliance from the power supply be-
fore adding water to the reservoir.
- Unplug the appliance from the wall socket before adding water to the reservoir.
• Empty the water reservoir after use.
- When placing the appliance on a base, make sure it is stable.
- The appliance generates a large amount of hot steam during operation. Always use oven mitts to avoid burns. Always pick up the lid slowly making sure steam will escape away from you.
- Make sure the baskets are stacked on the appliance correctly, fit well and are stable.
- Before taking the appliance apart, make sure it has cooled down completely.
- Do not move the appliance containing hot food.
• Under no circumstances should you touch the steam chamber — it is very hot.
- During cooking do not reach into the appliance. To check the temperature take the food out with a long spoon or fork. Do not lean over the appliance during operation.
- Do not use the appliance near furniture, as hot steam can damage the surfaces.
- Do not use the appliance when not fully assembled.
- The appliance generates heat. Be cautious when using the appliance.
- Unplug the appliance from the power outlet and wait until it cools down before
cleaning.
- The appliance is designed for cooking food — do not use it for any other purpose.
- Appliance components are not suitable for washing in the dishwasher.
- Do not add to the water any sugar, salt, pepper, spices, wine, olive oil and other such additives. This can irreversibly damage the appliance.
- Warning: there is a risk of burns from escaping steam. Observe all safety precautions when using the appliance.
- Electrical requirements: Make sure that the voltage indicated on the nameplate corresponds to that of your home electrical mains. Alternating current must be used, typically marked \~.

In accordance with European Directive 2012/19/EU and Polish legislation regarding used electrical and electronic goods, this appliance is marked with the symbol of the crossed-out waste container. This marking indicates that the appliance must not be disposed of together with other household waste after it has been used.
The user is obliged to hand it over to waste collection centre collecting used electrical and electronic goods. The collectors, including local collection points, shops and local authority departments provide recycling schemes.
Proper handling of used electrical and electronic goods helps avoid environmental and health hazards resulting from the presence of dangerous components and the inappropriate storage and processing of such goods.
SPECIFICATION:
Model - PT 3011 / PT 3012
Rated voltage - AC 220-240V \~ 50-60Hz
Rated power - 755-900 W
Display - YES - LCD
Power cord - \~1 m
Automatic cooking programmes - YES / 7
Time control - YES / 1-99 min
Automatic keep food warm - YES
Water level sensor - YES
Water reservoir - 1.1 L
Number of baskets - 3
Rice or soup bowl - YES
Overheating protection - YES
Power cord storage - YES
FEATURES AND COMPONENTS
-
Lid with venting holes
-
Rice or soup bowl
-
Top steaming basket
-
Base of the top basket (detachable)
-
Middle steaming basket
-
Base of the middle basket (detachable)
- Bottom steaming basket
- Drip tray
- Diffuser
- Water inlet with scale
- Control panel with LCD display
- Water reservoir
- Motor unit
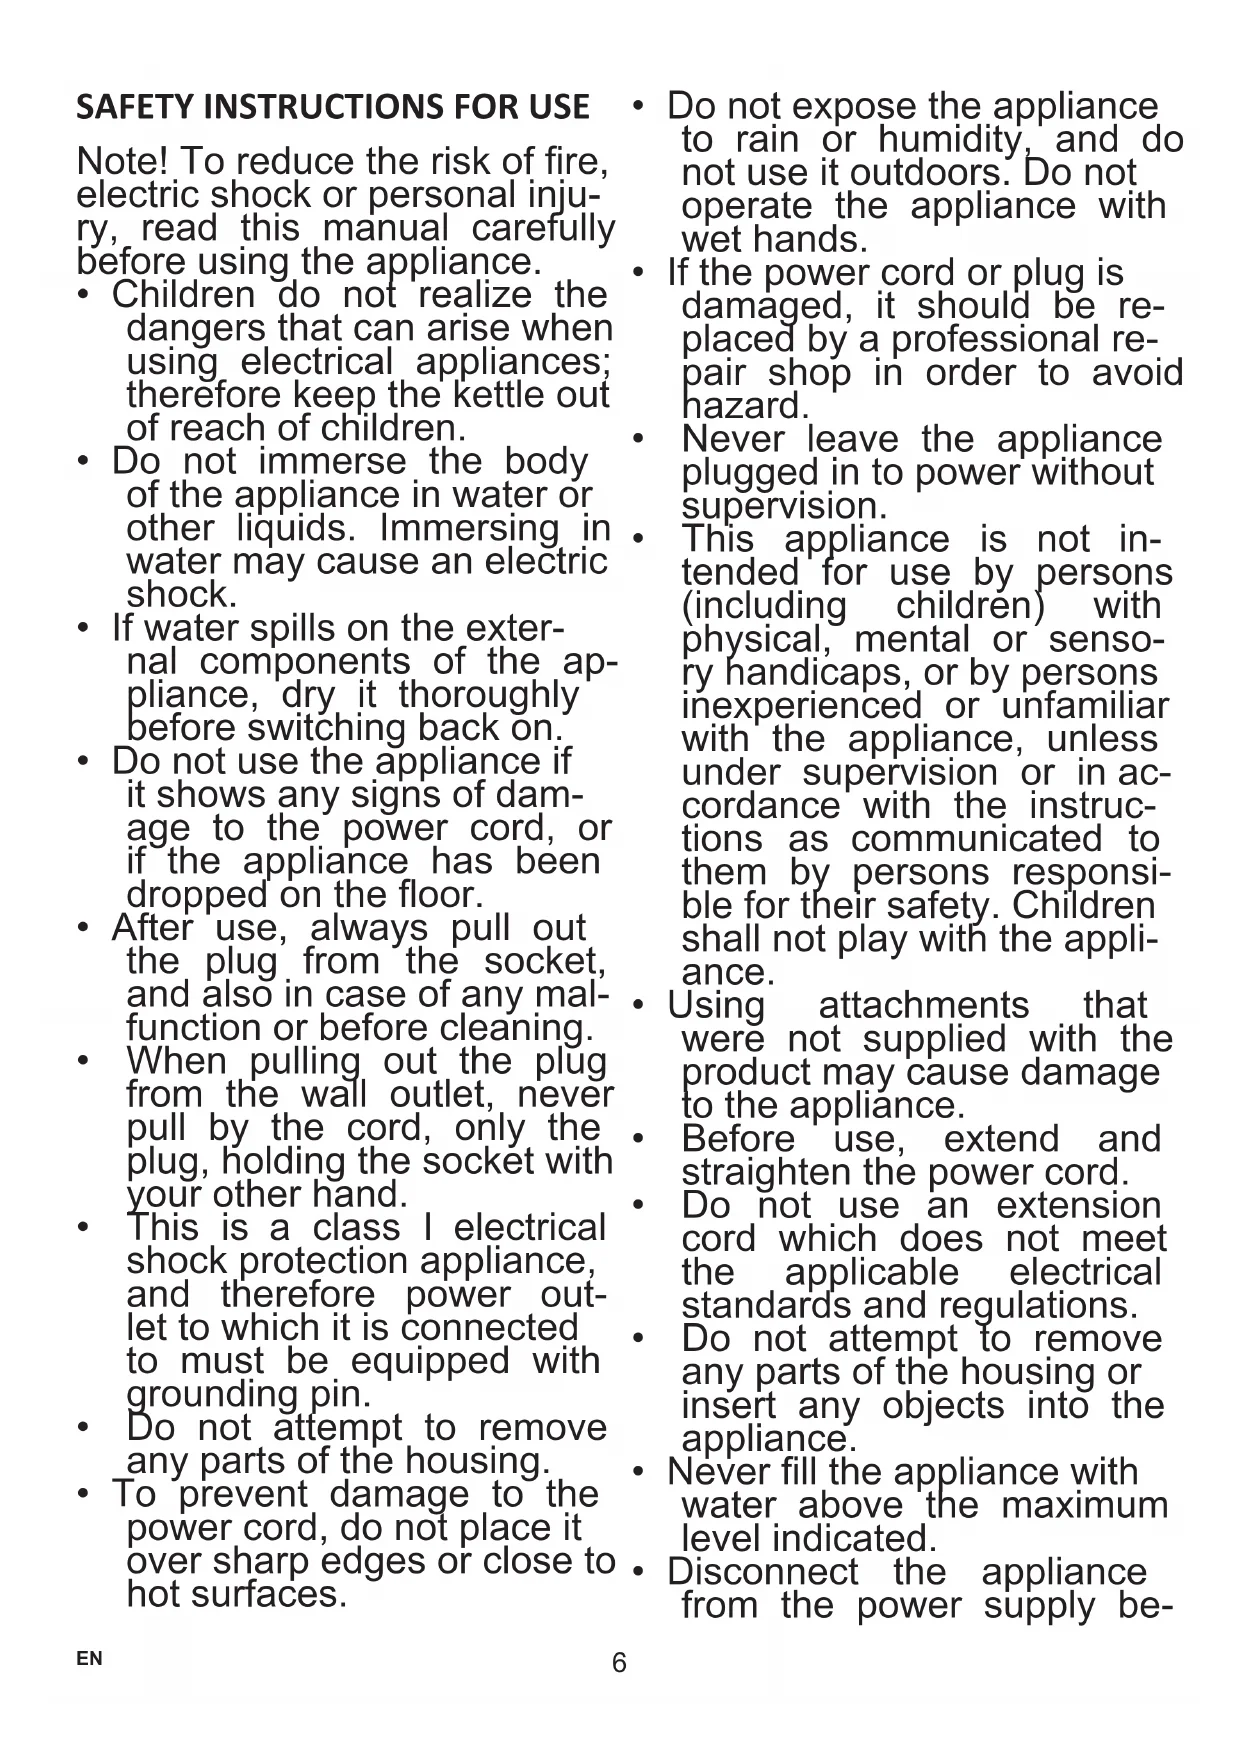
- On / off switch; menu button
- Reduce time “-”
- Add time "+"
- Start / pause

text_image
Exploded diagram of a cooking appliance with numbered parts for identification
text_image
MIN 88 14 15 16 17BEFORE FIRST USE:
- Unpack the appliance and check if the kit contains all the accessories.
- Remove any protective film and tape.
- Wash all elements (except the base unit with water reservoir) in warm water and mild detergent, then wipe dry with a cloth.
- Wipe the base unit with a damp cloth, then dry thoroughly.
COOKING:
- Place the appliance on a stable, flat surface.
- Pour enough water into the reservoir. Do not exceed the maximum water level in the reservoir. Depending on the method of filling pay attention to the "MIN" and "MAX" marks inside the reservoir and the water inlet.
- Place the drip tray with flavour infuser in the appliance and make sure that it is installed firmly in place.
- Depending on the amount of food you want to cook, place the appropriate number of baskets with food in the correct order (fit correct bases in baskets). Make sure the assembled appliance is stable. Place larger items of food that will take more time to cook in the bottom basket.
There is strainer in the middle of the drip tray where you can put fresh or dried herbs to spice up your dishes.
- Connect the appliance to the power supply. The appliance will be in standby mode. The display will light up with all the symbols, and you will hear a beep. The appliance is be ready to set the cooking programme.
- Set the desired programme and then press
- Within 30 seconds, the appliance will produce steam, the symbol will flash on the display. Timer will start countdown and when programme ends the Symbol will be displayed.
- When cooking programme ends you will hear two beeps and the appliance will start to keep food warm. This takes about 20 minutes. The keep food warm symbol is shown on the display, the timer countdown starts until shown. You will then hear five beeps and the appliance will turn off after one minute.
- Using oven mitts or a towel gently lift the lid. Use caution because a large amount of steam accumulated inside the baskets will be released.
While steam coking you can add or reduce the cooking time using the -1+ buttons. You can also adjust time in keep food warm mode. Press START / PAUSE to pause the programme while steam cooking. To end a programme press START / PAUSE button and then On/Off switch.
SET A COOKING PROGRAMME:
The appliance features 7 cooking programmes. Press to select a programme. You will hear a beep and appropriate symbol will be displayed:
| Programme Symbol shown on the display | Cook Time [min] | |
| Egg | 12 | |
| Fish | 15 | |
| Vegetables | 20 | |
| Meat | 30 | |
| Chicken | 35 | |
| Rice 40 |  | |
| Keep food warm |  | 10 |
USE THE KEEP FOOD WARM FUNCTION:
The keep food warm function activates automatically at the end of the cooking programme. It can also be set manually. When you select the keep food warm function, the relevant indicator will appear on the display and the time remaining until the function is turned off. At the end of the programme _00 will be shown on the display, you will hear five beeps and the appliance will turn off after 1 minute.
CUSTOM COOKING TIME:
-
You can set custom cooking time from 1 minute to 99 minutes.
-
When you start the appliance with default settings, adjust cooking time using the 10ons.
-
When you select the desired cooking time press to start the cooking process.
THE AUTO OFF
-
The appliance turns off automatically when it is plugged in and not in use (standby mode). The appliance will turn off after about 1 minute of inactivity and you will hear a beep.
-
The appliance will also turn off after the keep food warm function completes.
-
The appliance will auto power off when you select a programme, set the off-timer but do not confirm by pressing the button.
-
To resume cooking, press
FILL THE WATER RESERVOIR
-
You need to periodically add water during steam cooking.
-
Add water to the reservoir when water level approaches the "MIN" level at the water inlet.
-
When there is not enough water in the reservoir you will hear a beep and the flashing symbol will be shown on the display.
-
When you add more water the beeping will stop and the symbol will be turned off.
CLEANING AND CARE:
-
Before cleaning, make sure the appliance is disconnected from the power source and has cooled completely.
-
Do not immerse the base unit in water or other liquid. Wash the interior with a cloth and a little mild detergent. Wipe the external base unit surfaces with a damp cloth. Wipe dry.
-
Do not use abrasive powder detergents to clean the appliance components. Use a mild detergent and warm water.
-
Appliance components are not suitable for washing in the dish-washer.
-
Always wash all appliance elements after use.
-
Pay particular attention to clean the base unit around the diffuser and the float sensor — dirty float sensor may indicate low water level although there is enough water in the tank.
DESCALE THE APPLIANCE
-
Regular descaling prolongs the appliance life.
-
After every 15 hours of steam cooking (steaming only, keeping food warm does not count) the indicator will be displayed to remind you to descale the appliance.
-
Follow these steps to descale the appliance once you finish steam cooking:
- Add white vinegar in the water reservoir to the "MAX" mark. Do not use any chemicals or other substances.
- Assemble the appliance according to the relevant instructions.
- Plug the appliance into a power outlet.
- Set the cooking time to 25 minutes. If white vinegar starts to boil over, turn off the appliance, allow it to cool and reduce the amount of vinegar in the reservoir.
- After descaling, initiate the cooking process multiple times, changing the water every 5 minutes to eliminate the vinegar odour.
POKYNY K BEZPEČNÉMU POUŽÍ-VÁNÍ
text_image
Exploded view diagram of a cooking appliance with numbered parts for identification


text_image
Diagram showing two oval-shaped structures with labeled parts 4 and 6, possibly illustrating a biological or mechanical process.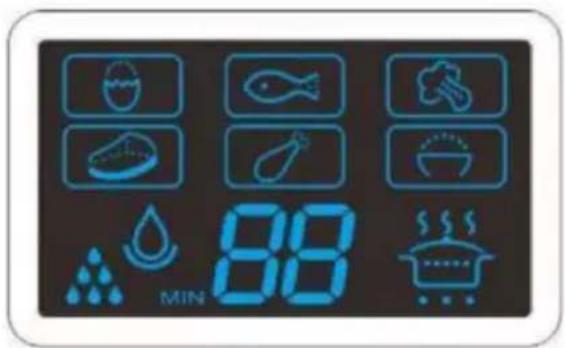
text_image
MIN 88
text_image
14 15 16 17PŘED PRVNÍM POUŽITÍM:
text_image
Exploded diagram of a cooking appliance with numbered parts for identification
text_image
MIN 88
text_image
14 15 16 17PRED PRVÝM POUŽITÍM:
natural_image
Simple line drawing of a cylindrical container with a labeled point (3) on the side, no text or symbols present.
natural_image
Simple line drawing of a cylindrical container with a label pointing to the number 5 (no text or symbols on the container itself)

text_image
Technical diagram of a kitchen appliance with numbered parts for identification


text_image
MIN 88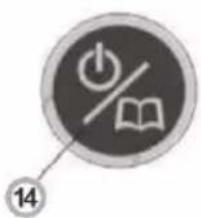
natural_image
Circular icon with power and percentage symbols (no readable text or numbers)
text_image
-1+ 15 16
text_image
Exploded diagram of a cooking appliance with numbered parts for identification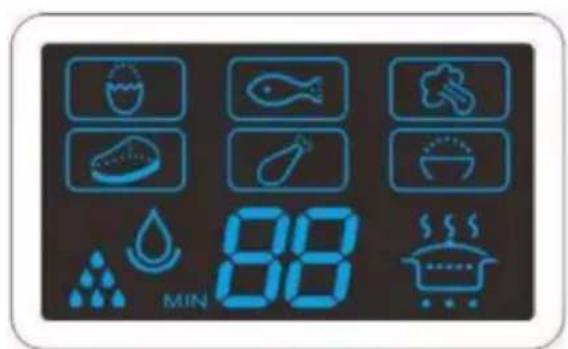
text_image
MIN 88
text_image
14 15 16 17text_image
Exploded diagram of a cooking appliance with numbered parts for identification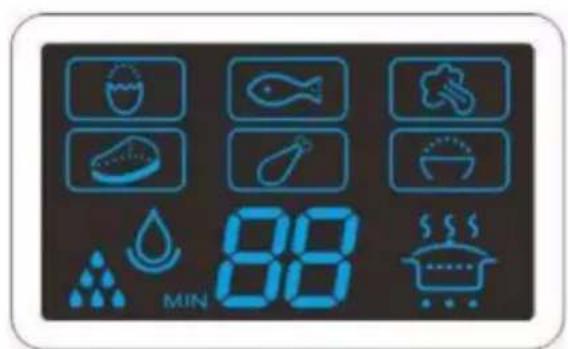
text_image
MIN 88
text_image
14 15 16 17natural_image
Simple line drawing of a cylindrical container with a label pointing to the number 3 (no text or symbols on the container itself)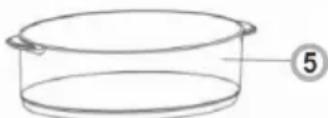


text_image
8 12 9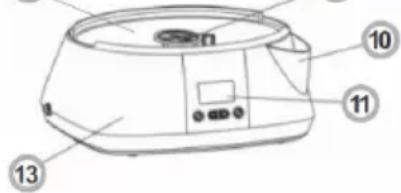
text_image
Technical diagram of a portable appliance with numbered parts labeled 10, 11, and 13


text_image
MIN 88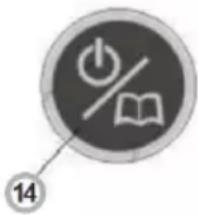
natural_image
Circular icon with power and percentage symbols (no text or numbers)
text_image
-1+ 15 16
text_image
Exploded diagram of a cooking appliance with numbered parts for identification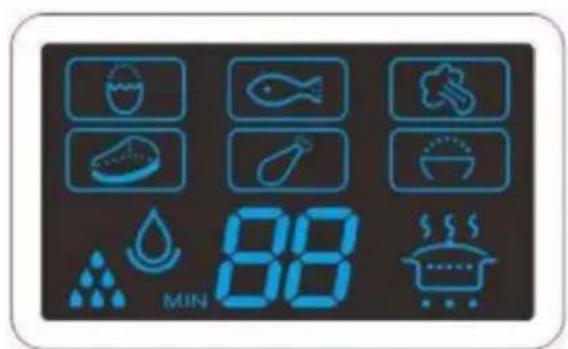
text_image
MIN 88
text_image
14 15 16 17ELSŐ HASZNÁLAT ELŐTT
text_image
Exploded diagram of a cooking appliance with numbered parts for identification
text_image
MIN 88
text_image
14 15 16 17text_image
Exploded diagram of a cooking appliance with numbered parts for identification
text_image
MIN 88