IAN 322004 - Educational toy Playtive - Free user manual and instructions
Find the device manual for free IAN 322004 Playtive in PDF.
| Brand | Playtive |
| Model | IAN 322004 |
| Product type | Educational toy: vehicle track with cave, waterfall, sound bridge and rails |
| Recommended age | 3 to 8 years |
| Number of pieces | 73 (cave, waterfall, bridge, rails, vehicles, figures, etc.) |
| Power supply | 2 x 3V CR2032 batteries (sound bridge and sound rail) + 1 x 1.5V AAA battery (electric vehicle) |
| Main functions | Electric vehicle with forward/reverse, sound bridge, sound rail, decorative waterfall |
| Main material | Plastic |
| Safety | Not suitable for children under 36 months (choking hazard), adult supervision required |
| Cleaning and maintenance | Damp cloth, no harsh chemicals; clean rails before first use |
| Warranty | 3 years (from date of purchase, subject to proper use) |
| Batteries included | Yes (2 CR2032 batteries and 1 AAA battery) |
| Box contents | Cave, waterfall, sound bridge, sound rail element, 25 rails, electric vehicle, trailer, 3 animals, 3 figures, lookout tower, palm trees, plants, accessories, manual |
| Spare parts | Available during warranty period (contact customer service) |
Frequently Asked Questions - IAN 322004 Playtive
User questions about IAN 322004 Playtive
0 question about this device. Answer the ones you know or ask your own.
Ask a new question about this device
Download the instructions for your Educational toy in PDF format for free! Find your manual IAN 322004 - Playtive and take your electronic device back in hand. On this page are published all the documents necessary for the use of your device. IAN 322004 by Playtive.
USER MANUAL IAN 322004 Playtive
Before reading, hold out the ilustrative page and get to know all of the functions of your unit.
图
Klap akon mad fluvatlananoe co indan ekan oen qo par dg ohefalpordo furold mad ola espehreti fikinien
DELTA-SPORT HANDELSKONTOR OMEH
Wingwings & Dct 2337 meeting.

三、备查文件目录
5
M
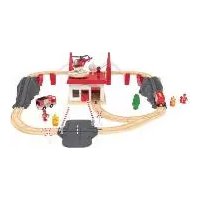
JUNGLE TRAIN SET
Instructions for use
You have chosen to purchase a high-quality product. Familiarise yourself with the product before using it for the first time.

Read the following instructions for use carefully.
Use the product only as described and only for the given areas of application. Store these instructions for use carefully. When passing the product on to third parties, please also hand over all accompanying documents.
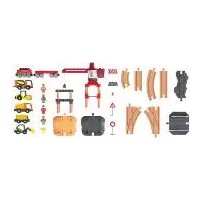
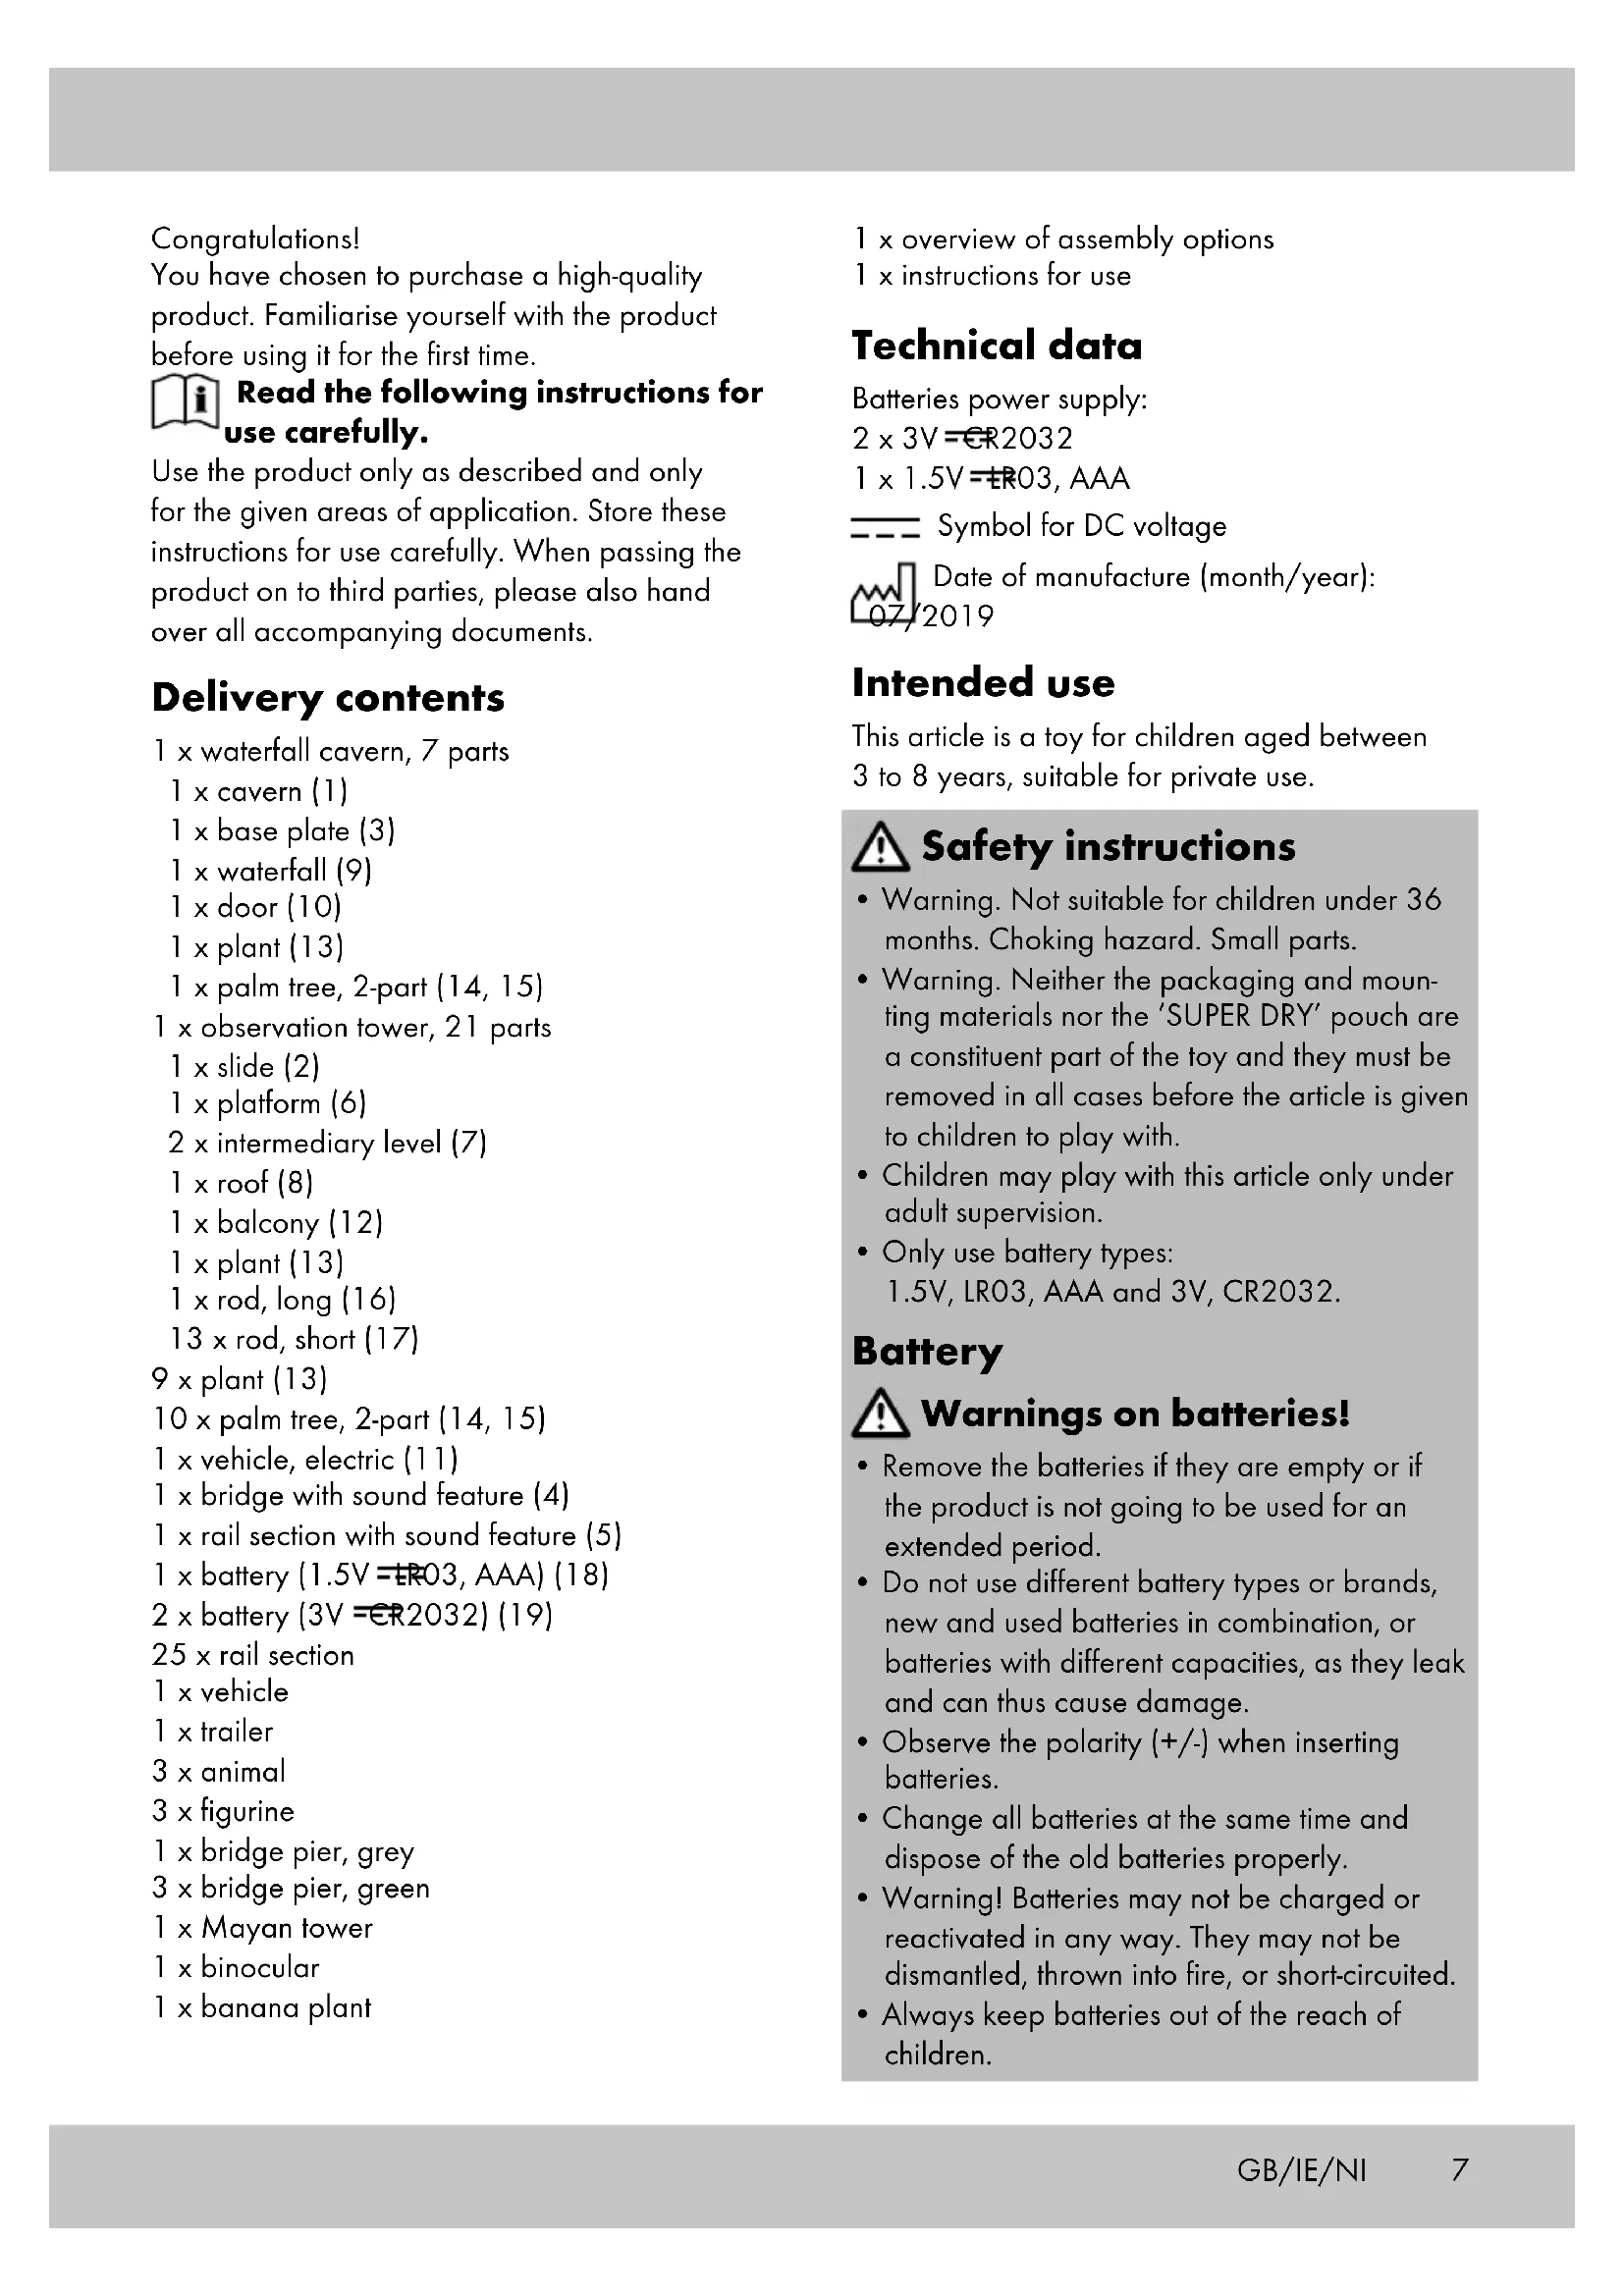
Delivery contents
1 x waterfall cavern, 7 parts
1 x cavern (1)
1 x base plate (3)
1 x waterfall (9)
1 x door (10)
1 x plant (13)
1x palm tree,2-part (14,15)
1 x observation tower, 21 parts
1 x slide (2)
1 x platform (6)
2× intermediary level (7)
1 × roof (8)
1 x balcony (12)
1 x plant (13)
1 x rod, long (16)
13× rod,short (17)
9 x plant (13)
10× palm tree, 2-part (14, 15)
1 x vehicle, electric (11)
1 x bridge with sound feature (4)
1 x rail section with sound feature (5)
1xbattery(1.5V=ER03,AAA)(18)
2xbattery(3V=ER2032)(19)
25 × rail section
1 x vehicle
1 x trailer
3 × animal
3 x figurine
1 x bridge pier, grey
3 x bridge pier, green
1 x Mayan tower
1 x binocular
1 x banana plant
1 x overview of assembly options
1 x instructions for use
Technical data
Batteries power supply:
2× 3V = ER2032
1×1.5V=R03, AAA
-
-
- Symbol for DC voltage
Date of manufacture (month/year): 07/2019
- Symbol for DC voltage
-
Intended use
This article is a toy for children aged between 3 to 8 years, suitable for private use.

Safety instructions
- Warning. Not suitable for children under 36 months. Choking hazard. Small parts.
- Warning. Neither the packaging and mounting materials nor the 'SUPER DRY' pouch are a constituent part of the toy and they must be removed in all cases before the article is given to children to play with.
Children may play with this article only under adult supervision. - Only use battery types: 1.5V, LR03, AAA and 3V, CR2032.
Battery

Warnings on batteries!
- Remove the batteries if they are empty or if the product is not going to be used for an extended period.
- Do not use different battery types or brands, new and used batteries in combination, or batteries with different capacities, as they leak and can thus cause damage.
- Observe the polarity (+/-) when inserting batteries.
- Change all batteries at the same time and dispose of the old batteries properly.
- Warning! Batteries may not be charged or reactivated in any way. They may not be dismantled, thrown into fire, or short-circuited.
-
Always keep batteries out of the reach of children.
-
Do not use rechargeable batteries!
- The cleaning and user-maintenance may not be carried out by children without supervision.
- Clean the batteries and the device contacts as necessary and before inserting the batteries.
- Do not expose the batteries to extreme conditions (e.g. radiators or direct sunlight). Otherwise there is an increased risk of leaks.
- Batteries can endanger life if swallowed. Keep batteries out of the reach of small children for this reason. Seek medical help immediately if a battery is swallowed.

Danger!
- Handle a damaged or leaking battery with extreme care and dispose of it properly and immediately. Wear gloves to handle the battery.
If you come into contact with battery acid then wash the affected area with soap and water. If battery acid gets in your eye rinse it out with water and seek medical help immediately! - Do not short-circuit the terminals.
Inserting batteries
WARNING! Follow these instructions to avoid mechanical and electrical damage.
Insert the batteries included with the product before first use.
Inserting the batteries in the electric vehicle (fig. B)
- Using a suitable screwdriver (not supplied), remove the screw (11b) of the battery compartment lid (11c) on the top of the electric vehicle (11).
- Remove the battery compartment lid and carefully insert the battery (18) into the battery compartment (11d). The battery must be fully seated in the battery compartment.
Note: Pay attention to the plus/minus polarity of the battery and its correct installation.
3. Screw the battery compartment lid on the top of the electric vehicle back on tight.
Insert the battery into the bridge with sound feature (fig. D)
- Using a suitable screwdriver (not supplied), remove the screw (4c) of the battery compartment lid (4b) on the bottom of the bridge (4).
- Remove the battery compartment lid and carefully insert the battery (19) into the battery compartment (4a). The battery must be fully seated in the battery compartment.
Note: Pay attention to the plus/minus polarity of the battery and its correct installation.
3. Screw the battery compartment lid on the bottom of the bridge back on tight..
Inserting the battery into the rail section with sound feature
Insert the battery (19) into the rail section (5) as described in the paragraph "Inserting the battery into the bridge".
Replacing batteries
If the batteries stop working, replace them using the same process as described for inserting them. Remove the batteries already in the product before inserting the new batteries.
Note: Switch the product off before replacing the batteries.
Assembly
In order to assemble the product please follow the individual steps as shown in figs. B-G.
Assembly options
You will find assembly options in the enclosed overview.
Note: In the case of assembly options with many consecutive curved sections the vehicles could possibly derail!
Clean the rails with a damp cloth before first use!
Use
Controlling the vehicle (fig. C)
- Slide the switch (11a) forwards to activate forward motion.
- Slide the switch to the middle to bring the vehicle to a stop.
- Slide the switch backwards to activate backward motion.
Warning! The vehicle has not been designed to travel backwards on bridges or inclines.
Activating sound (fig. G)
Sound is activated when a vehicle passes over the button (4d) on the bridge (4) or the track section (5) with sound feature.
Storage, cleaning
When not in use, always store the product dry, clean, without batteries, and at room temperature.
Only clean the product with a damp cloth and wipe dry afterwards.
Attention: the rails should be cleaned before using them for the first time!
IMPORTANT! Never clean the product with harsh cleaning agents.
Disposal
Dispose of the article and the packaging materials in accordance with current local regulations. Packaging materials such as foil bags are not suitable to be given to children. Keep the packaging materials out of the reach of children.

Dispose of the products and the packaging in an environmentally friendly manner.

The recycling code is used to identify various materials for recycling.
The code consists of the recycling symbol - which is meant to reflect the recycling cycle - and a number which identifies the material.

Devices that are marked with the symbol shown here may not be disposed of with domestic waste. You are obliged to dispose these kinds of used electrical and electronic uses separately. Ask your local authority if possible methods for regulated disposal. Love the batteries from the article before closing of it.
Dispose of batteries carefully

Please note: Batteries are hazardous waste and may not be disposed of with domestic waste by law. You can hand-sed batteries free of charge at local ion points or at retail outlets. Specialers are provided here for this purpose.
Notes on the guarantee and service handling
The product was produced with great care and under constant supervision. You receive a three-year warranty for this product from the date of purchase. Please retain your receipt.
The warranty applies only to material and workmanship and does not apply to misuse or improper handling. Your statutory rights, especially the warranty rights, are not affected by this warranty. With regard to complaints, please contact the following service hotline or contact us by e-mail. Our service employees will advise as to the subsequent procedure as quickly as possible. We will be personally available to discuss the situation with you. Any repairs under the warranty, statutory guarantees or through goodwill do not extend the warranty period. This also applies to replaced and repaired parts. Repairs after the warranty are subject to a charge.
IAN:322004_1901

Service Great Britain
Tel.: 0800 404 7657
E-Mail: deltasport@lidl.co.uk

Service Ireland

Tel.: 1890 930 034
(0,08 EUR/Min., (peak))
(0,06 EUR/Min., (off peak))
E-Mail: deltasport@lidl.ie
Hjertelig tillykke!
Symbol for jaevnspaending

Fremstillingsdato (måned/år): 2019