
LB406A - Fridge MBM - Free user manual and instructions
Find the device manual for free LB406A MBM in PDF.
| Product type | Professional dishwasher |
| Brand | MBM |
| Model | LB406A |
| Usage | Professional, for collective dishwashing |
| Electrical supply | Voltage and frequency according to rating plate; omnipolar switch required; grounding according to NFC 15-100; cable H07RN-F |
| Water supply | Cold water; pressure and temperature according to rating plate; shut-off valve nearby |
| Waste water drainage | By gravity (level lower than base) or with optional drain pump (max height 1 m) |
| Noise level | ≤ 70 dB(A) |
| Tank material | Stainless steel |
| Controls | Buttons ON/OFF, drain, program selection, START; LEDs power, cycle, heating |
| Programs | Selectable wash cycles (fastest by default) |
| Special functions | Manual or automatic drain with cycle; resin regeneration (optional); self-diagnosis of faults |
| Safety | Safety thermostats (tank and boiler); safety pressure switch; automatic stop in case of fault |
| Routine maintenance | Daily cleaning of filters and arms; drain at end of day; periodic disinfection |
| Integrated accessories | Detergent and rinse aid dispensers (adjustable); overflow; optional internal softener |
| Spare parts | Use only original manufacturer parts |
| Repairability | Repairs reserved for manufacturer, authorized after-sales service or qualified professional |
| Installation conditions | Indoors only; ambient temperature 4-40°C; altitude ≤2000 m; relative humidity max 90% at 20°C |
| Warranty | Warranty void if instructions not followed or improper use |
| Environment | Follow sorting instructions at end of life; use appropriate detergent doses; wash only full baskets |
Frequently Asked Questions - LB406A MBM
User questions about LB406A MBM
0 question about this device. Answer the ones you know or ask your own.
Ask a new question about this device
Download the instructions for your Fridge in PDF format for free! Find your manual LB406A - MBM and take your electronic device back in hand. On this page are published all the documents necessary for the use of your device. LB406A by MBM.
USER MANUAL LB406A MBM
TRANSLATION FROM THE ORIGINAL INSTRUCTIONS
CONTENTS
CHAP 1 PREFACE 2
CHAP 2 INSTALLATION 2
2.1 U NPACKING 2
2.2P 3
2.3 E LECTRICAL CONNECTION 3
2.4 W ATER CIRCUITHOOKUP 4
2.5 C ONNECTION TO THE DRAIN LINE 4
2.6 R INSE AID AND DETERGENT 4
CHAP 3 RISKS AND IMPORTANT WARNINGS 5
3.1 N ORMAL OPERATING CONDITIONS 5
CHAP 4 USING THE MACHINE 6
4.1 K EY AND SYMBOLS 6
4.2 S WITCHING THE DISHWASHER ON 6
4.3 FILLING THE RACK 6
4.4 C YCLE SELECTION AND START-UP 6
4.4.1 Under-counter dishwashers 6
4.4.2 Hood dishwashers 7
4.5 R EMOVING THE INTEGRAL FILTER 7
4.6 E MPTYING THE DISHWASHER 7
4.6.1 Appliances with no drain pump 7
4.6.2 Appliances with drain cycle (*optional) 7
4.7 T URNING THE DISHWASHER OFF 7
4.8 R ESIN REGENERATION (*OPTIONAL) 7
4.9 E ND OF SHIFT 8
CHAP 5 MAINTENANCE 8
5.1 G GENERAL RULES 8
5.2 C LEANING 8
5.3 C LEANING THE FILTER UNIT 8
5.4 C LEANING THE ARMS 9
CHAP 6 SELF DIAGNOSTICS 9
CHAP 7 DOSING UNIT SETTINGS. 10
CHAP 8 SCRAPPING 10
CHAP 9 ENVIRONMENT 10
In legal terms, the manufacturer reserves the property of this document. It is forbidden to reproduce it or divulge it with any means without prior written authorisation.
The manufacturer reserves the right to introduce changes in order to achieve the improvements it deems necessary without prior notice.

This manual contains important safety warnings relating to installation, use and maintenance. Failure to observe the instructions in the enclosed documentation may compromise the safety of the appliance and immediately voids the warranty.
Warnings:
Keep all documentation in the vicinity of the appliance; make it available to the technicians and operators charged with operating it and keep it in good condition in a safe place, along with extra copies for frequent reference
The operator must read, understand and familiarise himself with the contents of this manual before working on or with the appliance.
The appliance is intended solely for professional heavy duty dishwashing applications and must be installed, operated and serviced only by qualified persons according to the manufacturer's instructions.
Warranty:
The manufacturer is not liable for any damage or injury resulting from failure to observe the instructions or improper use of the machine
Failure to observe the instructions in the enclosed documentation may compromise the safety of the appliance and immediately voids the warranty
Installation and repair by unauthorised technicians and the use non-original spare parts immediately void the warranty.
Storage:
Transport and storage: -10^ to 55^ with peaks up to 70^ (for no longer than 24 hours)
Chap 2 INSTALLATION
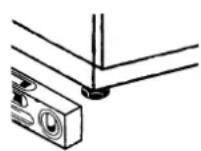
Proper installation is essential to the good operation of the appliance. Some of the data required for installation of the appliance are given on the nameplate on its RH body panel, and a copy is included on the cover page of this manual.

The appliance may only be installed by qualified persons authorised to do so.
For Australia and New Zealand this machine must be installed in accordance with AS/NZS3500.1
2.1 Unpacking
Check the condition of the packaging, and note any evident damage on the shipping bill. Remove the packaging and check that the appliance is in good condition; immediately report any damage to the reseller and the shipping agent by fax or registered letter with return receipt. If the damage is such as to compromise the safety of the appliance, do not install or operate it until it has been inspected by a qualified technician.

The packaging (plastic bags, expanded polystyrene, nails, etc.) are hazardous and must not be left within the reach of children or pets.
2.2 Positioning
- Check that there are no objects or materials in the installation area which may be damaged by the steam emitted by the appliance during operation, or if there are, make sure they are properly protected.
- Before positioning the appliance, set up the electrical power supply, water supply and drain connections
- The floor or build-in unit must be rated to support the weight of the appliance
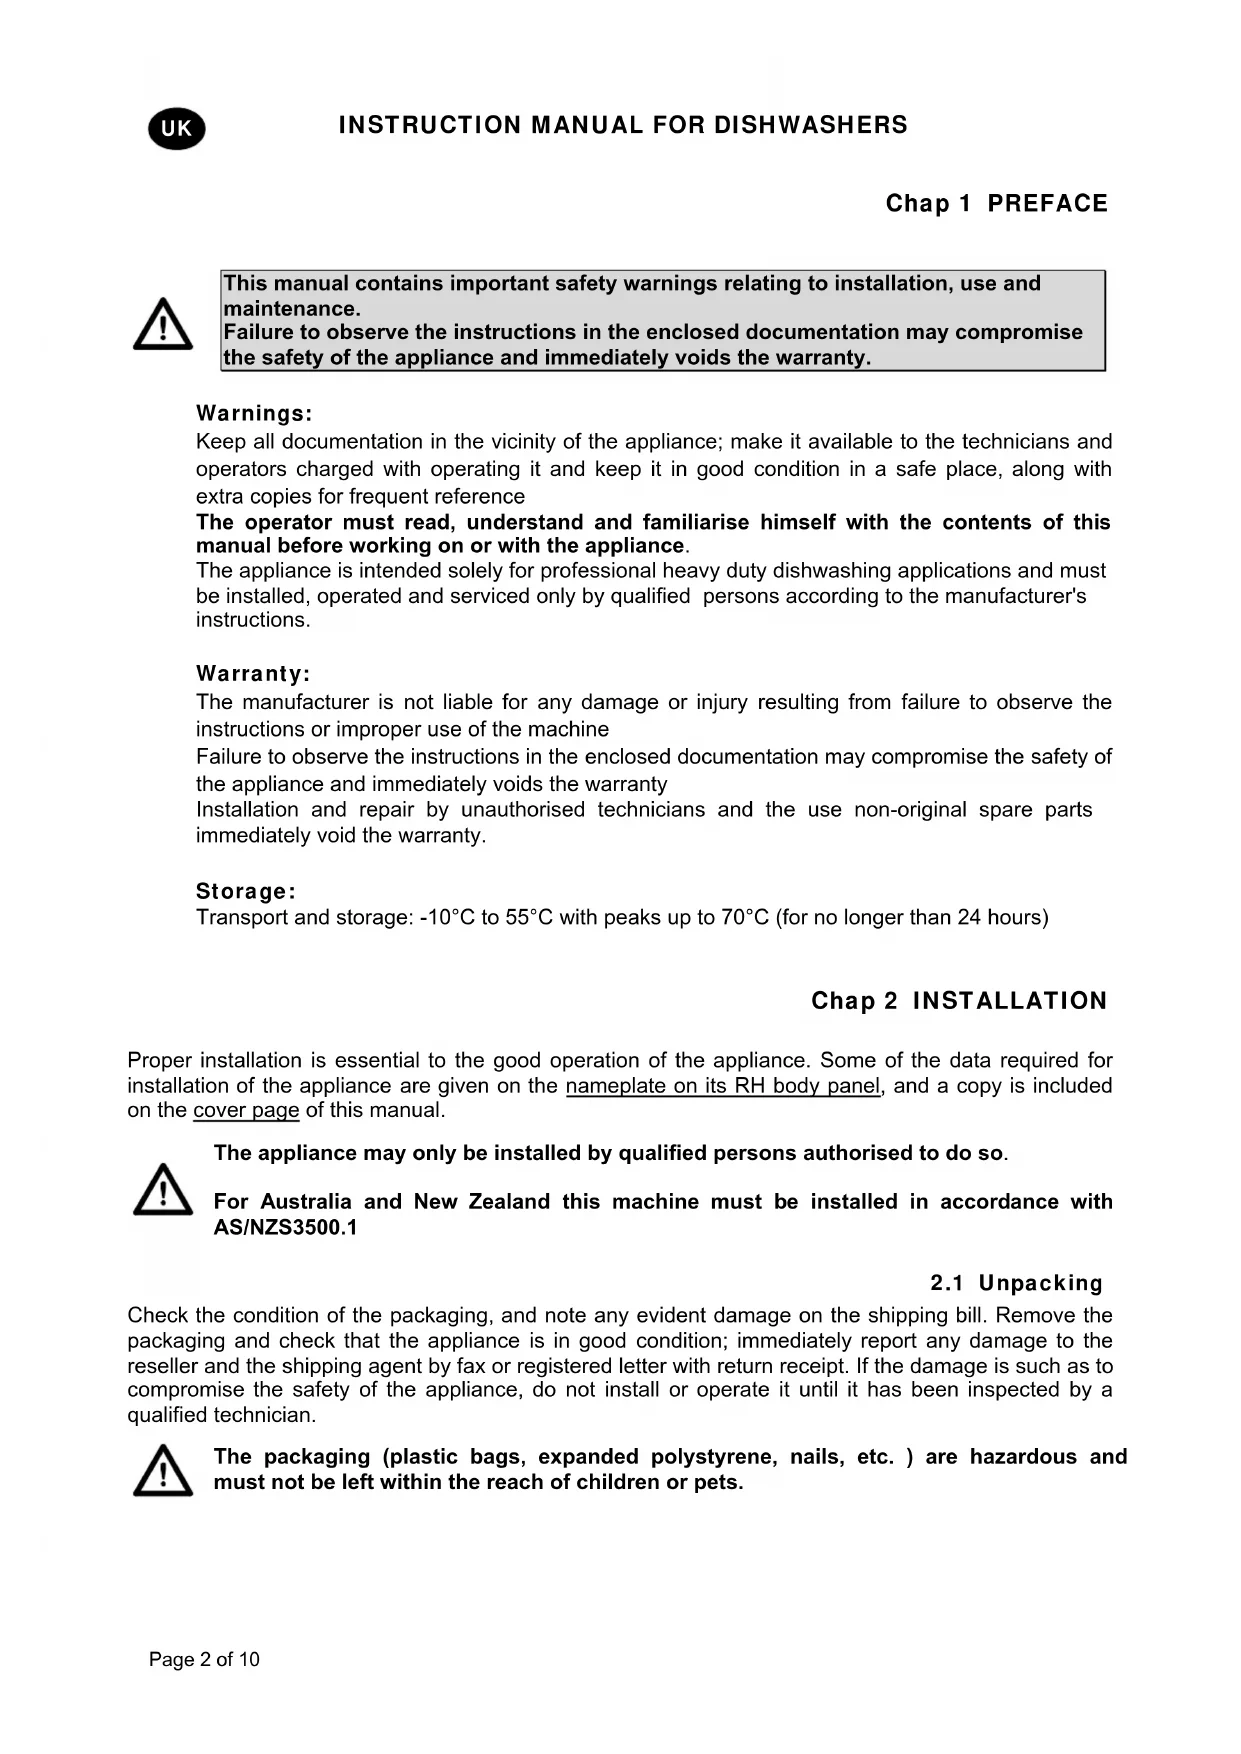
To ensure that it is stable, level the appliance with its four feet. - The appliance is intended for fixed installation only; any other approaches must be agreed with and approved by the manufacturer.
- Remove the protective film from its body panels before operating the dishwasher.
2.3 Electrical connection
- The power supply must be fitted with a omnipolar circuit breaker (master power switch) to break all contacts including neutral, with a contact gap of at least 3 mm and thermal cutout or fuses, which must be set or rated to the power indicated on the machine's nameplate.
- The master power switch must be fitted to the power line in the vicinity of the installation and may be connected to only one machine at a time.
The mains voltage and frequency must match the nameplate ratings. -
The installation must include a grounding system conforming with established electrical safety legislation, to protect the operator and the appliance itself
-
The power line, which must be H07RN-F unit, must not be stretched or crushed during normal operation or maintenance.
- The appliance must also be connected to an equipotential system with the screw marked with the symbol.
- The equipotential cable must have a cross section of 10mm^2
- Respect the polarities indicated in the wiring diagram.
- For further information, refer to the wiring diagram.

Do not use multi-sockets, adapters, cables of an inadequate cross section or type or with extensions not conforming to established electrical installation regulations.
2.4 Water circuit hookup
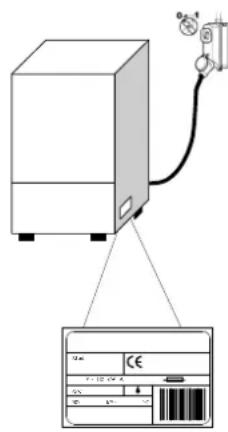
The appliance must be connected to its water supply with a flexible hose. A shut off valve (cock) must be installed between the water supply line and the appliance's solenoid valve. The cock must be close to the appliance.
- The water supply, temperature and pressure must be compatible with the ratings on the machine's nameplate.
- If the hardness of the water is greater than 14F (8 dH), we recommend using an internal water softener (available on request). If the hardness of the water is greater than 35F (19.5 dH), install and external water softener upline of the solenoid valve.
- If the water has a very high residual concentration of high conductivity minerals, we recommend installing a demineralisation system.
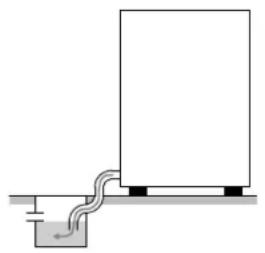
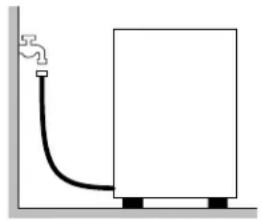
Free drain
2.5 Connection to the drain line
- The drain line must consist of a free drain sump with siphon suited to the flow capacity of the drain hose supplied with the appliance. The hose must be able to reach the sump without stretching, restriction, folding, crushing, pressing or forcing in any way.
- The tub drains under gravity, so the drain sump must be lower than the machine's base.
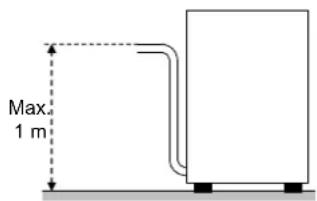
With pump (available on request)
- if the drain is not lower than the base of the appliance, you can use the version with drain pump (available on request).
- In this case, the drain connection may be no higher than 1m .
- Always check that the drain works properly and is not blocked.
- Any other solution must be approved by the manufacturer in advance.
2.6 Rinse aid and detergent
- The rinse aid and detergent are dispensed by the machine's integral dispenser (depending on model).
- The dose is set by the installer in relation to the hardness of the water, and he also calibrates the dispensers themselves.
- Before calibrating them, fill the dispenser supply tubes with their respective product.
The units are calibrated with the adjuster screws, or directly with the control panel (as applicable). - The level of fluid in the container must be sufficient for priming; do not allow it to drain completely or top it up with corrosive or impure product.
NEVER use CHLORINE or HYPOCHLORITE based detergents.
We recommend installing an automatic detergent dispenser.
Chap 3 RISKS AND IMPORTANT WARNINGS
- This appliance is intended solely for the use for which has been designed. Any other use is improper and hazardous.
- The specialised technician responsible for installing the appliance must instruct the user on its operation and any attendant safety measures, including practical demonstrations.
- Only the manufacturer or an authorised service centre with qualified staff may work on the machine, even in case of malfunction, using only original spare parts.
- Always disconnect or isolate the machine from its power and water supplies before servicing, repairing or cleaning it.
The machine may NOT be used by persons untrained in its use.
The machine may NOT be left powered up when not in use. - NEVER open the machine quickly if it has not completed its cycle.
- NEVER use the machine with its guards removed.
- NEVER use the machine to wash objects of any form, size or material not guaranteed to be machine-washable or not in good condition.
- NEVER use the machine or any of its assemblies as steps or support for persons, property or animals.
- NEVER overload the open door of front-loading machines, which is rated only to support the basket loaded with dishes.
NEVER place your bare hands in the wash solution. - NEVER overturn the machine after it has been installed.
- If you notice any malfunction or fluid leak, immediately disconnect the power supply and shut off the water supply.
- Do not install the dishwasher in the vicinity of heat sources over 50^ .
- NEVER leave the dishwasher exposed to the weather (rain, direct sunlight, etc.)
- The dishwasher may not be installed outdoors without proper cover.
- Never start a wash programme without the overflow in the tub (as applicable).
- Never place magnetic objects in the vicinity of the machine.
- Do not use the top of the machine as a table or support.
- The installer is responsible for checking that the grounding system is fully operational.
- At the end of testing, the installer must issue a written declaration stating that the machine has been installed and tested in accordance with established legislation and good practice.
- DO NOT change the position or tamper with the elements that compose the machine, these operations could compromise its safety.
Weighted sound pressure level LpA ≤ 70 dB(A).
3.1 Normal operating conditions
Ambient temperature: 40^ / 4^ (average 30^ )
Altitude : up to 2000 metres
Relative humidity : Max 30% at 40^ / max 90% at 20^
Chap 4 USING THE MACHINE
4.1 Key and symbols
Referring to Fig.1:
| 1 | ON/OFF BUTTON | 5 | POWER LED |
| 2 | DRAIN BUTTON | 6 | CYCLE UNDERWAY LED |
| 3 | PROGRAMME SELECTION BUTTON | 7 | HEATING UNDERWAY LED |
| 4 | START BUTTON |
The arrangement of buttons and leds may vary according to the machine type
4.2 Switching the dishwasher on
Referring to Fig.2:
- Turn on the main power switch and open the external water tap.
- Check the presence of the overflow.
Press ON/OFF (1).
The POWER led comes on and filling begins automatically.
After filling comes the heating phase; the HEATING UNDERWAY (7) led stays on until the working temperature is reached. - The optimal wash conditions have been reached.
4.3 Filling the rack
Referring to Fig.3, to ensure the correct operation of the dishwasher follow the rules described below:
- Use a suitable rack, fill without overloading and without overlapping the dishes.
- Always wipe the dishes before placing in the dishwasher; do not put dishes with dry or solid residues in the washer.
- Place the empty dishes in the rack facing downwards.
- Place plates and the like in the sloping rack, with the inner surface facing upwards.
- Place the cutlery in the cutlery basket, handle end down.
- Do not place silver and stainless steel cutlery in the same cutlery basket as this will turn the silver brown and may corrode the steel.
- Wash the dishes immediately after use, in order to prevent any residue from hardening and sticking on them.
- Use only solid, dishwasher-proof dishes.
4.4 Cycle selection and start-up
4.4.1 Under-counter dishwashers
- Select the washing cycle suited to the type of dishes using PROGRAMME SELECTION (3); with the button pressed, the shorter cycle is enabled (Fig. 4).
- Start the programme press the START (4) button, the CYCLE UNDERWAY (6) LED starts to flash (Fig.5).
- When the cycle is completed the CYCLE UNDERWAY (6) led goes off
- For rapid drying, remove the rack from the machine as soon as the cycle finishes.
- To stop a wash cycle early, press down and hold the START (4) button for a few seconds.
4.4.2 Hood dishwashers
- Select the washing cycle suited to the type of dishes using PROGRAMME SELECTION (3); with the button pressed, the shorter cycle is enabled (Fig. 4).
- Press START (3) for automatic start (Fig. 6).
- Lower the hood, the cycle starts automatically and the CYCLE UNDERWAY (5) led starts to flash.
- When the cycle is completed the CYCLE UNDERWAY (5) led goes off.
- The next cycles come on simply by lowering the hood.
- For rapid drying, remove the rack from the machine as soon as the cycle finishes.
- To stop a wash cycle early, press START (3).
4.5 Removing the integral filter
- Move the washing and rinsing arms at right angles to the edge of the door (Fig.7).
- Lift each semi-filter by the relative handle.
4.6 Emptying the dishwasher
4.6.1 Appliances with no drain pump
- Switch the dishwasher off.
If present, remove the integral filter (Fig.7 A).
Pull up and remove the overflow pipe (Fig. 8B). - Wait for the tub to empty completely.
If necessary, extract the tub filter and clean (Fig. 8 C).
4.6.2 Appliances with drain cycle (*optional)
- Switch the dishwasher off.
If present, remove the integral filter (Fig.7 A). - Withdraw the overflow, if present, by pulling it upwards (Fig.9); the overflow is not present on partial drain versions.
- Close the door.
- Press the DRAIN (2) button for a few seconds to start the cycle;
- The drain cycle is shown by the POWER (5) led coming on and the CYCLE UNDERWAY (5)led flashing.
- The machine runs a drain cycle and then switches off.
If necessary, extract the tub filter and clean (Fig. 8 C).
4.7 Turning the dishwasher off
- Press the ON/OFF button (1), the POWER LED (5) will continue to flash indicating that power is being supplied.
4.8 Resin regeneration (*optional)
In machines with internal water softener, a regeneration cycle should be run periodically to ensure the correct operation of the softener. The number of cycles between one resin regeneration and the next depends on the hardness of the local water, and should be set in accordance with the following table.
| dH | °F | N° Cicli | dH | °F | N° Cicli |
| 6 | 10 | 160 | 13 | 23 | 90 |
| 7 | 12 | 150 | 14 | 25 | 80 |
| 8 | 14 | 140 | 15 | 27 | 70 |
| 9 | 16 | 130 | 16 | 29 | 60 |
| 10 | 18 | 120 | 17 | 30 | 50 |
| 11 | 20 | 110 | 18 | 32 | 40 |
| 12 | 21 | 100 | 19 | 34 | 30 |
Proceed as follows (Fig. 11):
- Switch the dishwasher off
- Empty and clean it.
- Remove the integral filter and open the salt container in the tub.
- Pour in 250-300g of regeneration salt (1 or 2mm grain size kitchen salt with no additives).
- Close the container firmly.
- Make sure the overflow has been removed.
- To start the cycle, with the machine off press START (3) for a few seconds.
The cycle is shown by the POWER (5) led coming on and the CYCLE UNDERWAY (5)led flashing. - The regeneration cycle lasts around 20 minutes.
- The dishwasher will switch off when the cycle has completed.
N.B. Do not switch the machine off during the regeneration cycle
4.9 End of shift
- At the end of the day always drain the machine as described in the section Machine draining.
- Disconnect the power supply by means of the main switch and close the external water cock.
- Perform routine maintenance and clean the machine as described in the section Maintenance.
If possible, leave the door ajar to prevent bad odours building up inside the machine.
Chap 5 MAINTENANCE
5.1 General rules

Before doing any maintenance, completely drain out all water, shut off the power supply and close the water supply cock.
Do not use water under pressure - it can damage the electrical equipment.
Only wash the body panelling when it is cold, using only product specifically designed for steel.
If there is a risk of ice forming, drain the water from the boiler and wash pump.
5.2 Cleaning
To keep the machine in good working order, it must be maintained regularly as explained below. We recommend periodically running a sanitising treatment with suitable non-corrosive commercial products.
5.3 Cleaning the filter unit
Run this procedure at the end of the day or when you see the filters are dirty:
- Remove and clean the baskets.
- Empty out the tub as explained in "Machine draining".
- Remove and carefully clean all the filters.
- Do not use abrasive products to clean the tub.
- Restore all removed parts when finished.
5.4 Cleaning the arms
The wash and rinse arms are easily removed in order to clean their nozzles and prevent blockage/encrustations.
Proceed as follows (Fig.10):
- Undo nut R and remove the arms.
- Wash all parts under a jet of running water and clean the nozzles thoroughly, using a toothpick or pointed tool if necessary.
- Clean the arm rotation pins inside the machine and the wash and rinse water drainage area.
- Restore the arms and check that they rotate freely.
Chap 6 SELF DIAGNOSTICS
The machine is equipped with a self-diagnosis system that registers and warns of a number of malfunctions via the fast-flashing LEDs. The table below described the malfunctions recorded
Fast flashing
| Power LED | Electro-mechanical safety device. The boiler or tub safety thermostats have cut in, or the tub level safety pressure switch has been triggered. Check that the drain is not blocked. Switch the dishwasher off and then on. |
| Cycle LED | Water filling in tank fault. The tank has not filled correctly. Check the water supply and/or the presence of the overflow. Switch the dishwasher off and then on and fill again. Rinsing temperature reset fault. The boiler temperature did not reset in the set time during the washing cycle. Switch the machine off and then on and run a new cycle. |
| Heating LED | Tub or boiler thermometer fault. (Probe open or in short-circuit) The machine does not read the tub or boiler temperature value. Switch the dishwasher off and then on. |
WARNING! Switching the dishwasher off and then on again "retsets" the signals, if after carrying out the instructions given the problem persists, contact an Authorised Service Centre.
Chap 7 DOSING UNIT SETTINGS
If the machine is equipped with dosing units, the settings can be changed as follows:
Machine in standby with door open.
- Simultaneously hold pressed the DRAIN (2) and START (4) buttons.
The CYCLE LED (6) will start flashing, thereby indicating the machine is in programming mode.
- Press the START button (4) to adjust the DETERGENT dosing time; each press of the button is equivalent to one second. The POWER LED (5) will flash at each press.
- Press the DRAIN button (2) to adjust the RINSE AID dosing time; each press of the button is equivalent to one second. The HEATING LED (7) will flash at each press.
- Close the door and turn on the machine by pressing the ON-OFF button (1), to save the settings. Each time the machine enters programming mode, these settings will be erased.
Chap 8 SCRAPPING
Our machines do not contain materials requiring special handling.

(Applicable in the EU and countries with sorted waste disposal)
The mark applied to the product or its documentation indicates that it must not be scrapped with domestic waste when it reaches the end of its service life. To prevent damage to the environment or health risks due to improper scrapping, keep this product separate from other waste and recycle it so as to promote sustainable use of materials.

Domestic users are requested to contact their reseller or local authority for information on sorted waste disposal and recycling for this type of product.
Corporate users are requested to contact their supplier and check the terms and conditions of the purchase contract.
The product may not be scrapped together with other commercial waste.
Chap 9 ENVIRONMENT
RESPECT FOR THE ENVIRONMENT
Proper use of the dishwasher can improve its environmental footprint, if the following simple rules are observed:
Only wash full baskets.
Switch the dishwasher off when not using it.
Keep the machine closed when it is in standby.
Use wash programmes suited to the amount of soiling.
Supply the machine with hot water, if gas heated.
Make sure the drains flow into a suitable sewer.
Do not exceed the recommended dose of detergent.
The manufacturer reserves the right to modify the electrical, technical and aesthetic features of this appliance and replace any of its parts without notice, as he deems necessary to offer a reliable product with a long service life and advanced technology.

- TRANSLATION FROM THE ORIGINAL INSTRUCTIONS
- CONTENTS
- Warnings:
- Warranty:
- Storage:
- Chap 2 INSTALLATION
- Unpacking
- Positioning
- Electrical connection
- Water circuit hookup
- Connection to the drain line
- Rinse aid and detergent
- Chap 3 RISKS AND IMPORTANT WARNINGS
- Normal operating conditions
- Chap 4 USING THE MACHINE
- Switching the dishwasher on
- Filling the rack
- Cycle selection and start-up
- Under-counter dishwashers
- Hood dishwashers
- Removing the integral filter
- Emptying the dishwasher
- Appliances with no drain pump
- Appliances with drain cycle (*optional)
- Turning the dishwasher off
- Resin regeneration (*optional)
- N.B. Do not switch the machine off during the regeneration cycle
- End of shift
- Chap 5 MAINTENANCE
- General rules
- Cleaning
- Cleaning the filter unit
- Cleaning the arms
- Chap 6 SELF DIAGNOSTICS
- Fast flashing
- Chap 7 DOSING UNIT SETTINGS
- Chap 8 SCRAPPING
- Chap 9 ENVIRONMENT
- RESPECT FOR THE ENVIRONMENT
Brand : MBM
Model : LB406A
Category : Fridge