SonicPulse LED Bar 10 - Lighting Stairville - Free user manual and instructions
Find the device manual for free SonicPulse LED Bar 10 Stairville in PDF.

| Product type | Professional LED bar |
| Brand | Stairville |
| Model | SonicPulse LED Bar 10 |
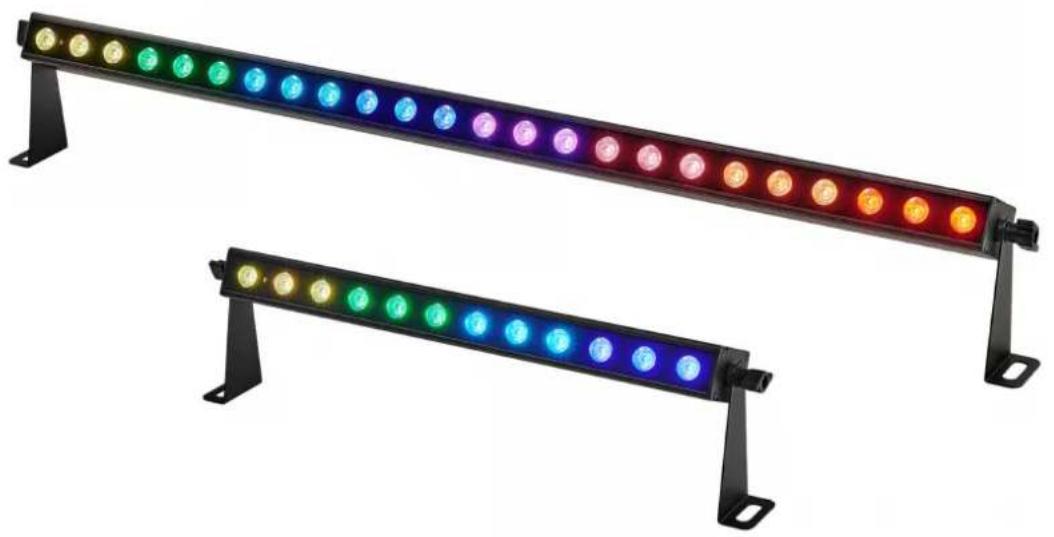
| Light source | 24 x RGBWW LED, 2 W each |
| Beam angle | 10° |
| Color temperature | 3000 K |
| Number of controllable segments | 8 segments (3 LEDs per segment) |
| Power consumption | 29 W |
| Power supply | 100 - 240 V ~, 50/60 Hz |
| Fuse | 5 x 20 mm, 1 A, 250 V, slow-blow |
| Dimensions (W x H x D) | 1075 mm x 165 mm x 65 mm |
| Weight | 2.8 kg |
| Protection rating | IP20 (indoor use only) |
| Control | DMX (4, 5, 6, 11 or 39 channels), built-in display and buttons, infrared remote control |
| Operating modes | Automatic, preprogrammed show, master/slave, sound control, manual color adjustment |
| Effects | Strobe, fade, color change, pixel rotation |
| Preprogrammed shows | 23 automatic shows |
| Sound modes | 25 sound-reactive modes |
| Input connectors | Lockable Power Twist (power), XLR 3-pin (DMX) |
| Output connectors | Lockable Power Twist (up to 6 A), XLR 3-pin (DMX) |
| Mounting | Hanging or on stand (mounting bracket included) |
| Ambient temperature | 0 °C to 40 °C |
| Relative humidity | 20% to 80% (non-condensing) |
| Cleaning | Clean the optical lenses with a soft cloth and lens cleaner (ref. 280122) |
| Safety | Do not look directly at the light source; maintain a safety distance of at least 2 m; do not use outdoors; disconnect before maintenance |
| Repairability | No user-serviceable parts; contact Thomann after-sales service |
| Included accessories | Infrared remote control (CR2025 battery included), power cable, mounting bracket |
| General information | Manual available for free download at notice-facile.com |
Frequently Asked Questions - SonicPulse LED Bar 10 Stairville
User questions about SonicPulse LED Bar 10 Stairville
0 question about this device. Answer the ones you know or ask your own.
Ask a new question about this device
Download the instructions for your Lighting in PDF format for free! Find your manual SonicPulse LED Bar 10 - Stairville and take your electronic device back in hand. On this page are published all the documents necessary for the use of your device. SonicPulse LED Bar 10 by Stairville.
USER MANUAL SonicPulse LED Bar 10 Stairville
1 General information 6
1.1 Symbols and signal words 6
2 Safety instructions 9
3 Features 13
4 Installation 14
5 Starting up 18
6 Connections and controls 20
7 Operation 23
7.1 Starting the device 23
7.2 Main menu 23
7.2.1 Automatic programme 24
7.2.2 Pre-programmed automatic show 25
7.2.3 DMX mode 26
7.2.4 "Master/slave" mode 27
7.2.5 Manual colour settings 27
7.2.6Sound control 28
7.3 Settings 29
7.3.1 Setting the dimmer curve 29
7.3.2 Pixel rotation 30
SonicPulse LED Bar 05, SonicPulse LED Bar 10 LED Bar
Table of contents
7.3.3 Behaviour on DMX control failure 30
7.3.4 Key lock 31
7.3.5 Reset to factory default setting 31
7.3.6 System information 32
7.4 RDM functions 32
7.5 Menu overview 34
7.6 Functions in 4-channel DMX mode 35
7.7 Functions in 5-channel DMX mode 36
7.8 Functions in 6-channel DMX mode 40
7.9 Functions in 11-channel DMX mode 41
7.10 Functions in 23-channel DMX mode (item no 580868). 49
7.11 Functions in 39-channel DMX mode (item no 580867) 57
8 Technical specifications 66
9 Plug and connection assignments 71
10 Troubleshooting 72
11 Cleaning 74
12 Protecting the environment 75
SonicPulse LED Bar 05, SonicPulse LED Bar 10 LED Bar
1 General information
This document contains important instructions for the safe operation of the product. Read and follow the safety instructions and all other instructions. Keep the document for future reference. Make sure that it is available to all those using the product. If you sell the product to another user, be sure that they also receive this document.
Our products and documentation are subject to a process of continuous development. They are therefore subject to change. Please refer to the latest version of the documentation, which is ready for download under www.thomann.de.
1.1 Symbols and signal words
In this section you will find an overview of the meaning of symbols and signal words that are used in this document.
Signal word Meaning
DANGER! This combination of symbol and signal word indicates an immediate dangerous situation that will result in death or serious injury if it is not avoided.
WARNING! This combination of symbol and signal word indicates a possible dangerous situation that can result in death or serious injury if it is not avoided.
NOTICE! This combination of symbol and signal word indicates a possible dangerous situation that can result in material and environmental damage if it is not avoided.
Warning signs Type of danger

Warning - high-voltage.
Warning - dangerous optical radiation.
Warning - suspended load.
Warning signs Type of danger

Warning - danger zone.
2 Safety instructions
Intended use
This device is intended for use as an electronic lighting effect by means of LED technology. The device is designed for professional use only and is not suitable for use in households. Use the device only as described in this user manual. Any other use or use under other operating conditions is considered to be improper and may result in personal injury or property damage. No liability will be assumed for damages resulting from improper use.
This device may be used only by persons with sufficient physical, sensorial, and intellectual abilities and having corresponding knowledge and experience. Other persons may use this device only if they are supervised or instructed by a person who is responsible for their safety.

Extend the operating life of the device by regular breaks and by avoiding frequent switching on and off. The device is not suitable for continuous operation.
Safety

DANGER!
Risk of injury and choking hazard for children!
Children can suffocate on packaging material and small parts. Children can injure themselves when handling the device. Never allow children to play with the packaging material and the device. Always store packaging material out of the reach of babies and small children. Always dispose of packaging material properly when it is not in use. Never allow children to use the device without supervision. Keep small parts away from children and make sure that the device does not shed any small parts (such knobs) that children could play with.

DANGER!
Danger to life due to electric current!
Within the device there are areas where high voltages may be present. Never remove any covers. There are no user-serviceable parts inside. Do not use the device when covers, safety equipment or optical components are missing or damaged.
DANGER!
Danger to life due to electric current!
A short circuit could lead to a fire hazard and risk of death. Always use proper ready-made insulated triple-core mains cable with a safety plug. Do not modify the mains cable or the plug. In case of isolation damage, disconnect immediately the power supply and arrange repair. If in doubt, seek advice from a qualified electrician.
WARNING!
Risk of eye damage caused by high light intensity!
The device generates highly intense light radiation. Looking directly into the light source can damage the eyes. Never look directly into the light source.
WARNING!
Risk of epileptic fit due to flashing lights!
The device emits flashing lights (strobe effects). Flashing lights can trigger epileptic fits in specific people. If you are at risk of epilepsy, avoid spending longer periods of time subjected to flashing lights and looking into strobing light.

NOTICE!
Risk of overheating and fire due to inadequate distance and bad ventilation!
If the distance between the light source and the illuminated surface is too short or the device is badly ventilated, the device can overheat and cause fires. Make sure that illuminated surfaces are more than 2m away. Do not operate the device in ambient temperatures above 40^ . Always ensure sufficient ventilation at the operating location.
NOTICE!
Damage to the device if operated in unsuitable ambient conditions!
The device can be damaged if it is operated in unsuitable ambient conditions. Only operate the device indoors within the ambient conditions specified in the "Technical specifications" chapter of this user manual. Avoid operating it in environments with direct sunlight, heavy dirt and strong vibrations. Avoid operating it in environments with strong temperature fluctuations. If temperature fluctuations cannot be avoided (for example after transport in low outside temperatures), do not switch on the device immediately. Never subject the device to liquids or moisture. Never move the device to another location while it is in operation. In environments with increased dirt levels (for example due to dust, smoke, nicotine or mist): Have the device cleaned by qualified specialists at regular intervals to prevent damage due to overheating and other malfunctions.
NOTICE!
Damage to the device due to high voltages!
The device can be damaged if it is operated with the incorrect voltage or if high voltage peaks occur. In the worst case, excess voltages can also cause a risk of injury and fires. Make sure that the voltage specification on the device matches the local power grid before plugging in the device. Only operate the device from professionally installed mains sockets that are protected by a residual current circuit breaker (FI). As a precaution, disconnect the device from the power grid when storms are approaching or it the device will not be used for a longer period.
- NOTICE!
Risk of fire by exceeding the maximum current!
The device can supply power to other devices of identical design and connected in series. If too many devices are connected, the maximum permitted power consumption can be exceeded, which can cause the device to overheat and burst into flames. Only connect devices of identical design to the device. When deciding how many devices you can connect in series, make sure that the maximum output current specified on the device and in the "Technical specifications" chapter of the user manual is not exceeded. Only use power cords with a cable cross-section designed for the required current intensity when connecting the devices in series.
NOTICE!
Risk of fire due to installation of a wrong fuse!
Using fuses of a different type than compatible with the device may cause a fire and seriously damage the device. Only use fuses of the same type. Observe the labelling on the device casing and the information in the "Technical data" chapter.
NOTICE!
Risk of fire due to incorrect polarity!
Incorrectly inserted batteries may cause fires and destroy the device and the batteries. Observe the markings on the batteries and on the device. Ensure that proper polarity is observed when inserting batteries.
NOTICE!
Possible damage due to leaking batteries!
- Batteries can leak and cause permanent damage to the device. Take the batteries out of the device if it is not going to be used for an extended period of time.
3 Features
The LED bar is particularly suitable for professional lighting tasks, for example at events, on rock stages, and in theatres and musicals. It is characterized by low power consumption and a long service life.
Special features of the device:
■ SonicPulse LED Bar 05: 24 × LEDs in eight controllable segments
■ SonicPulse LED Bar 10: 12 × LEDs in four controllable segments
Slim unobtrusive design
Control via DMX (5 different modes), via buttons and display on the device, and via infrared remote control
23 pre-programmed automatic shows
Sound control
25 different sound modes
Master/slave mode
Strobe effects
Robust metal housing
For technological reasons, the light output of LEDs decreases over their lifetime. This effect increases with higher operating temperature. You can extend the service life of the illuminants by providing adequate ventilation and operating the LEDs with the lowest possible brightness.
4 Installation
Unpack and check carefully there is no transportation damage before using the unit. Keep the equipment packaging. To fully protect the product against vibration, dust and moisture during transportation or storage use the original packaging or your own packaging material suitable for transport or storage, respectively.
WARNING!
Risk of injury from falling devices that were inadequately secured!
If devices are not properly secured during assembly, they can cause severe injury and considerable damage by falling.
When installing and operating, make sure to follow the standards and regulations that apply in your country.
Always secure the device with a secondary safety attachment, such as a safety cable or a safety chain.

NOTICE!
Risk of overheating and fire due to inadequate distance and bad ventilation! If the distance between the light source and the illuminated surface is too short or the device is badly ventilated, the device can overheat and cause fires.
Make sure that illuminated surfaces are more than 2m away.
Do not operate the device in ambient temperatures above 40^ .
Always ensure sufficient ventilation at the operating location.

NOTICE!
Potential property damage due to unsuitable stands!
If the device is mounted on an unsuitable stand, there is a risk that the stand will fall over and cause damage.
Only use stands whose maximum bearing capacity is at least as high as the weight of the device. Always ensure that the stand is stable.

NOTICE!
Data transfer errors due to improper wiring!
If the DMX connections are wired incorrectly, this can cause errors during the data transfer.
Do not connect the DMX input and output to audio devices, e.g. mixers or amplifiers.
Use special DMX cables for the wiring instead of normal microphone cables.
Mounting options
You can install the device in hanging or standing positions. When in use, the device must always be attached to a solid surface or an approved mount. Use the designated openings of the mounting brackets for mounting.
Always work from a stable platform whenever installing, moving or servicing the unit. While you do this, the area underneath the device must be cordoned off.
The safety cable must be attached to both mounting brackets.

Please note that this device must not be connected to a dimmer.
Inserting the battery into the remote control
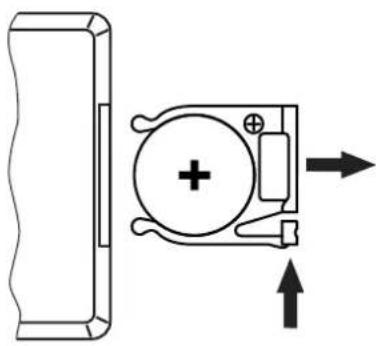
Push the lock of the battery holder towards the centre of the housing and pull out the battery holder like a drawer. Insert the batteries. The battery is correct if the positive pole points to the housing base of the remote control. Slide the battery holder back into the remote until it clicks into place.
When shipping, the battery is already installed in the remote and protected against discharge by a transparent plastic film. Remove the plastic film before initial use.

NOTICE!
Risk of fire due to incorrect polarity!
Incorrectly inserted batteries may cause fires and destroy the device and the batteries.
Observe the markings on the batteries and on the device.
Ensure that proper polarity is observed when inserting batteries.

NOTICE!
Possible damage due to leaking batteries!
Batteries can leak and cause permanent damage to the device.
Take the batteries out of the device if it is not going to be used for an extended period of time.
5 Starting up
Create all connections while the device is off. Use the shortest possible high-quality cables for all connections. Take care when running the cables to prevent tripping hazards.
Connections in DMX mode
Connect the DMX input of the device to the DMX output of a DMX controller or another DMX device. Connect the output of the first DMX device to the input of the second one, and so on to form a daisy chain. Always ensure that the output of the last DMX device in the daisy chain is terminated with a resistor (110 ,14W)
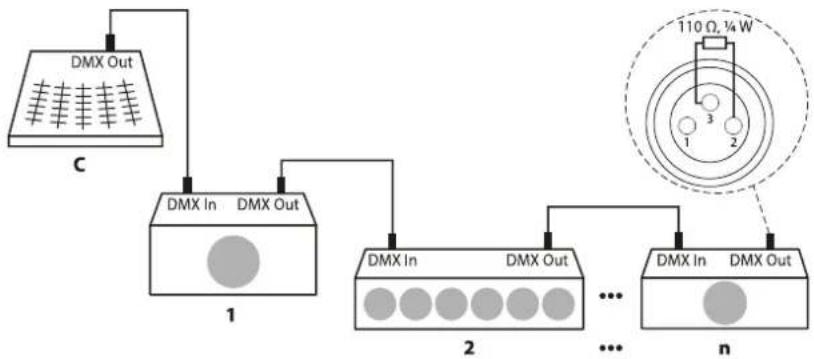
DMX indicator
If the indicator is flashing in "DMX" mode, no DMX signal is being received. The DMX controller may not be on, or the wiring may be incorrect. If the indicator lights up permanently, the device is receiving a valid DMX signal.
Connections in master/slave mode
When you configure a group of devices in master/slave mode, the first unit will control the other units for an automatic, sound-activated, synchronized show. This function is ideal when you want to start a show immediately. Connect the DMX output of the master device to the DMX input of the first slave device. Then connect the DMX output of the first slave device to the DMX input of the second slave device and so on.
6 Connections and controls
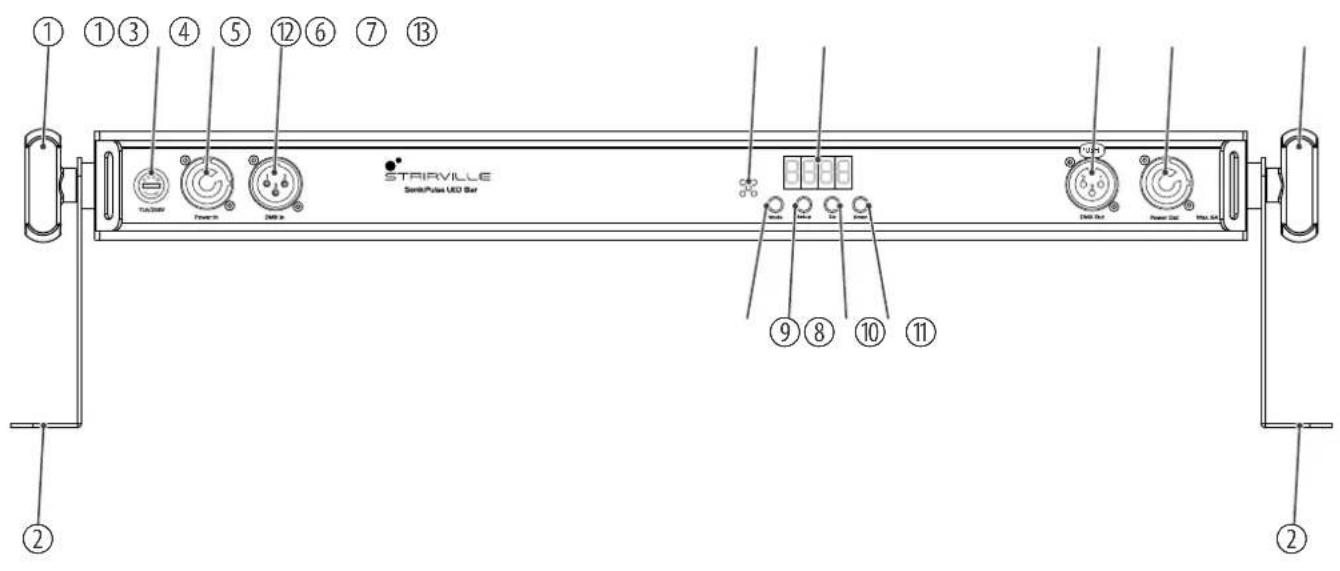
| 1 Locking screw for the mounting bracket |
| 2 Mounting bracket |
| 3 [T1A/250V] | Fuse holder |
| 4 [Power In] | Lockable input socket (Power Twist) for connection to mains power |
| 5 [DMX In] | DMX input, designed as XLR panel plug, 3-pin |
| 6 Built-in microphone for sound control |
| 7 Display |
| 8 [Mode] | Activates the main menu and toggles between menu items |
| 9 [Setup] | Selects an option of the respective operating mode |
| 10 [Up] | Navigates upwards in a menu list, increases the displayed value by one |
| 11 [Down] | Navigates downwards in a menu list, reduces the displayed value by one |
| 12 [DMX Out] | DMX output, designed as XLR panel socket, 3-pin |
| 13 [Power Out] | Lockable output socket (Power Twist) for powering a connected device |
SonicPulse LED Bar 05, SonicPulse LED Bar 10 LED Bar
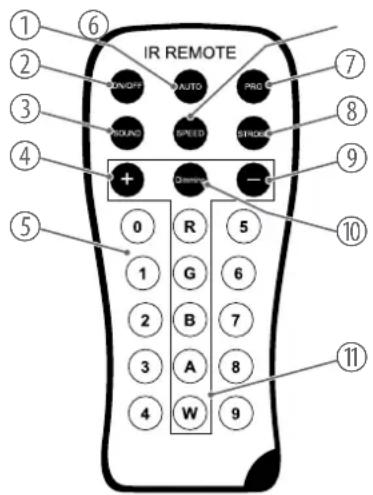
Infrared remote control
1 [AUTO] | Activates "Automatic" mode.
2 [ON/OFF] | Turns the device on and off.
3 [SOUND] | Activates "Sound control" mode. Set the sensitivity of the built-in microphone with [+] and [-] .
4 [+] | Increases the set value.
5 [0...9] | Number buttons for the direct selection of a fixed colour.
6 [SPEED] Activates the setting mode for the programme speed. Adjust the speed using [+] and [-] .
7 [PRG] Activates the "pre-programmed automatic show" mode. Select the required programme with [+] and [-] .
8 [STROBE] Activates the setting mode for the strobe speed. Adjust the speed using [+] and [-] .
9 [-] Decreases the set value.
10 [Dimming] Activates the dimming function for fixed colours. Set the value for each fixed colour using [+] and [-] .
11 [R], [G], [B], [A], [W] | Buttons for selecting the colour shade in dimmer mode.
7 Operation
7.1 Starting the device
Connect the device to the mains to start operation. After a few seconds, the display indicates that a reset is in progress. The device is now operational.
7.2 Main menu
- Press [Mode] to activate the main menu and switch between menu items.
- Press [Up] or [Down] to change the respectively displayed value. When the display shows the required value, confirm with [Setup].
- To exit the menu item without making changes, press [Mode].
- If you do not press a button for 30 seconds the display turns off. Briefly press [Mode], [Setup], [Up] or [Down] to switch it on again.
- To manually switch off the display, simultaneously hold down [Mode] and [Setup] for three seconds.
- All previous settings are retained even when you switch the device off and disconnect it from the mains.
7.2.1 Automatic programme
| Automatic mode can only be activated if the device is operating in stand-alone mode or as master in a master/slave combination. This setting is only relevant if the device is not controlled via DMX. | |
| 1. Press [Mode] repeatedly until the display shows 'Auto'. Confirm with [Setup]. | |
| 2. Press [Up] or [Down] to select one of the automatic programmes (display 'AU.01'... 'AU.03'). Confirm with [Setup]. | |
| The following automatic programmes are available: | |
| Menu level 2 Function | |
| 'AU.01'Effect 2...Effect 8 | |
| 'AU.02'Effect 9...Effect 24 | |
| 'AU.03'All effects | |
| Setting the programme speed | 3. Press [Up] or [Down] to set the playback speed of the automatic programme to between 'SP.01' (slow) and 'SP.99' (fast) or to 'FL81' (flash effect). Confirm with [Setup]. |
| Setting the strobe frequency | 4. Press [Up] or [Down] to set the strobe frequency of the automatic programme to between 'FS.00' (slow) and 'FS.99' (fast). Confirm with [Setup]. |
| 5. To exit the menu item without making changes, press [Mode]. | |
7.2.2 Pre-programmed automatic show
A pre-programmed automatic show can only be activated if the device is operating in standalone mode or as master in a master/slave combination. This setting is only relevant if the device is not controlled via DMX.
- Press [Mode] repeatedly until the display shows 'Pr.XX'. Confirm with [Setup].
- Press [Up] or [Down] to select one of the pre-programmed automatic shows (display 'Pr.01'... 'Pr.24'). Confirm with [Setup].
For programme 'Pr.01', you can set a static colour between 'CO.00' and 'CO.39'.
For programmes 'Pr.02'... 'Pr.24' you can set the playback speed to between 'SP.01' (slow) and 'SP.99' (fast) or to 'FL81' (flash effect).
- Press [Up] or [Down] to set the strobe frequency of the automatic programme to between 'FS.00' (slow) and 'FS.99' (fast). Confirm with [Setup].
- To exit the menu item without making changes, press [Mode].
7.2.3 DMX mode
This setting is only relevant when the device is controlled via DMX.
- Press [Mode] repeatedly until the display shows 'd---'. Confirm with [Setup].
- Press [Up] or [Down] to select a DMX address between 'd.001' and 'd.512'. Confirm with [Setup].
Make sure that this number matches the configuration of your DMX controller. The following table shows the respective highest possible DMX address for the various DMX modes.
Mode Highest possible DMX address
4-channel mode 509
5-channel mode 508
6-channel mode 507
11-channel mode 502
23-channel mode (only item no. 580868) 490
39-channel mode (only item no. 580867) 474

Press [Up] or [Down] to select the DMX mode (display '4.ch', '5.ch', '6.ch', '11.ch' or '23.ch'/'39.ch'). Confirm with [Setup].

exit the menu item without making changes, press [Mode].
7.2.4 "Master/slave" mode
This setting is only relevant if the device is serving as slave in a master/slave configuration and is not controlled via DMX.
- Press [Mode] repeatedly until the display shows 'Slav'. Confirm with [Setup].
- Press [Up] or [Down] to select 'Yes' (master/slave enabled) or 'No' (master/slave disabled). Confirm with [Setup].
- To exit the menu item without making changes, press [Mode].
7.2.5 Manual colour settings
- Press [Mode] repeatedly until the display shows 'Colr'. Confirm with [Setup].
- Press [Up] or [Down] to make the required colour setting. Confirm with [Setup].
'r.000'... 'r.255'
'g.000'... 'g.255'
b.000'...b.255
'u.000'... 'u.255'
- To exit the menu item without making changes, press [Mode].
7.2.6 Sound control
Setting an automatic show
In this mode, the device follows the rhythm of the background music or sounds detected by the built-in microphone.
- Press [Mode] repeatedly until the display shows 'Soud'. Confirm with [Setup].
- Press [Up] or [Down] to select the required automatic show (display 'SO.01'... 'SO.25'). Confirm with [Setup].
The following automatic shows are available:
Menu level 2 Function
'SO.01'... 'SO.04' Gentle effects
'SO.05' ... 'SO.22' Dynamic effects
'SO.23' Collections of gentle effects
'SO.24' Collections of dynamic effects
'SO.25' Collections of gentle and dynamic effects
Adjusting the sensitivity
- Press [Up] or [Down] to adjust the sensitivity (display 'SU.00' ... 'SU.50'). Confirm with [Setup].
- To exit the menu item without making changes, press [Mode].
7.3 Settings
7.3.1 Setting the dimmer curve
- Press [Mode] repeatedly until the display shows 'Set'. Confirm with [Setup].
- Press [Up] or [Down] repeatedly until the display shows 'Cur'. Confirm with [Setup].
- Press [Up] or [Down] to choose a dimmer curve. Confirm with [Setup].
The following dimmer curves are available:
| Menu level 3 Function | |
| ‘Cu-1’Linear proportional course (Linear) | |
| ‘Cu-2’ | Quadratic curve with a flat profile at the beginning and a steep profile at the end (Square Law) |
| ‘Cu-3’Inverted quadratic curve with a steep profile at the beginning and a flat profile at the end (Inv Square Law) | |
| ‘Cu-4’ | Non-linear curve with a distinctive flat profile at the beginning and the end (S-Type) |
- To exit the menu item without making changes, press [Mode].
7.3.2 Pixel rotation
- Press [Mode] repeatedly until the display shows 'Set'. Confirm with [Setup].
- Press [Up] or [Down] repeatedly until the display shows 'Pi.dI'. Confirm with [Setup].
- Press [Up] or [Down] to choose between 'NOR' (normal) and 'Inv' (rotated). Confirm with [Setup].
- To exit the menu item without making changes, press [Mode].
7.3.3 Behaviour on DMX control failure
- Press [Mode] repeatedly until the display shows 'Set'. Confirm with [Setup].
- Press [Up] or [Down] repeatedly until the display shows 'Fail'. Confirm with [Setup].
- Press [Up] or [Down] to choose 'Off' (spotlight is turned off) or 'Hold' (the most recently received signal is held). Confirm with [Setup].
- To exit the menu item without making changes, press [Mode].
7.3.4 Key lock
- Press [Mode] repeatedly until the display shows 'Set'. Confirm with [Setup].
- Press [Up] or [Down] repeatedly until the display shows 'Lock'. Confirm with [Setup].
- Press [Up] or [Down] to choose 'On' (key lock activated) or 'Off' (key lock deactivated). Confirm with [Setup].
- Simultaneously press [Mode] and [Setup] for five seconds if you want to activate the input while the key lock is activated.
- To exit the menu item without making changes, press [Mode].
7.3.5 Reset to factory default setting
- Press [Mode] repeatedly until the display shows 'Set'. Confirm with [Setup].
- Press [Up] or [Down] repeatedly until the display shows 'Fact'. Confirm with [Setup].
- Press [Up] or [Down] to select 'Yes' (reset device) or 'No' (do not reset device). Confirm with [Setup].
- To exit the menu item without making changes, press [Mode].
7.3.6 System information
- Press [Mode] repeatedly until the display shows 'Info'. Confirm with [Setup].
- Press [Up] or [Down] repeatedly until the display shows 'Ver'. Confirm with [Setup].
The display shows the current version number of the device.
- Press [Up] or [Down] repeatedly until the display shows 'Life'. Confirm with [Setup].
The display shows the total runtime of the device. -
If you want to reset the total runtime of the device, press and hold [Setup] for five seconds and enter the password 0088.
The total runtime of the device is reset. -
To exit the menu item without making changes, press [Mode].
7.4 RDM functions
The device provides an RDM function and supports the DMX512 standard. Any device with RDM can be recognised from the built-in UID code.
| Parameter ID Detection com- | mand | Sent command Received command |
| DISC_UNIQUE_BRANCH* | ||
| DISC_MUTE* | ||
| DISC_UN_MUTE* | ||
| DEVICE_INFO* | ||
| SOFTWARE_VERSION_LABEL* | ||
| DMX_START_ADDRESS** | ||
| IDENTIFY_DEVICE** | ||
| SUPPORTED_PARAMETERST* | ||
| DMX_PERSONALITY** | ||
| DMX.PersonALITY_DESCRIPTION* | ||
| RESET_DEVICE* | ||
| FACTORY_DEFAULTS | * |
SonicPulse LED Bar 05, SonicPulse LED Bar 10 LED Bar
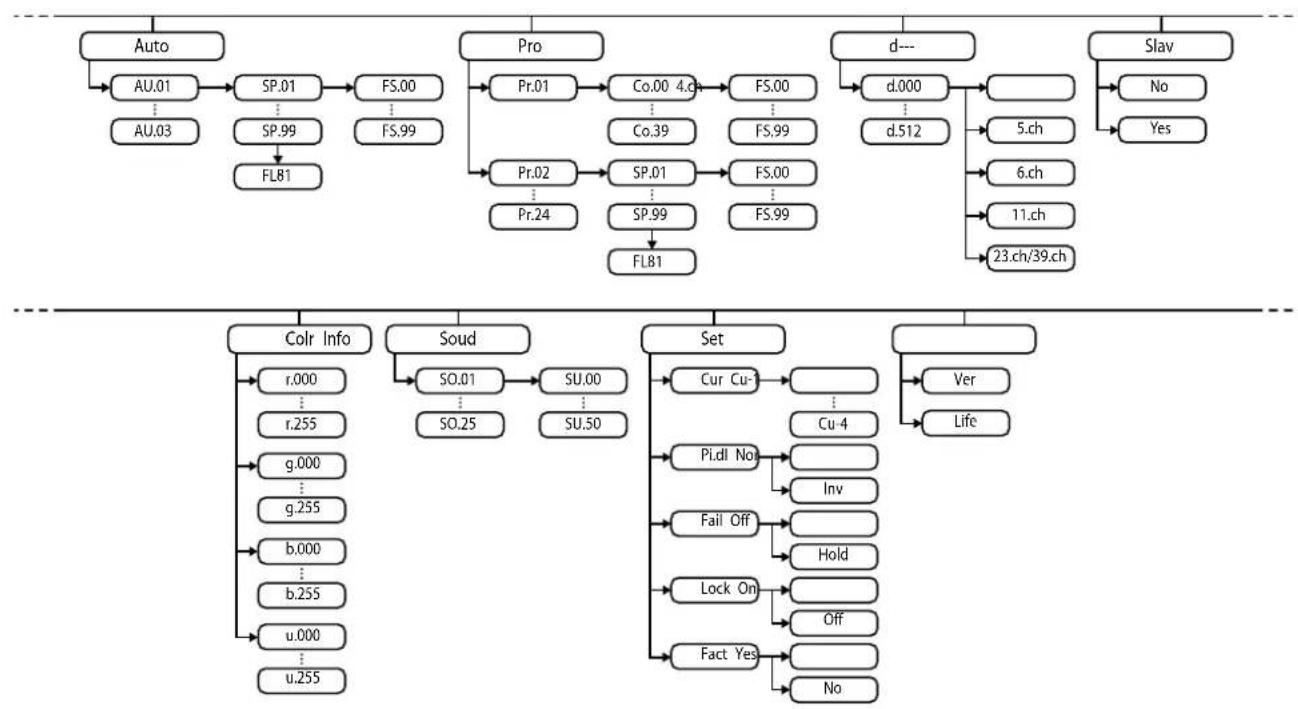
7.5 Menu overview
7.6 Functions in 4-channel DMX mode
| Channel Value Function | |
| 10...255 Intensity | (0% to 100%) of the red LEDs |
| 20...255 Intensity | (0% to 100%) of the green LEDs |
| 30...255 Intensity | (0% to 100%) of the blue LEDs |
| 40...255 Intensity | (0% to 100%) of the white LEDs |
7.7 Functions in 5-channel DMX mode
| Channel Value Function | |
| 1 0...255 Dimmer (0% to 100%) for all LEDs | |
| 2 0...127 Sound control | |
| 128...255 Pre-programmed automatic show | |
| 3 Function depending on setting of channel 2, if channel 2 = 128...255 | |
| 0...15 No function | |
| 16...25 Colour change 1 | |
| 26...35 Colour change 2 | |
| 36...45 Colour change 3 | |
| 46...55 Colour change 4 | |
| 66...65 Colour change 5 | |
| 66...75 Colour transition 1 | |
| 76...85 Colour transition 2 | |
| 86...95 Colour transition 3 | |
| 96...105 Colour transition 6 | |
| 106...115 Colour transition 7 | |
| 116...125 Colour transition 8 | |
| 126...135 Colour transition 9 | |
| 136...145 Colour transition 10 | |
| 146...155 Colour transition 11 | |
| 156...165 Colour transition 12 | |
| 166...175 Colour transition 4 | |
| 176...185 Colour transition 5 | |
| 186...195 Colour transition 6 | |
| 196...205 Colour transition 7 | |
| 206...215 Colour transition 8 | |
| 216...225 Colour transition 9 | |
| 226...235 Colour transition 10 | |
| 236...245 Colour transition 11 | |
| 246...255 No function | |
| 4 Function depending on setting of channel 2, if channel 2 = 0...127 | |
| 0...5 No function | |
| 6...15 Sound mode 1 | |
| 16...25 Sound mode 2 | |
| 26...35 Sound mode 3 | |
| 36...45 Sound mode 4 | |
| 46...55 Sound mode 5 | |
| 66...65 Sound mode 6 | |
| 66...75 Sound mode 7 | |
| 76...85 Sound mode 8 | |
| 86...95 Sound mode 9 | |
| 96...105 Sound mode 10 | |
| 106...115 Sound mode 11 | |
| 116...125 Sound mode 12 | |
| 126...135 Sound mode 13 | |
| 136...145 Sound mode 14 | |
| 146...155 Sound mode 15 | |
| 156...165 Sound mode 16 | |
| 166...175 Sound mode 17 | |
| 176...185 Sound mode 18 | |
| 186...195 Sound mode 19 | |
| 196...205 Sound mode 20 | |
| 206...215 Sound mode 21 | |
| 216...225 Sound mode 22 | |
| 226...235 Sound mode 23 | |
| 236...245 Sound mode 24 | |
| 246...255 Sound mode 25 | |
| 5 Function depending on setting of channel 2 | |
| Channel 2 = 0...127 | |
| 0...255 Sensitivity of the built-in microphone for sound control | |
| Channel 2 = 128...255 | |
| 0...255 Playback speed of the pre-programmed automatic show increasing | |
7.8 Functions in 6-channel DMX mode
| Channel Value Function | ||
| 10...255 Dimmer (0% to 100%) for all LEDs | ||
| 2 Strobe | ||
| 0...10 No function | ||
| 11...255 Linear flashing (strobe), increasing speed | ||
| 30...255 Intensity | (0% to 100%) of the red LEDs | |
| 40...255 Intensity | (0% to 100%) of the green LEDs | |
| 50...255 Intensity | (0% to 100%) of the blue LEDs | |
| 60...255 Intensity | (0% to 100%) of the white LEDs | |
7.9 Functions in 11-channel DMX mode
| Channel Value Function | ||
| 1 0...255 Dimmer (0% to 100%) for all LEDs | ||
| 2 Strobe | ||
| 0...10 No function | ||
| 11...255 Linear flashing (strobe), increasing speed | ||
| 3 0...63 RGBW colour change | ||
| 64...127 Colour resets | ||
| 128...191 Pre-programmed automatic show | ||
| 192...255 Sound control | ||
| 4 Colour selection | ||
| 0...21 Colour 0 (R000, G000, B000, W000) | ||
| 22...27 Colour 1 (R255, G000, B000, W000) | ||
| 28...33 Colour 2 (R255, G015, B000, W000) | ||
| 34...39 Colour 3 (R255, G050, B000, W000) | ||
| 40...45 Colour 4 (R255, G125, B000, W000) | ||
SonicPulse LED Bar 05, SonicPulse LED Bar 10 LED Bar
| Channel Value Function | |
| 46...51 Colour 5 (R255, G170, B000, W000) | |
| 52...57 Colour 6 (R255, G210, B000, W000) | |
| 58...63 Colour 7 (R255, G255, B000, W000) | |
| 64...69 Colour 8 (R200, G255, B000, W000) | |
| 70...75 Colour 9 (R160, G255, B000, W000) | |
| 76...81 Colour 10 (R110, G255, B000, W000) | |
| 82...87 Colour 11 (R070, G255, B000, W000) | |
| 88...93 Colour 12 (R000, G255, B000, W000) | |
| 94...99 Colour 13 (R000, G255, B010, W000) | |
| 100...105 Colour 14 (R000, G255, B025, W000) | |
| 106...111 Colour 15 (R000, G255, B040, W000) | |
| 112...117 Colour 16 (R000, G255, B070, W000) | |
| 118...123 Colour 17 (R000, G255, B120, W000) | |
| 124...129 Colour 18 (R000, G255, B255, W000) | |
| 130...135 Colour 19 (R000, G100, B255, W000) | |
| 136...141 Colour 20 (R000, G000, B255, W000) | |
| 142...147 Colour 21 (R020, G000, B255, W000) | |
| 148...153 Colour 22 (R050, G000, B255, W000) | |
| 154...159 Colour 23 (R080, G000, B255, W000) | |
| 160...165 Colour 24 (R130, G000, B255, W000) | |
| 166...171 Colour 25 (R180, G000, B255, W000) | |
| 172...177 Colour 26 (R225, G000, B255, W000) | |
| 178...183 Colour 27 (R255, G000, B255, W000) | |
| 184...189 Colour 28 (R255, G000, B220, W000) | |
| 190...195 Colour 29 (R255, G000, B070, W000) | |
| 196...201 Colour 30 (R255, G000, B020, W000) | |
| 202...207 Colour 31 (R255, G000, B007, W000) | |
| 208...213 Colour 32 (R000, G000, B000, W255) | |
| 214...219 Colour 33 (R255, G000, B000, W255) | |
| 220...225 Colour 34 (R125, G000, B000, W255) | |
| 226...231 Colour 35 (R000, G255, B000, W255) | |
| 232...237 Colour 36 (R000, G120, B000, W255) | |
SonicPulse LED Bar 05, SonicPulse LED Bar 10 LED Bar
| Channel Value Function | |
| 238...243 Colour 37 (R000, G000, B255, W255) | |
| 244...249 Colour 38 (R000, G000, B100, W255) | |
| 250...255 Colour 39 (R000, G000, B050, W255) | |
| 5 Function depending on setting of channel 3, if channel 3 = 128...191 | |
| 0...15 No function | |
| 16...25 Colour change 1 | |
| 26...35 Colour change 2 | |
| 36...45 Colour change 3 | |
| 46...55 Colour change 4 | |
| 66...65 Colour change 5 | |
| 66...75 Colour transition 1 | |
| 76...85 Colour transition 2 | |
| 86...95 Colour transition 3 | |
| 96...105 Colour transition 6 | |
| 106...115 Colour transition 7 | |
| 116...125 Colour transition 8 | |
| Channel Value Function | ||
| 126...135 Colour transition 9 | ||
| 136...145 Colour transition 10 | ||
| 146...155 Colour transition 11 | ||
| 156...165 Colour transition 12 | ||
| 166...175 Colour transition 4 | ||
| 176...185 Colour transition 5 | ||
| 186...195 Colour transition 6 | ||
| 196...205 Colour transition 7 | ||
| 206...215 Colour transition 8 | ||
| 216...225 Colour transition 9 | ||
| 226...235 Colour transition 10 | ||
| 236...245 Colour transition 11 | ||
| 246...255 No function | ||
| 6 Function depending on setting of channel 3, if channel 3 = 192...255 | ||
| 0...5 No function | ||
| 6...15 Sound mode 1 | ||
SonicPulse LED Bar 05, SonicPulse LED Bar 10 LED Bar
| Channel Value Function | |
| 16...25 Sound mode 2 | |
| 26...35 Sound mode 3 | |
| 36...45 Sound mode 4 | |
| 46...55 Sound mode 5 | |
| 66...65 Sound mode 6 | |
| 66...75 Sound mode 7 | |
| 76...85 Sound mode 8 | |
| 86...95 Sound mode 9 | |
| 96...105 Sound mode 10 | |
| 106...115 Sound mode 11 | |
| 116...125 Sound mode 12 | |
| 126...135 Sound mode 13 | |
| 136...145 Sound mode 14 | |
| 146...155 Sound mode 15 | |
| 156...165 Sound mode 16 | |
| 166...175 Sound mode 17 | |
| 176...185 Sound mode 18 | |
| 186...195 Sound mode 19 | |
| 196...205 Sound mode 20 | |
| 206...215 Sound mode 21 | |
| 216...225 Sound mode 22 | |
| 226...235 Sound mode 23 | |
| 236...245 Sound mode 24 | |
| 246...255 Sound mode 25 | |
| 7 Function depending on setting of channel 3 | |
| Channel 3 = 128...191 | |
| 0...255 Playback speed of the pre-programmed automatic show increasing | |
| Channel 3 = 192...255 | |
| 0...255 Sensitivity of the built-in microphone for sound control | |
| 8 0...255 Intensity (0% to 100%) of the red LEDs | |
| 9 0...255 Intensity (0% to 100%) of the green LEDs | |
Operation
Channel Value Function
10 0...255 Intensity (0% to 100%) of the blue LEDs
11 0...255 Intensity (0% to 100%) of the white LEDs
7.10 Functions in 23-channel DMX mode (item no 580868)
| Channel Value Function | |
| 1 0...255 Dimmer (0% to 100%) for all LEDs | |
| 2 Strobe | |
| 0...10 No function | |
| 11...255 Linear flashing (strobe), increasing speed | |
| 3 0...63 RGBW colour change | |
| 64...127 Colour resets | |
| 128...191 Pre-programmed automatic show | |
| 192...255 Sound control | |
| 4 Colour selection | |
| 0...21 Colour 0 (R000, G000, B000, W000) | |
| 22...27 Colour 1 (R255, G000, B000, W000) | |
| 28...33 Colour 2 (R255, G015, B000, W000) | |
| 34...39 Colour 3 (R255, G050, B000, W000) | |
| 40...45 Colour 4 (R255, G125, B000, W000) | |
SonicPulse LED Bar 05, SonicPulse LED Bar 10 LED Bar
| Channel Value Function | |
| 46...51 Colour 5 (R255, G170, B000, W000) | |
| 52...57 Colour 6 (R255, G210, B000, W000) | |
| 58...63 Colour 7 (R255, G255, B000, W000) | |
| 64...69 Colour 8 (R200, G255, B000, W000) | |
| 70...75 Colour 9 (R160, G255, B000, W000) | |
| 76...81 Colour 10 (R110, G255, B000, W000) | |
| 82...87 Colour 11 (R070, G255, B000, W000) | |
| 88...93 Colour 12 (R000, G255, B000, W000) | |
| 94...99 Colour 13 (R000, G255, B010, W000) | |
| 100...105 Colour 14 (R000, G255, B025, W000) | |
| 106...111 Colour 15 (R000, G255, B040, W000) | |
| 112...117 Colour 16 (R000, G255, B070, W000) | |
| 118...123 Colour 17 (R000, G255, B120, W000) | |
| 124...129 Colour 18 (R000, G255, B255, W000) | |
| 130...135 Colour 19 (R000, G100, B255, W000) | |
| 136...141 Colour 20 (R000, G000, B255, W000) | |
| 142...147 Colour 21 (R020, G000, B255, W000) | |
| 148...153 Colour 22 (R050, G000, B255, W000) | |
| 154...159 Colour 23 (R080, G000, B255, W000) | |
| 160...165 Colour 24 (R130, G000, B255, W000) | |
| 166...171 Colour 25 (R180, G000, B255, W000) | |
| 172...177 Colour 26 (R225, G000, B255, W000) | |
| 178...183 Colour 27 (R255, G000, B255, W000) | |
| 184...189 Colour 28 (R255, G000, B220, W000) | |
| 190...195 Colour 29 (R255, G000, B070, W000) | |
| 196...201 Colour 30 (R255, G000, B020, W000) | |
| 202...207 Colour 31 (R255, G000, B007, W000) | |
| 208...213 Colour 32 (R000, G000, B000, W255) | |
| 214...219 Colour 33 (R255, G000, B000, W255) | |
| 220...225 Colour 34 (R125, G000, B000, W255) | |
| 226...231 Colour 35 (R000, G255, B000, W255) | |
| 232...237 Colour 36 (R000, G120, B000, W255) | |
SonicPulse LED Bar 05, SonicPulse LED Bar 10 LED Bar
| Channel Value Function | |
| 238...243 Colour 37 (R000, G000, B255, W255) | |
| 244...249 Colour 38 (R000, G000, B100, W255) | |
| 250...255 Colour 39 (R000, G000, B050, W255) | |
| 5 Function depending on setting of channel 3, if channel 3 = 128...191 | |
| 0...15 No function | |
| 16...25 Colour change 1 | |
| 26...35 Colour change 2 | |
| 36...45 Colour change 3 | |
| 46...55 Colour change 4 | |
| 66...65 Colour change 5 | |
| 66...75 Colour transition 1 | |
| 76...85 Colour transition 2 | |
| 86...95 Colour transition 3 | |
| 96...105 Colour transition 6 | |
| 106...115 Colour transition 7 | |
| 116...125 Colour transition 8 | |
| Channel Value Function | ||
| 126...135 Colour transition 9 | ||
| 136...145 Colour transition 10 | ||
| 146...155 Colour transition 11 | ||
| 156...165 Colour transition 12 | ||
| 166...175 Colour transition 4 | ||
| 176...185 Colour transition 5 | ||
| 186...195 Colour transition 6 | ||
| 196...205 Colour transition 7 | ||
| 206...215 Colour transition 8 | ||
| 216...225 Colour transition 9 | ||
| 226...235 Colour transition 10 | ||
| 236...245 Colour transition 11 | ||
| 246...255 No function | ||
| 6 Function depending on setting of channel 3, if channel 3 = 192...255 | ||
| 0...5 No function | ||
| 6...15 Sound mode 1 | ||
SonicPulse LED Bar 05, SonicPulse LED Bar 10 LED Bar
| Channel Value Function | ||
| 16...25 Sound mode 2 | ||
| 26...35 Sound mode 3 | ||
| 36...45 Sound mode 4 | ||
| 46...55 Sound mode 5 | ||
| 66...65 Sound mode 6 | ||
| 66...75 Sound mode 7 | ||
| 76...85 Sound mode 8 | ||
| 86...95 Sound mode 9 | ||
| 96...105 Sound mode 10 | ||
| 106...115 Sound mode 11 | ||
| 116...125 Sound mode 12 | ||
| 126...135 Sound mode 13 | ||
| 136...145 Sound mode 14 | ||
| 146...155 Sound mode 15 | ||
| 156...165 Sound mode 16 | ||
| 166...175 Sound mode 17 | ||
| 176...185 Sound mode 18 | ||
| 186...195 Sound mode 19 | ||
| 196...205 Sound mode 20 | ||
| 206...215 Sound mode 21 | ||
| 216...225 Sound mode 22 | ||
| 226...235 Sound mode 23 | ||
| 236...245 Sound mode 24 | ||
| 246...255 Sound mode 25 | ||
| 7 Function depending on setting of channel 3 | ||
| Channel 3 = 128...191 | ||
| 0...255 Playback speed of the pre-programmed automatic show increasing | ||
| Channel 3 = 192...255 | ||
| 0...255 Sensitivity of the built-in microphone for sound control | ||
| 8 0...255 Intensity (0% to 100%) of the red LEDs in segment 1 | ||
| 9 0...255 Intensity (0% to 100%) of the green LEDs in segment 1 | ||
| 10 0...255 Intensity (0% to 100%) of the blue LEDs in segment 1 | ||
Channel Value Function
11 0...255 Intensity (0% to 100%) of the white LEDs in segment 1
12 0...255 Intensity (0% to 100%) of the red LEDs in segment 2
13 0...255 Intensity (0% to 100%) of the green LEDs in segment 2
140...255 Intensity (0% to 100%) of the blue LEDs in segment 2
15 0...255 Intensity (0% to 100%) of the white LEDs in segment 2
16 0...255 Intensity (0% to 100%) of the red LEDs in segment 3
17 0...255 Intensity (0% to 100%) of the green LEDs in segment 3
180...255 Intensity (0% to 100%) of the blue LEDs in segment 3
190...255 Intensity (0% to 100%) of the white LEDs in segment 3
20 0...255 Intensity (0% to 100%) of the red LEDs in segment 4
21 0...255 Intensity (0% to 100%) of the green LEDs in segment 4
22 0...255 Intensity (0% to 100%) of the blue LEDs in segment 4
23 0...255 Intensity (0% to 100%) of the white LEDs in segment 4
7.11 Functions in 39-channel DMX mode (item no 580867)
| Channel Value Function | ||
| 1 0...255 Dimmer (0% to 100%) for all LEDs | ||
| 2 Strobe | ||
| 0...10 No function | ||
| 11...255 Linear flashing (strobe), increasing speed | ||
| 3 0...63 RGBW colour change | ||
| 64...127 Colour resets | ||
| 128...191 Pre-programmed automatic show | ||
| 192...255 Sound control | ||
| 4 Colour selection | ||
| 0...21 Colour 0 (R000, G000, B000, W000) | ||
| 22...27 Colour 1 (R255, G000, B000, W000) | ||
| 28...33 Colour 2 (R255, G015, B000, W000) | ||
| 34...39 Colour 3 (R255, G050, B000, W000) | ||
| 40...45 Colour 4 (R255, G125, B000, W000) | ||
SonicPulse LED Bar 05, SonicPulse LED Bar 10 LED Bar
| Channel Value Function | |
| 46...51 Colour 5 (R255, G170, B000, W000) | |
| 52...57 Colour 6 (R255, G210, B000, W000) | |
| 58...63 Colour 7 (R255, G255, B000, W000) | |
| 64...69 Colour 8 (R200, G255, B000, W000) | |
| 70...75 Colour 9 (R160, G255, B000, W000) | |
| 76...81 Colour 10 (R110, G255, B000, W000) | |
| 82...87 Colour 11 (R070, G255, B000, W000) | |
| 88...93 Colour 12 (R000, G255, B000, W000) | |
| 94...99 Colour 13 (R000, G255, B010, W000) | |
| 100...105 Colour 14 (R000, G255, B025, W000) | |
| 106...111 Colour 15 (R000, G255, B040, W000) | |
| 112...117 Colour 16 (R000, G255, B070, W000) | |
| 118...123 Colour 17 (R000, G255, B120, W000) | |
| 124...129 Colour 18 (R000, G255, B255, W000) | |
| 130...135 Colour 19 (R000, G100, B255, W000) | |
| 136...141 Colour 20 (R000, G000, B255, W000) | |
| 142...147 Colour 21 (R020, G000, B255, W000) | |
| 148...153 Colour 22 (R050, G000, B255, W000) | |
| 154...159 Colour 23 (R080, G000, B255, W000) | |
| 160...165 Colour 24 (R130, G000, B255, W000) | |
| 166...171 Colour 25 (R180, G000, B255, W000) | |
| 172...177 Colour 26 (R225, G000, B255, W000) | |
| 178...183 Colour 27 (R255, G000, B255, W000) | |
| 184...189 Colour 28 (R255, G000, B220, W000) | |
| 190...195 Colour 29 (R255, G000, B070, W000) | |
| 196...201 Colour 30 (R255, G000, B020, W000) | |
| 202...207 Colour 31 (R255, G000, B007, W000) | |
| 208...213 Colour 32 (R000, G000, B000, W255) | |
| 214...219 Colour 33 (R255, G000, B000, W255) | |
| 220...225 Colour 34 (R125, G000, B000, W255) | |
| 226...231 Colour 35 (R000, G255, B000, W255) | |
| 232...237 Colour 36 (R000, G120, B000, W255) | |
SonicPulse LED Bar 05, SonicPulse LED Bar 10 LED Bar
| Channel Value Function | |
| 238...243 Colour 37 (R000, G000, B255, W255) | |
| 244...249 Colour 38 (R000, G000, B100, W255) | |
| 250...255 Colour 39 (R000, G000, B050, W255) | |
| 5 Function depending on setting of channel 3, if channel 3 = 128...191 | |
| 0...15 No function | |
| 16...25 Colour change 1 | |
| 26...35 Colour change 2 | |
| 36...45 Colour change 3 | |
| 46...55 Colour change 4 | |
| 66...65 Colour change 5 | |
| 66...75 Colour transition 1 | |
| 76...85 Colour transition 2 | |
| 86...95 Colour transition 3 | |
| 96...105 Colour transition 6 | |
| 106...115 Colour transition 7 | |
| 116...125 Colour transition 8 | |
| Channel Value Function | ||
| 126...135 Colour transition 9 | ||
| 136...145 Colour transition 10 | ||
| 146...155 Colour transition 11 | ||
| 156...165 Colour transition 12 | ||
| 166...175 Colour transition 4 | ||
| 176...185 Colour transition 5 | ||
| 186...195 Colour transition 6 | ||
| 196...205 Colour transition 7 | ||
| 206...215 Colour transition 8 | ||
| 216...225 Colour transition 9 | ||
| 226...235 Colour transition 10 | ||
| 236...245 Colour transition 11 | ||
| 246...255 No function | ||
| 6 Function depending on setting of channel 3, if channel 3 = 192...255 | ||
| 0...5 No function | ||
| 6...15 Sound mode 1 | ||
SonicPulse LED Bar 05, SonicPulse LED Bar 10 LED Bar
| Channel Value Function | ||
| 16...25 Sound mode 2 | ||
| 26...35 Sound mode 3 | ||
| 36...45 Sound mode 4 | ||
| 46...55 Sound mode 5 | ||
| 66...65 Sound mode 6 | ||
| 66...75 Sound mode 7 | ||
| 76...85 Sound mode 8 | ||
| 86...95 Sound mode 9 | ||
| 96...105 Sound mode 10 | ||
| 106...115 Sound mode 11 | ||
| 116...125 Sound mode 12 | ||
| 126...135 Sound mode 13 | ||
| 136...145 Sound mode 14 | ||
| 146...155 Sound mode 15 | ||
| 156...165 Sound mode 16 | ||
| 166...175 Sound mode 17 | ||
| 176...185 Sound mode 18 | ||
| 186...195 Sound mode 19 | ||
| 196...205 Sound mode 20 | ||
| 206...215 Sound mode 21 | ||
| 216...225 Sound mode 22 | ||
| 226...235 Sound mode 23 | ||
| 236...245 Sound mode 24 | ||
| 246...255 Sound mode 25 | ||
| 7 Function depending on setting of channel 3 | ||
| Channel 3 = 128...191 | ||
| 0...255 Playback speed of the pre-programmed automatic show increasing | ||
| Channel 3 = 192...255 | ||
| 0...255 Sensitivity of the built-in microphone for sound control | ||
| 8 0...255 Intensity (0% to 100%) of the red LEDs in segment 1 | ||
| 9 0...255 Intensity (0% to 100%) of the green LEDs in segment 1 | ||
| 10 0...255 Intensity (0% to 100%) of the blue LEDs in segment 1 | ||
Channel Value Function
11 0...255 Intensity (0% to 100%) of the white LEDs in segment 1
12 0...255 Intensity (0% to 100%) of the red LEDs in segment 2
13 0...255 Intensity (0% to 100%) of the green LEDs in segment 2
14 0...255 Intensity (0% to 100%) of the blue LEDs in segment 2
15 0...255 Intensity (0% to 100%) of the white LEDs in segment 2
16 0...255 Intensity (0% to 100%) of the red LEDs in segment 3
17 0...255 Intensity (0% to 100%) of the green LEDs in segment 3
18 0...255 Intensity (0% to 100%) of the blue LEDs in segment 3
190...255 Intensity (0% to 100%) of the white LEDs in segment 3
20 0...255 Intensity (0% to 100%) of the red LEDs in segment 4
21 0...255 Intensity (0% to 100%) of the green LEDs in segment 4
22 0...255 Intensity (0% to 100%) of the blue LEDs in segment 4
23 0...255 Intensity (0% to 100%) of the white LEDs in segment 4
24 0...255 Intensity (0% to 100%) of the red LEDs in segment 5
25 0...255 Intensity (0% to 100%) of the green LEDs in segment 5
26 0...255 Intensity (0% to 100%) of the blue LEDs in segment 5
| Channel Value Function |
| 27 0...255 Intensity (0% to 100%) of the white LEDs in segment 5 |
| 28 0...255 Intensity (0% to 100%) of the red LEDs in segment 6 |
| 29 0...255 Intensity (0% to 100%) of the green LEDs in segment 6 |
| 30 0...255 Intensity (0% to 100%) of the blue LEDs in segment 6 |
| 31 0...255 Intensity (0% to 100%) of the white LEDs in segment 6 |
| 32 0...255 Intensity (0% to 100%) of the red LEDs in segment 7 |
| 33 0...255 Intensity (0% to 100%) of the green LEDs in segment 7 |
| 34 0...255 Intensity (0% to 100%) of the blue LEDs in segment 7 |
| 35 0...255 Intensity (0% to 100%) of the white LEDs in segment 7 |
| 36 0...255 Intensity (0% to 100%) of the red LEDs in segment 8 |
| 37 0...255 Intensity (0% to 100%) of the green LEDs in segment 8 |
| 38 0...255 Intensity (0% to 100%) of the blue LEDs in segment 8 |
| 39 0...255 Intensity (0% to 100%) of the white LEDs in segment 8 |
SonicPulse LED Bar 05, SonicPulse LED Bar 10 LED Bar
8 Technical specifications

SonicPulse LED Bar 10 (item no. 580867)
Light source 24× RGBWW LED, 2 W each
(3 LEDs in each of the eight segments)
Light source properties Colour temperature 3000 K
Optical properties Beam angle 10^
Control DMX, buttons and display on the device, infrared remote control
Number of DMX channels 4, 5, 6, 11 or 39
| Input connections Power supply Lockable input socket (Power Twist) | ||
| DMX control XLR panel socket, 3-pin | ||
| Output connections Power supply for further devices Lockable output socket (Power Twist) | ||
| Output current, max.: 6 A | ||
| DMX control XLR panel socket, 3-pin | ||
| Power consumption 29 W | ||
| Supply voltage | 100 - 240 V ~50/60 Hz | |
| Fuse 5 mm × 20 mm, 1 A, 250 V, slow blow | ||
| Battery remote control Lithium-ion button cell CR2025, 3 V | ||
| International Protection Rating IP20 | ||
| Mounting options Hanging, standing | ||
| Dimensions (W × H × D) 1,075 mm × 165 mm × 65 mm | ||
| Weight 2.8 kg | ||
| Ambient conditions Temperature range 0 °C...40 °C | ||
| Relative humidity 20%...80% (non-condensing) | ||
SonicPulse LED Bar 05 (item no. 580868)
Light source 12× RGBWWLED,2W each
(3 LEDs in each of the four segments)
Light source properties Colour temperature 3000K
Optical properties Beam angle 10^
Control DMX, buttons and display on the device, infrared remote control
Number of DMX channels 4, 5, 6, 11 or 23
Input connections Power supply Lockable input socket (Power Twist)
DMX control XLR panel socket, 3-pin
| Output connections Power supply for further devices Lockable output socket (Power Twist) | |
| Output current, max.: 6 A | |
| DMX control XLR panel socket, 3-pin | |
| Power consumption 29 W | |
| Supply voltage | 100 - 240 V ~50/60 Hz |
| Fuse 5 mm × 20 mm, 1 A, 250 V, slow blow | |
| Battery remote control Lithium-ion button cell CR2025, 3 V | |
| International Protection Rating IP20 | |
| Mounting options Hanging, standing | |
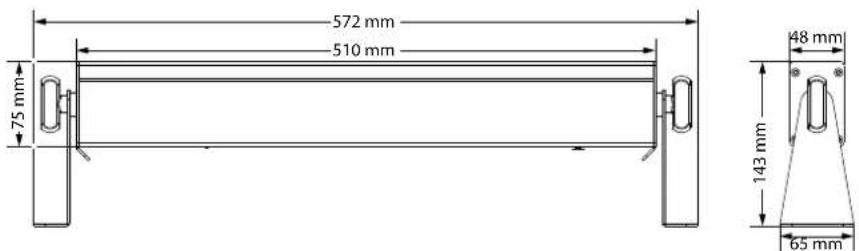
| Dimensions (W × H × D) 572 mm × 165 mm × 65 mm | |
| Weight 1.4 kg | |
| Ambient conditions Temperature range 0 °C...40 °C | |
| Relative humidity 20%...80% (non-condensing) | |
Further information
| Suitable for outdoor use No | |
| LED type x-in-1 | |
| Fanless Yes | |
| Remote control Included | |
| Wireless DMX No | |
| Separately controllable LEDs No | |
| Housing colour Black |
9 Plug and connection assignments
Introduction
This chapter will help you select the right cables and plugs to connect your valuable equipment so that a perfect light experience is guaranteed.
Please take our tips, because especially in 'Sound & Light' caution is indicated: Even if a plug fits into a socket, the result of an incorrect connection may be a destroyed DMX controller, a short circuit or 'just' a not working light show!
DMX connections
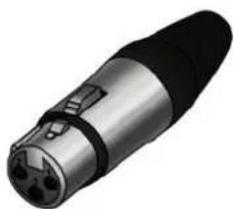
The unit offers a 3-pin XLR socket for DMX output and a 3-pin XLR plug for DMX input. Please refer to the drawing and table below for the pin assignment of a suitable XLR plug.
Pin Configuration
1 Ground, shielding
2 Signal inverted (DMX-, 'cold signal')
3 Signal (DMX+, 'hot signal')
10 Troubleshooting

NOTICE!
Data transfer errors due to improper wiring!
If the DMX connections are wired incorrectly, this can cause errors during the data transfer.
Do not connect the DMX input and output to audio devices, e.g. mixers or amplifiers.
Use special DMX cables for the wiring instead of normal microphone cables.
In the following we list a few common problems that may occur during operation. We give you some suggestions for easy troubleshooting:
| Symptom Remedy | |
| The device does not work, no light | Check the mains connection and the fuse. |
| No response to the DMX controller | 1. If the display flashes, e.g. ‘d001’, no valid DMX signal is being received. Check that the DMX controller is switched on. Check the DMX connections and cables for proper connection. |
| 2. If the display is not flashing but there is still no response, check the address settings and the DMX polarity. | |
| 3. Try using another DMX controller. | |
| 4. Check whether the DMX cables run near or parallel to high-voltage cables that may cause damage or interference to a DMX interface circuit. |
If the procedures recommended above do not succeed, please contact our Service Center. You can find the contact information at www.thomann.de.
11 Cleaning
Optical lenses
Clean the optical lenses, that are accessible from the outside, regularly in order to optimize the light output. The frequency of cleaning depends on the operating environment: wet, smoky or particularly dirty surroundings can cause more accumulation of dirt on the optics of the device.
Clean with a soft cloth using our lamp and lens cleaner (item no. 280122).
Always dry the parts carefully.
12 Protecting the environment
Disposal of the packing material


Disposal of batteries
Environmentally friendly materials have been chosen for the packaging. These materials can be sent for normal recycling. Ensure that plastic bags, packaging, etc. are disposed of in the proper manner.
Do not dispose of these materials with your normal household waste, but make sure that they are collected for recycling. Please follow the instructions and markings on the packaging.
Observe the disposal note regarding documentation in France.
Batteries must not be thrown away or burnt, but must instead be disposed of in line with the local regulations on the disposal of hazardous waste. Use the available collection sites.
Only dispose of lithium batteries when they are empty. Remove lithium batteries from the device before disposal if this is possible without destroying it. Protect used lithium batteries against short circuit, for example by taping the poles. Dispose the built-in lithium batteries together with the device. Check for an appropriate collection facility.
Dispose of the batteries and rechargeable batteries at relevant collection points or through your local waste facility.
Disposal of your old device

This product is subject to the European Waste Electrical and Electronic Equipment Directive (WEEE) as amended.
Do not dispose of your old device with your normal household waste; instead, deliver it for controlled disposal by an approved waste disposal firm or through your local waste facility. If in doubt, consult your local waste management facility. You can also return the device to a retailer if they offer to take the device back for free or if they are legally obliged to do so. When disposing of the device, comply with the rules and regulations that apply in your country. You can also return your old device to Thomann GmbH at no charge. Check the current conditions on www.thomann.de.
Proper disposal protects the environment as well as the health of your fellow human beings. This is because the proper handling of old devices negates the potential negative effects of hazardous substances, and because it conserves resources by recycling them.
Also note that waste avoidance is a valuable contribution to environmental protection. Repairing a device or passing it on to another user is an ecologically valuable alternative to disposal.
If your old device contains personal data, delete those data before disposing of it.
Notes
SonicPulse LED Bar 05, SonicPulse LED Bar 10 LED Bar
Notes