
MRW29B4ASL - Wine cellar MIDEA - Free user manual and instructions
Find the device manual for free MRW29B4ASL MIDEA in PDF.

| Product Type | Wine Cellar |
| Brand | Midea |
| Model | MRW29B4ASL |
| Dimensions (H × W × D) | 33.1 × 19.3 × 17.3 inches |
| Internal Volume | 86 L (3.0 cu ft) |
| Bottle Capacity | 29 bottles (standard size) |
| Temperature Range | 7 to 18 °C (44 to 65 °F) |
| Power Supply | AC 115 V, 60 Hz |
| Cooling Type | Compressor |
| Temperature Zones | Dual zone (upper and lower compartments independently adjustable) |
| Lighting | Interior LED, control key |
| Control | Touch panel on glass door |
| Special Functions | Lock/unlock, temperature memory, °C/°F conversion |
| Required Clearances | Minimum 4 inches on each side for ventilation |
| Cleaning | Interior: soft cloth with baking soda; exterior: soapy water; do not use solvents |
| Safety | Dedicated grounded outlet, 3-prong plug |
| After-Sales Service | USA: 1-866-646-4332; Canada: 1-888-365-2230 |
| Warranty | 1 year parts and labor (3-month extension upon registration) |
Frequently Asked Questions - MRW29B4ASL MIDEA
User questions about MRW29B4ASL MIDEA
0 question about this device. Answer the ones you know or ask your own.
Ask a new question about this device
Download the instructions for your Wine cellar in PDF format for free! Find your manual MRW29B4ASL - MIDEA and take your electronic device back in hand. On this page are published all the documents necessary for the use of your device. MRW29B4ASL by MIDEA.
USER MANUAL MRW29B4ASL MIDEA
original limited warranty
period!* Simply text a
picture of your proof of
purchase to:
1-844-224-1614
*The warranty extension is for the
three months immediately following
the completion of the product's
original warranty period.
THANK YOU
Thank you for choosing Midea! Before using your new Midea product, please read this manual thoroughly to ensure that you know how to operate the features and functions that your new appliance offers in a safe way.
CONTENTS
THANK YOU 01
SPECIFICATIONS 02
PRODUCT OVERVIEW 03
PRODUCT INSTALLATION 04
OPERATION INSTRUCTIONS 07
CLEANING AND MAINTENANCE 09
TROUBLESHOOTING 10
WARRANTY 11
SPECIFICATIONS
Product model MRW29B4ASL
Fresh Food Storage Compartment Volume 86L(3.0cu.ft.)
Rated Voltage
AC115V
Rated Current 60Hz
Overall Dimension (H x W x D) 33.1 x 19.3 x 17.3 inches
PRODUCT OVERVIEW
Names of components
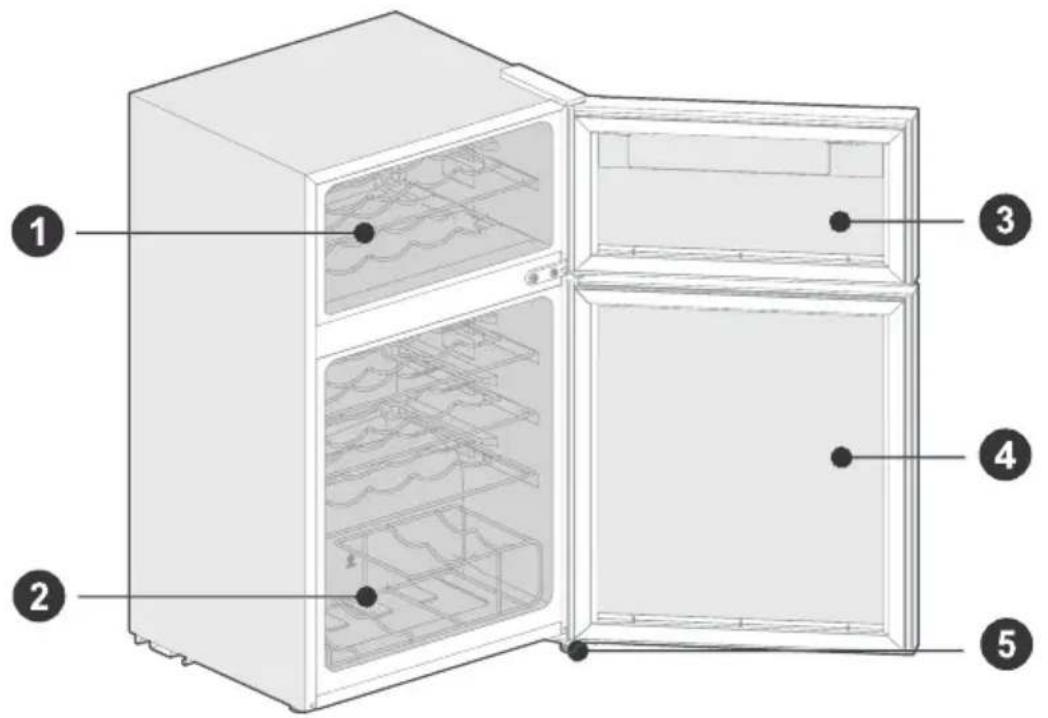
EN
1 Steel wire wine shelf
4 Lower glass door
2 Steel wire wine rack
5 Levelling foot
3 Upper glass door
ATTENTION
The picture above is only for reference. The actual configuration will depend on the physical product or statement by the distributor
PRODUCT INSTALLATION
Install Instruction
Finding a suitable location
- This cooler is designed to be free standing only, and should not be recessed or built-in.
- The cooler should be placed in a well-ventilated indoor place; the ground shall be flat and sturdy.
- Keep away from heat and avoid direct sunlight. Do not place the cooler in moist or watery places to prevent rust or reduction of insulating effect.
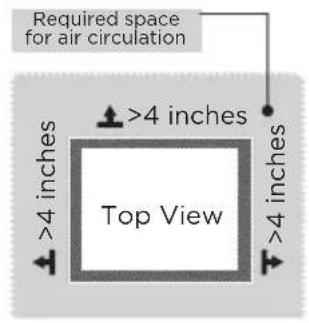
Dimensions and Clearances
- Too small of a distance from adjacent items may result in the degradation of freezing capability and increased electricity costs. Allow over 4 inches of clearance from each adjacent wall when installing the appliance.

Providing a proper power supply
-
Check your local power source. This cooler requires a AC115 V, 60 Hz power supply.
-
Use a receptacle that accepts the grounding prong. The power cord is equipped with a 3-prong (grounding) plug which mates with a standard 3-prong (grounding) wall outlet to minimize the possibility of electric shock hazard from this cooler.

CAUTION
The cooler should always be plugged into its own individual electrical outlet which has a voltage rating that matches the rating plate.
Never unplug your cooler by pulling on the power cord. Always grip the plug firmly and pull straight out from the outlet.
When positioning the appliance, ensure the supply cord is not trapped or damaged.
Start to use
- The cooler shall stay for half an hour before connecting power when it is firstly started.
- The cooler shall run 2 to 3 hours before loading fresh or frozen foods; the cooler shall run for more than 4 hours in summer in advance considering that the ambient temperature is high.
The arrangement of bottle
- Do not let bottle touch the back side of cooler in order to maintain good air circulation in the cooler.
- The capacity for bottle storage in the wine cabinet is based on the following marked bottle size. Oversized bottle may have impact on the number of bottle storage in the wine cabinet.

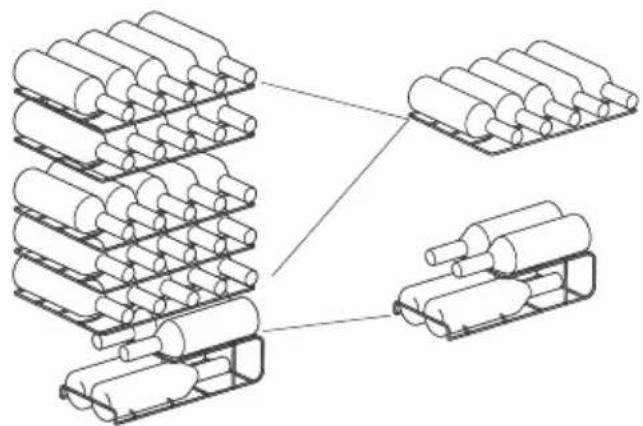

ATTENTION
The picture above is only for reference. The actual configuration will depend on the physical product or statement by the distributor.
Tips for energy saving
- The cooler shall be placed in room dry and ventilated. The beverage cooler can not be put under direct sunlight or next to heat source(such as radiator, stove, etc.), and a suitable insulation board shall be applied if necessary.
- Try to shorten opening time of cooler's door.
Practical skills for grape wine's storage
- Do not store bottled wine by box or case in refrigerator.
- The cork of the old bottle shall always be soaked in the wine putting into wine cooler. Air space is not allowed between wine and cork.
- Open-type bottle shelf is helpful, as it does not cut on air circulation. The air moisture that condensed on bottle can be dried out swiftly.
- The wine shall before drinking: such as put pink red wine onto the table 2-5 hours before drinking and red wine 4-5 hours, then can reach suitable serving temp. White wine, on the contray, can be served right on the table. champagne shall always be stored in cooler and taken out only before drinking.
- Please notice that wine's temperature is always lower than ideal serving temp, as the temperature will immediately rise 1 to 2^ when pouring into tumbler.
Serving temperature
- The wine's taste depends on right pouring temperature; therefore it determines its flavor.
We suggests the wine's temperature reaches the following degree when pouring:
| Wine Kinds Serving Temp | |
| Bordeaux red 18°C | |
| Louis Family dry red wine/Barolo 17°C | |
| Burgundy red/Bordeaux red 16°C | |
| Port 15°C | |
| Young Burgundy red 14°C | |
| Young red wine 12°C | |
| Young Beaujolais/all white wines with little residual sugar 11°C | |
| Old white wines/Chardonnay 10°C | |
| Sherry 9°C | |
| Young white wines from late vintage 8°C | |
| White wines Loire/Entre-deux-Mers 7°C |
OPERATION INSTRUCTIONS
Control panel
Display
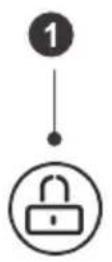
1 Lock/unlock key
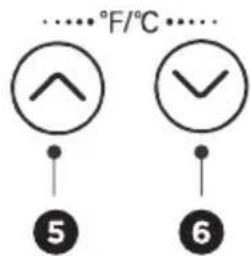
5 Temperature-rise key
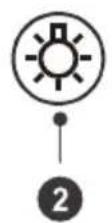
2 Lighting key
6 Temperature-drop key
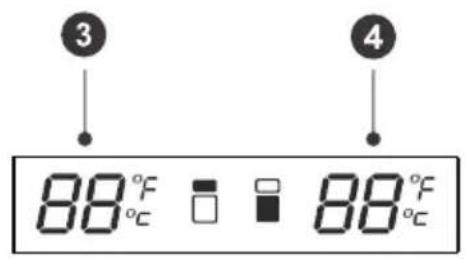
3 Upper chamber display area
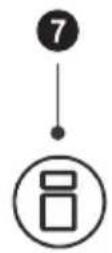
7 Temperature-area option key
4 Lower chamber display area
- The actual control panel may differ from model to model.
Display Control
- When power on the cooler for 1st time, the display screen will display in full for 3 seconds, and the start-up tone will ring, and then enter into the display of normal running;
- When it is in the locked state, the display screen will turn off if no key operation for 30 seconds; the display screen recovers the normal display if any key running.

ATTENTION
This cooler adopts the touch control of the glass door. Touch slightly when pressing the keys. It is to be avoided that the area of the display panel is scratched by the sharp things and it shall be kept away from the environment of high magnetic field and high humidity. Otherwise the cooler is possible not to be set and operate normally.
Locking and unlocking
- By pressing the button for 3s in the unlocked mode, the buzzer rings and the locked mode is activated; the temperature display areas (digit display areas) of upper chamber and lower chamber stop flashing.
- By pressing the button for 3s in the locked mode, the buzzer rings and the unlocked mode is activated; After unlocking, the temperature display area of selected chamber flashes.
- In the locked mode, touch any except lighting key or lock/unlock key, the display screen will keep flashing for 2.5s and be with the buzzer alerting.

Lighting
- After power on for 3s, the lighting turns on, and keeps on for 30s. If the lighting key is not operated within 30s, the lighting shall automatically turn off.
- Press the Lighting key to turn on or turn off the light.
Selection of adjustable temperature chamber
Each time power-on the cooler, the upper chamber is default adjustable temperature chamber, by pressing the temperature-area option key to switch between upper chamber and lower chamber; when select the upper or lower chamber, the corresponding temperature digital display area will blink, and stop blink after the panel locked.
Conversion of the Fahrenheit temperature and Celsius temperature
- Press the Temperature-rise key and the Temperature-drop key at the same time for 3s to finish the conversion of the Celsius temperature and Fahrenheit temperature; the screen will display the Fahrenheit temperature or Celsius temperature under the existing mode.
Temperature setting
- when select the upper chamber or lower chamber as the adjustable temperature chamber, the corresponding temperature digital display area will blink.
- Press the Temperature-rise key, the temperature will increase 1^ (or ^ ). After locking, the cooler will operate according to the setting temperature.
- Press the Temperature-drop key , the temperature will decrease 1^ C (or ^ F ). After locking, the cooler will operate according to the setting temperature.
- The cooler's temperature can be set between 7 - 18^ (44 - 65^)
Memory function
- The cooler has the power off memory function. When power on again, the cooler will operate according to the setting mode before power off.
Error code
- If the indication of the following table is displayed on the display area, it means the cooler is with faults.
| Fault Code Description | |
| Upper chamber display E1 The fault of temperature sensor of upper chamber | |
| Lower chamber display E1 The fault of temperature sensor of lower chamber | |
| Upper chamber display E4 The fault of defrosting sensor of upper chamber | |
| Lower chamber display E4 The fault of defrosting sensor of lower chamber | |
| Upper chamber display E6 Communication fault | |
ATTENTION
When the above faults are displayed on the screen, please do not disassemble the cooler to check by yourself. Please contact the special maintenance personnel of the local after-sales service company for the maintenance.
CLEANING AND MAINTENANCE
Stop using the cooler
If the cooler left unused for a long time, please:
- Unplug the cooler;
- Clean the cooler;
- Keep the cooler door open.
Clean the cooler
- Dusts behind the cooler and on the ground shall be timely cleaned to improve the cooling effect and energy saving.
- Check the door gasket regularly to make sure there are no debris. Clean the door gasket with a soft cloth dampened with soapy water or diluted detergent.
- The interior of the cooler should be cleaned regularly to avoid odor.
- Please turn off the power before cleaning, remove drinks, shelves,etc.
- Use a soft cloth or sponge to clean the inside of the cooler, with two tablespoons of baking soda and a quart of warm water. Then rinse with water and dry with a soft cloth. After cleaning, open the door and let it dry naturally before turning on the power.
- For areas that are difficult to clean in the cooler (such as narrow sandwiches, gaps or corners), it is recommended to wipe them regularly with a soft rag, soft brush, etc. and when necessary, combined with some auxiliary tools (such as thin sticks) to ensure no contaminants or bacterials accumulation in these areas.
- Do not use soaps, detergents, spray cleaners, etc. to clean the inside of your cooler as these may create odors or contamination.
- Clean the shelves with a soft cloth dampened with soapy water or diluted detergent. Then rinse with water and dry with a soft cloth or dry naturally.
- The wooden wine rack should not be directly immersed in liquid to prevent cracking or mold after moisture. The wooden wine rack is cleaned with a dry soft cloth. The heavily contaminated wooden wine rack should be cleaned with a soft cloth that has been wrung out, and dry naturally.
- Wipe the outer surface of the cooler with a soft cloth dampened with soap water, detergent, etc., and then wipe dry. Do not rub or scratch the surface of the glass door to prevent the door from being broken or scratched.
- Do not use hard brushes, clean steel balls, wire brushes, abrasives (such as toothpastes), organic solvents (such as alcohol, acetone, banana oil, etc.), boiling water, acid or alkaline items, which may damage the cooler surface and interior. Boiling water and organic solvents such as benzene may deform or damage plastic parts.
- Do not rinse directly with water or other liquids during cleaning to avoid short circuits or affect electrical insulation after immersion. Water should not soak the operating control elements and lighting system in the glass door.
TROUBLESHOOTING
The following simple issues can be handled by the user. Please call the after-sale service department if the issues are not solved.
| Problem Possible reason | |
| Not work | ·Whether the cooler is plugged and connected to power |
| ·Low voltage | |
| ·Failure power or tripping circuit. | |
| Long-time operation of the compressor | ·It is normal that cooler operates for longer time in summer when the ambient temperature is higher |
| ·Do not put too much beverage s in the cooler at one time; | |
| ·Frequent opening of cooler door. | |
| Light not work | ·Whether the cooler is connected to power, whether the indicator light is damaged. |
| Loud noises | ·Whether the floor is flat, whether the placement of cooler is stable; |
| ·Whether the cooler accessories are properly placed. | |
| Over heat on sidewall | ·The cooler enclosure may emit heat during running specially in summer, this is caused by the radiation of the condenser, and it is a normal phenomenon. |
| Surface condensation | ·Condensation: condensation phenomenon will be detected on the exterior surface and door seals of the cooler when the ambient humidity is high, this is a normal phenomenon, and after wiping with towel, turns up the set temperature of the appliance properly. |
| Airflow sound Buzz Clatter | ·Refrigerants circulating in the refrigerant lines will produce eruption of sound and grunts which is normal does not affect the cooling effect. |
| ·Buzz will be generated by running compressor specially when starting up or shutting down. | |
| ·The solenoid valve or electric switch valve will clatter which is a normal phenomenon and does not affect the operation. | |
ATTACH YOUR RECEIPT HERE. PROOF OF PURCHASE IS REQUIRED TO OBTAIN WARRANTY SERVICE.
Please have the following information available when you call the Customer Service Center:
■Name, address and telephone number
■Model number and serial number
A clear, detailed description of the problem
Proof of purchase including dealer or retailer name and address
IF YOU NEED SERVICE:
- Before contacting us to arrange service, please determine whether your product requires repair. Some questions can be addressed without service. Please take a few minutes to review the Troubleshooting section of the User Manual, or visit http://us.Midea.com/support.
- All warranty service is provided exclusively by our authorized Midea Service Providers, in the U.S. and Canada.
Midea Customer Service
USA: CANADA:
https://www.midea.com/us/support
Or contact us at:
Telephone: 1-866-646-4332
Email: customerserviceusa@midea.com
https://www.midea.com/ca/support
Or contact us at:
Telephone: 1-888-365-2230
Email: canadasupport@midea.com
If outside the 50 States of the United States or Canada, contact your authorized Midea dealer to determine whether another warranty applies.
1 YEAR PARTS AND LABOR
WHAT IS COVERED
FIRST YEAR LIMITED WARRANTY (PARTS AND LABOR)
Midea will repair or replace, without charge, any defects due to faulty materials or workmanship for one full year from the date of delivery. For further detail of warranty coverage and warranty repair information, visit www.midea.com or call 1-866-646-4332 (USA) / 1-888-365-2230 (CANADA).
Consumer will be responsible for:
Diagnostics, removal, transportation and reinstallation cost required because of service.
Costs of service calls that are a result of items listed under NORMAL RESPONSIBILITIES OF THE CONSUMER**
NORMAL RESPONSIBILITIES OF THE CONSUMER**
This warranty applies only to products in ordinary household use, and the consumer is responsible for the items listed below:
- Proper use of the appliance in accordance with the instructions provided with the product.
- Routine maintenance and cleaning necessary to keep the good working condition.
- Proper installation by an authorized service professional in accordance with instructions provided with the appliance and in accordance with all local plumbing, electrical and / or gas codes.
- Proper connection to a grounded power supply of sufficient voltage, replacement of blown fuses, repair of loosened connections or defects in house wiring.
- Expenses for making the appliance accessible for servicing.
- Damages to finish after installation.
YOUR SOLE AND EXCLUSIVE REMEDY UNDER THIS LIMITED WARRANTY SHALL BE PRODUCT REPAIR OR REPLACEMENT AS PROVIDED HEREIN. Service must be provided by a Midea designated service company. This limited warranty is valid only in the 50 States of the United States or Canada and applies only when the major appliance is used in the country in which it was purchased. This limited warranty is effective from the date of original consumer purchase. Proof of original purchase date is required to obtain service under this limited warranty.
WHAT IS NOT COVERED
- Failure caused by damage to the unit while in your possession (other than damage caused by defect or malfunction), by its improper installation, or by unreasonable use of the product, including without limitation, failure to provide reasonable and necessary maintenance or to follow the written Installation and Instruction Manual.
- Products purchased "as-is" or refurbished are not covered by this warranty.
- Food loss caused by refrigerator or freezer failure.
- Service calls to repair or replace consumables such as water filters, light bulbs airfilters etc., or handles, knobs and other cosmetic parts.
- Product that has been transferred from its original owner.
- Interior or exterior rust on the unit.
- Damages caused by services performed by persons other than authorized Midea servicers; use of parts other than Midea replacement parts; obtained from persons other than such Midea customer service; or external causes such as abuse, misuse, inadequate power supply or acts of God.
- Service calls resulting from improper installation of your product.
- Service calls to instruct you on the use of your product.
- Surcharges including, but not limited to, any after hour, weekend, or holiday service calls, tolls, ferry trip charges, or mileage expense for service calls to remote areas, including the state of Alaska.
- If the unit is put to commercial, business, rental, or other use or application other than for consumer use, we make no warranties, express or implied, including but not limited to, any implied warranty of merchantability or fitness for particular use or purpose.
- Product that has been removed outside the USA or Canada.
- Products without original serial numbers or products that have serial numbers which have been altered or cannot be readily determined.
EN
NOTE: Some states do not allow the exclusion or limitation of incidental or consequential damages. So this limitation or exclusion may not apply to you.
The cost of repair or replacement under these excluded circumstances shall be borne by the customer.
DISCLAIMER OF IMPLIED WARRANTYES
IMPLIED WARRANTY, INCLUDING ANY IMPLIED WARRANTY OF MERCHANTABILITY OR IMPLIED WARRANTY OF FITNESS FOR A PARTICULAR PURPOSE, ARE LIMITED TO ONE YEAR OR THE SHORTEST PERIOD ALLOWED BY LAW. Some states and provinces do not allow limitations on the duration of implied warranties of merchantability or fitness, so this limitation may not apply to you. This warranty gives you specific legal rights, and you also may have other rights that vary from state to state or province to province.
DISCLAIMER OF REPRESENTATIONS OUTSIDE OF WARRANTY
Midea makes no representations about the quality, durability, or need for service or repair of this major appliance other than the representations contained in this warranty. If you want a longer or more comprehensive warranty than the limited warranty that comes with this major appliance, you should ask Midea or your retailer about buying an extended warranty.
LIMITATION OF REMEDIES; EXCLUSION OF INCIDENTAL AND CONSEQUENTIAL DAMAGES
YOUR SOLE AND EXCLUSIVE REMEDY UNDER THIS LIMITED WARRANTY SHALL BE PRODUCT REPAIR AS PROVIDED HEREIN. MIDEA SHALL NOT BE LIABLE FOR INCIDENTAL OR CONSEQUENTIAL DAMAGES. Some states and provinces do not allow the exclusion or limitation of incidental or consequential damages, so these limitations and exclusions may not apply to you. This warranty gives you specific legal rights, and you also may have other rights that vary from state to state or province to province.
Prolongation gratuite de 3
INSTALLATION DU PRODUIT
Instructions dinstallation
https://www.midea.com/us/support
https://www.midea.com/ca/support
make yourself at home

- THANK YOU
- CONTENTS
- SPECIFICATIONS
- Product model MRW29B4ASL
- PRODUCT OVERVIEW
- Names of components
- ATTENTION
- PRODUCT INSTALLATION
- Install Instruction
- Finding a suitable location
- Dimensions and Clearances
- Providing a proper power supply
- CAUTION
- Start to use
- The arrangement of bottle
- Tips for energy saving
- Practical skills for grape wine's storage
- Serving temperature
- OPERATION INSTRUCTIONS
- Control panel
- Display
- Display Control
- Locking and unlocking
- Lighting
- Selection of adjustable temperature chamber
- Conversion of the Fahrenheit temperature and Celsius temperature
- Temperature setting
- Memory function
- Error code
- CLEANING AND MAINTENANCE
- Stop using the cooler
- Clean the cooler
- TROUBLESHOOTING
- ATTACH YOUR RECEIPT HERE. PROOF OF PURCHASE IS REQUIRED TO OBTAIN WARRANTY SERVICE.
- IF YOU NEED SERVICE:
- Midea Customer Service
- USA: CANADA:
- YEAR PARTS AND LABOR
- WHAT IS COVERED
- FIRST YEAR LIMITED WARRANTY (PARTS AND LABOR)
- Consumer will be responsible for:
- NORMAL RESPONSIBILITIES OF THE CONSUMER**
- WHAT IS NOT COVERED
- EN
- DISCLAIMER OF IMPLIED WARRANTYES
- DISCLAIMER OF REPRESENTATIONS OUTSIDE OF WARRANTY
- LIMITATION OF REMEDIES; EXCLUSION OF INCIDENTAL AND CONSEQUENTIAL DAMAGES
- Prolongation gratuite de 3
- INSTALLATION DU PRODUIT
- Instructions dinstallation
Brand : MIDEA
Model : MRW29B4ASL
Category : Wine cellar