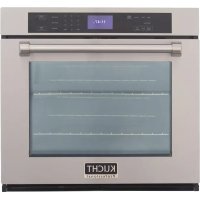
KWO310 - Oven Kucht - Free user manual and instructions
Find the device manual for free KWO310 Kucht in PDF.


| Product Type | Single Built-in Oven |
| Brand | Kucht |
| Model | KWO310 |
| Width | 29 7/8 in (75.9 cm) |
| Height | 28 7/16 in (72.2 cm) |
| Depth | 23 1/2 in (59.7 cm) |
| Net Weight | 59 kg (130 lb) |
| Maximum Load Capacity | 14 kg (30 lb) of food |
| Power Supply | 240 V ~ 60 Hz, single-phase |
| Maximum Power | 4800 W |
| Rated Current | 20 A |
| Recommended Circuit Protection | 25 A |
| Cooking Functions | Conventional Baking, Broil |
| Control Type | Electronic with Digital Display |
| Door | Removable Glass Door, Hinges with Latches |
| Cavity Material | Enameled Steel |
| Racks Provided | 2 Removable Racks |
| Installation | Built-in, requires cutout of 28 5/8 in x 27 1/2 in (W x H) |
| Electrical Connection | 3 or 4 conductors, 120/240 V, 60 Hz |
| Safety | Mandatory grounding, automatic shutoff (not specified) |
| Maintenance and Cleaning | Manual cleaning recommended, removable door |
| Spare Parts | Mounting screws, racks, connectors (not provided) |
Frequently Asked Questions - KWO310 Kucht
User questions about KWO310 Kucht
0 question about this device. Answer the ones you know or ask your own.
Ask a new question about this device
Download the instructions for your Oven in PDF format for free! Find your manual KWO310 - Kucht and take your electronic device back in hand. On this page are published all the documents necessary for the use of your device. KWO310 by Kucht.
USER MANUAL KWO310 Kucht
Gather the required tools before starting installation. Read and follow the instructions provided with any tools listed here.
ALL INSTALLATIONS
TOOLSNEEDED:
- Measuring Tape
- Straightedge
- Pencil
- Phillips Screwdriver
Level - Wire Cutters and Wire Stripper
- Hand or Sabre Saw
- 1" Hole Saw
- Cordless Drill and Drill Bit
- Safety Gloves and Goggles
Volt Meter (0-250VAC)
PARTS NEEDED:
- UL Listed Conduit Connector
- UL Listed Wire Connectors
PARTS PROVIDED:
8-14 x 1" Screws - Single Ovens (2), Double Ovens (4)
LOCATION REQUIREMENTS
IMPORTANT: Observe all governing codes and ordinances.
- Cabinet opening dimensions that are shown must be used. Given dimensions provide minimum clearance with oven.
- Recessed installation area must provide complete enclosure around the recessed portion of the oven.
- The oven support surface must be solid, level and flush with the bottom of the cabinet cutout.
THE OVEN SUPPORT SURFACE MUST BE ABLE TO SUPPORT THE WEIGHT OF:
Single Oven: 130 lbs (59 kg) plus 30 lb (14 kg) food load
Double Oven: 230 lbs (105 kg) plus 60 lb (28 kg) food load
- Grounded electrical supply is required. See "Electrical Requirements" section.
NOTE: For undercover installation, it is recommended that the junction box be located in the adjacent right or left cabinet.
IMPORTANT: To avoid damage to your cabinets, check with your builder or cabinet supplier to make sure that the materials used will not discolor, delaminate or sustain other damage. This oven has been designed in accordance with the requirements of UL and CSA International and complies with the maximum allowable wood cabinet temperatures of 194^ (90^) .
YOUR SAFETY AND THE SAFETY OF OTHERS ARE VERY IMPORTANT.
We have provided many important safety messages in this manual and on your appliance. Always read and obey all safety messages.

This is the safety alert symbol.
This symbol alerts you to potential hazards that can kill or hurt you and others. All safety messages will follow the safety alert symbol and either the work "DANGER", "WARNING" or "CAUTION".
DANGER
WARNING
CAUTION
An imminently hazardous situation. You could be killed or seriously injured if you don't immediately follow instructions.
A potentially hazardous situation which, if not avoided, could result in death or serious bodily injury.
A potentially hazardous situation which, if not avoided, may result in moderate or minor injury.
All safety messages will tell you what the potential hazard is, tell you how to reduce the chance of injury, and tell you what can happen if the instructions are not followed.
State of California Proposition 65Warnings:
WARNING: This product contains one or more chemicals known to the State of California to cause cancer.
WARNING: This product contains one or more chemicals known to the State of California to cause birth defects or other reproductive harm.
PRODUCT DIMENSIONS
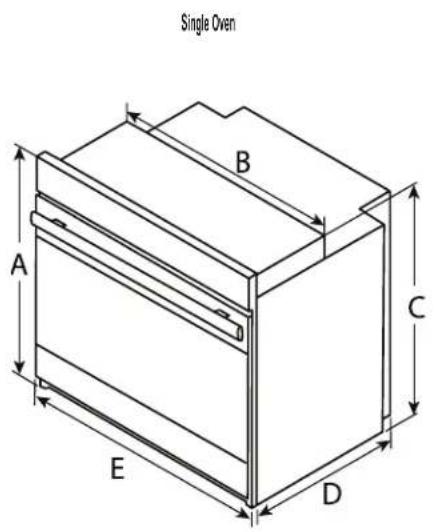
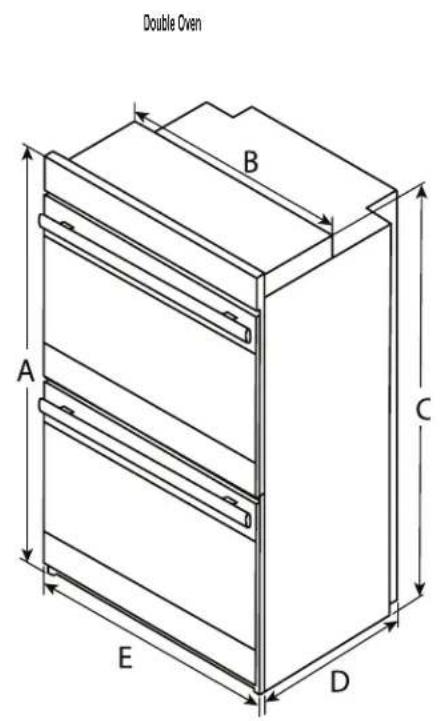
| LETTER SINGLE OVER DIMENSIONS DOUBLE OVER DIMENSIONS | ||
| A | 287/16" (72.2 cm) Height (overall) | 513/16" (130.0 cm) Height (overall) |
| B | 281/2" (72.4 cm) Width (recessed) | 281/2" (72.4 cm) Width (recessed) |
| C | 273/16" (69 cm) Height (recessed) | 4915/16" (126.8 cm) Height (recessed) |
| D* | 231/2" (59.7 cm) Depth (recessed) | 231/2" (59.7 cm) Depth (recessed) |
| E | 297/8" (75.9 cm) Width (overall) | 297/8" (75.9 cm) Width (overall) |
- From back of unit to cabinet face.
TECHNICAL DATA
| OVER DIMENSIONS MODEL | ELECTRICAL RATINGS AND MAXIMUM CONNECTED LOAD @240VOLT560Hz | |||
| Single Built-in Oven 30" | (76 cm) KWO310 20.0 | Amp. 4800 Watts | ||
| Double Built-in Oven 30" | (76 cm) KWO620 35.4 | Amp. 8500 Watts | ||
OPENING DIMENSIONS
Single Oven - Installed in Cabinet and Installed Undercounter
Double Oven - Installed in Cabinet
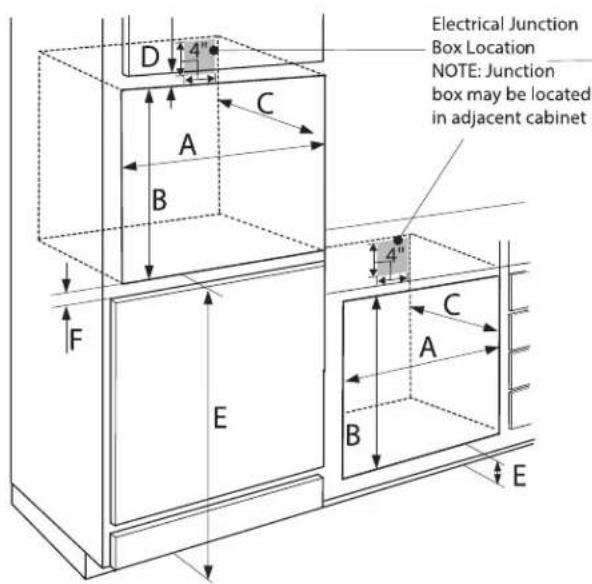

| LETTER DESCRIPTIONS | SINGLE OVEN UNDER COUNTER WITHOUT COOKTOP | SINGLE OVEN IN CABINET DOUBLE OVEN IN CABINET | ||
| A Width (cutout) 28 | 5/8" (72.7 cm) 28 | 5/8" (72.7 cm) 28 | 5/8" (72.7 cm) | |
| B Height (cutout) 27 | 1/2" (70.0 cm) 27 | 1/2" (70.0 cm) 50 | 1/4" (127.6 cm) | |
| C Depth (cutout) 24" (61.0 cm) 24" (61.0 cm) | 24" (61.0 cm) | |||
| D | Top of Cutout to Bottom of Upper Cabinet Door | N/A 1 | 1/2" (3.8 cm) 1 | 1/2" (3.8 cm) |
| E | Bottom of Cutout to Floor (recommended)* | 51/4" (13.3 cm) 32" (8.1.3 cm) 14 | 3/4" (37.5 cm)* | |
| F | Bottom of Cutout to Top of Cabinet Door | N/A 1 | 1/2" (3.8 cm) 1 | 1/2" (3.8 cm) |
| G Overlap of oven with sides of cutout | 11/16" (1.7 cm) | 11/16" (1.7 cm) | 11/16" (1.7 cm) | |
- Bottom of Cutout to Floor (acceptable) 4" to 143/4^ ( 10.2 cmto37.5 cm)
ELECTRICAL REQUIREMENTS
If codes permit and a separate ground wire is used, it is recommended that a qualified electrical installer determine that the ground path is adequate and wire gauge is in accordance with local codes.
Do not use an extension cord.
IN U.S.A.:
Be sure that the electrical connection and wire size are adequate and in conformance with the National Electrical Code, ANSI/ NFPA No. 70-latest edition and all local codes and ordinances.
A copy of the above code standards can be obtained from:
National Fire Protection Association
One Batterymarch Park
Quincy, MA 02269
IN CANADA:
Be sure that the electrical connection and wire size are adequate and in conformance with CSA standard C22.1, Canadian Electrical Code, Part 1 - latest edition, and all local codes and ordinances.
A copy of the above code standards can be obtained from:
Canadian Standards Association
178 Rexdale Blvd.
Toronto, ON M9W 1R3 CANADA.

WARNING

ELECTRICAL SHOCK HAZARD
The electrical power to the oven branch circuit must be shut off while line connections are being made.
Do not use an extension cord with this appliance.
Electrical ground is required on this appliance. The free end of the green wire (the ground wire) must be connected to a suitable ground. This wire must remain grounded to the oven.
If cold water pipe is interrupted by plastic, non metallic gaskets, union connections or other insulating materials, DO NOT use for grounding.
DO NOT ground to a gas pipe.
DO NOT have a fuse in the NEUTRAL or GROUNDING circuit. A fuse in the NEUTRAL or GROUNDING circuit could result in an electrical shock.
Check with a qualified electrician if you are in doubt as to whether the appliance is properly grounded.
Failure to do so could result in death, fire or electric shock.
ELECTRICAL CONNECTION
To properly install your oven, you must determine the type of electrical connection you will be using and follow the instructions provided for it here.
- Oven must be connected to the proper electrical voltage and frequency as specified on the model/serial number rating plate. The model/serial number rating plate is located under the control panel on single ovens and under the control panel on the upper oven cavity on double ovens. All models are dual rated, and designed to be connected to 120/240V AC, 60Hz, 3-wire or 4-wire, single-phase power supply.
| STYLE | VOLTAGE AND FREQUENCY | AMPS CIRCUIT REQUIRED |
| Single Oven 240V, 60 Hz 20.0A | 25 Amp Circuit | |
| Double Oven 240V, 60 Hz 35.4 | A 40 Amp Circuit | |
- Install a suitable conduit box (not furnished). An appropriately sized, UL conduit connector must be used to correctly attach the conduit to the junction box.
IMPORTANT: Local Codes may vary; installation electrical connections and grounding must comply with all applicable local codes.
If local codes permit grounding through the electrical supply neutral, connect both the white neutral wire and the green ground wire from the oven to the white neutral electrical supply wire.
- Check with a qualified electrical installer if you are not sure the oven is properly grounded.
- Single Oven - When a 4-wire, single phase 120/240volt , 60Hz , AC only electrical supply is available, a 25-amp maximum circuit protection is required.
- Double Oven - When a 4-wire, single phase 120/240volt , 60Hz , AC only electrical supply is available, a 40-amp maximum circuit protection is required.
INSTALLATION INSTRUCTIONS
IMPORTANT: This appliance shall be installed only by authorized persons and in accordance with the manufacturer's installation instructions, local gas fitting regulations, municipal building codes, electrical wiring regulations, local water supply regulations.
Use two or more people to move and install oven.
Failure to do so can result in back or other injury.
1 Using two or more people, remove the oven and set it on cardboard to avoid floor damage.
NOTE: Do not use the handle or any portion of the front frame for lifting.
2 Remove the shipping materials and tape from the oven.
3 Remove the hardware package from inside the bag containing literature.
4 Remove and set aside racks and other parts from inside the oven.
5 Move the oven on the cardboard near where it will be installed.
STEP 2 - REMOVE THE OVEN DOOR
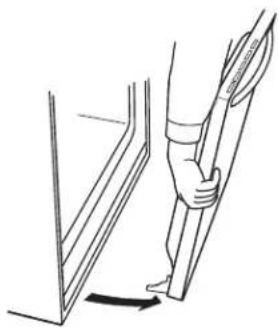
IMPORTANT: The oven door is heavy and fragile, and the door front is glass. To avoid oven door glas breakage, use both hands, and grasp only the sides of the oven door to remove.
1 Open the oven door.
2 Locate the door latches in both corners of the oven door, and rotate the latches forward to the unlocked position.
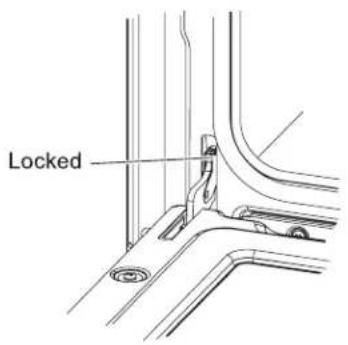
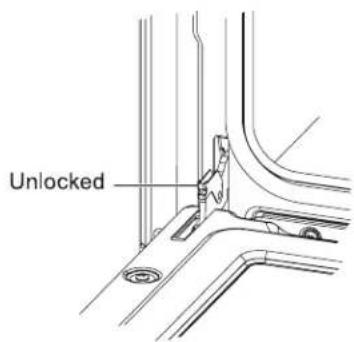
3 Grasp the edges of the oven door with both hands and push the oven door fully closed. Lift up and pull oven door toward you to remove. Set the oven door(s) aside on a covered work surface.
STEP 3 - INSTALL OVEN

WARNING
EXCESSIVE WEIGHT HAZARD
Use two or more people to move and install oven.
Failure to do so can result in back or other injury.
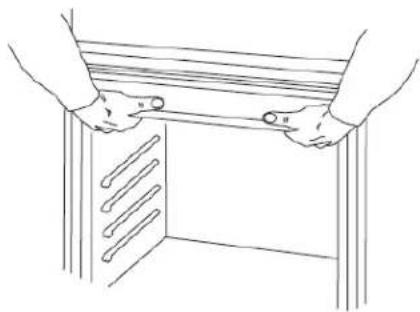
1 Using two or more people, grasp the ceiling of the oven cavity and lift the oven onto a table or platform even with the cutout opening.
NOTE: The surface must be able to support the following weight:
- Single Oven: 160 lb (73 kg)
- Double Oven: 290 lb (132 kg)
2 Feed the flexible electrical supply conduit from the oven to the junction box.
STEP 4 - MAKE ELECTRICAL CONNECTION
To properly install your oven, you must determine the type of electrical connection you will be using and follow the instructions provided for it here.
DIRECT WIRE
WARNING
ELECTRICAL SHOCK HAZARD
Disconnect power before servicing.
Improper connection of aluminum house wiring and copper appliance leads can result in an electrical hazard or re. If the home has aluminum wiring, only use connectors designed and UL listed for joining copper to aluminum and precisely follow the manufacturer's recommended procedure. Aluminum-to-Copper connections must conform with local codes.
For Single Oven, use 10 gauge copper or aluminum wire.
For Double Oven, use 8 gauge copper or aluminum wire.
Electrically ground oven.
Failure to do so can result in death, re or electrical shock.
Be sure your appliance is properly installed and grounded by a qualified technician. Ask your dealer to recommend a qualified technician or an authorized repair service.
This oven is manufactured with a neutral (white) power supply wire and a cabinetconnected green (or bare) ground wire twisted together.
After making sure that the power has been turned off, connect the flexible conduit from the oven to the junction box using a UL listed conduit connector. The Grounded Neutral and Ungrounded Neutral Graphics on the following pages and the instructions provided, present the most common way of connecting ovens. Your local codes and ordinances, of course, take precedence over these instructions. Complete electrical connections according to local codes and ordinances.
1 Disconnect power.
2 Remove junction box cover.
3 Install a UL listed or CSA approved conduit connector to the junction box.
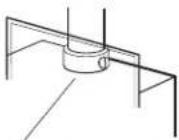
UL or CSA Listed Conduit Connector
4 Route the flexible electrical supply conduit from the oven to the junction box through a UL listed or CSA approved conduit connector.
5 Tighten screws on conduit connector.
3-WIRE CONNECTION (GROUNDED NEUTRAL) - U.S.A. ONLY
WARNING
ELECTRICAL SHOCK HAZARD
Grounding through the neutral conductor is prohibited for new branch-circuit installations (1996 NEC); mobile homes; and recreational vehicles, or in an area where local codes prohibit grounding through the neutral conductor. For installations where grounding through the neutral conductor is prohibited, see the Ungrounded Neutral graphic.
Use grounding terminal or lead to ground unit.
Connect neutral termina or lead to branch circuit neutral in usual manner.
Failure to do so could result in death, fire or electric shock.
3-WIRE CABLE FROM HOME POWER SUPPLY
IMPORTANT: Use the 3-wire cable from home power supply where local codes permit a 3-wire connection.
1 Disconnect power.
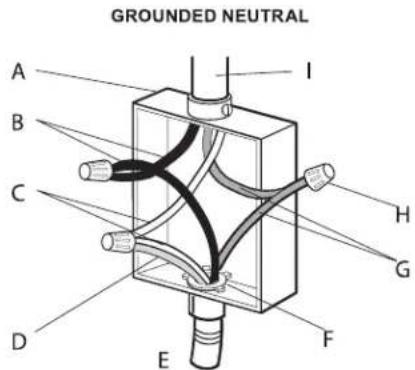
A. Junction Box
B. Black Wires
C. Neutral (White) Wires
D. Ground (Green or Bare) Wire
E. Cable from Oven
F. UL Listed Conduit Connector
G. Red Wires
H. UL Listed Wire Connectors
I. House Electrical Supply
2 Connect the two black wires B together using a UL listed wire connector.
3 Connect the two neutral (white) wires C and the ground (green or bare) wire d (of the oven cable) using a UL listed wire connector.
4 Connect the two red wires G together using a UL listed wire connector.
5 Install junction box cover.
4-WIRE CONNECTION (UNGROUNDED NEUTRAL) - U.S.A. AND CANADA
4WIRE CABLE FROM HOME POWER SUPPLY
IMPORTANT: Use the 4-wire cable from home power supply in the U.S. where local codes do not allow grounding through neutral, New Branch circuit installations (1996 NEC), mobile homes and recreational vehicles, new construction and in Canada.
1 Disconnect power.
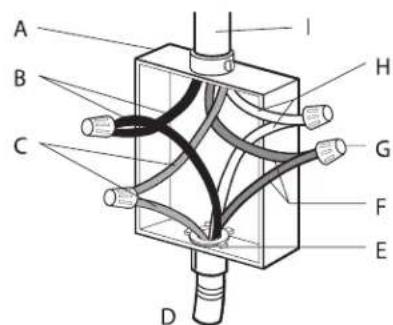
UNGROUNDED NEUTRAL
A. Junction Box
B. Black Wires
C. Red Wires
D. Cable from Oven
E. UL listed or CSA
Approved Conduit
Connector
F. Ground (Green or Bare) Wires
G. UL Listed Wire Connector
H. Neutral (White) Wires
I. House Electrical
Supply
2 Connect the 2 black wires B together using a UL listed wire connector.
3 Connect the 2 red wires C together using a UL listed wire connector.
4 Untwist white wire from green (or bare) ground wire coming from the oven.
5 Connect the 2 neutral (white) wires H together using a UL listed wire connector.
6 Connect the ground (green or bare) wire FA from the oven cable to the ground (green or bare) wire (in the junction box) using a UL listed wire connector.
7 Install junction box cover.
STEP 5 - MOUNT THE OVEN
1 Slide the oven completely into the cabinet until the back surface of the front frame touches the front wall of the cabinet. Center the oven within the cabinet cutout.
NOTE: Push against seal area of the oven front frame when pushing the oven into the cabinet. Do not push against the outside edges.
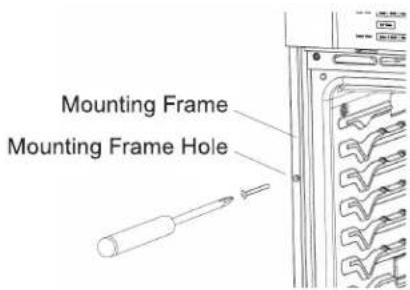
2 There are two holes, one on each side of the front frame that surrounds the oven cavity. Drill 1/8'' (3.18 mm) pilot holes through the holes, and into the front wall of the cabinet.
NOTE: The double oven has four mounting holes, two on each side.
3 Insert the # 8-14 x 1" screws (provided) through the pilot holes to securely fasten the oven to the cabinet. Do not overtighten screws.
4 Replace the oven racks.
NOTE: Ensure all plastic and foam packaging are removed from the oven racks before reinserting them.
5 Reconnect power to the oven.
STEP 6 - REPLACE THE DOOR
IMPORTANT: The oven door is heavy and fragile, and the door front is glass. To avoid oven door glass breakage, use both hands, and grasp only the sides of the oven door to remove.
1 Verify that the door hinge latches are forward, and then insert the oven door hinges into the openings.
2 Lower the oven door to engage the hinges.
3 Press the hinge latches down to lock.
STEP 7 - COMPLETE INSTALLATION
1 Check that all parts are now installed. If there is an extra part, go back through the steps to see which step was skipped.
2 Dispose of/recycle all packaging materials.
3 Check Operation of Oven.
- Turn on power.
Press BROIL. - Set the temperature.
Press START.
NOTE: If oven(s) does not operate, check the following:
Household fuse is intact and tight; or circuit breaker has not tripped.
- Electrical supply is connecte d.
- See "Troubleshooting" section in the Operation Manual.
4 When oven has been on for 5 minutes, feel for heat. If you do not feel heat or if an error message appears in the display, turn off the oven and contact a qualified technician.
5 Press STOP/CLEAR to turn off the oven.
IMPORTANT: For oven use and cleaning, read the User Manual.
WWW.KUCHT.COM
EXIGENCES D'INSTALLATION
OUTILLAGE ET PIECES
National Fire Protection Association
One Batterymarch Park
Quincy, MA 02269
AU CANADA :
Canadian Standards Association
178 Rexdale Blvd.
Toronto, ON M9W 1R3 CANADA.
A NERTISSEMENT

RISQUE DE CHOC ÉLECTRIQUE
WE TRANSFORM A SIMPLE KITCHEN INTO A PRO ONE.
THIS IS WHY WE CARE ABOUT MAKING VERY HIGH PERFORMANCE
RANGES AND HOODS, TO MAKE YOU FEEL LIKE A PRO AND STYLISH COOKER.
DESIGN: LONDON DC - WWW.LONDON-DC.COM
- ALL INSTALLATIONS
- TOOLSNEEDED:
- PARTS NEEDED:
- PARTS PROVIDED:
- 8-14 x 1" Screws - Single Ovens (2), Double Ovens (4)
- LOCATION REQUIREMENTS
- THE OVEN SUPPORT SURFACE MUST BE ABLE TO SUPPORT THE WEIGHT OF:
- YOUR SAFETY AND THE SAFETY OF OTHERS ARE VERY IMPORTANT.
- DANGER
- WARNING
- CAUTION
- PRODUCT DIMENSIONS
- OPENING DIMENSIONS
- ELECTRICAL REQUIREMENTS
- IN U.S.A.:
- IN CANADA:
- ELECTRICAL SHOCK HAZARD
- ELECTRICAL CONNECTION
- INSTALLATION INSTRUCTIONS
- STEP 2 - REMOVE THE OVEN DOOR
- STEP 3 - INSTALL OVEN
- EXCESSIVE WEIGHT HAZARD
- STEP 4 - MAKE ELECTRICAL CONNECTION
- DIRECT WIRE
- Be sure your appliance is properly installed and grounded by a qualified technician. Ask your dealer to recommend a qualified technician or an authorized repair service.
- 3-WIRE CONNECTION (GROUNDED NEUTRAL) - U.S.A. ONLY
- 3-WIRE CABLE FROM HOME POWER SUPPLY
- 4-WIRE CONNECTION (UNGROUNDED NEUTRAL) - U.S.A. AND CANADA
- STEP 5 - MOUNT THE OVEN
- STEP 6 - REPLACE THE DOOR
- STEP 7 - COMPLETE INSTALLATION
- EXIGENCES D'INSTALLATION
- OUTILLAGE ET PIECES
- AU CANADA :
- A NERTISSEMENT
- RISQUE DE CHOC ÉLECTRIQUE
Brand : Kucht
Model : KWO310
Category : Oven