
63386 - Food processor HAMILTON BEACH - Free user manual and instructions
Find the device manual for free 63386 HAMILTON BEACH in PDF.

| Product Type | Stand Mixer |
| Brand | Hamilton Beach |
| Model | 63386 |
| Bowl Capacity | 4 liters (4.2 quarts) |
| Bowl Material | Stainless Steel |
| Included Accessories | Non-stick flat beater, wire whisk, non-stick dough hook, splash guard |
| Number of Speeds | 7 speeds |
| Power Consumption | 320 watts (estimated) |
| Dimensions (L x W x H) | 34 x 22 x 34 cm (estimated) |
| Weight | 4.5 kg (estimated) |
| Main Functions | Mix, knead, whip, beat |
| Safety | Polarized plug, automatic overload shut-off, lockable head |
| Care and Cleaning | Bowl and accessories dishwasher safe (except SANI cycle). Wipe base with a damp cloth. |
| Warranty | 5 years (Canada), 1 year (United States) |
| Country of Origin | China (estimated) |
Frequently Asked Questions - 63386 HAMILTON BEACH
User questions about 63386 HAMILTON BEACH
0 question about this device. Answer the ones you know or ask your own.
Ask a new question about this device
Download the instructions for your Food processor in PDF format for free! Find your manual 63386 - HAMILTON BEACH and take your electronic device back in hand. On this page are published all the documents necessary for the use of your device. 63386 by HAMILTON BEACH.
USER MANUAL 63386 HAMILTON BEACH
hamiltonbeach.com For recipes, tips and product information.
natural_image
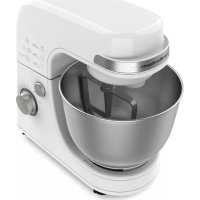
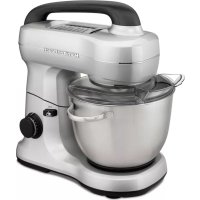
Two black kitchen models with metallic bowls, one labeled 'Batter' (no other text or symbols visible)Stand Mixer
Batteur sur socle
Batidora de Pedestal
English 2
Français.... 17
Español 31
Recipes Included! Recettes à l'intérieur ! iRecetas Incluídas!
IMPORTANT SAFEGUARDS
When using electrical appliances, basic safety precautions should always be followed to reduce the risk of fire, electric shock, and/or injury to persons, including the following:
- Read all instructions.
- This appliance is not intended for use by persons with reduced physical, sensory, or mental capabilities, or lack of experience and knowledge, unless they are closely supervised and instructed concerning use of the appliance by a person responsible for their safety.
- This appliance shall not be used by children. Keep the appliance and its cord out of reach of children.
- Close supervision is necessary when any appliance is used near children. Children should be supervised to ensure that they do not play with the appliance.
- To protect against risk of electrical shock, do not put cord, plug, base, or motor in water or other liquid.
- Turn the appliance OFF( ) then unplug from outlet when not in use, before putting on or taking off parts, and before cleaning. To unplug, grasp the plug and pull from the outlet. Never pull from the power cord.
- Avoid contacting moving parts. Keep hands, hair, and clothing, as well as spatulas and other utensils, away from beaters during operation to reduce risk of injury to persons and/or damage to mixer. Do not place fingers in hinge area.
- Remove beaters from mixer before washing.
-
Do not let cord hang over edge of table or counter or touch hot surfaces, including stove.
-
Do not operate any appliance with a damaged supply cord or plug, or after the appliance malfunctions or has been dropped or damaged in any manner. Supply cord replacement and repairs must be conducted by the manufacturer, its service agent, or similarly qualified persons in order to avoid a hazard. Contact Customer Service for information on examination, repair, or adjustment as set forth in the Limited Warranty.
- The use of attachments not recommended or sold by the appliance manufacturer may cause fire, electric shock, or injury.
- Do not use outdoors.
- Do not place on or near a hot gas or electric burner, or in a heated oven.
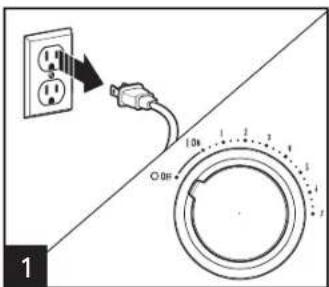
- Check that the appliance is OFF (☐) before plugging cord into wall outlet. To disconnect, turn the control to OFF (☐); then remove plug from wall outlet. To unplug, grasp the plug and pull from the outlet. Never pull from the power cord.
- Do not use appliance for other than intended purpose.
- CAUTION! In order to avoid a hazard due to inadvertent resetting of the thermal cut-out, this appliance must not be supplied through an external switching device, such as a timer, or connected to a circuit that is regularly switched on and off by the utility.
- Do not leave Stand Mixer unattended while it is operating.
SAVE THESE INSTRUCTIONS
Other Consumer Safety Information
This appliance is intended for household use only.
⚠ WARNING Electrical Shock Hazard: This appliance is provided with a polarized plug (one wide blade) to reduce the risk of electric shock. The plug fits only one way into a polarized outlet. Do not defeat the safety purpose of the plug by modifying the plug in any way or by using an adapter. If the plug does not fit fully into the outlet, reverse the plug. If it still does not fit, have an electrician replace the outlet.
The length of the cord used on this appliance was selected to reduce the hazards of becoming tangled in or tripping over a longer cord. If a longer cord is necessary, an approved extension cord may be used. The electrical rating of the extension cord must be equal to or greater than the rating of the appliance. Care must be taken to arrange the extension cord so that it will not drape over the countertop or tabletop where it can be pulled on by children or accidentally tripped over.
CAUTION Moving Parts Hazard.
To reduce the risk of personal injury, always unplug mixer before inserting or removing attachments.
WATTAGE/PEAK POWER INFORMATION
The marked rating of the stand mixer is defined by agency safety standards as the maximum stabilized power consumption of the stand mixer at high speed under a loaded condition.
Peak power is an average of the maximum wattage a stand mixer may consume during initial operation at high speed.
Parts and Features

BEFORE FIRST USE: Wash bowl and attachments in warm, sudsy water; rinse and dry. Always unplug mixer from electrical outlet before inserting or removing attachments.
To order parts:
US: hamiltonbeach.com
Canada: hamiltonbeach.ca
Mexico: hamiltonbeach.com.mx
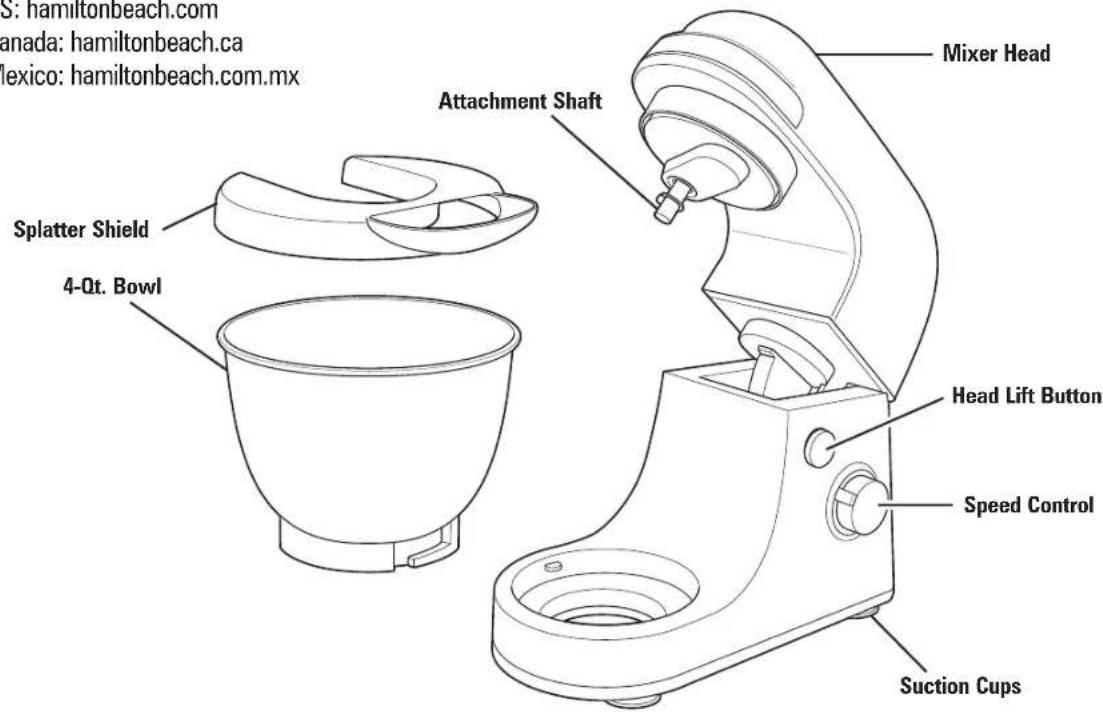
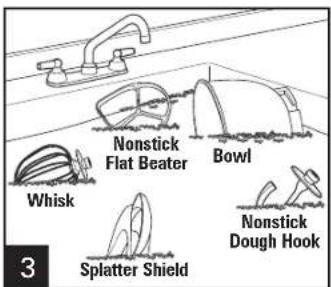
ATTACHMENTS
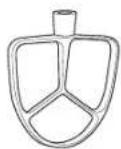
Nonstick Flat Beater
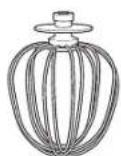
Whisk
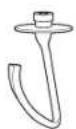
Nonstick Dough Hook
How to Use
BEFORE FIRST USE: Wash bowl and attachments in warm, sudsy water; rinse and dry. Always unplug mixer from electrical outlet before inserting or removing attachments.
Always make sure mixer is unplugged and speed control is set to OFF (①)
WARNING Cut and Crush Hazard.
Unplug mixer before inserting or removing attachments. Failure to do so can result in broken bones or cuts.
natural_image
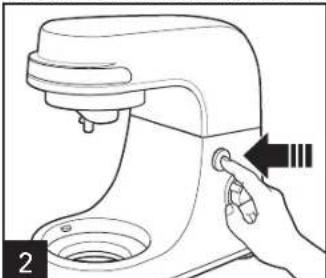
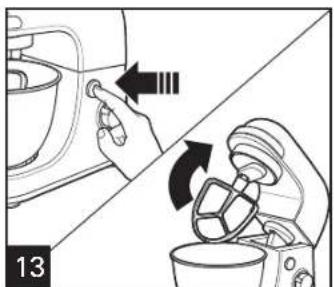
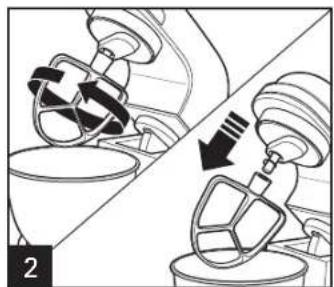
Line drawing of a hand operating a kitchen mixer with a scroll wheel (no text or symbols)Press head lift button. Tilt mixer head up.
natural_image
Mechanical component diagram showing a rotating lever mechanism (no text or symbols)NOTE: Attachment must be in place before adding the splatter shield. Use the splatter shield when making thin batters or mixtures that will splash.
natural_image
Illustration of a kitchen mixer with directional arrows indicating rotation (no text or symbols)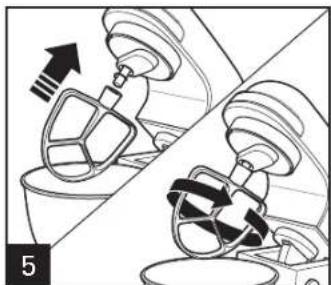
natural_image
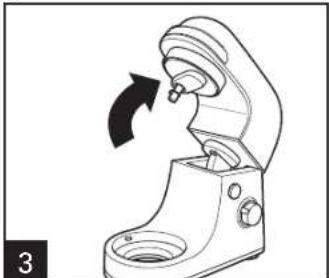
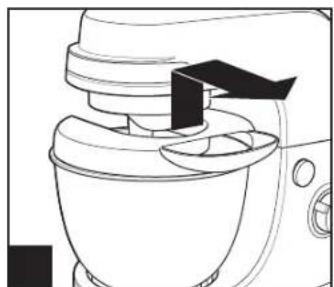
Diagram showing two mechanical components with arrows indicating motion, no text or symbols presentPush attachment up onto attachment shaft and turn clockwise.
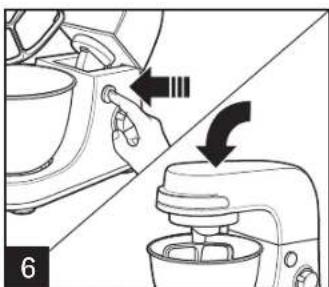
Press head lift button. Tilt the mixer head down.
CAUTION Pinch Hazard: Do not place fingers in hinge area.
How to Use (cont.)
natural_image
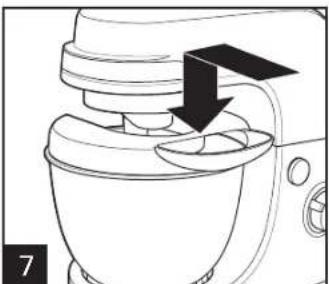
Line drawing of a kitchen mixer with a black arrow indicating the press direction (no text or symbols)Slide splatter shield over bowl until it is against the area above the attachment shaft.
natural_image
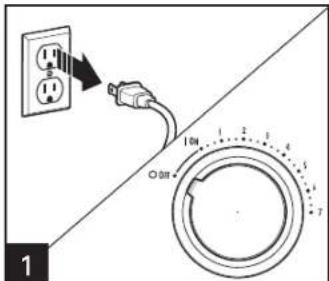
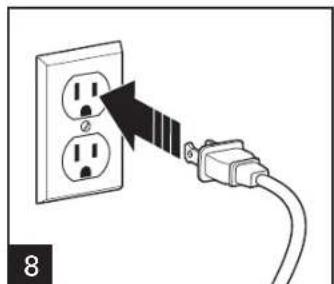
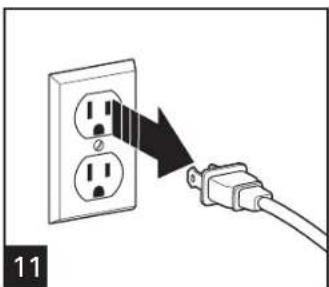
Diagram showing a plug inserted into an electrical outlet with a black arrow indicating the direction (no text or symbols present)Plug mixer into outlet.
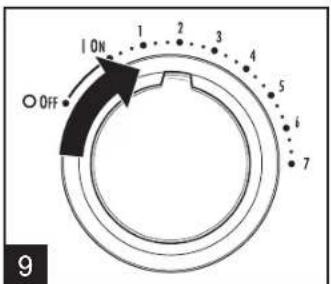
Speed control should always be set on lowest speed for starting, then gradually moved to desired higher speed to avoid splashing ingredients out of bowl.
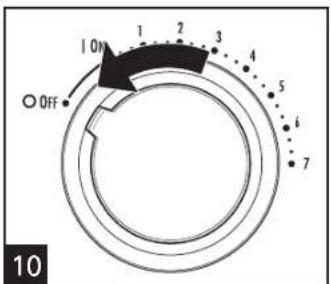
When finished, turn speed control to OFF (Φ)
natural_image
Diagram showing a cable being inserted into an electrical socket (no text or symbols present)Unplug from outlet.
natural_image
Line drawing of a kitchen mixer with handle and control panel (no text or symbols)Remove splatter shield from bowl.
natural_image
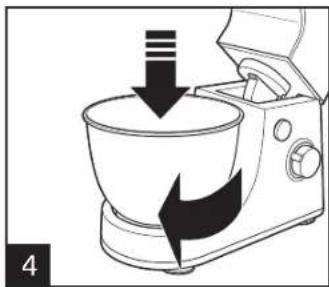
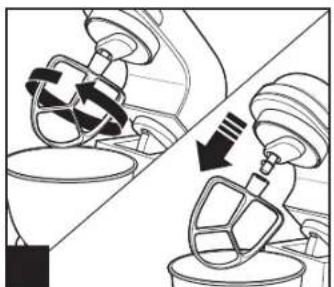
Diagram showing two kitchen utensils in a mixing room, one being lifted by a hand mixer and the other holding a bowl (no text or symbols present)To remove attachment, turn counterclockwise and pull straight down.
Mixing Guide
The following mixing guide is a suggestion for selecting mixing speeds. Begin on Speed 1 and increase to desired speed, depending on the recipe consistency.
| FOOD | ATTACHMENT | SPEED |
| Cakes (mixes and from scratch) | Flat Beater | 1–3 |
| Cookie Dough | Flat Beater | 2–4 |
| Mashed Potatoes | Flat Beater | 2–4 |
| Frosting | Flat Beater | 1–7 |
| Egg Whites (for meringues, etc.) | Whisk | 5–7 |
| Whipped Cream | Whisk | 5–7 |
| Instant Pudding | Whisk | 1–7 |
| Bread | Dough Hook | 1 |
General Mixing Tips
- Place liquid ingredients in bowl first and then add dry ingredients.
• Always stay near mixer during use. - To begin mixing, use the lower speeds until the ingredients are thoroughly combined. This will reduce splattering.
• Always add ingredients as close to the sides of the bowl as possible, not directly into the moving attachment. -
When preparing package cake mixes, use Speed 1 for low speed, Speed 4 for medium speed, and Speed 7 for high speed. For best results, mix for the time stated on the package directions.
-
Mixtures containing large amounts of liquid ingredients should be mixed at lower speeds to avoid splashing. Increase speed only after the mixture has thickened.
- When mixing thin batters, use medium speeds and frequently stop the mixer to scrape the sides of the bowl with a spatula.
Flat Beater Tips
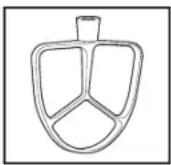
Flat beater is used for most of your mixing needs.
Use the flat beater attachment to mix cakes, cookie dough, fudge, or potatoes.
Cookie dough is one of the thickest doughs to mix. Make it easier by following these tips:
- Have butter or margarine at room temperature.
- Add ingredients one at a time, thoroughly mixing after each addition.
- Add flour one cup at a time.
- If the mixer seems to struggle, increase the speed setting.
Dough Hook Tips
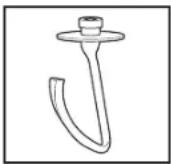
Dough hook is for recipes that requires kneading.
- The mixer head locks down for thorough mixing.
- When mixing thin batters, use medium speeds and frequently stop the mixer to scrape the sides of the bowl with a spatula. Place liquid ingredients in the bowl first and then add dry ingredients.
• Always stay near mixer during use. - If a spoon is accidentally caught in an attachment or the motor stalls, turn the speed control to OFF (O) and then unplug. Clear the obstruction or reduce the amount of mixture in the bowl. Let the motor cool for 5 minutes before continuing.
Whisk Tips
- The whisk is designed to whip liquids, such as egg whites and cream. Do not use the whisk for mixing thick mixtures, such as dough, fudge, or mashed potatoes.
- Your mixer is designed to whisk a minimum of 2 large egg whites or 1 cup (237 ml) of cream. Mixer performance is enhanced as the tip of the whisk is immersed into the liquid. If smaller quantities are needed, a hand mixer is recommended.
EGG WHITES
Place egg whites in a clean, dry mixing bowl. Attach bowl and whisk. To avoid splashing, gradually turn speed control to desired speed. See chart below.
AMOUNT
SPEED
2 to 4 egg whites up to 7
6 or more egg whites up to 5
Your stand mixer whips egg whites quickly. Watch carefully to avoid overwhipping. Here is what to expect:
Frothy: Large, uneven air bubbles.
Begins to Hold Shape: Air bubbles are fine and compact; product is white.
Soft Peak: Tips of peaks fall over when whisk is removed.
Almost Stiff: Sharp peaks form when whisk is removed, but whites are still soft.
Stiff But Not Dry: Sharp, stiff peaks form when whisk is removed. Whites are uniform in color and glisten.
Stiff and Dry: Sharp, stiff peaks form when whisk is removed. Whites are speckled and dull in appearance.
WHIPPED CREAM
Pour cold whipping cream into chilled bowl. Attach bowl and whisk. To avoid splashing, gradually turn to designated speed and whip to desired stage. See chart below.
AMOUNT
1 cup (237 ml) up to 7
1 pint (473 ml) up to 5
Your stand mixer whips cream very quickly. Watch cream closely during whipping because there are just a few seconds between whipping stages. Look for these characteristics:
Begins to Thicken: Cream is thick and custard-like.
Holds Its Shape: Cream forms soft peaks when whisk is removed. Can be folded into other ingredients when making desserts and sauces.
Stiff: Cream stands in stiff, sharp peaks when whisk is removed. Use for topping on cakes or desserts, or filling for cream puffs.
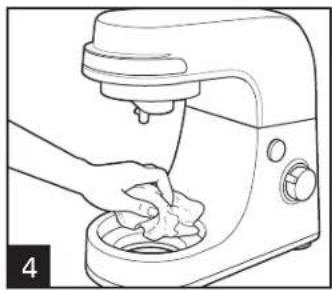
Care and Cleaning
Make sure mixer is unplugged and speed control is set to OFF (Q)
natural_image
Illustration of a kitchen mixer blending into a bowl, showing mechanical components and motion arrows (no text or symbols)WARNING Electrical Shock Hazard.
Do not immerse mixer, cord, or plug in water or any other liquid.
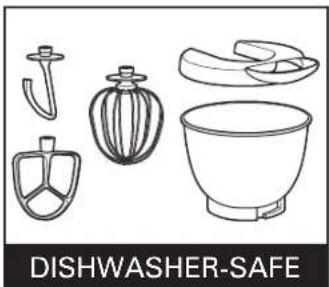
DO NOT use the "SANI" setting when washing in the dishwasher. "SANI" cycle temperatures could damage your product.
natural_image
Line drawing of a hand washing a small bowl into a kitchen mixer (no text or symbols)10
Troubleshooting
PROBLEM
| Food is not mixed. | Place liquid ingredients in bowl before adding dry ingredients.Stop mixer and scrape sides of bowl.Increase speed. |
| Food splatters during mixing. | Mixtures containing large amounts of liquid ingredients should be mixed at lower speeds to avoid splashing. Increase speed only after the mixture has thickened. See page 6 for how to use splatter shield. |
| Mixer “walks” on counter during mixing. | Reduce speed.Reduce quantity of ingredients in bowl.Make sure countertop is clean. This allows the suction cups to grip countertop and reduce mixer movement. |
Recipes
Chocolate Velvet Layer Cake
2 cups (473 ml) cake flour
1/2 cup (118 ml) unsweetened baking cocoa
2 teaspoons (10 ml) baking soda
1/4 teaspoon (1.2 ml) salt
10 tablespoons (148 ml) butter, room temperature
2 cups (473 ml) light brown sugar, packed
2 eggs
1 teaspoon (5 ml) vanilla
3/4 cup (177 ml) sour cream
3/4 cup (177 ml) cold brewed coffee
Directions:
Preheat oven to 350^ F ( 180^ C). In a small bowl, stir together flour, cocoa, baking soda, and salt. Set aside. Using flat beater attachment, cream butter and sugar on setting 4. Add eggs, one at a time, beating well after each addition. Add vanilla. Reduce speed to setting 2. Add half of flour mixture, then all of sour cream. Add remaining flour mixture; then slowly pour in coffee. Mix on setting 2 for about 30 seconds. Turn off mixer and scrape sides and bottom of bowl. Turn mixer on to setting 4 and mix until thoroughly blended. Divide batter between 2 greased and wax paper-lined 9-inch (23-cm) round cake pans. Bake 30 to 35 minutes or until tests done. Cool in pan for 5 minutes; then remove from pans and cool on racks. Frost with Bittersweet Chocolate Frosting.
Makes one 2-layer cake.
Bittersweet Chocolate Frosting
1/3 cup (79 ml) butter, room temperature
2 1/2 cups (591 ml) confectioners' sugar
3/4 cup (177 ml) unsweetened baking cocoa
1/4 cup (59 ml) milk
1 to 2 tablespoons (15 to 30 ml) cold brewed coffee
1 teaspoon (5 ml) vanilla
Directions:
Using flat beater attachment, beat butter on setting 4 until smooth. Add confectioners' sugar and cocoa alternately with milk and continue beating until smooth. Add vanilla and beat until smooth and blended.
Recipes (cont.)
Best Ever Sugar Cookies
2 1/2 cups (591 ml) all-purpose flour
1 teaspoon (5 ml) baking powder
1/2 teaspoon (2.5 ml) baking soda
1/4 teaspoon (1.2 ml) salt
1/4 teaspoon (1.2 ml) nutmeg
3/4 cup (177 ml) butter, softened
3/4 cup (177 ml) sugar
1 egg
1 teaspoon (5 ml) vanilla
1/4 cup (59 ml) milk
Directions:
Preheat oven to 375^ F ( 190^ C). Mix together flour, baking powder, baking soda, salt, and nutmeg and set aside. Using flat beater, cream butter on high speed until light and fluffy. Reduce speed to lowest setting. Add sugar, egg, and vanilla, mixing thoroughly. Gradually add dry ingredients and milk; continue mixing until thoroughly mixed. Form cookie dough into 1 1/2-inch (3.5-cm) diameter balls and arrange balls on ungreased baking sheets. Flatten balls slightly with the bottom of a drinking glass. Bake in oven for 6 to 7 minutes or until lightly golden around edges. Cool on wire racks.
Makes about 4 dozen.
Cowboy Cookies
1 cup (237 ml) butter
1 cup (237 ml) sugar
1 cup (237 ml) light brown sugar
2 eggs
2 cups (473 ml) flour
1 teaspoon (5 ml) baking soda
1/2 teaspoon (2.5 ml) baking powder
1/2 teaspoon (2.5 ml) salt
2 cups (473 ml) oatmeal
1 tablespoon (15 ml) vanilla
12 ounces (340 g) chocolate chips
1 1/2 cups (355 ml) coconut
Directions:
Preheat oven to 350^ F ( 180^ C). With flat beater attachment, cream together butter, sugar, and brown sugar at a medium setting until well blended. Mix in vanilla and eggs. Reduce speed and gradually add flour, baking soda, baking powder, and salt mix until smooth. On a low setting, mix in oatmeal, chocolate chips, and coconut until well mixed. Drop rounded spoonful onto ungreased cookie sheet. Bake on middle rack of oven for 12 to 14 minutes.
Makes 3 dozen cookies.
Recipes (cont.)
Sour Cream Coffee Cake
Crumb Topping
1 1/2 cups (355 ml) all-purpose flour
1 1/2 sticks (3/4 cup [177 ml]) unsalted butter, softened
1/3 cup (79 ml) packed light brown sugar
1/3 cup (79 ml) sugar
1 1/4 teaspoons (6.2 ml) ground cinnamon
1 cup (237 ml) pecans, chopped
Cake
1 1/2 sticks (3/4 cup [177 ml]) unsalted butter, softened
1 1/4 cups (296 ml) sugar
1 tablespoon (15 ml) baking powder
3/4 teaspoon (3.7 ml) baking soda
3/4 teaspoon (3.7 ml) salt
4 large eggs
1 tablespoon (15 ml) vanilla
1 1/2 cups (355 ml) sour cream
2 1/4 cups (532 ml) all-purpose flour
Streusel
1/3 cups (79 ml) all-purpose flour
1/2 cup (118 ml) packed light brown sugar, divided
3/4 teaspoon (3.7 ml) ground cinnamon
3 tablespoons (44 ml) cold butter
Crumb Topping: In a small bowl, combine flour, butter, brown sugar, granulated sugar, and cinnamon; mix with fork until large crumbs are formed. Add pecans and mix to incorporate.
Streusel: In another small bowl, combine flour, brown sugar, cinnamon, and butter. Mix with fork until large crumbs are formed.
Cake: Lower oven rack to lowest position. Preheat oven 350°F (180°C). Grease 10-inch (26-cm) bundt pan with butter.
Directions:
Using the flat beater attachment, cream butter on medium speed until smooth. Add sugar, baking powder, baking soda, and salt. Beat on medium speed for 3 minutes. With mixer on low speed, add in eggs, one at a time, until well blended. Mix in vanilla and sour cream. Gradually add flour. Continue to mix until well blended.
Spread about 2 cups (473 ml) of batter into the bottom of prepared pan. Sprinkle evenly with half of streusel mixture. Repeat. Spread remaining batter over and top with crumb topping.
Bake 50 to 60 minutes or until a toothpick inserted into the center of the cake comes out clean. Cool on wire rack 30 minutes. Invert cake onto plate and then flip on wire rack with topping side up. Cool completely.
Makes one cake.
Recipes (cont.)
Simple Yeast Rolls
1 cup (237 ml) warm water, 100° to 110°F (38° to 43°C)
.25-ounce (8-g) package active dry yeast
1/4 cup (59 ml) butter, melted and cooled
3 Tablespoons (44 ml) sugar
1 teaspoon (5 ml) salt
1 egg
3 to 3 1/2 cups (710 to 828 ml) flour
Directions:
Pour water into mixing bowl. Add yeast and let dissolve for 5 minutes. Add butter, sugar, salt, and egg. Using dough hook, mix on speed 2 for about 30 seconds. Add 3 cups (710 ml) of the flour and mix on speed 4 for about 2 minutes. Add additional flour, if necessary, to make a soft dough. Cover and let rise in a warm place for about 1 hour.
Preheat oven to 350^ F ( 180^ C). Stir down the dough and dump onto lightly floured surface. Divide the dough into 4 equal portions; then divide each portion into 4 golf ball-sized balls. Place the 16 balls in a greased 9- x 13-inch (23- x 33-cm) baking pan. Let rise in a warm place for about 30 minutes. Bake 25 to 30 minutes.
Makes 16 rolls.
Limited Warranty
This warranty applies to products purchased and used in the U.S. and Canada. This is the only express warranty for this product and is in lieu of any other warranty or condition.
This product is warranted to be free from defects in material and workmanship for a period of five (5) years from the date of original purchase in Canada and one (1) year from the date of original purchase in the U.S. During this period, your exclusive remedy is repair or replacement of this product or any component found to be defective, at our option; however, you are responsible for all costs associated with returning the product to us and our returning a product or component under this warranty to you. If the product or component is no longer available, we will replace with a similar one of equal or greater value.
This warranty does not cover glass, filters, wear from normal use, use not in conformity with the printed directions, or damage to the product resulting from accident, alteration, abuse, or misuse. This warranty extends only to the original consumer purchaser or gift recipient. Keep the original sales receipt, as proof of purchase is required to make a warranty claim. This warranty is void if the product is used for other than single-family household use or subjected to any voltage and waveform other than as specified on the rating label (e.g., 120V \~ 60 Hz).
We exclude all claims for special, incidental, and consequential damages caused by breach of express or implied warranty. All liability is limited to the amount of the purchase price. Every implied warranty, including any statutory warranty or condition of merchantability or fitness for a particular purpose, is disclaimed except to the extent prohibited by law, in which case such warranty or condition is limited to the duration of this written warranty. This warranty gives you specific legal rights. You may have other legal rights that vary depending on where you live. Some states or provinces do not allow limitations on implied warranties or special, incidental, or consequential damages, so the foregoing limitations may not apply to you.
To make a warranty claim, do not return this appliance to the store. Please write Hamilton Beach Brands, Inc., Customer Service Department, 4421 Waterfront Dr., Glen Allen, VA 23060, or visit hamiltonbeach.com/customer-service in the U.S. or hamiltonbeach.ca/customer-service in Canada. For faster service, locate the model, type, and series numbers on your appliance.
PRÉCAUTIONS IMPORTANTES
natural_image
Line drawing of a hand operating the switch on a kitchen mixer (no text or symbols)natural_image
Line drawing of a kitchen blender with a rotating handle and handle (no text or symbols)natural_image
Illustration of a kitchen mixer with downward arrow indicating process (no text or symbols)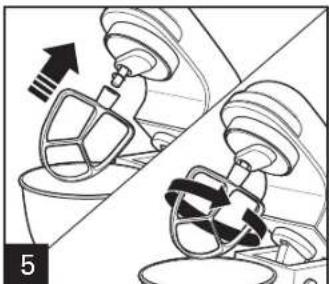
natural_image
Diagram showing two mechanical components with arrows indicating motion, no text or symbols presentnatural_image
Diagram showing a hand operating a kitchen mixer with directional arrows indicating action (no text or symbols present)natural_image
Line drawing of a kitchen mixer with a black arrow indicating the press direction (no text or symbols)natural_image
Diagram showing a plug inserted into an electrical socket with a black arrow indicating the insertion direction (no text or symbols present)natural_image
Diagram showing a cable being inserted into an electrical socket (no text or symbols present)natural_image
Line drawing of a kitchen mixer with handle and control panel (no text or symbols)natural_image
Diagram showing two kitchen utensils in a mixing room, one with a handle and the other with a handle (no text or symbols present)natural_image
Diagram showing two mechanical components with directional arrows, no text or symbols present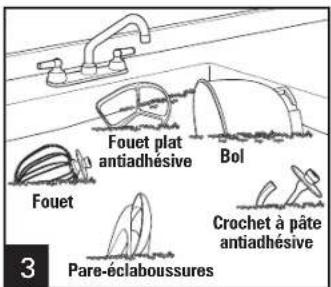
natural_image
Line drawing of a hand washing a kitchen mixer with a cloth (no text or symbols)Dépannage
PROBLÈME
3/4 tasse (177 ml) de crème sure
natural_image
Line drawing of a kitchen mixer with a hand adjusting the handle (no text or symbols)natural_image
Mechanical component diagram showing a rotating lever mechanism (no text or symbols)natural_image
Illustration of a kitchen mixer with directional arrows indicating process flow (no text or symbols)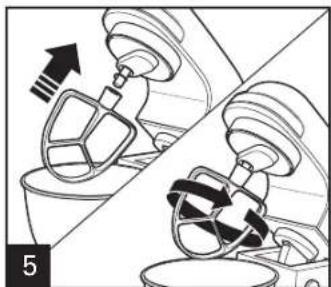
natural_image
Diagram showing mechanical components and motion, no text or symbols presentnatural_image
Diagram showing a hand operating a kitchen mixer with directional arrows indicating action (no text or symbols present)natural_image
Line drawing of a kitchen mixer with a black arrow indicating the component (no text or symbols present)natural_image
Diagram showing a plug inserted into an electrical socket with a black arrow indicating the insertion direction (no text or symbols present)natural_image
Diagram showing a plug inserted into an electrical socket with two outlets, connected to a cable (no text or symbols present)natural_image
Line drawing of a kitchen mixer with handle and control panel (no text or symbols)natural_image
Diagram showing a hand using a kitchen mixer to press or rotate a cup, with no text or symbols present.natural_image
Diagram showing two kitchen utensils in a mixing room, one with a handle and the other with a handle (no text or symbols present)natural_image
Illustration of a kitchen mixer blending into a bowl, showing the mixing process (no text or symbols)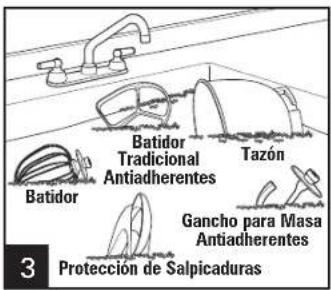
natural_image
Line drawing of a hand using a kitchen mixer to clean food (no text or symbols)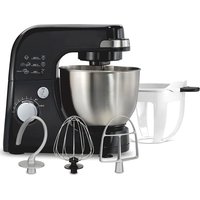
- IMPORTANT SAFEGUARDS
- SAVE THESE INSTRUCTIONS
- Other Consumer Safety Information
- This appliance is intended for household use only.
- CAUTION Moving Parts Hazard.
- WATTAGE/PEAK POWER INFORMATION
- Parts and Features
- How to Use
- WARNING Cut and Crush Hazard.
- How to Use (cont.)
- General Mixing Tips
- Flat Beater Tips
- Dough Hook Tips
- Whisk Tips
- EGG WHITES
- AMOUNT
- SPEED
- WHIPPED CREAM
- Care and Cleaning
- WARNING Electrical Shock Hazard.
- Troubleshooting
- Recipes
- Chocolate Velvet Layer Cake
- Bittersweet Chocolate Frosting
- Recipes (cont.)
- Best Ever Sugar Cookies
- Cowboy Cookies
- Sour Cream Coffee Cake
- Crumb Topping
- Cake
- Streusel
- Directions:
- Simple Yeast Rolls
- Limited Warranty
- PRÉCAUTIONS IMPORTANTES
- Dépannage
Brand : HAMILTON BEACH
Model : 63386
Category : Food processor