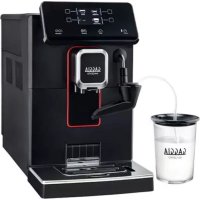
Magenta Milk RI8701 - Coffee machine GAGGIA - Free user manual and instructions
Find the device manual for free Magenta Milk RI8701 GAGGIA in PDF.


| Product type | Automatic espresso machine with integrated milk frother |
| Brand | Gaggia |
| Model | Magenta Milk RI8701 |
| Dimensions (L x D x H) | 224 x 357 x 435 mm |
| Weight | 7.7 kg |
| Power supply | 220-240 V, 50/60 Hz (see rating plate) |
| Rated power | See rating plate (approx. 1450 W) |
| Pump pressure | 15 bar |
| Boiler type | Stainless steel |
| Water tank capacity | 1.8 L (removable) |
| Bean hopper capacity | 250 g |
| Grounds container capacity | 15 cakes |
| Number of beverages | 9 recipes (Ristretto, Espresso, Coffee, Americano, Cappuccino, Café au lait, Frothy milk, Hot water, etc.) |
| Milk frother | Capp in Cup system with glass carafe |
| Grind adjustment | 5 levels, ceramic burr grinder |
| Customization | Quantity, temperature, intensity, pre-ground, memory (MEMO) |
| Water filter | INTENZA+ (optional, 3 hardness levels) |
| Maintenance and cleaning | Fast and deep milk circuit cleaning, automatic descaling, removable brew group washable with water |
| Safety | Automatic shut-off, thermal cut-out, shut-off in case of malfunction |
| Accessories | Gaggia descaler, INTENZA+ filter, cleaning tablets, lubricant, coffee scoop |
| Reparability | Spare parts available via authorized service center (www.gaggia.com) |
Frequently Asked Questions - Magenta Milk RI8701 GAGGIA
User questions about Magenta Milk RI8701 GAGGIA
0 question about this device. Answer the ones you know or ask your own.
Ask a new question about this device
Download the instructions for your Coffee machine in PDF format for free! Find your manual Magenta Milk RI8701 - GAGGIA and take your electronic device back in hand. On this page are published all the documents necessary for the use of your device. Magenta Milk RI8701 by GAGGIA.
USER MANUAL Magenta Milk RI8701 GAGGIA
natural_image
Exterior view of a Gaggia Magenta coffee maker with water dispenser and glass cup (no text or symbols on main device)ENGLISH
FRANÇAIS
GAGGIA MAGENTA
MILK
RI8701 (SUP 051P)
Operating instructions
Mode d'emploi
CE
02
First installation / Première installation
natural_image
Diagram of a building with an upward arrow indicating growth, no text or symbols present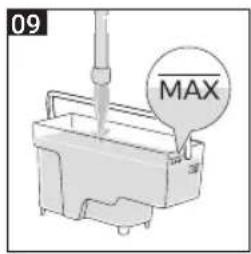
natural_image
Diagram of a mechanical assembly with a downward arrow indicating force or direction (no text or symbols present)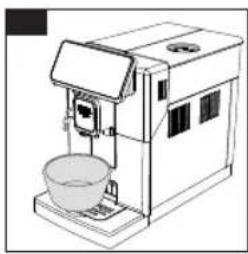
natural_image
Line drawing of a coffee maker with a bowl on the front panel (no text or symbols)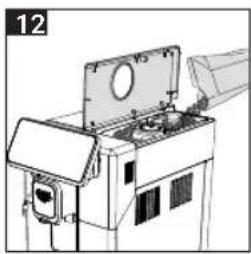
natural_image
Technical line drawing of a mechanical assembly with mounting bracket and housing (no text or symbols)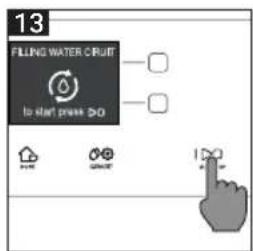
natural_image
Illustration of hands holding a ruler and a measuring tool (no text or symbols visible)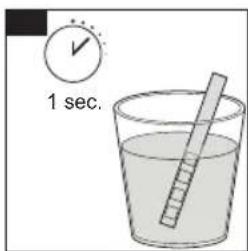
Capp in Cup System / Système Capp in Cup
natural_image
Diagram of a door lock mechanism with a downward arrow indicating force or movement (no text or symbols present)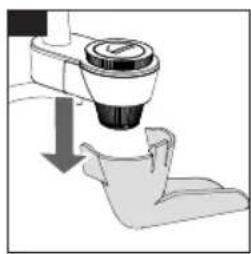
natural_image
Illustration of a mechanical device with a downward arrow indicating process (no text or symbols)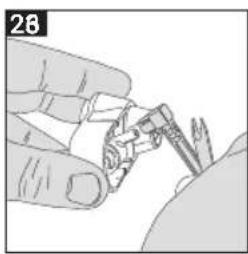
natural_image
Illustration of a hand holding a small object with a pointed tip, possibly a tool or device (no text or symbols visible)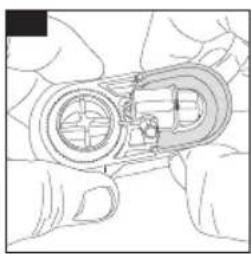
natural_image
Line drawing of a mechanical device with hands holding a tool (no text or symbols)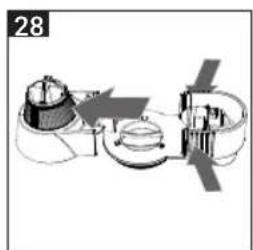
flowchart
graph TD
    A["Start"] --> B["Process Unit"]
    B --> C{Check Point}
    C -->|Yes| D["Output"]
    C -->|No| E["Feedback Loop"]
    E --> B
natural_image
Line drawing of a toilet with lid and side arm (no text or symbols)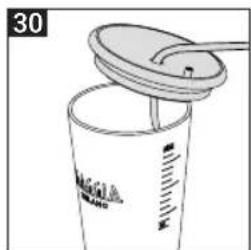
natural_image
Illustration of a glass cup with a straw and lid, no text or symbols present4 English
IMPORTANT SAFEGUARDS
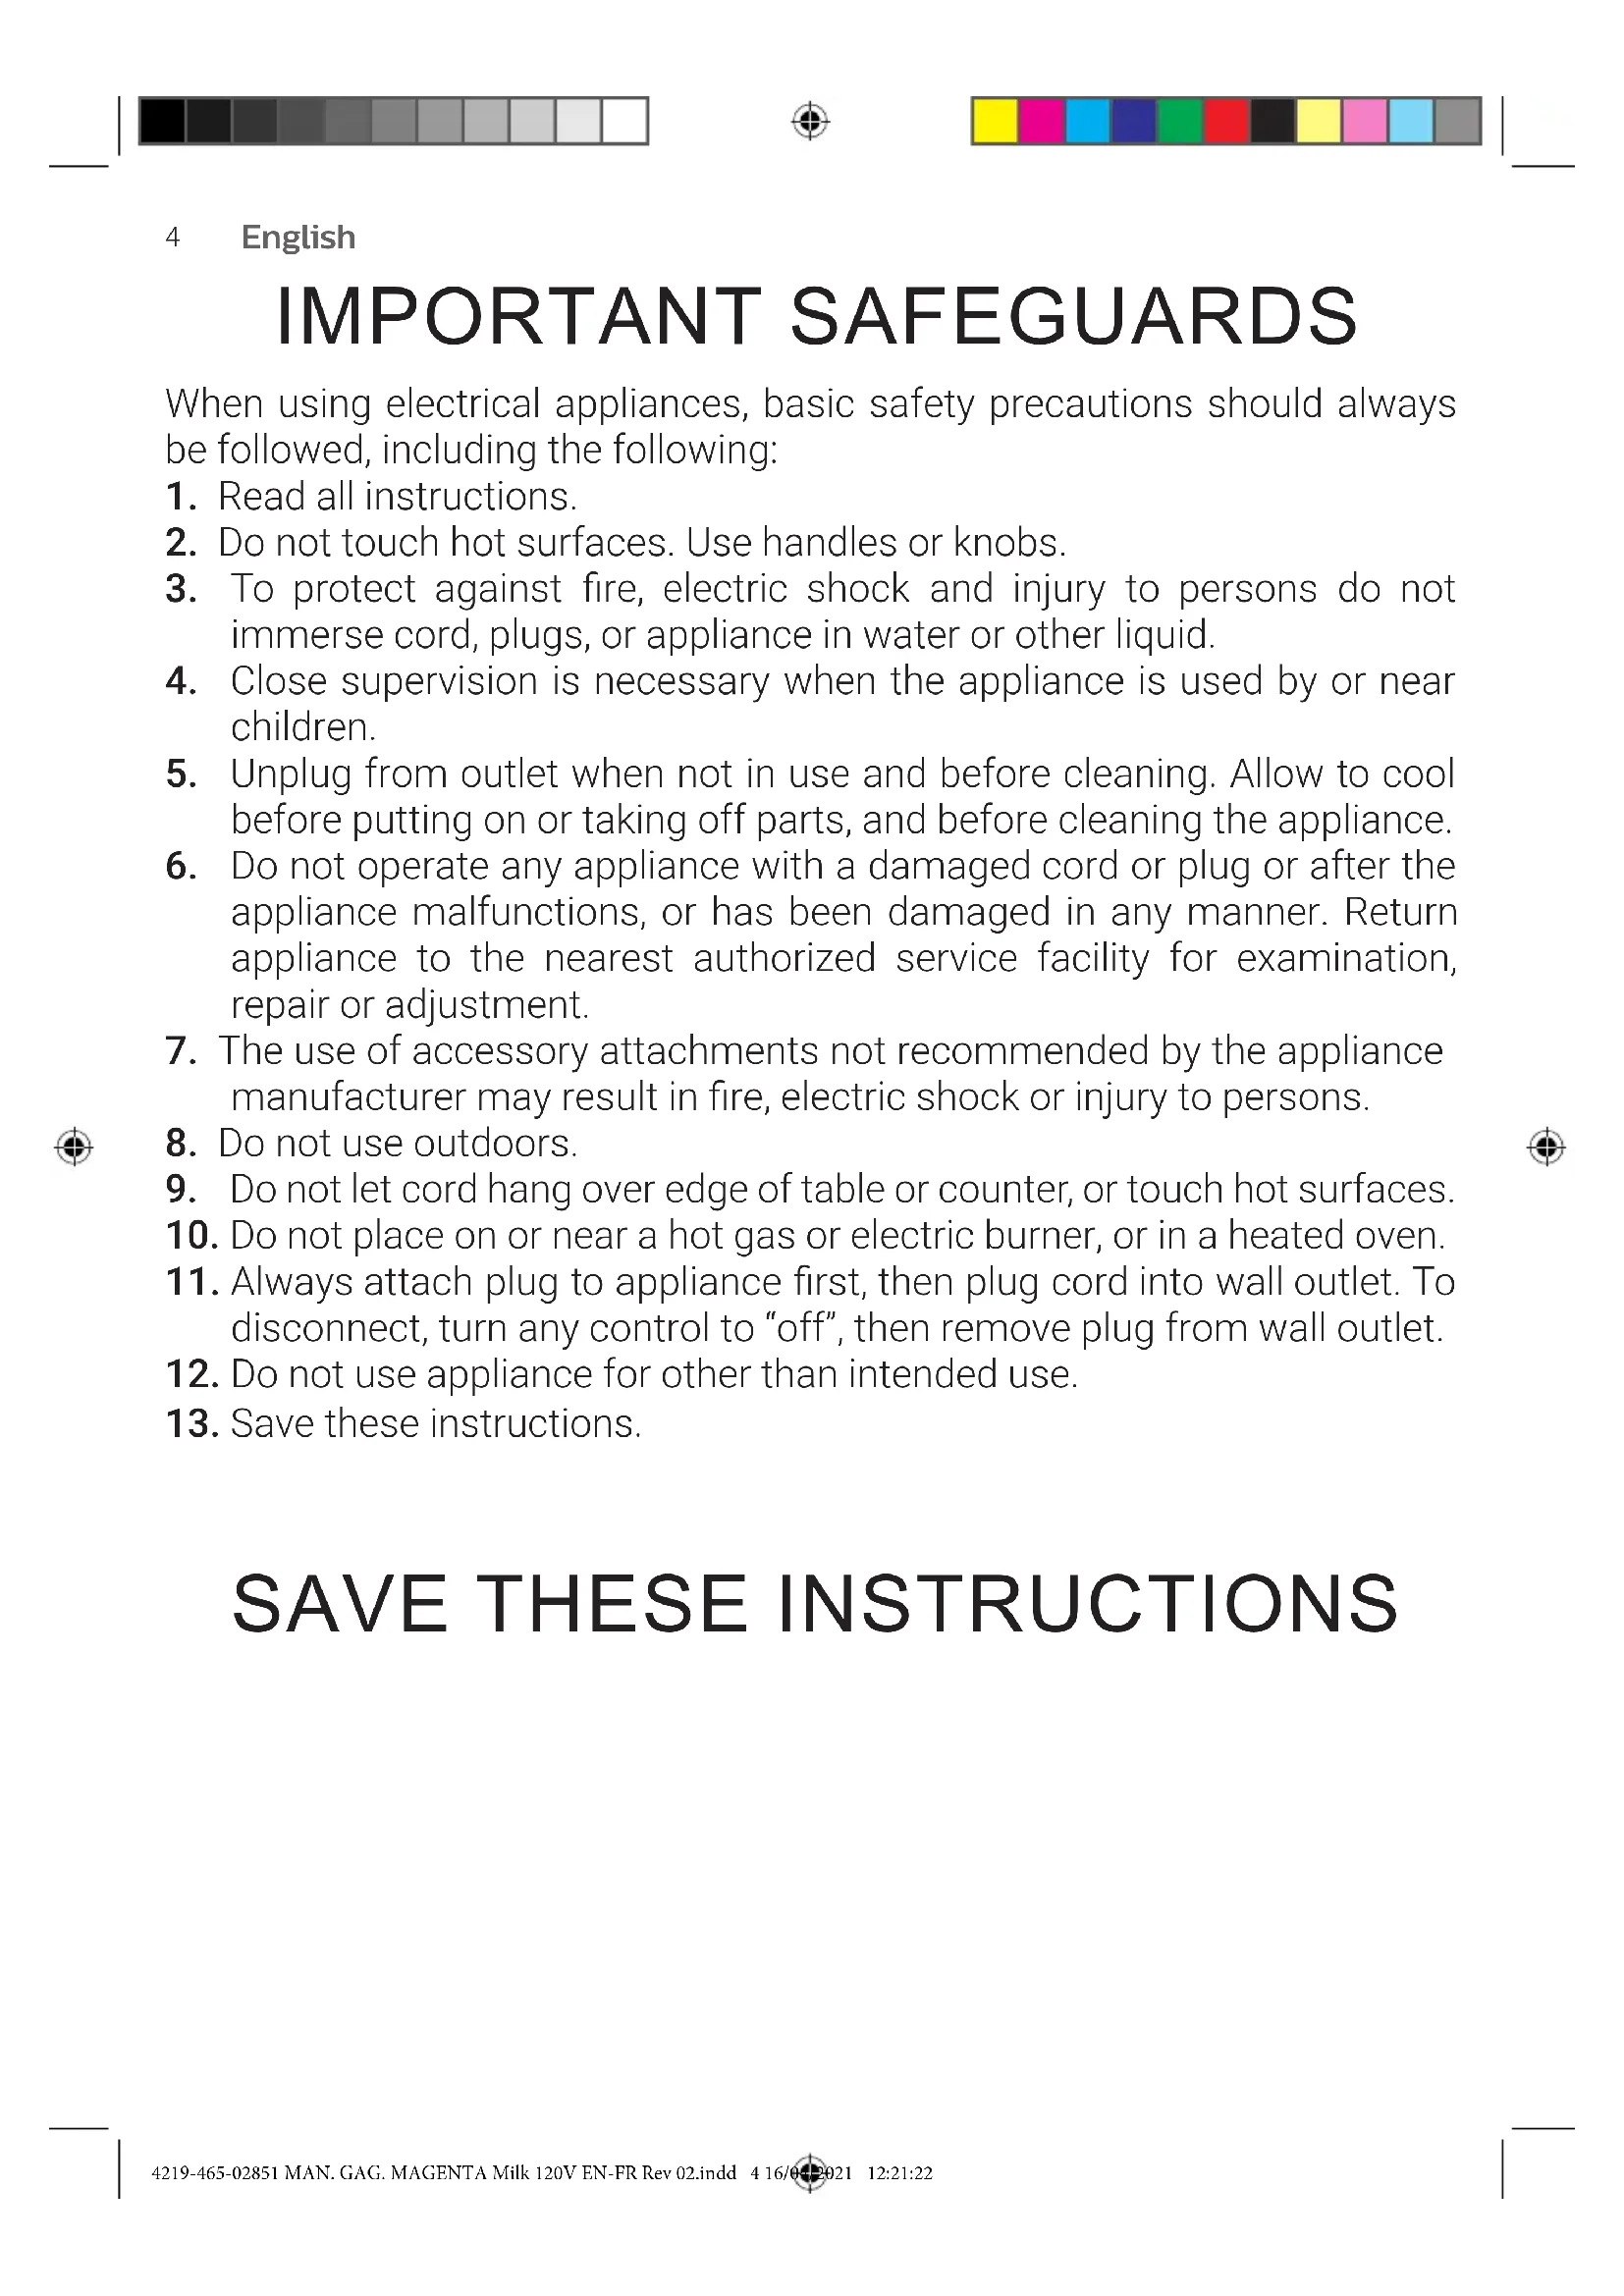
When using electrical appliances, basic safety precautions should always be followed, including the following:
- Read all instructions.
- Do not touch hot surfaces. Use handles or knobs.
- To protect against fire, electric shock and injury to persons do not immerse cord, plugs, or appliance in water or other liquid.
- Close supervision is necessary when the appliance is used by or near children.
- Unplug from outlet when not in use and before cleaning. Allow to cool before putting on or taking off parts, and before cleaning the appliance.
- Do not operate any appliance with a damaged cord or plug or after the appliance malfunctions, or has been damaged in any manner. Return appliance to the nearest authorized service facility for examination, repair or adjustment.
- The use of accessory attachments not recommended by the appliance manufacturer may result in fire, electric shock or injury to persons.
- Do not use outdoors.
- Do not let cord hang over edge of table or counter, or touch hot surfaces.
- Do not place on or near a hot gas or electric burner, or in a heated oven.
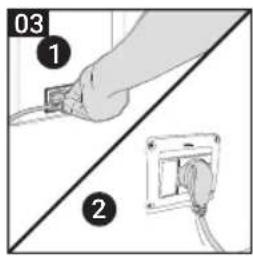
- Always attach plug to appliance first, then plug cord into wall outlet. To disconnect, turn any control to "off", then remove plug from wall outlet.
- Do not use appliance for other than intended use.
- Save these instructions.
SAVE THESE INSTRUCTIONS
CAUTION
This appliance is for household use only. Any servicing, other than cleaning and user maintenance, should be performed by an authorized service center. Do not immerse machine in water. To reduce the risk of fire or electric shock, do not disassemble the machine. There are no parts inside the machine serviceable by the user. Repair should be done by authorized service personnel only.
- Check voltage to be sure that the voltage indicated on the nameplate corresponds with your voltage.
- Never use warm or hot water to fill the water tank. Use cold water only.
- Keep your hands and the cord away from hot parts of the appliance during operation.
- Never clean with scrubbing powders or harsh cleaners. Simply use a soft cloth dampened with water.
- For optimal taste of your coffee, use purified or bottled water. Periodic descaling is still recommended every 2-3 months.
- Do not use caramelized or flavored coffee beans.
INSTRUCTIONS FOR THE POWER SUPPLY CORD
A. A short power-supply cord (or detachable power-supply cord) is to be provided to reduce risks resulting from becoming entangled in or tripping over a longer cord.
B. Longer detachable power-supply cords or extension cords are available and may used if care is exercised in their use.
C. If a long detachable power-supply cord or extension cord is used,
- The marked electrical rating of the detachable power-supply cord or extension cord should be at least as great as the electrical rating of the appliance
- If the appliance is of the grounded type, the extension cord should be a grounding-type 3-wire cord, and
- The longer cord should be arranged so that it will not drape over the counter top or table top where it can be pulled on by children or tripped over.
6 English
Important safety information
This machine is equipped with safety features. Nevertheless, read and follow the safety instructions carefully and only use the machine as described in these instructions, to avoid accidental injury or damage due to improper use of the machine. Keep this safety booklet for future reference.
Warning
General
- Check if the voltage indicated on the machine corresponds to the local mains voltage before you connect the appliance.
- Connect the machine to an earthed wall socket.
- Do not let the power cord hang over the edge of a table or worktop and do not let it touch hot surfaces.
- To avoid the danger of electric shock, never immerse the machine, mains plug or power cord in water or any other liquid.
- Do not pour liquids on the power cord connector.
- To avoid the danger of burns, keep body parts away from hot water jets produced by the machine.
- Do not touch hot surfaces. Use handles and knobs.
- Switch off the machine with the main switch located on the back (if present) and remove the mains plug from the wall socket:
• If a malfunction occurs.
- If you are not going to use the appliance for a long time.
• Before you clean the machine.
- Pull at the plug, not at the power cord.
- Do not touch the mains plug with wet hands.
- Do not use the machine if the mains plug, the power cord or the machine itself is damaged.
- Do not make any modifications to the machine or its power cord.
- Only have repairs carried out by a service center authorized by Gaggia to avoid a hazard.
- The machine should not be used by children younger than 8 years old.
- This machine can be used by children aged from 8 years and above and by persons with reduced physical, sensory or mental capabilities or lack of experience and knowledge if they have been given supervision or instruction concerning use of the machine in a safe way and if they understand the hazards involved.
- Cleaning and user maintenance shall not be made by children unless they are older than 8 and supervised.
- Keep the machine and its cord out of the reach of children aged less than 8 years.
- Children should be supervised to ensure that they do not play with the machine.
- Never insert fingers or other objects into the coffee grinder.
- Be careful when you dispense hot water.
Dispensing may be preceded by small jets of hot water. Wait until the end of the dispensing cycle before you remove the hot water dispensing spout.


Caution
General
- This machine is intended for normal household use only. It is not intended for use in environments such as staff kitchens of shops, offices, farms or other work environments.
- Always put the machine on a flat and stable surface. Keep it in upright position, also during transport.
- Do not place the machine on a hotplate or directly next to a hot oven, heater or similar source of heat.
- Only put roasted coffee beans in the bean hopper. Putting ground coffee, instant coffee, raw coffee beans or any other substance in the coffee bean hopper may cause damage to the machine.
- Let the machine cool down before you insert or remove any parts. The heating surfaces may retain residual heat after use.
- Never fill the water tank with warm, hot or sparkling water, as this may cause damage to the water tank and the machine.
- Never use souring pads, abrasive cleaning agents or aggressive liquids such as petrol or acetone to clean the machine. Simply use a soft cloth dampened with water.
- Descale your machine regularly. The machine indicates when descaling is needed. Not doing this will make your appliance stop working properly. In this case repair is not covered by your warranty.
- Do not keep the machine at temperatures below 0^ C/ 32^ F. Water left in the heating system may freeze and cause damage.
- Do not leave water in the water tank when you are not going to use the machine for a long period of time. The water can become contaminated. Use fresh water every time you use the machine.
- Never use any accessories or parts from other manufacturers or that Gaggia does not specifically recommend. If you use such accessories or parts, your warranty becomes invalid.
- Regular cleaning and maintenance prolongs the lifetime of your machine and ensures optimum quality and taste of your coffee.
- The machine is exposed continuously to moisture, coffee and scale. Therefore it is very important to regularly clean and maintain the machine as described in the user manual and shown on the website. If you do not perform these cleaning and maintenance procedures, your machine eventually may stop working. In this case repair is not covered by warranty.
- Do not clean the brew group in the dishwasher and do not use washing-up liquid or a cleaning agent to clean it. This may cause the brew group to malfunction and may have a negative effect on the coffee taste.
- Do not dry the brew group with a cloth to prevent fibers from collecting inside the brew group.
- Never drink the solution dispensed during the descaling process.
- Only put preground coffee into the preground coffee compartment. Other substances and objects may cause severe damage to the machine. In this case, repair is not covered by your warranty.
- The machine shall not be placed in a cabinet when in use.
Machines with milk carafe
Warning
- To avoid the danger of burns, be aware that dispensing may be preceded by jets of milk and steam. Wait until the end of the cycle before you remove the milk carafe.
8 English
Caution
- Make sure that the milk carafe is installed and the milk dispensing spout is open before you select a milk-based coffee beverage or milk froth.
- Do not put any other liquids in the milk jug/carafe than water (for cleaning) or milk.
- Do not clean the milk carafe in the dishwasher.
Machines with classic milk frother / pannarello
Warning
- To avoid the danger of burns, be aware that dispensing may be preceded by small jets of hot water.
- Never touch the classic milk frother with bare hands, as it may become very hot. Use the appropriate protective handle only.
Caution
- After frothing milk, quickly clean the classic milk frother by dispensing a small quantity of hot water into a container. Then remove the external part of the classic milk frother and wash it with lukewarm water.
Machines with automatic milk frother / cappucinatore / Capp in Cup system
Warning
- To avoid the danger of burns, be aware that dispensing steam or hot water may be preceded by small jets of hot water. Never touch the hot water/steam dispensing spout with bare hands, as it may become very hot. Use the appropriate protective handle only.
- During dispensing make sure that the spout of the "Capp in Cup" system, if present, is oriented towards the cup and not towards yourself.
- Never drink the solution dispensed during the monthly cleaning procedure of the automatic milk frother.
Caution
- For hygienic reasons, make sure that the outer surface of the hot water/steam dispensing spout is clean.
- After frothing milk, quickly clean the automatic milk frother by dispensing a small quantity of hot water. Follow the cleaning instructions in the user manual.
- Be careful, the hot water/steam dispensing spout could be hot if the machine has recently been used.
- Do not push the rubber fitting too far on the hot water/steam dispensing spout when you insert it. In this case, the automatic milk frother would not work correctly as it would not be able to suck up milk.

Electromagnetic fields (EMF)
This machine complies with all applicable standards and regulations regarding exposure to electromagnetic fields.
Recycling
- This symbol means that this product shall not be disposed of with normal household waste (2012/19/EU).
- Follow your country's rules for the separate collection of electrical and electronic products. Correct disposal helps prevent negative consequences for the environment and human health.
Warranty and support
For service or support, contact your local dealer or an authorized service center.
Contact details are included in the warranty booklet supplied separately or visit www.gaggia.com or www.gaggia.it.


10 English
Congratulations on your purchase of Gaggia Magenta Milk!
This easy-to-use machine guarantees excellent results every day.
Thanks to the intuitive interface, you can choose among 9 beverages and customise them according to your preferences.
Before being packed, each of our high-quality machines undergoes rigorous testing in our laboratories in order to ensure its correct operation. Some coffee residue might be found in your machine, since real coffee is normally used during testing. However, this does not compromise the integrity of the product. Please be assured that this is a brand new machine.
In this user manual you will find all the information you need to install, use, clean and descale your machine. Before using it for the first time, please read carefully the safety manual provided separately and store it for future use.


English
Contents
Machine overview (Fig.2) 12
Control panel and display 13
Control panel overview (Fig. 1) 13
Multifunction buttons 13
First installation 14
Manual rinse cycle 14
Measuring water hardness 15
INTENZA+ water filter 15
Installing the INTENZA+ water filter 16
Replacing the INTENZA+ water filter 16
Types of beverage 17
Espresso tray 18
Coffee Brewing 18
Brewing coffee using coffee beans 18
Brewing coffee using pre-ground coffee 19
Preparation of coffee-based beverages and frothed milk 20
How to assemble the Capp in Cup system 20
Brewing coffee-based and frothed milk beverages 20
Dispensing hot water 21
Customising beverages and saving settings (MEMO) ____22
Beverage Customisation 22
Coffee grind settings 23
Cleaning and maintenance 24
Cleaning table 24
Cleaning the Capp in Cup system 25
Cleaning the brew group 26
Lubricating the brew group 29
Descaling 30
Descaling procedure 30
What to do if the descaling process is interrupted 31
Other settings 31
Language 31
Water filter 32
Stand-by Time 32
Units 32
Water hardness 32
Beverage counter 32
Button sound 32
Factory settings 32
Error code key 33
Troubleshooting 34
GAGGIA accessories 36
Technical specifications ____ 37


12 English
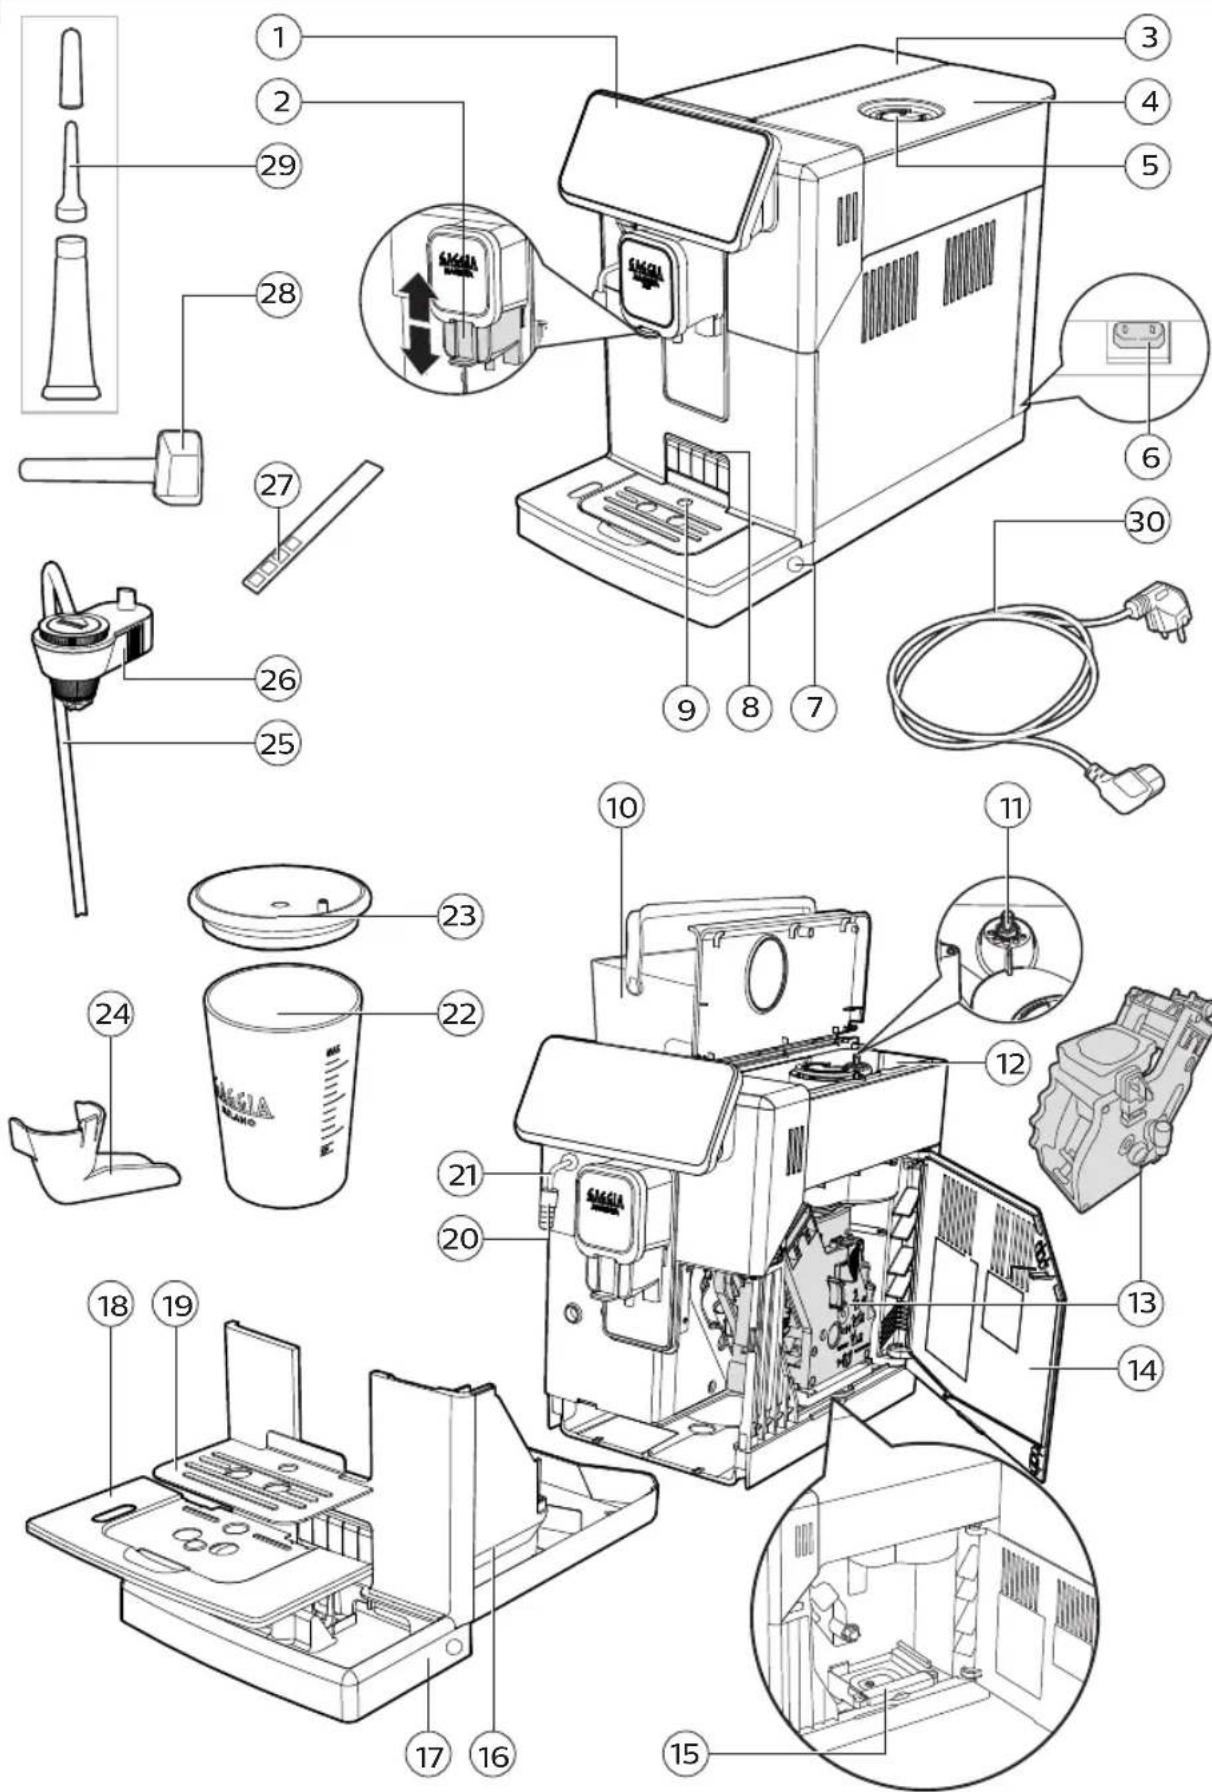
Machine overview (Fig.2)
1 Control panel 16 Coffee pucks container
2 Adjustable coffee dispensing spout 17 Drip tray
3 Water tank lid 18 Drip tray grid
4 Coffee bean container lid 19 Espresso tray
5 Pre-ground coffee compartment 20 Capp in Cup system handle
6 Power cord socket 21 Steam tube
7 Drip tray release buttons 22 Glass milk carafe
8 Espresso tray insertion slot 23 Glass milk carafe lid
9 Full drip tray indicator 24 Capp in Cup system Spout
10 Water tank 25 Milk suction tube
11 Coffee grinder adjustment knob 26 Main body of Capp in Cup system
12 Coffee bean container 27 Water hardness tester
13 Brew group 28 Grinder adjustment key and pre-ground coffee
measuring spoon
14 Service door
29 Lubricant
15 Coffee residues drawer
30 Power cord
Control panel and display
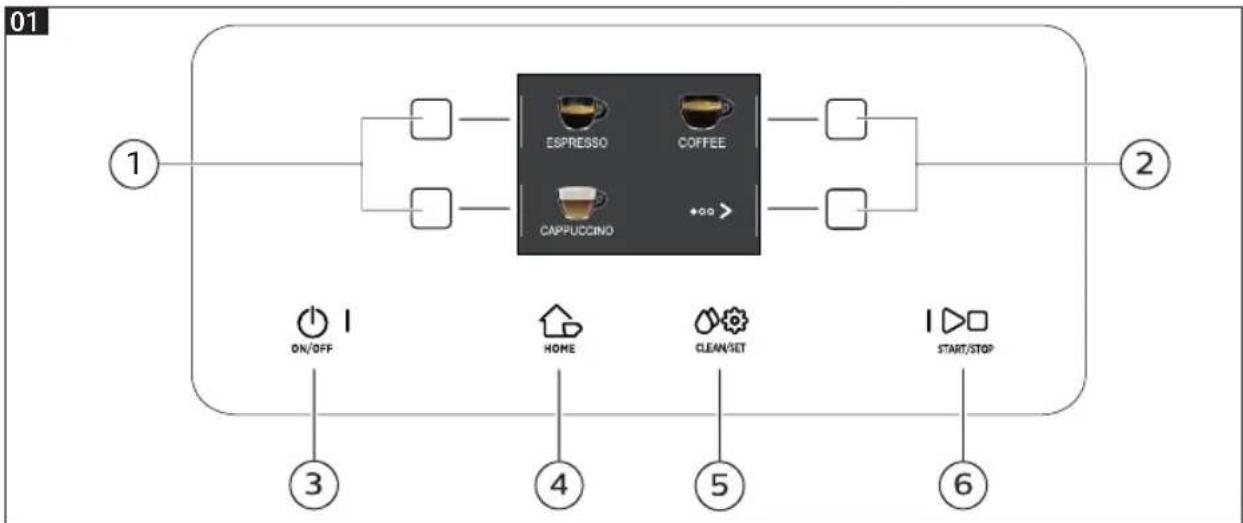
flowchart
graph LR
    A["①"] --> B["ESPRSSO"]
    A --> C["COPFEE"]
    B --> D["CAPPUCCINO"]
    C --> D
    D --> E["②"]
    F["ON/OFF"] --> G["③"]
    H["HOME"] --> I["④"]
    J["CLEAN/SET"] --> K["⑤"]
    L["START/STOP"] --> M["⑥"]
Control panel overview (Fig. 1)
| 1/2 MULTIFUNCTION buttons | Select the function shown on the display. | |
| 3 | ON/OFF button | To switch the machine on or off, by keeping the button pressed for a few seconds. |
| 4 | HOME button | To open the beverage menu. |
| 5 | CLEAN/SET button | To open the cleaning and settings menu. |
| 6 | START/STOP button | To start/stop the dispensing of the selected beverage, or to start/stop the procedure indicated on the display. |
Note: HOME ↑ and CLEAN/SET 🔊 also work as ESC buttons. You can exit the screen by pressing one of the two buttons to go back to the main menu. This will not be possible if you have already accessed a function or a programme.
Multifunction buttons
The multifunction buttons on the sides of the display are used to select the function or the beverage to which they refer at that time.
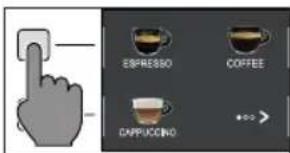
Note: To make the reading of this manual easier, <
14 English
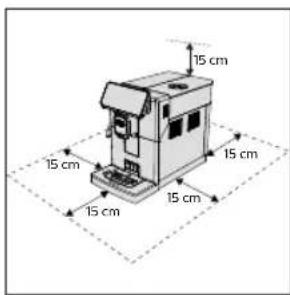
First installation
Before using the machine, it is essential to follow a few simple steps, clearly described in the explanatory drawings you found in the quick guide at the beginning of this instruction manual.
Note: for even tastier coffee, we recommend that you initially prepare 5 cups of coffee to allow the machine to self-adjust.
Manual rinse cycle
During the first installation or after a long period of machine inactivity, a manual rinse cycle must be carried out.
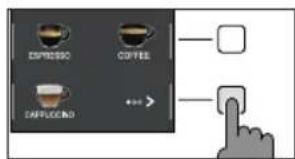
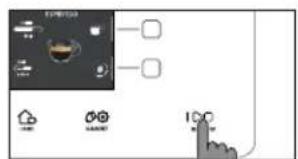
1 Place a container under the coffee dispensing spout, scroll through the different pages and select a "ESPRESSO LUNGO".
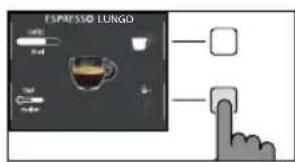
2 Press the " 🔒" button until " 🔒" is selected, without adding pre-ground coffee.
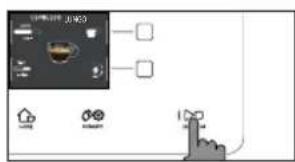
3 Press the START/STOP ▷□ button to start dispensing. The machine will dispense hot water.
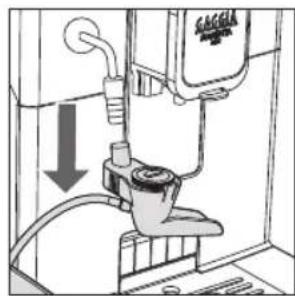
natural_image
Diagram of a coffee maker with a cup and pipe, showing a downward arrow indicating flow (no text or symbols present)4 Empty the container and remove the Capp in Cup system from the steam tube.
5 Place the container under the steam tube and select "HOT WATER".
6 Press the START/STOP ▷□ button to start dispensing.
7 Empty the container and repeat steps 5 to 7 until the water tank is empty.
8 When finished, refill the water tank to the MAX level. The machine is now ready for use.
English
Measuring water hardness
You will need to set the water hardness when you install your machine.
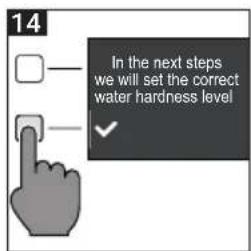
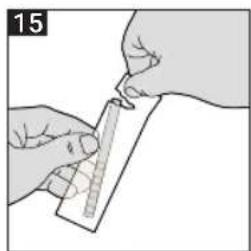
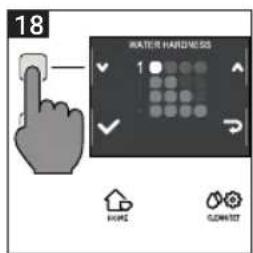
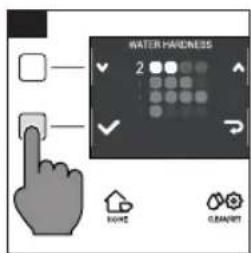
Take the water hardness measuring strip contained in the packaging and follow the steps shown on the display during the installation phase. To change the water hardness later, press the CLEAN/SET 🔊 button, then select "SETTINGS", and once in the settings menu, please select "WATER HARDNESS".
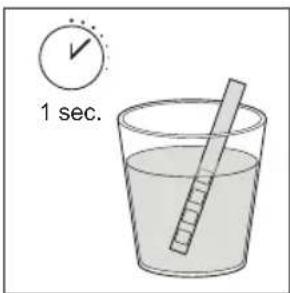
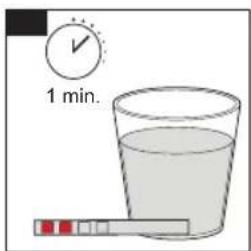
1 Immerse the water hardness measuring strip in a glass of water for 1 second. Remove the strip from the water and wait 1 minute.
2 Note how many squares turn red.
3 Use the green "√" and "^" buttons to select the water hardness according to the table below. Confirm the setting by pressing "√"
| Small red squares | Value to set Water hardness INTENZA+ |
| 1 very soft water A | |
| 2 soft water A | |
| 3 hard water B | |
| 4 very hard water C |


natural_image
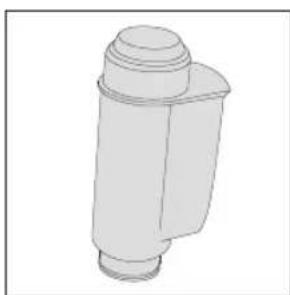
Line drawing of a cylindrical mechanical component with a flanged top and base (no text or symbols)INTENZA+ water filter
We recommend using the INTENZA+ water filter to limit limescale formation. This ensures a longer operating life of your machine and a better coffee aroma over time.
Water is an essential element in brewing coffee. Therefore, it is extremely important that water is always filtered adequately.
The INTENZA+ water filter prevents the formation of mineral deposits, improving the quality of the water.
16
English
natural_image
Line drawing of a hand holding a pen above a glass with water droplets (no text or symbols)Installing the INTENZA+ water filter
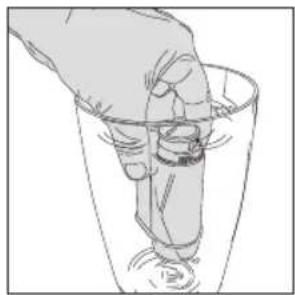
Immerse the INTENZA+ water filter in cold water, in a vertical position and with the opening facing upwards. Press both sides of the filter gently to let air bubbles out.
natural_image
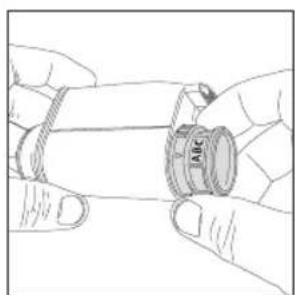
Illustration of hands holding a mechanical component with a circular component labeled 'ABC' (no text or symbols beyond label)Remove the INTENZA+ water filter from the water. Set the machine according to the detected water hardness - see the "Measuring water hardness" chapter. On the filter base, please set one of the following:
A = soft water - 1 or 2 small squares
B = hard water (standard) - 3 small squares
C = very hard water - 4 small squares
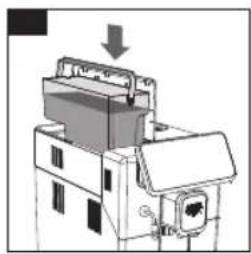
Place the INTENZA+ filter in the water tank, ensuring it is correctly positioned. Refill the water tank and place it back in its housing.
1 Press the CLEAN/SET 🔊 button and then the " SETTINGS " button.
2 Select "WATER FILTER" and press the "button.
3 Select "ACTIVATE" and follow the instructions on the display to activate the filter correctly.
Note: you can pause the filter activation procedure by pressing the START/STOP ▷□ button. To resume the filter activation procedure, press the START/STOP ▷□ button again.
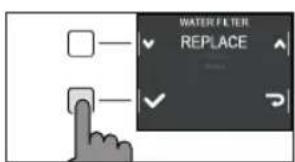
Replacing the INTENZA+ water filter
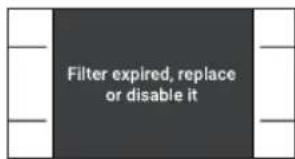
When the INTENZA+ water filter expires, the warning message appears on the display.
1 Replacement or deactivation can be executed by pressing the CLEAN/SET button and then the "SETTINGS" button.
2 Select "WATER FILTER" then press the "button.
3 Select "REPLACE" to change the filter or " DISABLE "if you do not intend to use the filter. Confirm with the " √ button.
Follow the instructions shown on the display to activate the filter.
Types of beverage
Original recipe Description
| Ristretto A ristretto, served in a small cup, is an espresso whose brewing time is shorter than a regular espresso. This results in a coffee that is shorter and less in rich in caffeine. | ||
 | Coffee 30 ml | |
| Espresso The espresso is known around the globe as true Italian coffee. Served in a small cup, its unmistakable features are a full and intense aroma and a top layer of compact, natural “crema”. It is the result of the pressurized hot water extraction process invented by Achille Gaggia in 1938. | ||
 | Coffee 40 ml | |
| Espresso lungo The long espresso is an espresso with a longer extraction time. It is more diluted, with a different aromatic intensity and a higher caffeine content. It is served in a medium-sized cup. | ||
 | Coffee 80 ml | |
| Coffee Coffee is a beverage prepared with more water than espresso. It has a lighter aroma and is served in a medium-large cup. | ||
 | Coffee 120 ml | |
| American coffee American coffee is a less intense long coffee, prepared with an espresso to which hot water is added. | ||
 | Coffee 40 ml | |
| Water 110 ml | ||
| Cappuccino The cappuccino is an Italian classic, among the most loved in the world. It is prepared with espresso, milk and a milk froth, which must be no less than 1 cm thick. It is served in a large cup. | ||
 | Milk 120 ml | |
| Coffee 40 ml | ||
| Café au lait A café au lait is a beverage composed of equal parts coffee and milk. This can even be enriched by a thin layer of milk froth. It is served in a large cup. | ||
 | Coffee 90 ml | |
| Milk 90 ml | ||
| Frothed milk Frothed milk is used to make cappuccinos, latte macchiatos and several other beverages. The result is a compact, homogeneous layer of milk froth. | ||
 | Milk 180 ml | |
| Hot water Hot water can be used to prepare hot teas, infusions and instant beverages. | ||
 | Water 150 ml | |
Note: In the original recipes the beverages are all set to an average temperature and aroma intensity.
18
English
natural_image
Hand inserting a component into a device (no text or symbols visible)Espresso tray
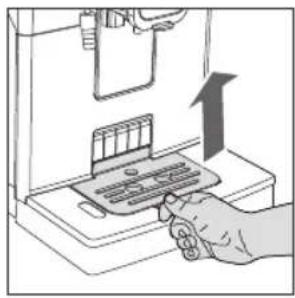
This machine was designed to guarantee flawless results, from a traditional espresso to a number of different beverages. If you want to enjoy an Italian espresso with a delicious layer of its natural "crema" on top and as tradition dictates, we suggest your using of the "Espresso Tray" which is specifically designed for this purpose. This tray allows the use of traditional espresso cups, ensuring the perfect height for a compact, homogeneous "crema" and a splash-free brewing.
natural_image
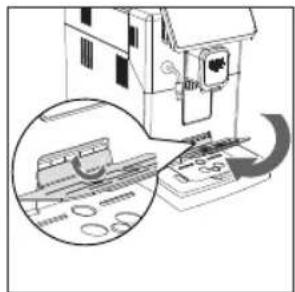
Diagram showing a device with a magnified inset of its internal components (no text or symbols visible)Lift the espresso tray off the grid of the drip tray and place it into the dedicated slot as shown in the drawing.
Coffee Brewing
Brewing coffee using coffee beans
Warning: only use coffee beans when making espresso. Do not put any pre-ground, unroasted, freeze-dried or instant coffee in the coffee bean container, as they may damage the machine.
Tip: Preheat the cups with hot water to enjoy a warmer coffee.
natural_image
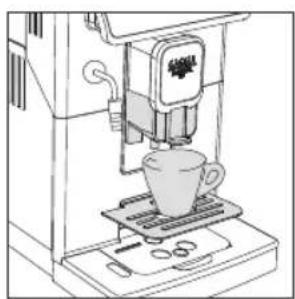
Line drawing of a coffee machine with a cup on a tray (no text or symbols)1 Upon positioning the espresso tray, place a cup under the coffee dispensing spout, raise or lower the coffee dispensing spout according to the size of the cup you are using. Press the HOME button to access the beverage menu.
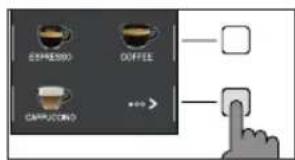
2 Browse the various pages to find and select the desired coffee.
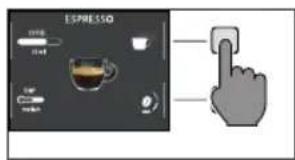
3 Upon selection of your desired coffee, it is possible to prepare two cups at the same time- besides AMERICANO, using the "button.
English
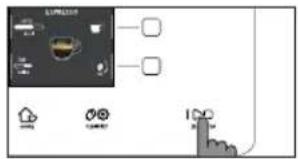
4 Finally, press the START/STOP ▷□ button to start brewing.
Note: you can interrupt the brewing at any time by pressing the START/STOP ▷□ button.
If you wish to customise the settings of a specific beverage, please refer to the "Beverage customisation" chapter.
Brewing coffee using pre-ground coffee
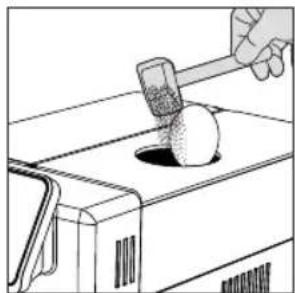
Use the measuring scoop provided to insert the correct dose in the pre-ground coffee compartment.
natural_image
Line drawing of a hammer striking a ball on a tray (no text or symbols)1 Lift the lid of the pre-ground coffee compartment and add a little less than one level scoop of pre-ground coffee.
Warning: do not insert anything other than pre-ground coffee, as it may damage the machine.
2 Place a cup under the coffee dispensing spout and select the desired beverage.
3 Press the " 🔍" button until " 🔍" is selected.
Note: The "pre-ground coffee" function excludes the possibility of brewing two cups of coffee at the same time, as well as the aroma setting. In fact, these are only possible with coffee beans.
4 Press the START/STOP ▷□ button to start brewing the coffee.
If you wish to customise the settings of a specific beverage, please refer to the "Beverage customisation" chapter.
Note: you can interrupt the brewing at any time by pressing the START/STOP ▷□ button.


20
English
Preparation of coffee-based beverages and frothed milk
How to assemble the Capp in Cup system
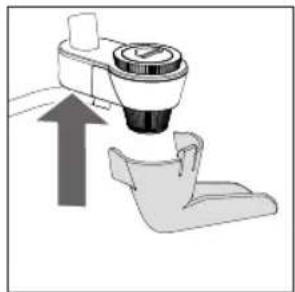
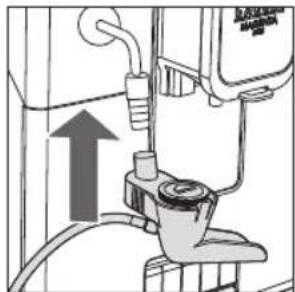
Note: Before preparing any milk-based beverage, make sure that the Capp in Cup system is fitted properly on the machine.
natural_image
Illustration of a coffee maker with an upward arrow indicating growth (no text or symbols)1 Fit the spout on the main body of the Capp in Cup system.
natural_image
Diagram of a coffee maker with an upward arrow indicating growth (no text or symbols present)2 Insert the Capp in Cup system into the rubber grip on the steam tube until it locks into place.
natural_image
Illustration of a cup pouring liquid into a paper liner with a lid (no text or symbols)Brewing coffee-based and frothed milk beverages
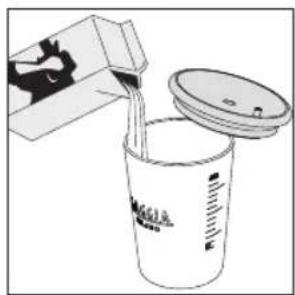
Tip: use only cold milk at a temperature of 5^ C approx. and with at least a 3% protein content so as to obtain a perfect milk froth. You can use either whole milk or semi-skimmed milk. Also, you can use skimmed, soy or lactose-free milk.
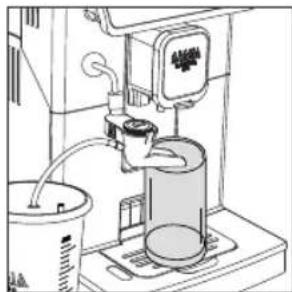
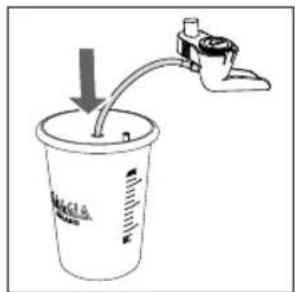
1 Lift the carafe lid and pour the milk into the carafe: the milk must reach a level between the minimum (MIN) and the maximum (MAX) level marks available on the carafe.
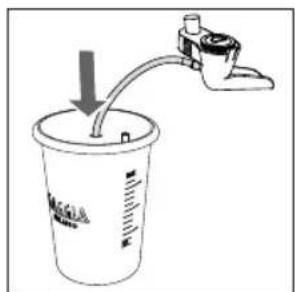
2 Insert the suction tube of the main body of the Capp in Cup system into the milk carafe until it reaches the carafe bottom.
English
21
natural_image
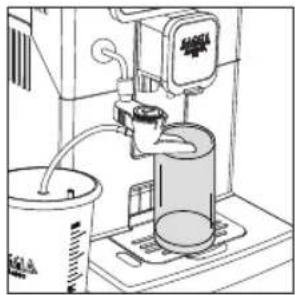
Line drawing of a laboratory setup with a beaker, tubing, and a gas collection bottle (no text or labels)3 Place a cup or a glass under the Coffee dispensing spout and the Capp in Cup system.
4 Press the HOME 🔒 button and choose the desired beverage from the menu.
- Press the button corresponding to the desired beverage.
- Press the START/STOP ▷□ button to start dispensing the selected beverage.
5 The machine dispenses a default amount of coffee and frothed milk into the cup or the glass. Depending on the beverage chosen, either coffee or frothed milk will be dispensed first.
If you wish to customise the settings of a specific beverage, please refer to the "Beverage customisation" chapter.
6 After dispensing your coffee-based and frothed milk beverages, it is best to complete the quick cleaning procedure of the milk circuit within 10 seconds. However, the procedure can also be carried out later by accessing the cleaning menu via the CLEAN/SET 🎨 button. Press the "CLEAN" button and select the "QUICK CLEAN" option. Then press the "✓ button. Then, follow the instructions shown on the display.
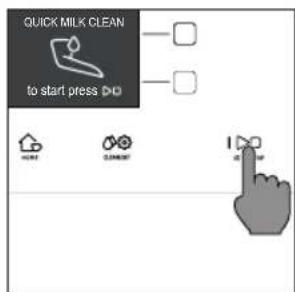
Note: We suggest that you carry out a quick clean at least once a day and that you rinse the Capp in Cup system Spout under running water.
Press the START/STOP ▷□ button to confirm, or "→" to carry out the procedure later.
Dispensing hot water
Warning: when preparation starts, the steam tube may spray steam and hot water.
natural_image
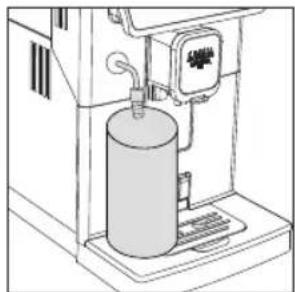
Line drawing of a mechanical device with a cylindrical component and control panel (no text or symbols)1 Remove the Capp in Cup system and place a container under the steam tube.
2 Press the HOME button, browse the various screens using the green ""> button, and select hot water.
22 English
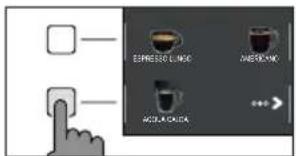
3 Press the "HOT WATER" button Finally, press the START/STOP ▷□ button to commence dispensing.
Note: you can interrupt dispensing at any time by pressing the START/STOP ▷□ button.
If you wish to customise the settings of a specific beverage, please refer to the "Beverage Customisation" chapter.
Customising beverages and saving settings (MEMO)
This machine allows you to change the settings of a beverage according to your preferences and save them (MEMO), by overwriting the previous settings.
Beverage Customisation
1 Press the HOME 🔒 button.
2 Select your beverage.
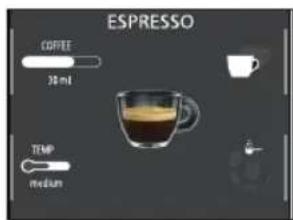
3 All the settings that can be adjusted and/or selected are displayed on the screen. Based on the type of beverage, you can adjust and/or select:
- coffee and milk amount;
- coffee temperature;
- brewing two cups at a time;
- pre-ground coffee use;
- aroma intensity (only when using coffee beans);
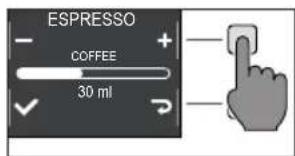
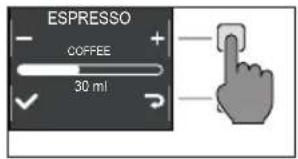
4 Once the "COFFEE" or "MILK" button has been pressed, use
the green " + and " " buttons to select the desired amount.
Press "√" to confirm and return to the previous screen, where the new quantity will be displayed.
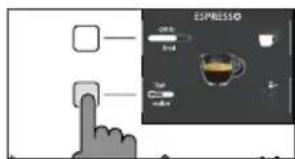
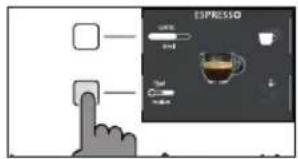
5 Press the "TEMP" button repeatedly to adjust the temperature of the beverage among the following options:
- low;
- medium;
- high;
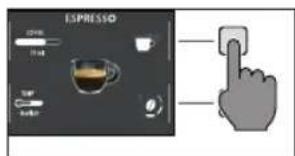
6 Press " 🔍" button to brew two cups, or " 🔍" for a single cup. The picture of the beverage in the centre of the display will indicate the number of cups selected.
Note: this function is not available for beverages with milk, AMERICANO and HOT WATER.


English
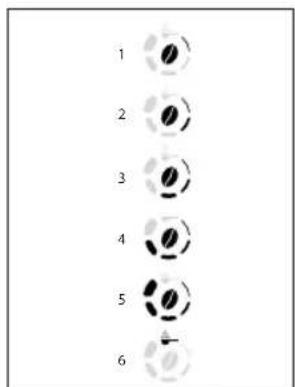
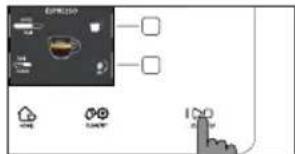
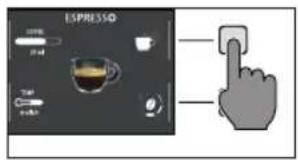
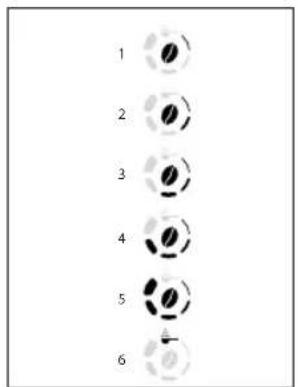
8 To change the intensity of the aroma or select the pre-ground, press the "button. You can choose among 5 different degrees of intensity. Every time you press the "button, the aroma strength changes by one degree. The display shows the selected intensity or the selection of the pre-ground.
1 Very light
2 Light
3 Normal
4 Strong
5 Very strong
6 Pre-ground.
Note: the function Pre-ground allows the brewing of just one coffee at a time.
9 Once the beverage has been customised according to your preferences, you can proceed with dispensing it by pressing START/STOP ▶□ button.
10 If you have changed any of the parameters listed above, you will be asked at the end of dispensing if you would like to save the recipe with the changes made.
Note: the new saved settings will overwrite those of the previous recipe.
Note: to return to the factory settings of the single recipes, you must re-enter and save the settings indicated in the "Beverage type" section.
Coffee grind settings
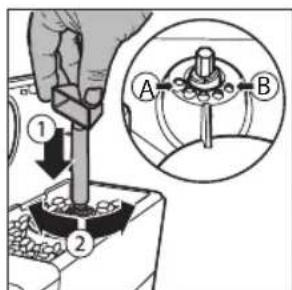
You can adjust the grind setting using the grinder adjustment knob on the coffee bean container. The ceramic coffee grinder guarantees a perfect and homogeneous grinding for the preparation of every cup of coffee. The aroma is thus preserved, ensuring the perfect flavour every time.
Warning: to avoid damages to the coffee grinder, do not rotate the grinder adjustment knob more than one notch at a time.
1 Open the lid of the coffee bean container.
2 Press and turn the grinder adjustment knob placed inside the coffee bean container one notch at a time. Use the grinder adjustment key. The reference marks in the coffee bean container compartment indicate the grinding setting.
3 You can select from 5 different grinding settings. The smaller the bar, the stronger and richer the coffee.
Note:
- Coarse grind: lighter taste, for dark roasted coffee blends (3-5);
- Fine grind: stronger taste, for light roasted coffee blends (1-3);
24 English
Cleaning and maintenance
Regular cleaning and maintenance keep the machine in perfect condition and ensure perfect coffee flavour, a constant coffee flow and an excellent milk froth. Please refer to the following table to know when and how to clean the removable parts of the machine. Please read the specific chapter for further information.
Cleaning table
Part description When to clean How to clean
| Capp in Cup system After use Start the " QUICK CLEAN" process followingthe instructions on the display. Disassembleand wash the Capp in Cup system Spout underrunning water. | |
Daily Wash the glass milk carafe or place it in yourfridge by positioning the milk suction tube asshown in the figure.You can also dishwash it.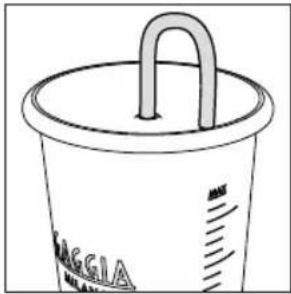 | |
| Monthly Start the "DEEP CLEAN" cycle by followingthe instructions described in the chapter "Cappin Cup System Cleaning". For this cleaning cycleuse the Philips Milk Circuit Cleaner. Remove theCapp in Cup system and wash all its componentsunder running water. | |
| Brew group Weekly Remove the brew group and clean it underrunning water. | |
| Depending on usage See the "Cleaning and lubricating the brew group"chapter. | |
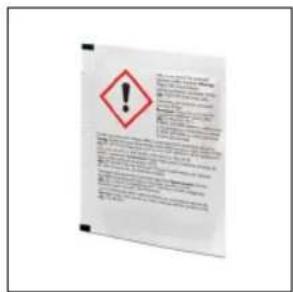
| Monthly Clean the brew group with the Gaggia coffee oilremover to remove any oily coffee residue | |
| Drip tray full When the red mark appears fromthe drip tray grid. | Empty the drip tray and clean it under runningwater. |
| Coffee puckscontainer | Whenever the machine requires it Empty the coffee pucks container and clean itunder running water. Ensure that the machine isswitched on during this procedure, otherwise thecoffee pucks container will not reset. |
| Water tank Weekly Clean it under running water. | |
Part description When to clean How to clean
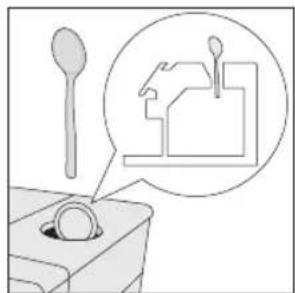
Pre-ground coffee compartment/coffee outlet duct
Weekly Clean the upper part using the handle of a spoon, as shown below.
natural_image
Illustration of a spoon and a mechanical device with a magnified inset showing a component (no text or symbols)Espresso tray Depending on usage Remove the espresso tray and clean it with running water. You can also dishwash it in the upper tray.
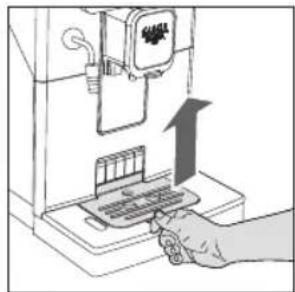
natural_image
Illustration of a hand inserting a device into a machine (no text or symbols visible)Cleaning the Capp in Cup system
Capp in Cup system Cleaning Programmes
The machine allows two cleaning programmes for the Capp in Cup system: quick and deep clean. Both programmes can be selected with the CLEAN/SET button. Press the "CLEANING" button upon selection.
Quick clean is also recommended after dispensing a milk-based beverage. For both programmes, follow the instructions shown on the display.
- Quick clean programme
The quick clean programme includes the milk circuit cleaning with hot water.
- Deep clean programme
The deep clean programme for the Capp in Cup system includes also the deep cleaning of the whole milk circuit by means of Philips "Milk Circuit Cleaner".
26
English
Cleaning of the Capp in Cup system under running water \_\_\_\_
Warning: the steam tube may be hot after use.
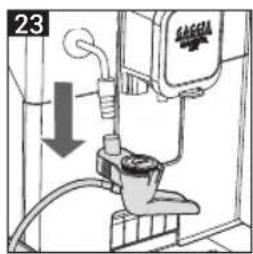
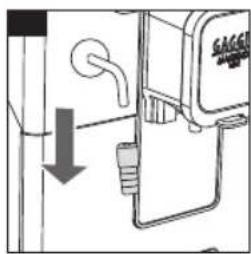
1 Remove the Capp in Cup system from the steam tube (Fig. 23).
2 Remove the rubber handle from the steam tube. (Fig. 24).
3 Remove the Capp in Cup system spout (Fig. 25).
4 Remove the milk suction tube from the main body of the Capp in Cup system (Fig. 26).
5 To disassemble the main body:
- hold it tight from the sides as shown (Fig. 27);
- pull and extract the left part as shown in figure (Fig. 28);
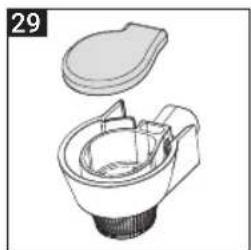
6 Remove the rubber lid (Fig. 29).
7 Disassemble the glass milk carafe (Fig. 30).
8 Wash all components under running water.
9 After cleaning, reassemble all the components by following the same procedure in reverse order.
Cleaning the brew group
Warning: do not wash the brew group in the dishwasher and do not use dishwashing detergents, since they may cause the malfunctioning of the brew group and alter the coffee flavour.
Removing the brew group
1 Turn off the machine and disconnect the power cord.
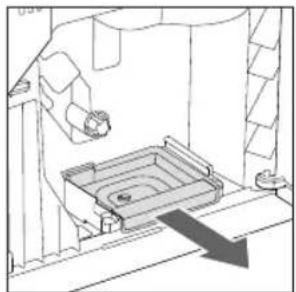
2 Remove the drip tray and the coffee pucks container.
3 Open the service door.
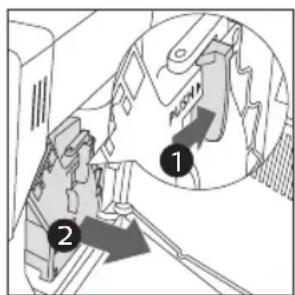
4 Press the PUSH lever (1) and pull the handle of the brew group (2) to remove it from the machine.
English
natural_image
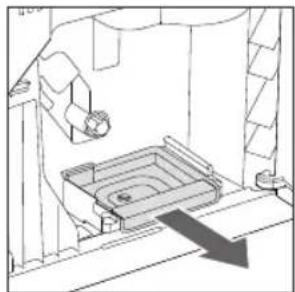
Line drawing of a room interior with furniture and a central platform (no text or symbols)5 Remove the coffee residues drawer.
natural_image
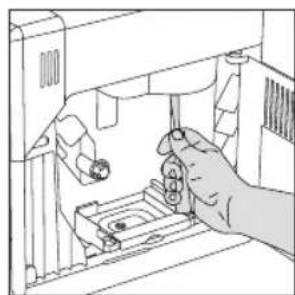
Line drawing of a hand inserting a component into a device (no text or symbols)Cleaning the brew group under running water
1 Clean the coffee outlet duct thoroughly with a spoon handle or with another round-tipped kitchen utensil.
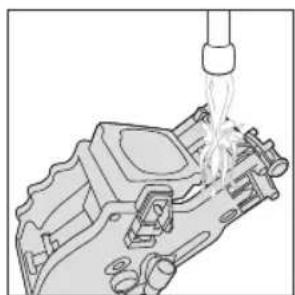
natural_image
Mechanical assembly diagram showing a piston and crankshaft inserted into a housing (no text or labels)2 Rinse the brew group and the coffee residues drawer thoroughly with lukewarm water. Carefully wash the upper filter.
3 Let the brew group air dry.
Note: to avoid the build-up of fibres in its interior, do not dry the brew group with cloth.
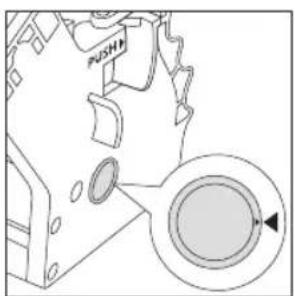
natural_image
Technical diagram of a mechanical component with a circular inset showing a circular feature (no text or symbols)Reinserting the brew group
1 Before placing the brew group back into the machine, make sure that the two yellow reference marks on the side match. If this is not the case, perform the following step:
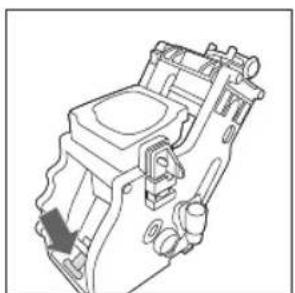
natural_image
Technical line drawing of a mechanical component with no visible text or symbolsMake sure that the lever is in contact with the base of the brew group.
28 English
natural_image
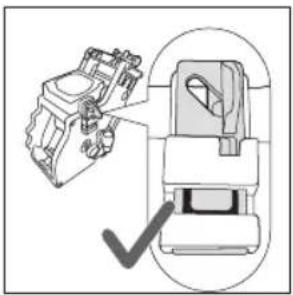
Technical diagram of a mechanical device with a checkmark indicating assembly or inspection (no text or symbols present)2 Make sure that the yellow locking hook of the brew group is in the right position.
To position the hook correctly, push it upwards to the highest possible position.
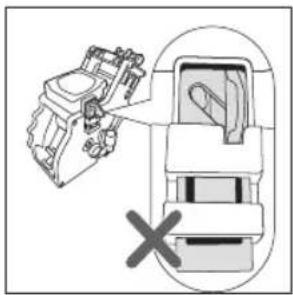
natural_image
Diagram of a mechanical component with a cross mark indicating a specific part (no text or symbols present)If the hook is still in the lower position, it means that it is not positioned correctly.
3 Reinsert the coffee residues drawer.
4 Reinsert the brew group into the machine along the side guides until it locks in the right position with a click.
Warning: do not press the PUSH lever.
5 Close the service door.
Cleaning the brew group with cleaning tablets for the removal of oily coffee residues \_\_\_\_
Warning: use only Gaggia cleaning tablets to remove oily coffee residues.
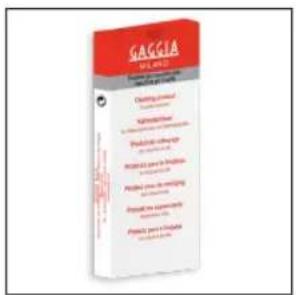
1 Place a container under the coffee dispensing spout.
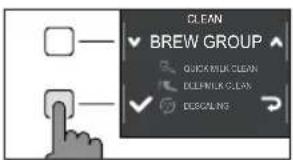
2 Press the CLEAN/SET 🎨 button and select the "CLEAN" button shown on the display.
3 Select "BREW GROUP CLEANING" and press the "✓" button, then press START/STOP ▶□ button to start the cleaning procedure.
4 Follow the instructions shown on the display to clean the brew group correctly.
5 The procedure will take approximately 5 minutes. START/STOP ▶ button can be used to pause and resume the procedure.
English
Lubricating the brew group
In order to ensure the perfect performance of the machine, it is necessary to lubricate the brew group. Refer to the following table for the frequency of lubrication.
| Frequency of use | Number of beverages prepared daily | Lubrication frequency |
| Low 1-5 Every 4 months | ||
| Regular 6-10 Every 2 months | ||
| High >10 Every month | ||
natural_image
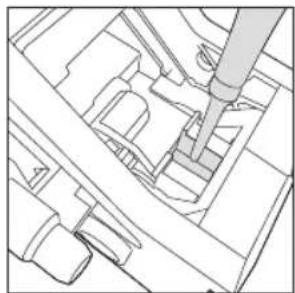
Technical line drawing of a mechanical assembly with no visible text or symbols1 Turn off the appliance and disconnect the power cord.
2 Remove the brew group and rinse it using lukewarm water - see the "Cleaning the brew group under running water" chapter.
3 Apply a thin layer of the lubricant provided around the insertion pin on the lower part of the brew group.
natural_image
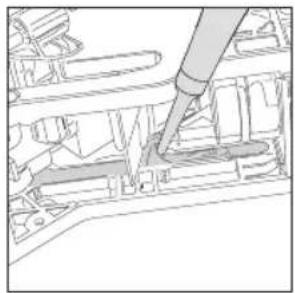
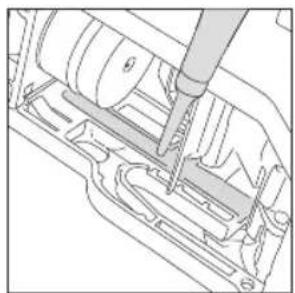
Technical line drawing of a mechanical assembly with a tool inserted (no text or symbols)4 Apply a thin layer of lubricant to the guides, on both sides (see figure).
5 Reinsert the brew group - see the "Reinserting the brew group" chapter.
natural_image
Technical line drawing of a mechanical assembly with no visible text or symbolsNote: you can use the lubricant tube multiple times.
30
English
Descaling
Descaling procedure
Descaling needs to be carried out when the machine requires it.
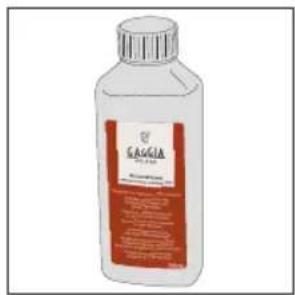
Use only Gaggia descaling solution designed to guarantee the machine's excellent performance. The use of different products could damage the machine and leave residue in the water. Failure to descale the machine will void the warranty.
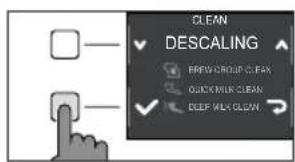
1 Remove the Capp in Cup system if fitted on the machine.
2 Press CLEAN/SET 🎨 button and select the "CLEAN" button shown on the display.
- Select "DESCALING" and after confirming with "✓" press the START/STOP ▷□ button to start.
3 Remove the drip tray and the coffee pucks container, empty and place them all back into the machine.
4 Remove the water tank and empty it. Remove the INTENZA+ filter, if in place.
5 Pour the entire bottle of Gaggia descaling solution into the water tank and fill the tank with water up to the CALC CLEAN level. Reinsert it into the machine.

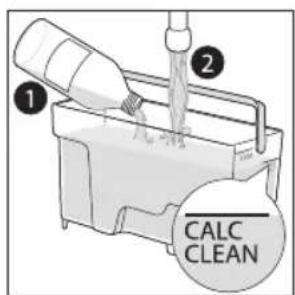
6 Place a large recipient (1.5l) under the steam tube and the coffee dispensing spout.
7 Follow the instructions shown on the display to launch the descaling procedure. This procedure lasts approximately 25 minutes and consists of a descaling cycle and a rinse cycle, carried out with dispensing at regular intervals.
8 Once the descaling cycle is complete, rinse the water circuit and tank by following the instructions shown on the display.
9 Position the INTENZA+ filter back into the water tank.
Note: it is possible to pause and resume the procedure at any time by pressing the START/STOP ▶□ button.
Warning: when the descaling procedure is active, the brew group cannot be removed. Wait for the descaling process to end, then remove the brew group.

What to do if the descaling process is interrupted
You can exit the descaling procedure by keeping the ON/OFF ⏻ button on the control panel, pressed for a few seconds. If the descaling procedure is interrupted before its completion, proceed as follows:
1 Empty the water tank and wash it thoroughly.
2 Fill the water tank with running water up to the CALC CLEAN level mark, then switch the machine back on. The machine will warm up and perform an automatic rinse cycle.
3 Before preparing any beverages, carry out a manual rinse cycle as described in the dedicated chapter.
Note: if the procedure has not been completed, it will be necessary to carry out another descaling procedure as soon as possible.
Other settings
By pressing the CLEAN/SET 🎧 button and selecting “SETTINGS” on the display, you can reset or modify some of the machine parameters including:
- Language.
- Water filter.
- Stand-by Time.
- Units.
- Water hardness.
- Beverage counter.
- Button sound
- Factory settings.
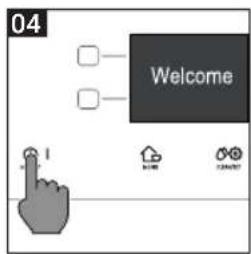
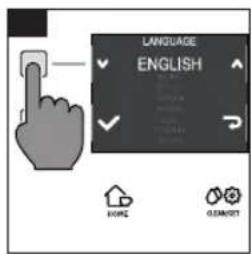
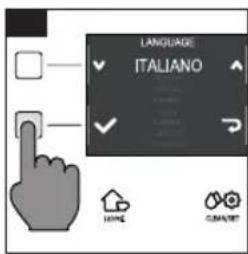
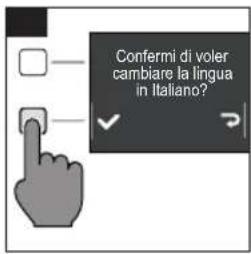
Language
When the language setting icon is selected, the list of available languages will be displayed.
Available languages
| ITALIAN DANISH CZECH | ||
| ENGLISH GREEK SLOVAKE | ||
| GERMAN POLISH LITHUANIAN | ||
| FRENCH RUSSIAN JAPANESE | ||
| SPANISH ROMANIAN KOREAN | ||
| PORTUGUESE HUNGARIAN | TRADITIONAL CHINESE | |
| DUTCH | BULGARIAN | SIMPLIFIED CHINESE |
32 English
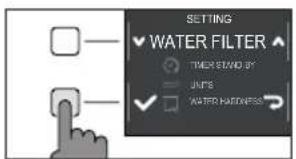
Water filter
When "WATER FILTER" is selected, follow the instructions on the display and those described under the "Installing the INTENZA+ water filter" and "Replacing the INTENZA+ water filter" chapters.
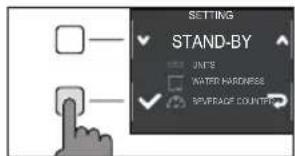
Stand-by Time
When "STAND-BY TIME" is selected, the timer can be set to:
- 15 min
-30 min - 60 min
- 180 min
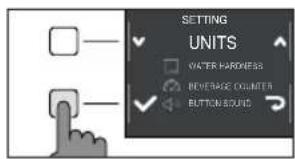
Units
By selecting "UNITS":
you can set the unit of measurement in "ml" or "oz".
Water hardness
With "WATER HARDNESS" selected, follow the instructions on the display and those described under the "Measuring water hardness" chapter.
Beverage counter
It is possible to display the number of cups of each beverage that have been dispensed since the first operation of the machine. These data cannot be reset.
Button sound
You can turn the button sound off by selecting "OFF" so as not to be disturbed.
Factory settings
You can reset the machine to factory default values. The machine will require a double confirmation before proceeding.
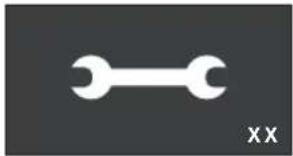
Error code key
natural_image
Simple white wrench icon on dark background, no text or symbols presentThe list below reports the error codes that the display can show, their meanings and how to solve the problem. If the indicated solutions are ineffective because the display continues to show the error code icon and the machine does not return to normal operation, or if other error codes are displayed, you must contact an authorized service center or distributors in your country. The contact info is listed on www.gaggia.com and www.gaggia.it.
Error code Problem Cause Possible solution
| 01 The coffee grinder is clogged. | The coffee outlet duct is clogged. | Remove the power cord and remove the brew group. Clean the coffee outlet duct thoroughly using a spoon handle. Switch the appliance back on again. |
| 03 - 04 A problem occurred in the brew group. | The brew group is dirty or not well lubricated. | Switch off the machine. Remove the brew group and clean it thoroughly. (Refer to the "Cleaning the Brew Group" chapter) |
| The brew group is not positioned correctly. | Switch off the machine. Remove the brew group and reinsert it. Ensure that the brew group is in the correct position before inserting it. Refer to the "Reinserting the brew group" chapter. | |
| 05 A problem occurred in the water circuit. | There is air in the water circuit. | Remove and reinsert the tank in the machine a couple of times. Make sure you insert the tank correctly in the machine. Check that the water tank seat is clean. |
| If you use an "INTENZA+" filter: pull out the filter from the water tank and shake it to remove the air from the filter. Then place the "INTENZA+" filter back into the water tank. | ||
| 14 The machine is overheated. | There may be multiple causes. | Switch off the machine and switch it back on again after 30 minutes. Perform this operation 2 or 3 times. |
Troubleshooting
This chapter outlines the most common problems you may encounter while using the machine. If you are unable to solve the problem using the information provided below, visit the FAQ sections on www.gaggia.com or www.gaggia.it or contact the either the Customer Service Centre or the local distributors in your country.
Problem Cause Solution
| The machine does not switch on. | The machine is not connected. Check that the power cord has been inserted correctly. | |
| The on / off button was not pressed and held down long enough. | Keep the on / off key pressed for a few seconds. | |
| The drip tray fills up quickly. | It is a normal phenomenon. The machine uses water to rinse the internal circuit and the brew group. Part of the water flows through the internal system directly into the drip tray. | Empty the drip tray when the red mark appears through the grid. We recommend your placing a cup under the dispensing spout to collect rinse water |
| The display continuously shows the "coffee pucks container full" icon. | The coffee pucks container has been emptied when the machine was off. | Always empty the coffee pucks container when the machine is on. If you empty the coffee pucks container when the machine is off, the coffee cycle counter does not reset. In this case, the display shows the icon even if the container is not full. |
| The coffee pucks container has been placed back too quickly. | Always wait about 5 seconds when you replace the coffee pucks container. This way, the counter will reset to zero. | |
| The machine requests to empty the coffee pucks container even if it is not full. | The machine has not reset the counter last time the coffee pucks container has been emptied. | Always wait about 5 seconds when you replace the coffee pucks container. This way, the coffee grounds counter will reset to zero. |
| Always empty the coffee pucks container when the machine is on. If you empty the coffee pucks container when the machine is off, the coffee cycle counter does not reset. | ||
| The coffee pucks container is too full and the "coffee pucks container full" icon, did not display. | The drip tray has been removed without emptying the coffee pucks container. | When you remove the drip tray, also empty the coffee pucks container even if it contains only a few coffee pucks. In this way the coffee grounds counter will be reset to zero, re-starting to correctly count the coffee pucks. |
| Impossible to remove the brew group. | The brew group is not in the correct position. | Close the service door. Switch the machine off and then back on. Wait for the display to show the ready message, then remove the brew group. |
English
Problem Cause Solution
| The brew group cannot be inserted. | The brew group is not in the correct position. | The brew group has not been positioned correctly before being placed back. Ensure that the lever is in contact with the base of the brew group and that the hook of the brew group is in its correct position. See the “Reinserting the brew group” chapter. |
| To reset the machine put the drip tray with the coffee pucks container back in place. Do not insert the brew group. Close the service door, then unplug the power cord and plug it back in. Then try to reinsert the brew group and switch on the machine. | ||
| The espresso is not creamy enough or it is watery. | The coffee grinder is set to a coarse grinding. | Adjust the coffee grinder to a finer setting. |
| The machine is performing its self-adjustment. | Dispense several cups of coffee so that the machine adjusts itself automatically. | |
| The coffee outlet duct is clogged. | Clean the coffee outlet duct with a spoon as described in the “Cleaning the brew group under running water” chapter. | |
| The brewed coffee is not hot enough. | The set temperature is too low. Check the menu settings. | Set the menu temperature to “MAX”. |
| The machine grinds the coffee beans, but no brewing happens. | The coffee grinder is set to a too fine grinding. | Adjust the coffee grinder to a coarser grinding. |
| The coffee dispensing spout is blocked. | Dispense a long coffee from pre-ground coffee but without actually adding pre-ground coffee. | |
| The nozzles of the coffee dispensing spout are blocked. | Clean the nozzles of the coffee dispensing spout with a small bottlebrush. | |
| The coffee comes out slowly or in drops. | The coffee grinder is set to a too fine grinding. | Adjust the coffee grinder to a coarser grinding. |
| The nozzles of the coffee dispensing spout are blocked. | Clean the nozzles of the coffee dispensing spout with a small bottlebrush. | |
| The machine circuit is clogged by limescale. | Descale the machine. | |
| The milk does not froth. | The Capp in Cup system is dirty or not correctly inserted. Or, the system has not been correctly installed in all its components. | Clean the Capp in Cup system as indicated in the chapter “Capp in Cup System Deep Cleaning Under Running Water”, then place it back in the right way. |
| Make sure all components have been correctly assembled. | ||
| The type of milk used is not suitable for foaming. | The amount and the quality of froth vary depending on the type of milk. |
36
English
Problem Cause Solution
| The "INTENZA+" filter cannot be inserted. | Remove the air from the filter. Let the air bubbles out of the filter. | |
| The tank still contains some water. Empty the water tank before installing the filter. | ||
| The rubber seal is not inserted onto the "INTENZA+" filter. | Check the packaging and insert the seal onto the "INTENZA+" filter. | |
| You can not activate the "INTENZA+" filter. | Another filter is already active The machine indicates the filter usage in percentage.However, if you want to activate a new filter before the one currently in use has expired, the latter must be disabled first and as described in section "Replacing INTENZA+ water filter" | |
| There is some water under the machine. | The drip tray is too full and has spilled over. | Empty the drip tray when the mark appears though the tray. Always empty the drip tray before starting the descaling procedure. |
| The machine is in DEMO mode. | While switching on the machine, you pressed a combination of buttons (HOME - CLEAN/SET - HOME - CLEAN/SET). | Switch the machine off and on again, with the ON/OFF button on the control panel. |
GAGGIA accessories
Coffee and accessories are available through authorised centres (Italy), or distributors in your country.
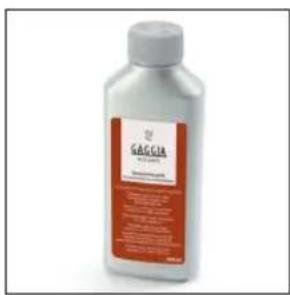
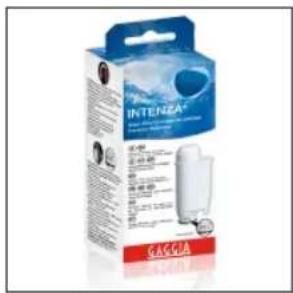
Descaling product Coffee oil removerINTENZA+ water filter
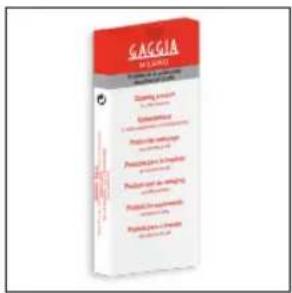

Milk circuit cleaner (Philips)

Coffee range available in beans and powder: 100% Arabica / Intense / Decaffeinated
Technical specifications
| Nominal voltage - Power rating - Power supply | See data plate on the inside of the service door |
| Housing material Thermoplastic type | |
| Dimensions 224 x 357 x 435 mm | |
| Weight 7,7 kg | |
| Power cord length 1200 mm | |
| Control panel Front panel | |
| Water tank 1.8 litres - Removable type | |
| Coffee bean container capacity 250 g | |
| Coffee pucks container capacity 15 | |
| Pump pressure 15 bar | |
| Boiler Stainless steel boiler | |
| Safety devices Thermal Fuse |
Français
IMPORTANT
natural_image
Diagram of a coffee maker with a cup and stand, showing a downward arrow indicating flow or movement (no text or symbols present)natural_image
Line drawing of a mechanical component with a flanged top and side profile (no text or symbols)natural_image
Line drawing of a hand holding a cylindrical object over a glass (no text or symbols)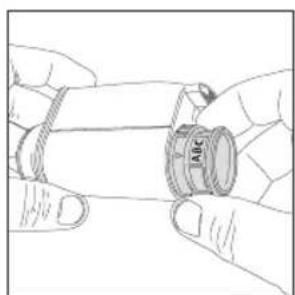
natural_image
Line drawing of hands holding a mechanical component with a circular head (no text or symbols)natural_image
Hand inserting a device into a machine (no text or symbols visible)natural_image
Diagram showing a device with control panel and a magnified inset of its components (no text or symbols)natural_image
Line drawing of a coffee machine with a cup on its tray (no text or symbols)natural_image
Illustration of a hand using a hammer to hit a ball on a tray (no text or symbols)natural_image
Illustration of a coffee maker with an upward arrow indicating growth (no text or symbols present)natural_image
Illustration of a milk being poured into a glass cup with a lid (no text or symbols)56 Français
natural_image
Line drawing of a laboratory setup with a beaker, tubing, and a gas collection device (no text or labels)natural_image
Line drawing of a mechanical device with a cylindrical component and control panel (no text or symbols)58
Français

natural_image
Illustration of a spoon interacting with a mechanical component, no text or symbols presentnatural_image
Hand inserting a card into a printer device (no text or symbols visible)Français
natural_image
Technical line drawing of a mechanical assembly with no visible text or symbolsnatural_image
Line drawing of a hand inserting a component into a device (no text or symbols)natural_image
Mechanical assembly diagram showing a piston pouring liquid into a housing (no text or labels)natural_image
Mechanical gear assembly diagram with a highlighted circular component (no text or symbols)natural_image
Technical line drawing of a mechanical component with no visible text or symbolsnatural_image
Technical diagram of a mechanical assembly with a checkmark indicating a detail (no text or symbols present)natural_image
Diagram of a mechanical component with a cross mark indicating a specific part (no text or symbols present)natural_image
Technical line drawing of a mechanical assembly with a tool inserted (no text or symbols)natural_image
Technical line drawing of a mechanical assembly with no visible text or symbolsnatural_image
Technical line drawing of a mechanical assembly with no visible text or symbolsFiltre à eau
natural_image
Simple white wrench icon on dark background, no text or symbols presentdégraissage
Milk circuit cleaner (Philips)

GAGGIA S.p.A. reserves the right to make all changes deemed necessary.
- GAGGIA MAGENTA
- First installation / Première installation
- Capp in Cup System / Système Capp in Cup
- English
- IMPORTANT SAFEGUARDS
- SAVE THESE INSTRUCTIONS
- CAUTION
- INSTRUCTIONS FOR THE POWER SUPPLY CORD
- English
- Important safety information
- Warning
- General
- Machines with milk carafe
- English
- Machines with classic milk frother / pannarello
- Machines with automatic milk frother / cappucinatore / Capp in Cup system
- Electromagnetic fields (EMF)
- Recycling
- Warranty and support
- English
- Contents
- English
- Machine overview (Fig.2)
- Control panel and display
- Control panel overview (Fig. 1)
- Multifunction buttons
- English
- First installation
- Manual rinse cycle
- English
- Measuring water hardness
- INTENZA+ water filter
- Installing the INTENZA+ water filter
- Replacing the INTENZA+ water filter
- Types of beverage
- Espresso tray
- Coffee Brewing
- Brewing coffee using coffee beans
- Brewing coffee using pre-ground coffee
- Preparation of coffee-based beverages and frothed milk
- How to assemble the Capp in Cup system
- Brewing coffee-based and frothed milk beverages
- Dispensing hot water
- English
- Customising beverages and saving settings (MEMO)
- Beverage Customisation
- Coffee grind settings
- Note:
- English
- Cleaning and maintenance
- Cleaning table
- Part description When to clean How to clean
- Cleaning the Capp in Cup system
- Capp in Cup system Cleaning Programmes
- Cleaning of the Capp in Cup system under running water \_\_\_\_
- Cleaning the brew group
- Removing the brew group
- Cleaning the brew group under running water
- Reinserting the brew group
- English
- Cleaning the brew group with cleaning tablets for the removal of oily coffee residues \_\_\_\_
- Lubricating the brew group
- Descaling
- Descaling procedure
- What to do if the descaling process is interrupted
- Other settings
- Language
- English
- Water filter
- Stand-by Time
- Units
- Water hardness
- Beverage counter
- Button sound
- Factory settings
- Error code key
- Troubleshooting
- GAGGIA accessories
- Français
- IMPORTANT
- Français
- Filtre à eau
Brand : GAGGIA
Model : Magenta Milk RI8701
Category : Coffee machine