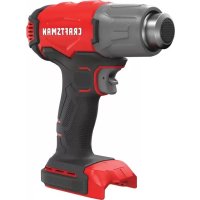
CMCE530B - Heat gun Craftsman - Free user manual and instructions
Find the device manual for free CMCE530B Craftsman in PDF.


| Product Type | Cordless Heat Gun |
| Brand | Craftsman |
| Model | CMCE530B |
| Power Source | 20 V max Lithium-Ion Battery |
| Maximum Temperature | Above 510 °C |
| Included Nozzles | Reflector nozzle, 75 mm fish tail tip |
| Main Uses | Paint stripping, plastic welding, PVC shrinking, drying, forming |
| Safety | Burn guard barrel, trigger lock |
| Battery Compatibility | Craftsman 20 V battery packs |
| Tool Warranty | 3-year limited |
| Battery Warranty | 2-year limited |
| Weight (with battery) | Approximately 0.7 kg |
| Length | Approximately 25 cm |
| Width | Approximately 8 cm |
| Height | Approximately 20 cm |
| Cooling Time | 30 minutes minimum |
| Cleaning | Dry compressed air for vents; damp cloth with mild soap |
| Repairability | Repairs by authorized Craftsman center only |
| Safety Standards | ANSI Z87.1 (eye protection) |
Frequently Asked Questions - CMCE530B Craftsman
User questions about CMCE530B Craftsman
0 question about this device. Answer the ones you know or ask your own.
Ask a new question about this device
Download the instructions for your Heat gun in PDF format for free! Find your manual CMCE530B - Craftsman and take your electronic device back in hand. On this page are published all the documents necessary for the use of your device. CMCE530B by Craftsman.
USER MANUAL CMCE530B Craftsman
20V Cordless Heat Gun
Pistolet thermique sans fil 20 V
Pistola de Calor Inalámbrica 20 V
CMCE530

IF YOU HAVE QUESTIONS OR COMMENTS, CONTACT US.
POUR TOUTE QUESTION OU TOUT COMMENTAIRE, NOUS CONTACTER.
SI TIENE DUDAS O COMENTARIOS, CONTÁCTENOS.
1-888-331-4569 WWW.CRAFTSMAN.COM
English (original instructions) 1
Definitions: Safety Alert Symbols and Words
This instruction manual uses the following safety alert symbols and words to alert you to hazardous situations and your risk of personal injury or property damage.
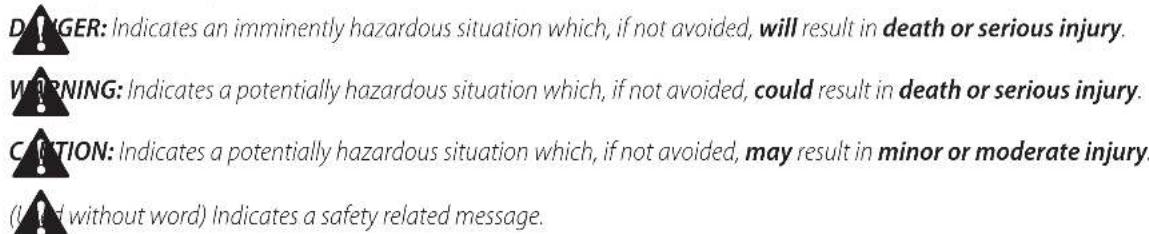
NOTICE: Indicates a practice not related to personal injury which, if not avoided, may result in property damage.
Fig. A
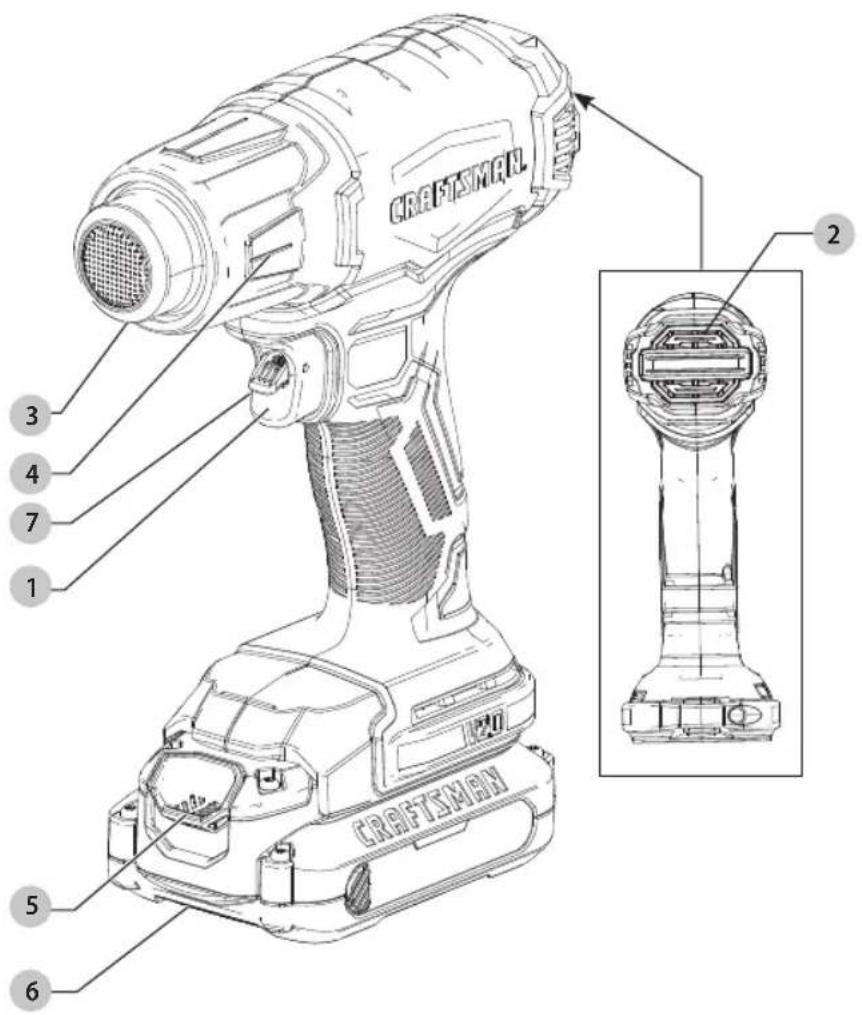
1 On/off trigger switch
2 Air vents
3 Nozzle
4 Heat barrel cover
5 Battery release button
6 Battery
7 Lock-off
WARNING: Read all safety warnings and all
instructions. Failure to follow the warnings and instructions may result in electric shock, fire and/or serious injury.

WARNING: To reduce the risk of injury, read the instruction manual.
If you have any questions or comments about this or any product, call CRAFTSMAN toll free at: 1-888-331-4569.
20V Cordless Heat Gun CMCE530
GENERAL POWER TOOL SAFETY WARNINGS
WARNING! Read all safety warnings and all instructions. Failure to follow the warnings and instructions may result in electric shock, fire and/or serious injury.
SAVE ALL WARNINGS AND INSTRUCTIONS FOR FUTURE REFERENCE
IMPORTANT SAFETY INSTRUCTIONS
Safety Instructions for Heat Guns
WARNING: To reduce the risk of fire or electric shock, do not expose this product to rain or moisture. Store indoors. Read instruction manual before using.
- To reduce the risk of explosion, DO NOT use in paint spray booths or within 10' (3.0 m) of paint spraying operations.
- DO NOT use this tool to remove paint containing lead. The peelings, residue and vapors of paint may contain lead which is poisonous.
- Hidden areas such as behind walls, ceilings, floors, soffit boards and other panels may contain flammable materials that could be ignited by the heat gun when working in these locations. The ignition of these materials may not be readily apparent and could result in property damage and injury to persons. When working in these locations, keep the heat gun moving in a back-and-forth motion. Lingering or pausing in one spot could ignite the panel or the material behind it.
NOTE: These heat guns are capable of producing temperatures in excess of 950^ F ( 510^ C).
• DO NOT use this tool as a hair dryer.
• DO NOT use this tool to heat food.
- DO NOT lay the heat gun on flammable surfaces when operating the gun or immediately after shutting it off. Allow the tool to cool before storing. Always set the gun on a flat level surface so that the nozzle tip is pointed upward.
- DO NOT use in the presence of explosive materials.
- Keep moveable items secured and steady while scraping.
- NEVER obstruct the air intake or nozzle outlet. This may cause excessive heat build up resulting in damage to the tool.
- Be sure to direct the hot air blast in a safe direction; away from other people or flammable objects.
- DO NOT remove the heat barrel cover during use.
- KEEP FINGERS AWAY FROM METAL NOZZLE; it becomes very hot during use and remains hot for 30 minutes after use. Wear gloves to protect hands.
- DO NOT touch the nozzle to any surface while running or shortly after running.
- DO NOT place anything inside the nozzle as it could cause an electric shock. Do not look down the nozzle
while the unit is turned on due to the high temperatures being produced.
- Splinters and small particles of stripped paint can be ignited and blown through holes and cracks in the surface being stripped.
- DO NOT apply heat to the same area for a long period of time.
- DO NOT burn the paint. Use the scraper and keep the nozzle at least 1" (25 mm) away from the painted surface. When working in a vertical direction, work downwards to prevent paint from falling into the tool and burning.
- DO NOT allow paint to adhere to the nozzle or scraper. It could ignite.
- ALWAYS use good quality scrapers and stripping knives.
- DO NOT use the heat gun in combination with chemical strippers.
• DO NOT use accessory nozzles as scrapers. - DO NOT direct heatgun airflow directly on glass. The glass may crack and could result in property damage or personal injury.
- Maintain labels and nameplates. These carry important information.
- Place the heat gun on a stable, level surface when not hand held.
- Be constantly aware that this tool can ignite flammable materials, soften or melt others. Regardless of the task you are performing, shield or keep the heat gun away from these materials.
- You may occasionally notice some slight smoking of the tool after it is turned off. This is the result of heating the residual oil that was deposited on the heating element during the manufacturing process.
- Use eye protection and other safety equipment.
- Do not expose tools to rain or wet conditions. Water entering a tool will increase the risk of electric shock.
- Do not overreach. Keep proper footing and balance at all times. This enables better control of the tool in unexpected situations.
- Store idle tools out of the reach of children and do not allow persons unfamiliar with the tool or these instructions to operate the tool. Tools are dangerous in the hands of untrained users.
- Have your tool serviced by a qualified repair person using only identical replacement parts. This will ensure that the safety of the tool is maintained.
Persons Removing Paint Should Always Follow These Guidelines:
WARNING: Extreme care should be taken when swapping paint. The peelings, residue and vapors of paint may contain lead, which is poisonous. Any pre-1977 paint may contain lead and paint applied to homes prior to 1950 is likely to contain lead. Once deposited on surfaces, hand to mouth contact can
result in the ingestion of lead. Exposure to even low levels of lead can cause irreversible brain and nervous system damage; young and unborn children are particularly vulnerable.
Before beginning any paint removal process you should determine whether the paint you are removing contains lead. This can be done by your local health department or by a professional who uses a paint analyzer to check the lead content of the paint to be removed. LEAD-BASED PAINT SHOULD ONLY BE REMOVED BY A PROFESSIONAL AND SHOULD NOT BE REMOVED USING A HEAT GUN. Persons removing paint should follow these guidelines:
- Move the workpiece outdoors. If this is not possible, keep the work area well ventilated. Open the windows and put an exhaust fan in one of them. Be sure the fan is moving the air from inside to outside.
- Remove or cover any carpets, rugs, furniture, clothing, cooking utensils and air ducts.
- Place drop cloths in the work area to catch any paint chips or peelings. Wear protective clothing such as extra work shirts, overalls and hats.
- Work in one room at a time. Furnishings should be removed or placed in the center of the room and covered. Work areas should be sealed off from the rest of the dwelling by sealing doorways with drop cloths.
- Children, pregnant or potentially pregnant women and nursing mothers should not be present in the work area until the work is done and all clean up is complete.
- Wear a dust respirator mask or a dual filter (dust and fume) respirator mask which has been approved by the Occupational Safety and Health Administration (OSHA), the National Institute of Safety and Health (NIOSH), or the United States Bureau of Mines. These masks and replaceable filters are readily available at major hardware stores. Be sure the mask fits. Beards and facial hair may keep masks from sealing properly. Change filters often. DisPOsABIE PAPER MAsKs ARE nOT ADEQUATE.
- Use caution when operating the heat gun. Keep the heat gun moving as excessive heat will generate fumes which can be inhaled by the operator.
- Keep food and drink out of the work area. Wash hands, arms and face and rinse mouth before eating or drinking. Do not smoke or chew gum or tobacco in the work area.
- Clean up all removed paint and dust by wet mopping the floors. Use a wet cloth to clean all walls, sills and any other surface where paint or dust is clinging. DO nOT sWEEP, DRY DUsT OR VACUUM. Use a high phosphate detergent or trisodium phosphate (TSP) to wash and mop areas.
- At the end of each work session put the paint chips and debris in a double plastic bag, close it with tape or twist ties and dispose of properly.
- Remove protective clothing and work shoes in the work area to avoid carrying dust into the rest of the dwelling. Wash work clothes separately. Wipe shoes off with a wet
rag that is then washed with the work clothes. Wash hair and body thoroughly with soap and water.
IMPORTANT NOTICE
In order for this tool to be an effective paint stripper, it must produce extremely high temperatures. As a consequence, the stripper is capable of igniting paper, wood, paint and varnish residue and similar materials.
As you become more familiar with the tool and develop the proper technique, the danger of accidental ignition will be greatly reduced. In establishing the proper technique, the best thing to do is PRACTICE! Work on simple stripping projects, preferably outdoors, until you get a "feel" for how to use your stripper safely and effectively.
As You Practice, Observe the Following Procedures for Safety
• Always be sure the tool is turned off and disconnected from power supply when unattended.
- Clean the scraper blade often during use. Built up residue on the blade is highly flammable.
- Experiment to find the optimum distance from the tool's nozzle to the surface being stripped. This distance [1"-2" (25.4 mm-50.8 mm)] will vary depending on the material being removed.
- Keep the heat gun moving ahead of the scraper blade at all times.
- As you work, clean up loose pieces of paint as they accumulate around the work area.
- When working indoors, keep away from curtains, papers, upholstery and similar flammable materials.
- Above all, remember that this is a serious tool that is capable of producing excellent results when used properly. Practice on simple projects until you feel comfortable with your stripper. Only then will you have mastered the proper technique.
SAVE THESE INSTRUCTIONS FOR FUTURE USE
Additional Safety Information
WARNING: Never modify the power tool or any part or damage or personal injury could result.
WARNING: ALWAYS use safety glasses. Everyday eyeglasses are NOT safety glasses. Also use face or dust mask if operation is dusty. ALWAYS WEAR CERTIFIED SAFETY EQUIPMENT:
• ANSI Z87.1 eye protection (CAN/CSA Z94.3),
• ANSI S12.6 (S3.19) hearing protection,
• NIOSH/OSHA/MSHA respiratory protection.
WARNING: Some dust created by power sanding, sowing, grinding, drilling, and other construction activities contains chemicals known to the State of California to cause cancer, birth defects or other reproductive harm. Some examples of these chemicals are:
- lead from lead-based paints,
• crystalline silica from bricks and cement and other masonry products, and
English
• arsenic and chromium from chemically-treated lumber.
Your risk from these exposures varies, depending on how often you do this type of work. To reduce your exposure to these chemicals: work in a well ventilated area, and work with approved safety equipment, such as those dust masks that are specially designed to filter out microscopic particles.
- Avoid prolonged contact with dust from power sanding, sawing, grinding, drilling, and other construction activities. Wear protective clothing and wash exposed areas with soap and water. Allowing dust to get into your mouth, eyes, or lay on the skin may promote absorption of harmful chemicals.
WARNING: Use of this tool can generate and/or disperse dust, which may cause serious and permanent respiratory or other injury. Always use NIOSH/OSHA approved respiratory protection appropriate for the dust exposure. Direct particles away from face and body.
WARNING: Always wear proper personal hearing protection that conforms to ANSI S12.6 (S3.19)
during use. Under some conditions and duration of use, noise from this product may contribute to hearing loss.
CAUTION: When not in use, place tool on its surface on a stable surface where it will not cause
a tripping or falling hazard. Some tools with large battery packs will stand upright on the battery packbut may be easily knocked over.
• Air vents often cover moving parts and should be avoided. Loose clothes, jewelry or long hair can be caught in moving parts.
The label on your tool may include the following symbols. The symbols and their definitions are as follows:
V....volts
Hz......hertz
min......minutes
or DC.....direct current
Class I Construction (grounded)
.../min.....per minute
BPM.....beats per minute
ClassII Construction (double insulated)
n_0 .....no load speed n .....rated speed
earthing terminal
⚠️ ____ safety alert symbol
△......visible radiation
⚠️...... avoid staring at light
wearrespiratory protection
⑦......weareye protection
O....wearhearing protection
readall documentation IPXX....IPsymbol
BATTERIES AND CHARGERS
The battery pack is not fully charged out of the carton. Before using the battery pack and charger, read the safety instructions below and then follow charging procedures outlined. When ordering replacement battery packs, be sure to include the catalog number and voltage.
READ ALL INSTRUCTIONS
Important Safety Instructions for All Battery Packs
WARNING: Read all safety warnings, instructions, and cautionary markings for the battery pack, charger and product. Failure to follow the warnings and instructions may result in electric shock, fire and/or serious injury.
- Do not charge or use the battery pack in explosive atmospheres, such as in the presence of flammable liquids, gases or dust. Inserting or removing the battery pack from the charger may ignite the dust or fumes.
- When battery pack is not in use, keep it away from other metal objects, like paper clips, coins, keys, nails, screws, or other small metal objects, that can make a connection from one terminal to another. Shorting the battery terminals together may cause burns or a fire.
- NEVER force the battery pack into the charger. DO NOT modify the battery pack in any way to fit into a non-compatible charger as battery pack may rupture causing serious personal injury. Consult the chart at the end of this manual for compatibility of batteries and chargers.
- Charge the battery packs only in CRAFTSMAN chargers.
• DO NOT splash or immerse in water or other liquids.
- Do not store or use the tool and battery pack in locations where the temperature may reach or exceed 104 °F (40 °C) (such as outside sheds or metal buildings in summer). For best life store battery packs in a cool, dry location. NOTE: Do not store the battery packs in a tool with the trigger switch locked on. Never tape the trigger switch in the ON position.
- Do not expose battery pack or tool/appliance to fire or excessive temperature. Exposure to fire or temperature above 265 °F (130 °C) may cause explosion.
- Do not incinerate the battery pack even if it is severely damaged or is completely worn out. The battery pack can explode in a fire. Toxic fumes and materials are created when lithium-ion battery packs are burned.
- If battery contents come into contact with the skin, immediately wash area with mild soap and water. If battery liquid gets into the eye, rinse water over the open eye for 15 minutes or until irritation ceases. If medical attention is needed, the battery electrolyte is composed of a mixture of liquid organic carbonates and lithium salts.
- Contents of opened battery cells may cause respiratory irritation. Provide fresh air. If symptoms persist, seek medical attention.
WARNING: Burn hazard. Battery liquid may be flammable if exposed to spark or flame.
WARNING: Fire hazard. Never attempt to open the battery pack for any reason. If the battery pack case is cracked or damaged, do not insert into the charger. Do not crush, drop or damage the battery pack. Do not use a battery pack or charger that has received a sharp blow, been dropped, run over or damaged in any way (e.g., pierced with a nail, hit with a hammer, stepped on). Damaged battery packs should be returned to the service center for recycling.
Storage Recommendations
- The best storage place is one that is cool and dry, away from direct sunlight and excess heat or cold.
- For long storage, it is recommended to store a fully charged battery pack in a cool dry place out of the charger for optimal results.
NOTE: Battery packs should not be stored completely depleted of charge. The battery pack will need to be recharged before use.
Battery Pack Cleaning Instructions
Dirt and grease may be removed from the exterior of the battery using a cloth or soft non-metallic brush. Do not use water or any cleaning solutions.
The RBRC® Seal
The RBRC® (Rechargeable Battery Recycling Corporation) Seal on the nickel cadmium, nickel metal hydride or lithiumion batteries (or battery packs) indicates that the costs to recycle these batteries (or battery packs) at the end of their useful life have already been paid by CRAFTSMAN. In some areas, it is illegal to place spent nickel cadmium, nickel metal hydride or lithium-ion batteries in the trash or municipal solid waste stream and the Call 2 Recycle® program provides an environmentally conscious alternative.
Call 2 Recycle, Inc., in cooperation with CRAFTSMAN and other battery users, has established the program in the United States and Canada to facilitate the collection of spent nickel cadmium, nickel metal hydride or lithium-ion batteries. Help protect our environment and conserve natural resources by returning the spent nickel cadmium, nickel metal hydride or lithium-ion batteries to an authorized CRAFTSMAN service center or to your local retailer for recycling. You may also contact your local recycling center for information on where to drop off the spent battery. RBRC® is a registered trademark of Call 2 Recycle, Inc.
Fuel Gauge Battery Packs
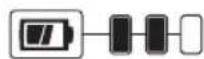
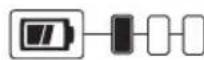
Some CRAFTSMAN battery packs include a fuel gauge which consists of three LED lights that indicate the level of charge remaining in the battery pack. The fuel gauge is an indication of approximate levels of charge remaining in the battery pack according to the following indicators:

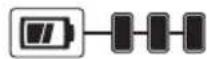
75–100% charged
51–74% charged
< 50% charged
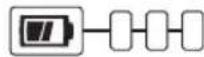
Pack needs to be charged
To actuate the fuel gauge, press and hold the fuel gauge button. A combination of the LED lights will illuminate designating the level of charge left. When the level of charge in the battery is below the usable limit, the fuel gauge will not illuminate and the battery will need to be recharged.
NOTE: The fuel gauge is only an indication of the charge left on the battery pack. It does not indicate tool functionality and is subject to variation based on product components, temperature and end-user application.
For more information regarding fuel gauge battery packs, please contact CRAFTSMAN at 1-888-331-4569 or visit our website www.craftsman.com.
Transportation
WARNING: Fire hazard. Do not store or carry the battery pack so that metal objects can contact exposed battery terminals. For example, do not place the battery pack in aprons, pockets, tool boxes, product kit boxes, drawers, etc., with loose nails, screws, keys, etc. Transporting batteries can possibly cause fires if the battery terminals inadvertently come in contact with conductive materials such as keys, coins, hand tools and the like. The US Department of Transportation Hazardous Material Regulations (HMR) actually prohibit transporting batteries in commerce or on airplanes in carry-on baggage UNLESS they are properly protected from short circuits. So when transporting individual battery packs, make sure that the battery terminals are protected and well insulated from materials that could contact them and cause a short circuit. NOTE: Li-ion batteries should not be put in checked baggage
Important Safety Instructions for All Battery Chargers
WARNING: Read all safety warnings, instructions, and cautionary markings for the battery pack, charger and product. Failure to follow the warnings and instructions may result in electric shock, fire and/or serious injury.
- DO NOT attempt to charge the battery pack with any chargers other than a CRAFTSMAN charger. CRAFTSMAN chargers and battery packs are specifically designed to work together.
ENGLISH
• These chargers are not intended for any uses other than charging CRAFTSMAN rechargeable batteries. Any other uses may result in risk of fire, electric shock or electrocution.
- Do not expose the charger to rain or snow.
- Pull by the plug rather than the cord when disconnecting the charger. This will reduce the risk of damage to the electric plug and cord.
- Make sure that the cord is located so that it will not be stepped on, tripped over or otherwise subjected to damage or stress.
- Do not use an extension cord unless it is absolutely necessary. Use of improper extension cord could result in risk of fire, electric shock or electrocution.
- When operating a charger outdoors, always provide a dry location and use an extension cord suitable for outdoor use. Use of a cord suitable for outdoor use reduces the risk of electric shock.
- An extension cord must have adequate wire size (AWG or American Wire Gauge) for safety. The smaller the gauge number of the wire, the greater the capacity of the cable, that is, 16 gauge has more capacity than 18 gauge. An undersized cord will cause a drop in line voltage resulting in loss of power and overheating. When using more than one extension to make up the total length, be sure each individual extension contains at least the minimum wire size. The following table shows the correct size to use depending on cord length and nameplate ampere rating. If in doubt, use the next heavier gauge. The lower the gauge number, the heavier the cord.
Minimum Gauge for Cord Sets
| Volts | Total Length of Cord in Feet (meters) | ||||
| 120V 25 (7.6) | 50 (15.2) 100 (30.5) 150 (45.7) | ||||
| 240V 50 (15.2) | 100 (30.5) 200 (61.0) 300 (91.4) | ||||
| Ampere Rating | American Wire Gauge | ||||
| More Than | Not More Than | ||||
| 0 6 18 | 16 16 14 | ||||
| 6 10 | 18 16 14 12 | ||||
| 10 12 | 16 16 14 12 | ||||
| 12 16 | 14 12 Not Recommended | ||||
- Do not place any object on top of the charger or place the charger on a soft surface that might block the ventilation slots and result in excessive internal heat. Place the charger in a position away from any heat source. The charger is ventilated through slots in the top and the bottom of the housing.
- Do not operate the charger with a damaged cord or plug—have them replaced immediately.
- Do not operate the charger if it has received a sharp blow, been dropped or otherwise damaged in any way. Take it to an authorized service center.
-
Do not disassemble the charger; take it to an authorized service center when service or repair is required. Incorrect reassembly may result in a risk of electric shock, electrocution or fire.
-
Disconnect the charger from the outlet before attempting any cleaning. This will reduce the risk of electric shock. Removing the battery pack will not reduce this risk.
- NEVER attempt to connect 2 chargers together.
- The charger is designed to operate on standard 120V household electrical power. Do not attempt to use it on any other voltage.
WARNING: Shock hazard. Do not allow any liquid to go inside the charger. Electric shock may result.
WARNING: Burn hazard. Do not submerge the battery pack in any liquid or allow any liquid to enter the battery pack. Never attempt to open the battery pack for any reason. If the plastic housing of the battery pack breaks or cracks, return to a service center for recycling.
CAUTION: Burn hazard. To reduce the risk of injury, charge only CRAFTSMAN rechargeable battery packs. Other types of batteries may overheat and burst resulting in personal injury and property damage.
CAUTION: Under certain conditions, with the charger plugged into the power supply, the charger can be shorted by foreign material. Foreign materials of a conductive nature, such as, but not limited to, grinding dust, metal chips, steel wool, aluminum foil or any buildup of metallic particles should be kept away from the charger cavities. Always unplug the charger from the power supply when there is no battery pack in the cavity. Unplug the charger before attempting to clean.
Charging a Battery
NOTE: To ensure maximum performance and life of lithium-ion battery packs, charge the battery pack fully before first use.
- Plug the charger into an appropriate outlet before inserting battery pack.
- Connect the charger and battery pack, making sure the battery is fully seated. The (charging) light will blink continuously indicating that the charging process has started.
- The completion of charge will be indicated by the light remaining ON continuously. The battery pack is fully charged and may be removed and used at this time or left in the charger.
NOTE: To remove the battery pack, some chargers require the battery pack release button to be pressed.
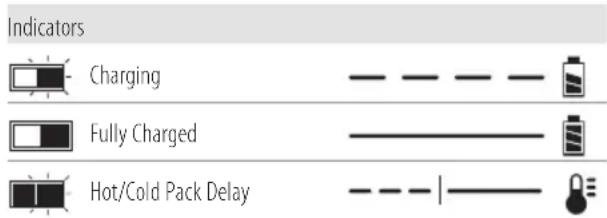
A charger will not charge a faulty battery pack. The charger refusing to light could indicate a problem with the charger.
NOTE: If the charger refuses to light, take the charger and battery pack to be tested at an authorized service center.
Leaving the Battery Pack In the Charger
The charger and battery pack can be left connected with the charge indicator showing pack charged.
Hot/Cold Pack Delay
When the charger detects a battery pack that is too hot or too cold, it automatically starts a Hot/Cold Pack Delay, suspending charging until the battery pack has reached an appropriate temperature. The charger then automatically switches to the pack charging mode. This feature ensures maximum battery pack life.
A cold battery pack may charge at a slower rate than a warm battery pack.
Important Charging Notes
- Longest life and best performance can be obtained if the battery pack is charged when the air temperature is between 65^ F – 75^ F ( 18^ C – 24^ C). DO NOT charge when the battery pack is below +40^ F (+4.5 °C), or above +104^ F (+40 °C). This is important and will prevent serious damage to the battery pack.
-
The charger and battery pack may become warm to the touch while charging. This is a normal condition, and does not indicate a problem. To facilitate the cooling of the battery pack after use, avoid placing the charger or battery pack in a warm environment such as in a metal shed or an uninsulated trailer.
-
If the battery pack does not charge properly:
a. Check operation of receptacle by plugging in a lamp or other appliance;
b. Check to see if receptacle is connected to a light switch which turns power off when you turn out the lights;
c. Move the charger and battery pack to a location where the surrounding air temperature is approximately 65 ^ - 75 ^ ( 18 ^ - 24 ^ );
d. If charging problems persist, take the tool, battery pack and charger to your local service center.
-
The battery pack should be recharged when it fails to produce sufficient power on jobs which were easily done previously. DO NOT CONTINUE to use under these conditions. Follow the charging procedure. You may also charge a partially used pack whenever you desire with no adverse effect on the battery pack.
-
Foreign materials of a conductive nature such as, but not limited to, grinding dust, metal chips, steel wool, aluminum foil, or any buildup of metallic particles should be kept away from charger cavities. Always unplug the charger from the power supply when there is no battery pack in the cavity. Unplug the charger before attempting to clean.
-
Do not freeze or immerse the charger in water or any other liquid.
Charger Cleaning Instructions
WARNING: Shock hazard. Disconnect the charger from the AC outlet before cleaning. Dirt and grease may be removed from the exterior of the charger using a cloth or soft non-metallic brush. Do not use water or any cleaning solutions.
Wall Mounting
These chargers are designed to be wall mountable or to sit upright on a table or work surface. If wall mounting, locate the charger within reach of an electrical outlet, and away from a corner or other obstructions which may impede air flow. Use the back of the charger as a template for the location of the mounting screws on the wall. Mount the charger securely using drywall screws (purchased separately) at least 1" (25.4 mm) long, with a screw head diameter of 0.28–0.35" (7–9 mm), screwed into wood to an optimal depth leaving approximately 7/32" (5.5 mm) of the screw exposed. Align the slots on the back of the charger with the exposed screws and fully engage them in the slots
Versatrack™
CRAFTSMAN chargers can be mounted to the wall using CRAFTSMAN Versatrack™ Trackwall. Hooks and accessories are sold separately. Please refer to the Versatrack™ Trackwall accessory sheet for further information.
Intended Use
Your CRAFTSMAN heat gun has been designed for stripping paint, soldering pipes, shrinking PVC, welding and bending plastics as well as general drying and thawing purposes.
DO NOT use under wet conditions or in presence of flammable liquids or gases.
DO NOT let children come into contact with the tool. Supervision is required when inexperienced operators use this tool.
ASSEMBLY AND ADJUSTMENTS
WARNING: To reduce the risk of serious personal injury, turn unit off and remove the battery pack before making any adjustments or removing/installing attachments or accessories. An accidental start-up can cause injury.
Applications
- Welding plastics
- Bending plastic pipes and sheets
- Loosening rusted or tightly fastened nuts and bolts
- Removing paint and lacquer
- Heat shrink wrap around wires.
- Removing/ melting glue/ adhesive
English
To Attach the Correct Accessory
This tool is supplied with a set of accessories for different applications.
Icon Description Purpose
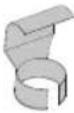 | Reflector nozzle or hook nozzle | Heat shrink wrap, reflecting heat around item, avoiding excess heat burning or hurting surface behind item being heated. |
 | 3" (75 mm) Fish tail surface nozzle | Drying, removing paint, removing vinyl or linoleum, thawing (heat spread over wide area) |
- Make sure the trigger switch 1 is in the off position and the tool is disconnected from the power source. Ensure the nozzle has cooled down.
- Place the desired accessory onto the nozzle.
OPERATION
WARNING: To reduce the risk of serious personal injury, turn unit off and remove the battery pack before making any adjustments or removing/installing attachments or accessories. An accidental start-up can cause injury..
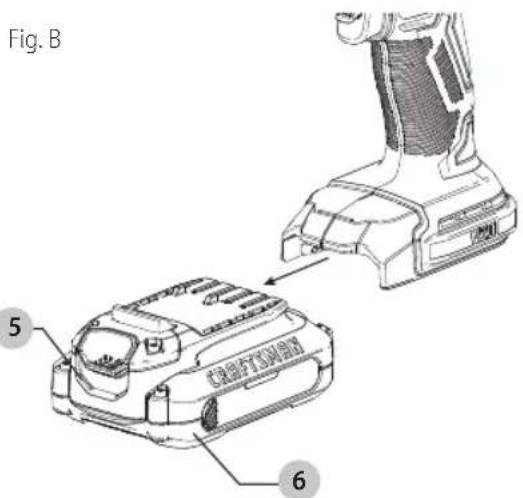
Installing and Removing the Battery Pack (Fig. B)
WARNING: Use only CRAFTSMAN 20V batteries with this product. Use of any other batteries may create the risk of fire.
nOTE: For best results, make sure your battery pack is fully charged.
To install the battery pack 6 into the tool handle, align the battery pack with the rails inside the tool's handle and slide it into the handle until the battery pack is firmly seated in the tool and ensure that it does not disengage.
To remove the battery pack from the tool, press the release button 5 and firmly pull the battery pack out of the tool handle. Insert it into the charger as described in the charger section of this manual
Proper Hand Position (Fig. C)
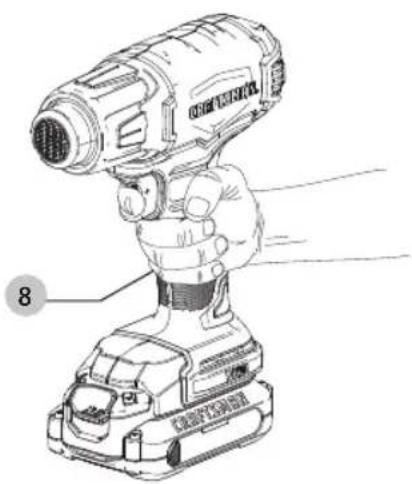
WARNING: To reduce the risk of serious personal injury, ALWAYS use proper hand position as shown. WARNING: To reduce the risk of serious personal injury, ALWAYS hold securely in anticipation of a sudden reaction.
Proper hand position requires one hand on the main handle 8.
Fig. C
natural_image
Line drawing of a handheld electric shock absorber with labeled parts (no text or symbols on the device itself)Prior to Operation (Fig. A)
WARNING: Make sure the nozzle always points away from you and any bystanders. WARNING: DO NOT drop anything into the nozzle. WARNING: DO NOT exceed 60 minutes "ON" in a Z-score period.
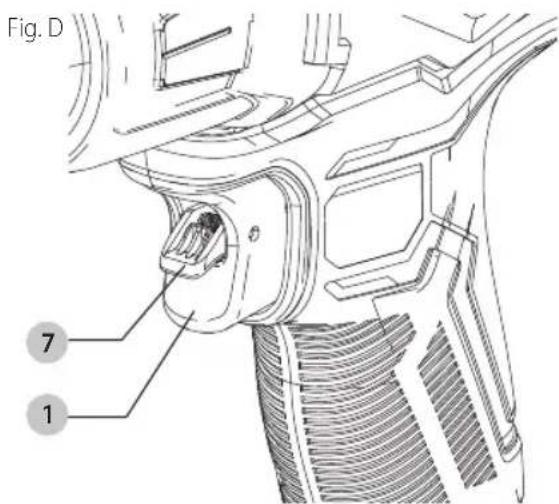
Switching On and Off (Fig. D)
- To power on the tool, flip lock-off 7 upwards and depress the trigger 1.
- To turn the unit off release the trigger.
nOTE: Disconnect the tool from the power source and let the tool cool down before moving or storing it.
Removing Paint (Fig. A)
WARNING: Refer to Important Notice under Additional Safety Information before using the tool to remove paint.
WARNING: Do not strip metal window frames as the key may crack the glass.
- When striping other window frames, use a glass protection nozzle.
• To prevent igniting the surface, do not keep the tool directed at one spot too long. -
Avoid collecting paint on the scraper accessory, as it may ignite. If necessary, carefully remove paint debris from the scraper accessory using a knife.
-
Attach the appropriate accessory.
- To power on the tool, flip lock-off 7 upwards and depress the trigger 1.
- Direct the hot air onto the paint to be removed. Best results will be achieved if the heat gun is moved slowly, but CONSTANTLY, from side to side to evenly distribute heat. DO NOT LINGER OR PAUSE IN ONE SPOT.
- When the paint softens, scrape the paint away using a hand scraper.
REMEMBER: Splinters and small particles of stripped paint can be ignited and blown through holes and cracks in the surface being stripped.
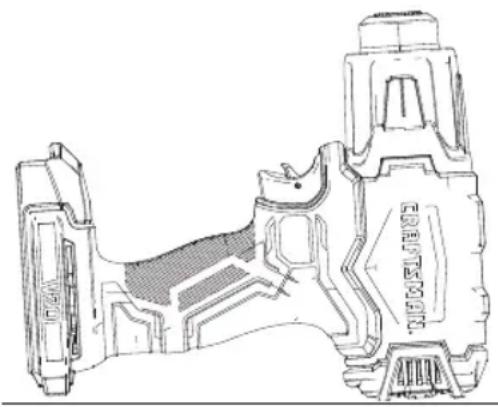
Cool Down Period (Fig. E)
The nozzle and accessory becomes very hot during use. Turn heat gun off, disconnect from the power source, place in position shown in Fig. E, and let the tool cool down for at least 30 minutes before moving or storing it.
Fig. E
natural_image
Technical line drawing of a mechanical component with no visible text or symbolsMAINTENANCE
WARNING: To reduce the risk of serious personal injury, turn unit off and remove the battery pack before making any adjustments or removing/installing attachments or accessories. An accidental start-up can cause injury.
Cleaning
WARNING: Blow dirt and dust out of all air vents with dry air at least once a week. To minimize the risk of eye injury, always wear ANSI Z87.1 approved eye protection when performing this procedure.
WARNING: Never use solvents or other harsh chemicals for cleaning the non-metallic parts of the tool. These chemicals may weaken the plastic materials used in these parts. Use a cloth dampened only with water and mild soap. Never let any liquid get inside the tool; never immerse any part of the tool into a liquid.
Accessories
WARNING: Since accessories, other than those offered by CRAFTSMAN, have not been tested with this product, use of such accessories with this tool could be hazardous. To reduce the risk of injury, only CRAFTSMAN recommended accessories should be used with this product.
Recommended accessories for use with your tool are available at extra cost from your local dealer or authorized service center. If you need assistance in locating any accessory, please contact CRAFTSMAN1-888-331-4569.
Repairs
The charger and battery pack are not serviceable. There are no serviceable parts inside the charger or battery pack.
WARNING: To assure product SAFETY and PABILITY, repairs, maintenance and adjustment (including brush inspection and replacement, when applicable) should be performed by a CRAFTSMAN factory service center or a CRAFTSMAN authorized service center. Always use identical replacement parts.
Register Online
Thank you for your purchase. Register your product now for:
- WARRANTY SERVICE: Registering your product will help you obtain more efficient warranty service in case there is a problem with your product.
- CONFIRMATION OF OWNERSHIP: In case of an insurance loss, such as fire, flood or theft, your registration of ownership will serve as your proof of purchase.
- FOR YOUR SAFETY: Registering your product will allow us to contact you in the unlikely event a safety notification is required under the Federal Consumer Safety Act.
Register online at www.craftsman.com/
Three Year Limited Warranty
CRAFTSMAN will repair or replace, without charge, any defects due to faulty materials or workmanship for three years from the date of purchase (two years for batteries). This warranty does not cover part failure due to normal wear or tool abuse. For further detail of warranty coverage and warranty repair information, visit www.craftsman.com
English
or call 1-888-331-4569. This warranty does not apply to accessories or damage caused where repairs have been made or attempted by others. THIS LIMITED WARRANTY IS GIVEN IN LIEU OF ALL OTHERS, INCLUDING THE IMPLIED WARRANTY OF MERCHANTABILITY AND FITNESS FOR A PARTICULAR PURPOSE, AND EXCLUDES ALL INCIDENTAL OR CONSEQUENTIAL DAMAGES. Some states do not allow limitations on how long an implied warranty lasts or the exclusion or limitation of incidental or consequential damages, so these limitations may not apply to you. This warranty gives you specific legal rights and you may have other rights which vary in certain states or provinces.
2 YEARs FREE sERViCE On CRAFTsMAn BATTERY PACKs
CMCB201, CMCB2011
3 YEARs FREE sSERVICE On CRAFTsMAn BATTERY PACKs
CMCB202, CMCB204
NOTE: Battery warranty voided if the battery pack is tampered with in any way. CRAFTSMAN is not responsible for any injury caused by tampering and may prosecute warranty fraud to the fullest extent permitted by law.
90 DAY MOnEY BACK gUARAnTEE
If you are not completely satisfied with the performance of your CRAFTSMAN Power Tool or Nailer for any reason, you can return it within 90 days from the date of purchase with a receipt for a full refund – no questions asked.
IATin AMERiCA: This warranty does not apply to products sold in Latin America. For products sold in Latin America, see country specific warranty information contained in the packaging, call the local company or see website for warranty information.
FREE WARning IABEI REPIACEMENT: If your warning labels become illegible or are missing, call 1-888-331-4569 for a free replacement.
minute protection auditive
OPM....oscillationspor minuto ..... lire toute la documentation
A.....ampères
IPXX......symboleIP
BLOCS-PILES ET CHARGEURS
natural_image
Technical line drawing of a mechanical component with no visible text or symbolsMAINTENANCE
= = or DC.....directcurrent
natural_image
Technical line drawing of a mechanical component with no visible text or symbolsMANTENIMIENTO
Eje Central Lázaro Cárdenas No. 18 - Local (55) 5588 9377 D, Col. Obrera
MERIDA, YUC
Calle 63 #459-A - Col. Centro (999) 928 5038
MONTERREY, N.L.
ESPAÑOL
Av. Francisco I. Madero 831 Poniente - Col. (818) 375 23 13 Centro
PUEBLA, PUE
17 Norte #205 - Col. Centro (222) 246 3714
QUERETARO, QRO
Av. San Roque 274 - Col. San Gregorio (442) 2 17 63 14
SAN LUIS POTOSI, SLP
WARNING: Use only CRAFTSMAN 20 Volt batteries with this product. Use of any other batteries may create the risk of fire.
"C" Indicates that the battery pack is compatible with that specific charger. Read the instruction manual for more specific information.
- 20V Cordless Heat Gun
- Pistolet thermique sans fil 20 V
- Pistola de Calor Inalámbrica 20 V
- Definitions: Safety Alert Symbols and Words
- 20V Cordless Heat Gun CMCE530
- GENERAL POWER TOOL SAFETY WARNINGS
- SAVE ALL WARNINGS AND INSTRUCTIONS FOR FUTURE REFERENCE
- IMPORTANT SAFETY INSTRUCTIONS
- Safety Instructions for Heat Guns
- Persons Removing Paint Should Always Follow These Guidelines:
- IMPORTANT NOTICE
- As You Practice, Observe the Following Procedures for Safety
- SAVE THESE INSTRUCTIONS FOR FUTURE USE
- Additional Safety Information
- English
- BATTERIES AND CHARGERS
- READ ALL INSTRUCTIONS
- Important Safety Instructions for All Battery Packs
- Storage Recommendations
- Battery Pack Cleaning Instructions
- The RBRC® Seal
- Fuel Gauge Battery Packs
- Transportation
- Important Safety Instructions for All Battery Chargers
- Charging a Battery
- Leaving the Battery Pack In the Charger
- Hot/Cold Pack Delay
- Important Charging Notes
- Charger Cleaning Instructions
- Wall Mounting
- Versatrack™
- Intended Use
- ASSEMBLY AND ADJUSTMENTS
- Applications
- To Attach the Correct Accessory
- OPERATION
- Installing and Removing the Battery Pack (Fig. B)
- Proper Hand Position (Fig. C)
- Prior to Operation (Fig. A)
- Switching On and Off (Fig. D)
- Removing Paint (Fig. A)
- Cool Down Period (Fig. E)
- MAINTENANCE
- Cleaning
- Accessories
- Repairs
- Register Online
- Three Year Limited Warranty
- YEARs FREE sERViCE On CRAFTsMAn BATTERY PACKs
- YEARs FREE sSERVICE On CRAFTsMAn BATTERY PACKs
- DAY MOnEY BACK gUARAnTEE
- BLOCS-PILES ET CHARGEURS
- MANTENIMIENTO
- MERIDA, YUC
- MONTERREY, N.L.
- ESPAÑOL
- PUEBLA, PUE
- QUERETARO, QRO
- SAN LUIS POTOSI, SLP
Brand : Craftsman
Model : CMCE530B
Category : Heat gun