GHS 5006 5TE - Log splitter Güde - Free user manual and instructions
Find the device manual for free GHS 5006 5TE Güde in PDF.

| Product type | Electric log splitter |
| Model | GHS 5006 5TE |
| Power supply | 230 V ~ 50 Hz |
| Rated power | 2.6 kW (S3 20%) |
| No-load speed | 2820 min⁻¹ |
| Max. hydraulic pressure | 240 bar |
| Max. splitting force | 6.5 tonnes |
| Max. splitting stroke | 390 mm |
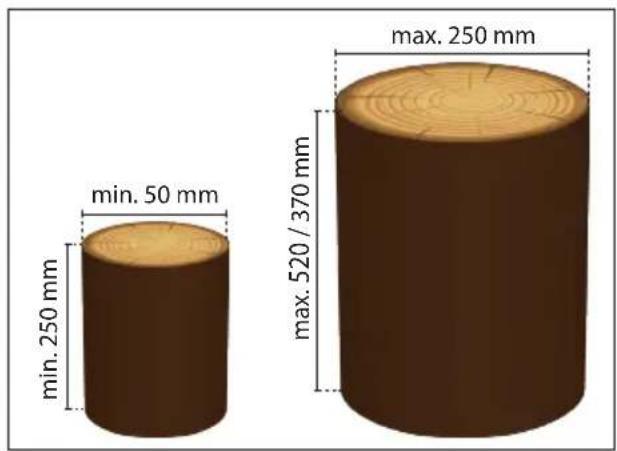
| Log length | 250 - 520 mm |
| Log diameter | 50 - 250 mm |
| Hydraulic tank capacity | 3.2 L (oil HLP 46) |
| Forward speed | 0.032 m/s |
| Return speed | 0.065 m/s |
| Dimensions (L x W x H) | 1470 x 405 x 620 mm |
| Weight | 71 kg |
| Protection class | F |
| Protection type | IP 54 |
| Sound level (L_WA) | 86 dB(A) |
| Safety devices | Two-lever control, emergency stop, 30 mA residual current circuit breaker |
| Maintenance | Check oil level, clean with damp cloth, tighten hydraulic fittings after 4 h |
| Spare parts | Available at www.guede.com |
| Warranty | 24 months for consumers, 12 months for professional use |
Frequently Asked Questions - GHS 5006 5TE Güde
User questions about GHS 5006 5TE Güde
0 question about this device. Answer the ones you know or ask your own.
Ask a new question about this device
Download the instructions for your Log splitter in PDF format for free! Find your manual GHS 5006 5TE - Güde and take your electronic device back in hand. On this page are published all the documents necessary for the use of your device. GHS 5006 5TE by Güde.
USER MANUAL GHS 5006 5TE Güde
natural_image
Blue industrial machine labeled 'BRENNHOLTTECHNIK' with black handle and wheels (no visible text beyond label)GHS 370/4TE
02041
natural_image
Blue industrial machine with black wheels and a metal frame, no visible text or symbolsGHS 500/6,5TE
02048
GÜDE GmbH & Co. KG
Birkichstrasse 6
74549 Wolpertshausen
Deutschland


text_image
Güde

ENGLISH Please read the instructions carefully before starting the machine.
English TECHNICAL DATA | SAFETY INSTRUCTIONS | SPECIFIED CONDITIONS OF USE | EMERGENCY PROCEDURE | CHARGING EQUIPMENT | BATTERY | WORK INSTRUCTIONS | SYMBOLS | DISPOSAL | GUARANTEE | SERVICE ____33
Français CARACTÉRISTIQUES TECHNIQUES | I NSTRUCTIONS DE SÉCURITÉ | UTILISATION CONFORME À LA DESTINATION | CONDUITE EN CAS D'URGENCE | DISPOSITIF DE CHARGE | BATTERIA | CONSIGNES DE TRAVAIL | SYMBOLES | LIQUIDATION | GARANTIE | SERVICE 39
text_image
Scanned document page with Chinese text and a blue circular logo, likely a form or report section.GHS 500/6,5TE
02048

text_image
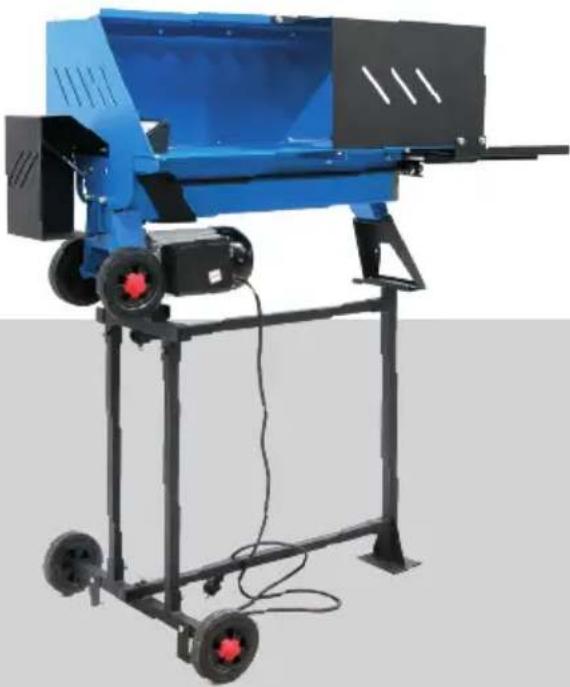
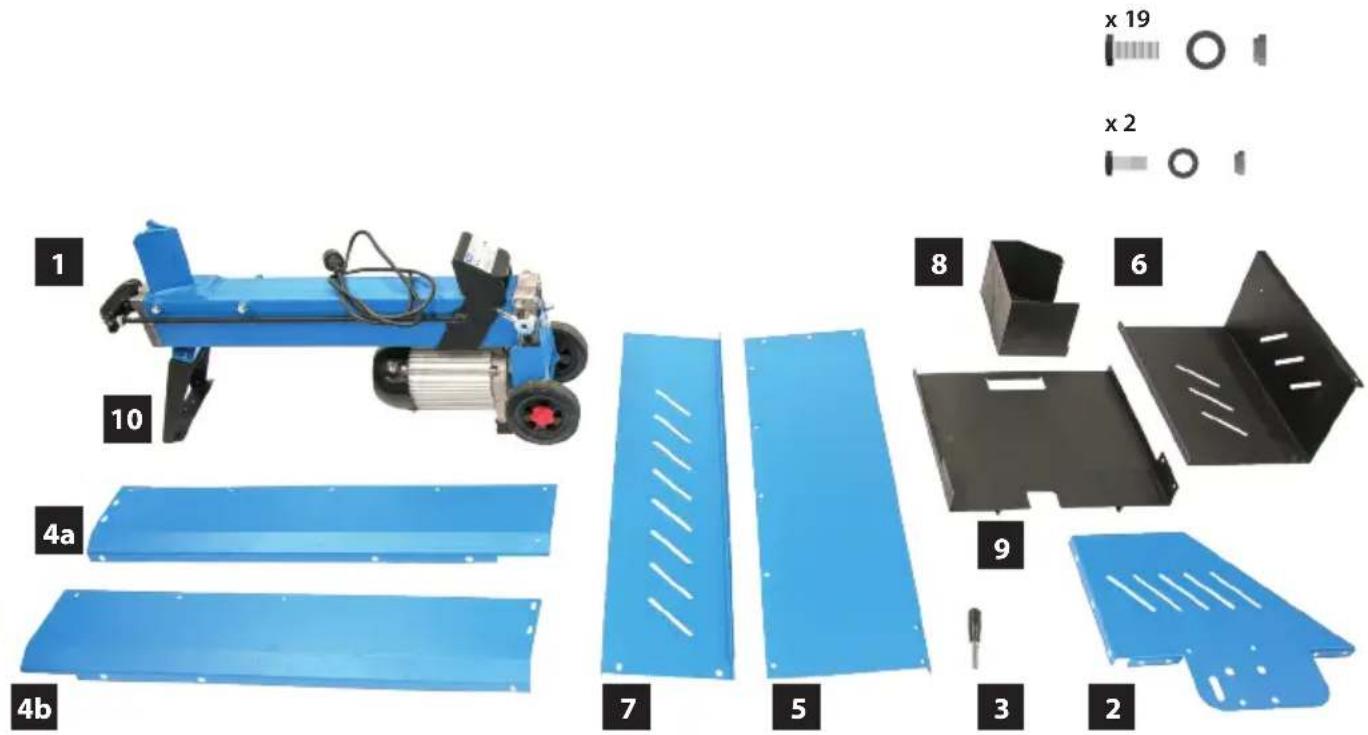
1 x 2 x 8 x 2 4 5 8 1 6 3 2 7 2 x 2
LIEFERUMFANG | DELIVERED ITEMS | ARTICLES DÉLIVRÉS | VOLUME DELLA FORNITURA | LEVERINGSOMVANG | OBJEM DODÁVKY | ROZSAH DODÁVKY | SZÁLLÍTÁSI TERJEDELEM | OBSEG DOBAVE | OPSEG ISPORUKE | ОБЕМ НА ДОСТАВКАТА | VOLUMUL LIVRĂRII | OPSEG ISPORUKE | TESLIMAT KAPSAMI | ZAKRES DOSTAWY
text_image
Scanned document page with Chinese text and a blue circular logo, likely a form or report section.GHS 500/6,5TE
02048
GHS 370/4TE
02041
text_image
1 x 19 x 2 10 4a 4b 7 5 8 6 9 3 2| DE | Montage | RO | Montaj |
| GB | Assembly | ||
| FR | Montage | ||
| IT | Montaggio | ||
| NL | Montage | ||
| CZ | Montáz | ||
| SK | Montáz | ||
| HU | Szerelés |
2-15
| DE | Inbetriebnahme | RO | Punerea în funcțiune |
| GB | Starting-up the machine | ||
| FR | mise en service | ||
| IT | Messa in funzione | ||
| NL | Inbedrijfstelling | ||
| CZ | Uvedení do provozu | ||
| SK | Uvedenie do prevádzky | ||
| HU | Üzembe helyezés |
16-17
| DE | Betrieb | RO | Functionare |
| GB | Operation | ||
| FR | Fonctionnement | ||
| IT | Esercizio | ||
| NL | Gebruik | ||
| CZ | Provoz | ||
| SK | Prevádzka | ||
| HU | Üzemeltetés |
18-22
| DE | Reinigung / Wartung | RO | Curățare / Întreținere |
| GB | Cleaning / Maintenance | ||
| FR | Nettoyage / Entretien | ||
| IT | Pulizia / Manutenzione | ||
| NL | Schoonmaken / Onderhoud | ||
| CZ | Čištění / Údržba | ||
| SK | Čistenie / Údrzba | ||
| HU | Tisztítás / Karbantartás |
23
| DE | Transport / Lagerung | RO | Transport / Depozitare |
| GB | transport / storage | ||
| FR | Transport / Stockage | ||
| IT | Trasporto / Stoccaggio | ||
| NL | Transport / Bewaring | ||
| CZ | Přeprava / Uložení | ||
| SK | Transport / Uloženie | ||
| HU | Szállítás / Tárolás |
24
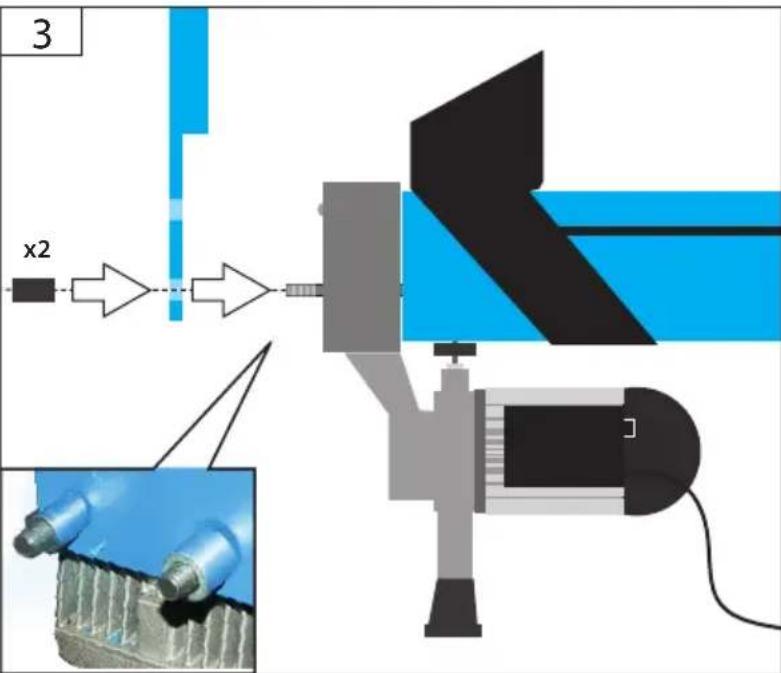
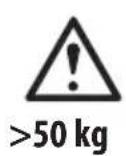
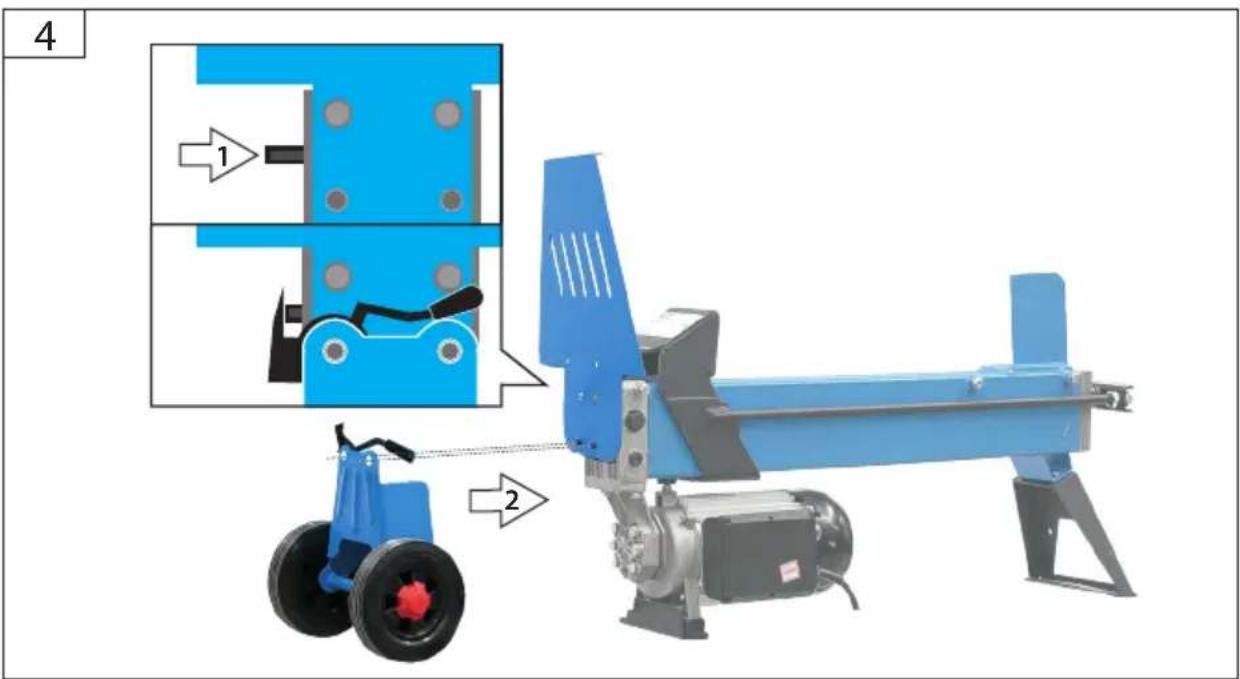
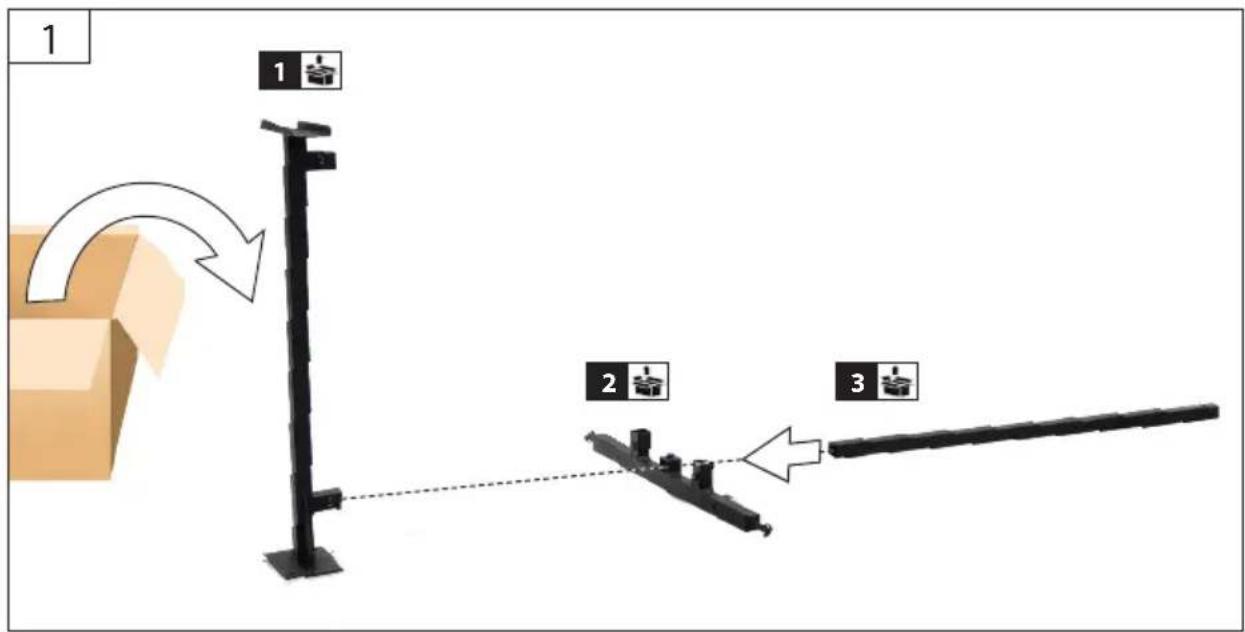
| 1 | DE | Montage | RO | Montaj |
| GB | Assembly | |||
| FR | Montage | |||
| IT | Montaggio | |||
| NL | Montage | |||
| CZ | Montáž | |||
| SK | Montáž | |||
| HU | Szerelés |
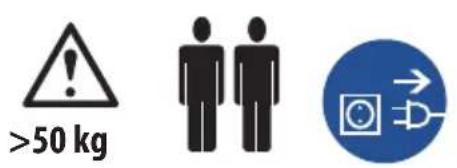
text_image
1 x2 10RO Montaj
DE Montage
GB Assembly
FR Montage
IT Montaggio
NL Montage
CZ Montáž
SK Montáž
HU Szerelés
1

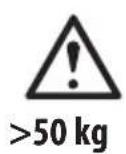
50 kg


GHS 500/6,5TE
02048
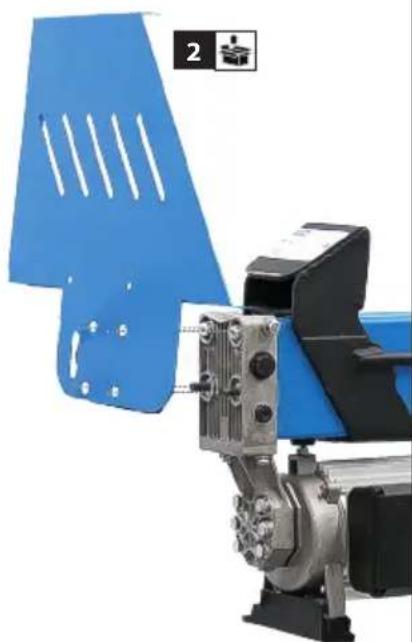
2
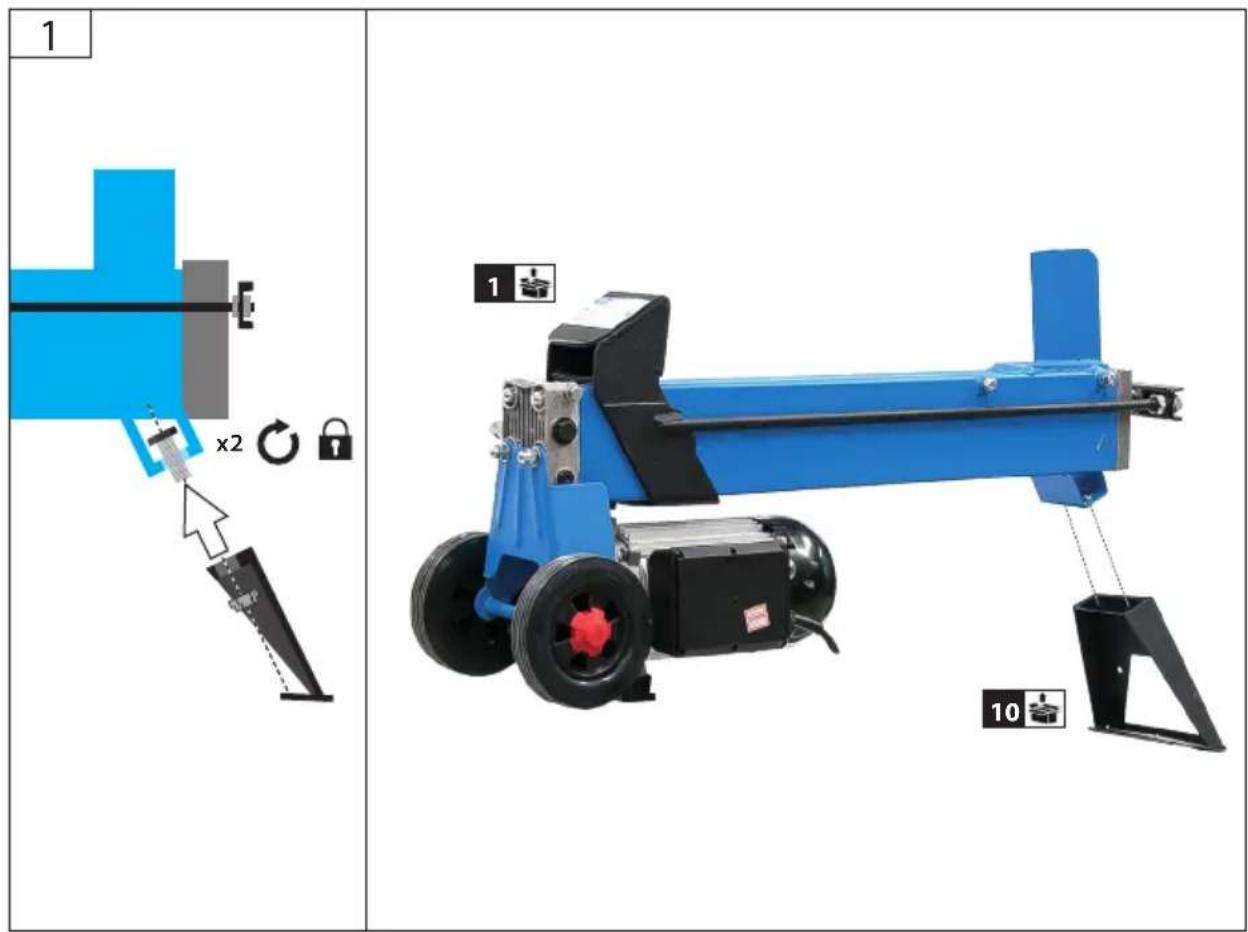
text_image
Diagram of a mechanical device with labeled components including lock, reset, and x2 indicator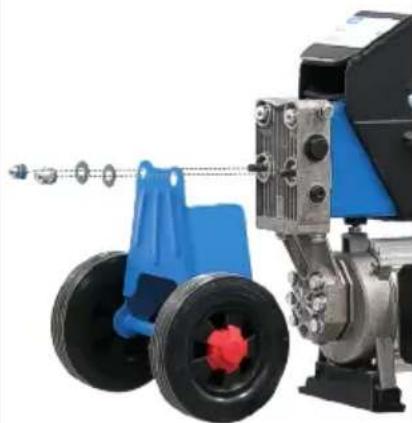
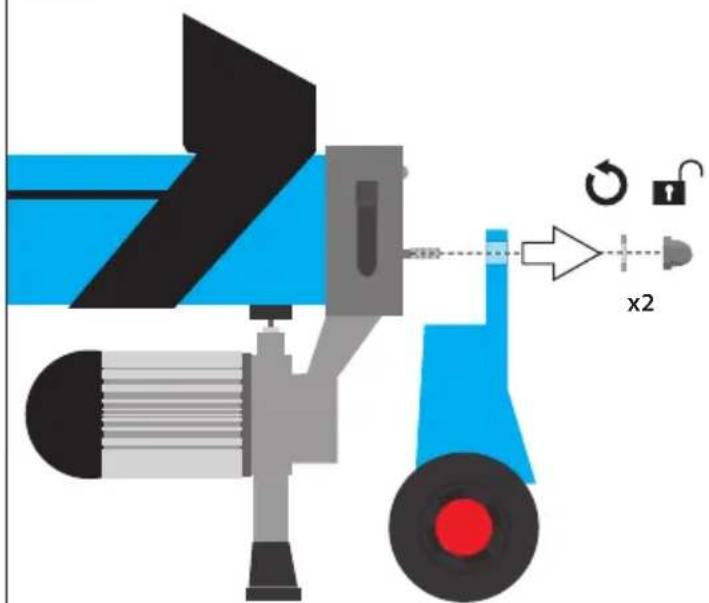
natural_image
Close-up of a blue industrial pump with attached motor and wheels (no visible text or symbols)3
natural_image
Mechanical assembly diagram showing a component being processed with a close-up view of the internal structure (no text or symbols present)
natural_image
Close-up of a blue industrial machine with a perforated metal panel and mechanical components (no visible text or symbols)| 1 | DE Montage | RO Montaj |
| GB Assembly | ||
| FR Montage | ||
| IT Montaggio | ||
| NL Montage | ||
| CZ Montáž | ||
| SK Montáž | ||
| HU Szerelés |


GHS 500/6,5TE
02048
text_image
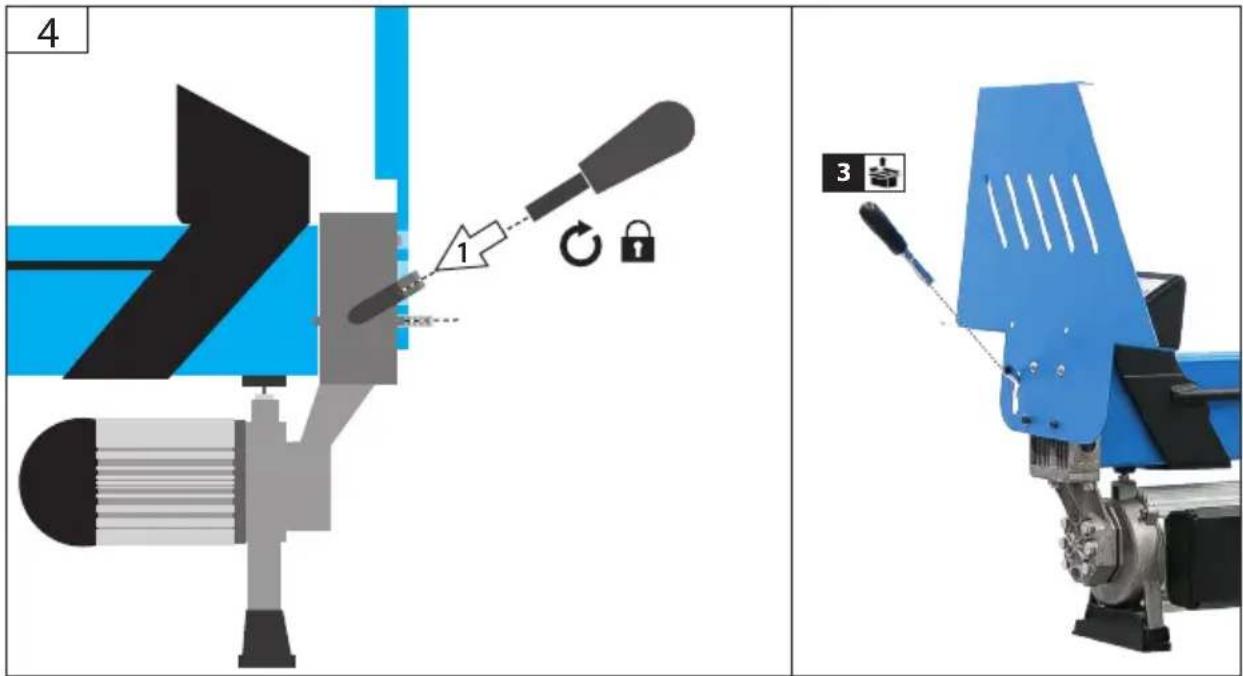
4 1 3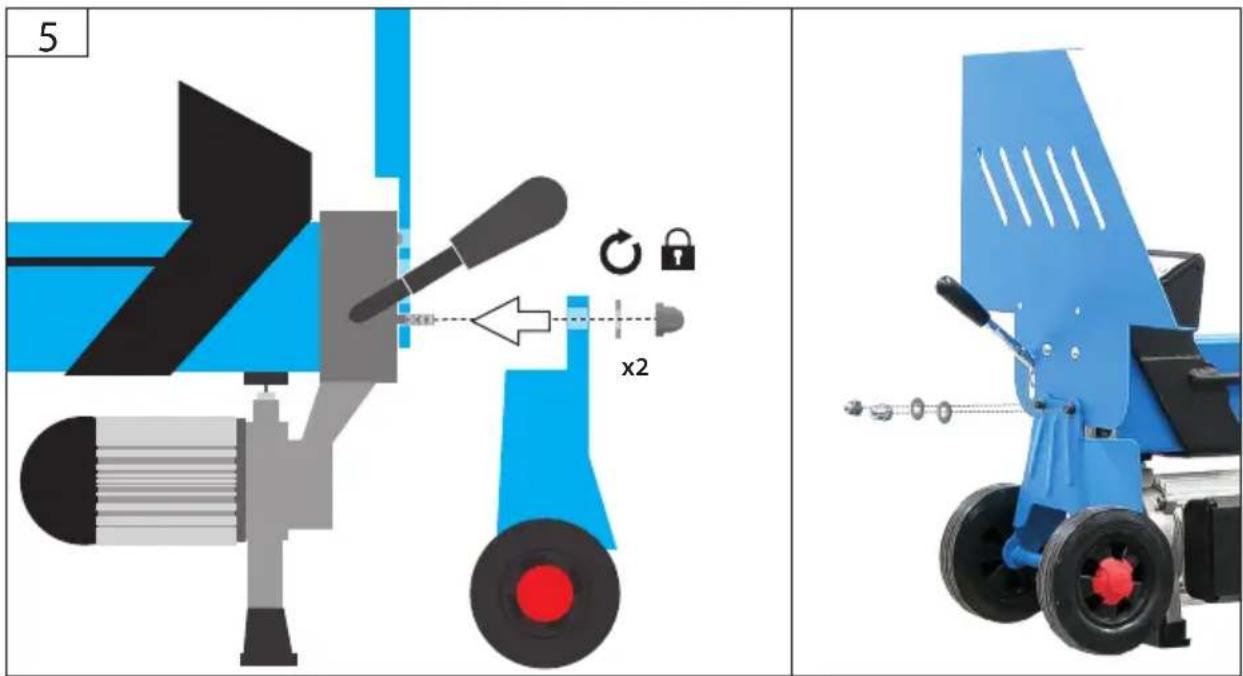
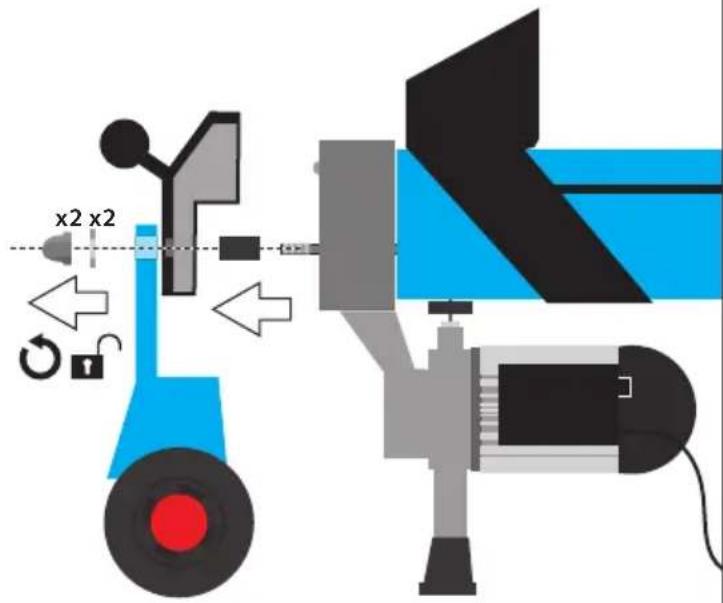
text_image
5 x2DE Montage
GB Assembly
FR Montage
IT Montaggio
NL Montage
CZ Montáž
SK Montáž
HU Szerelés
RO Montaj
1

50 kg


GHS 370/4TE
02041
2
text_image
x2 x2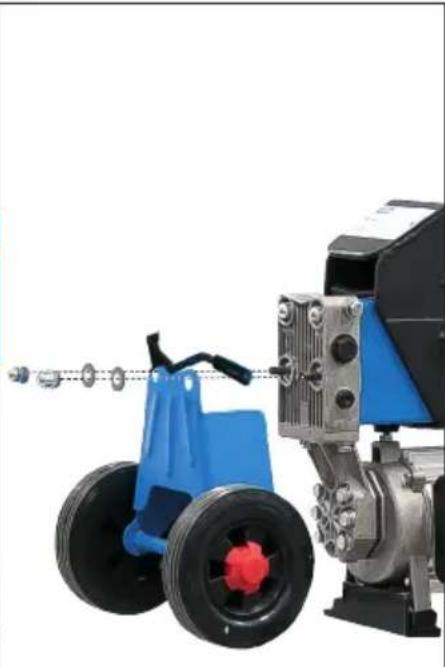
natural_image
Close-up of a blue and black industrial machine with wheels and attached components (no visible text or symbols)3
text_image
3 x2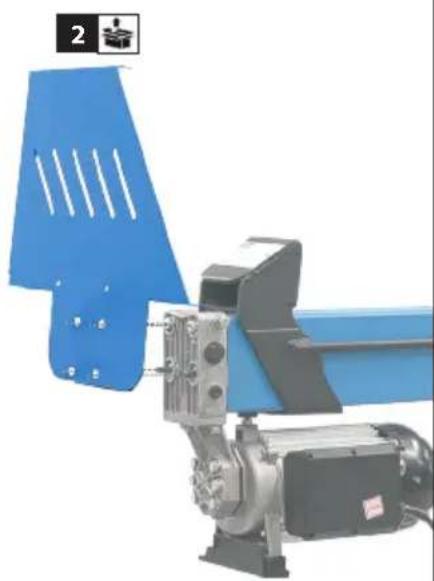
natural_image
Industrial machine with blue metal panel and mechanical components (no visible text or symbols)| 1 | DE Montage | RO Montaj |
| GB Assembly | ||
| FR Montage | ||
| IT Montaggio | ||
| NL Montage | ||
| CZ Montáž | ||
| SK Montáž | ||
| HU Szerelés |


GHS 370/4TE
02041
text_image
4 1 2
natural_image
Two technical diagrams: one showing a blue industrial machine with wheels and a mechanical component, the other showing a close-up of a mechanical assembly with a lock and x2 indicator (no text or symbols on components)DE Montage
RO Montaj
GB Assembly
FR Montage
IT Montaggio
NL Montage
CZ Montáž
SK Montáž
HU Szerelés
1

6
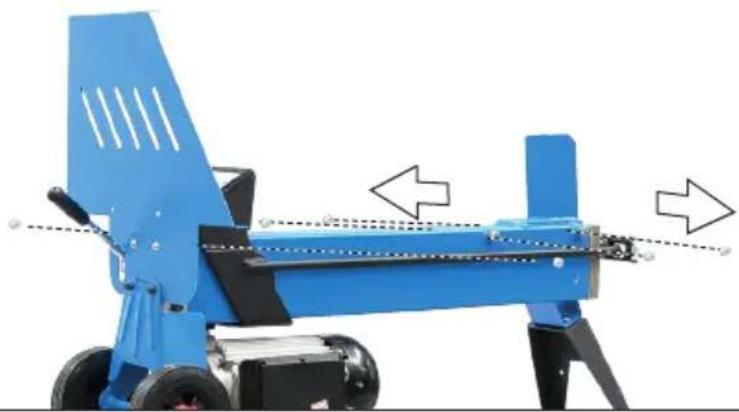
natural_image
Blue industrial machine with mechanical components and directional arrows indicating motion (no text or symbols)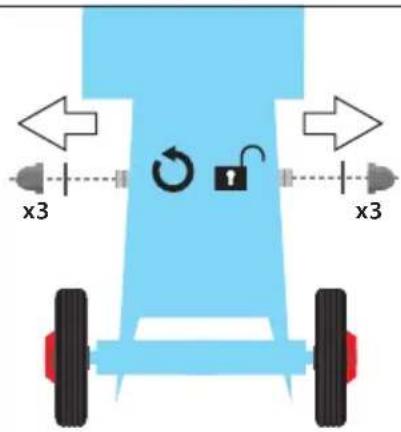
text_image
x3 x37
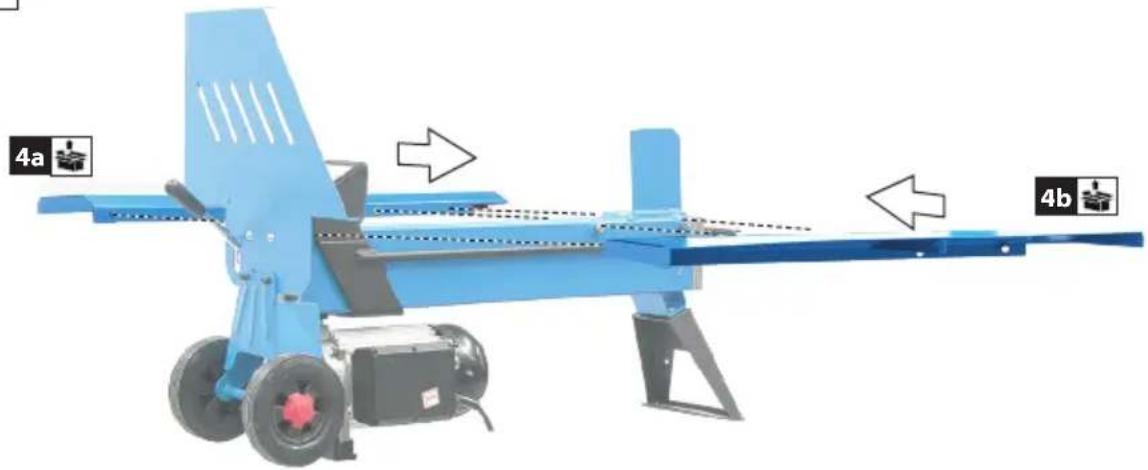
text_image
4a 4b
flowchart
graph TD
    A["Left Wheel"] --> B["Left Leg"]
    B --> C["Right Leg"]
    C --> D["Left Wheel"]
    style A fill:#f9f,stroke:#333
    style D fill:#bbf,stroke:#333
| 1 | DE Montage | RO Montaj |
| GB Assembly | ||
| FR Montage | ||
| IT Montaggio | ||
| NL Montage | ||
| CZ Montáž | ||
| SK Montáž | ||
| HU Szerelés |

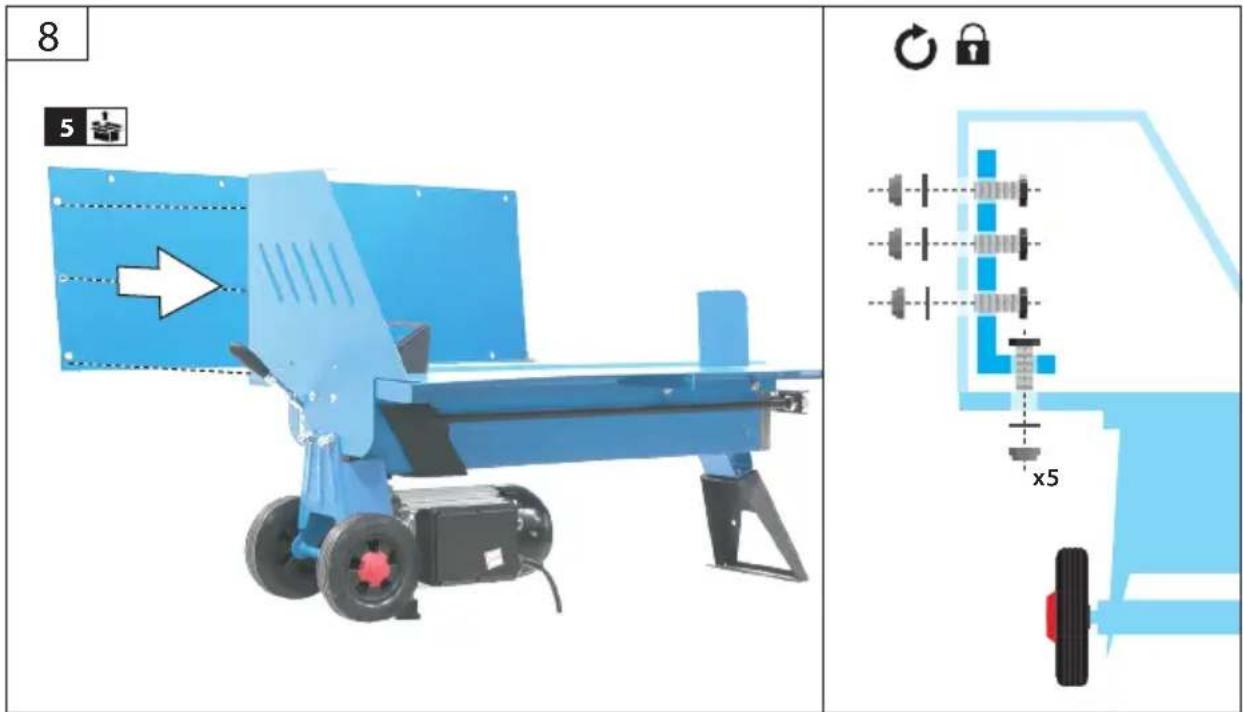
text_image
8 5 x5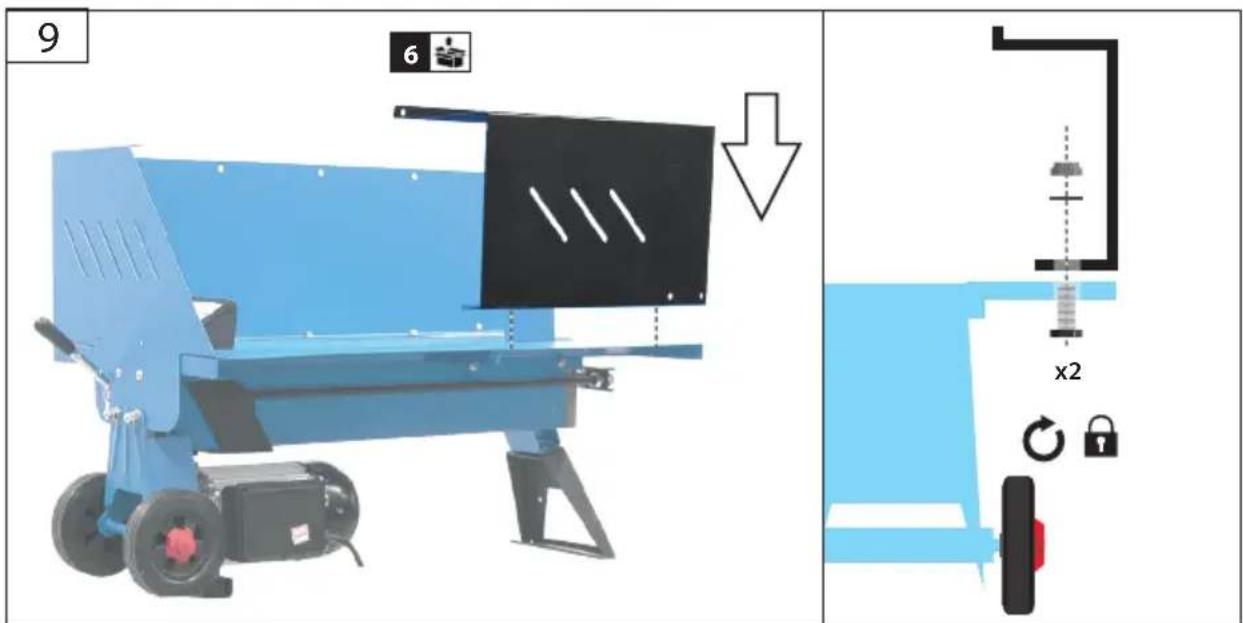
text_image
9 6 x2DE Montage
GB Assembly
FR Montage
IT Montaggio
NL Montage
CZ Montáž
SK Montáž
HU Szerelés
RO Montaj
1

text_image
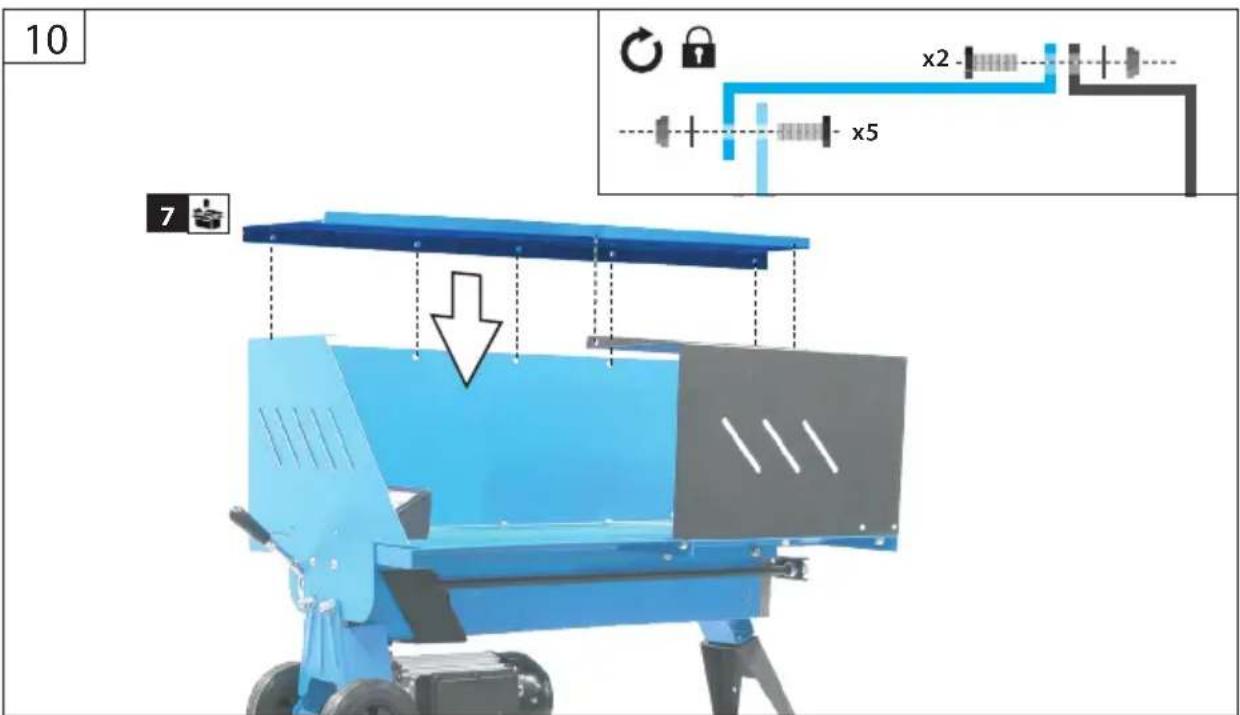
10 7 x2 x5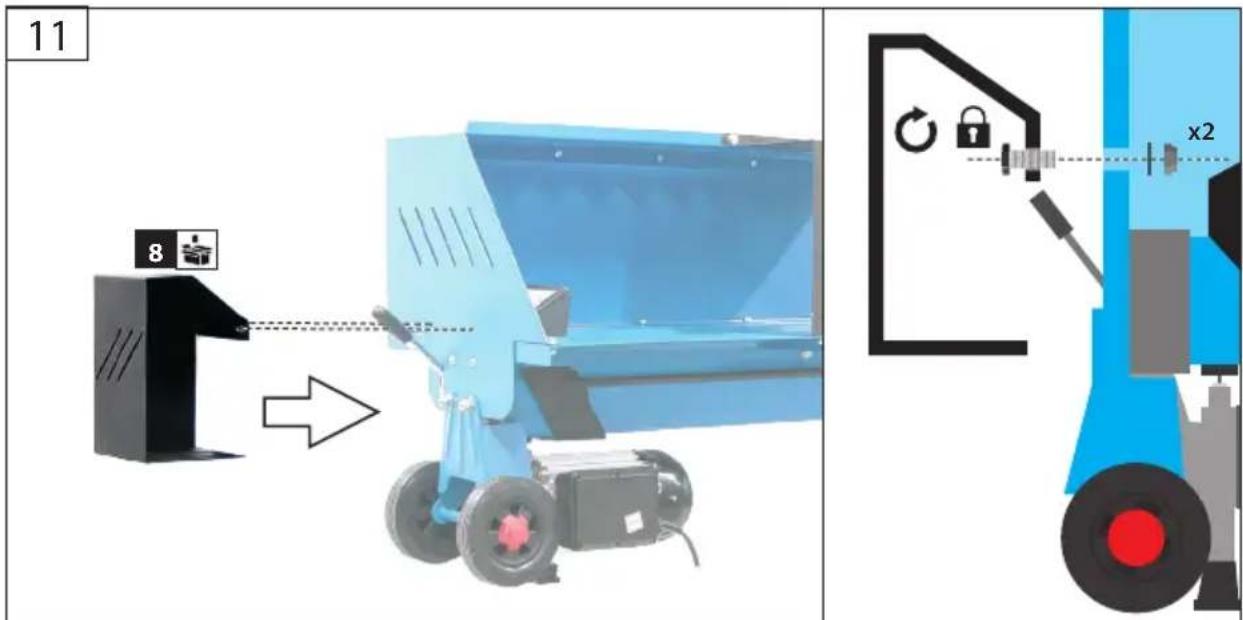
text_image
11 8 x2| 1 | DE | Montage | RO | Montaj |
| GB | Assembly | |||
| FR | Montage | |||
| IT | Montaggio | |||
| NL | Montage | |||
| CZ | Montáž | |||
| SK | Montáž | |||
| HU | Szerelés |
1
text_image
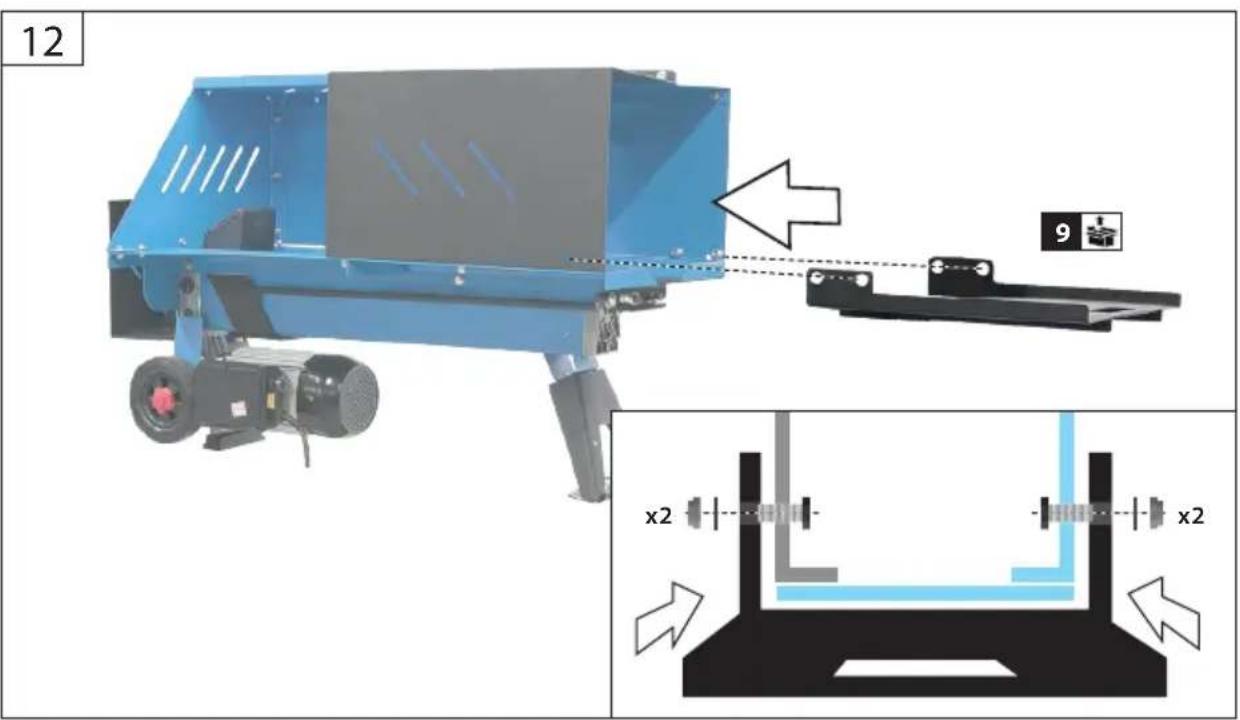
12 9 x2 x2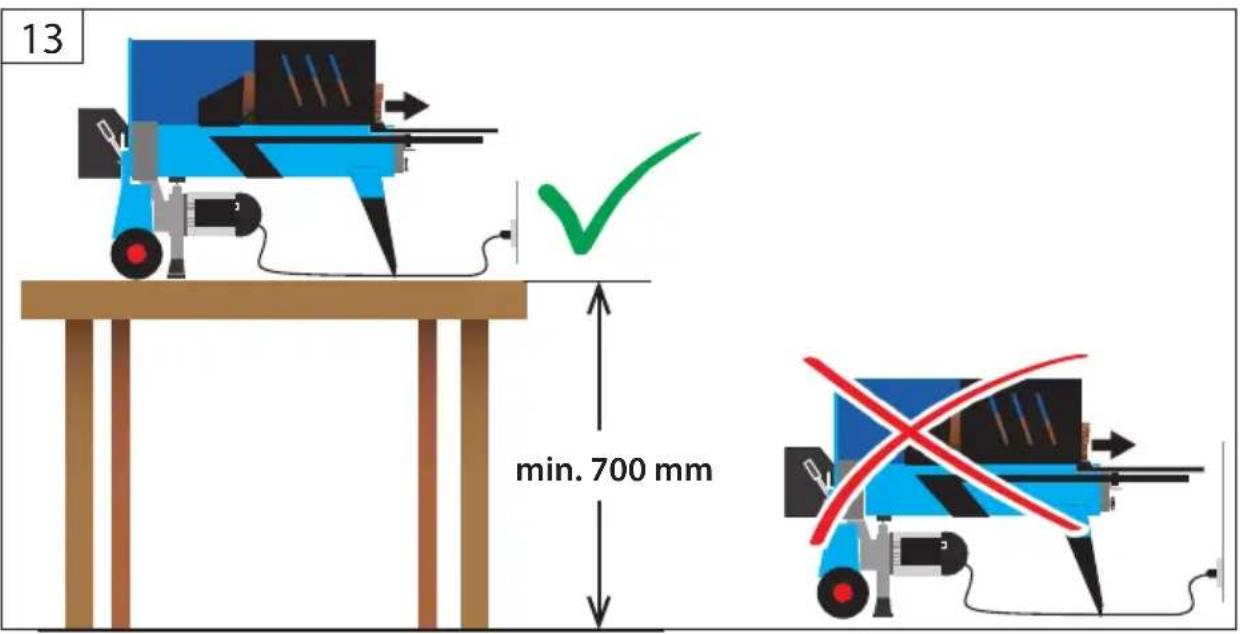
text_image
13 min. 700 mmDE Montage
RO Montaj
GB Assembly
FR Montage
IT Montaggio
NL Montage
CZ Montáž
SK Montáž
HU Szerelés
1

GHS 500/6,5TE
02048
text_image
1 1 2 3
natural_image
Technical illustration of a structural support frame with mounting base and vertical supports, showing close-up details and lock mechanism (no text or symbols)| 1 | DE | Montage | RO | Montaj |
| GB | Assembly | |||
| FR | Montage | |||
| IT | Montaggio | |||
| NL | Montage | |||
| CZ | Montáž | |||
| SK | Montáž | |||
| HU | Szerelés |

GHS 500/6,5TE
02048
3

natural_image
Mechanical support structure with vertical rods and a base, showing motion arrows (no text or symbols)
natural_image
Mechanical assembly with lock and rotation arrow symbol (no text or labels)4
natural_image
Mechanical setup with a vertical frame and a horizontal support, showing a mechanical component with an arrow indicating motion (no text or symbols present)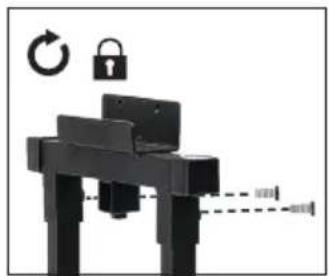
natural_image
Mechanical assembly diagram showing a lock mechanism with rotating and fixed keys (no text or symbols)| DE | Montage | RO | Montaj |
| GB | Assembly | ||
| FR | Montage | ||
| IT | Montaggio | ||
| NL | Montage | ||
| CZ | Montáž | ||
| SK | Montáž | ||
| HU | Szerelés |

GHS 500/6,5TE
02048

text_image
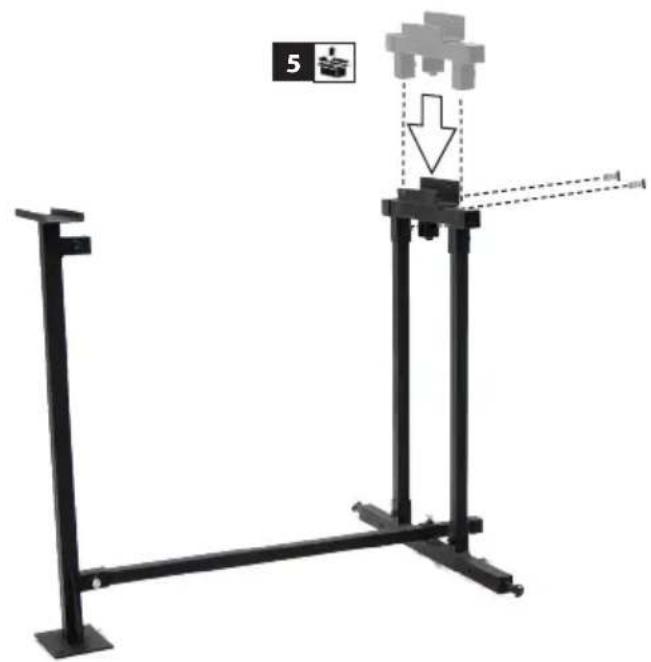
5 7
text_image
Technical diagram showing a mechanical device with labeled parts and directional arrows, including lock icons and adjustment indicators.| 1 | DE | Montage | RO | Montaj |
| GB | Assembly | |||
| FR | Montage | |||
| IT | Montaggio | |||
| NL | Montage | |||
| CZ | Montáž | |||
| SK | Montáž | |||
| HU | Szerelés |

GHS 500/6,5TE
02048
7

natural_image
Mechanical frame with wheels and support structures, no visible text or symbols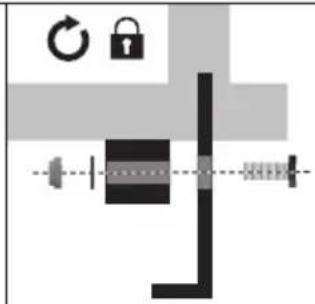
text_image
Diagram showing lock and refresh icons with a central lock mechanism and a dashed line indicating a control or status.8

natural_image
Simple line drawing of a black metal frame with two wheels and a green checkmark (no text or symbols)DE Montage
RO Montaj
GB Assembly
FR Montage
IT Montaggio
NL Montage
CZ Montáž
SK Montáž
HU Szerelés
1

GHS 500/6,5TE
02048
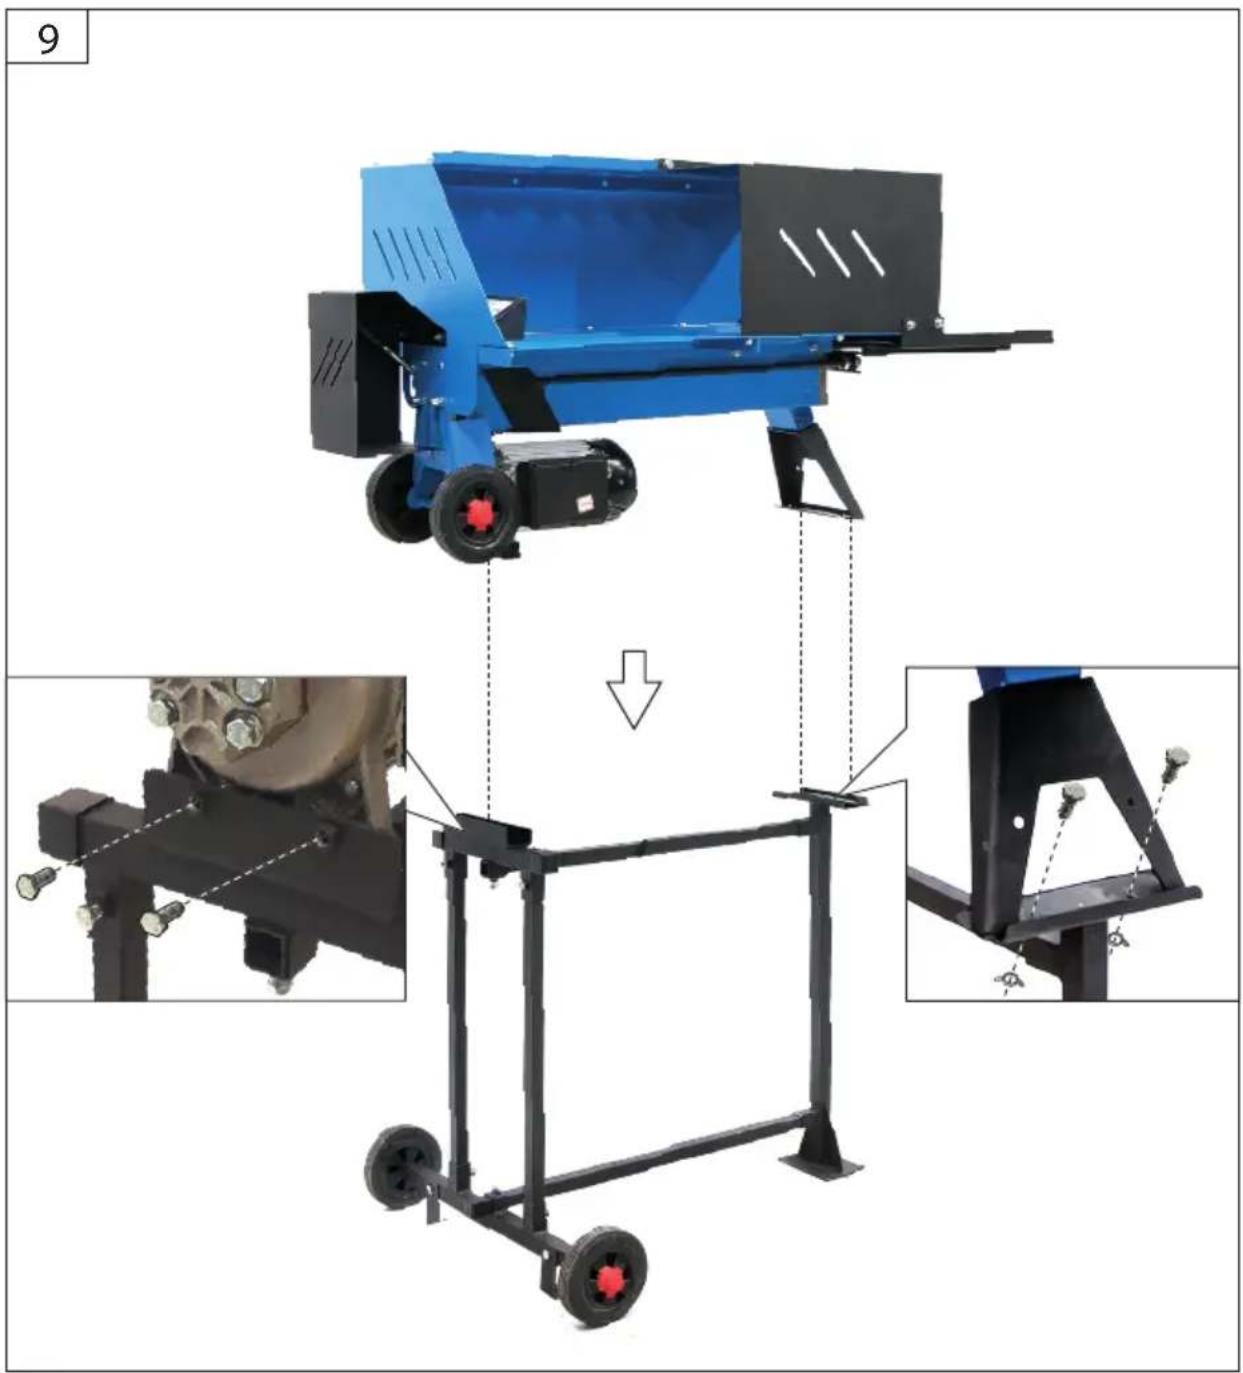
9
natural_image
Industrial machine setup with wheels and frame, showing mechanical components and assembly steps (no text or symbols visible)| 1 | DE | Montage | RO | Montaj |
| GB | Assembly | |||
| FR | Montage | |||
| IT | Montaggio | |||
| NL | Montage | |||
| CZ | Montáž | |||
| SK | Montáž | |||
| HU | Szerelés |

GHS 500/6,5TE
02048
10
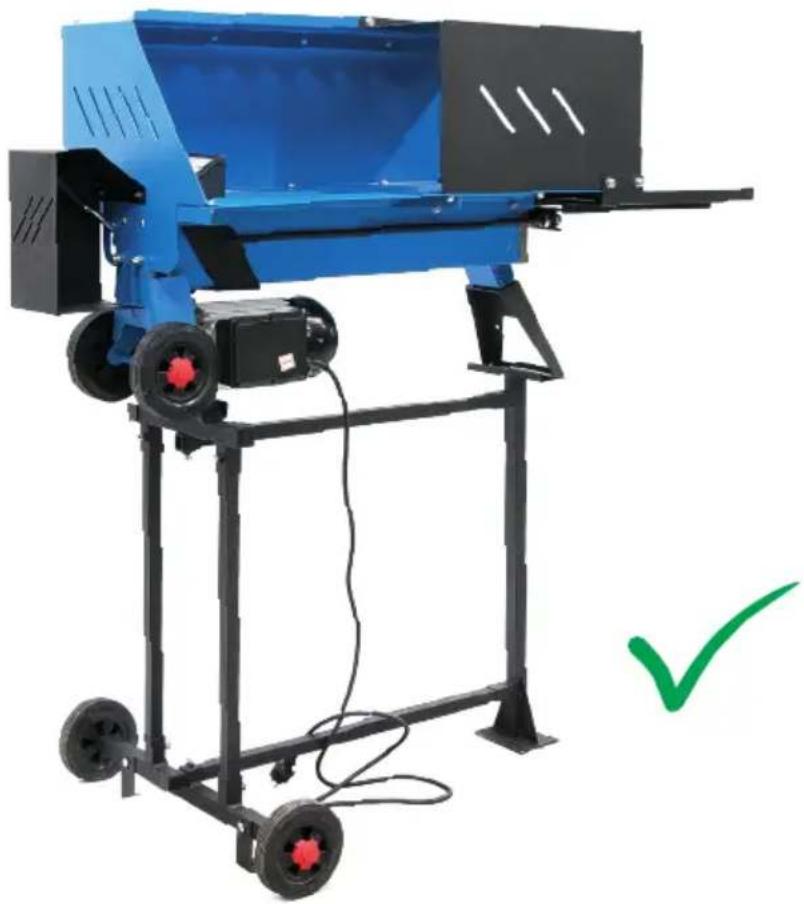
natural_image
Blue industrial machine with black wheels and a green checkmark indicating inspection (no text or symbols on the machine itself)DE Ölstand kontrollieren
GB Oil level inspection
natural_image
Blue industrial machine with wheels and a black panel, next to a green checkmark (no text or symbols on the machine itself)2
natural_image
Pure technical diagram of a mechanical or electrical component without any text, numbers, or symbols3
natural_image
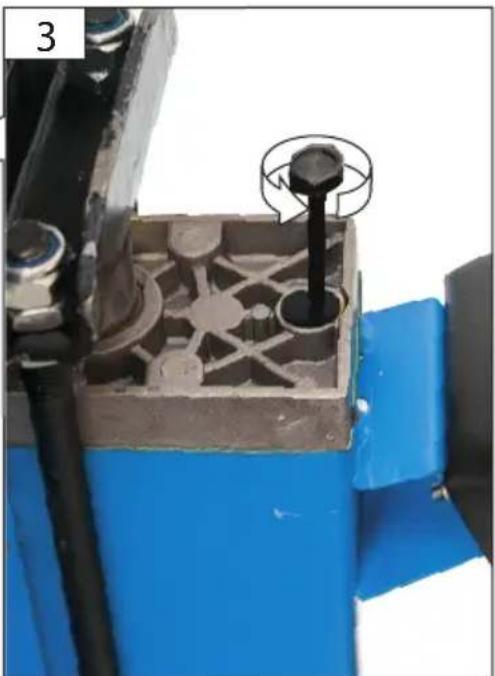
Close-up of a mechanical component with a bolt inserted into a concrete block, showing internal structure and mounting features (no text or symbols visible)4

natural_image
Illustration of a hand holding a blue cloth with a black hammer on top (no text or symbols)| DE | Ölstand kontrollieren | RO | Verificarea stării uleiului | |
| GB | Oil level inspection | |||
| FR | Contrôle du niveau d'huile | |||
| IT | Controllo livello d'olio | |||
| NL | Oliepeil controleren | |||
| CZ | Kontrola stavu oleje | |||
| SK | Kontrola stavu oleja | |||
| HU | Olajszint ellenőrzése |


natural_image
Close-up of a mechanical component with internal cavities and a highlighted cylindrical feature (no text or symbols visible)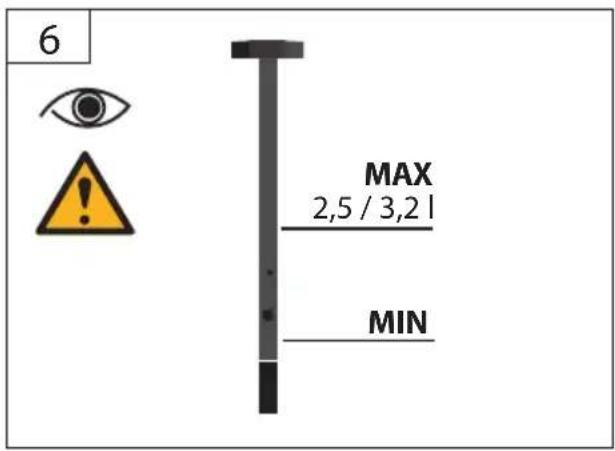
text_image
6 MAX 2,5 / 3,2 l MIN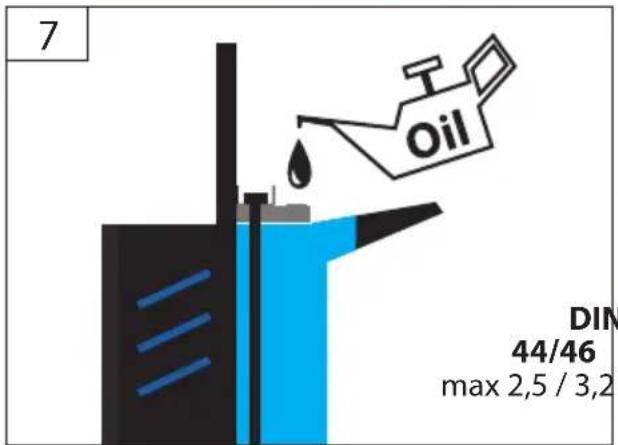
text_image
7 Oil DIN 44/46 max 2,5 / 3,2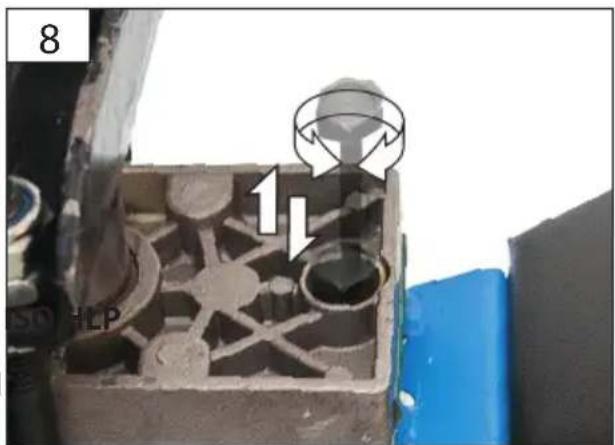
text_image
8 1 HCP
text_image
9 MAX 2,5 / 3,21 MINDE Betrieb
RO Functionare
GB Operation
FR Fonctionnement
IT Esercizio
NL Gebruik
CZ Provoz
SK Prevádzka
HU Üzemeltetés

text_image
START 3 STOP
text_image
min. 250 mm min. 50 mm max. 250 mm max. 520 / 370 mm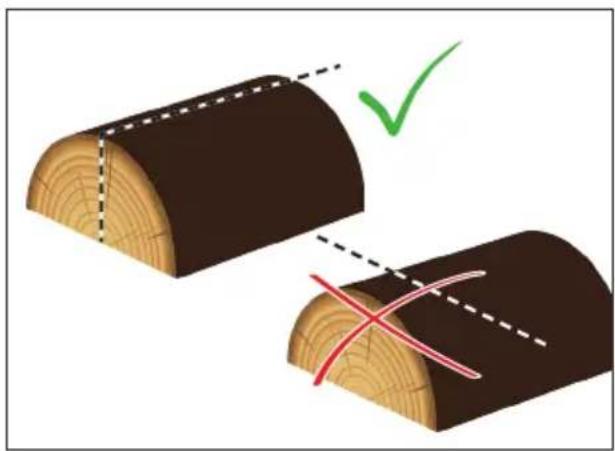
natural_image
Illustration of two wooden logs with a checkmark indicating a specific point (no text or symbols present)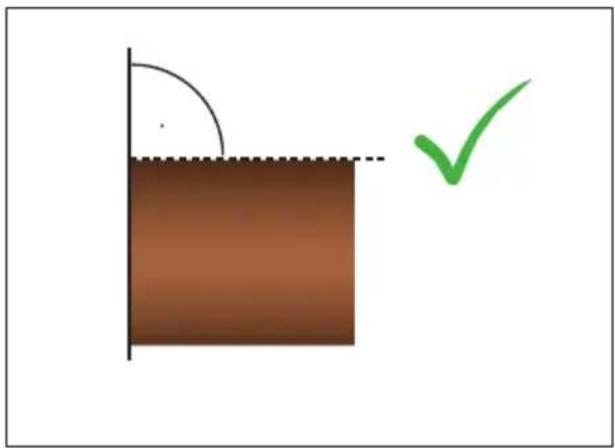
natural_image
Simple diagram showing a brown rectangle partially submerged in liquid with a curved line and a green checkmark (no text or symbols)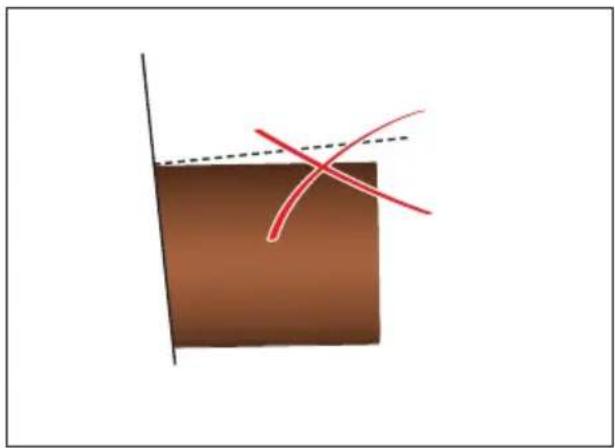
natural_image
Simple geometric diagram showing a brown square with a red X-shaped line intersecting it, and a dashed line extending from its top (no text or symbols)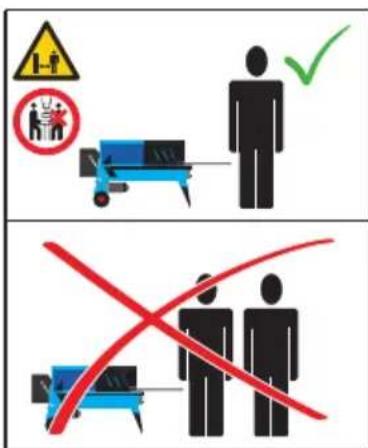
text_image
Safety warning illustration showing hazard, no gathering, and checkmark symbols for workplace safety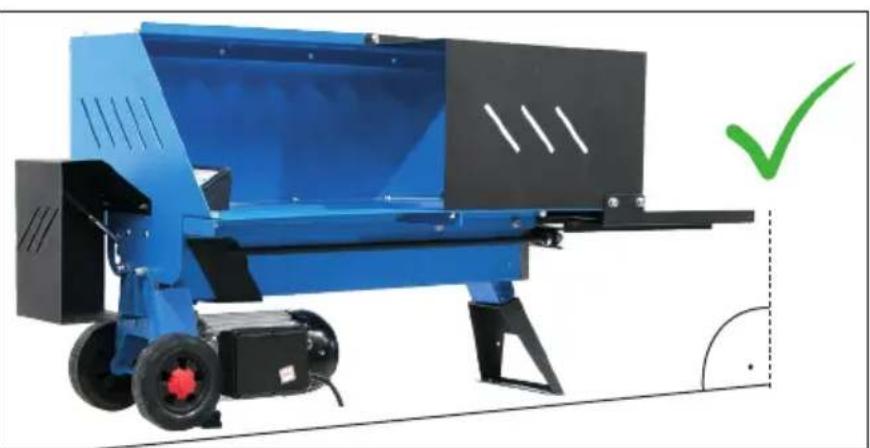
natural_image
Blue industrial machine with wheels and a black panel, no visible text or symbols | DE | Betrieb - START | RO | Functionare - START |
| GB | Operation - START | |||
| FR | Fonctionnement - START | |||
| IT | Esercizio - START | |||
| NL | Gebruik - START | |||
| CZ | Provoz - START | |||
| SK | Prevádzka - START | |||
| HU | Üzemeltetés - START |

text_image
Warning symbols including safety gear, hand gesture, knee contact, pictogram, and hazard signs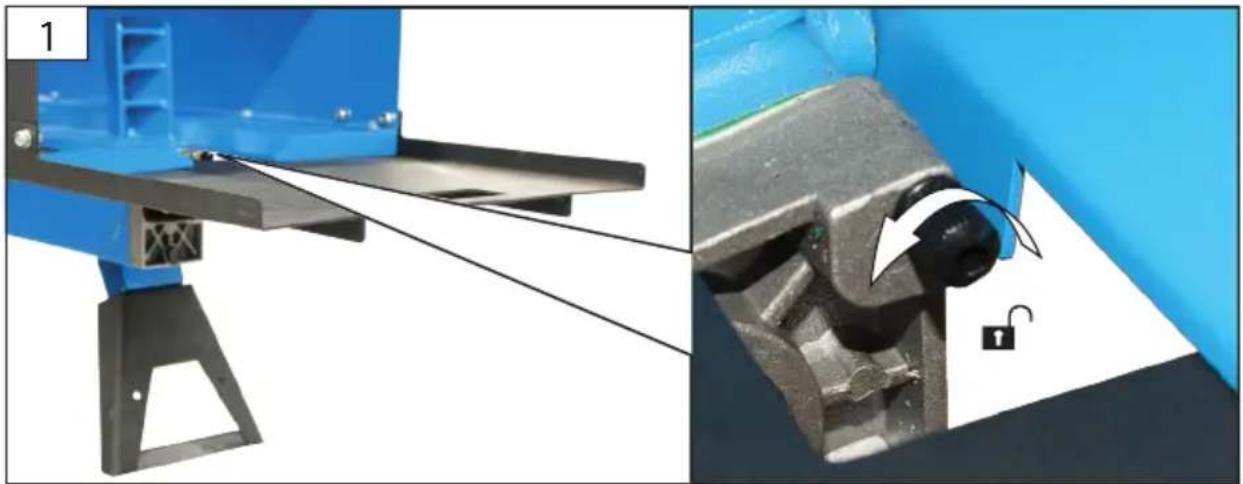
natural_image
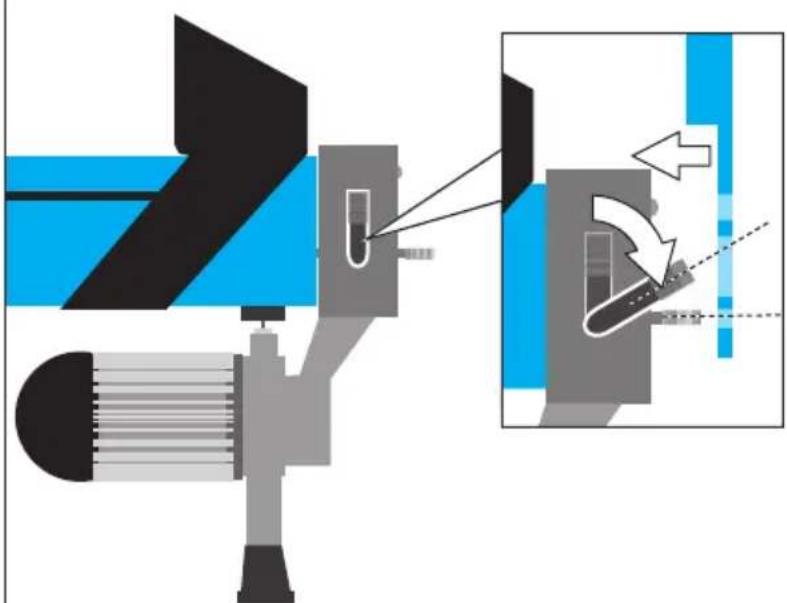
Two-panel image showing a blue industrial machine and a close-up of a mechanical component with an open lock (no text or symbols visible)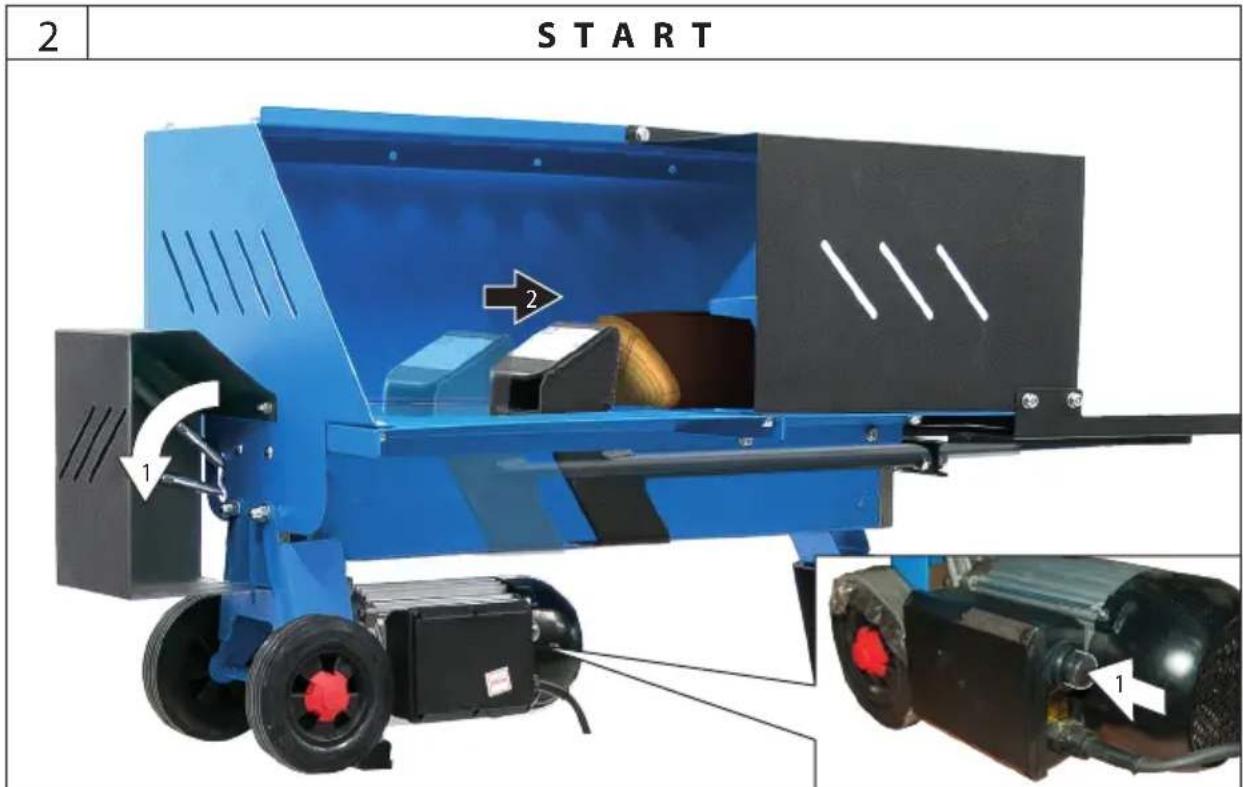
text_image
2 | START | 1 2 1DE Betrieb - STOP
RO Functionare - STOP
GB Operation - STOP
FR Fonctionnement - STOP
IT Esercizio - STOP
NL Gebruik - STOP
CZ Provoz - STOP
SK Prevádzka - STOP
HU Üzemeltetés - STOP

text_image
START 3 STOP1
STOP
natural_image
Blue industrial machine with wheels and a side panel, showing internal components and directional arrows (no text or symbols)2
natural_image
Two-panel image showing a blue industrial machine with metal components and a close-up of a mechanical component with a lock mechanism (no text or symbols visible) | DE | Betrieb | RO | Functionare |
| GB | Operation | |||
| FR | Fonctionnement | |||
| IT | Esercizio | |||
| NL | Gebruik | |||
| CZ | Provoz | |||
| SK | Prevádzka | |||
| HU | Üzemeltetés |

text_image
Warning symbols and hazard signs in Chinese, including helmet, hand gesture, foot contact, cross symbol, hand holding contact, safety warning sign, falling object, falling person, and running figure.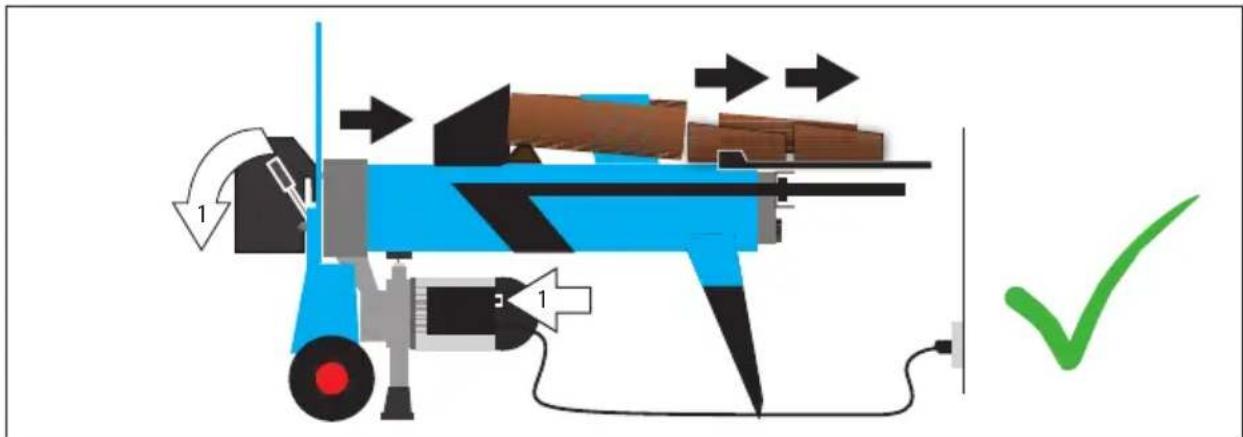
natural_image
Diagram of a mechanical device with directional arrows and a green checkmark, no readable text or symbols present.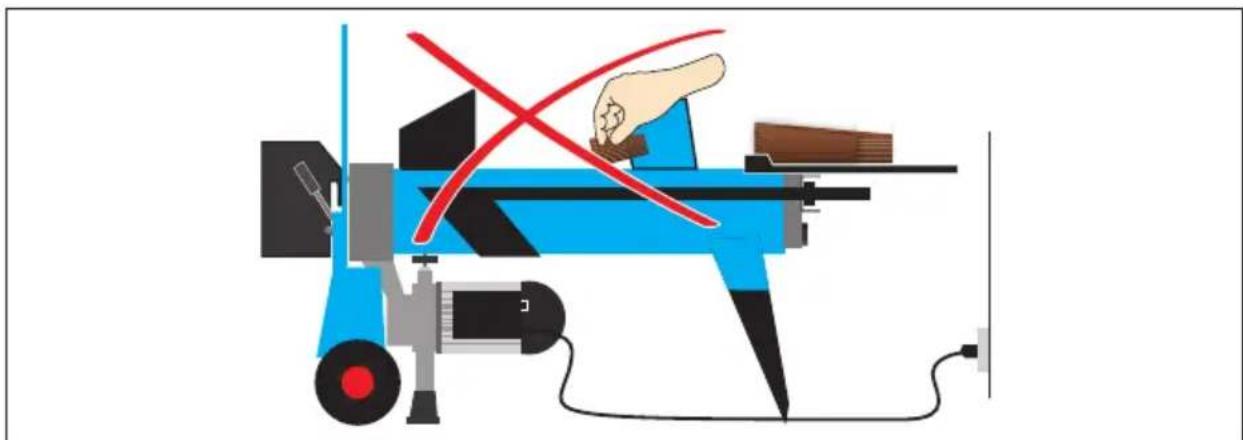
natural_image
Illustration of a blue industrial machine with a red X mark indicating a crossed-out mechanism, no text or symbols present.text_image
Diagram of a mechanical device with labeled components and directional arrows, showing a cross-shaped component and directional indicators.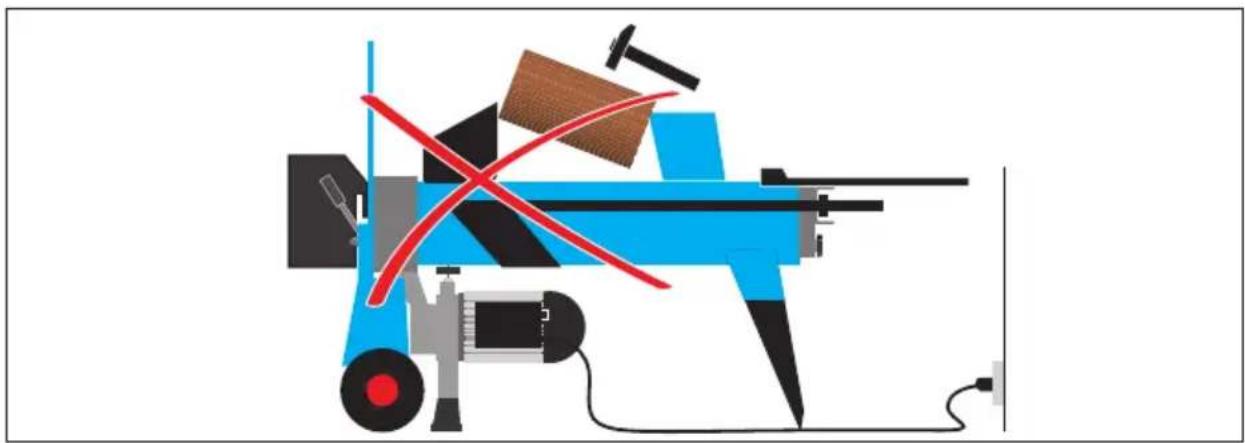
natural_image
Illustration of a blue mechanical device with a red X mark, no text or symbols present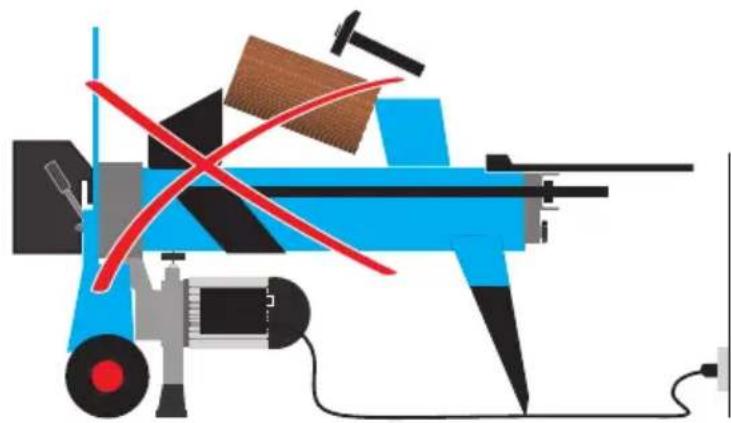
natural_image
Illustration of a blue mechanical device with red X-shaped mark, no text or symbols present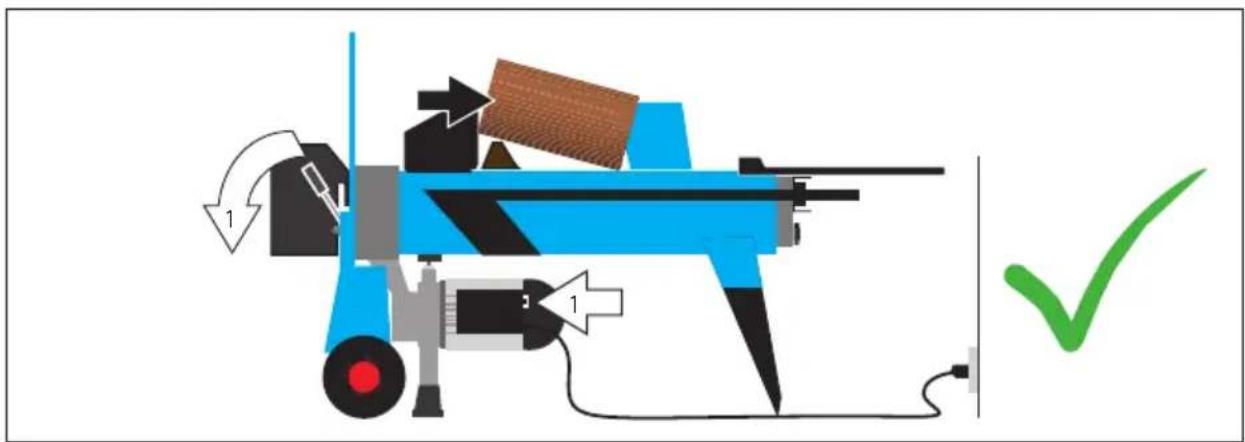
natural_image
Diagram of a mechanical device with arrows indicating motion, no text or symbols present| 4 | DE Reinigung / Wartung | RO Curățare / Întreținere |
| GB Cleaning / Maintenance | ||
| FR Nettoyage / Entretien | ||
| IT Pulizia / Manutenzione | ||
| NL Schoonmaken / Onderhoud | ||
| CZ Čištění / Údržba | ||
| SK Čistenie / Údrzba | ||
| HU Tisztítás / Karbantartás |

text_image
T10 FETT GREASE FETT GREASEGB transport / storage
FR Transport / Stockage
NL Transport / Bewaring
natural_image
Illustration of a blue and black industrial machine with a close-up view showing internal components (no text or symbols)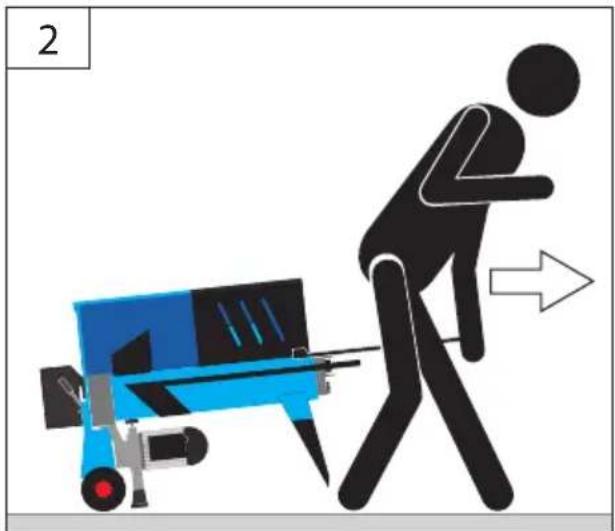
natural_image
Illustration of a person using a gun to drive a blue gun, with a small vehicle nearby (no text or symbols)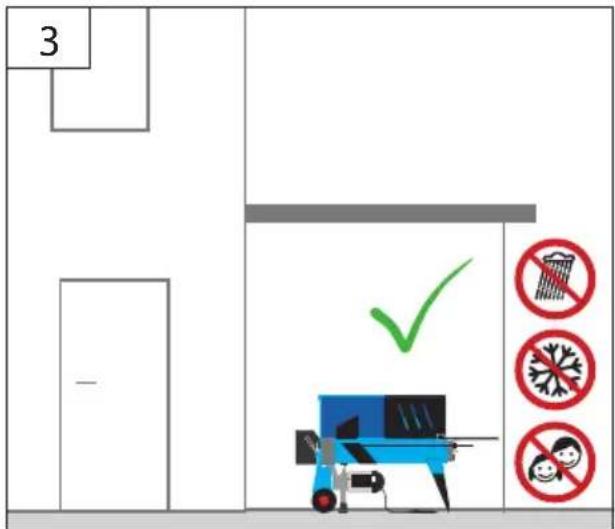
text_image
3 - ✓ No No No NoTechnische Daten
The values stated are emission values and as such do not necessarily constitute values which are safe for the workplace. Although there is a correlation between emission levels and environmental impact levels, whether further precautions are necessary cannot be derived from this. Factors in uencing the actually present environmental impact level in the workplace include the characteristics of the work area and other noise sources, i.e. the number of machines and other neighbouring work processes. The permitted workplace values can likewise vary from country to country. This information is intended to assist the user in estimating hazards and risks.
The S6-40% indicates a load profile of 4 min load and 6 min idle time


rstand the operating instructions before using the appliance. Familiarise with the
control elements and how to use the appliance properly. Abide by all the safety measures stated in the service manual. Act responsibly toward third parties.
The operator is responsible for accidents or risks to third parties.
Persons over 16 years of age can only work on the appliance. An exception includes youngsters trained in order to reach knowledge under supervision of the trainer during occupational education.
In case of any doubts about connection and operation refer please to our customer center
The operating personnel must be adequately trained in the use, adjustment and operation of the device.
Specified Conditions Of Use
The wood splitter has only been designed to split wood in the fibre direction. Respecting technical data and safety precautions.
The machine may only be used if it is fully assembled.
Operation of a machine that is not fully assembled is strictly prohibited.
The usage of horizontal log splitters without stand is only allowed on a working bench or table with a minimum height of 700 mm.
The device must not be used without the attachment tables.
It is essential to follow instructions for installation, operation, repairs, etc. to prevent hazards and damage.
Please do not forget that this machine, as designed, is not intended for industrial use.
Make sure there are no persons in the working area during operation or make sure such persons keep a sufficient safety distance.
This appliance is not intended for use by children.

The wood splitter has been designed to be operated by 1 person. The machine must never be operated by two or more
Wood splitter being operated by two persons, with one holding a piece of wood and the other controlling the clamps is strictly prohibited.
Do not use this product in any other way as stated for normal use. Not observing general regulations in force and instructions from this manual does not make the manufacturer liable for damages.
Residual risks
Dry and dried-up wood may jump up when being split and injure the face of the operator. Adequate protective clothes to be worn!
⚠ Wooden pieces produced during splitting may fall down and injure legs of the operator.
When splitting wood, parts of body may be crushed or separated due to hydraulic knife lowering.
There is a risk of branchy wood getting stuck when being split. Please be advised that wood being separated is under heavy pressure and your fingers may get squeezed in the gap.
Caution! Pieces of wood cut at the right angle to be split only! Diagonally cut pieces of wood may slip when cutting!
General Power Tool Safety Warnings WARNING Read all safety warnings and all
instructions. Failure to follow the warnings and instructions may result in electric shock, fire and/or serious injury.
Save all warnings and instructions for future reference.
The term „power tool“ in the warnings refers to your mains-operated (corded) power tool or battery-operated (cordless) power tool.
1) Safety in the place of work
a) Keep work area clean and well lit. Cluttered or dark areas invite accidents.
b) Do not operate power tools in explosive atmospheres, such as in the presence of flammable liquids, gases or dust. Power tools create sparks which may ignite the dust or fumes.
c) Keep children and bystanders away while operating a power tool. Distractions can cause you to lose control.
2) Electrical safety
a) Power tool plugs must match the outlet. Never modify the plug in any way. Do not use any adapter plugs with earthed (grounded) power tools. Unmodified plugs and matching outlets will reduce risk of electric shock.
b) Avoid body contact with earthed or grounded surfaces, such as pipes, radiators, ranges and refrigerators. There is an increased risk of electric shock if your body is earthed or grounded.
c) Do not expose power tools to rain or wet conditions. Water entering a power tool will increase the risk of electric shock.
d) Do not abuse the cord. Never use the cord for carrying, pulling or unplugging the power tool. Keep cord away from heat, oil, sharp edges or moving parts. Damaged or entangled cords increase the risk of electric shock.
e) When operating a power tool outdoors, use an extension cord suitable for outdoor use. Use of a cord suitable for outdoor use reduces the risk of electric shock.
f) If operating a power tool in a damp location is unavoidable, use a residual current device (RCprotected supply. Use of an RCD reduces the risk of electric shock.
3) Safety of persons
a) Stay alert, watch what you are doing and use common sense when operating a power tool. Do not use a power tool while you are tired or under the influence of drugs, alcohol or medication. A moment of inattention while operating power tools may result in serious personal injury.
b) Use personal protective equipment. Always wear eye protection. Protective equipment such as dust mask, non-skid safety shoes, hard hat, or hearing protection used for appropriate conditions will reduce personal injuries.
c) Prevent unintentional starting. Ensure the switch is in the off-position before connecting to power source and/or battery pack, picking up or carrying the tool. Carrying power tools with your finger on the switch or energising power tools that have the switch on invites accidents.
d) Remove any adjusting key or wrench before turning the power tool on. A wrench or a key left attached to a rotating part of the power tool may result in personal injury.
e) Do not overreach. Keep proper footing and balance at all times. This enables better control of the power tool in unexpected situations.
f) Dress properly. Do not wear loose clothing or jewellery. Keep your hair, clothing and gloves away from moving parts. Loose clothes, jewelle-
ry or long hair can be caught in moving parts.
g) If devices are provided for the connection of dust extraction and collection facilities, ensure these are connected and properly used. Use of dust collection can reduce dust-related hazards.
4) Use and treatment of electric tools
a) Do not force the power tool. Use the correct power tool for your application. The correct power tool will do the job better and safer at the rate for which it was designed.
b) Do not use the power tool if the switch does not turn it on and off. Any power tool that cannot be controlled with the switch is dangerous and must be repaired.
c) Disconnect the plug from the power source and/or the battery pack from the power tool before making any adjustments, changing accessories, or storing power tools. Such preventive safety measures reduce the risk of starting the power tool accidentally.
d) Store idle power tools out of the reach of children and do not allow persons unfamiliar with the power tool or these instructions to operate the power tool. Power tools are dangerous in the hands of untrained users.
e) Maintain power tools. Check for misalignment or binding of moving parts, breakage of parts and any other condition that may affect the power tool's operation. If damaged, have the power tool repaired before use. Many accidents are caused by poorly maintained power tools.
f) Keep cutting tools sharp and clean. Properly maintained cutting tools with sharp cutting edges are less likely to bind and are easier to control.
g) Use the power tool, accessories and tool bits etc. in accordance with these instructions, taking into account the working conditions and the work to be performed. Use of the power tool for operations different from those intended could result in a hazardous situation.
5) Service
a) Have your power tool serviced by a qualified repair person using only identical replacement parts. This will ensure that the safety of the power tool is maintained.
Safety Instructions
Using the wood splitter may lead to some hazards. Therefore, the machine may only be handled by instructed and experienced persons.
Wear suitable protective clothing such as sturdy shoes with non-slip sole, robust long trousers, gloves, safety glasses and hearing protection! Do not wear loose clothing or jewels. Hear, clothing and gloves must be out of reach of moving parts as they could get caught by the rotating parts. Do not use the appliance when barefooted or in open sandals. In the event of a blockage, switch off the machine immediately. Disconnect the power plug and remove the jammed piece of wood.
Mains Connection
⚠ WARNING! Electric shock! There is a risk of an injury caused by electric shock!
Operation is only allowed with a safety switch against stray current (RCD max. stray current of 30mA).
Check the voltage. Technical data given on the type label must correspond with electric network voltage.
Insert the plug of the electrical cable in a socket of suitable shape, voltage and frequency complying with current regulations.
Pursuant to the provisions of „CE“ professional associations, etc., all splitters are fitted with an undervoltage release in the switch. This will prevent accidental repeated starting in case of current interruption due to power failure, accidental unplugging, defective fuse, etc. The machine must necessarily be turned on again by repeated pressing of the green switch.
Wilful holding or blocking of the switch, unless being a neutral, will automatically lead to switch failure. The warranty will not apply in such a case that must naturally be checked.
Work preparation
Before putting the machine into operation, working of the safety guards (two-lever operation system, in particular) must be checked.
Carry out a visual inspection before switching the appliance on.
- Proper function of the on and off button, incl. the emergency switch.
- Before starting work, check hydraulic lines and hoses for leaks.
- Check especially the safety equipment, electrical control elements, power lines and screw couplings for any damage and if they are tightened appropriately.
The appliance must not be used if damaged or safety equipment is defective. Replace any worn-out and damaged parts.
Working area
For safe wood splitting, it is essential that the working area is flat and slip-resistant and that a sufficient space for moving is provided. To take the wood splitter to your home, it is necessary there are no obstacles in the way, i.e. no risk of tripping. Adequate lighting of the working area needs to be provided.
When being operated, the machine must stand on a horizontal and flat surface and the floor around the machine must be flat, well-maintained and with no waste, such as sawdust and cuttings.
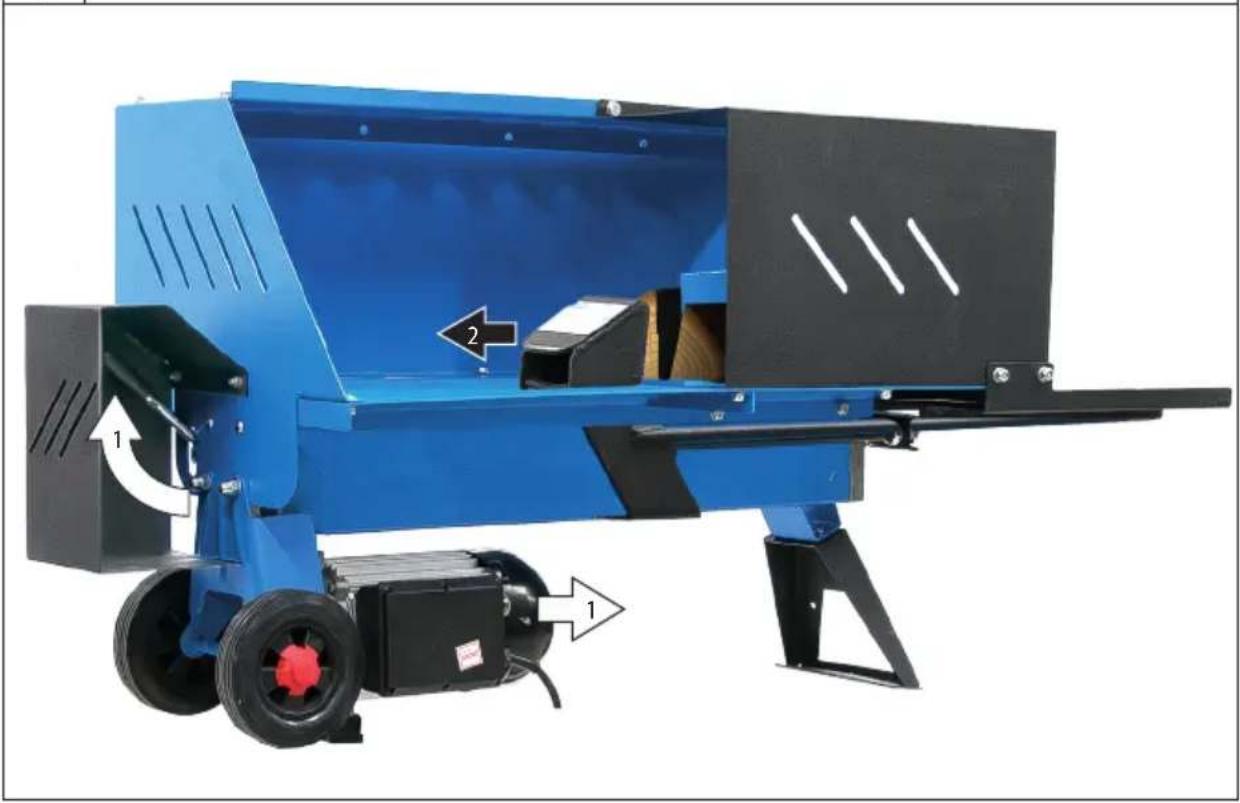
Operation

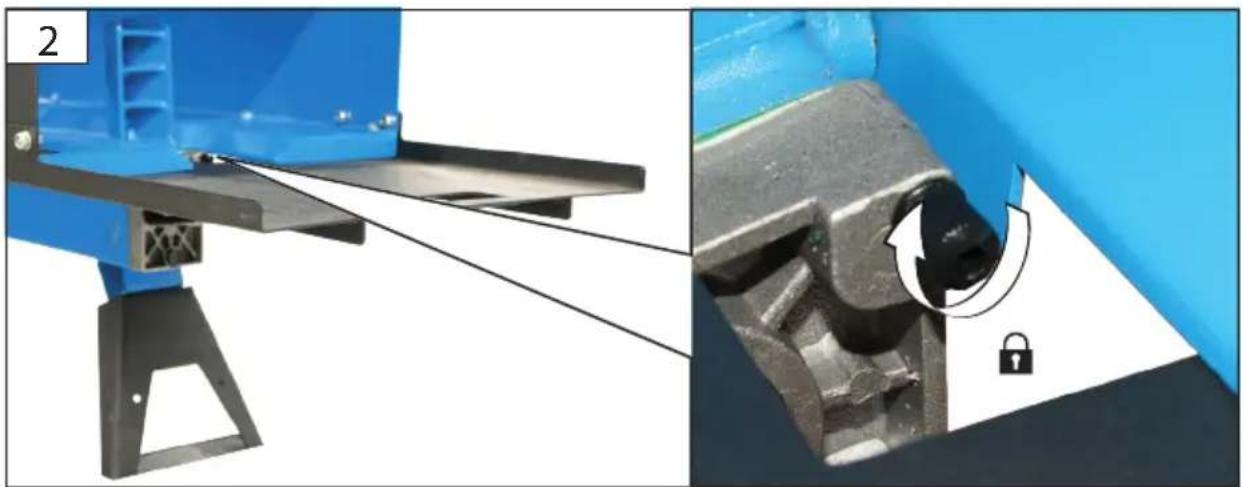
Open the air vent screw!
When splitting intergrown wood, trunk sections of irregular shape, etc., there may be risks of parts being thrown out, blocked or crushed.
Never reach into the gap area.
Power supply must be interrupted by pressing the red button on the switch and unplugging the machine for any repair or servicing work or when leaving the wood splitter. Turning to the Off position is not enough to interrupt the power supply.
Handling equipment to be used only when handling the machine. Make sure the device cannot roll away, fall over or tip over with suitable fastening devices.
The machine must be secured to the ground with suitable fasteners. (e.g. ground nails)
The machine may only be used if it is fully assembled. Operation of a machine that is not fully assembled is strictly prohibited.
Emergency procedure
Conduct a first-aid procedure adequate to the injury and summon qualified medical attendance as quickly as possible. Protect the injured person from further harm and calm them down. If you seek help, state the following pieces of information: 1. Accident site, 2. Accident type, 3. Number of injured persons, 4. Injury type(s)
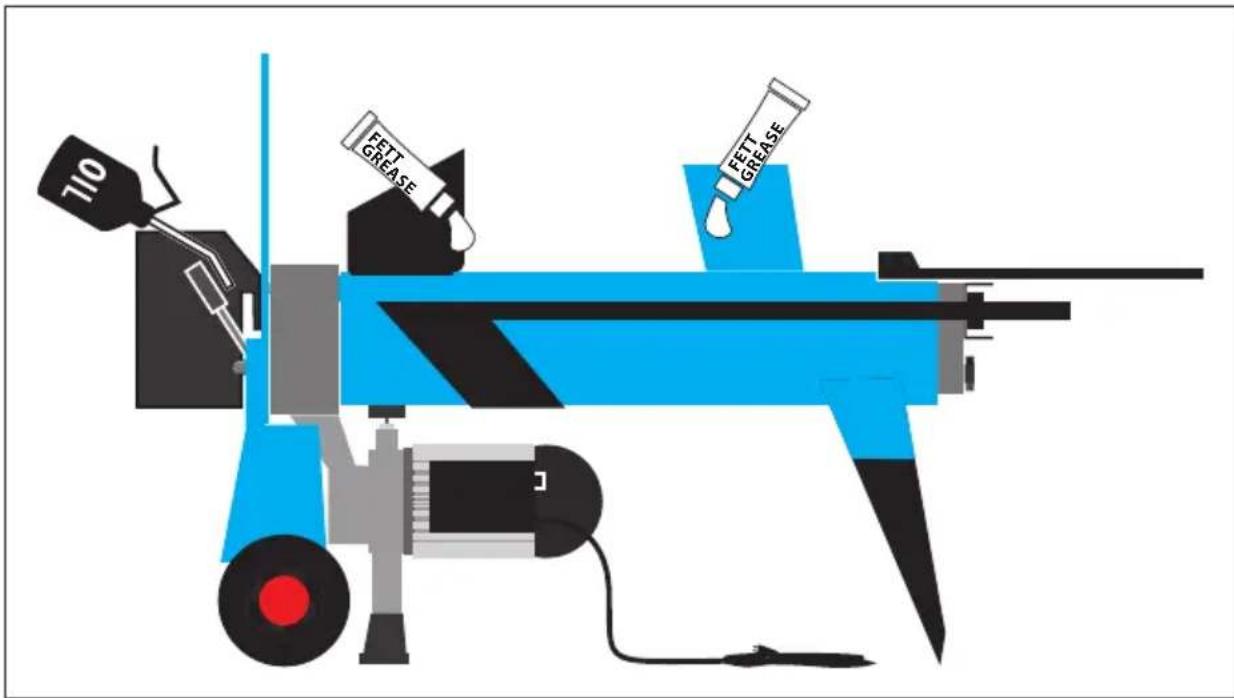
Maintenance

Unplug the machine before any work on it.
Switch off the apparatus, disconnect it from mains by unplugging and allow it to cool down before setting up, retrofitting, cleaning, performing maintenance, storing or transporting the apparatus.
The hydraulic hoses and connections must be checked if tight enough after app. 4 hours of operation and tightened if necessary.
If the device is defective, the repair has to be made exclusively by the customer service.
Use only original accessories and original spare parts.
If necessary, a list of spare parts can be found at www.guede.com.
Never clean the machine and its components with solvents, flammable or toxic liquids. Us only a damp cloth making.
Only a regularly maintained and treated appliance can serve as a satisfactory aid. Insufficient maintenance and care can lead to unforeseen accidents and injuries.
Disposal
Any damaged or disposed devices must be delivered to appropriate collection centres.
The device contains hydraulic fluid. Hydraulic fluids pose a hazard to groundwater. Uncontrolled draining or improper disposal is punishable by law.
Symbols

CAUTION! WARNING

WARNING! Read the Operating Instructions

Caution!
Unplug the machine before any servicing or repair!

Wear eye protective goggles!
Wear ear protectors!

Safety gloves to be used!

Wear safety shoes with steel reinforcement!

Use of crane
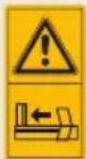
Caution! Moving parts of the machine!
Danger! Keep away from moving machine parts!

To be operated by 1 person only!

Do not touch in the splitting area!

Protect against humidity. Never expose tool to rain.

Remove all undesirable items, e.g. nails and wire, before working
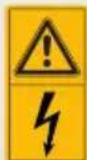
Dangerous voltage

Warning against hand injuries

Warning against thrown-off items
Keep distance of persons
Observe to keep out of dangerous zone

Rotation direction

2 people are needed for implementation.
Any damaged or disposed devices must be delivered to appropriate collection centres.

Open the air vent screw!
Guarantee
Warranty period of 12 months applies to commercial use and 24 months applies to private use and commences on the day of purchase of the device.
Warranty applies exclusively to failures due to defective material or workmanship. An original sale slip with indication of date of sale must be presented in case of claiming for the warranty rights.
Warranty does not cover unprofessional use such as device overload, violent use, damage caused by third party or foreign materials, failure to comply with operations and assembly manual, and normal wear and tear.
Important information for the customer
Please be sure to know that returning the product in or after the warranty period must be made in the original packaging.
Service
Do you have any technical questions? Any claim? Do you need any spare parts or operating instructions? We will quickly help you and without needles bureaucracy at our web pages at www.guede.com in the Servicing part. Please help us be able to help you. In order to identify your device in case of claim we need the serial No., product No. and year of production. All this data can be found on the type label.
Tel.: +49 (0) 79 04 / 700-360
Fax: +49 (0) 79 04 / 700-51999
E-Mail: support@ts.guede.com
Failure removal
| Failures Causes Removal | ||
| Engine does not start No power in the socket Check the fuse | ||
| Defective electric extension cable Pull the plug out, check it, replace it | ||
| Wrong connecting cable 5-wire connection at 2.5 mm2 cross section | ||
| Defective condenser switch Have the machine checked by a professional electrician | ||
| Splitting knife is not moving Adjust the two-hand control and starting levers | Defective control valve - to be replaced in a service centre only | |
| Few hydraulic oil Hydraulic oil to be added | ||
| Trigger is bent; hydraulic piston on the valve is not fully seated | Check all screws on the triggerAdjust the trigger so that the hydraulic piston on the valve is fully seated | |
| Wood has many knobs and the splitting knife is getting stuck | Lubricate the splitting knife | |
| Hydraulic pump is whistling, splitting knife running jerkily | Oil loss, bottom contamination Tighten the screws hose Replace the | |
| Few hydraulic oil Hydraulic oil to be added | ||
OPGELET! WAARSCHUWING

Translation of the EC-Declaration of Conformity
We, hereby declare the conception and construction of the below mentioned appliances correspond - at the type of construction being launched - to appropriate basic safety and hygienic requirements of EC Directives.
In case of any change to the appliance not discussed with us the Declaration expires.
Notified Body Name: No: Adress:
Type Ex. Cert.-No.:
97/68/EC_ & 2016/1628/EU
Emission No.:
2000/14/EC_2005/88/EC