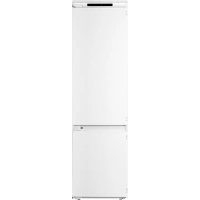
FGCBB193 - Fridge Infiniton - Free user manual and instructions
Find the device manual for free FGCBB193 Infiniton in PDF.



| Product type | Refrigerator with freezer compartment |
| Brand | Infiniton |
| Model | FGCBB193 |
| Dimensions (H x W x D) | 1772 x 540 x 711 mm (approx., depending on model RIB291/RIB312) |
| Power supply | 220-240 V ~ 50 Hz, earthed plug |
| Climate class | N to ST (ambient temperature +16°C to +38°C) |
| Control panel | Electronic with display, buttons Temp, Super Cool, Alarm, Power |
| Super Cool function | Rapid cooling of food, stops after 3 hours |
| Open door alarm | Triggers after 2 minutes, stops by Alarm button |
| Defrost | Automatic for refrigerator and freezer compartments |
| Interior lighting | LED (not user-replaceable, contact customer service) |
| Capacity (estimate) | Approximately 250-300 L (not exactly specified) |
| Shelf material | Glass, plastic or metal depending on model |
| Child safety | Use possible by children ≥8 years under supervision; packaging out of reach |
| Refrigerant gas | R600a (isobutane), flammable |
| Door reversal | Possible: change from right to left opening (tools provided not included) |
| Maintenance and cleaning | Internal cleaning with warm soapy water; do not use sharp objects |
| Repairability | LED lamp not user-replaceable; other repairs by approved professional |
| General information | Compliant with European directives LVD 2014/35/EU, EMC 2014/30/EU, 2009/125/EC, 2011/65/EU, EU 1060/2010 |
Frequently Asked Questions - FGCBB193 Infiniton
User questions about FGCBB193 Infiniton
0 question about this device. Answer the ones you know or ask your own.
Ask a new question about this device
Download the instructions for your Fridge in PDF format for free! Find your manual FGCBB193 - Infiniton and take your electronic device back in hand. On this page are published all the documents necessary for the use of your device. FGCBB193 by Infiniton.
USER MANUAL FGCBB193 Infiniton
Before operating this unit, please read this manual thoroughly, and retain for future reference
Contents
Safety and warning information 2
Description of the appliance 8
Electronic control 8
First use and installation 10
Daily use 12
Helpful hints and tips 13
Cleaning and care 14
Troubleshooting 15
Reverse the door 17
Disposal of the appliance 18
CE This appliance is in accordance with the following EU guidelines : LVD 2014/35/EU and EMC 2014/30/EU and 2009/125/EC and 2011/65/EU and EU 1060/2010.

Safety and warning information
For your safety and correct usage, before installing and first using the appliance, read this user manual carefully, including its hints and warnings. To avoid unnecessary mistakes and accidents, it is important to make sure that all people using the appliance are thoroughly familiar with its operation and safety features. Save these instructions and ensure that remain them with the appliance if it is moved or sold, so that anyone using it throughout its life, will be properly informed on its usage and safety notices. For the safety of life and property, keep the precautions of these user's instructions as the
manufacturer is not responsible for damages caused by omission.
Safety for children and others who are vulnerable people
-
This appliance can be used by children aged from 8 years and above, and persons with reduced physical, sensory or mental capabilities or lack of experience and knowledge if they have been given supervision or instruction concerning use of the appliance in a safe way and understand the hazards involved. Children shall not play with the appliance. Cleaning and user maintenance shall not be made by children without supervision.
-
Keep all packaging away
from children as there is risk of suffocation.
- If you are discarding the appliance, pull the plug out of the socket, cut the connection cable (as close to the appliance as you can) and remove the door to prevent children playing from suffering an electric shock or closing themselves inside.
- If this appliance, featuring a magnetic door seals, is to replace an older appliance having a spring lock (latch) on the door or lid, be sure to make the spring lock unusable before you discard the old appliance. This will prevent it from becoming a death trap for a child.
General safety
WARNING - This appliance is intended
to be used in households and similar applications such as
- staff kitchen areas in shops, offices and other working environments;
- farm houses and by clients in hotels, motels and other residential type environments;
- bed and breakfast type
environments; -catering and similar nonretail applications
- WARNING — Do not store explosive substances such as aerosol cans with a flammable propellant in this appliance.
- WARNING — If the supply cord is damaged, it must be replaced by the manufacturer, its service agent or similarly qualified persons in order to avoid a hazard.
- WARNING — Keep ventilation openings, in the appliance enclosure or in the built-in structure, clear of obstruction.
- WARNING — Do not use mechanical devices or other means to accelerate the defrosting process, other than those recommended by the manufacturer.
- WARNING — Do not damage the refrigerant circuit.
-
WARNING — Do not use electrical appliances inside the food storage compartments of the appliance, unless they are of the type recommended by the manufacturer.
-
WARNING — The refrigerant and insulation blowing gas are flammable. When disposing of the appliance, do so only at an authorized waste disposal centre. Do not expose to flame.
- WARNING — To avoid a hazard due to instability of the appliance, it must be fixed in accordance with the instructions.
Refrigerant
The refrigerant isobutene (R600a) is contained within the refrigerant circuit of the appliance, a natural gas with a high level of environmental compatibility, which is nevertheless flammable. During transportation and installation of the appliance, ensure that the tubing of the refrigerant circuit is not damaged The refrigerant (R600a) is flammable.
Caution:risk of fire
If the refrigerant circuit is damaged:
- Avoid naked flames and ignition sources.
- Thoroughly ventilate the room in which the appliance is situated. It is dangerous to alter the specifications or modify this product in any way. Any damage to the cord may cause a shortcircuit, fire, and/or electric shock.
Electrical safety
- The power cord must not be lengthened.
- Make sure that the power plug is not corroded damaged. A corroded damaged power plug may overheat to cause a fire.
- Make sure that you can access the main plug of the appliance.
- Do not pull the main cable.
- If the power plug socket is loose, do not insert the power plug. There is a risk of electric shock or fire.
- You must not operate the appliance without the interior lighting lamp cover.
- The fridge is only applied with power supply of single phase alternating current of 220 240V / 50Hz . If fluctuation of voltage in the district of user is so large
that the voltage exceeds the above scope, for safety sake, be sure to apply A.C. Automatic voltage regulator of more than 350W to the fridge. The fridge must employ a special power socket instead of common one with other electric appliances. Its plug must match the socket with ground wire.
Daily use
- Do not store flammable gass or liquids in the appliance. Risk of explosion!
- Do not operate any electrical appliances in the appliance (e.g.electric ice cream makers, mixers etc.).
- When unplugging always pull the plug from the mains socket, do not pull on the cable.
- Do not place hot items near the plastic components of this appliance.
- Store pre-packed frozen food in accordance with the frozen food manufacture's instructions.
The appliances manufactures storage
recommendations should be strictly adhered to. Refer to relevant instructions for storage.
- Do not place carbonated or fizzy drinks in the freeze compartment as it creates pressure on the container, which may cause it to explode, resulting in damage to the appliance.
- Frozen food can cause frost burns if consumed straight from the freezer compartment.
- Do not place the appliance in direct sunlight.
- Keep buring candles, lamps and other items with naked flames away from the appliance so that do not set the appliance on fire.
- The appliance is intended for keeping food stuff and/or beverages in normal household as explained in this instruction booklet. The appliance is heavy. Care should be taken when moving it.
-
Do not remove or touch items from the freezer compartment if your hands are damp/wet, as this could cause skin abrasions or frost/freeze burns.
-
Never use the base, drawers, doors etc. to stand on or as supports.
- Frozen food must not be refrozen once it has been thawed out.
- Do not consume ice popsicles or ice cubes straight from the freezer as this can cause freezer burn to the mouth and lips.
- To avoid items falling and causing injury or damage to the appliance, do not overload the door racks or put too much food in the crisper drawers.
- Never cover or obstruct the ventilation slats on the appliance.
Caution!
Care and cleaning
- Before maintenance, switch off the appliance and disconnect the mains plug from the mains socket.
- Do not clean the appliance with metal objects, steam cleaner, ethereal oils, organic solvents or abrasive cleansers.
- Do not use sharp objects to remove frost from the appliance. Use a plastic scraper.
Installation Important!
- For electrical connection carefully, follow the instructions given in this manual.
- Unpack the appliance and check if there are damages on it. Do not connect the appliance if it is damaged.
Report possible damages immediately to the place you bought it. In this case retain packing. - It is advisable to wait at least four hours before connecting the appliance to allow the oil to flow back in the compressor.
- Adequate air circulation should be around the appliance, lacking this leads to overheating. To achieve sufficient ventilation, follow the instructions relevant to installation.
- Wherever possible the back of the product should not be too close to a wall to avoid touching or catching warm parts (compressor, condenser) to prevent the risk of a fire, follow the instructions relevant to installation.
-
The appliance must not be locate close to radiators or cookers.
-
Make sure that the mains plug is accessible after the installation of the appliance.
Service
- Any electrical work required to do the servicing of the appliance should be carried out by qualified electrician or competent person.
- This product must be serviced by an authorized Service Center, and only genuine spare parts must be used.
1) If the appliance is Frost Free.
2) If the appliance contains freezer compartment.
Description of the appliance
View of the appliance
- Electronic control
- Storage shelves
- Bottle rack
- Vegetable drawer cover
- Vegetable drawer
- Freezer drawers
- Freezer glass
- Upper rack
9.Middle rack - Lower rack
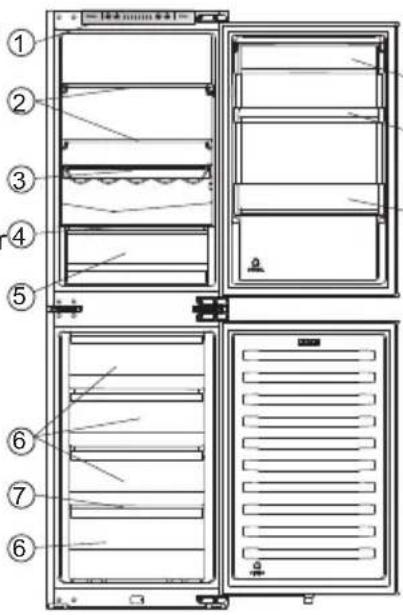
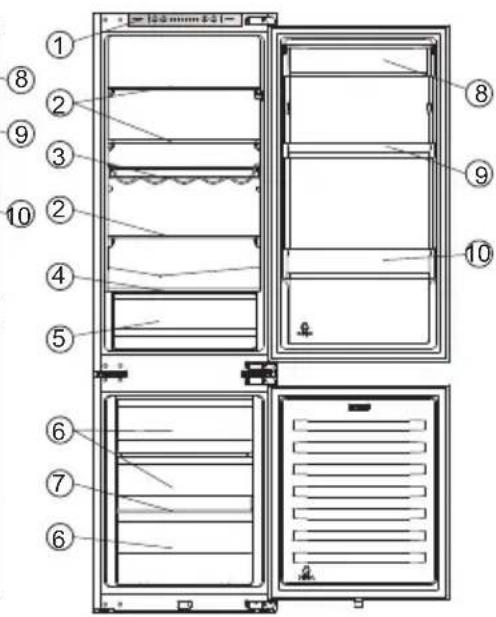
RIB291 RIB312
Note: Due to constant modification of our products, your refrigerator may be slightly different from this Instruction Manual, but its functions and using methods remain the same.
Note: To get the best energy efficiency of this product, please place all shelves, drawer and baskets on their original position as the Instruction Manual.
Electronic Control
All functions and controls of the unit are accessible from a control panel conveniently located on the roof of the cabinet. A display circuit board allows easy configuration of features and settings in a simple and intuitive manner.
Important!
When the refrigerator is energized, all the pilot lights will turn on for 3 sec and you will also heard a long sound of "beep". The display board consists of four buttons and eight pilot lights. You will heard a short sound of "beep" when you press the buttons.
Controlling the temperature
To ensure the normal operation of the refrigerator, we recommend that when you start your refrigerator for the first time, the temperature for the refrigerator is set to 5^
However, the exact setting should be chosen keeping in mind that the temperature inside the appliance depends on:
- room temperature
- how often the door is opened
quantity of food stored - appliance location

Electronic Control (located at the top of appliance)
1.Temp
Press "Temp" button to set fridge temperature between 8 and 2 as needed, and ^ C
the light of the comparable temperature will be lighten corresponding values according to the following sequence.

Note!
Settings may be made from 2 to 8. You will obtain a colder fridge temperature and a lower freezer temperature by adjusting "Temp" towards 2 position:
Coldest setting: 2^
Warmest setting: 8 °C.
A medium setting is generally the most suitable.
2. Super Cool

"Super Cool" can refrigerate the food quicker and keep food fresh for a long period.
-
Press "Super Cool" button to activate the super cool function. The Super icon will light up and the fridge temperature indicator will display 2^ . Super cool automatically switches off after 3 hours.
-
When super cool function is on, you can switch off super cool function by pressing "Super Cool" or "Temp" button, then the fridge temperature setting or function mode will revert back to the previous setting.
3. Alarm
In case of alarm, "Alarm" icon will light up and a buzzing sound will start.
Press "Alarm" button to stop alarm and buzzing then "Alarm" icon will turn off.
Door Alarm
The alarm light on and a buzzing sound indicate abnormal conditions, such as accidentally a door left open.
Leaving the door of refrigerator open for over 2 minutes will activate a door alarm and buzzer. The buzzer will beep 3 times per minute for 10 minutes. Closing the door cancels the door alarm and buzzer.
To save energy, please avoid keeping the door open for a long time when using refrigerator.
4. Power
If you want to stop using it, you can turn the appliance off by pressing "Power" button.
- When the refrigerator is working, you can switch the appliance off by pressing "Power" button for above 3 seconds, meanwhile the display panel will be turned off.
Important! Do not store any food in the fridge during this time. If you will not use the refrigerator for a long time, please pull the plug.
- When the appliance is power off, you can switch the appliance on by pressing "Power" button for 1 second, and the refrigerator returns to previous temperature setting.
First use and installation
Built-In Fridge Freezer
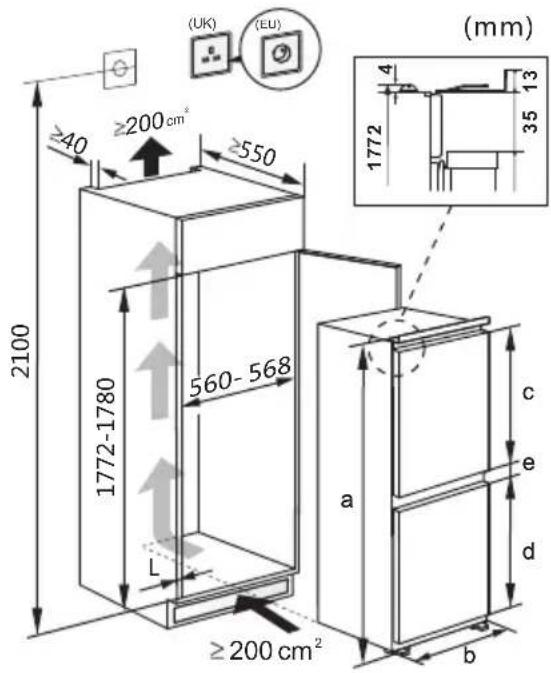
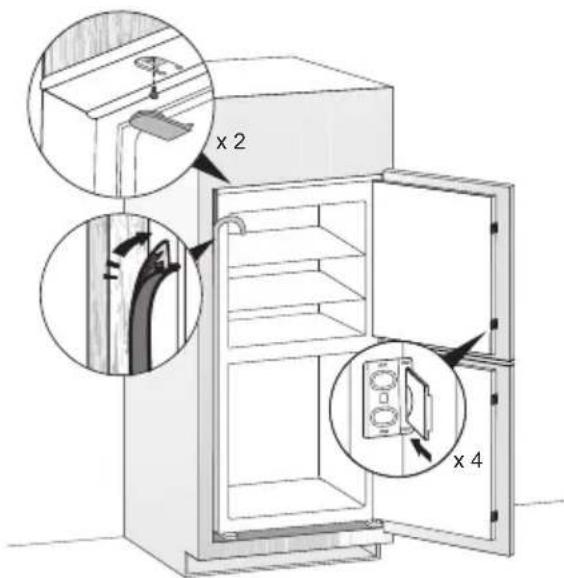
Technical characteristics
a Height
b Width
c Refrigerator door height
d Freezer door height
e Profundity
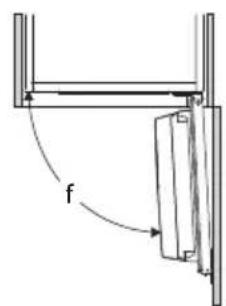
Door-opening angle
| Parameters of appliance | a | b | c | d | e | f |
| RIB291 | 1772 | 540 | 811 | 8 | 11 71 | |
| RIB312 | 1772 | 540 | 990 | 632 | 71 |
Note: Your product is designed and built for domestic household use only. The product must be correctly installed, located and operated in accordance with the instructions contained in the User Instructions provided.
Note: Parameters provided in table are design parameters. Because of the various reasons, there will be a slight deviation between actual dimension and design parameter. The data listed are only for reference.
Cleaning before use
- Before using the appliance for the first time, wash the interior and all internal accessories with lukewarm water and neutral soap in order to remove the typical smell of a brand new product, then dry thoroughly.
Installation Positioning
Warning! Before installing, read the instructions carefully for your safety and the correct operation of the appliance.
- Position the appliance away from sources of heat such as stoves, radiators, direct sunlight, etc.
Maximum performance and safety are guaranteed by maintaining the correct indoor temperature for the class of unit concerned, as specified on the rating plate.
This appliFeesNwtd Srom The appliance may not work properly if it is left for a longer period at a temperature above or below the indicated range.
Important! It is necessary to have good ventilation around the refrigerator to allow for the dissipation of heat, high efficiency, and low power consumption. For this reason, sufficiently cleared space should be available around the refrigerator
| Climate class | Ambient temperature |
| SN | +10°C to +32°C |
| N | +16°C to +32°C |
| ST | +16°C to +38°C |
| T | +16°C to +43°C |
Leveling
The appliance should be level in order to eliminate vibration. To make the appliance level, it should be upright and adjusters should be in stable contact with the floor. Also adjust the level by unscrewing the appropriate level adjustment in the front (use your fingers or a suitable spanner).
Electrical connection
Caution! Any electrical work required to install the appliance should be carried out by a qualified or person(authorized
Warning! This appliance must be grounded. The manufacturer declines any liability should these safety measures not be observed.
Daily use
Accessories 1) Movable shelves/trays
- Various glass, plastic storage shelves or wire trays are included with your appliance. Different models have different combinations and different models have different features.
The walls of the refrigerator are equipped with a series of runners so that the shelves can be positioned as desired.
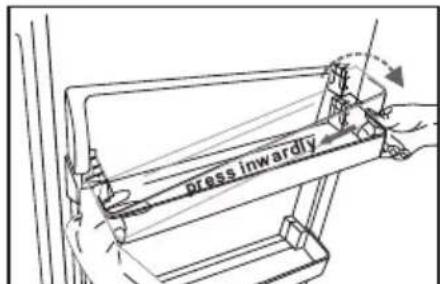
Positioning the door racks
- To permit the storage of food packages of various sizes, the door racks can be placed at different heights.
To agjauctally pull the rack in the direction of the arrows until it comes free, then reposition as required.

Remove the door rack
Install the door rack
VegetableDrawer
For storing fruit and vegetables. FreezerDrawer
For storing frozen food.
Ice-cube tray
- For making ice and storing ice-cubes.
Refrigerator compartment 2)
- For storing food that does not need to be frozen and different sections suitable for different kinds of food.
Freezer food compartment 2)
- For freezing fresh food and storing frozen and deep-frozen food for long periods of time.
Thawing food 2)
- In the refrigerator compartment.
- At room temperature.
In a microwave oven.
In a conventional or convection oven. - Food once thawed should be re-frozen with the exception of special cases.
1) If the appliance contains related accessories and functions.
2) If the appliance contains a freezer compartment.
Helpful hints and tips
Noises during operation
Clicks- Whenever the compressor switches on or off, a click can be heard.
Humming- As soon as the compressor is in operation, you can hear it humming.
Bubbling- When refrigerant flows into thin tubes, you can hear bubbling or splashing noises.
Splashing- Even after the compressor has been switched off, this noise can be heard for a short time.
Energy saving tips
- Do not install the appliance near stoves, radiators or other sources of warmth.
- Keep the time the appliance is open to a minimum.
- Do not set the temperature colder than necessary.
- Make sure the side plates and back plate of the appliance are at some distance from the wall, and follow the instructions relevant to installation.
- If the diagram shows the correct combination for the drawers, crisper and shelves, do not adjust the combination as it would produce an effect on energy consumption.
Hints for fresh food refrigeration
- Do not store warm foods or evaporating liquids in the appliance.
- Do cover or wrap the food, particularly if it has a strong flavor or odor.
- Position food so that air can circulate freely around it.
Hints for refrigeration
- Meat (all types): wrap in polyethylene (plastic) bags and place on the glass shelf above the vegetable drawer. For safety, store in this way only one or two days at the most.
Cooked foods, cold dishes, etc... these should be covered and may be placed on any shelf. -
Fruit and vegetables: these should be thoroughly cleaned and placed in the special drawer provided.
-
Butter and cheese: these should be placed in aluminum foil or polyethylene (plastic) bags while removing as much air as possible.
- Milk bottles: these should have a cap and should be stored in the bottle rack on the door.
- When first starting-up or after a period out of use. Before putting the food in the compartment, let the appliance run at 2 hours on the higher settings.
Prepare food in small portions to enable it to be rapidly and completely frozen and to make it possible to subsequently thaw only the quantity required. - Wrap up the food in aluminum foil or polyethylene (plastic) and make sure that the packages are airtight.
- Do not allow fresh, unfrozen food to touch food that is already frozen, thus avoiding a rise in the temperature of the latter.
- Iced products, if consumed immediately after removal from the freezer compartment, can possibly cause skin to become freezer burnt.
It is recommended to label and date each frozen package in order to keep track of the storage time. - Ensure that frozen food has been stored correctly by the food retailer.
- Once defrosted, foods deteriorate rapidly and can not be re-frozen.
- Do not exceed the storage period indicated by the food manufacturer.
Note: If the appliance contains related accessories and functions. - Empty the appliance.
Pull out the power plug.
Clean and dry the interior thoroughly. - Ensure that all doors are wedged open slightly to allow air to circulate.
Hints for freezing
Hints for the storage of frozen food
Switching off your appliance
Cleaning and Care
Cleaning and care
For hygienic reasons, the appliance (the including exterior and interior accessories) should be cleaned regularly at least every two months.

Warning! Danger of electrical shock!
- The appliance must not be connected to the duringpoleanisupply Before cleaning, switch the appliance of and remove the plug from the main pow supply, or shut off the circuit breaker or fuse.
Exterior cleaning
To maintain good appearance of your appliance, you should clean it regularly.
- Wipe the digital panel and display panel with a clean, soft cloth.
- Spray water onto the cleaning cloth instead of spraying directly on the surface of the appliance. This helps ensure an even distribution of moisture to the surface.
- Clean the doors and cabinet surfaces with a mild detergent and then wiped dry with a soft cloth.
Caution!
- Don't use sharp objects as they are likely to scratch the surface.
- Don't use Thinner, Car detergent, Clorox, ethereal oil, abrasive cleansers or organic solvent such as Benzene for cleaning. They may damage the surface of the appliance and may cause fire.
Interior cleaning
- You should clean the appliance interior regularly. It will be easier to clean when food stocks are low. Wipe the inside of the fridge freezer with a weak solution of bicarbonate of soda, and then rinse with warm water using a wrung-out sponge or cloth. Wipe completely dry before replacing the shelves and baskets. Thoroughly dry all surface and removable parts
- Although this appliance automatically defrosts, a layer of frost may occur on the freezer compartment's interior walls if the freezer door is opened frequently or kept open too long. If the frost is too thick, choose a time when the supply of food stocks are low and proceed as follows:
- Remove existing food and accessories
baskets, unplug the appliance from the mains power and leave the doors open. Ventilate the room thoroughly to accelerate the thawing process.
- When defrosting is completed, clean your freezer as described above.
Caution!
Don't use sharp objects to remove frost from the freezer compartment. Only after the interior is completely dry should the appliance be switched back on and plug back into the mains socket.
Defrosting
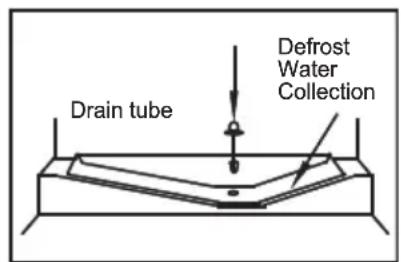
A) Fridge compartment
- This compartment defrosts automatically. The defrosting water runs to the drain tube via a collection container at the back of the appliance.
B) Freezer compartment
- This compartment defrosts automatically.
Door seals cleaning
Take care to keep door seals clean. Sticky food and drinks can cause seals to the cabinet and tear when you open the door. Wash seal with a mild detergent and warm water. Rinse and dry it thoroughly after cleaning.
Caution!
Only after the door seals are completely dry should the appliance be powered on.
Replacing the LED light
-
Warning: The LED light must not be replaced by the user! If damaged, contact the customer helpline for assistance. To replace the LED light, the below steps can be followed:
-
Unplug your appliance.
- Remove light cover by pushing up and out.
- Hold the LED cover with one hand and pull it with the other hand while pressing the connector latch.
- Replace LED light and snap it correctly in place.
Troubleshooting
If you experience a problem with your appliance or are concerned that the appliance is not functioning correctly, you can carry out some easy checks before calling for service, please see below.
Warning! Don't try to repair the appliance yourself. If the problem persists after you have made the checks mentioned below, contact a qualified electrician, authorized service engineer or the shop where you purchased the product.
| Problem | Possible cause & Solution |
| Appliance is not working correctly | Check whether the power cord is plugged into the power outlet properly. |
| Check the fuse or circuit of your power supply, replace if necessary. | |
| The ambient temperature is too low. Try setting the chamber temperature to a colder level to solve this problem. | |
| It is normal that the freezer is not operating during the automatic defrost cycle, or for a short time after the appliance is switched on to protect the compressor. | |
| Odours from the compartments | The interior may need to be cleaned |
| Some food, containers or wrapping cause odours. | |
| Noise from the appliance | The sounds below are quite normal:·Compressor running noises.·Air movement noise from the small fan motor in the freezer compartment or other compartments.·Gurgling sound similar to water boiling.·Popping noise during automatic defrosting.·Clicking noise before the compressor starts. |
| Other unusual noises are due to the reasons below and may need you to check and take action:·The cabinet is not level.·The back of appliance touches the wall. Bottles or containers fallen or rolling. | |
| The motor runs continuously | It is normal to frequently hear the sound of the motor, it will need to run more when in following circumstances:·Temperature setting is set colder than necessary·Large quantity of warm food has recently been stored within the appliance.·The temperature outside the appliance is too high.·Doors are kept open too long or too often.·After your installing the appliance or it has been switched off for a long time. |
| A layer of frost occurs in the compartment | Check that the air outlets are not blocked by food and ensure food is placed within the appliance to allow sufficient ventilation. Ensure that door is fully closed. To remove the frost, please refer to cleaning and care chapter. |
| Temperature inside is too warm | You may have left the doors open too long or too frequently; or the doors are kept open by some obstacle; or the appliance is located with insufficient clearance at the sides, back and top |
| Temperature inside is too cold | Increase the temperature by following the “Display controls” chapter. |
| Doors can’t be closed easily | Check whether the top of the refrigerator is tilted back by 10-15mm to allow the doors to self close, or if something inside is preventing the doors from closing. |
| Water drips on the floor | The water pan (located at the rear bottom of the cabinet) may not be properly leveled, or the draining spout (located underneath the top of the compressor depot) may not be properly positioned to direct water into this pan, or the water spout is blocked. You may need to pull the refrigerator away from the wall to check the pan and spout. |
| The light is not working | •The LED light may be damaged. Refer to replace LED lights in cleaning and care chapter. •The control system has disabled the lights due to the door being kept open too long, close and reopens the door to reactivate the lights. |
Reverse the door
The side in which the door opens can be changed from the right side (as supplied) to the left side, if the installation site allows for it.
Warning! When reversing the door, the appliance must not be connected to the mains. Ensure that the plug is removed from the mains socket.
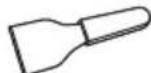
Tools you will need:
- 8mm socket driver

- Cross-shaped screwdriver

- Putty knife or thin-blade screwdriver

Note: When required, tilt the refrigerator side in order to gain access to the base, you should rest the appliance on soft foam packaging or similar material to avoid damage.
- Stand the refrigerator upright. Open the upper door to take out all door racks (to avoid racks damaged) and then close the door.
- Unscrew the upper door hinge and remove it. Remove the upper door from the middle hinge by carefully lifting the door straight up. Then place it on a smooth surface with its upper cover upwards.
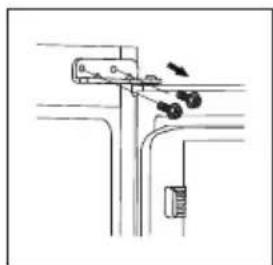
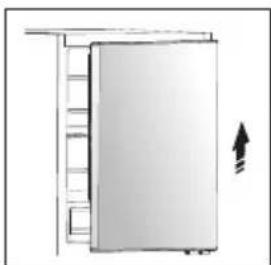
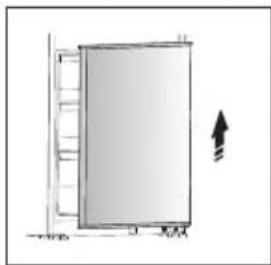
- Loose screws used to fix the middle door hinges and remove them. Then remove the lower door. And unscrew the lower door hinge.

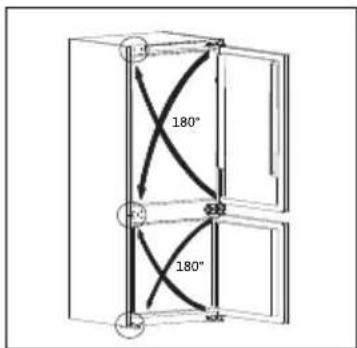
- Change screw hole covers from left to right, and change the door hinges to opposite side (as shown in figure below).
- Fix the lower hinge with screws, and slot the lower door onto the bottom hinge pin and hold in position. Adjust the middle hinges to the appliance position and then install it ensuring the lower door in secured in place.
- Install the upper door and the upper hinge as the same way.
Note: When reversing the door, the cabinet installation can refer to Built-In Fridge Freezer installation instructions.
Disposal of the appliance
It is prohibited to dispose of this appliance in domestic household waste.
Packaging materials
Packaging materials with the recycle symbol are recyclable. Dispos of the packaging in a suitable waste ationleocycle it.
Before disposal of the appliance.
- Disconnect the main plug from the main socket.
- Cut off the main cable and discard it.
| Correct disposal of this product | |
| This marking indicates that this product should not be disposed with other household wastes throughout the EU. To prevent possible harm to the environment or human health from uncontrolled waste disposal, recycle it responsibly to promote the sustainable reuse of material resources. To return your used device, please use the return and collection systems or contact the retailer where the product was purchased. They can take this product for environmental safe recycling. |
INFINITON
0 \(18/\)' (\() 81 &,21 \$0 ,( 172
$ QWHV□GH□XWLOL] DU□HVWD□XQLGDG□OOHD□GHWHQLGDP HQWH□HVWHO
TXHWRGDVDDVSHUVRQDV-TXHO
XNOLFHQHOCDSDUDWHHOHVWpQ
SURIXQGDP HQHIDP LLDUL DGRV
FRQVXXVRFDDUFWHUTVWFLFDVGH
VHJXULGDG□
- XDUGHHvWDVOLQWUXFFLQRHVD
DVHJ\~UHVHGHPDQWHHQUDVFRQ
HDDSDUDWRVLOORWUDVDGDROYHQGH
GHIRUP DTOXHFOXDOTXLHUOSHUVRQD
TXHORXNLOLFHXUDQWHOVXYLGDO~WLO
HVWpLQIRUP DGRGHELGDP HQH
DFHUFDGHHXVRVXV
FDUDFWHUTVWLFDVGHVOVHJXULGDGO
UHVSHWHDDVSDUHFDXFLRQHVGHO
HVWDVOLQWUXFFLRQHV0GHOXVXDULRO
\DTXHHOIDEULFDQHQRVOHKDUI
UHVSRQVDEHGHRVGDxRV
FDXVDGRV□SRU□RP LVlyQ
UHFLELGRLQVWUXFFLRQHVO
UHDWLYDVDDXVRGHHDSDUDWRGH
IRUP DVOVHJXUD\VLOFRP SUHQGHU
0RVUULHVJRVDDVRFDLGDRV/ RVO
QLRXVQRGHEHQWXJDUFRQHO
DSDUDWR/ DOLP SLH] D\HO
[FDVDVU~VMLFDV\SDUD]
FOLHQWHVHOHQKRIHNOHVOPRNOHVO
\RWRVHQWRRUQRVGHOWSLRS
UHVLGHQFLD0
HQRUQRVWSRSHQVLyQ
DSLFDFLRQHVGH
UHVWXUDFLyQ\QR\P LQRULWVDV
VLP DUHVO
• ' 9(57(1 &,²)¹ R DOP DFHQH□VXVWDQFLDV□ H[ SORVLYDV□FRP R□DWDV□GH□ DHURVR□FRQ□XQ□SURSX□VR□ LQIDP DEOH□HQ□HVWH□DSDUDWR□
• ' 9 (57(1 &,²) 6LH0 FDEOHGHDOLPHQDHVIGGxDGRGHEHVOXVWLMXLUORH0 IDEULFDQWHVXDDJHQHGH P DQHQLP LHQWRROSHUVRQDV FXDLIFGDGVLP LDUHVSDUDHLYWDUULHVJRV
•' 9(57(1&,□ 0 DQWHQJD □DV□DSHUWXUDV□GH□YHQWLODFlyQ□ GH□D□FDUFDVD□GH□DSDUDWR□R□ GH□DV□HVUXFXWUXUDV□LQHJUDGDV□ OLEUHV□GH□REVWUXFFLRQHV□
•' 9 (57(1 &,² □1 R□XWLOLFH□ GLVSRVLWYRV□P HFi QLFRV□QL□ RWURV□PHGLRV□QR□ UHFRP HQGDGRV□SRU□H□ IDEULFDQWH□SDUD□DFHOHUDU□H□ SURFHVROGH□GHVFRQJHODFLyQ□
•' 9 (57(1 &,² '1 R○GDxH○ H○FLUFXLWR○GH○UHIULJHUDQWH○
• ' 9 (57 (1 &,²) 1 R×WLOLFH DSDUDWRVHOpFWULFRVGHQWURGH0 ORV0FRP SDUWPHQWRVGH0 DOP DFHQDP LHQWRGH0 DOLPHQWRVGH0DSDUDWRD P HQRV0TXH0VHDQGH0WLSR0 UHFRP HQGDGRSRUH0 IDEULFDQWH0
•' 9(57(1&,²) ( UHIULJHUDQWHHOHODLVODP LHQWRO VRQLQIDP DEHVO
3 DUDGHVHFKDUHDDSDUDWR
pYHorDXXQFHQWUR
DXRUL]DGRGHHOHPLQDFlyQ
GHUHVLGXRV1ROR
HRSQJDQDDDPDV
• ' 9 (57 (1 &,□3DUD HYLWDU□SHOLJURV□GHULYDGRV□ GH□D□LQHVWDELGLDG□GH□ DSDUDR□□GHEH□HVWDU□LMDG□ HQFRQIRUP LGDG□FRQ□DV□ LQVUXFFLRQHV□
Refrigerante
(FLUFXLWRGHUHIULJHUDQWHGHDSDUDWRFRQWLHQHUHIULJHUDQWHLVREXWHQR5DXXQJDVQDXUDFRQXXQDWRQLYHCHGFRP SDWLELGDGPHGLRDP ELHQWDTOTXHVLQHP EDUJRHOVLQIDP DEOHXUDQWHHOWUDQVSRWHO LQWDCDFyQGHDDSDUDWRDVHJ\UHVHGHTXHOQLQJ\QFRPSRQHQWHGHFOFLUFXLWRGHUHIULJHUDQWHUHVXOWHGDxDGRO(UHIULJHUDQWH05DHOHVDQHLDQHVDQ
DMXVWUDUDDWHP SHUDXUDGHD
QHYHUDHQNUHOO&OOO&
VHJ~QVHDQHFVDUL
D00X] GHCDWHP SHUDXUDFRP SDUDEHO
LXP LQDui DRVYDURUHVFRUUHVSRQGLWHVHQ
DDVJXLHQHVOVFXHQFLD
;Nota!
6HSXGHHDIXVWDUHQUHOOO/DO
WP SHUDWXUDGHDDQHYHUDVHuPi VUItDn
DDWHP SHUDXUDGHOFRQJHCDGRUPI VUEIDDU
DIXVWD037HP S'HQDDSRVLFLyQOO
$XVWHOPi VLiutR000C
SXVWHOpVFiQGLR000C
1 RUP DOP HQHXQDXVHOP HGLRHOOPi V0
DGHFXDGR
2. Super Cool
36XSHU&RR'SXHGHO
UHIJUHUDUORVDDLPHQNRV
PXFKR@PivUUI SLGR
HOERyQ36XSHU&RR0'R37HP S'HO
DIXWGHGHNHP SHUDNXUDGHDDQHYHUDRoHO
PRGRGHIXQFlyQYRYHui D0DIXVXHO
SUHYLRI
3. Alarma
QUFDFVROGHDDUPDUHOO
LFRQR13$DUP D'VOH
LXP LQDU \HP SH] DUI D
VRQDUXQXPELGRO
3XVHHOERWyQDUPDSDUDGHHQHU
DDDDUPD\H0XPELGRHOLFRQRO
3$DUP D'VH DSDJDU
Alarma de puerta
/D[XX]GHDDUPDHQFHQGLDGH
1 XP ELGRLQGLFDQIFRQGLFLRQHV0
DQRUP D0HVFRPRGHDU
DFFLGHQWDP HQHHOXQDOxSHUDDELHUDD
XWOLD DCDQHYHUDGXDUQWHOPXFKRMLHP SR
GHVHQFK~IH□D
&XDQGRHDDSDUDNRHVWpDSDJDGRR
SXHGHHQFHQGHRSSXVDQGRHOERlyQGH
- Contents
- Safety and warning information
- Safety for children and others who are vulnerable people
- General safety
- Refrigerant
- Caution:risk of fire
- Electrical safety
- Daily use
- Caution!
- Care and cleaning
- Installation Important!
- Service
- Description of the appliance
- View of the appliance
- Electronic Control
- Important!
- Controlling the temperature
- 1.Temp
- Note!
- Super Cool
- Alarm
- Door Alarm
- Power
- First use and installation
- Built-In Fridge Freezer
- Technical characteristics
- Cleaning before use
- Installation Positioning
- Leveling
- Electrical connection
- Accessories 1) Movable shelves/trays
- Positioning the door racks
- VegetableDrawer
- Ice-cube tray
- Refrigerator compartment 2)
- Freezer food compartment 2)
- Thawing food 2)
- Helpful hints and tips
- Noises during operation
- Energy saving tips
- Hints for fresh food refrigeration
- Hints for refrigeration
- Hints for freezing
- Hints for the storage of frozen food
- Switching off your appliance
- Cleaning and Care
- Warning! Danger of electrical shock!
- Exterior cleaning
- Interior cleaning
- Defrosting
- A) Fridge compartment
- B) Freezer compartment
- Door seals cleaning
- Replacing the LED light
- Troubleshooting
- Reverse the door
- Disposal of the appliance
- Packaging materials
- Before disposal of the appliance.
- INFINITON
- Refrigerante
- ;Nota!
- Alarma
- Alarma de puerta
Brand : Infiniton
Model : FGCBB193
Category : Fridge