
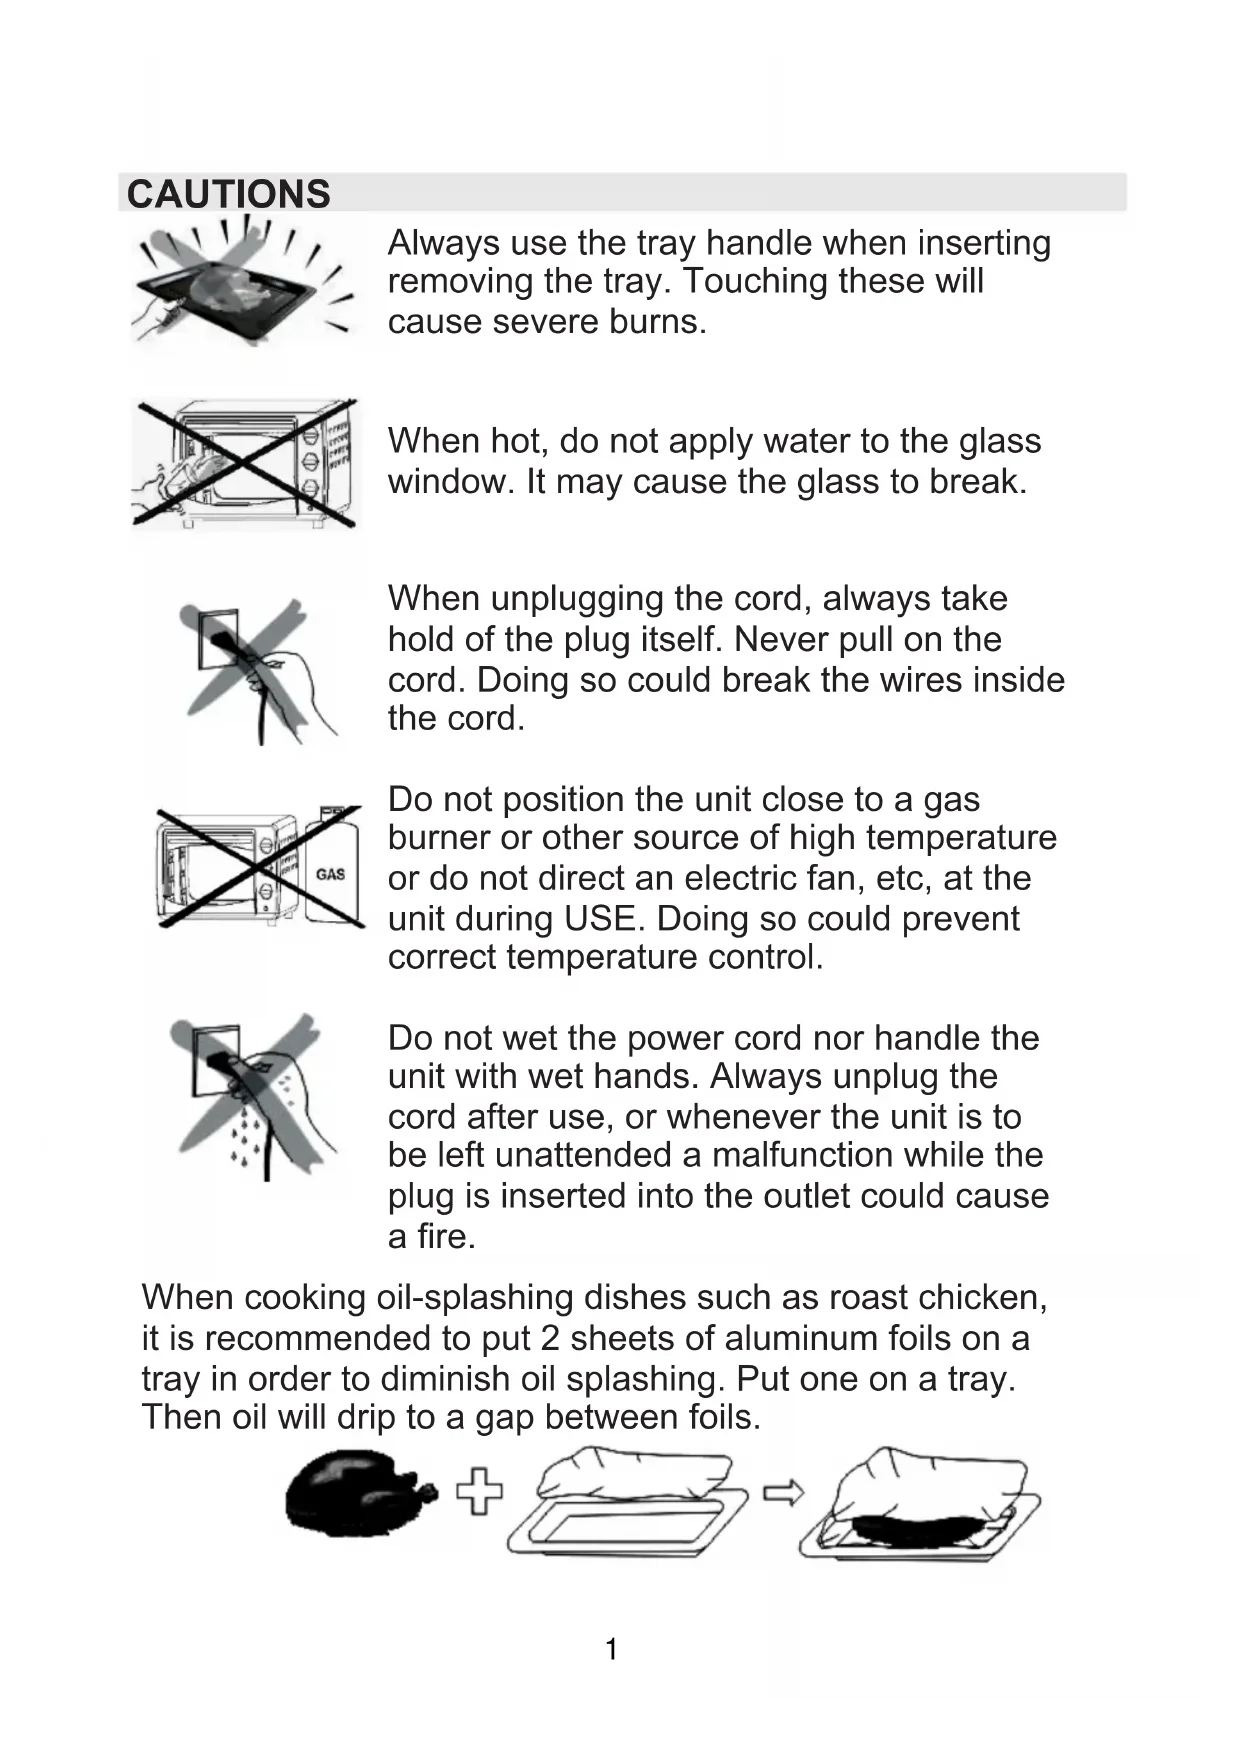
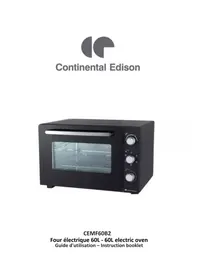
CEMF70B - Electric oven CONTINENTAL EDISON - Free user manual and instructions
Find the device manual for free CEMF70B CONTINENTAL EDISON in PDF.
| Product type | Electric oven |
| Brand | Continental Edison |
| Model | CEMF70B |
| Supply voltage | 230 V ~ |
| Frequency | 50-60 Hz |
| Power | 2200 W |
| Capacity | 70 L |
| Temperature range | 100 °C – 220 °C |
| Cooking functions | Conventional cooking, fan-assisted cooking, rotisserie, grill + fan, turbo rotisserie |
| Timer | Yes, with automatic shut-off |
| Heating indicator light | Yes |
| Included accessories | Grid, drip tray, rotisserie spit, rotisserie handle |
| Interior wall material | Enameled steel |
| Door | Tempered glass |
| Control type | Rotary knobs |
| Cleaning | Do not immerse; clean with a damp cloth; avoid abrasive products |
| Safety | Automatic timer shut-off; do not use near flammable materials; unplug before cleaning |
| Repairability | Contact the manufacturer, customer service, or a qualified person; do not disassemble yourself |
| Dimensions (approx.) | Approximately 55 x 45 x 40 cm (W x D x H) |
| Weight (approx.) | Approximately 15 kg |
Frequently Asked Questions - CEMF70B CONTINENTAL EDISON
User questions about CEMF70B CONTINENTAL EDISON
0 question about this device. Answer the ones you know or ask your own.
Ask a new question about this device
Download the instructions for your Electric oven in PDF format for free! Find your manual CEMF70B - CONTINENTAL EDISON and take your electronic device back in hand. On this page are published all the documents necessary for the use of your device. CEMF70B by CONTINENTAL EDISON.
USER MANUAL CEMF70B CONTINENTAL EDISON
natural_image
Abstract geometric shapes resembling partial crescent and angular segments (no text or symbols)Continental Edison
natural_image
Black portable microwave oven with open lid and control knobs (no visible text or symbols)CEMF70B
natural_image
Illustration of a tray with a lid and radiating lines, no text or symbols presentnatural_image
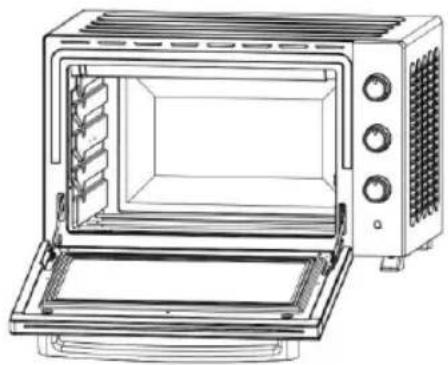
Hand holding a pen with a square lens, no text or symbols visible- Door handle
- Glass door
3.Heating element
4.cavity
5.Housing - Thermostat knob
-
Select knob
8.Time knob -
Indicator light
10.Oven feet
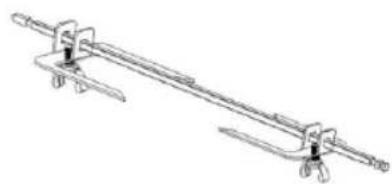
11.Rotisserie fork & shaft
12.Rotisserie handle
13.Bake tray
14.Wire rack - Tray handle
PARAMETER DATA
| REF | CEMF70B |
| MODEL NO | KR-K66RCL-E1Dkh |
| POWER SUPPLY | 230V~ 50-60Hz |
| POWER CONSUME | 2200W |
CAUTIONS

natural_image
Illustration of a device with radiating lines and a central screen (no text or symbols)Always use the tray handle when inserting removing the tray. Touching these will cause severe burns.
natural_image
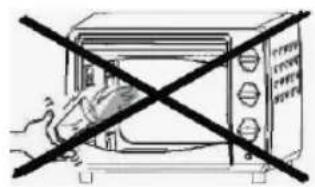
Illustration of a microwave oven with a hand using a tool crossed out by a diagonal line (no text or symbols)When hot, do not apply water to the glass window. It may cause the glass to break.
natural_image
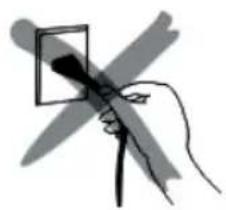
Hand holding a pen or stylus with a square lens, no text or symbols visibleWhen unplugging the cord, always take hold of the plug itself. Never pull on the cord. Doing so could break the wires inside the cord.
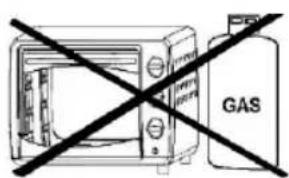
Do not position the unit close to a gas burner or other source of high temperature or do not direct an electric fan, etc, at the unit during USE. Doing so could prevent correct temperature control.
natural_image
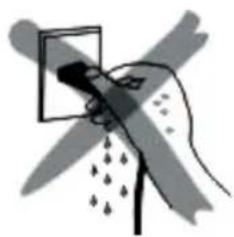
Illustration of a hand holding a spray gun with droplets and spray particles (no text or symbols)Do not wet the power cord nor handle the unit with wet hands. Always unplug the cord after use, or whenever the unit is to be left unattended a malfunction while the plug is inserted into the outlet could cause a fire.
When cooking oil-splashing dishes such as roast chicken, it is recommended to put 2 sheets of aluminum foils on a tray in order to diminish oil splashing. Put one on a tray. Then oil will drip to a gap between foils.

USE INDICATION
Special indication: the parts and accessory varies from different models. Please refer the image to the real item you buy.
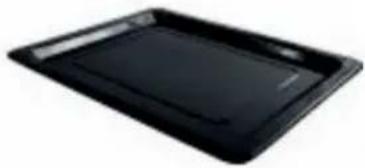
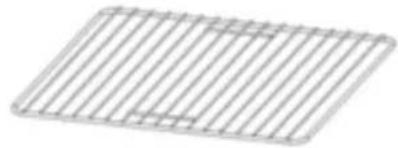
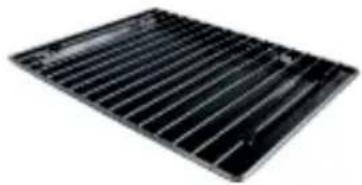
Bake tray and Wire rack
Food tray
natural_image
Black rectangular electronic device with a flat top and side panel (no visible text or symbols)Roast Chicken,
Hamburg steak,
Gratin, Sponge cake, almost all other oven-cooked foods
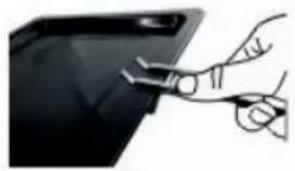
How to use tray handle
natural_image
Hand holding a small object on a dark surface, no visible text or symbolsWire rack
natural_image
Pure electrical circuit lines without any symbolsBaked potatoes, Dry food

natural_image
Hand holding a pen writing on a lined paper sheet (no text or symbols visible)Food tray and wire rack
natural_image
Black rectangular metal grate with parallel slats (no text or symbols visible)For food which will drip/boiled fish, etc.
natural_image
Technical line drawing of a mechanical clamp or lever assembly (no text or symbols)The trays are not perfectly square.
Note:
Be careful when removing pudding and other hot liquids.
Rack Support
You can adjust the tray at different positions according to the dishes you want to cook. For instance, when making macaroni gratin and you want to have the top part cooked the most, use the top or the second rack support. For roasting a chicken, use the bottom rack support.
natural_image
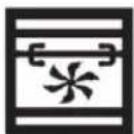
Line drawing of a microwave oven with control panel and tray (no text or symbols)Convection Function
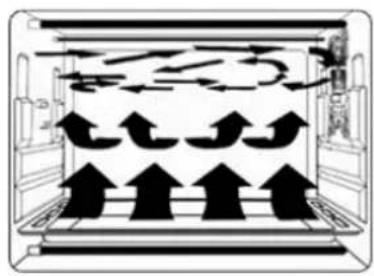
natural_image
Diagram of airflow patterns inside a storage unit with multiple directional arrows indicating movement (no text or labels)Featured with a special convection function, strong and absolute cycling airflow by making the heating more complete. Original flavor can be kept.
| Rotisserie Function | ||
| Use with Rotisserie Forks | Install Rotisserie Forks | |
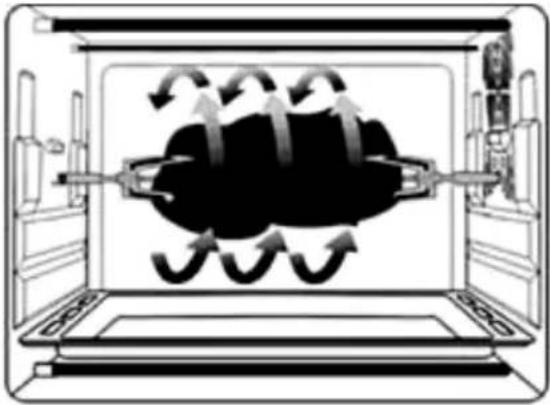 With this function, even baking will be provided.Rotisserie forks can carry food under 3 kilograms. With this function, even baking will be provided.Rotisserie forks can carry food under 3 kilograms. | 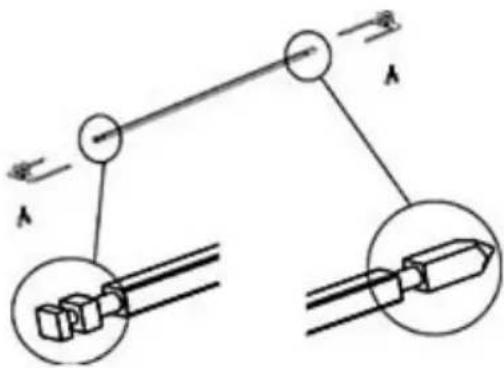 Left Right Left Right | |
| Install Rotisserie Forks | Remove Rotisserie Forks | Rotisserie Handle |
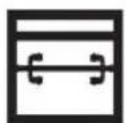
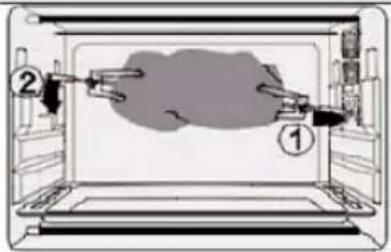 Install the Rotisserie Forks to the rotisserie hole, and then put it to the rotisserie tray. Install the Rotisserie Forks to the rotisserie hole, and then put it to the rotisserie tray. | 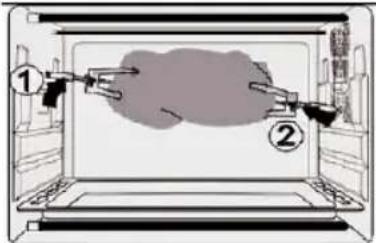 Use Rotisserie Handle to take out the Rotisserie Forks from the rotisserie tray, and then remove it from the rotisserie hole.CAUTION: Beware of HOT dripping oil! Use Rotisserie Handle to take out the Rotisserie Forks from the rotisserie tray, and then remove it from the rotisserie hole.CAUTION: Beware of HOT dripping oil! | 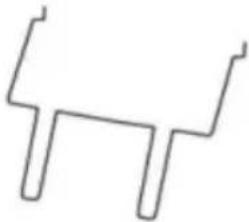 Please always use Rotisserie Handle to take out the Rotisserie Forks. Please always use Rotisserie Handle to take out the Rotisserie Forks. |
Functional Control
radar
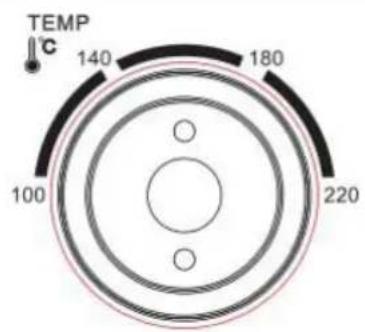
| Temperature (°C) | | ----------------- | | 140 | | 180 | | 220 |Set the “Temperature Control” by turning clockwise to select the suitable temperature according to the dishes you are going to cook. (Temperature Control ranging from 100°C to 220°C)
Temperature Control
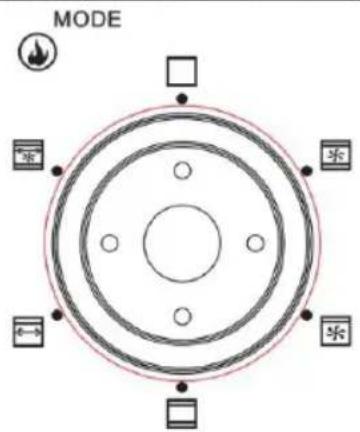
Function Control Select the suitable heating element according to the dishes you are going to cook.
To stop the oven (STOP / OFF)

Upper & Lower Heating + Convection Function

Upper Heating + Convection Function
Upper & Lower Heating
Upper Heating + Rotisserie Function
Upper & Lower Heating + Convection Function + Rotisserie Function
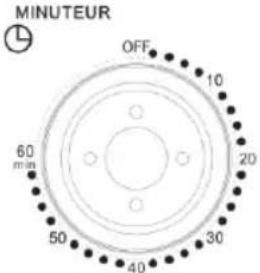 Timer*You can observe whether the oven is switched on or not by observing the front Indicator light. Timer*You can observe whether the oven is switched on or not by observing the front Indicator light. | |
| 1. Set the arrow on the “Timer” to the number which indicates the cooking time (minutes) according to the dishes you are going to cook. | |
| 2. Set the “Timer” by turning it clockwise. The oven will turn off automatically at the end of the selected time and a bell will ring. When setting the Timer to less than 5 mins, turn it to more than 6 mins. and then back to the selected time. | |
| 3. The oven can be turned off manually during cooking by turning the “Timer” anti-clockwise to the "OFF" position. | |
METHOD OF CLEANING

natural_image
Line drawing of a microwave oven with a hand holding a spoon above it (no text or symbols)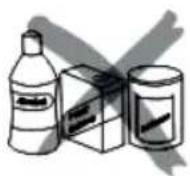
Take off the plug and cool down before cleaning.
When cleaning, wash the interior and exterior surface, bake tray, wire rack and tray handle with soft cotton (or sponge) with neutral cleaner. Then wash with clean and warm water. Do not use hard brush or any others to wash, so as not to scrape the interior surface of the oven, and to protector of the bake tray, the wire rack and the tray handle.
Do not use the toxic and abrasive cleaners such as gasoline, polishing powder, solvent.
BAKING REFERENCE OF COMMON FOOD
| Type of food | Number or thickness | Temperature(°C) | Timer«(min.) |
| Sandwich | 2-3 pcs | 200 | 2-3 |
| Toast | 2-4 pcs | 220 | 2-5 |
| Hamburger | 2-3 pcs | 200 | 3-5 |
| Fish | / | 200 | 7-10 |
| Ham | 2 cm | 200 | 7-12 |
| Sausage | 3-4 pcs | 200-220 | 8-10 |
| Cake | / | 150 | 20-30 |
| Steak | 1-2 cm | 220 | 10-15 |
| Chicken | Half chicken | 175-200 | 30-40 |
OPERATING INSTRUCTIONS
Before using the unit for the first time: Heat the empty oven.
(1) Insert the bake tray and wire rack.
(2) Set the heater operating switch to "UPPER & LOWER", set the temperature control dial to "220°C" and heat the empty oven for about 10 minutes. Note: There may be some smoke and a burning smell at first, but this is not a malfunction.
Temperature control dial
Set the Temperature Control Dial for the dishes which you are going to cook
Heat Operating
Select the cooking setting according to the dishes you are going to cook. You can observe whether the oven switched on or not by observing the front Indicator light.
CAUTIONS
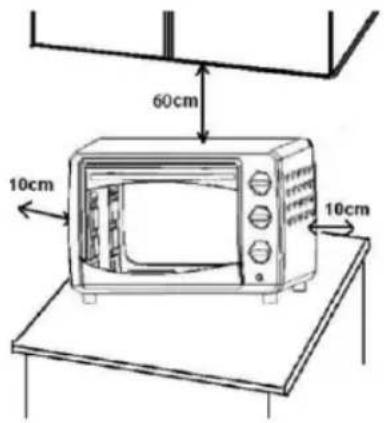
If the oven is positioned to close to a wall, the wall will be burned or stained. Be sure the curtain, etc. Are not in contact with the body. Do not put anything between the bottom of the body and the surface on which it is set, an object so placed could be burned.
Do not put anything on the oven while using it, the heat could cause deformation, cracking, etc.
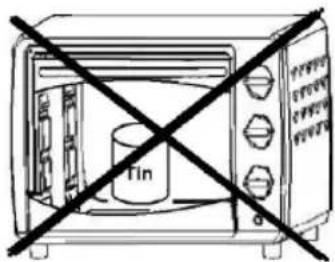
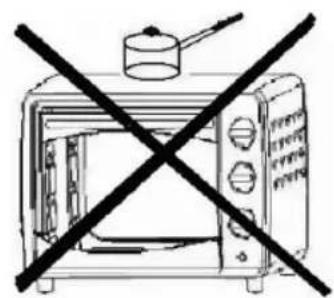
Any bottled or tinned food can not be heated directly as prevent the bottle or tin would be broken out and scald the person.

natural_image
Simple line drawing of a microwave oven with a hand holding the lid and crossed out by a diagonal line (no text or symbols)Be careful! Not to burn yourself during use or immediately after use. The metal parts and glass window of the door become extremely hot during use. Be careful not to touch them when opening and closing the door.
natural_image
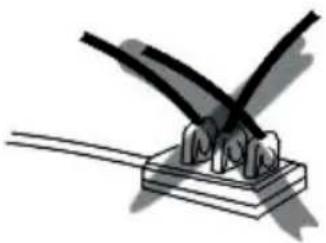
Pure electrical circuit lines without any symbolsAC power must be taken from a properly wired outlet. Insert the plug completely into the socket. If it is not, it could become abnormally hot. Do not use an electric light outlet. Never connect multiple plugs to the same outlet.
WARNING:
If the supply cord is damaged, the manufacturer or its service agent or a similarly qualified person in order to avoid a hazard must replace it.
IMPORTANT SAFEGUARDS
Follow basic safety precautions, including:
- Read all instructions.
- Do not touch hot surfaces. Use handles or knobs.
- To protect against risk of electrical shock, do not immerse cord, plugs or cooking unit in water or other liquid.
- Close supervision is necessary when any appliance is used by or near children.
- The appliance is not intended for use by young children or infirm persons without supervision.
- Young children should be supervised to ensure that they do not play with the appliance.
- Unplug from outlet when not in use and before cleaning. Allow to cool before putting on or taking off parts and before cleaning the appliance.
- Do not operate any appliance with a damaged cord or plug or after the appliance malfunctions, or is dropped or damaged in any manner. Return appliances to the nearest authorized service facility for examination, repair, electrical or mechanical adjustment.
- The use of accessory attachments, not recommended or sold by the appliance manufacturer, may cause hazards.
- Do not use outdoors.
- Do not allow the cord to hang over the edge of a table or counter, or touch hot surfaces.
-
Do not place on or near a hot gas or electric burner, or in a heated oven.
-
Extreme caution must be used when moving an appliance containing hot oil or other hot substances.
- To disconnect, remove plug from wall outlet.
- Do not use appliance other than for its intended use.
- If the external flexible cable or cord of this appliance is damaged, it shall be exclusively replaced by the manufacture or his service agent or a similar qualified person in order to avoid a hazard.
- This appliance is not intended for use by persons (including children) with reduced physical, sensory or mental capabilities, or lack of experience and knowledge, unless they have been given supervision or instruction concerning use of the appliance by a person responsible for their safety. Children should be supervised to ensure that they do not play with the appliance.
- This appliance is not intended to be operated by means of an external timer or separate remote-control system.
- This appliance is for household use only.
- No user-serviceable parts inside. Refer servicing to qualified service personnel.
-
A short power-supply cord is provided to reduce the hazards resulting from entanglement or tripping over a long cord. An extension cord may be used with care, however, the marked electrical rating should be at least as great as the electrical rating of this appliance. The extension cord should not be allowed to drape over the counter or tabletop where it can be pulled by children or tripped over.
-
This appliance can be used by children aged from 8 year and above and persons with reduced physical, sensory or mental capabilities or lack of experience and knowledge if they have been given supervision or instruction concerning use of the appliance in a safe way and understand the hazards involved. Cleaning and user maintenance shall not be made by children unless they are older than 8 and supervised. This appliance and its cord must be kept out of reach of children less than 8 years.
Warning: Do not immerse in water or any liquid.
SPECIAL WARNING:
Recycling symbol, don't dispose of the product with household refuse.
Continental Edison
120-126 Quai de Bacalan
CS 11584
33000 Bordeaux
IMPORTE PAR:
A.M.C.
natural_image
Abstract geometric shapes in gray, no text or symbols presentContinental Edison


Brand : CONTINENTAL EDISON
Model : CEMF70B
Category : Electric oven