
CEBC1000B - Blender CONTINENTAL EDISON - Free user manual and instructions
Find the device manual for free CEBC1000B CONTINENTAL EDISON in PDF.
| Product type | Electric blender with heating function |
| Brand | Continental Edison |
| Model | CEBC1000B |
| Power supply | 220-240 V, 50/60 Hz |
| Motor power | 1000 W |
| Heating power | 900 W |
| Jug capacity | 1.5 L (max 1 L for hot liquids) |
| Jug material | Glass |
| Control | Manual via rotary knob and touch panel |
| Automatic programs | Soup, Cream soup, Boil/Steam, Custom manual |
| Variable speed | Yes, from Min to Max |
| Pulse function | Yes (P position) |
| Display | LED temperature and duration |
| Safety | Safety switch on the lid |
| Automatic shutdown | After 3 min at max speed |
| Energy saving mode | Yes, screen dims after 3 min of inactivity |
| Protection class | II |
| Cleaning | Wash removable parts in soapy water; clean housing with damp cloth |
| Estimated net weight | 4 kg |
| Estimated dimensions (LxWxH) | 20 x 20 x 40 cm |
Frequently Asked Questions - CEBC1000B CONTINENTAL EDISON
User questions about CEBC1000B CONTINENTAL EDISON
0 question about this device. Answer the ones you know or ask your own.
Ask a new question about this device
Download the instructions for your Blender in PDF format for free! Find your manual CEBC1000B - CONTINENTAL EDISON and take your electronic device back in hand. On this page are published all the documents necessary for the use of your device. CEBC1000B by CONTINENTAL EDISON.
USER MANUAL CEBC1000B CONTINENTAL EDISON
natural_image
Abstract geometric design with two dark semicircles and a partial letter-like shape (no text or symbols)Continental Edison
natural_image
Black blender with digital display and control knob (no visible text or symbols)CEBC1000B
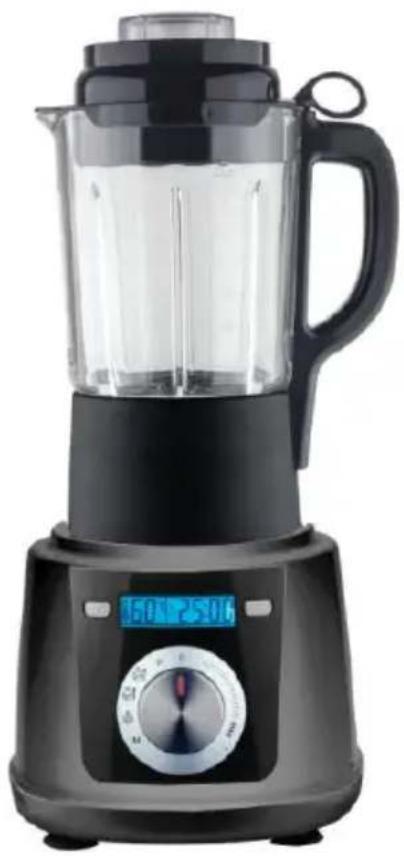
BLENDER CHAUFFANT - HEATING BLENDER
Manuel d'instructions - Instruction Manual

CONSIGNES DE SÉCURITÉ

■ MISE AU REBUT APPROPRIÉE
natural_image
Symbol of a trash bin with crossed lines indicating no waste or discharge (no text or labels)Read the operating instructions carefully before putting the appliance into operation and keep the instructions for future reference.
- This appliance is for household use only. Do not use outdoors.
- Never dip machine into any liquid and sharp edges. Do not use the appliance with wet hands. If the appliance is humid or wet, unplug it immediately.
- The appliance shall not be used by children. Keep the appliance and its cord out of reach of children.
- Appliances can be used by persons with reduced physical, sensory or mental capabilities or lack of experience and knowledge if they have been given supervision or instruction concerning use of the appliance in a safe way and if they understand the hazards involved.
• Children shall not play with the appliance.
- Always disconnect the machine from the supply if it is left unattended and before assembling, disassembling or cleaning.
- Switch off the appliance and disconnect from supply before changing accessories or approaching parts that move in use.
- Use the appliance according to this instruction, any misuse may cause electric shock or other hazards.
- Care shall be taken when handing the sharp cutting blades, emptying the bowl and during cleaning.
- If the supply cord is damaged, it must be replaced by the manufacture of its service agent or a similar qualified person in order to avoid a hazard.
- Keep your finger away from moving parts and fitted tools. Never put your fingers etc. in hinge mechanism.
- Use only original spare parts.
- In order to ensure your children's safety, please keep all packaging (plastic bags, boxes, polystyrene etc.) out of their reach.
- Do not interfere with any safety switches.
- Place the machine on a smooth, flat and stable working surface.
- Be very careful when you handle the blades or inserts. Be especially careful when you remove them from machine, their cutting edges are very sharp.
- Wait until moving parts stop running before you remove the lid of machine.
- Do not exceed the maximum content indicated on the accessories.
- About how to clean surfaces in contact with food, please refer to the section “CLEANING”.
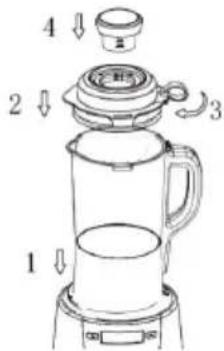
This glass jar could use for cool and hot blending processing, also could be for soup preparing, steam preparing and jam preparation.
For cool and hot blending processing:
-
Before operation, sure the coupler of jar and body are in clean, dry status. Matching both couplers well and then press down the glass jar to into housing.
-
Press down the lid into the jar, sure the silicone part is fixed well on the lid.
-
Turn the lid clockwise to start the switch of jar handle If the lid not lock well, the machine cannot work.
-
Place the cup into the lid. If for hot blending processing, please take care on the steam from the cup.
* Never open the lid when the blade is still rotating. For extra caution, you can unplug the appliance before removing the lid.
* To add liquid ingredients during processing, remove the cup of the lid and pour liquid through the opening in the lid.
* Cut solid ingredients into smaller pieces before you process them.
* For a large quantity, pour small batches of ingredients instead of a large quantity at one time.
* Use cooked ingredients for a soup preparation.
* If a liquid is hot or tends to foam (e.g. milk), do not put more than 1 liter in the blender jar to avoid spillage.
* If the result is not satisfactory, switch the appliance off and stir the ingredients with a spatula.
For steam preparation:
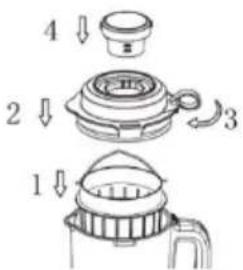
- Place the basket into the jar by its handle.
- Put the food into the basket.
- Press down the lid into the jar, sure the silicone part is fixed well on the lid.
-
Turn the lid clockwise to start the switch of jar handle. If the lid not lock well, the machine cannot work.
-
Place the cup into the lid.
-
Choose【Boiling / Steam】mode
When checking the food in the basket, always hang the food up by the handle and careful on the steam.
BEFORE CONNECTING TO POWER
- Before connecting to the power, recheck the type of supply and the mains voltage match with the details given on the rating label on the appliance.
- Using for the first time, rip off all wrapping paper and plastic bags. Clean the fittings.
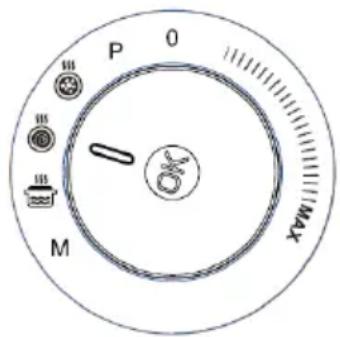
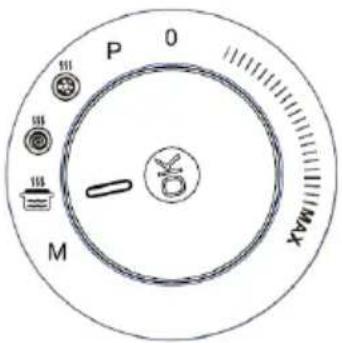
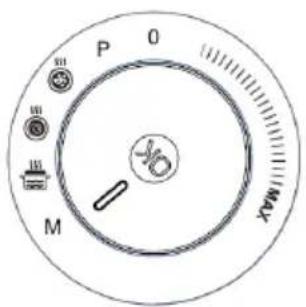
CONTROL AND MODE DETAILS
Important information:
After plug in, the knob need to be in “0” position, then turn to the function mode. If not from “0” position, the machine will be no function.
2. DIY control panel:

Increasing button: Increase the Time/ Temperature of "Manual mode".
Decreasing button: Decrease the Time/ Temperature of "Manual mode".


Temperature display: Temperature of the glass jar.
Time display: Show elapsed time and remaining time.
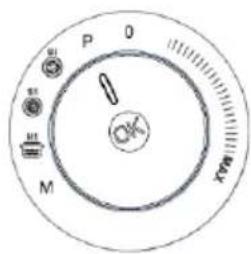
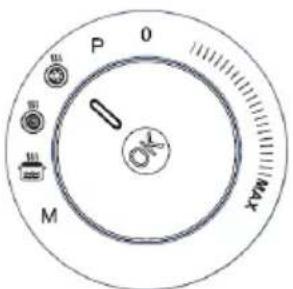
3. Control panel
【Stepless Speed control】mode --- cool processing.

● Used this mode, could get different speeds and for all cool processing.
- This mode only for cool processing, cannot for heating processing.
● DIY control panel ➕ ➕ ➕ ➕ cannot work under this mode.
-
Turn the knob from Min. to Max. to choose the requested speed.
-
In case the motor over working, under this mode each speed max could operate for 3 mins each time. The appliance will stop working automatically after 3 mins.
-
If cancel the function, turn knob back to "0".
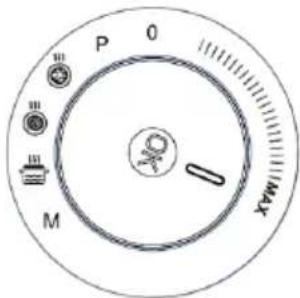
【Pulse】mode --- cool processing.
● Used this mode, could for ice crushing, short time strong power blending or mixing-and also used when clean the Jar.
- This mode only for cool processing, cannot for heating processing.
● DIY control panel 🧑️ ➕ ➕ ➕ cannot work under this mode.
●
-
Turn the knob to "P".
-
Press and hold the middle of knob down for 3 seconds to start the machine.
-
If cancel the function, leave your hand from the knob, the machine will stop.
【Thick soup】mode --- heating processing.
● Full program time: 35:00
● DIY control panel + - ⏰ cannot work under this mode.
- Turn the knob to【Thick soup】mode
- Press down the middle of knob to start the mode.
- The machine heats to 100^ C and keeps the temperature at 100^ C, the motor starts running for 15 seconds at the last minute. (The temperature display will show "HH" if the liquid temperature is 100^ C).
- Once the program is complete, the machine stops and goes into stand-by mode, and 3 beeps sound.
- If need a pause, press down the middle of knob.
- If cancel the function, press down the knob and turn knob back to "0".
【Smoothies Soup】mode --- heating processing.
● Full program time: 30:00
● DIY control panel + - 🔍 cannot work under this mode.
-
Turn the knob to【Smoothies Soup】mode
-
Press down the middle of knob to start the mode.
-
The machine heats up to 100^ C and keeps the temperature at 100^ C. Mixing will begin in the last three minutes, based on a 15 seconds mixing cycle and 45 seconds for the rest.
(The temperature display will show "HH" if the liquid temperature is 100^ C)
-
Once the program is complete, the machine stops and goes into stand-by mode, and 3 beeps sound.
-
If need a pause, press down the middle of knob.
-
If cancel the function, press down the knob and turn knob back to "0".
【Boiling / Steam】mode --- heating processing.
● Full program time: 30:00
● DIY control panel + - - - cannot work under this mode.
- Turn the knob to【Boiling / Steam】mode
- Press down the middle of knob to start the mode.
- The machine heats up to a temperature of 100^ C.
- Once the program is complete, the machine stops and goes into stand-by mode, and 3 beeps sound.
- If cancel the function, press down the knob and turn knob back to "0".
【Manual / D.I.Y】mode --- heating processing.

● Under this mode, the mixing function is disable.
- Turn the knob to 【Manual / D.I.Y】 mode
- Beginning setting is at 60^ C and 20:00
- If beginning setting is ok, press down the middle of knob to start the mode.
- If not, press down the DIY control panel to set the time and temperature.
Set the temperature:
- press Increasing button for 2 seconds till the icon is flashing.
- Choose Increasing button or Decreasing button, Each press could adjust 5°C. Max could be set to 100°C (HH°C)
- Fix the requested temperature and leave it 3 seconds. The temperature is set well.
- If need to change the temperature again, again step 1.
- Only press down the knob to start the machine when time and temperature both are settled.
Set the Time:
- press Decreasing button for 2 seconds till the icon is flashing.

-
Choose Increasing button or Decreasing button, Each press could adjust 30s. Time max could be set to 40:00
-
Fix the requested time and leave it 3 seconds, then the time is set well.
-
If need to change the temperature again, again step 1.
-
Only press down the knob to start the machine when time and temperature both are settled.
【Energy Saving】mode
If no any operation after 3 min,
-
LED displayer and light will turn into dark status.
-
Push the knob to wake up the machine and continue the work. Turn the knob back to "0" location then choose working mode and press down the knob.
If no any operation after 1 hour, the machine will be under blocked. Only turn the knob back to “0”, the machine back to standby for working again.
CLEANING
- Before cleaning please remove the power cord from the socket.
- Do not immerse the housing with motor in water.
- Do not use any abrasive detergents.
- Please only use a damp to clean the outside of the housing.
- Components that have come into contact with food can be cleaned in soapy water.
- Allow the parts to dry thoroughly before reassembling the device.
TROUBLESHOOTING
| PROBLEM | EASY SOLUTION |
| Machine does not work | * There is a safety interlock switch on blender handle. Also make sure the jar is insert into housing position well.* If the motor still will not start, check the power cord and power outlet. |
| Motor slows down when working | * Amount of food may exceed maximum capacity.Remove half and process in two batches. |
| Vibrates/moves during processing | * Clean and dry the rubber feet at the bottom of the unit.* Also make sure that the maximum load capacity is not being exceeded. |
■ TECHNICAL DATA
Item reference: CEBC1000B
Model: CY-908
Rated voltage: 220-240V, 50/60Hz
Power consumption: 1000W
Heating power: 900W
Protection class: I
Manual version V1
■ PROPER DISPOSAL
Correct Disposal of this product

natural_image
Symbol of a trash bin with crossed lines indicating no waste, and a solid black rectangle below (no text or labels)This marking indicates that this product should not be disposed with other household wastes throughout the EU. To prevent possible harm to the environment or human health from uncontrolled waste disposal, recycle it responsibly to promote the sustainable reuse of material resources. To return your used device, please use the return and collection systems or contact the retailer where the product was purchased. They can take this product for environmental safe recycling.
Continental Edison
120-126 Quai de Bacalan
CS 11584
33000 Bordeaux
IMPORT BY :
A.M.C.
123, QUAI JULES GUESDE
94400 VITRY SUR SEINE
France

natural_image
Two overlapping gray semicircles on white background, no text or symbols presentContinental Edison
www.continentaledison.fr


- Continental Edison
- BLENDER CHAUFFANT - HEATING BLENDER
- CONSIGNES DE SÉCURITÉ
- ■ MISE AU REBUT APPROPRIÉE
- For cool and hot blending processing:
- For steam preparation:
- BEFORE CONNECTING TO POWER
- CONTROL AND MODE DETAILS
- Important information:
- DIY control panel:
- Control panel
- 【Stepless Speed control】mode --- cool processing.
- 【Pulse】mode --- cool processing.
- 【Thick soup】mode --- heating processing.
- 【Smoothies Soup】mode --- heating processing.
- 【Boiling / Steam】mode --- heating processing.
- 【Manual / D.I.Y】mode --- heating processing.
- Set the temperature:
- Set the Time:
- 【Energy Saving】mode
- CLEANING
- ■ TECHNICAL DATA
- ■ PROPER DISPOSAL
- Correct Disposal of this product
- IMPORT BY :
Brand : CONTINENTAL EDISON
Model : CEBC1000B
Category : Blender