
CERVC001 - Robot vacuum CONTINENTAL EDISON - Free user manual and instructions
Find the device manual for free CERVC001 CONTINENTAL EDISON in PDF.

| Product Type | Robot vacuum cleaner |
| Brand | Continental Edison |
| Model | CERVC001 |
| Dimensions (diameter x height) | 286 mm x 75 mm |
| Net weight | Approximately 1.70 kg |
| Power supply | Rechargeable NiMH battery 7.2 V 1300 mAh |
| Charger input voltage | 100-240 V AC 50-60 Hz |
| Charger output voltage | 12 V, 600 mA |
| Charging time | 3 to 4 hours |
| Continuous runtime | > 60 minutes |
| Dustbin capacity | 0.3 L |
| Main brush width | 240 mm |
| Usage | Indoor only, hard floors and low/medium pile carpets |
| Main functions | Automatic cleaning, obstacle and stair detection, automatic shutdown on low battery |
| Sensors | Drop sensor, obstacle sensor, light sensor |
| Brushes | Side brush, central brush (removable) |
| Maintenance and cleaning | Empty dustbin, clean brushes and sensors, use a soft dry cloth |
| Safety | Do not use on stairs or balconies (no step avoidance sensor), do not immerse, unplug before cleaning |
| Replacement parts and repairability | Battery replaceable by qualified technician, side and central brushes replaceable |
| LED indicator | Steady on: stand-by/full charge; fast blinking: problem; slow blinking: low battery |
| Warranty | Does not cover normal wear, misuse, unauthorized repair |
| Disposal | Product and battery subject to selective sorting (WEEE), do not dispose with household waste |
Frequently Asked Questions - CERVC001 CONTINENTAL EDISON
User questions about CERVC001 CONTINENTAL EDISON
0 question about this device. Answer the ones you know or ask your own.
Ask a new question about this device
Download the instructions for your Robot vacuum in PDF format for free! Find your manual CERVC001 - CONTINENTAL EDISON and take your electronic device back in hand. On this page are published all the documents necessary for the use of your device. CERVC001 by CONTINENTAL EDISON.
USER MANUAL CERVC001 CONTINENTAL EDISON
natural_image
Abstract geometric shapes resembling partial arcs or crescent, rendered in grayscale with no text or symbols.Continental Edison

natural_image
Technical line drawing of a circular mechanical component with concentric rings and central features (no text or symbols)ASPIRATEUR ROBOT
CERVC001
GUIDE D'UTILISATION
AVERTISSEMENTS ET CONSEILS DE SECURITE IMPORTANTS
natural_image
Close-up of a hand pressing down on a dark mechanical component with visible wear and grooves (no text or symbols)B. Comment charger
natural_image
Close-up of hands holding a black object with an arrow pointing to it (no visible text or symbols)natural_image
Close-up of a mechanical component being adjusted with an arrow (no visible text or symbols)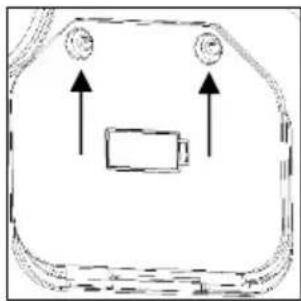
natural_image
Simple line drawing of a device with two circular components and an internal battery (no text or symbols)natural_image
Symbol of a trash bin with crossed lines indicating no waste or restriction, and a solid black rectangle below (no text or labels)natural_image
Symbol of a trash bin crossed out by a diagonal line, representing no waste or elimination (no text or labels present)natural_image
Abstract geometric shapes resembling partial crescent and angular segments (no text or symbols)Continental Edison
natural_image
Technical line drawing of a circular mechanical component with concentric rings and central features (no text or symbols)ROBOT VACUUM CLEANER
CERVC001
USER MANUAL
IMPORTANT WARNINGS AND SAFETY ADVICE
We encourage you to read this user guide carefully and completely before installing and using your device.
It is important that this user guide is kept with the device for any new consultation. If this unit is to be transferred to another person, make sure that the user guide follows the unit so that the new user can be informed of the operation of the unit. In this user guide, the following symbols are used:
 | Important information about your personal safety and how to avoid damage to the device |
 | General information and advice |
 | Risk of electric shock |
Carefully read this manual before operating the machine. Any wrong operation may cause damage or injuries.

Safety Instructions:
- Do not use next to steps or on balconies. This machine does not have step avoidance sensors.
-
This machine is not intended for use by persons (including children) with reduced physical, sensory or mental capabilities. Also it is also intended for use by those with a lack of knowledge and experience, unless they have been given instruction or supervision concerning the use of the machine by a person responsible for their safety.
-
This appliance is for indoor use only.
-
This unite is suitable for low to medium file carpet. It is not
suitable for uneven floor or in mixed carpet.
-
Take off the side brush when cleaning undercoat carpet to protect the side brush.
-
A damaged power supply should be replaced only with the original parts from manufacturer.
-
Do not use on wet or greasy dust.
-
Before operation, move away the fragile things (glass, light and etc) and other things possibly entangle brushes (long hair, plastic bag, rope, wire and etc)
-
Don't sit on the machine or put heavy things on it.
-
Clean the machine regularly. Empty the dust container.
-
Charge the machine without use for three months.
-
Charge it only when alarms for low power or power off. Use it after fully charged.
13. Recycle the battery when machine become broken.
For installation, handling, cleaning and disposal of the device, refer to the following chapters of the User's Guide.
Information on the meaning of the conformity marking

The marking C€ indicates that the product meets the main requirements of the European Directives: 2014/35/EU (Low Voltage), 2014/30/EU (Electromagnetic Compatibility), 2011/65/EU (Restriction of use of certain substances in equipment electronic)
SUMMARY
Important warnings and safety advice -21-
I. Description of the device -27-
II. Technical characteristics -28-
III. Installation -29-
IV. Before first use -30-
V. Instructions to use -31-
A. How to remove and reinstall the middle brush -31-
B. How to recharge -32-
C. How to replace battery -32-
VI. Maintenance and cleaning -34-
VII. Trouble shooting -35-
VIII. Warranty -37-
IX. Disposal -38-
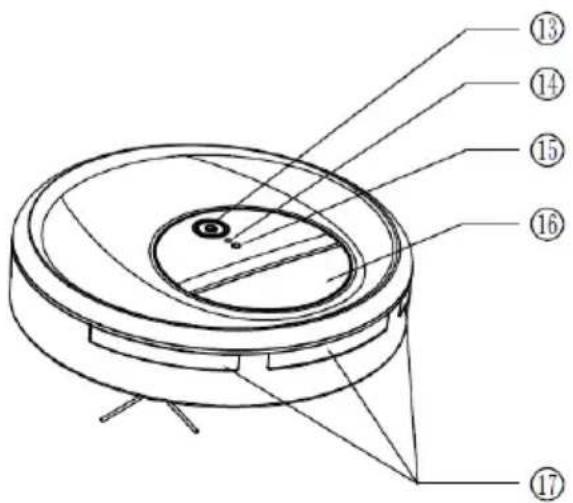
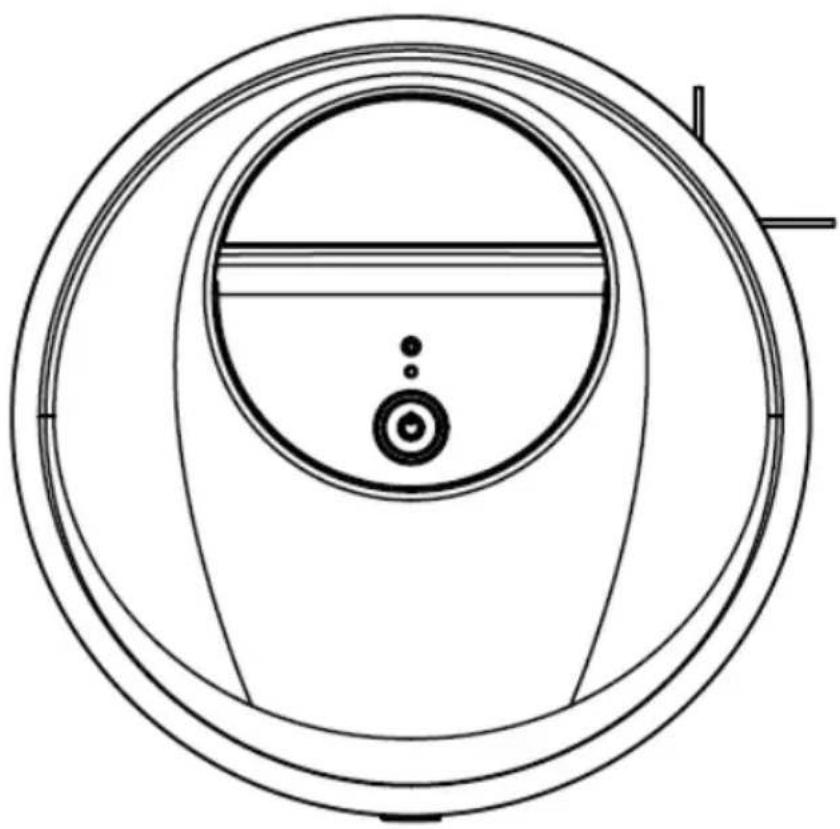
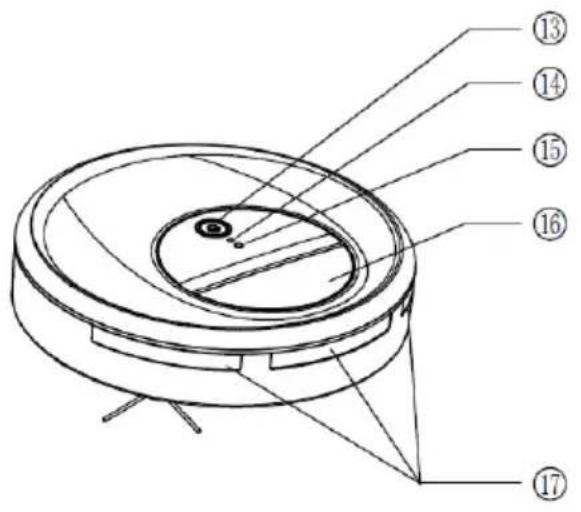
I. DESCRIPTION OF THE DEVICE
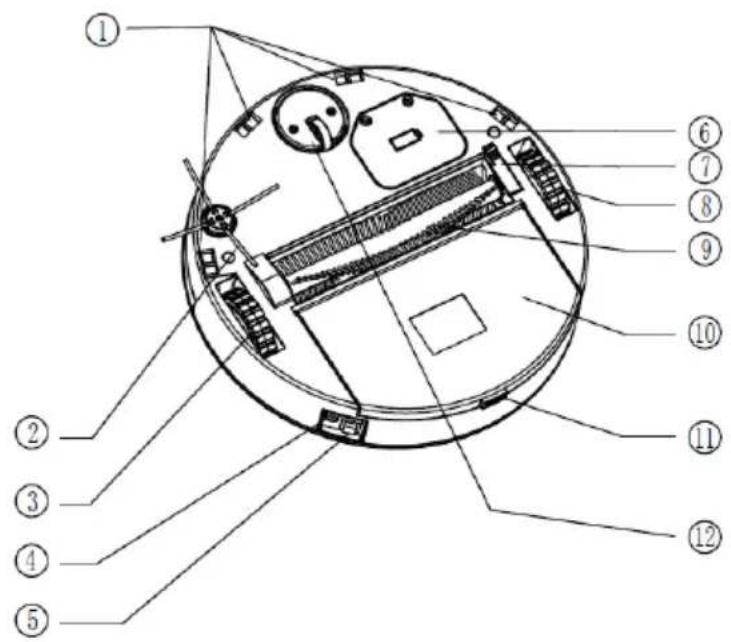
- Stair fall protection sensor
- Side brush
- Right wheel
- Charger port
- On/off button
- Battery cover
- Middle brush holder
- Left wheel
-
Brush wheel
-
Dust container
- Dust container opening button
- Universal wheel
- Start/pause button
- Led indicator
- Light sensor
- Handle
- Obstacle sensor
II. TECHNICAL CHARACTERISTICS
Technical data:
| Mark | Continental Edison |
| Model | CERVC001 |
| Power supply | Rechargeable battery |
| Voltage | Input:100-240VAC 50-60HzOutput:12V, 600mA |
| Battery | NIMH 7.2V 1300mAh |
| Charging time | 3 to 4 hrs |
| Continuous autonomy | >60 minutes |
| Capacity of dust container | 0.3L |
| Width of the brush wheel | 240mm |
| Dimensions | Diameter:286mmWidth:75mm |
| Net weight | About 1.70 kg |
III. INSTALLATION
How to assemble side brush
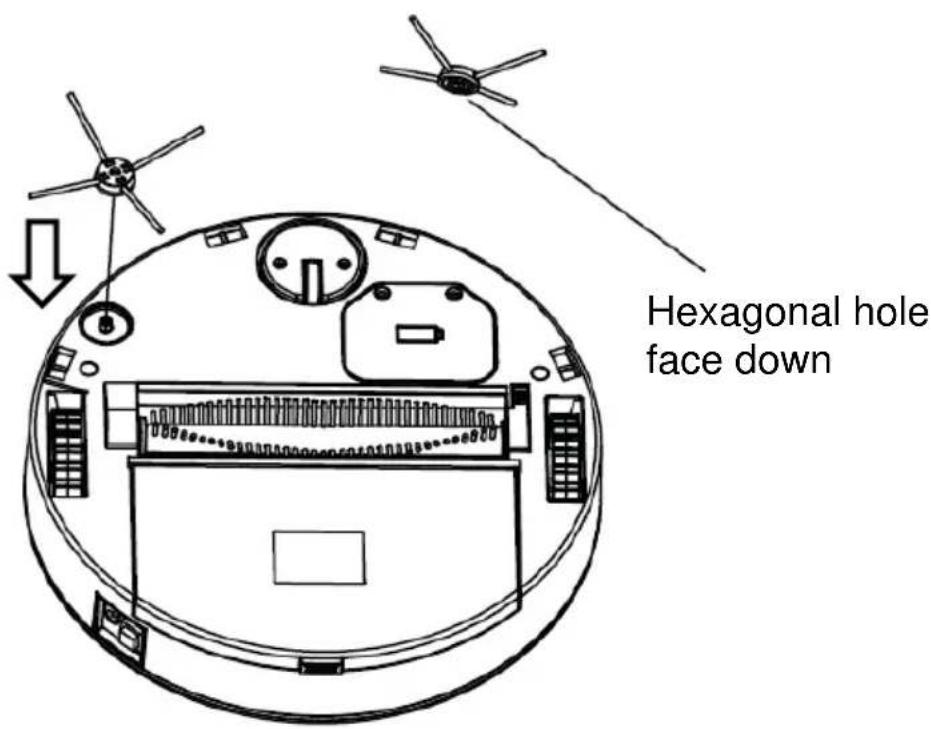
There is a hexagonal hole at the bottom of side brush, align the brush and press it until clicks in.
- Remove all packing material around the appliance and the protective elements inside the appliance compartments.
- Cartonboard and sheets of paper are recyclable. They must be thrown in the collection bins provided for this purpose.
- Materials bearing the symbol are recyclable:
PE <= polyethylene; > PS <= polystyrene; > PP <= polypropylene
This means that they can be recycled by depositing them into appropriate collection containers.
- Other packaging elements (adhesive, fasteners, etc.) must be disposed of with household waste.
To know more: www.quefairedemesdechets.fr
V. INSTRUCTIONS TO USE
- Install the side brush.
- Place the machine on the ground to be cleaned.
- Turn on the power button, music play accordingly. LED indicator is on, the machine enters standby status.
- Press start/pause button, machine starts working.
- When in operation, press start/pause button, the machine will stop temporarily.
- When machine stops unexpectedly, LED indicator quick flashes in 3Hz, please check carefully if machine being entangled or brush wheel fails to operate, if machine being entangled, take it to the spacious place to re-start, if brush wheel fails to operate, take it out and make it clean, If the machine still can not start properly, product malfunction happens, a long press on the on/off button to power off the machine, and start once again, If the malfunction can not be recovery by its own, send it to after-sale service center for repairing.
- When machine stops working, LED indicator slow flashes 1Hz, it means run out of battery, please charge it in time, the LED indicator flashes when charging and will be constantly on after fully charged, plug out the charger then.
A. How to remove and replace the main brush
Turn the robot upside down on a flat surface, press the middle brush release catch, take out the brush and wheel. Clean the brush and the side wheel and reverse procedure to reinstall.
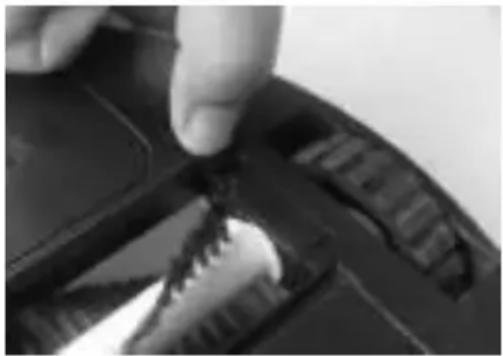
natural_image
Close-up of a hand pressing down on a black mechanical component with visible teeth and grooves (no text or symbols)B. How to recharge
Note: If the machine shuts down when working, the display shows “ ! ” and the battery light flashes, that means power shortage and the machine needs to be recharged.
- Plug the adapter into the power outlet.
- Plug the lead in the charging port next to the ON/OFF button.
- With a sound, three grids electricity dynamically flashing. The screen shows the charging status. It means the machine is charged normally.
- When fully charged, it will beep again. The display show 99% and three grids electricity fully light up. Then remove the charger.
- Plug out the charger and power cord.
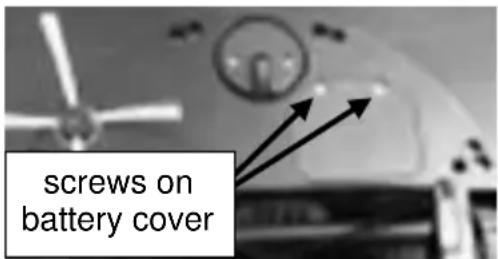
C. How to replace battery
IMPORTANT:
The battery must not be replaced by the user. For its replacement, the operation must be performed by a qualified technician. Only the battery reference recommended by the manufacturer or by the after-sales service must be used.
- Open the battery cover and take out the battery and keep the screws. Plug the lead in the charging port next to the ON/OFF button.
natural_image
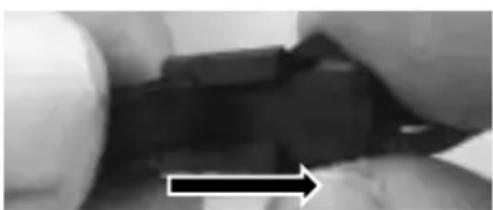
Close-up of a mechanical component with a black block and directional arrow (no visible text or symbols)-
Remove the connector. Press the lock on the connector and pull off.
-
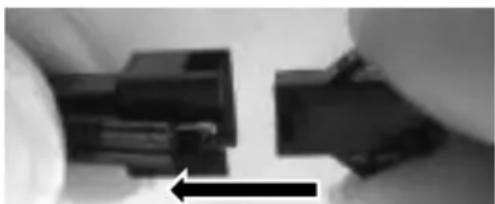
Replace with new battery; push down the lock and push the right part to the left unit your hearing it clicking into place.
natural_image
Close-up of hands holding a black mechanical component with an arrow indicating direction (no visible text or symbols)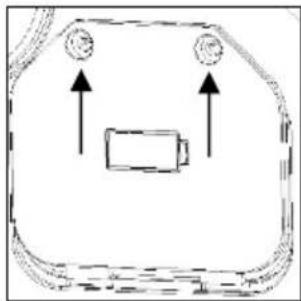
natural_image
Simple line drawing of a battery inside a rounded rectangular frame with two circular indicators above (no text or symbols)- Close the battery cover and secure it with the screws you keep.
VI. MAINTENANCE AND CLEANING
※ Make sure the unit is unplugged before cleaning.
※ Do not clean the robot, charger or battery by immersing them in water or other liquids.
- Metal parts (power plug or terminal): wipe them with a clean dry cloth.
- Plastic parts: wipe them gently by a clean, soft cloth together with water or a mild detergent.
- Never use alcohols, hydrocarbons (eg gasoline) or corrosive solvents when servicing. Use soapy water or mild detergent instead.
- Store the robot in a cool and dry place.
VII. TROUBLESHOOTING
Some malfunctions can be easily solved. Before calling your after-sales service or repairer, please consult the following table:
| Problem | Possible reason | Solution |
| Abnormal sound | The robot is blocked and no longer moves | Remove accumulated dirt around the wheel from the main brush |
| The unit is running and stops suddenly despite the full charge of the battery | The main brush wheel is stuck, it can not turn or the battery is defective. | Remove the main brush wheel and clean it. If it still does not work. Consult the dealer for replacing the battery or changing the defective part. |
| The device stops when it is in operation, the LED indicator flashes quickly | 1. The device is blocked2. The main brush wheel is blocked3. Malfunction of the machine. | 1. Move the device, turn it off and then on again.2. Clean the wheel of the main brush3. Send the unit to the after-sales service if the problem persists. |
| LED indicator flashes slowly | Low battery | Charge the battery |
| The camera is turning abnormally. | 1. Dirt around the multi-directional wheel2. Dirt on the fall sensor | 1. Remove dirt from the wheel2. Clean the fall sensor using a soft cloth or tissue. |
| The device makes trips to the same place. | Deformed ground.Object stuck under the device. | Check that the floor is flat and that no object is under the unit. |
| The device falls down the stairs | Malfunction of the fall arrest sensor | Clean the fall arrest sensor with a soft cloth or cloth. If the problem persists, send it to the after-sales service |
| The robot often stops under the bed. | 1. Dark room, lack of light2. Dirt on the light sensor | 1. Turn on the light2. Clean the sensor |
| Deformation of the side brush | Wear | Replace it with a new side brush |
| The side brush does not work | Fur or hair around the side brush | Remove fur or hair from the brush. |
| The dust bin does not close. | The open button does not work after pressing it. | Remove the screws from the dust container, remove the button cover, clean it and reposition it. |
For any other problem occurring on your device: contact the After-Sales Service.
VIII. WARRANTY
Warranty does not cover product wear parts, problems or loads
- superficial damage to the normal wear and tear of the product;
- defects or deterioration due to product contact with liquids and corrosion caused by rust or the presence of insects;
- any incident, misuse, misuse, alteration, disassembly or unauthorized repair;
- any maintenance not in accordance with the instructions for the product or connection to incorrect voltage;
- any use of accessories not supplied or not approved by the manufacturer.

The warranty will be void if the nameplate and / or serial number of the product is removed.
1. End of life of the product:
natural_image
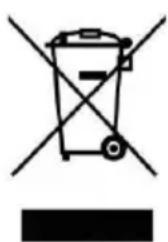
Symbol of a trash bin crossed with no text or numbers, representing waste sorting or disposal (no text present)This appliance carries the selective sorting symbol for waste electrical and electronic equipment (WEEE).
This means that this product must be supported by a selective collection system in accordance with EU Directive 2012/19 / EU so that it can either be dismantled
or recycled, and thus reduce the impact on the environment.
For more information, you can contact your local (city hall) or regional administration.
Electronic products that have not been sorted are potentially dangerous for the environment due to the presence of hazardous substances.
2. At the end of the battery life:
natural_image
Symbol of a waste bin crossed out by a diagonal line, representing no waste or disposal (no text present)This unit comes with a removable rechargeable battery that can be replaced.
Used batteries must be supported by a selective collection system in order to be recycled and thus reduce the impact on the environment.
When the battery reaches the end of its useful life, you must deposit it in an appropriate selective collection system that will be responsible for its destruction and / or recycling.
IMPORTANT :
Under no circumstances should you dispose of the device or battery on public roads.

natural_image
Abstract geometric shapes resembling partial crescent and angular form (no text or symbols)Continental Edison
- Continental Edison
- ASPIRATEUR ROBOT
- CERVC001
- AVERTISSEMENTS ET CONSEILS DE SECURITE IMPORTANTS
- Comment charger
- ROBOT VACUUM CLEANER
- IMPORTANT WARNINGS AND SAFETY ADVICE
- Carefully read this manual before operating the machine. Any wrong operation may cause damage or injuries.
- Safety Instructions:
- Recycle the battery when machine become broken.
- SUMMARY
- Important warnings and safety advice -21-
- DESCRIPTION OF THE DEVICE
- TECHNICAL CHARACTERISTICS
- INSTALLATION
- How to assemble side brush
- INSTRUCTIONS TO USE
- How to remove and replace the main brush
- How to recharge
- How to replace battery
- IMPORTANT:
- MAINTENANCE AND CLEANING
- TROUBLESHOOTING
- WARRANTY
- End of life of the product:
- At the end of the battery life:
- IMPORTANT :
Brand : CONTINENTAL EDISON
Model : CERVC001
Category : Robot vacuum