
ECO Design G90003 - Vacuum Cleaner G3 Ferrari - Free user manual and instructions
Find the device manual for free ECO Design G90003 G3 Ferrari in PDF.

| Product type | Vacuum cleaner |
| Brand | G3 Ferrari |
| Model | ECO Design G90003 |
| Power supply | AC 220-240 V, 50-60 Hz, 700 W |
| Annual energy consumption | 26 kWh/year |
| Suction power | 17-20 kPa |
| Filtration system | Cyclonic and HEPA filter |
| Power cord length | 4.8 m |
| Automatic cord rewind | Yes |
| Dust container type | Bagless, transparent dust container |
| Dust container capacity | Not specified |
| Included accessories | Flexible hose, telescopic tube, floor brush, multi-function nozzle with mini brush |
| Power adjustment | By air regulator on the handle |
| Floor brush type | Adjustable for carpets and hard floors |
| Container maintenance | Empty frequently, clean filters |
| Filter cleaning | Tap or rinse with warm water (drying mandatory) |
| Filter replacement | Original filters available |
| Safety | Do not vacuum sharp objects, liquids, flammable or explosive items |
| Overheating protection | Automatic shutdown in case of overheating |
| Reparability | Contact an authorized service center |
| Usage | Indoor only, dry surfaces |
Frequently Asked Questions - ECO Design G90003 G3 Ferrari
User questions about ECO Design G90003 G3 Ferrari
0 question about this device. Answer the ones you know or ask your own.
Ask a new question about this device
Download the instructions for your Vacuum Cleaner in PDF format for free! Find your manual ECO Design G90003 - G3 Ferrari and take your electronic device back in hand. On this page are published all the documents necessary for the use of your device. ECO Design G90003 by G3 Ferrari.
USER MANUAL ECO Design G90003 G3 Ferrari
natural_image
Close-up of a modern vacuum cleaner with exposed internal components and metallic casing (no text or symbols visible)Aspirapolvere Ciclone Cyclone vacuum cleaner
ECO DESIGN
ITA: INDICE
Simbologia.... p. 2
Safety instructions.... p. 8
General information.... p. 10
Description G90003 p. 11
Assembling the accessories p. 11
Operating controls....p. 11
Removing the container p. 12
Filter maintenance p. 12
Floor brush....p. 12
Storage....p. 12
Maintenance and Cleaning....p. 12
Technical features....p. 13
Waste of electric and electronic equipment (WEEE Directive)....p. 19
FRANCAIS:....p. 13
CLASSI DI PROTEZIONE / PROTECTION CLASSES
ATTENZIONE RISCHIO DI SCOSSE ELETTRICHE NON ESPORRE A PIOGGIA E UMIDITA'
WARNING ELECTRIC SHOCK RISK DO NOT EXPOSE TO RAIN OR MOISTURE

ATTENZIONE: NON APRITE L'APPARECCHIO. ALL'INTERNO NON VI SONO COMANDI MANIPOLABILI DALL'UTENTE NE' PARTI DI RICAMBIO. PER TUTTE LE OPERAZIONI DI SERVIZIO RIVOLGERSI AD UN CENTRO DI ASSISTENZA AUTORIZZATO.
This symbol warns the user that un-insulated dangerous voltage inside the system may cause an electrical shock. Do not open the case.
Class II Appliance symbol. The double insulated electrical appliance is one which has been designed in such a way that it does not require a safety connection to electrical earth/ground.
Caution: this symbol reminds the user to read carefully the important operations and maintenance instructions in this owner's guide.
AVVERTENZE DI SICUREZZA
natural_image
Line drawing of a vacuum cleaner with handle and wheels (no text or symbols)UTILIZZO DELLA SPAZZOLA PER PAVIMENTI
ENGLISH: SAFETY INSTRUCTIONS
The following are important notes on the installation, use and maintenance; save this instruction manual for future reference; use the equipment only as specified in this guide; any other use is considered improper and dangerous; therefore, the manufacturer cannot be held responsible in the event of damages caused by improper, incorrect or unreasonable use.
Before use, ensure the equipment is undamaged; if in doubt, do not attempt to use it and contact the authorized service center; do not leave packing materials (i.e. plastic bags, polystyrene foam, nails, staples, etc.) within the reach of children as they are potential sources of danger; always remember that they must be separately collected. Make sure that the rating information given on the technical label are compatible with those of the electricity grid; the installation must be performed according to the manufacturer's instructions considering the maximum
power of the appliance as shown on the label; an incorrect installation may cause damage to people, animals or things, for which the manufacturer cannot be considered responsible thereof.
If it is necessary to use adapters, multiple sockets or electrical extensions, use only those that comply with current safety standards; in any case do not exceed the power consumption limits indicated on the electrical adapter and / or extensions, as well as the maximum power shown on multiple adaptor.
Do not leave the unit plugged; better to remove the plug from the mains when the device is not in use. Always disconnect from power supply if you leave it unattended.
Cleaning operations should be carried out after unplugging the unit.
If the unit is out of order and you do not want to fix it, it must be made inoperable by cutting power cord.
- Do not allow the power cord to get closer to sharp objects or in contact with hot surfaces; do not pull it to disconnect the plug.
- Do not use the appliance in the event of damage to the power cord, plug, or in case of short circuits; to repair the product only address an authorized service center.
- Do not handle or touch the appliance with wet hands or bare feet. Do not expose the appliance to harmful weather conditions such as rain, moisture, frost, etc.. Always store it in a dry place.
- This appliance can be used by children of 8 years and above and persons with reduced physical, sensory or mental capabilities or lack of experience and knowledge if they received supervision or instruction concerning use of the appliance in a safe way and understand hazards involved; children shall not play with the appliance; cleaning and user maintenance shall not be made by children without supervision.
- Children must not play with the appliance. - Keep the appliance and its cord out of reach of children less than 8 years.
If the power cord is damaged, or in case of failure and / or malfunction do not tamper with the unit. The reparation must be done by manufacturer or by service center authorized by the manufacturer in order to prevent any risk. Failure to comply with the above may compromise the unit safety and invalidate the warranty.
This appliance is intended to be used in household and similar applications such as: staff kitchen areas in shops, offices and other working environments; by clients in hotels, motels and other residential type environments; farm houses, bed and breakfast type environments.
The appliance is not intended to be operated by means of an external timer or separate remote-control system.
Before every use, unroll the power cord.
Use original spare parts and accessories only.
Do not subject the product to strong impacts, serious damages may result. Do not use near or under flammable materials (like curtains), heat, cold spots and steam.
GENERAL INFORMATION
CAUTION: Do not vacuum sharp objects, liquids, flammable, explosive or hazardous to health materials, acids, combustible objects such as cigarettes or firebrands.
If you need to change a filter, make sure that the re-assembly is made properly and new filters are not wet or damp. In this case, wait for it to dry completely before assembling.
Do not expose the appliance to high temperatures and do not bring it closer to heat sources.
Never leave the appliance unattended while it is running. Only use the button to turn on or off the vacuum cleaner.
In case of overheating, if the unit produces smoke, smell or unusual noises, turn it off immediately and check that the pipe is free from obstacles. If the tube is free, contact the service center for fixing it.
To avoid serious damage, do not walk on the power cord. Disconnect the plug from the electrical outlet immediately after use. Additionally it is advisable to wind the power cord in order to ensure a better cleaning and to avoid any risk of damage.
Do not immerse the motor unit in water or other liquids, clean it with a damp cloth only.
Do not use the appliance if the dust bin is not installed.
Do not use the product without proper filtering system assembled: this may seriously damage the engine avoiding the warranty. Use only on dry surfaces.
Caution when using the device on the stairs.
CAUTION: while the unit is running, do not approach the air inlet to ears, eyes, etc., or to fragile items such as vases, tools, electronic machines.
DESCRIPTION G90003
-
Power button 2. Power cord rewind button 3. Suction nozzle
-
Dust bin 5. Handle 6. Resting hook
-
Air outlet filter 8. Flexible hose 9. Central pivot wheel
-
Hose handle
-
Air regulator
-
Telescopic tube
-
Brush
A. Dust bin release button
B. Dust bin cover lid
C. Opening lid button
D. Cyclone Pre-
filterL and M are protective plastics. Remove before using.
ASSEMBLING THE ACCESSORIES
- Insert the hose (8) in the suction nozzle (3), pushing it until blocking. The flexible hose terminates in the handle (10), a curved tube equipped with a hole for adjusting the air flow (11). With this controller you can reduce or increase the suction power. Fit the telescopic tube (12) to the handle (10). The tube can be extended pushing the black button present on the tube.
- Attach the floor brush (13) (normal or parquet) or the nozzle to the extension tube. The nozzle can be oriented horizontally or vertically depending on the type of area you need to clean and is equipped with a mini-brush. Pull out the power cord to the desired length and plug it to the main electrical outlet.
OPERATING CONTROLS
- Power on: press the power button (1) and the device is turned on/off.
- Cable rewind: after use, unplug the appliance from the electrical outlet and press the button (2) to rewind the power cord.
CAUTION: when rewinding the power cord, it is recommended to pick up the plug to avoid whiplash.
REMOVING THE CONTAINER
The dust bin (4) must be emptied when full of dust. In any case empty it frequently, in order to ensure good performance of the vacuum cleaner and to prevent any leak in the air flow power.
To empty the bin, follow the instructions below:
- Grasp the handle of the dust bin (4) and press the release button of the container (A); remove the dust bin from the unit by pulling it out.
- Bring the dust container (4) over a bin and press the release button (C) which is located on the back of the container. This button will open the door dropping all the dirt. It is recommended to do this outdoors to avoid soiling the house when the dust comes out of the trash.
- Lightly beat the dust container to bring down the last remnants.
- Close the door. Install the dust bin (4) on the main unit by matching the openings for air circulation by pushing it until you hear a click.
FILTER MAINTENANCE
DISASSEMBLING THE FILTER SYSTEM
Once extracted dust container (4), to disassemble the filter (F) from the dust bin (4), follow the steps below:
- Grasp the handle (5) of the container (4) and turn the cover lid anticlockwise.
- Remove the filter assembly from the dust container (4).
- Lift the blocking clip of the lid (B) and open the lid.
- Clean the filter that is under the lid as described in the next paragraph.
- At the end of the cleaning process, re-assemble as follows
o insert the filter.
○ Attach the lid to the bin (4) by turning clockwise.
- Install the container (4) on the main body of the unit.
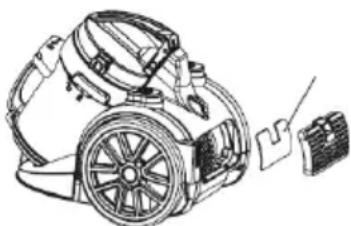
The air-outlet filter is placed in the rear of the unit, at the right of the resting hook (6). To remove it, follow the steps below:
- Remove the grid by pulling the tab and remove the filter inside.
- Clean the filter as shown in the next section.
- During installation make sure to properly assemble the filter and the grid.
CLEANING FILTERS
natural_image
Line drawing of a vacuum cleaner with wheels and attached electrical socket (no text or symbols)The filters can be cleaned in various ways. For a brief cleaning lightly beat them on a trash can.
For a more thorough cleaning using compressed air or rinse with warm water. In this case, DRY THEM THOROUGHLY.
Caution: Do not use detergent to clean the filters, the cyclone or the container. The filters must be completely dry before being assembled again.
FLOOR BRUSH
The floor brush can be adjusted in two ways, depending on the type of floor to clean. The position are: a) For carpets b) For floors
STORAGE Rewind the power cord by using the button (2) and place the floor brush into the proper resting hook (6) placed on the back of the unit.
MAINTENANCE AND CLEANING
MAINTENANCE
Normally this vacuum cleaner is not very noisy. But when the dust bin is full the noise emitted changes and the suction power decreases. To lengthen the life of the product, it is recommended to empty the dust bin frequently.
Even the filters, as mentioned previously, should be cleaned periodically. These filters can also be damaged or depleted; in these cases they should be replaced with original new ones.
CLEANING
CAUTION: Before attempting any cleaning operation, ensure that the unit is turned off and the power
plug is disconnected from the main electrical outlet.
Clean the body of the unit with a damp non-abrasive cloth, avoid using detergents or abrasive cleaners. The cloth should not be too wet, because if the water penetrates into the device, it can seriously damage the appliance. To clean the filters and the dust bag, please follow the previous instructions.
TECHNICAL FEATURES
• Power supply: AC 220-240V\~50-60Hz\~700W
• Power consumption 26 kWh/year
• Suction power 17-20 Kpa
• Cyclone system and HEPA filter
• Power cord length: 4,8 m
• Power cord rewinding system
- Accessories: flexible hose, telescopic tube, floor brush, parquet brush, multi-function nozzle SPARE FILTERS: ask to your reseller the spare filter set, model G3FERRARI G90004
FRANÇAIS: AVERTISSEMENT
natural_image
Line drawing of a vacuum cleaner with attached mechanical components (no text or symbols)NETTOYAGE DES FILTRES
The product is made of non-biodegradable and potentially polluting substances if not properly disposed of; other parts can be recycled. It’s our duty to contribute to the ecological health of the environment following the correct procedures for disposal. The crossed out wheelie bin symbol indicates the product complies with the requirements of the new directives introduced to protect the environment (2002/96/EC, 2003/108/EC, 2002/95/EC, 2012/19/EC) and must be properly disposed at the end of its lifetime. If you need further information, ask for the dedicated waste disposal areas at your place of residence. Who does not dispose of the product as specified in this section shall be liable according to the law.
RÉSIDUS D'APPAREILS ELÉCTRIQUES ET ELÉCTRONIQUES
To find the nearest service center, please call the telephone number 0541 694246, fax number 0541 756430 or contact us at assistenzatecnica@trevidea.it asking for the service centers supervisor.
Appliance is conform to the pertinent European regulation and is therefore marked with the CE mark.

www.g3ferrari.it TREVIDEA S.r.l.
TREVIDEA S.R.L. – Strada Consolare Rimini – San Marino n. 62 – 47924 – RIMINI (RN) - ITALY
MADE IN CHINA

- ITA: INDICE
- CLASSI DI PROTEZIONE / PROTECTION CLASSES
- ATTENZIONE RISCHIO DI SCOSSE ELETTRICHE NON ESPORRE A PIOGGIA E UMIDITA'
- WARNING ELECTRIC SHOCK RISK DO NOT EXPOSE TO RAIN OR MOISTURE
- AVVERTENZE DI SICUREZZA
- UTILIZZO DELLA SPAZZOLA PER PAVIMENTI
- ENGLISH: SAFETY INSTRUCTIONS
- GENERAL INFORMATION
- DESCRIPTION G90003
- ASSEMBLING THE ACCESSORIES
- OPERATING CONTROLS
- REMOVING THE CONTAINER
- FILTER MAINTENANCE
- DISASSEMBLING THE FILTER SYSTEM
- CLEANING FILTERS
- FLOOR BRUSH
- MAINTENANCE AND CLEANING
- MAINTENANCE
- CLEANING
- plug is disconnected from the main electrical outlet.
- TECHNICAL FEATURES
- FRANÇAIS: AVERTISSEMENT
- NETTOYAGE DES FILTRES
- RÉSIDUS D'APPAREILS ELÉCTRIQUES ET ELÉCTRONIQUES
Brand : G3 Ferrari
Model : ECO Design G90003
Category : Vacuum Cleaner