
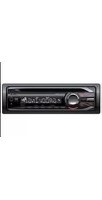
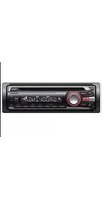
XAV9500ES - Cd player/recorder SONY - Free user manual and instructions
Find the device manual for free XAV9500ES SONY in PDF.
| Product Type | CD player/recorder for vehicle |
| Brand | Sony |
| Model | XAV9500ES |
| Dimensions (W × H × D) | 182 mm × 53 mm × 160 mm |
| Weight | 2.5 kg |
| Power Supply | 12 V DC battery (negative ground), rated current 10 A |
| Display | 10.1 inches (257 mm) color LCD, active matrix TFT, resolution 1280×720 |
| FM Radio Section | Range 87.5 – 107.9 MHz, sensitivity 7 dBf, signal-to-noise ratio 70 dB |
| AM Radio Section | Range 530 – 1710 kHz, sensitivity 32 μV |
| USB Port | USB Type-C high speed, max current 3.0 A |
| Bluetooth | 2.4 GHz band, range ~10 m, profiles A2DP, AVRCP, HFP |
| Wi-Fi | IEEE 802.11 a/n/ac, 5 GHz band |
| Power Amplifier | 55 W × 4 (max), speaker impedance 4 – 8 Ω |
| Main Functions | CD playback, FM/AM radio, Apple CarPlay, Android Auto, SiriusXM Ready, Bluetooth hands-free, voice control, rear camera, GPS |
| Maintenance and Cleaning | Clean the screen with a soft, dry cloth; do not use solvents |
| Safety | Do not open the case; avoid moisture and shocks; observe RF exposure distances (20 cm) |
| Spare Parts and Accessories | Remote control RM-X400, SiriusXM Connect receiver (SXV100, SXV200, SXV300), iDataLink Maestro module |
| General Information | Manual downloadable free of charge; firmware update via USB or Internet |
Frequently Asked Questions - XAV9500ES SONY
User questions about XAV9500ES SONY
0 question about this device. Answer the ones you know or ask your own.
Ask a new question about this device
Download the instructions for your Cd player/recorder in PDF format for free! Find your manual XAV9500ES - SONY and take your electronic device back in hand. On this page are published all the documents necessary for the use of your device. XAV9500ES by SONY.
USER MANUAL XAV9500ES SONY
Operating Instructions
GB
Mode d'emploi
FR
The model and serial numbers are located on the bottom of the unit.
Record the serial number in the space provided below.
Refer to these numbers whenever you call upon your Sony dealer regarding this product.
Model No. XAV-9500ES
Serial No. ____
To cancel the demonstration (Demo Mode) display, see page 8.

XAV-9500ES(UC)
https://rd1.sony.net/help/ev/xav-95/h_zz/

Warning
For safety, be sure to install this unit in the dashboard of the car as the rear side of the unit becomes hot during use.
For details, see "Connection/Installation" (page 11).
The nameplate indicating operating voltage, etc., is located on the bottom of the chassis.
WARNING
To prevent fire or shock hazard, do not expose the unit to rain or moisture.
To avoid electrical shock, do not open the cabinet. Refer servicing to qualified personnel only.
FOR THE CUSTOMERS IN THE USA. NOT APPLICABLE IN CANADA, INCLUDING IN THE PROVINCE OF QUEBEC.
POUR LES CLIENTS AUX ÉTATS-UNIS. NON APPLICABLE AU CANADA, Y COMPRIS LA PROVINCE DE QUÉBEC.
This equipment has been tested and found to comply with the limits for a Class B digital device, pursuant to Part 15 of the FCC Rules. These limits are designed to provide reasonable protection against harmful interference in a residential installation. This equipment generates, uses, and can radiate radio frequency energy and, if not installed and used in accordance with the instructions, may cause harmful interference to radio communications. However, there is no guarantee that interference will not occur in a particular installation. If this equipment does cause harmful interference to radio or television reception, which can be determined by turning the equipment off and on, the user is encouraged to try to correct the interference by one or more of the following measures:
- Reorient or relocate the receiving antenna.
- Increase the separation between the equipment and receiver.
- Connect the equipment into an outlet on a circuit different from that to which the receiver is connected.
- Consult the dealer or an experienced radio/TV technician for help.
You are cautioned that any changes or modifications not expressly approved in this manual could void your authority to operate this equipment.
This device complies with part 15 of FCC Rules and Innovation, Science and Economic Development Canada's licence-exempt RSS(s). Operation is subject to the following two conditions:
(1) this device may not cause harmful interference, and
(2) this device must accept any interference received, including interference that may cause undesired operation.
This transmitter must not be co-located or operated in conjunction with any other antenna or transmitter.
This equipment complies with FCC/ISED radiation exposure limits set forth for an uncontrolled environment and meets the FCC radio frequency (RF) Exposure Guidelines and RSS-102 of the ISED radio frequency (RF) Exposure rules. This equipment should be installed and operated keeping the radiator at least 20 cm or more away from person's body.
Data transmission is always initiated by software, which is the passed down through the MAC, through the digital and analog baseband, and finally to the RF chip. Several special packets are initiated by the MAC. These are the only ways the digital baseband portion will turn on the RF transmitter, which it then turns off at the end of the packet. Therefore, the transmitter will be on only while one of the aforementioned packets is being transmitted. In other words, this device automatically discontinue transmission in case of either absence of information to transmit or operational failure.
If you have any questions about this product:
Visit: https://www.sony.com/electronics/support
Contact: Sony Customer Information Service Center at 1-800-222-7669
Write: Sony Customer Information Service Center 12451 Gateway Blvd., Fort Myers, FL 33913
Supplier's Declaration of Conformity Trade Name: SONY
Model: XAV-9500ES
Responsible Party: Sony Electronics Inc.
Address: 16535 Via Esprillo, San Diego, CA 92127 U.S.A.
Telephone Number: 858-942-2230
This device complies with part 15 of the FCC rules.
Operation is subject to the following two conditions:
(1) This device may not cause harmful interference, and
(2) this device must accept any interference received, including interference that may cause undesired operation.
Warning if your car's ignition has no ACC position
Do not install this unit in a car that has no ACC position. The display of the unit does not turn off even after turning the ignition off, and this causes battery drain.
Disclaimer regarding services offered by third parties
Services offered by third parties may be changed, suspended, or terminated without prior notice. Sony does not bear any responsibility in these sorts of situations.
About Change of the Unit
For the latest functions, refer to "Help Guide" on the website.
The QR code and URL can be found on the front cover.
Important notice
Caution
IN NO EVENT SHALL SONY BE LIABLE FOR ANY INCIDENTAL, INDIRECT OR CONSEQUENTIAL DAMAGES OR OTHER DAMAGES INCLUDING, WITHOUT LIMITATION, LOSS OF PROFITS, LOSS OF REVENUE, LOSS OF DATA, LOSS OF USE OF THE PRODUCT OR ANY ASSOCIATED EQUIPMENT, DOWNTIME, AND PURCHASER'S TIME RELATED TO OR ARISING OUT OF THE USE OF THIS PRODUCT, ITS HARDWARE AND/OR ITS SOFTWARE.
Dear customer, this product includes a radio transmitter.
Please check your vehicle operation manual or contact the manufacturer of your vehicle or your vehicle dealer, before you install this product into your vehicle.
Emergency calls
This BLUETOOTH car handsfree and the electronic device connected to the handsfree operate using radio signals, cellular, and landline networks as well as user-programmed function, which cannot guarantee connection under all conditions.
Therefore do not rely solely upon any electronic device for essential communications (such as medical emergencies).
On BLUETOOTH communication
- Microwaves emitting from a BLUETOOTH device may affect the operation of electronic medical devices. Turn off this unit and other BLUETOOTH devices in the following locations, as it may cause an accident.
- where inflammable gas is present, in a hospital, train, airplane, or petrol station
- near automatic doors or a fire alarm
- This unit supports security capabilities that comply with the BLUETOOTH standard to provide a secure connection when the BLUETOOTH wireless technology is used, but security may not be enough depending on the setting. Be careful when communicating using BLUETOOTH wireless technology.
- We do not take any responsibility for the leakage of information during BLUETOOTH communication.
If you have any questions or problems concerning your unit that are not covered in this manual, consult your nearest Sony dealer.
Main Unit and Remote Commander
Main unit
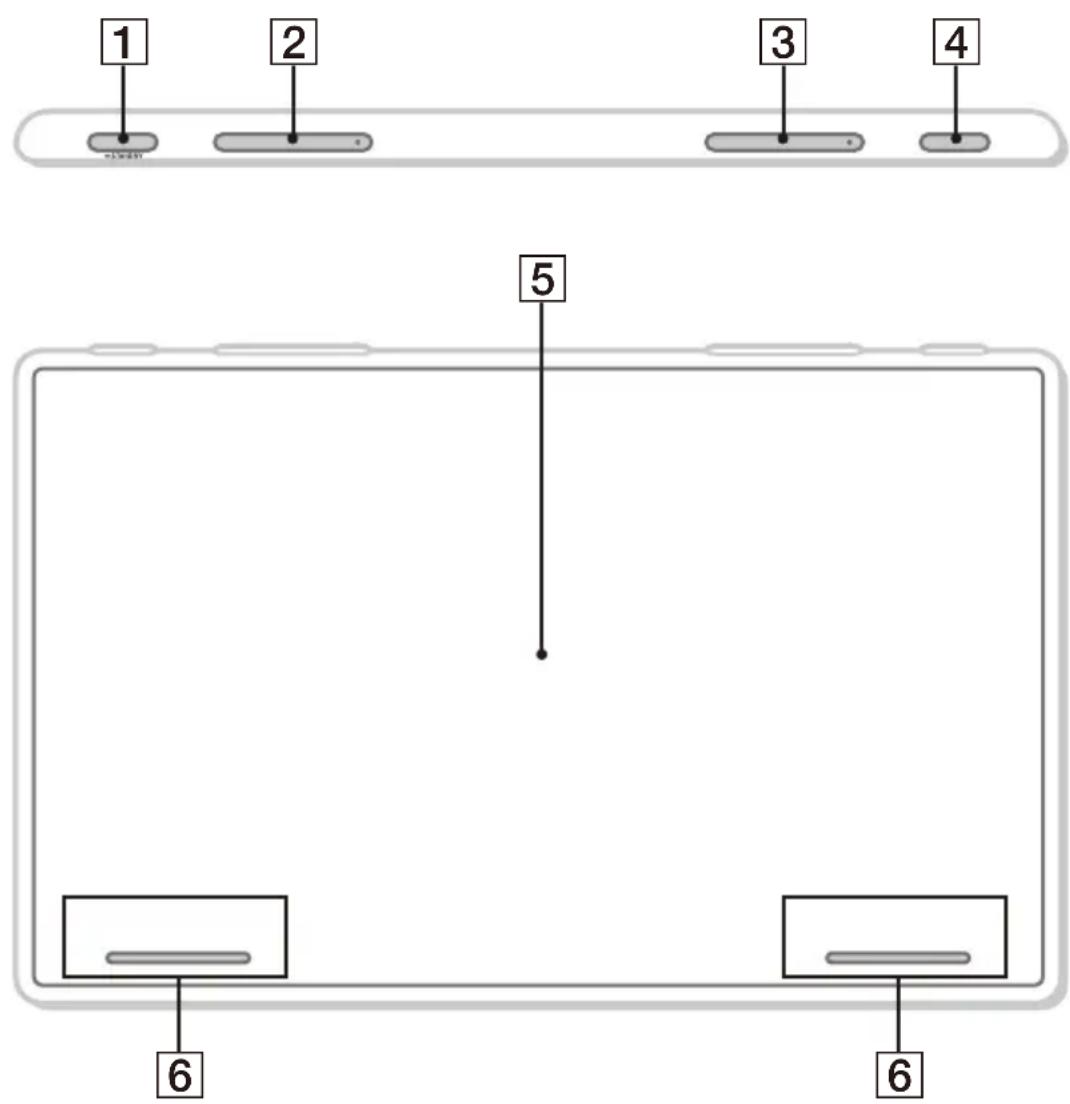
The VOL (volume) +/ ▶▶▶I (next) buttons have a tactile dot.
1 HOME
Displays the HOME screen (page 6).
STANDBY
Press and hold to turn off the unit.
Press and hold for more than 10 seconds to reset the unit.
2 VOL (volume) +/-
3 ◀◀◀ /▶▶▶ (previous/next)
Functions differently depending on the selected source:
– [Radio]: select a preset station.
– [SiriusXM]: select a preset channel.
- [USB]/[Bluetooth Audio]: move to the previous/next content.
- [Apple CarPlay]/[Android Auto]: move to the previous/next content.
Press and hold to:
– [Radio]: tune into a station automatically (SEEK+/SEEK−).
- [USB]/[Bluetooth Audio]: fast-reverse/fast-forward.
4 VOICE
Activates the voice command function for Apple CarPlay and Android Auto ^™ .
5 Display/touch screen
6 Custom Key 1/2
Registers functions (Mute, Disp. Off, Source Change, Home, Next, Previous, Vol +, Vol -, None).
To register, select [Settings] → [Customize] → [Custom Key].
RM-X400 remote commander (not supplied)
The RM-X400 remote commander is recommended. You can use it to operate the audio controls. For menu operations, use the touch screen.
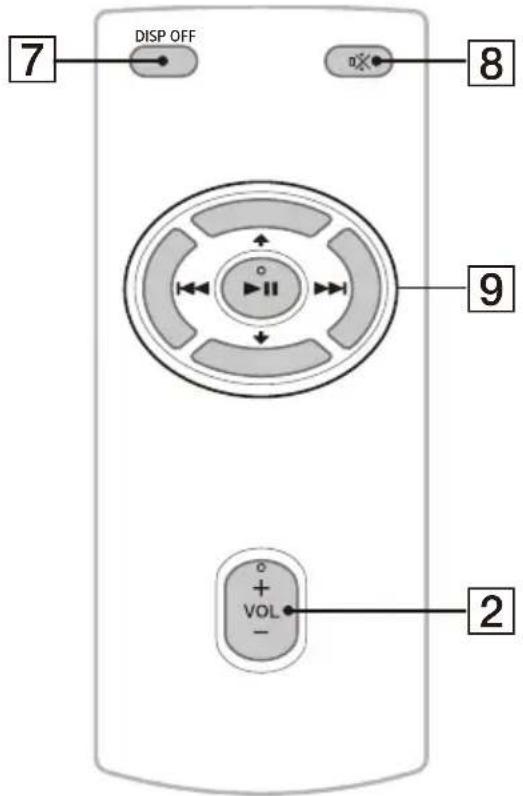
The VOL (volume) +/ ▶II (play/pause) buttons have a tactile dot.
7 DISP OFF (display off)
Turns off the display.
To turn back on, press again.
8 (mute)
Mutes the sound. To cancel, press again.
9 ▶II (play/pause)
I◄◄/►►I (previous/next)
Functions differently depending on the selected source:
- [Radio]: select a preset station.
- [SiriusXM]: select a preset channel.
– [USB]/[Bluetooth Audio]: move to the previous/next content. - [Apple CarPlay]/[Android Auto]: move to the previous/next content.
Press and hold to:
- [Radio]: tune into a station automatically (SEEK+/SEEK-).
- [USB]/[Bluetooth Audio]: fast-reverse/fast-forward.
Tip
The RM-X400 remote commander is available online at https://encompass.com.
Screen Displays
Playback screen:
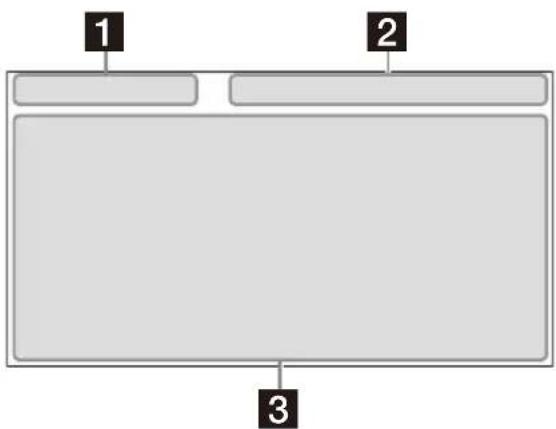
HOME1 screen:

flowchart
graph TD
    A["4"] --> B[" "]
    C["5"] --> D[" "]
    E["6"] --> F[" "]
    G["7"] --> H[" "]
    H --> I["Arrow Symbol"]
HOME2 screen:

flowchart
graph TD
    A["Process Block 6"] --> B["Checkmark"]
    C["Process Block 8"] --> B
    D["Process Block 9"] --> B
1 Status indication (left side)
→ (back) Returns to the previous display.
≡ (list) Opens the list. The available lists differ depending on the source.
2 Status indication (right side)
Clock Displays the time which was set on the Date/Time setting.
※ (mute) Lights up when the sound is muted.
… (option) Opens the source option menu. The available items differ depending on the source.
☐ (device) Displays the device's name to connect to the unit.
(antenna) Indicates the signal strength status of the connected mobile phone.
(battery) Indicates the remaining battery status of the connected mobile phone.
3 Application specific area
Displays playback controls/indications or show the unit's status. Displayed items differ depending on the source.
4 ©(Apple CarPlay)/ (Android Auto)
Displays when connecting Apple CarPlay/Android Auto.
5 Clock
Displays the date and time which were set on the Date/Time setting.
6 Apps area (Favorite)
Up to 5 Apps can be set. Apps can be changed. You can set your Favorite Apps.
7 All Apps
Opens the HOME2 screen.
8 \Close
Returns to the HOME1 screen.
9 Apps area
Displays all Apps except for Favorite Apps.
Apps icon list
| [TY02] | Android Auto | Apple CarPlay | Radio | ||
 | SiriusXM | Bluetooth | USB | ||
| [WXX6] | Settings Phone | RearCam | |||
| [3000] | Camera 1 Camera 2 Devices | ||||
| [KSTH] | Gauges*1*2 | Park Assist*1*2 | Vehicle Info*1*2 | ||
| [HBK2] | Climate*1*2 | Satellite Radio*1*2*3 | BT Audio*1*2*3 | ||
| [ZXCT] | Media Player*1*2*3 | ||||
*1 When connecting the iDataLink Maestro module (not supplied), the icon is displayed.
*2 Available functions differ according to your car type.
*3 The display may be different.
Basic Operations
Using Apple CarPlay Wirelessly
When using Apple CarPlay for the first time, device registration is required. Follow the procedure in "Pairing with a Bluetooth® Device" (page 7).
Note
Make sure the GPS antenna (aerial) is connected. For details, see "Installing the GPS antenna (aerial)" (page 16).
Using Android Auto
When using Android Auto wirelessly for the first time, device registration is required. Follow the procedure in "Pairing with a Bluetooth® Device" (page 7).
When using Android Auto with a USB cable, connect the Android Auto compatible Android ^™ phone to the unit with the USB cable.
Pairing with a Bluetooth® Device
When connecting a BLUETOOTH device for the first time, mutual registration (called "pairing") is required. Pairing enables this unit and other devices to recognize each other.
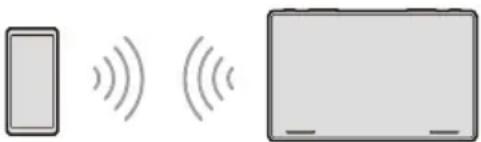
natural_image
Simple diagram showing a smartphone and a rectangular device with sound waves (no text or symbols)When turning on the unit, the unit sends the BLUETOOTH signal.
To pair from the settings of this unit
1 Press HOME, then touch [Settings].
If [Settings] is not set in the Favorite area, touch [All Apps] to display the HOME2 screen, then select [Settings].
2 Touch [Device Connection].
3 Touch [+Add New Device].
4 Operate the BLUETOOTH device according to its message on the [Add New Device] screen.
If a passkey input is required on the BLUETOOTH device, input [0000].
The registered device name appears on the [Device Connection] screen.
You can connect or disconnect the registered device on this screen.
To pair from the BLUETOOTH device
When setting the BLUETOOTH setting of the BLUETOOTH device to [ON], select "XAV-9500ES" on the setting screen of your BLUETOOTH device and then proceed to the pairing steps. Follow the instructions on the screen of the unit.
Canceling the Demonstration Mode
1 Press HOME, then touch [Settings].
If [Settings] is not set in the Favorite area, touch [All Apps] to display the HOME2 screen, then select [Settings].
2 Touch [System], then touch [Demo Mode] to set to [Off].
3 To exit the setup menu, touch (back) twice.
Updating the Firmware
To update the firmware, visit the support site, then follow the online instructions.
URL: https://www.sony.com/am/support
To update the firmware with USB tethering mode
When using the smartphone with tethering function, you can update the firmware with USB tethering mode.
Connect your smartphone to the USB port, then follow the instructions on the screen of the unit.
Notes
- During the update with a USB connection, do not disconnect the USB cable or USB device.
- A network connection may be required, and high packet communication fees may be incurred.
Additional Information
Precautions
•Power antenna (aerial) extends automatically.
- When you transfer ownership or dispose of your car with the unit installed, initialize all the settings to the factory settings by performing the factory reset.
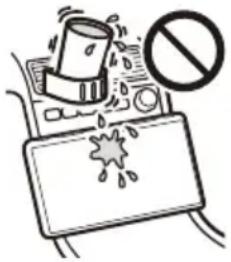
- Do not splash liquid onto the unit.
Notes on safety
- Comply with your local traffic rules, laws, and regulations.
- While driving
- Do not watch or operate the unit, as it may lead to distraction and cause an accident. Park your car in a safe place to watch or operate the unit.
- Do not use the setup feature or any other function which could divert your attention from the road.
- When backing up your car, be sure to look back and watch the surroundings carefully for your safety even if the rear view camera is connected. Do not depend on the rear view camera exclusively.
- While operating
- Do not insert your hands, fingers, or foreign objects into the unit as it may cause injury or damage to the unit.
- Keep small articles out of the reach of children.
- Be sure to fasten seatbelts to avoid injury in the event of sudden movement of the car.
- Do not insert your hands, fingers, or foreign objects into the unit as it may cause injury or damage to the unit.
- Keep small articles out of the reach of children.
- Be sure to fasten seatbelts to avoid injury in the event of sudden movement of the car.
Preventing an accident
Do not operate the unit or watch the monitor while driving.
Pictures appear only after you park the car and set the parking brake.
If the car starts moving during video playback, the following caution is displayed and you cannot watch the video.
[Video blocked for your safety]
Notes on LCD panel
- Do not get the LCD panel wet or expose it to liquids. This may cause a malfunction.
- Do not press down hard on the LCD panel as doing so can distort the picture or cause a malfunction (i.e., the picture may become unclear or the LCD panel may be damaged).
- Do not touch the panel with objects other than with your finger as it may damage or break the LCD panel.
- Clean the LCD panel with a dry soft cloth. Do not use solvents such as benzine, thinner, commercially available cleaners, or antistatic spray.
- Do not use the unit outside the temperature range 0^ to 40^ (32°F to 104°F).
- If your car was parked in a cold or hot place, the picture may not be clear. However, the monitor is not damaged and the picture will become clear after the temperature in your car becomes normal.
- Some stationary blue, red, or green dots may appear on the monitor. These are called "bright spots" and can happen with any LCD. The LCD panel is precision-manufactured with more than 99.99% of its segments functional. However, it is possible that a small percentage (typically 0.01% ) of the segments may not light up properly. This will not, however, interfere with your viewing.
Notes on the touch screen
- This unit uses a capacitive touch screen. Touch the screen directly with your fingertip.
- Multi-touch operation is not supported on this unit.
- Do not touch the screen with sharp objects such as a needle, pen, or fingernail. Operation with a stylus is not supported on this unit.
- Touching the screen with a gloved finger may cause the unit to operate incorrectly or not respond.
- Do not let any objects contact the touch screen. If the screen is touched by an object other than your fingertip, the unit may not respond correctly.
- Since glass material is used for the screen, do not subject the unit to strong shock. If cracking or chipping occurs on the screen, do not touch the damaged part as it may cause injury.
- Keep other electrical devices away from the touch screen. They may cause the touch screen to malfunction.
- If there are water droplets on the touch screen, or if you touch the screen with wet fingertips, the touch screen may not react correctly.
About iPhone
- Compatible iPhone models:
iPhone 11 Pro Max, iPhone 11 Pro, iPhone 11, iPhone XS Max, iPhone XS, iPhone XR, iPhone X, iPhone 8 Plus, iPhone 8, iPhone 7 Plus, iPhone 7, iPhone SE, iPhone 6s Plus, iPhone 6s, iPhone 6 Plus, iPhone 6, iPhone 5s
- Use of the Made for Apple badge means that an accessory has been designed to connect specifically to the Apple product(s) identified in the badge, and has been certified by the developer to meet Apple performance standards. Apple is not responsible for the operation of this device or its compliance with safety and regulatory standards.
Please note that the use of this accessory with an Apple product may affect wireless performance.
- Check the Apple CarPlay website for supported iOS versions. Update to the latest iOS version before use.
If you have any questions or problems concerning your unit that are not covered in this Operating Instructions, consult your nearest Sony dealer.
Specifications
FOR THE CUSTOMERS IN THE USA. NOT APPLICABLE IN CANADA, INCLUDING IN THE PROVINCE OF QUEBEC.
POUR LES CLIENTS AUX ÉTATS-UNIS. NON APPLICABLE AU CANADA, Y COMPRIS LA PROVINCE DE QUÉBEC.
AUDIO POWER SPECIFICATIONS

CTA2006 Standard
Power Output: 20 Watts RMS × 4 at
4 Ohms < 1% THD+N
SN Ratio: 88 dBA (reference: 1 Watt into 4 Ohms)
Monitor section
Display type: Wide LCD color monitor
Dimensions: 10.1 in/257 mm
System: TFT active matrix
Number of pixels:
2,764,800 pixels (1280 × 3 (RGB) × 720)
Radio section
FM
Tuning range: 87.5 MHz - 107.9 MHz
Usable sensitivity: 7 dBf
Signal-to-noise ratio: 70 dB (mono)
Separation at 1 kHz: 45 dB
AM
Tuning range: 530 kHz - 1,710 kHz
Sensitivity: 32 μV
USB player section
Interface: USB Type-C® (Hi-speed)
Maximum current: 3.0 A
BLUETOOTH section
Communication System:
BLUETOOTH Standard version 5.0
Output:
BLUETOOTH Standard Power Class 1
(Max. Conducted +7.5 dBm)
Maximum communication range ^*1 :
Line of sight approx. 10 m (33 ft)
Frequency band:
2.4 GHz band (2.4000 GHz - 2.4835 GHz)
Modulation method: FHSS
Compatible BLUETOOTH Profiles ^2 :
A2DP (Advanced Audio Distribution Profile) 1.3.1
AVRCP (Audio Video Remote Control Profile) 1.6.1
HFP (Handsfree Profile) 1.7.1
PBAP (Phone Book Access Profile) 1.2
Corresponding codec: SBC, AAC, LDAC ^TM
*1 The actual range will vary depending on factors such as obstacles between devices, magnetic fields around a microwave oven, static electricity, reception sensitivity, antenna (aerial) performance, operating system, software application, etc.
*2 BLUETOOTH standard profiles indicate the purpose of BLUETOOTH communication between devices.
Wi-Fi section
Compatible standards:
IEEE802.11 a/n/ac
Radio frequency:
5 GHz band (5.725 GHz - 5.850 GHz)
Output power:
Max. conducted 16 dBm
Frequency Tolerance: 20 ppm
Power amplifier section
Outputs: Speaker outputs
Speaker impedance: 4 Ω - 8 Ω
Maximum power output: 55 W × 4 (at 4 Ω)
General
Power requirements:
12 V DC car battery (negative ground (earth))
Rated current consumption: 10 A
Dimensions (maximum):
Approx. 271 mm × 171 mm × 247 mm
(10^3 / 4in× 6^3 / 4in× 9^3 / 4in)(w / h / d)
Mounting dimensions:
Approx. 182 mm × 53 mm × 160 mm
(7 1/4 in × 2 1/8 in × 6 3/8 in) (w/h/d)
Mass: Approx. 2.5 kg (5 lb 9 oz)
Package contents:
Main unit (1)
Parts for installation and connections (1 set)
Optional accessories/equipment:
Remote commander: RM-X400
SiriusXM Connect Vehicle Tuner*: SXV100, SXV200, SXV300
iDataLink Maestro RR module
iDataLink Maestro RR2 module
* Some features are compatible with SXV200 or later tuner models.
Ask the dealer for detailed information.
Design and specifications are subject to change without notice.
Copyrights
((SiriusXM) READY
SiriusXM-Ready® allows you to Listen to ad-free music, plus all the sports, talk, comedy, news coverage, all in one place. (SiriusXM Connect Tuner and subscription required. Sold separately.) For more information, visit www.siriusxm.com. SiriusXM and all related marks and logos are trademarks of Sirius XM Radio, Inc. All rights reserved.
The Bluetooth ^® word mark and logos are registered trademarks owned by Bluetooth SIG, Inc. and any use of such marks by Sony Group Corporation and its subsidiaries is under license. Other trademarks and trade names are those of their respective owners.
Windows Media is either a registered trademark or trademark of Microsoft Corporation in the United States and/or other countries.
This product is protected by certain intellectual property rights of Microsoft Corporation. Use or distribution of such technology outside of this product is prohibited without a license from Microsoft or an authorized Microsoft subsidiary.
Apple and iPhone are trademarks of Apple Inc., registered in the U.S. and other countries. Apple CarPlay is a trademark of Apple Inc.
IOS is a trademark or registered trademark of Cisco in the U.S. and other countries and is used under license.
Android and Android Auto are trademarks of Google LLC.
The Wi-Fi CERTIFIED™ Logo is a certification mark of Wi-Fi Alliance®.
LDAC and LDAC logo are trademarks of Sony Corporation.
USB Type-C® and USB-C® are registered trademarks of USB Implementers Forum.
All other trademarks are trademarks of their respective owners.
Connection/Installation
Cautions
- Do not install this unit in a car that has no ACC position. The display of the unit does not turn off even after turning the ignition off, and this causes battery drain.
- Run all ground (earth) leads to a common ground (earth) point.
- Do not get the leads trapped under a screw or caught in moving parts (e.g., seat railing).
- Before making connections, turn the car ignition off to avoid short circuits.
- Connect the yellow and red power supply leads only after all other leads have been connected.
- Be sure to insulate any loose unconnected leads with electrical tape for safety.
- Choose the installation location carefully so that the unit will not interfere with normal driving operations.
- Avoid installing the unit in areas subject to dust, dirt, excessive vibration, or high temperature, such as in direct sunlight or near heater ducts.
- Use only the supplied mounting hardware for a safe and secure installation.
- Be sure to use the supplied USB extension cables.
- This unit may not be installed properly depending on the car type. For details on the mounting space, see "Ensuring the mounting location of the unit" (page 12).
- To avoid injury, be careful not to drop the display during installation.
- When installing, be careful not to cut off your fingers with the metal parts of the brackets and mounting base.
- Do not pinch your fingers when attaching the display to the unit.
- Do not install the unit in a position where the unit interferes with driving operations (such as in positions where the shift lever hits the unit, or the hazard button cannot be pressed).
- When using the unit for a long period of time, there may be a possibility that the screws securing the display may come loose. Periodically tighten these screws.
- Do not make any changes or modifications to the unit other than those described in this manual.
Note on the power supply lead (yellow)
When connecting this unit in combination with other stereo components, the amperage rating of the car circuit to which the unit is connected must be higher than the sum of each component's fuse amperage rating.
Note on installing in cars with a start-stop system
The unit may restart when starting the engine from start-stop. In this case, turn off the start-stop system of your car.
Note on installing in cars with electric parking brake system
For cars with electric parking brakes, some related functions (such as video blocking function) may not work properly.
Mounting angle adjustment
Adjust the mounting angle to less than 30^ .
Ensuring the mounting location of the unit
Before installing the unit, consult the installer for details on the installation of the unit and the display.
- Make sure that the distance from the front surface (reference surface) of the mounted unit to the surface of your car's center cluster is within 22 mm (7/8 in). If exceeded, the unit cannot be installed properly.
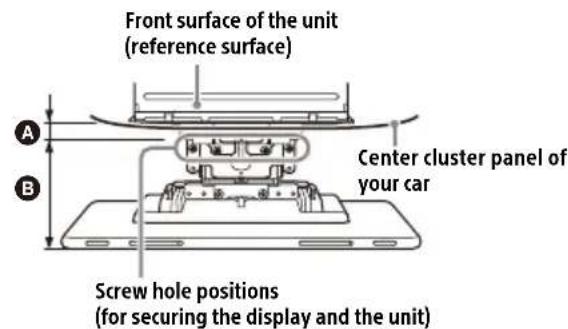
A 22 mm (7/8 in) B 42 mm to 62 mm (1 11/16 in to 2 1/2 in)
- For your safety, adjust the mounting location of the unit so that it does not interfere with driving operations such as button (switch) or shift lever operations.
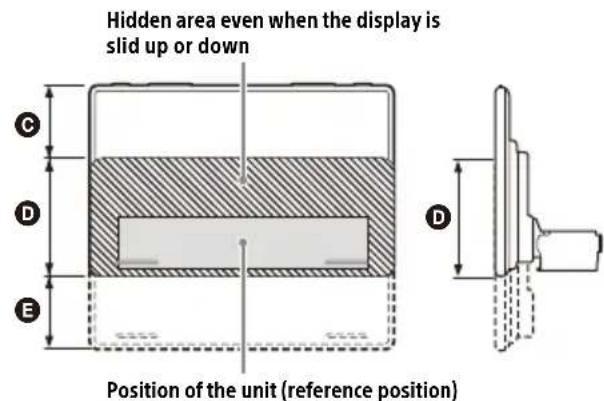
© 60 mm (2 3/8 in) D 112 mm (41/2 in) E 60 mm (2 3/8 in)
natural_image
Simple line drawing of a rectangular frame with dashed border and two labeled force arrows (F), no text or symbols present.
natural_image
Technical line drawing of a mechanical component with dimension lines and force indicators (no text or symbols)F 25 mm (1 in)
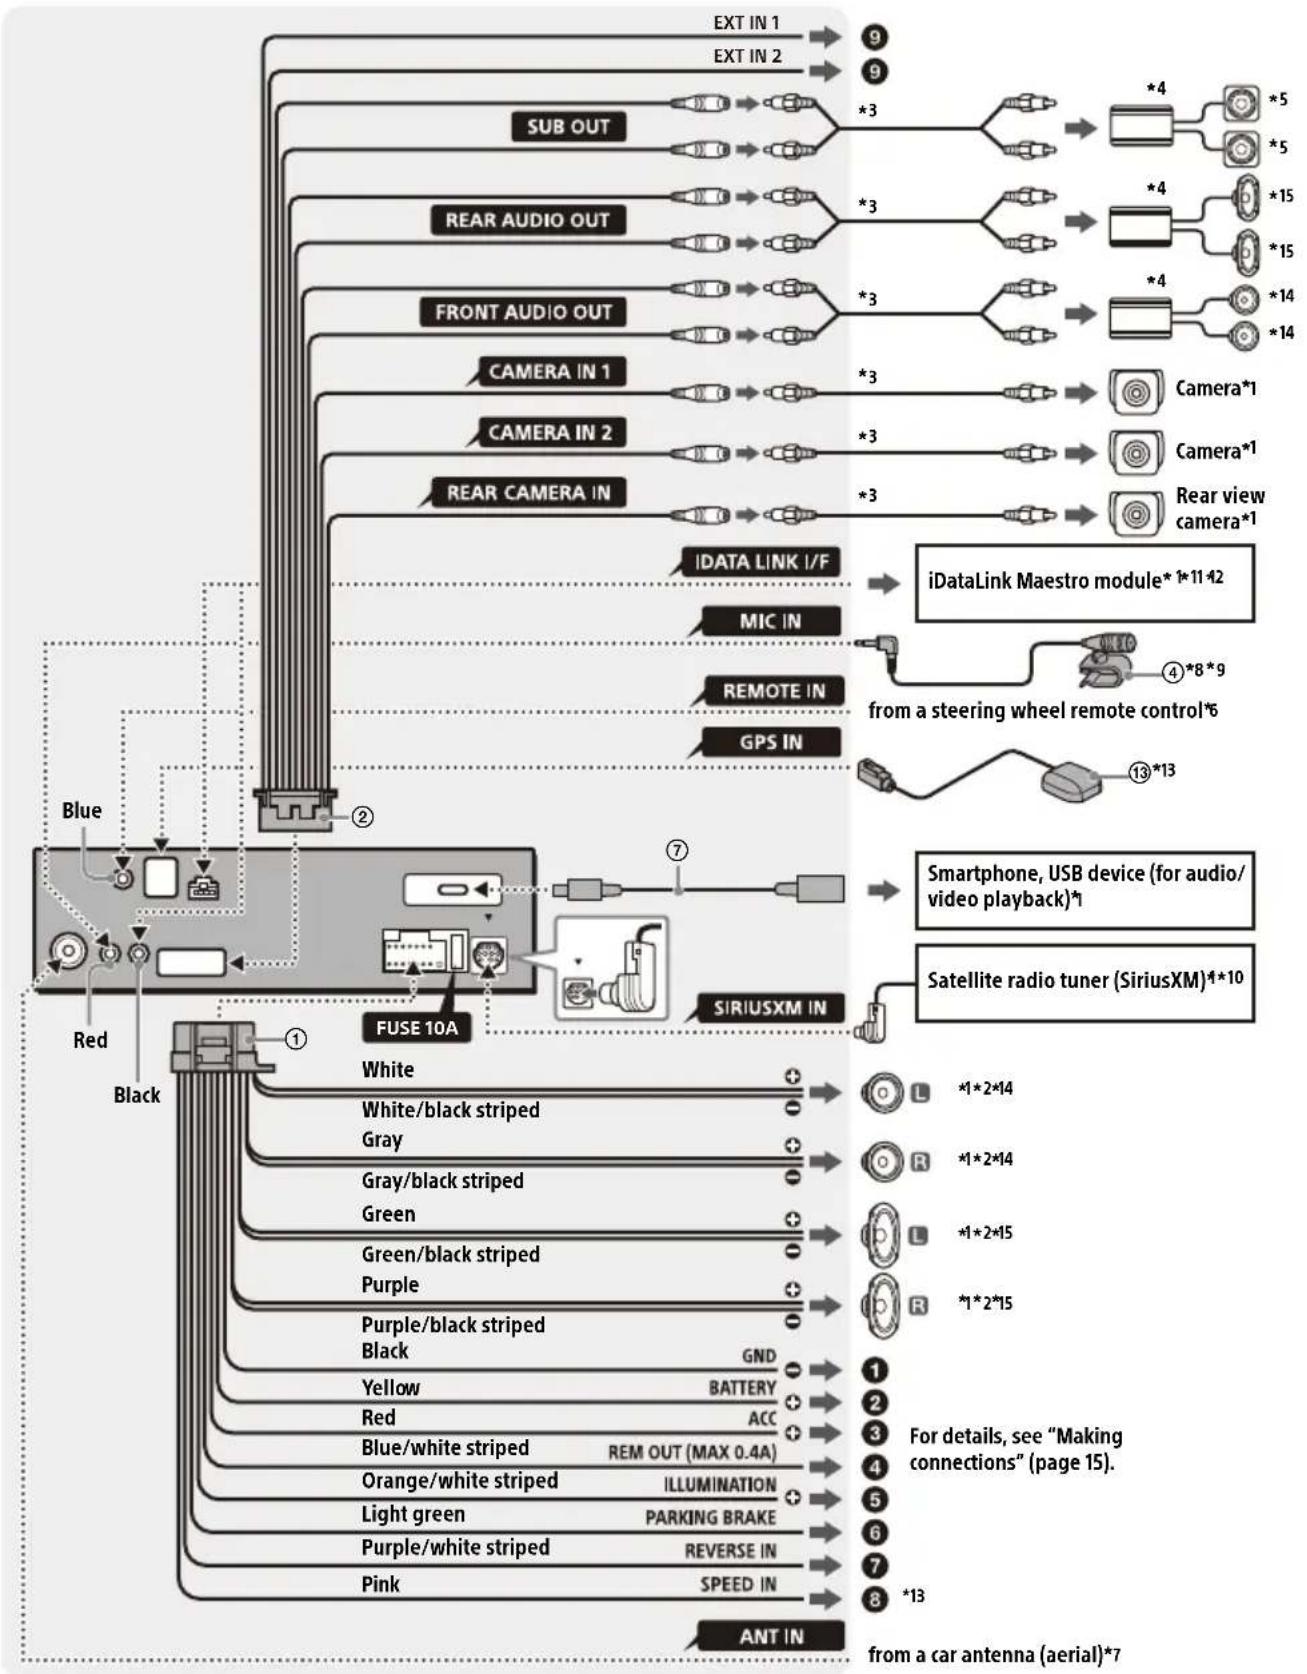
Parts List for Installation
① Power supply leads (1)
② Connection cables (Audio/Camera) (1)
③ Mounting screw (5 × max. 9 mm (7/32 × max. 3/8 in)) (4)

④ Microphone (1)

⑤ Flat-mount base (1) ⑥ Double-sided tape (1)

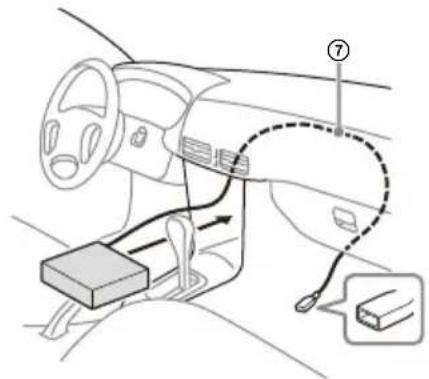
⑦ USB Type-C extension cable (1)

⑧ USB cable holder (1)

⑨ Screw for USB cable holder (1)

⑩ Cable for steering wheel remote input (RC-SR1) (1)

⑪ Fixing screw (for the joint cover) (3 × 8 mm (1/8 × 11/32 in)) (1)

⑫ Fixing screw (for the joint part) (4 × 6 mm (3/16 × 1/4 in)) (4)

⑬ GPS antenna (aerial) (1) ⑭ Metal plate (1)


⑮ Rear panel cover (2)

This parts list does not include all the package contents.
Connection
- To prevent short circuits, insulate leads with a cover or tape.
- Note that the unit may be damaged if it is connected incorrectly or by short circuits at the leads.
flowchart
graph TD
    A["EXT IN 1"] --> B["9"]
    C["EXT IN 2"] --> D["9"]
    E["SUB OUT"] --> F["*3"]
    G["REAR AUDIO OUT"] --> H["*3"]
    I["FRONT AUDIO OUT"] --> J["*3"]
    K["CAMERA IN 1"] --> L["*3"]
    M["CAMERA IN 2"] --> N["*3"]
    O["REAR CAMERA IN"] --> P["*3"]
    Q["IDATA LINK I/F"] --> R["iDataLink Maestro module* 1*11*2"]
    S["MIC IN"] --> T["4*8*9"]
    U["REMOTE IN"] --> V["13*13"]
    W["GPS IN"] --> X["13*13"]
    Y["SIRIUSXM IN"] --> Z["13*13"]
    AA["FUSE 10A"] --> AB["7"]
    AC["SiriusXM IN"] --> AD["13*13"]
    AE["Smartphone, USB device (for audio/video playback)*"] --> AF["13*13"]
    AG["Satellite radio tuner (SiriusXM)*10"] --> AH["13*13"]
    AI["Blue"] --> AJ["Red"]
    AK["Black"] --> AL["1"]
    AM["White"] --> AN["*1*2*14"]
    AO["White/black striped"] --> AP["*1*2*14"]
    AQ["Gray"] --> AR["*1*2*14"]
    AS["Gray/black striped"] --> AT["*1*2*15"]
    AU["Green"] --> AV["*1*2*15"]
    AW["Green/black striped"] --> AX["*1*2*15"]
    AY["Purple"] --> AZ["*1*2*15"]
    BA["Purple/black striped"] --> BB["*1*2*15"]
    BC["Black"] --> BD["GND"]
    BE["Yellow"] --> BF["BATTERY"]
    BG["Red"] --> BH["ACC"]
    BI["Blue/white striped"] --> BJ["REM OUT (MAX 0.4A)"]
    BK["Orange/white striped"] --> BL["ILLUMINATION"]
    BM["Light green"] --> BN["PARKING BRAKE"]
    BO["Purple/white striped"] --> BP["REVERSE IN"]
    BQ["Pink"] --> BR["SPEED IN"]
    BS["ANT IN"] --> BT["from a car antenna (aerial)*7"]
*1 Not supplied
*2 Speaker impedance: 4 Ω to 8 Ω × 4
*3 RCA pin cord (not supplied)
*4 Power amplifier (not supplied)
*5 Subwoofer (not supplied)
*6 Depending on the type of car, use an adaptor for a steering wheel remote control (not supplied). For details on using the steering wheel remote control, see "Using the steering wheel remote control" (page 17).
*7 Depending on the type of car, use an adaptor (not supplied) if the antenna (aerial) connector does not fit.
*8 Whether in use or not, route the microphone input cord so it does not interfere with driving operations. Secure the cord with a clamp, etc., if it is installed around your feet.
*9 For details on installing the microphone, see "Installing the microphone" (page 16).
*10 For more information on how to install the SiriusXM Connect Vehicle Tuner, consult the installation guide supplied with the tuner.
*11 When connecting the iDataLink Maestro module (not supplied), do not connect any device to the REMOTE IN terminal (blue). Likewise, when connecting a device to the REMOTE IN terminal (blue), do not connect the iDataLink Maestro module (not supplied) to the IDATA LINK I/F terminal (black).
*12 Use the connection cable supplied with the iDataLink Maestro module (not supplied).
*13 Connect when using Apple CarPlay with a wireless connection.
*14 Front speaker/Front tweeter
If [Speaker Configuration] in [Sound] is set to [Front & Rear], connect the front speaker. If [Speaker Configuration] in [Sound] is set to [Front 2-way], connect the front tweeter.
*15 Rear speaker/Front woofer
If [Speaker Configuration] in [Sound] is set to [Front & Rear], connect the rear speaker. If [Speaker Configuration] in [Sound] is set to [Front 2-way], connect the front woofer.
Making connections
① To a common ground (earth) point
First connect the black ground (earth) lead then connect the yellow and red power supply leads.
② To the +12 V power terminal which is energized at all times
Be sure to first connect the black ground (earth) lead to a common ground (earth) point.
③ To the +12 V power terminal which is energized when the ignition switch is set to the accessory position
Be sure to first connect the black ground (earth) lead to a common ground (earth) point.
4 To the power antenna (aerial) control lead or the power supply lead of the antenna (aerial) booster
It is not necessary to connect this lead if there is no power antenna (aerial) or antenna (aerial) booster, or with a manually-operated telescopic antenna (aerial).
To AMP REMOTE IN of an optional power amplifier
This connection is only for amplifiers and a power antenna (aerial). Connecting any other system may damage the unit.
Note
It will take about 10 seconds to shut down the output of REM OUT after the unit is turned off.
⑤ To a car's illumination signal
Be sure to first connect the black ground (earth) lead to a common ground (earth) point.
⑥ To the parking brake switch lead
The mounting position of the parking brake switch lead depends on your car. Be sure to connect the parking brake lead (light green) of the power supply leads ① to the parking brake switch lead.
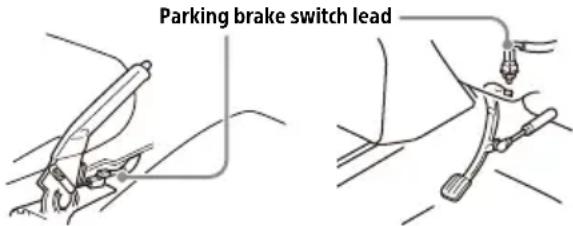
Hand brake type Foot brake type
⑦ To the +12 V power terminal of the car's rear lamp lead (only when connecting the rear view camera)
⑧ To a car's speed pulse signal
When using Apple CarPlay with a wireless connection, it is necessary to connect to keep the accurate location of your car. The mounting position of the speed pulse output lead depends on your car.
⑨ To an interruption signal (+3.3 V to +12 V) to display the picture from CAMERA IN 1 and CAMERA IN 2
Note
REVERSE IN, EXT IN 1, and EXT IN 2 interrupt detections have the following priority levels.
REVERSE IN always has priority; if both EXT IN 1 and EXT IN 2 occur at the same time, EXT IN 1 has higher priority.
Camera Connection
Installation of cameras (not supplied) is required before use.
Connect the camera power cord (lead) to the accessory power terminal.
When connecting the iDataLink Maestro module (not supplied) and you are using the Backup Camera Dynamic Guidelines function, adjust the guideline.
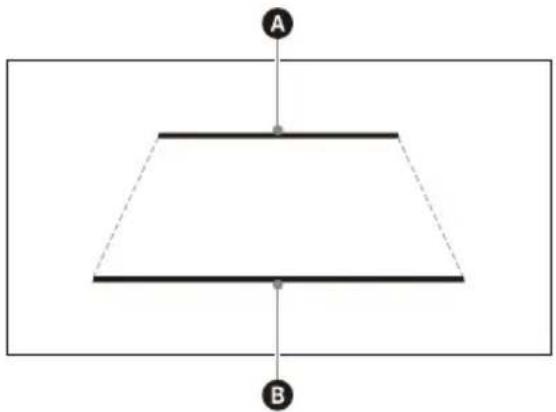
natural_image
Simple geometric diagram of a trapezoid with labeled points A and B, no text or symbols present.A 2.0 m (6 1/2 feet) behind the car
B 0.5 m (13/4 feet) behind the car
Memory hold connection
When the yellow power supply lead is connected, power will always be supplied to the memory circuit even when the ignition switch is turned off.
Speaker connection
- Before connecting the speakers, turn the unit off.
- Use speakers with an impedance of 4 to 8 , and with adequate power handling capacities to avoid damage.
- Set [Speaker Configuration] in [Sound] to [Front & Rear] or [Front 2-way] depending on your speaker system.
- When connecting a speaker system for the Front 2-way mode, do not set [Speaker Configuration] in [Sound] to [Front & Rear]. This may cause damage to the speakers.
- When connecting the iDataLink Maestro module (not supplied) and you are using the factory amplifier, set [Speaker Configuration] in [Sound] to [Front & Rear].
Installing the microphone
To capture your voice during handsfree calling, you need to install the microphone ④.
Cautions
- It is extremely dangerous if the cord becomes wound around the steering column or gearstick. Be sure to keep it and other parts from interfering with your driving operations.
- If airbags or any other shock-absorbing equipment are in your car, contact the store where you purchased this unit or the car dealer before installation.
Notes
- When mounting on the dashboard, remove the visor clip carefully from the microphone ④, then attach the flat-mount base ⑤ to the microphone ④.
- Before attaching the double-sided tape ⑥, clean the surface of the dashboard with a dry cloth.
Installing the GPS antenna (aerial)
- Choose a location where no obstacle blocks GPS satellite reception so as to achieve the best reception.
- Make sure the GPS antenna (aerial) ⑬ does not interfere with the operation of car equipment.
- Some types of front windshields (windscreens) block GPS satellite radio waves. Make sure the signal reception is not blocked.
- When using Apple CarPlay with a wireless connection, make sure the GPS antenna (aerial) ⑬ is connected.
1 Decide the installation location on the dashboard, then clean the attachment surface.
Choose a flat surface where:
— the GPS antenna (aerial) ⑬ can be positioned horizontally.
— operation of the passenger-side airbag is not impeded.
— GPS satellite reception is not blocked by anything inside the car or the windshield (windscreen) wipers.
2 Remove the tape of the metal plate ⑭, then attach it on the dashboard.
3 Remove the tape of the GPS antenna (aerial) ⑬, then attach it on the metal plate ⑭.
Cautions
- It is extremely dangerous if the cord becomes wound around the steering column or gearstick. Be sure to keep it and other parts from interfering with your driving operations.
- If airbags or any other shock-absorbing equipment are in your car, contact the store where you purchased this unit or the car dealer before installation.
Notes
- Be sure to use the metal plate ⑭, otherwise signal reception may be poor.
- Do not install the GPS antenna (aerial) ⑬ close to other electrical equipment, otherwise signal reception may be unstable.
- If the surface of the metal plate ⑭ is cold, the tape may not stick firmly. Warm up its surface with a hair dryer, etc., before applying the tape.
- If there is no flat surface on which to install the GPS antenna (aerial) ⑬, bend the metal plate ⑭ to fit a curved surface before installing.
Using the steering wheel remote control
When using the steering wheel remote control
Installation of the connection cable RC-SR1 ⑩ is required before use.
1 Select [Settings] → [System] → [Steering Wheel Settings].
2 Set the [Custom] switch to [On].
You can make the registration to enable the steering wheel remote control. When the registration is complete, the steering wheel remote control becomes available.
Notes on installing the connection cable RC-SR1 ⑩
A Black
B Green
© Brown
- Refer to the support site for details, then connect each lead properly to the appropriate leads. Making an improper connection may damage the unit.
URL: https://www.sony.com/am/support - Consulting the dealer or an experienced technician for help is recommended.
- When connecting the iDataLink Maestro module (not supplied), do not connect any device to the REMOTE IN terminal (blue). Likewise, when connecting a device to the REMOTE IN terminal (blue), do not connect the iDataLink Maestro module (not supplied) to the IDATA LINK I/F terminal (black).
When using an adaptor for the steering wheel remote control
Depending on the type of car, use an adaptor for the steering wheel remote control (not supplied).
1 Select [Settings] → [System] → [Steering Wheel Settings].
2 Set the [Custom] switch to [Off].
The adaptor for the steering wheel remote control is enabled.
Installation
To install the unit and the display securely, be sure to follow the steps ① to ⑤ in order.
① Before mounting the unit (page 18)
② Mounting the unit in the dashboard (page 18)
③ Setting up the display (page 19)
④ Making sure the mounting positions of the display (page 22)
⑤ Attaching the display to the unit (page 22)
For your safety
After mounting the display to the unit, make sure that the display does not interfere with normal driving operations such as blocking the driver's view or getting the cables tangled.
① Before mounting the unit
Before mounting the unit in the dashboard, arrange the USB extension cables.
1 Connect the USB Type-C extension cable ⑦ to the USB port.
2 Tighten the screw ⑨ firmly on the USB cable holder ⑧ to secure the USB Type-C extension cable ⑦.
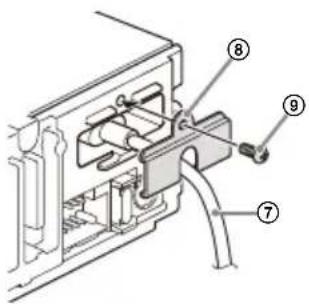
3 Route the USB Type-C extension cable ⑦ inside the dashboard.
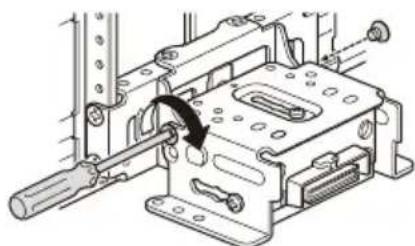
② Mounting the unit in the dashboard
Using the mounting brackets supplied with your car
You may not be able to install this unit in some makes of Japanese cars. In such a case, consult your Sony dealer.
Example

Note
To prevent malfunction, install only with the mounting screws ③.
③ Setting up the display
The mounting positions of the display can be adjusted.
natural_image
Pure mechanical diagram showing a beam supported at the base with two opposing arrows indicating bidirectional motion (no text or symbols)Width
(within 25 mm (1 in), in 5 steps)
Adjusting the depth of the display position
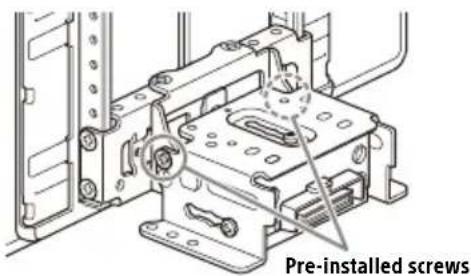
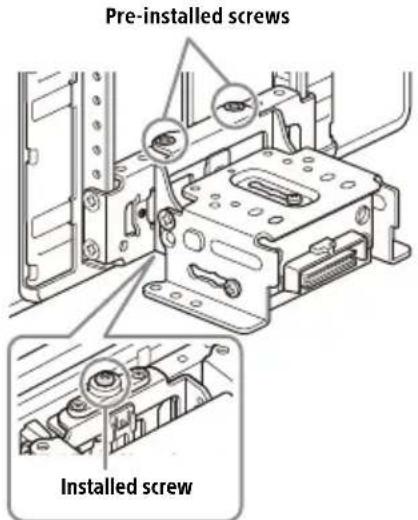
1 Loosen the 3 pre-installed screws for depth adjustment (on top and both sides).
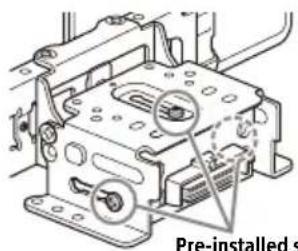
natural_image
Mechanical assembly diagram showing a pre-installed housing with mounting holes and internal components (no text or symbols)Slightly loosen the screws until you can slide the connector bracket. Do not remove the screws from the bracket. Doing so may damage the parts.
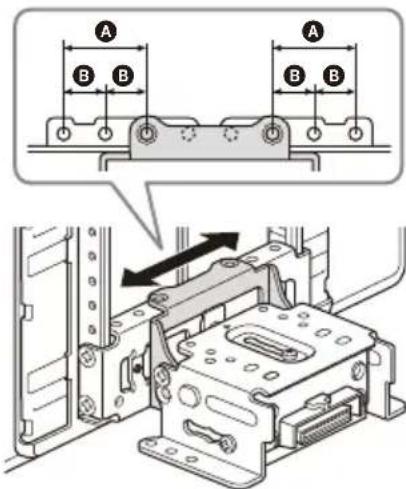
2 Slide the connector bracket to decide the appropriate depth position.
Adjustable depth: within 20 mm (13/16 in) (A), in 3 steps, in 10 mm (13/32 in) pitch (B).
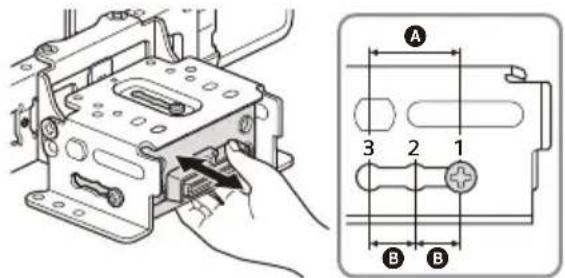
Bracket positions 1 to 3 for the display:
1: Slide-out position
2: Intermediate position
3: Slide-in position
3 At the desired position, tighten the 3 screws firmly to secure the connector bracket.
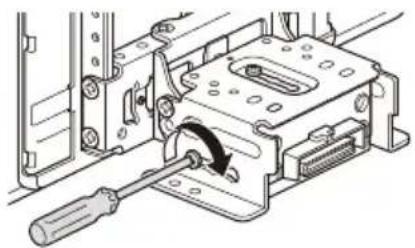
natural_image
Mechanical assembly diagram showing a screwdriver inserted into a housing component with a curved arrow indicating motion (no text or symbols present)Tighten the screws firmly.
When you tighten a screw, be careful not to apply too much torque as doing so may damage the screw (the torque value should be from 1.5 N•m to 2.0 N•m).
Adjusting the height of the display position
1 Remove the 4 pre-installed screws for height adjustment (on both sides).
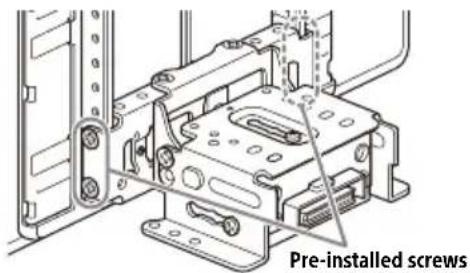
2 Slide the connector bracket up or down to decide the appropriate height position.
Adjustable height: within 60 mm (2 ^3 /8 in) (A), in 7 steps, in 10 mm (13/32 in) pitch (B).
3 At the desired position, tighten the 4 screws firmly to secure the connector bracket.
natural_image
Technical line drawing of a mechanical assembly with no visible text or symbolsTighten the screws firmly.
When you tighten a screw, be careful not to apply too much torque as doing so may damage the screw (the torque value should be from 1.5 N•m to 2.0 N•m).
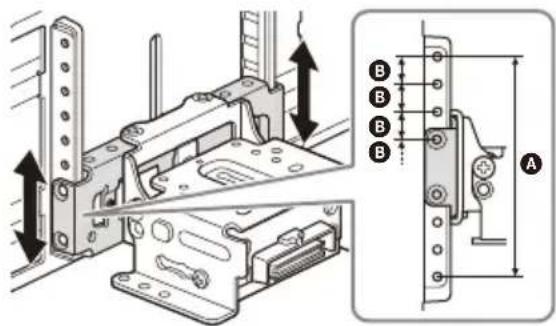
Adjusting the display angle (tilt)
1 Remove the 2 pre-installed screws for angle adjustment (on both sides).
2 Adjust the display angle to decide the appropriate angle.
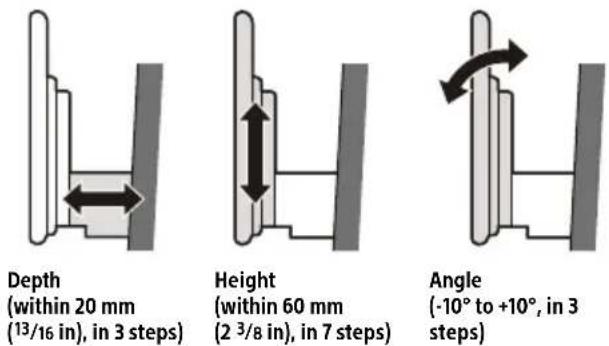
Adjustable angle: -10^ to +10^ , in 3 steps

Screw holes to use:
$$ 0 ^ {\circ} (1 - A) - 1 0 ^ {\circ} (3 - B) + 1 0 ^ {\circ} (2 - B) $$
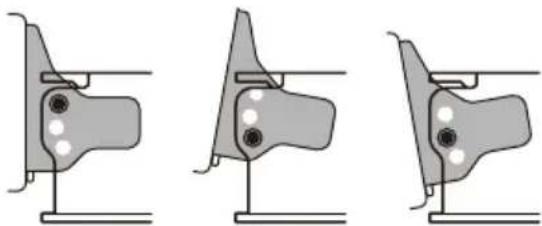
natural_image
Three identical diagrams showing a mechanical component with circular holes, mounted on a stand (no text or symbols)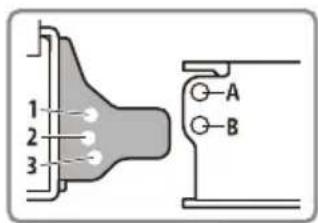
3 At the desired angle, tighten the 2 screws through the screw holes (upper or lower) that match the display angle.
natural_image
Mechanical assembly diagram showing a lever mechanism with no visible text or symbolsTighten the screws firmly.
When you tighten a screw, be careful not to apply too much torque as doing so may damage the screw (the torque value should be from 1.5 N•m to 2.0 N•m).
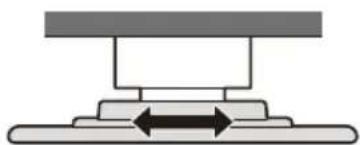
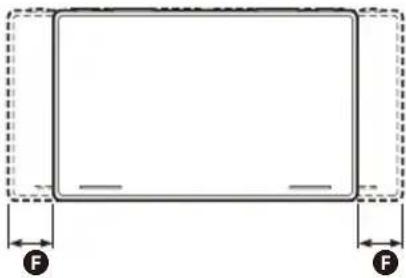
Adjusting the width of the display position
1 Remove the 2 pre-installed screws on the top side and loosen the 1 installed screw on the bottom side for left/right adjustment.
2 Slide the connector bracket to the left or right to decide the appropriate position.
Adjustable left/right: within 25 mm (1 in) (A), in 5 steps, in 12.5 mm (1/2 in) pitch (B).
Be sure to adjust the appropriate position with the connector bracket in the same state as the illustration above.
If the connector bracket is upside down, it will be stuck by the screw on the bottom side and will not move left or right.
3 At the desired positon, tighten the 2 screws on the top side firmly to secure the connector bracket.

natural_image
Technical diagram of a mechanical assembly with a screwdriver inserted, showing no text or symbolsTighten the screws firmly.
When you tighten a screw, be careful not to apply too much torque as doing so may damage the screw (the torque value should be from 1.5 N•m to 2.0 N•m).
4 Turn the unit over, tighten the 1 screw firmly to secure the connector bracket.
natural_image
Technical illustration showing a mechanical assembly with a screwdriver inserted into a housing (no text or symbols present)Note
Be sure to tighten the screws on the top side first, then tighten the screw on the bottom side.
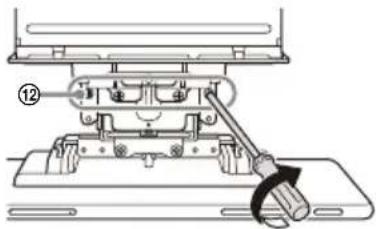
④ Making sure the mounting positions of the display
Be careful not to pinch your fingers or scratch the center cluster panel of your car when attaching the display to the unit.
1 Attach the display to the unit temporarily.
natural_image
Diagram showing a device being inserted into an internal housing, with no visible text or symbols.2 Confirm that the display does not block the driver's view or interfere with normal driving operations.
If further adjustment of the mounting position (depth, height, angle, width) is necessary, remove the display from the unit, then adjust it again accordingly.
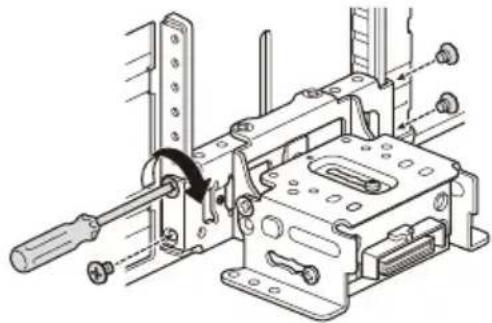
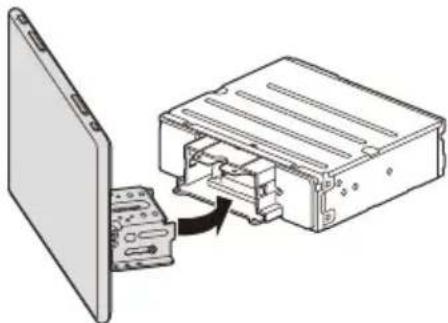
⑤ Attaching the display to the unit
Be careful not to pinch your fingers or scratch the center cluster panel of your car when attaching the display to the unit.
1 Attach the display to the unit.
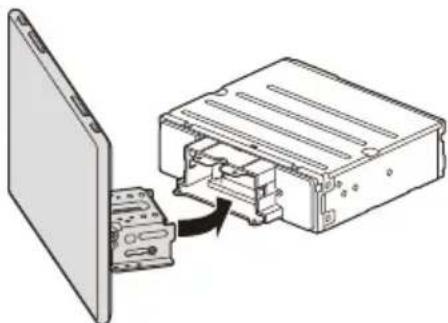
natural_image
Diagram of an electronic device showing a component being inserted into a housing (no text or symbols visible)Make sure that the connector brackets of the display is fully inserted to the unit.
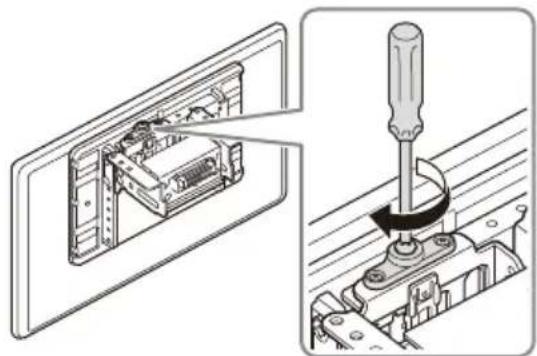
2 Tighten 4 screws ⑫ (on top) to secure the connector bracket to the unit.
natural_image
Mechanical assembly diagram showing a lever mechanism with no visible text or symbolsTighten the screws firmly.
When you tighten a screw, be careful not to apply too much torque as doing so may damage the screw (the torque value should be from 1.5 N•m to 2.0 N•m).
3 Slide the joint cover out to protect the mounting base of the display, then tighten the fixing screw ⑪ to secure the cover.
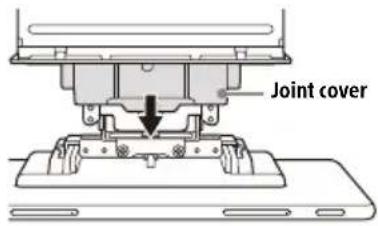
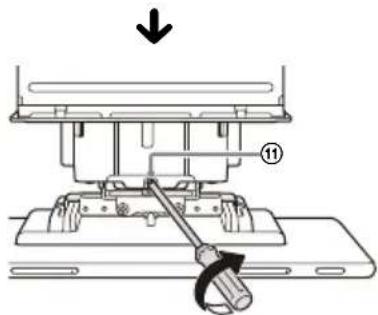
Tighten the screw firmly.
When you tighten a screw, be careful not to apply too much torque as doing so may damage the screw (the torque value should be from 1.5 N•m to 2.0 N•m).
4 Attach the rear panel covers ⑮ along the guides for protection.

Notes
- Be sure to use the specified screws.
- If the display appears to rattle, tighten the screws periodically.
Fuse replacement
When replacing the fuse, be sure to use one matching the amperage rating stated on the original fuse. If the fuse blows, check the power connection and replace the fuse.
If the fuse blows again after replacement, there may be an internal malfunction. In such a case, consult your nearest Sony dealer.
Fuse (10 A)

About License
END USER LICENSE AGREEMENT
IMPORTANT:
BEFORE USING THE SOFTWARE, PLEASE READ THIS END USER LICENSE AGREEMENT ("EULA") CAREFULLY. BY USING THE SOFTWARE YOU ARE ACCEPTING THE TERMS OF THIS EULA. IF YOU DO NOT ACCEPT THE TERMS OF THIS EULA, YOU MAY NOT USE THE SOFTWARE.
This EULA is a legal agreement between you and Sony Electronics Inc. ("SONY"). This EULA governs your rights and obligations regarding the AV Receiver firmware of SONY and/or its third party licensors (including SONY's affiliates) and their respective affiliates (collectively, the "THIRD-PARTY SUPPLIERS"), together with any updates/upgrades provided by SONY, any printed, on-line or other electronic documentation for such software, and any data files created by operation of such software (collectively, the "SOFTWARE").
Notwithstanding the foregoing, any software in the SOFTWARE having a separate end user license agreement (including, but not limited to, GNU General Public license and Lesser/Library General Public License) shall be covered by such applicable separate end user license agreement in lieu of the terms of this EULA to the extent required by such separate end user license agreement ("EXCLUDED SOFTWARE").
SOFTWARE LICENSE
The SOFTWARE is licensed, not sold. The SOFTWARE is protected by copyright and other intellectual property laws and international treaties.
COPYRIGHT
All right and title in and to the SOFTWARE (including, but not limited to, any images, photographs, animation, video, audio, music, text and "applets" incorporated into the SOFTWARE) is owned by SONY or one or more of the THIRD-PARTY SUPPLIERS.
GRANT OF LICENSE
SONY grants you a limited license to use the SOFTWARE solely in connection with your compatible device ("DEVICE") and only for your individual, non-commercial use. SONY and the THIRD-PARTY SUPPLIERS expressly reserve all rights, title and interest (including, but not limited to, all intellectual property rights) in and to the SOFTWARE that this EULA does not specifically grant to you.
REQUIREMENTS AND LIMITATIONS
You may not copy, publish, adapt, redistribute, attempt to derive source code, modify, reverse engineer, decompile, or disassemble any of the SOFTWARE, whether in whole or in part, or create any derivative works from or of the SOFTWARE unless such derivative works are intentionally facilitated by the SOFTWARE. You may not modify or tamper with any digital rights management functionality of the SOFTWARE. You may not bypass, modify, defeat or circumvent any of the functions or protections of the SOFTWARE or any mechanisms operatively linked to the SOFTWARE. You may not separate any individual component of the SOFTWARE for use on more than one DEVICE unless expressly authorized to do so by SONY. You may not remove, alter, cover or deface any trademarks or notices on the SOFTWARE. You may not share, distribute, rent, lease, sublicense, assign, transfer or sell the SOFTWARE. The software, network services or other products other than SOFTWARE upon which the SOFTWARE'S performance depends might be interrupted or discontinued at the discretion of the suppliers (software suppliers, service suppliers, or SONY). SONY and such suppliers do not warrant that the SOFTWARE, network services or other products will continue to be available, or will operate without interruption or modification.
EXCLUDED SOFTWARE AND OPEN SOURCE COMPONENTS
Notwithstanding the foregoing limited license grant, you acknowledge that the SOFTWARE may include EXCLUDED SOFTWARE. Certain EXCLUDED SOFTWARE may be covered by open source software licenses ("OPEN SOURCE COMPONENTS"), which means any software licenses approved as open source licenses by the Open Source Initiative or any substantially similar licenses, including but not limited to any license that, as a condition of distribution of the software licensed under such license, requires that the distributor make the software available in source code format. If and to the extent disclosure is required, please visit oss.sony.net/Products/Linux or other SONY-designated web site for a list of applicable OPEN SOURCE COMPONENTS included in the SOFTWARE from time to time, and the applicable terms and conditions governing its use. Such terms and conditions may be changed by the applicable third party at any time without liability to you. To the extent required by the licenses covering EXCLUDED SOFTWARE, the terms of such licenses will apply in lieu of the terms of this EULA. To the extent the terms of the licenses applicable to EXCLUDED SOFTWARE prohibit any of the restrictions in this EULA with respect to such EXCLUDED SOFTWARE, such restrictions will not apply to such EXCLUDED SOFTWARE. To the extent the terms of the licenses
applicable to OPEN SOURCE COMPONENTS require SONY to make an offer to provide source code in connection with the SOFTWARE, such offer is hereby made.
USE OF SOFTWARE WITH COPYRIGHTED MATERIALS
The SOFTWARE may be capable of being used by you to view, store, process and/or use content created by you and/or third parties. Such content may be protected by copyright, other intellectual property laws, and/or agreements. You agree to use the SOFTWARE only in compliance with all such laws and agreements that apply to such content. You acknowledge and agree that SONY may take appropriate measures to protect the copyright of content stored, processed or used by the SOFTWARE. Such measures include, but are not limited to, counting the frequency of your backup and restoration through certain SOFTWARE features, refusal to accept your request to enable restoration of data, and termination of this EULA in the event of your illegitimate use of the SOFTWARE.
CONTENT SERVICE
PLEASE ALSO NOTE THAT THE SOFTWARE MAY BE DESIGNED TO BE USED WITH CONTENT AVAILABLE THROUGH ONE OR MORE CONTENT SERVICES ("CONTENT SERVICE"). USE OF THE SERVICE AND THAT CONTENT IS SUBJECT TO THE TERMS OF SERVICE OF THAT CONTENT SERVICE. IF YOU DECLINE TO ACCEPT THOSE TERMS, YOUR USE OF THE SOFTWARE WILL BE LIMITED. YOU ACKNOWLEDGE AND AGREE THAT CERTAIN CONTENT AND SERVICES AVAILABLE THROUGH THE SOFTWARE MAY BE PROVIDED BY THIRD PARTIES OVER WHICH SONY HAS NO CONTROL. USE OF THE CONTENT SERVICE REQUIRES AN INTERNET CONNECTION. THE CONTENT SERVICE MAY BE DISCONTINUED AT ANY TIME.
INTERNET CONNECTIVITY AND THIRD PARTY SERVICES
You acknowledge and agree that access to certain SOFTWARE features may require an Internet connection for which you are solely responsible. Further, you are solely responsible for payment of any third party fees associated with your Internet connection, including but not limited to Internet service provider or airtime charges. Operation of the SOFTWARE may be limited or restricted depending on the capabilities, bandwidth or technical limitations of your Internet connection and service. The provision, quality and security of such Internet connectivity are the sole responsibility of the third party providing such service.
EXPORT AND OTHER REGULATIONS
You agree to comply with all export and re-export restrictions and regulations of the Department of Commerce and other United States agencies and authorities, and not to transfer, or authorize the transfer, of the SOFTWARE to a prohibited country or otherwise in violation of any such restrictions or regulations.
U.S. GOVERNMENT RESTRICTED RIGHTS
Use, duplication, or disclosure by the United States Government is subject to restriction as set forth in subparagraph (c) (1) and (2) of the Commercial Computer Software-Restricted Rights at 48 C.F.R. § 52.227-19, as applicable. The manufacturer solely for purposes of this section is Sony Electronics Inc., 16530 Via Esprillo, San Diego, CA 92127.
HIGH RISK ACTIVITIES
The SOFTWARE is not fault-tolerant and is not designed, manufactured or intended for use or resale as on-line control equipment in hazardous environments requiring fail-safe performance, such as in the operation of nuclear facilities, aircraft navigation or communication systems, air traffic control, direct life support machines, or weapons systems, in which the failure of the SOFTWARE could lead to death, personal injury, or severe physical or environmental damage ("HIGH RISK ACTIVITIES"). SONY, each of the THIRD-PARTY SUPPLIERS, and each of their respective affiliates specifically disclaim any express or implied warranty, duty or condition of fitness for HIGH RISK ACTIVITIES.
EXCLUSION OF WARRANTY ON SOFTWARE
You acknowledge and agree that use of the SOFTWARE is at your sole risk and that you are responsible for use of the SOFTWARE. The SOFTWARE is provided "AS IS," without warranty, duty or condition of any kind.
SONY AND EACH OF THE THIRD-PARTY SUPPLIERS (for purposes of this Section, SONY and each of the THIRD-PARTY SUPPLIERS shall be collectively referred to as "SONY") EXPRESSLY DISCLAIM ALL WARRANTIES, DUTIES OR CONDITIONS, EXPRESS OR IMPLIED, INCLUDING, BUT NOT LIMITED TO, THE IMPLIED WARRANTIES OF MERCHANTABILITY, NONINFRINGEMENT AND FITNESS FOR A PARTICULAR PURPOSE. SONY DOES NOT WARRANT OR MAKE ANY CONDITIONS OR REPRESENTATIONS (A) THAT THE FUNCTIONS CONTAINED IN ANY OF THE SOFTWARE WILL MEET YOUR REQUIREMENTS OR THAT THEY WILL BE UPDATED, (B) THAT THE OPERATION OF ANY OF THE SOFTWARE WILL BE CORRECT OR ERROR-FREE OR THAT ANY DEFECTS WILL BE CORRECTED, (C) THAT THE SOFTWARE WILL NOT DAMAGE ANY OTHER SOFTWARE, HARDWARE OR DATA, (D) THAT ANY SOFTWARE, NETWORK
SERVICES (INCLUDING THE INTERNET) OR PRODUCTS (OTHER THAN THE SOFTWARE) UPON WHICH THE SOFTWARE'S PERFORMANCE DEPENDS WILL CONTINUE TO BE AVAILABLE, UNINTERRUPTED OR UNMODIFIED, AND (E) REGARDING THE USE OR THE RESULTS OF THE USE OF THE SOFTWARE IN TERMS OF ITS CORRECTNESS, ACCURACY, RELIABILITY, OR OTHERWISE.
NO ORAL OR WRITTEN INFORMATION OR ADVICE GIVEN BY SONY OR AN AUTHORIZED REPRESENTATIVE OF SONY SHALL CREATE A WARRANTY, DUTY OR CONDITION OR IN ANY WAY INCREASE THE SCOPE OF THIS WARRANTY. SHOULD THE SOFTWARE PROVE DEFECTIVE YOU ASSUME THE ENTIRE COST OF ALL NECESSARY SERVICING, REPAIR OR CORRECTION. SOME JURISDICTIONS DO NOT ALLOW THE EXCLUSION OF IMPLIED WARRANTIES, SO THESE EXCLUSIONS MAY NOT APPLY TO YOU.
LIMITATION OF LIABILITY
SONY AND EACH OF THE THIRD-PARTY SUPPLIERS (for purposes of this Section, SONY and each of the THIRD-PARTY SUPPLIERS shall be collectively referred to as "SONY") SHALL NOT BE LIABLE FOR ANY INCIDENTAL OR CONSEQUENTIAL DAMAGES FOR BREACH OF ANY EXPRESS OR IMPLIED WARRANTY, BREACH OF CONTRACT, NEGLIGENCE, STRICT LIABILITY OR UNDER ANY OTHER LEGAL THEORY RELATED TO THE SOFTWARE, INCLUDING, BUT NOT LIMITED TO, ANY DAMAGES ARISING OUT OF LOSS OF PROFITS, LOSS OF REVENUE, LOSS OF DATA, LOSS OF USE OF THE SOFTWARE OR ANY ASSOCIATED HARDWARE, DOWN TIME AND USER'S TIME, EVEN IF ANY OF THEM HAVE BEEN ADVISED OF THE POSSIBILITY OF SUCH DAMAGES. IN ANY CASE, EACH AND ALL OF THEIR AGGREGATE LIABILITY UNDER ANY PROVISION OF THIS EULA SHALL BE LIMITED TO THE AMOUNT ACTUALLY PAID FOR THE SOFTWARE. SOME JURISDICTIONS DO NOT ALLOW THE EXCLUSION OR LIMITATION OF INCIDENTAL OR CONSEQUENTIAL DAMAGES, SO THE ABOVE EXCLUSION OR LIMITATION MAY NOT APPLY TO YOU.
ENTIRE AGREEMENT, WAIVER, SEVERABILITY
This EULA and SONY's privacy policy, each as amended and modified from time to time, together constitute the entire agreement between you and SONY with respect to the SOFTWARE. The failure of SONY to exercise or enforce any right or provision of this EULA shall not constitute a waiver of such right or provision. If any part of this EULA is held invalid, illegal, or unenforceable, that provision shall be enforced to the maximum extent permissible so as to maintain the intent of this EULA, and the other parts will remain in full force and effect. The United Nations Convention on Contracts for the International Sale of Goods shall not apply to the SOFTWARE or this EULA. Furthermore, this EULA will not be governed or interpreted in any way by referring to any law based on the Uniform Computer Information Transactions Act (UCITA) or any other act derived from or related to UCITA.
BINDING ARBITRATION (ONLY FOR UNITED STATES RESIDENTS)
ANY "DISPUTE" THAT IS NOT RESOLVED THROUGH THE INFORMAL NEGOTIATION PROCESS DESCRIBED ABOVE SHALL BE RESOLVED EXCLUSIVELY THROUGH BINDING ARBITRATION.
"DISPUTE" is defined as any disagreement, cause of action, claim, controversy, or proceeding between you and any Sony entity related to or arising out of the SOFTWARE or this EULA. DISPUTE is to be given the broadest possible meaning that will be enforced. If a DISPUTE arises, you agree to first give notice to SONY by contacting Sony Electronics Inc. at 16530 Via Esprillo, MZ 1105, San Diego, CA 92127, Attn: Legal Department, and engaging in good faith negotiations to attempt to resolve any DISPUTE for at least 14 days, except that you or Sony (or any of its affiliates) may skip this informal negotiation procedure for DISPUTE enforcing, protecting, or concerning the validity of intellectual property rights.
ARBITRATION INSTRUCTIONS (ONLY FOR UNITED STATES RESIDENTS)
To begin arbitration, either you or SONY must make a written demand to the other for arbitration. The arbitration will take place before a single arbitrator. It will be administered in keeping with the Expedited Procedures of the Commercial Arbitration Rules, and the Supplementary Proceedings for Consumer-Related disputes when applicable ("Rules") of the American Arbitration Association ("AAA") in effect when the claim is filed. You may get a copy of AAA's Rules by contacting AAA at (800) 778-7879 or visiting www.adr.org. The filing fees to begin and carry out arbitration will be shared between you and SONY, but in no event shall your fees ever exceed the amount allowable by the special rules for Consumers Disputes provided for by AAA, at which point SONY will cover all additional administrative fees and expenses. This does not prohibit the arbitrator from giving the winning party their fees and expenses of the arbitration when appropriate pursuant to the Rules. Unless you and SONY agree differently, the arbitration will take place in the county and state where you live, and applicable federal or state law shall govern the substance of any DISPUTE. The Federal Arbitration Act, 9 U.S.C. § 1, et seq., will govern the arbitration itself and not any state law on arbitration. The arbitrator's decision will be binding and final, except for a limited right of appeal under the Federal Arbitration Act. The arbitrator may award declaratory or injunctive relief
only in favor of the party seeking relief, and only to the extent necessary to provide relief warranted by that party's individual claim. Any court with jurisdiction over the parties may enforce the arbitrator's decision.
SMALL CLAIMS EXCEPTION (ONLY FOR UNITED STATES RESIDENTS)
Despite the provisions set forth above, you have the right to litigate any DISPUTE in small claims court or other similar court of limited jurisdiction, to the extent the amount at issue does not exceed \$15,000, and as long as such court has proper jurisdiction and all other requirements (including amount in controversy) are satisfied.
CLASS ACTION WAIVER (ONLY FOR UNITED STATES RESIDENTS)
YOU UNDERSTAND AND ACKNOWLEDGE THAT BY AGREEING TO BINDING ARBITRATION, YOU ARE GIVING UP THE RIGHT TO LITIGATE (OR PARTICIPATE IN AS A PARTY OR CLASS MEMBER) ANY DISPUTES IN COURT BEFORE A JUDGE OR JURY. ANY DISPUTE RESOLUTION PROCEEDING WILL BE CONDUCTED ONLY ON AN INDIVIDUAL BASIS, AND BOTH PARTIES AGREE NOT TO HAVE ANY DISPUTE HEARD AS A CLASS ACTION, REPRESENTATIVE ACTION, CONSOLIDATED ACTION, OR PRIVATE ATTORNEY GENERAL ACTION, UNLESS ALL PARTIES INVOLVED IN THE DISPUTE SPECIFICALLY AGREE TO DO SO IN WRITING FOLLOWING INITIATION OF THE ARBITRATION.
OPT-OUT INSTRUCTIONS (ONLY FOR UNITED STATES RESIDENTS)
IF YOU DO NOT WISH TO BE BOUND BY THE BINDING ARBITRATION PROVISION AND/OR THE CLASS ACTION WAIVER ABOVE, THEN: (1) YOU MUST NOTIFY SONY IN WRITING WITHIN 30 DAYS OF THE DATE THAT YOU FIRST USE THE SOFTWARE OR AGREE TO THIS EULA, WHICHEVER OCCURS FIRST; (2) YOUR WRITTEN NOTIFICATION MUST BE MAILED TO SONY ELECTRONICS INC., 16530 VIA ESPRILLO, MZ 1105, SAN DIEGO CA 92127, ATTN: LEGAL DEPARTMENT; AND (3) YOUR WRITTEN NOTIFICATION MUST INCLUDE: (A) YOUR NAME; (B) YOUR ADDRESS; (C) THE DATE YOU FIRST USED THE SOFTWARE OR AGREED TO THIS EULA; AND (D) A CLEAR STATEMENT THAT YOU DO NOT WISH TO RESOLVE DISPUTES WITH ANY SONY ENTITY THROUGH ARBITRATION AND/OR TO BE BOUND BY THE CLASS ACTION WAIVER.
REJECTING CHANGES MADE TO THE DISPUTE PROCEDURES (ONLY FOR UNITED STATES RESIDENTS)
Despite anything to the contrary in this EULA, you may reject changes made to the binding arbitration provision and class action waiver if: (1) you've already begun authorized use of the SOFTWARE at the time the change was/is made; and (2) you mail written notice to the address in the immediately preceding paragraph within 30 days after the particular change was/is made. Should such a situation arise, you will still be bound by the DISPUTE procedures you previously agreed to and existing before the change you rejected was made.
MISCELLANEOUS (ONLY FOR UNITED STATES RESIDENTS)
Any DISPUTE determined not subject to arbitration and not initiated in small claims court will be litigated by either party in a court of competent jurisdiction in either the superior court for the County of San Diego or in the United States District Court for the Southern District of California.
JURISDICTION, JURY TRIAL WAIVER (ONLY FOR CANADA RESIDENTS)
The United Nations Convention on Contracts for the International Sale of Goods shall not apply to this EULA. Furthermore, this EULA will not be governed or interpreted in any way by referring to any law based on the Uniform Computer Information Transactions Act (UCITA) or any other act derived from or related to UCITA. This EULA, any disputes or claims arising out of or related to this EULA and your relationship with Sony under this EULA, shall be governed by and construed in accordance with the laws of the State of California, United States, without regard to its conflict of laws principles. Any and all disputes or claims arising out of or relating to this EULA or your relationship with SONY under this EULA shall be determined by arbitration in San Diego, California, before three (3) impartial arbitrators, in accordance with the laws of the State of California, United States, without regard to its conflict of laws principles. If you reside in the United States, the arbitration shall be administered by JAMS and the arbitrators shall be selected pursuant to the rules and procedures of JAMS. If you reside outside the United States, the arbitration shall be administered by ICC and the arbitrators shall be selected pursuant to the rules and procedures of ICC. The parties shall bear their own costs and expenses, including attorneys' fees, but the arbitrators may, in the award, allocate all of the administrative costs of the arbitration, including the fees of the arbitrators, against the party who did not prevail. The decision of the arbitrators shall be final and non-appealable. Judgment on any award may be entered in any court having competent
jurisdiction. EXCEPT TO THE EXTENT PROHIBITED BY LAW, SONY AND YOU EXPRESSLY WAIVE TRIAL BY JURY WITH RESPECT TO ANY MATTERS OR DISPUTES ARISING UNDER OR RELATING TO THIS EULA. Any claim or cause of action arising under this EULA must be commenced within one (1) year after the claim or cause of action arises.
EQUITABLE REMEDIES
Notwithstanding anything contained in this EULA to the contrary, you acknowledge and agree that any violation of or non-compliance with this EULA by you will cause irreparable harm to SONY, for which monetary damages would be inadequate, and you consent to SONY obtaining any injunctive or equitable relief that SONY deems necessary or appropriate in such circumstances. SONY may also take any legal and technical remedies to prevent violation of and/or to enforce this EULA, including, but not limited to, immediate termination of your use of the SOFTWARE, if SONY believes in its sole discretion that you are violating or intend to violate this EULA. These remedies are in addition to any other remedies SONY may have at law, in equity or under contract.
TERMINATION
Without prejudice to any of its other rights, SONY may terminate this EULA if you fail to comply with any of its terms. In case of such termination, you must: (i) cease all use, and destroy any copies, of the SOFTWARE; (ii) comply with the requirements in the section below entitled "Your Account Responsibilities".
AMENDMENT
SONY RESERVES THE RIGHT TO AMEND ANY OF THE TERMS OF THIS EULA AT ITS SOLE DISCRETION BY POSTING NOTICE ON A SONY DESIGNATED WEB SITE, BY EMAIL NOTIFICATION TO AN EMAIL ADDRESS PROVIDED BY YOU, BY PROVIDING NOTICE AS PART OF THE PROCESS IN WHICH YOU OBTAIN UPGRADES/UPDATES OR BY ANY OTHER LEGALLY RECOGNIZABLE FORM OF NOTICE. If you do not agree to the amendment, you should promptly contact SONY for instructions. Your continued use of the SOFTWARE after the effective date of any such notice shall be deemed your agreement to be bound by such amendment.
THIRD-PARTY BENEFICIARIES
Each THIRD-PARTY SUPPLIER is an express intended third-party beneficiary of, and shall have the right to enforce, each provision of this EULA with respect to the SOFTWARE of such party.
Should you have any questions concerning this EULA, you may contact SONY by writing to SONY at: Sony Electronics Inc., 16530 Via Esprillo, San Diego, CA 92127.
Copyright © 2020 Sony Electronics Inc. All rights reserved.
Notice on license
This product contains software that Sony uses under a licensing agreement with the owner of its copyright. We are obligated to announce the contents of the agreement to customers under requirement by the owner of copyright for the software.
For details on software licenses, select [Settings] → [System] → [Open Source Licenses].
Notice on GNU GPL/LGPL applied software
The software included in this product contains copyrighted software that is licensed under the GPLv2 and other licenses which may require access to source code. You may find a copy of the relevant source code as required under the GPLv2 (and other licenses) at
http://www.sony.net/Products/Linux/.
To download, please access the URL, then select the model name "XAV-9500ES."
You may obtain the source code as required by the GPLv2 on a physical medium from us for a period of three years after our last shipment of this product by applying through the form at http://www.sony.net/Products/Linux/.
This offer is valid to anyone in receipt of this information.
Please note that Sony cannot answer or respond to any inquiries regarding the content of the source code.
Avertissement
Communication BLUETOOTH
Les touches VOL (volume) +/ ▶II (lecture/pause) comportent un point tactile.
9 ▶II (lecture/pause)
Norme BLUETOOTH version 5.0
Sortie :
Norme BLUETOOTH Power Class 1
PBAP (Phone Book Access Profile) 1.2
Codec correspondant : SBC, AAC, LDAC™
Dimensions (maximum):
Environ 271 mm × 171 mm × 247 mm
(10 3/4 po × 6 3/4 po × 9 3/4 po) (l/h/p)
Appareil principal (1)
Raccordement/Installation
Mises en garde
natural_image
Simple line drawing of a rectangular frame with dashed border and two labeled force indicators (F) at the bottom, no text or symbols present.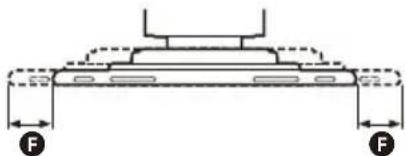
natural_image
Technical line drawing of a mechanical component with two labeled force indicators (F), no text or symbols present.F 25 mm (1 po)
natural_image
Simple geometric diagram showing a trapezoid with two horizontal lines and labeled points A and B (no text or symbols beyond labels)Mises en garde
Mises en garde
natural_image
Diagram showing a mechanical or structural component with an arrow indicating rotational motion (no text or symbols)natural_image
Pure mechanical diagram showing a lever and base with bidirectional arrows, no text or symbols presentnatural_image
Mechanical assembly diagram showing a screwdriver inserted into a housing component with a curved arrow indicating motion (no text or symbols present)natural_image
Technical line drawing of a mechanical assembly with no visible text or symbolsnatural_image
Three identical diagrams showing a mechanical component with mounting holes and a base, no text or symbols present.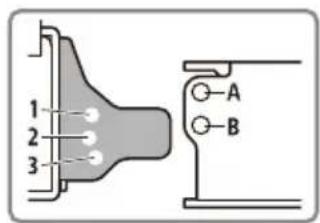
natural_image
Mechanical assembly diagram showing a lever mechanism with no visible text or symbolsnatural_image
Technical diagram of a mechanical assembly with a screwdriver inserted, showing no text or symbolsnatural_image
Technical illustration showing a mechanical assembly with a screwdriver inserted into a housing component (no text or symbols present)Remarque
natural_image
Diagram showing a device being inserted into an internal housing, with no visible text or symbols.natural_image
Diagram of an electronic device showing a computer case connected to a physical chassis (no text or symbols present)natural_image
Mechanical assembly diagram showing a lever mechanism with no visible text or symbolsSerrez fermement la vis.
Remarques
URL: https://www.sony.com/am/support
© 60 mm D 112 mm E 60 mm
natural_image
Simple line drawing of a rectangular frame with dashed border and two labeled force indicators (F) at bottom corners (no text or symbols within the frame)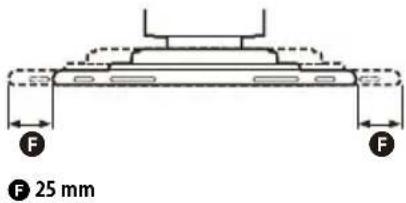
natural_image
Line drawing of a mechanical tool or tool interacting with a surface (no text or symbols)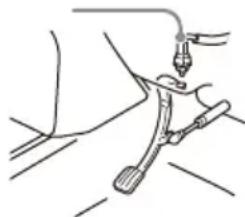
natural_image
Line drawing of a medical procedure with tubing and instrument (no text or symbols)natural_image
Simple geometric diagram showing a trapezoid with two horizontal lines and labeled points A and B (no text or symbols beyond labels)Advertencias
URL: https://www.sony.com/am/support
natural_image
Diagram of a device showing an open panel with a cable inserted, labeled with number 7 (no text or symbols on the diagram itself)natural_image
Diagram showing a mechanical or structural component with an arrow indicating rotational motion (no text or symbols present)natural_image
Pure mechanical diagram showing a beam supported at the base with two opposing arrows indicating bidirectional motion (no text or symbols)natural_image
Mechanical assembly diagram showing a screwdriver inserted into a housing component with a curved arrow indicating rotation (no text or symbols present)natural_image
Technical line drawing of a mechanical assembly with no visible text or symbolsnatural_image
Three identical diagrams showing a mechanical component with mounting holes and a central hole, no text or symbols present.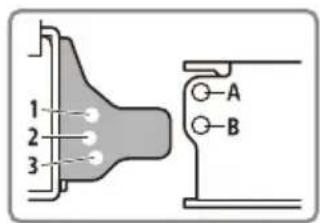
natural_image
Mechanical assembly diagram showing a lever mechanism with no visible text or symbolsnatural_image
Technical diagram of a mechanical assembly with a screwdriver inserted, showing no text or symbolsnatural_image
Technical illustration showing a mechanical assembly with a screwdriver inserted into a housing (no text or symbols present)Nota
natural_image
Diagram showing a device being inserted into a computer chassis (no text or symbols present)natural_image
Diagram of an electronic device showing a device being inserted into a housing (no text or symbols visible)natural_image
Mechanical assembly diagram showing a lever mechanism with no visible text or symbolsNotas
Copyright © 2020 Sony Corporation.
If you have any questions/problems regarding this product, try the following:
1 Read Troubleshooting in Help Guide (online manual).
2 Please contact (U.S.A. only);
Call 1-800-222-7669
URL https://www.SONY.com


Bluetooth®
((SiriusXM®)) READY

- Warning
- FOR THE CUSTOMERS IN THE USA. NOT APPLICABLE IN CANADA, INCLUDING IN THE PROVINCE OF QUEBEC.
- POUR LES CLIENTS AUX ÉTATS-UNIS. NON APPLICABLE AU CANADA, Y COMPRIS LA PROVINCE DE QUÉBEC.
- If you have any questions about this product:
- Warning if your car's ignition has no ACC position
- Disclaimer regarding services offered by third parties
- About Change of the Unit
- Important notice
- Caution
- Emergency calls
- On BLUETOOTH communication
- Main Unit and Remote Commander
- Custom Key 1/2
- RM-X400 remote commander (not supplied)
- DISP OFF (display off)
- (mute)
- ▶II (play/pause)
- I◄◄/►►I (previous/next)
- Tip
- Screen Displays
- Status indication (left side)
- Status indication (right side)
- Application specific area
- ©(Apple CarPlay)/ (Android Auto)
- Clock
- Apps area (Favorite)
- All Apps
- \Close
- Apps area
- Basic Operations
- Using Apple CarPlay Wirelessly
- Note
- Using Android Auto
- Pairing with a Bluetooth® Device
- To pair from the settings of this unit
- To pair from the BLUETOOTH device
- Canceling the Demonstration Mode
- Updating the Firmware
- To update the firmware with USB tethering mode
- Notes
- Additional Information
- Precautions
- Notes on safety
- Preventing an accident
- Notes on LCD panel
- Notes on the touch screen
- About iPhone
- - Compatible iPhone models:
- Specifications
- AUDIO POWER SPECIFICATIONS
- Monitor section
- Radio section
- FM
- AM
- USB player section
- BLUETOOTH section
- Wi-Fi section
- Power amplifier section
- General
- Copyrights
- ((SiriusXM) READY
- Connection/Installation
- Cautions
- Note on the power supply lead (yellow)
- Ensuring the mounting location of the unit
- Parts List for Installation
- Connection
- Making connections
- To AMP REMOTE IN of an optional power amplifier
- Camera Connection
- Memory hold connection
- Speaker connection
- Installing the microphone
- Installing the GPS antenna (aerial)
- Decide the installation location on the dashboard, then clean the attachment surface.
- Remove the tape of the metal plate ⑭, then attach it on the dashboard.
- Remove the tape of the GPS antenna (aerial) ⑬, then attach it on the metal plate ⑭.
- Using the steering wheel remote control
- When using the steering wheel remote control
- Notes on installing the connection cable RC-SR1 ⑩
- When using an adaptor for the steering wheel remote control
- Installation
- For your safety
- ① Before mounting the unit
- ② Mounting the unit in the dashboard
- Using the mounting brackets supplied with your car
- ③ Setting up the display
- Adjusting the depth of the display position
- Adjusting the height of the display position
- Adjusting the display angle (tilt)
- Adjusting the width of the display position
- ④ Making sure the mounting positions of the display
- ⑤ Attaching the display to the unit
- Fuse replacement
- About License
- END USER LICENSE AGREEMENT
- IMPORTANT:
- SOFTWARE LICENSE
- COPYRIGHT
- GRANT OF LICENSE
- REQUIREMENTS AND LIMITATIONS
- EXCLUDED SOFTWARE AND OPEN SOURCE COMPONENTS
- USE OF SOFTWARE WITH COPYRIGHTED MATERIALS
- CONTENT SERVICE
- INTERNET CONNECTIVITY AND THIRD PARTY SERVICES
- EXPORT AND OTHER REGULATIONS
- U.S. GOVERNMENT RESTRICTED RIGHTS
- HIGH RISK ACTIVITIES
- EXCLUSION OF WARRANTY ON SOFTWARE
- LIMITATION OF LIABILITY
- ENTIRE AGREEMENT, WAIVER, SEVERABILITY
- BINDING ARBITRATION (ONLY FOR UNITED STATES RESIDENTS)
- ANY "DISPUTE" THAT IS NOT RESOLVED THROUGH THE INFORMAL NEGOTIATION PROCESS DESCRIBED ABOVE SHALL BE RESOLVED EXCLUSIVELY THROUGH BINDING ARBITRATION.
- ARBITRATION INSTRUCTIONS (ONLY FOR UNITED STATES RESIDENTS)
- SMALL CLAIMS EXCEPTION (ONLY FOR UNITED STATES RESIDENTS)
- CLASS ACTION WAIVER (ONLY FOR UNITED STATES RESIDENTS)
- OPT-OUT INSTRUCTIONS (ONLY FOR UNITED STATES RESIDENTS)
- REJECTING CHANGES MADE TO THE DISPUTE PROCEDURES (ONLY FOR UNITED STATES RESIDENTS)
- MISCELLANEOUS (ONLY FOR UNITED STATES RESIDENTS)
- JURISDICTION, JURY TRIAL WAIVER (ONLY FOR CANADA RESIDENTS)
- EQUITABLE REMEDIES
- TERMINATION
- AMENDMENT
- THIRD-PARTY BENEFICIARIES
- Notice on license
- Notice on GNU GPL/LGPL applied software
- Avertissement
- Communication BLUETOOTH
- Raccordement/Installation
- Mises en garde
- Remarque
- Remarques
- Advertencias
- Nota
- Notas
Brand : SONY
Model : XAV9500ES
Category : Cd player/recorder