
NCER22N - Insulated bottle PANASONIC - Free user manual and instructions
Find the device manual for free NCER22N PANASONIC in PDF.
| Product Type | Insulated Electric Kettle |
| Brand | Panasonic |
| Model | NCER22N |
| Nominal Capacity | 2.2 liters |
| Power Supply | 120 V AC |
| Power Consumption (Boiling) | 770 W |
| Power Consumption (Keep Warm at 208 °F) | 75 W (approx. 43 Wh/h) |
| Power Consumption (Keep Warm at 140 °F) | 75 W (approx. 16 Wh/h) |
| Dimensions (H × W × D) | 24.5 × 22.0 × 28.5 cm |
| Weight | 2.0 kg |
| Keep Warm Temperatures | 208 °F (98 °C) and 140 °F (60 °C) |
| Economy Timer | 6 h or 10 h |
| Long Boil Function | Yes (chlorine reduction, +3 min) |
| Overheat Protection | Yes (auto shut-off if empty) |
| Locking System | Auto lock 10 seconds after dispensing |
| Inner Coating | Binchotan Carbon Fluoride (far infrared) |
| Maintenance and Cleaning | Cleaning with citric acid recommended every 2-3 months |
| Available Spare Parts | Metal filter, rubber gaskets |
| Repairability | Authorized service center for repairs |
Frequently Asked Questions - NCER22N PANASONIC
User questions about NCER22N PANASONIC
0 question about this device. Answer the ones you know or ask your own.
Ask a new question about this device
Download the instructions for your Insulated bottle in PDF format for free! Find your manual NCER22N - PANASONIC and take your electronic device back in hand. On this page are published all the documents necessary for the use of your device. NCER22N by PANASONIC.
USER MANUAL NCER22N PANASONIC
Operating Instructions
取扱説明書□
natural_image
Line drawing of a rice cooker with control panel and side door (no text or symbols)Panasonic®
Before using this unit, please read these instructions completely.
This product is intended for household use only.
When using electrical appliances, basic safety precautions should always be followed, including the following :
- Read all instructions.
- To protect against fire, electric shock and personal injury, do not immerse cord, plugs, or Thermo Pot in water or other liquid.
- Close supervision is necessary when any appliance is used by or near children.
- Unplug from outlet when not in use and before cleaning. Allow to cool before putting on or taking off parts, and before cleaning the appliance.
- Do not operate any appliance with a damaged cord or plug or after the appliance malfunctions, or has been damaged in any manner. Return appliance to the nearest authorized servicentre for examination, repair or adjustment.
- The use of accessory attachments not recommended by the appliance manufacturer may result in fire, electric shock or personal injury.
- Do not use outdoors.
- Do not let cord hang over edge of table or counter, or touch hot surfaces.
- Do not place on or near a hot gas or electric burner, or in a heated oven.
- Always attach plug to appliance first, then plug cord into the wall outlet. To disconnect, remove plug from wall outlet first, then detach plug from appliance.
- Do not use appliance for other than intended use.
- Do not place on uneven surfaces.
- Do not touch hot surfaces. Use handles or knobs.
- Extreme caution must be used when moving an appliance containing hot liquids.
- This appliance has a polarized plug (one blade is wider than the other). As a safety feature, this plug will fit in a polarized outlet only one way. If the plug does not fit fully in the outlet, reverse the plug. If it still does not fit, contact a qualified electrician.
SAVE THESE INSTRUCTIONS
NOTE:
A short cord is provided to reduce the hazards of becoming entangled or tripping over a longer cord. An extension cord may be used if the rating is equal to, or greater than, the rating of this appliance and if care is taken to arrange the extension cord so that it can not be pulled or tripped over accidentally.
Fluoride coating containing far-infrared emitting Binchotan-Carbon
Using a container coated with fluoride that contains far-infrared emitting Binchotan-Carbon produces hot water ideally suited for bringing out the color, taste, and aroma of tea.
備長炭遠赤フッ素
Keeps water warm economically
The 6- and 10-hour economy timer can reduce electricity costs. ("How to use" see P.20)
僉約保温
Keep warm temperature selections includes 140 keep-warm.
It is ideal for making baby formula. ("How to use" see P.20)
140保温
Cleaning with citric acid
regularly allows the product to function at its best ("How to clean" see P.28)
クエン酸による洗浄
Safety Precautions 3-5
Part Names and Handling Instructions .....15-16
How to Use 19-20
Daily Maintenance 27
How to Clean the Inner Container with Citric Acid ....28
Troubleshooting....35-36
Replacement of Parts 39
主要特長……1
目次……2
安全上のご注意……6-8
各部の名前と扱い方……15-16
湯を沸かして注ぐ……21-22
日常のお手入れ……29
クエン酸による洗浄のしかた……30
故障かな?……35-36
消耗部品の交換……39
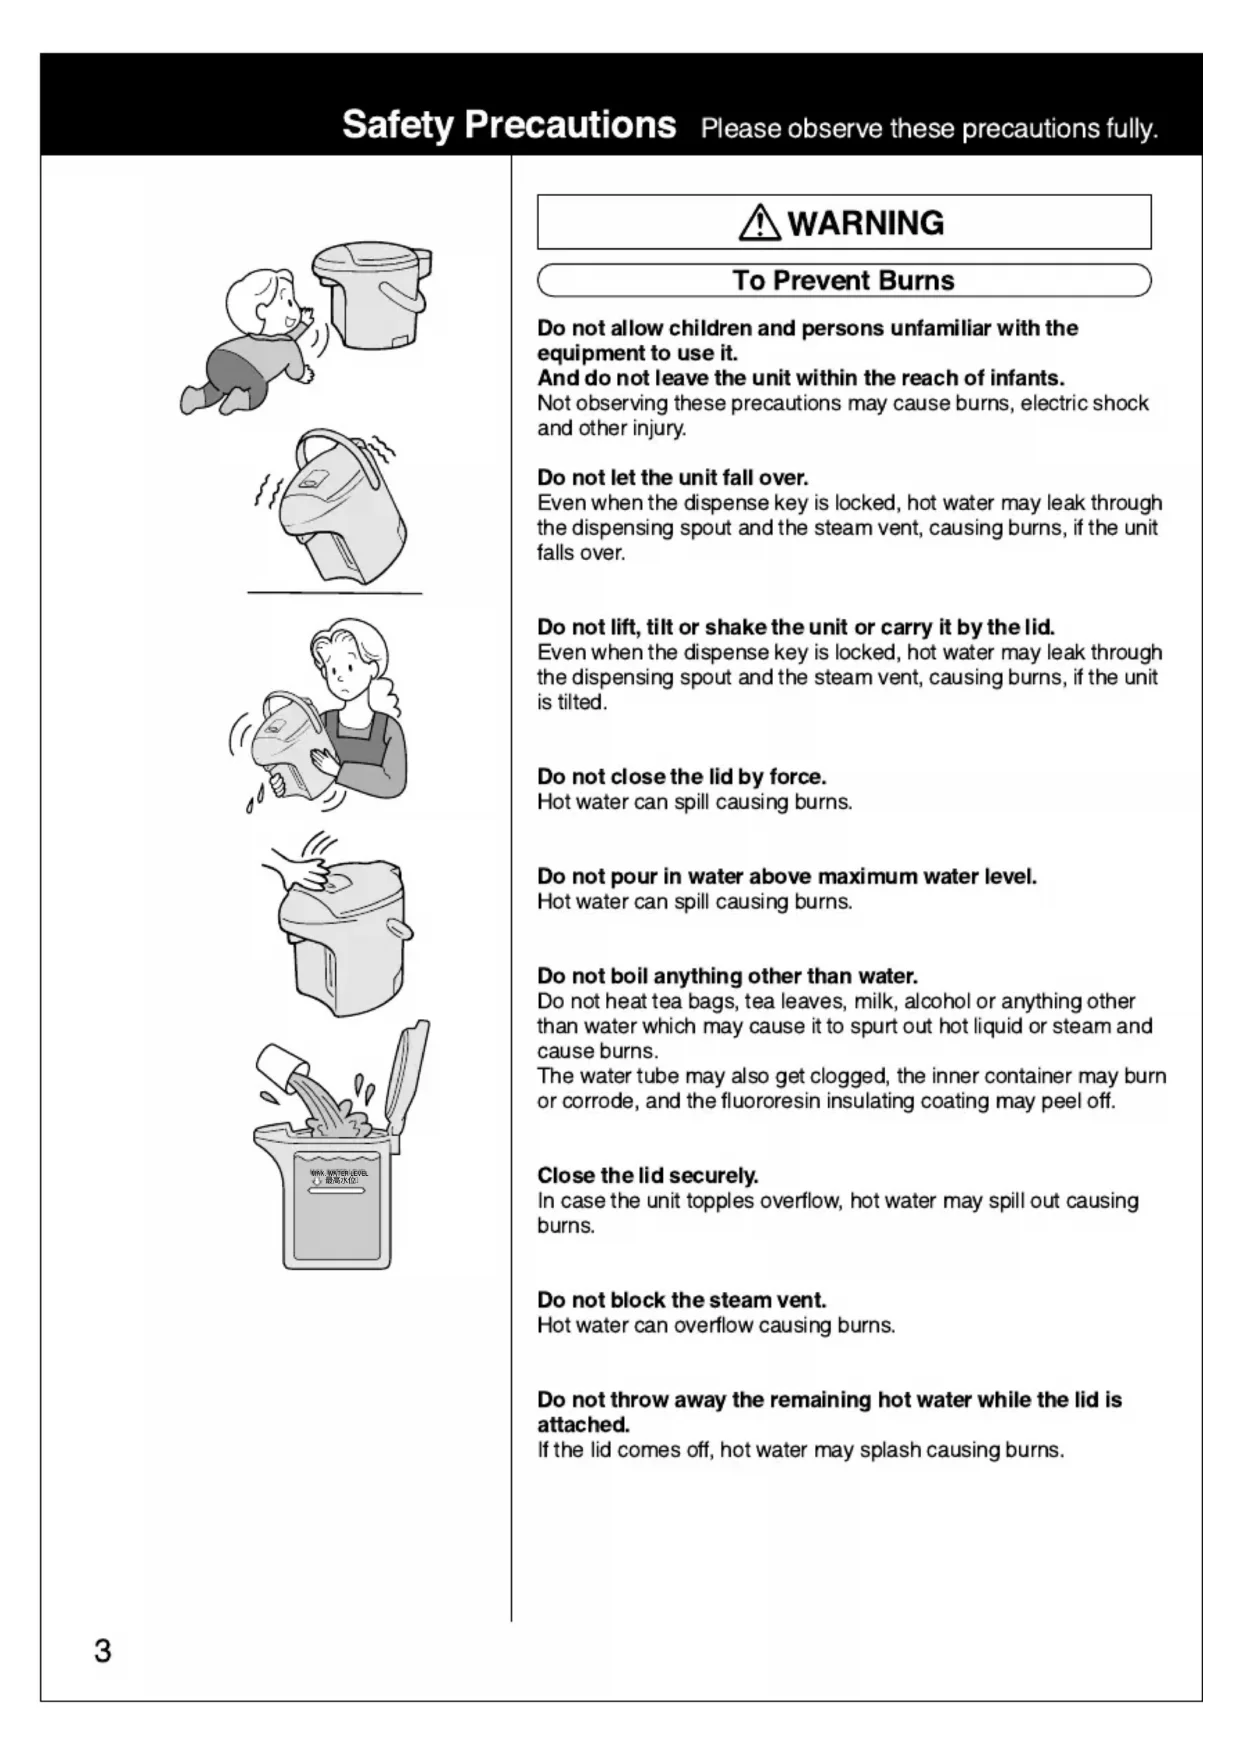
Please observe these precautions fully.

WARNING
To Prevent Burns
Do not allow children and persons unfamiliar with the equipment to use it.
And do not leave the unit within the reach of infants.
Not observing these precautions may cause burns, electric shock and other injury.
Do not let the unit fall over.
Even when the dispense key is locked, hot water may leak through the dispensing spout and the steam vent, causing burns, if the unit falls over.
Do not lift, tilt or shake the unit or carry it by the lid.
Even when the dispense key is locked, hot water may leak through the dispensing spout and the steam vent, causing burns, if the unit is tilted.
Do not close the lid by force.
Hot water can spill causing burns.
Do not pour in water above maximum water level.
Hot water can spill causing burns.
Do not boil anything other than water.
Do not heat tea bags, tea leaves, milk, alcohol or anything other than water which may cause it to spurt out hot liquid or steam and cause burns.
The water tube may also get clogged, the inner container may burn or corrode, and the fluororesin insulating coating may peel off.
Close the lid securely.
In case the unit topples overflow, hot water may spill out causing burns.
Do not block the steam vent.
Hot water can overflow causing burns.
Do not throw away the remaining hot water while the lid is attached.
If the lid comes off, hot water may splash causing burns.
Safety Precautions Please observe these precautions fully.
natural_image
Illustration of a small water dispenser with splashing liquid, no text or symbols presentMain unit
Power cord

WARNING
During use
Do not immerse the unit in water or splash water over it. It may cause a short circuit and may result in electric shock.
Never disassemble, repair or modify the unit.
Any attempt to do so may cause the unit to operate abnormally and may result in fire or injury.
- If in need of repair (except for the replacement parts), please contact an authorized Service Center.
Do not use to store ice.
Condensation will occur, creating a potential source of electric shock and malfunction.
Power Cord
Use a single outlet that matches the power rating of the unit. Heat generated when plugging in multiple appliances into one outlet may result in fire.
Never do anything that might cause damage to the cord, power plug or body plug,
such as damage them, modify them, place hot objects near to them, bend them, twist them, stretch them, place heavy objects on them, or bundle them together.
If the unit is used when damaged, electrical short circuit or fire may result.
- If in need of repair please contact an authorized Service Center.
Make sure the power plug is correctly inserted in to the wall outlet.
If the plug is inserted improperly it may cause electric shock or generate heat resulting in fire.
- Do not use a damaged plug or a connection in a loose outlet.
Clean dust from the power plug or the body plug regularly.
A build-up of dust on the plug will attract condensation, which could cause cable damage resulting in fire.
- Remove the plugs and clean them with a dry cloth.
Do not connect or disconnect the power plug or the body plug with wet hands.
This may result in electric shock.
Do not allow infants access to the body plug.
You must pay special attention to prevent infants from putting the body plug into their mouths.
This may result in electric shock or injury.
Do not allow small metal parts near the body plug.
This may result in electric shock, electrical short circuit or fire.

Attention
To Prevent Burns
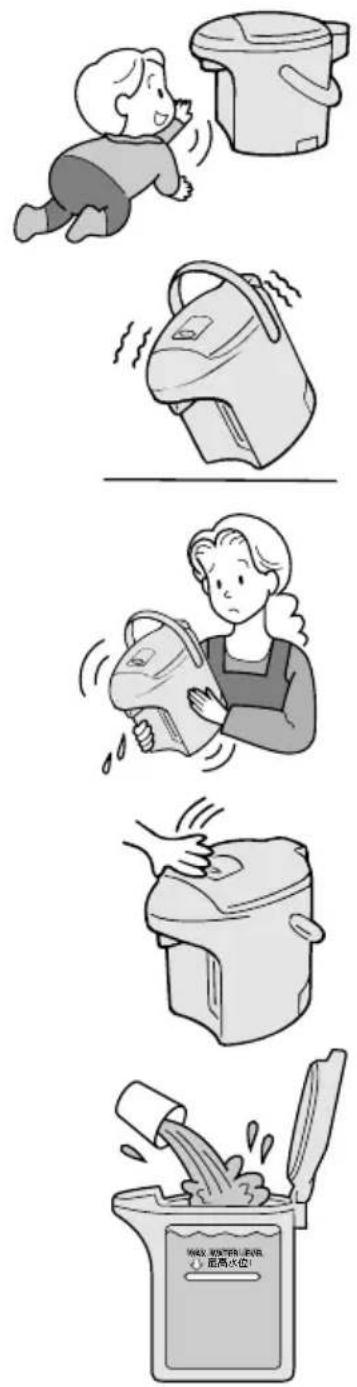
Do not place the unit on unstable surfaces or surfaces that can be affected by heat.
The appliance may topple over causing burns.
When opening the lid, keep hands away from the steam.
Steam can cause burns.
Do not open the lid or dispense hot water while boiling.
Splashing hot water or steam may cause burns.
Do not touch the steam vent.
This may cause burns. Take special care to prevent infants from touching the steam vent.
Do not rotate the unit while dispensing hot water.
Splashing hot water may cause burns.
Do not touch the hot parts of the unit during use or shortly after use.
This may cause burns.
When carrying the unit, do not touch the lid opening lever.
The lid may open causing burns and other injury.
Wait for the unit to cool before maintenance.
A hot appliance may cause burns.
- When disposing hot water, be careful not to get burned.
Power Cord
When the unit is not in use, unplug the power plug from the wall outlet.
Deteriorating insulation may result in electric shock and/or fire.
When unplugging the unit, pull by the power plug - not the cord.
Electric shock and short circuit may result in fire.
Only use the power cord designed specifically for the unit. Do not use a different cord and do not use this cord with any other device.
It may cause a malfunction or it may start a fire.
Where to position the unit
Do not place near walls or furniture.
Steam and heat could damage walls and furniture, causing a change in color and shape.
Precautions When Cleaning with Citric Acid
- Use only our citric acid to clean this thermo pot.
- Do not fill with water above maximum water level.
- Fill the container only with tap water.(Do not fill with hot water.)
Hot water may spout out causing burns.
For instructions on how to clean the inner container with citric acid please see page 28.
安全上のご注意『必ずお守りください』

警告
やけどを防ぐために
natural_image
Illustration of a steaming machine with steam rising from its side (no text or symbols)本体□
natural_image
Illustration of a kitchen appliance on a sink with water droplets (no text or symbols)Appareil
natural_image
Illustration of a steaming machine with steam rising from its side, creating snow or ice (no text or symbols)本體
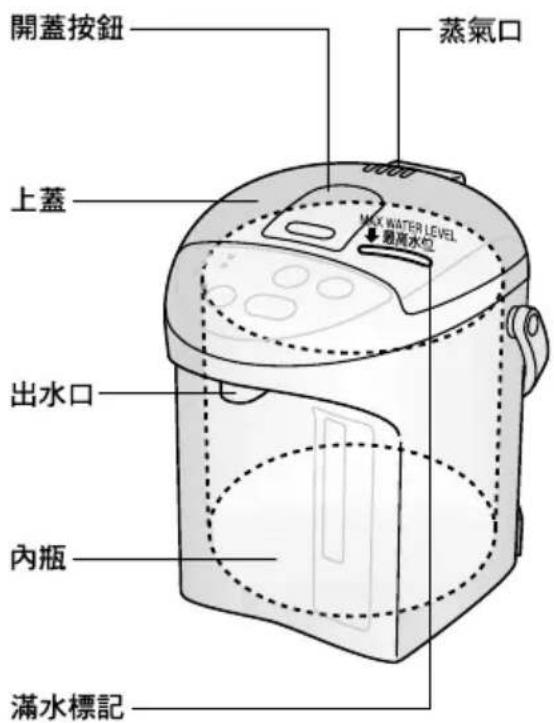
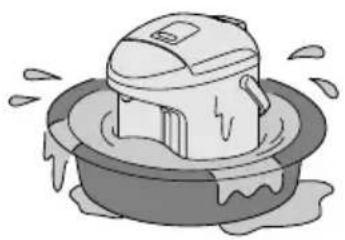
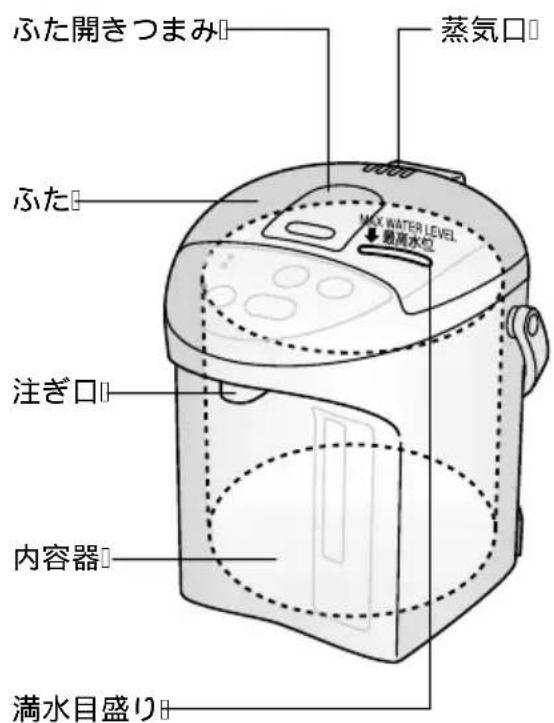
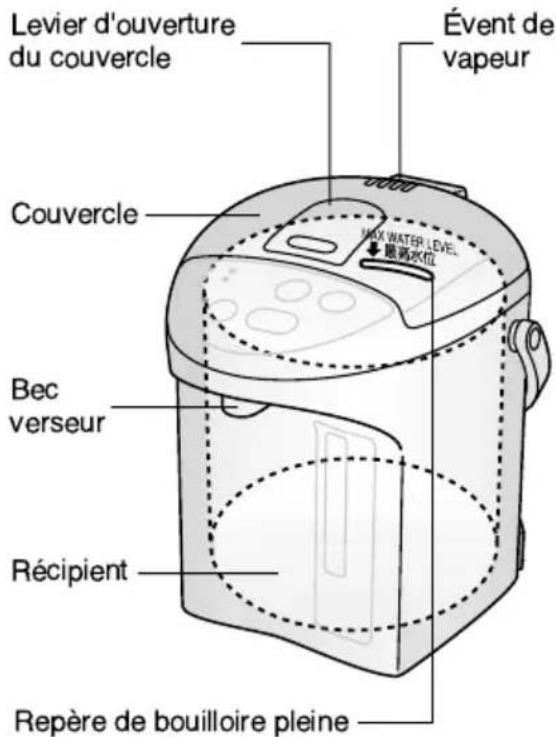
Dispensing spout 注ぎ口
Rotating base (360 degrees)
When rotating the pot, do not allow the cord to wind around the unit.
回転台(360°)
Do not place the unit onto a vinyl table cloth or similar.
(The odor of the vinyl or similar may be carried over into the water.)
natural_image
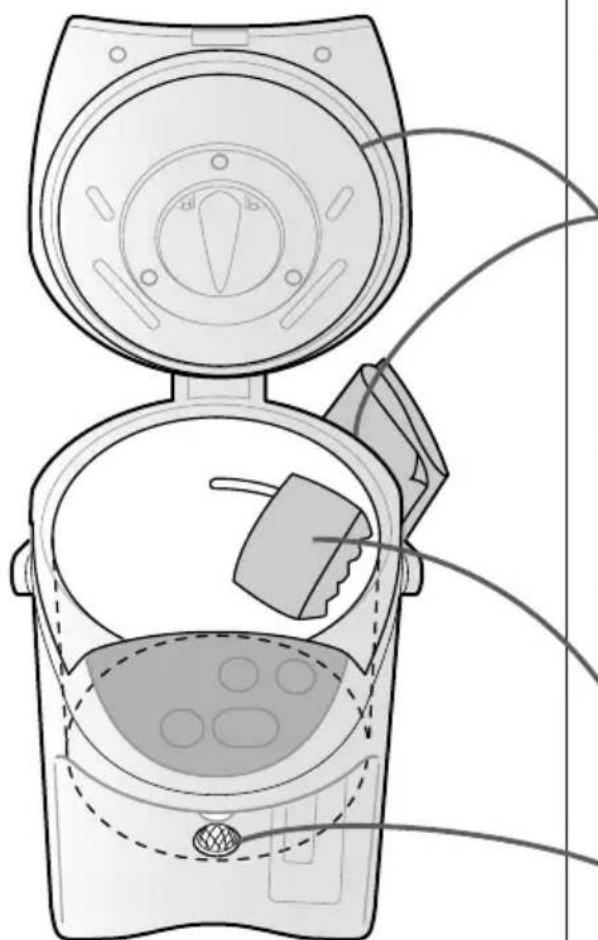
Line drawing of a modern kitchen grater with control panel and side door (no text or symbols)Checking the Enclosed Parts
同梱部品の確認
Mesh filter (Replaceable part)
Placed at the bottom of the container by a magnet. Make sure it is located properly.
(See P.39)

フィルター(消耗部品)
内容器の底に入っています。
外れている場合は、正しく
セットする。(PB.99)
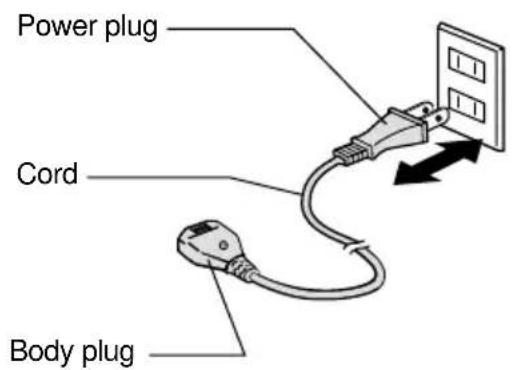
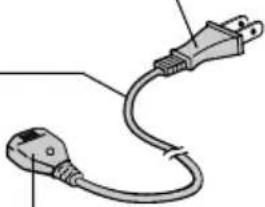
Power cord
電源コード
Plug
電源プラグ
Cord (black)
コード(黒)
Body plug
器具用プラグ
natural_image
Line drawing of an electrical plug with a terminal connector (no text or symbols)How to Remove the Lid
ふたの外し方
- Press the depression in the lid opening lever, and lift the lid.
- Push on the lid release lever, hold the lid opening lever, and pull the lid out and up diagonally.
- To attach the lid, insert it at an angle. To close the lid, press down on the lid until it clicks.
Overheating protection
カラだき防止について
If an empty container is heated, the overheat safety function (which prevents an empty container from being heated) will be activated. The power will be shut off automatically to prevent the problems that can occur due to overheating. This will be shown on the display as shown below.
flowchart
graph TD
    A["Flashing alternately"] --> B["Interimally to point滅"]
    B --> C["208"]
    B --> D["140"]
    C --> E["Economy Timer"]
    D --> F["Cleaning"]
    E --> G["Select"]
    F --> H["Long Boil/Reboil"]
If an empty container is heated, a bad smell will be emitted and the container may be discolored. Please observe the following.
- Do not connect the power without pouring water into the container.
- Do not boil water when less than the minimum water level is in the container.
• After water is added, do not leave the lid open.
natural_image
Line drawing of a modern kitchen appliance with control panel and buttons (no text or symbols)Évent de vapeur 蒸氣口
Poignée
natural_image
Simple line drawing of an electrical outlet with a plug and cable (no text or symbols)natural_image
Illustration of hands cleaning a toilet with arrows indicating direction (no text or symbols)Before you use this pot for the first time, boil water in it to clean the thermo pot container and the sections through which the hot water is dispensed. (Boil some water, dispense about half the hot water and then empty the container.)
1. Boiling water
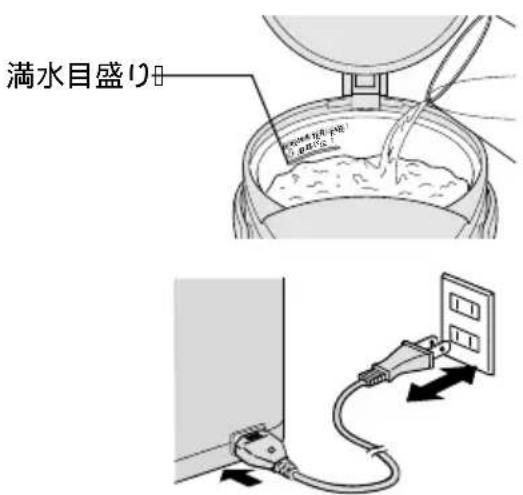
①Pour in water with another container. Close the lid securely.
② Securely plug the body plug horizontally into the body.
③Plug into wall outlet.
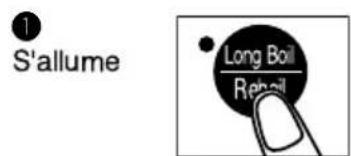
4The '208' indicator light flashes, the 'Long Boil/Reboil' indicator light is lit and water starts boiling.
⑤After the water has been boiled, the 'Long Boil/Reboil' indicator light goes off. Then the '208' indicator light will be lit and the boiled water will be kept warm at approx. 208°F (98C) automatically.
Time required to boil water.
NC-ER30N:approx.25 min.
NC-ER22N:approx.19 min.
(Amount of water: Maximum at room temperature 68°F (20°C))
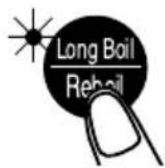
- Long Boil (to reduce the chlorine in the water)
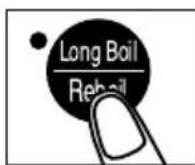
⑥Press 'Long Boil/Reboil' key to make the indicator light flash. Extends the boiling time by about three minutes to reduce the chlorine in the water.
2. Dispensing
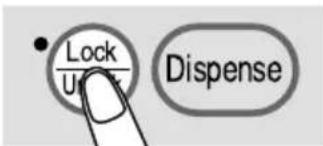
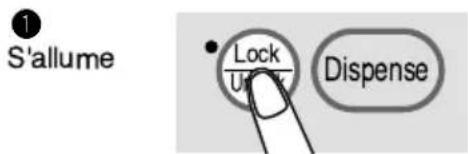
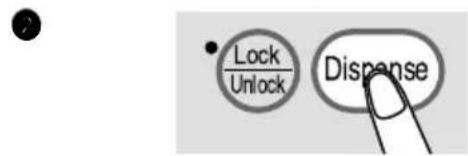
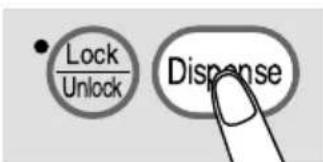
①Press the 'Lock/Unlock' key to release lock. The indicator light beside the key will be lit.
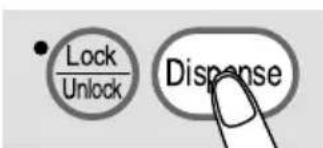
2Press 'Dispense' key and dispense the hot water.
The 'Dispense' key will be re-locked automatically in 10 seconds after dispensing hot water. (The 'Unlock' indicator light will go off.)
- After boiling, bubbles may form for a time and make it difficult to dispense the hot water. If this happens, opening and closing the lid will correct the situation. (Be careful of the steam when opening the lid.)
- To lock the key immediately after dispensing water, press the 'Lock/Unlock' key. (The 'Unlock' indicator light will go off.)
3. Keeping water warm
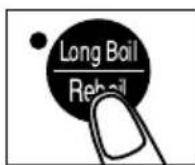
•Reboil
1 Press the 'Long Boil/Reboil' key to reboil water that is being kept warm.
The 'Long Boil/Reboil' indicator light is lit and the '208' indicator light flashes.
(The keep warm temperature and the economy timer setting are left unchanged.)
Time required for the reboil procedure :
When keep warm is set at 208-keep warm : 3-4 min.
When keep warm is set at 140-keep warm : 12-14 min.
When using the economy timer: usually less than 14 min.
(Amount of water: Maximum at room temperature 68°F (20°C))
- When the water runs low
Refill water before it becomes lower than the minimum water level mark.
- When the unit is not used
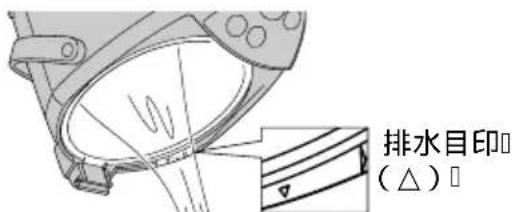
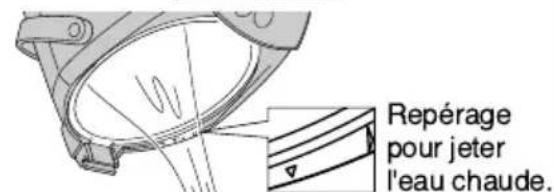
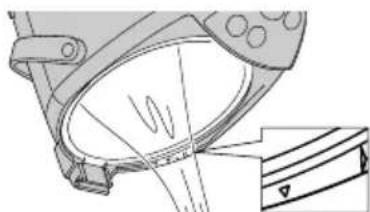
Unplug, and remove the lid. Pour out any remaining hot water via the guideline for throwing away hot water △.
How to Use
○208
○140

○Cleaning
Lights
Flashing Lights solidly Goes out
•208
○140

○Cleaning
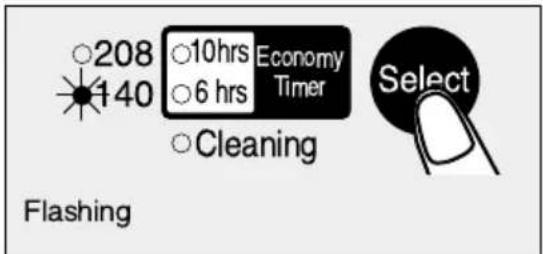
Economy timer
When the unit will not be used for a short time, such as when you are sleeping or when you go out for the day, by setting this timer you can reduce the amount of electricity used.
- Select either the "6 hrs" or "10 hrs" timer, depending on how long you will sleep or be away from your house.
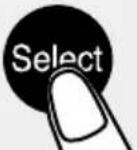
Press the 'Select' key to select the "6 hrs" or "10 hrs" timer.
When the timer is started, the indicator light will light, and the temperature of hot water will drop automatically (to approx. 140^ F ( 60^ C)).
6 or 10 hours later, the timer will be reset. After the water is brought up to boiling temperature again, it will be kept warm at approx. 208°F (98°C).
140 keep-warm function
Press the 'Select' key to select "140".
(The '140' indicator light will flash.)
The temperature of hot water will drop to approx. 140°F (60°C). (When the temperature reaches approx. 140°F (60°C), the indicator light will change to steadily lit.)
Time required to reach approx. 140°F (60°C)
Approx. 3 - 4 hours
(Amount of water: Maximum, Room temperature: 68°F (20°C))
Precautions when the economy timer is used or when the 140 keep-warm function is selected
- When the power is restored after a power failure, the keep-warm temperature will be set to "208".
- When the temperature of hot water has dropped because water was added, the water will be brought up to boiling temperature.
- The keep-warm temperature can be changed while the water is being boiled.
- The economy timer can be set while the water is being boiled. In this case, even though the timer has been started, the water will be brought to boiling temperature.
- The minimum water temperature is approx. 140°F (60°C) while the economy timer is being used.
Notice
- Do not use the unit near an open flame. (The unit may become deformed.)
- Do not supply water directly from the tap. (If the water overflows the pot and it enters the electrical parts built into the main unit, it may cause a malfunction.)
- Do not leave water standing in the container. (It may cause the container to corrode or smell.)
- Do not pour water out of the pot over the side where the operation panel is located. (Water infiltration may cause a malfunction.)
湯を沸かして注ぐ
点滅□
① 点灯
2
点灯□
2
點亮
natural_image
Technical line drawing of a mechanical component with internal structure and an inset detail (no text or symbols)排水標誌(△)
節約定時器
natural_image
Technical line drawing of a device with internal components and wiring (no text or symbols)
natural_image
Diagram of a mechanical or electrical component with a cross symbol crossed out, no text or labels present.Main unit and lid
Clean with a damp, well-wrung cloth.
- Do not wet or soak the main unit in water. (If water enters the main unit from the bottom or from the dispensing spout, it can also get into the electrical components in the main unit and may cause a malfunction.)
- Do not use detergents. (They may leave an odor.)
- Do not use benzine or thinner. (They may damage the surface.)
Inner container
Clean with a sponge.
- Do not use polishing powder, a scrub brush or a nylon brush. (They may damage the fluororesin finish of the inner container.)
Mesh filter
Clean the filter with a brush.
* After cleaning the filter, be sure to reattach it to the inner container.
When the container shows signs of being covered with scale
While you are using this unit, minerals contained in the water (like calcium) can get stuck on the inner container or on the mesh filter. This is called "scale", and it is harmless.
- Milky-white gritty surface
- White or glittering floating material
- Discoloration in the finish like dark brown, gray, or green areas.
These are not discoloration or corrosion of the inner container itself, nor are they flakes from the fluororesin covering.

To maintain the pot's performance, clean the inner container once every two or three months using citric acid.
Notice
- Do not wash in a dishwasher and never put it in a heated dish dryer. (The unit may become deformed.)
- To store the unit, dry it thoroughly and put it into a plastic bag. Seal the bag to keep insects from getting in.
How to Clean the Inner Container with Citric Acid

- Make sure that the mesh filter is attached to the container.
- Put citric acid in the inner container.
• Amount of citric acid to be used at one time
NC-ER30N: 80 g (two packages) or seven level tablespoons
NC-ER22N: 40 g (one package) or three to four level tablespoons
- Add water to the maximum water level mark, and mix the citric acid and water well. Close the lid.
- Connect the plug immediately after stirring and press the 'Select' key until the indicator light next to 'Cleaning' lights up.
Cleaning start
○208
○140
○10hrs Economy
○6 hrs
Economy
Timer
- Cleaning
Lights
[Non-Text]
Cleaning time
NC-ER30N: approx. 41 min. NC-ER22N: approx. 35 min.
End of cleaning
○208
○140
○10hrs Economy ○6 hrs Timer
Cleaning
Flashes
- Unplug, remove the lid and throw away the hot water following guideline for throwing away hot water.
- Refill with water and boil it to remove the smell of the citric acid. Then throw away the hot water following the guideline.
The citric acid is available at an authorized dealer.
(Model No:SAN-80N)
* Follow the directions for cleaning printed on the citric acid package.
* Since the citric acid used for cleaning is a food additive, it is harmless to humans.
Notice
- To remove any discoloration from the area above the maximum water level, rub the inside lightly with a wet sponge.
- If the discoloration cannot be removed by rubbing, clean the inner container several times using citric acid.
日常のお手入れ
natural_image
Technical line drawing of a portable electronic device with internal components and wiring (no text or symbols)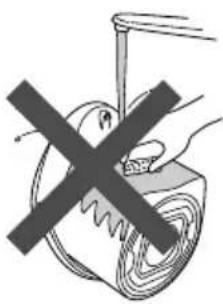
natural_image
Diagram of a hand holding a magnet above a coil, crossed out by a black X (no text or symbols present)本体・ふた
よく絞ったふきんでふき取る
natural_image
Technical line drawing of a portable air conditioner unit with internal components and wiring (no text or symbols)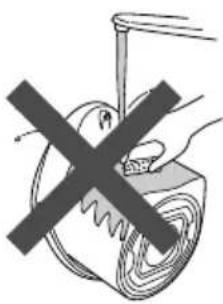
natural_image
Diagram of a mechanical or electrical component with a cross symbol crossed out, no text or labels present.natural_image
Technical line drawing of a device with internal components and wiring (no text or symbols)
natural_image
Diagram of a mechanical or electrical component with a cross symbol crossed out, no text or labels present.本體、上蓋
用擰乾的濕抹布擦拭。

White or glittering flakes floating in the hot water.
湯に白やキラキ
ラした浮遊物が
浮いている
Hot water from the unit has an unpleasant odor.
湯がにおう
Hot water does not flow out smoothly.
湯が出にくい
Hot water won't dispense.
湯が出ない
ause How to fix
が原因□ 直し方□
- When the unit is new, resin used in manufacture may give off a mild odor. This will disappear with use.
- Press the 'Long Boil/Reboil' key.
- Long Boil / Reboil キーを 押す。
- Press the 'Long Boil/Reboil' key.
- Long Boil / Reboil キーを押す。
- Press the 'Long Boil/Reboil' key.
- Long Boil / Reboil キーを押す。
- Press the 'Long Boil/Reboil' key.
- Long Boil / Reboil キーを押す。
- Press the 'Long Boil/Reboil' key.
- Long Boil / Reboil キーを押す。
- Press the 'Long Boil/Reboil' key.
- Press the 'Long Boil/Reboil' key.
- Press the 'Long Boil/Reboil' key.
- Press the 'Long Boil/Reboil' key.
-
Press the 'Long Boil/Reboil' key.
-
If the foreign matter cannot be removed, replace the filter. (See P.29)
■ ブラシなどで洗う。(P.29)
Hot water comes out by itself.
湯が自然に出る
The water is not boiled.
湯が沸かない
The outside of the main unit is hot.
本体外側が熱い
The indicator lights flash alternately.
ランプが交互に 点滅する

○10hrs ○6 hrs

Possible cause
ここが原因
- Water has been added above maximum water level.
- 水を満水目盛り以上入れていませんか?
- Disconnect the plug, and stir the citric acid well to disperse it. Then, plug in.
Replace gaskets if they crack, lose their pliancy or, for any other reason, allow steam to escape from between the container and the lid.
ゴムパッキング
Remove lid, unscrew 3 tapping screws and remove the lid cover. Exchange the gaskets and then place the lid cover back and secure with the tapping screws.
Replace the filter, if foreign materials which clog the filter can not be removed, even after you scrub with a cleaning brush, etc.
フィルター
Consumable parts are available from your nearest authorized dealer.
natural_image
Simple line drawing of a circular tank with a central minus sign and a small bolt on the side (no text or symbols)* The values in the parentheses indicate the keep-warm electric power consumption per hour (amount of water: maximum, room temperature: 68°F (20°C))
* Under certain conditions, such as at very high altitudes and in intense cold, the unit may not function properly.
Please avoid using the unit in such conditions.
* If the unit is not used during cold conditions, make sure to empty it of water. The water left in the inner container may freeze causing damage.
| Nom de la pièce | 易耗品名稱 | No. de pièce | 易耗品編號 |
| Joint en caoutchouc | 密封墊 | APH65-198 | |
| Filtre métallique | 過濾網 | APB96-360-0U | |
| Model No. | NC-ER22N NC-ER30N | ||
| Power supply | 120V a.c. | ||
| Power consumption | When boiling water | 770W | |
| Keep warm at 208 | 75W (approx. 43Wh) | 75W (approx. 47Wh) | |
| Keep warm at 140 | 75W (approx. 16Wh) | 75W (approx. 21Wh) | |
| Dimensions (approx.) (H x W x D)When the handle is tilted | 10" × 9" × 115" (24.5 × 22.0 × 28.5 cm) | 11^1/5" × 9" × 11^1/5" (28.5 × 22.0 × 28.5 cm) | |
| Weight (approx.) | 4.4 lbs. / 2.0 kg | 4.9 lbs. / 2.2 kg | |
| Rated capacity | 2^1/3 quarts / 2.2 L | 3^1/5 quarts / 3.0 L | |
Matsushita Electric Industrial Co., Ltd.
Web Site: http://www.panasonic.co.jp/global/
- Operating Instructions
- 取扱説明書□
- Panasonic®
- SAVE THESE INSTRUCTIONS
- NOTE:
- Fluoride coating containing far-infrared emitting Binchotan-Carbon
- Keeps water warm economically
- Keep warm temperature selections includes 140 keep-warm.
- Cleaning with citric acid
- Please observe these precautions fully.
- WARNING
- To Prevent Burns
- Safety Precautions Please observe these precautions fully.
- During use
- Never disassemble, repair or modify the unit.
- Do not use to store ice.
- Power Cord
- Never do anything that might cause damage to the cord, power plug or body plug,
- Make sure the power plug is correctly inserted in to the wall outlet.
- Clean dust from the power plug or the body plug regularly.
- Do not connect or disconnect the power plug or the body plug with wet hands.
- Do not allow infants access to the body plug.
- Do not allow small metal parts near the body plug.
- Attention
- Where to position the unit
- Precautions When Cleaning with Citric Acid
- 安全上のご注意『必ずお守りください』
- 警告
- やけどを防ぐために
- Checking the Enclosed Parts
- Mesh filter (Replaceable part)
- How to Remove the Lid
- Overheating protection
- カラだき防止について
- Poignée
- Boiling water
- Dispensing
- Keeping water warm
- How to Use
- Economy timer
- keep-warm function
- Precautions when the economy timer is used or when the 140 keep-warm function is selected
- Notice
- 湯を沸かして注ぐ
- 節約定時器
- Main unit and lid
- Clean with a damp, well-wrung cloth.
- Inner container
- Clean with a sponge.
- Mesh filter
- Clean the filter with a brush.
- When the container shows signs of being covered with scale
- How to Clean the Inner Container with Citric Acid
- The citric acid is available at an authorized dealer.
- 日常のお手入れ
- 本体・ふた
- 本體、上蓋
- 用擰乾的濕抹布擦拭。
- White or glittering flakes floating in the hot water.
- Hot water from the unit has an unpleasant odor.
- Hot water does not flow out smoothly.
- Hot water won't dispense.
- ause How to fix
- が原因□ 直し方□
- Hot water comes out by itself.
- The water is not boiled.
- The outside of the main unit is hot.
- The indicator lights flash alternately.
- Possible cause
- ここが原因
- Consumable parts are available from your nearest authorized dealer.
- Matsushita Electric Industrial Co., Ltd.
Brand : PANASONIC
Model : NCER22N
Category : Insulated bottle