JEC0530ADB - Cooker JennAir - Free user manual and instructions
Find the device manual for free JEC0530ADB JennAir in PDF.
Download the instructions for your Cooker in PDF format for free! Find your manual JEC0530ADB - JennAir and take your electronic device back in hand. On this page are published all the documents necessary for the use of your device. JEC0530ADB by JennAir.
USER MANUAL JEC0530ADB JennAir
Form No. A/01/08 Part No. 8112P343-60 ©2006 Maytag Appliances Sales Co. All rights reserved. Litho U.S.A .1 Installer: Please leave this manual with this appliance.Consumer: Please read and keep this manual for futurereference. Keep sales receipt and/or cancelled check asproof of purchase.Model Number__________________________________Serial Number __________________________________Date of Purchase ________________________________If you have questions, call:Jenn-Air Customer Assistance1-800-JENNAIR (1-800-536-6247) USA and Canada1-800-688-2080 ( U.S. TTY for hearing or speech impaired)(Mon.-Fri., 8 am-8 pm Eastern Time)Internet: http://www.jennair.comIn our continuing effort to improve the quality and perfor-mance of our cooking products, it may be necessary to makechanges to the appliance without revising this guide.For service information, see page 11. IMPORTANT SAFETY INSTRUCTIONS Warning and Important Safety Instructions appearing in thisguide are not meant to cover all possible conditions andsituations that may occur. Common sense, caution, and caremust be exercised when installing, maintaining, or operatingthe appliance.Always contact the manufacturer about problems or condi-tions you do not understand. Recognize Safety Symbols, Words, Labels WARNING – Hazards or unsafe practices which COULDresult in severe personal injury or death.CAUTION – Hazards or unsafe practices which COULDresult in minor personal injury. WARNING CAUTION Read and follow all instructions before using thisappliance to prevent the potential risk of fire, electric shock,personal injury or damage to the appliance as a result ofimproper usage of the appliance. Use appliance only for itsintended purpose as described in this guide.To ensure proper and safe operation: Appliance must beproperly installed and grounded by a qualified technician. Donot attempt to adjust, repair, service, or replace any part ofyour appliance unless it is specifically recommended in thisguide. All other servicing should be referred to a qualifiedservicer.Always disconnect power to appliance before servicing. General Instructions If appliance is installed near a window, precautions should betaken to prevent curtains from blowing over surface elements.NEVER use appliance to warm or heat the room. Failure tofollow this instruction can lead to possible burns, injury, fire,or damage to the appliance.NEVER wear loose-fitting or hanging garments while usingthe appliance. Clothing could catch utensil handles or igniteand cause burns if garment comes in contact with hot heatingelements.To ensure proper operation and to avoid damage to theappliance or possible injury, do not adjust, service, repair orreplace any part of the appliance unless specifically recom-mended in this guide. Refer all other servicing to a qualifiedtechnician.NEVER store or use gasoline or other combustible or flam-mable materials near surface units or in the vicinity of thisappliance as fumes could create a fire hazard or an explosion.To prevent grease fires, do not let cooking grease or otherflammable materials accumulate in or near the appliance.Use only dry potholders. Moist or damp potholders on hotsurfaces may result in a steam burn. Do not let potholderstouch hot heating elements. Do not use a towel or other bulkycloth which could easily touch hot heating elements andignite.Always turn off all controls when cooking is completed.This appliance has been tested for safe performance usingconventional cookware. Do not use any devices or accesso-ries that are not specifically recommended in this manual. Donot use eyelid covers or stove top grills. The use of devices oraccessories that are not expressly recommended in thismanual can create serious safety hazards, result in perfor-mance problems, and reduce the life of the components ofthis appliance. In Case of Fire Turn off appliance and ventilating hood to avoid spreadingthe flame. Extinguish flame then turn on hood to removesmoke and odor.• Smother fire or flame in a pan with a lid or cookie sheet.NEVER pick up or move a flaming pan.Do not use water on grease fires. Use baking soda, a drychemical or foam-type extinguisher to smother fire or flame.CAUTION
NEVER use aluminum foil or foil containers on the cooktop.These may become very hot. Use foil only as directed in thisguide.Aerosol-type cans are EXPLOSIVE when exposed to heat andmay be highly flammable. Do not use or store near appliance.Clean only parts listed in this guide and use proceduresrecommended. Cooktop NEVER leave surface units unattended especially when usinghigh heat. An unattended boilover could cause smoking and agreasy spillover can cause a fire.This appliance is equipped with different size surface ele-ments. Select pans with flat bottoms large enough to coverelement. Fitting pan size to element will improve cookingefficiency.If pan is smaller than element, a portion of the element will beexposed to direct contact and could ignite clothing orpotholder.Only certain types of glass, glass/ceramic, ceramic, earthen-ware, or other glazed utensils are suitable for cooktop servicewithout breaking due to the sudden change in temperature.Follow utensil manufacturer’s instructions when using glass.Turn pan handle toward center of cooktop, not out into theroom or over another surface element. This reduces the riskof burns, ignition of flammable materials, or spillage if pan isaccidently bumped or reached by small children. Glass-Ceramic Cooktop NEVER cook on broken cooktop. If cooktop should break,cleaning solutions and spillovers may penetrate the brokencooktop and create a risk of electric shock. Contact a quali-fied technician immediately.Clean cooktop with caution. Some cleaners can producenoxious fumes if applied to a hot surface. If a wet sponge,cloth, or paper towel is used on a hot cooking area, be carefulto avoid steam burn.Never stand on the cooktop. Deep Fat Fryers Use extreme caution when moving the grease pan or dispos-ing of hot grease. Allow grease to cool before attempting tomove pan. Heating Elements NEVER touch surface elements or areas near elements.Heating elements may be hot even though they are dark incolor. Areas near surface elements may become hot enoughto cause burns.During and after use, do not touch or let clothing or otherflammable materials contact heating elements or areas nearelements until they have had sufficient time to cool.Other potentially hot surfaces include: Cooktop and areasfacing the cooktop. Child Safety Save These Instructions for Future Reference NEVER store items of interest to children in cabinetsabove an appliance or on the cooktop. Children climbingon appliance to reach items could damage the applianceor be burned or seriously injured.NEVER leave children alone or unsupervised in area whereappliance is in use or is still hot.NEVER allow children to sit or stand on any part of theappliance as they could be injured or burned.Children must be taught that the appliance and utensils in oron it can be hot. Let hot utensils cool in a safe place, out ofreach of small children. Children should be taught that anappliance is not a toy. Children should not be allowed to playwith controls or other parts of the unit. Ventilating Hoods Clean range hood and filters frequently to prevent grease orother flammable materials from accumulating on hood or filterand to avoid grease fires.Turn the fan on when flambéing foods (such as CherriesJubilee) under the hood. Important Safety Notice and Warning IMPORTANT NOTICE REGARDING PET BIRDS: Neverkeep pet birds in the kitchen or in rooms where the fumesfrom the kitchen could reach. Birds have a very sensitiverespiratory system. Fumes released during an oven self-cleaning cycle may be harmful or fatal to birds. Fumesreleased due to overheated cooking oil, fat, margarine andoverheated non-stick cookware may be equally harmful.
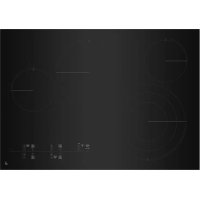
1. Left rear element (cook and warm)
4. Right front element (custom control
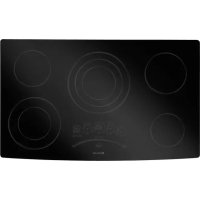
2. Left rear element (cook and warm)
5. Right front element (custom control
element) Model JEC0536 Model JEC05304 Using the Touch Control
- Press the desired ON pad. A light on the left side of thecontrol will blink.• While the light is blinking, press the desired temperaturesetting using the Temperature Selector Bar.• A beep will sound each time a pad is pressed. Setting the Controls 1. Place pan on surface element.2. Press ON.3. Select the temperature setting using the TemperatureSelector Bar.4. When cooking is completed, press OFF and remove the pan.
Surface Controls Suggested Heat Settings The size, type of cookware and cooking operation will affectthe heat setting.SETTINGS USESUltra High Offers higher speed cooking that can beused to quickly bring water to a boil,searing, blackening and for large-quantity cooking.High Use to bring liquid to a boil. Alwaysreduce setting to a lower heat whenliquids begin to boil or foods begin tocook.6-8 Use to brown meat, heat oil for deep fat(medium high) frying or sauteing. Maintain fast boil forlarge amounts of liquids.4-6 Use to maintain slow boil for large(medium) amounts of liquids and for most fryingoperations.2-4 Use to continue cooking covered foods(medium low) or steam foods.Low Use to melt butter or chocolate.Ultra Low/ Offers a lower temperature for cookingWarm delicate sauces without scorching. Useto keep cooked foods warm. Notes
- If a temperature setting is not selected within approxi-mately 10 seconds, the element will automatically shut off.
- To change the temperature setting while cooking withone element, press the ON pad and select a newtemperature on the Temperature Selector Bar while thelight is blinking.• To change the temperature setting when multipleelements are on, press the ON pad for the desiredelement, then select a new temperature on theTemperature Selector Bar while the light is blinking.TemperatureSelector BarStyle variesby model.5
On Indicators All Models - The LOW light will illuminate when the element is on. Hot Surface Indicator Lights A Hot Surface light is located next to each element. The lightwill illuminate when the cooking area is hot. It will remain on,even after the control is turned off, until the area has cooled. Cooling Fan A cooling fan will automatically turn on when any element isturned on. The fan is used to keep internal parts inside thecooktop cool. The fan will automatically turn off when all theelements are off. With heavy use, the fan may continue to runafter the controls are turned off until the cooktop has cooled. Control Lockout The touchpad controls can be locked out for cleaning and toprevent unwanted use. To lock controls: Press and hold the All-Off/Lock pad for three seconds. To unlock controls: Press and hold the All-Off/Lock pad for three seconds. TheAll-Off/Lock light will illuminate whenever the controls arelocked. Cook and Warm Element The Cook and Warm Element, located in the left rear position,is a fully-functioning element that provides an Ultra Low/Warm heat setting for holding delicate sauces and keepingcooked foods warm. To use the Warm setting, touch ON, and then touch Ultra Lo/Warm on the Temperature Selector Bar.To use the regular temperature settings, touch ON, and thentouch any setting from LOW to HIGH on the TemperatureSelector Bar.Note: When using the normal temperature settings toprepare foods, it will take a few minutes for the cookingarea to cool to the Ultra Lo/Warm temperature setting. Triple Element (select models) The Triple Element, located in the center position, offers threedifferent element sizes to accommodate different pan sizes.Use one, two or three sections of the element to best matchyour pan. To use the element:
1. Press ON. The inner-most element will activate.2. Set the desired temperature on the Temperature Selector
3. Press ON again to activate the center and middle areas.
4. Press ON again to activate all three areas.
Note: The Triple Element will remember the setting fromthe last time it was used. Therefore, one, two or all threeareas may activate when ON is pressed. To change theareas activated, press ON again while the indicator light onthe left is flashing. If the indicator light on the left is notflashing, press ON twice. Red lights on the control willindicate which areas of the element are activated. Custom Control Dual Element The Custom Control Dual Element offers two element sizesand is located in the right front position. This element uses anelectronic sensor to constantly monitor and adjust heat outputfor precise and consistent temperature control. To use the element:
1. Press ON. The inner-most element will activate.2. Set the desired temperature on the Temperature Selector
Bar. 3. Press ON again to activate the entire element.Note: The Custom Control dual Element will remember thesetting from the last time it was used. Therefore, one orboth areas may activate when ON is pressed. To changethe areas activated, press ON again while the indicatorlight on the left is flashing. If the indicator light on the leftis not flashing, press ON twice. A red light on the controlwill indicate which areas of the element are activated.6 Use the Warming Center to keep cooked foods warm, such asvegetables, gravies and oven-safe dinner plates. Setting the Control:
1. Press ON.• Warming temperatures are approximate and are
indicated on the control as Ultra Low/Warm, Low,1-8, High and Ultra High.
2. When done, press OFF and remove food.
- The Hot Surface Indicator light will go off when theWarming Center surface has cooled. Warming Center
- All foods should be covered with a lid or aluminum foilto maintain food quality.• When warming pastries and breads, the cover shouldhave an opening to allow moisture to escape.• Do not use plastic wrap to cover foods. Plastic may melton to the surface and be very difficult to clean.• Use only cookware and dishes recommended as safe forcooktop use.• Always use potholders when removing food from theWarming Center as cookware and plates will be hot.
- Never warm food for longer than one hour (eggs for 30 minutes), as food quality may deteriorate.• Do not heat cold food on the Warming Center.• The quantity and type of food being held may affect therequired heat setting.• Do not use large utensils or large amounts of food asthis may cause uneven heating.• Always hold food at proper food temperatures. USDA recommends food temperatures between 140° - 170° F (except pastries). Notes ULTRA LOW - 2 Pastries/Breads Breakfast Foods (Eggs)Delicate Foods3 - 5 Soups (Cream) StewsVegetables Meats6 - 8 Sauces GraviesHIGH - Hot BeveragesULTRA HIGH Soups (Liquid)SETTINGS TYPE OF FOOD
- Cooktop may emit light smoke and odor the first fewtimes the cooktop is used. This is normal.• Smoothtop cooktops retain heat for a period of timeafter the element is turned off. Turn the elements offa few minutes before food is completely cooked and usethe retained heat to complete cooking. When the HotSurface light turns off, the cooking area will be coolenough to touch. Because of the way they retain heat, thesmoothtop surface will not respond to changes in settingsas quickly as coil elements.• In the event of a potential boilover, remove the pan fromthe cooking surface.• The smoothtop surface may appear discolored when it ishot. This is normal and will disappear when the surfacecools. Smoothtop Surface Cooking Areas The cooking areas on your cooktop are identified by perma-nent circles on the smoothtop surface. For most efficientcooking, fit the pan size to the element size.Pans should not extend more than
to 1-inch beyondthe cooking area.When a control is turned on, a glow can be seen through thesmoothtop surface. The element will cycle on and off tomaintain the preset heat setting, even on Hi.For more information on cookware, refer to CookwareRecommendations on page 8.• Never use abrasive cleansing powders or scouring padswhich will scratch the cooktop.• Never use chlorine bleach, ammonia or other cleansers notspecifically recommended for use on glass-ceramic. To Prevent Marks & Scratches
- Do not use glass pans. They may scratch the surface.
- Never place a trivet or wok ring between the surface and pan. These items can mark or etch the top.• Do not slide aluminum pans across a hot surface. The pansmay leave marks which need to be removed promptly. (SeeCleaning, page 9.)• Make sure the surface and the pan bottom are clean beforeturning on to prevent scratches.• To prevent scratching or damage to the glass-ceramic top,do not leave sugar, salt or fats on the cooking area. Wipethe cooktop surface with a clean cloth or paper towelbefore using.• Never slide heavy metal pans across the surface sincethese may scratch. To Prevent Stains
- Never use a soiled dish cloth or sponge to clean thecooktop surface. A film will remain which may cause stainson the cooking surface after the area is heated.• Continuously cooking on a soiled surface may/will result ina permanent stain. To Prevent Other Damage
- Do not allow plastic, sugar or foods with high sugar contentto melt onto the hot cooktop. Should this happen, cleanimmediately. (See Cleaning, page 9.)
- Never let a pan boil dry as this will damage the surface and pan.
- Never use cooktop as a work surface or cutting board.
- Never cook food directly on the surface.• Do not use a small pan on a large element. Not only doesthis waste energy, but it can also result in spillovers burningonto the cooking area which requires extra cleaning.• Do not use non-flat specialty items that are oversized oruneven such as round bottom woks, rippled bottom and/oroversized canners and griddles.• Do not use foil or foil-type containers. Foil may melt ontothe glass. If metal melts on the cooktop, do not use. Call anauthorized Jenn-Air Servicer. Tips to Protect the Smoothtop Surface Cleaning (see page 9 for more information)
- Before first use, clean the cooktop.• Clean your cooktop daily or after each use. This will keepyour cooktop looking good and can prevent damage.• If a spillover occurs while cooking, immediately clean thespill from the cooking area while it is hot to prevent a toughcleaning chore later. Using extreme care, wipe spill with aclean dry towel.• Do not allow spills to remain on the cooking area or thecooktop for a long period of time.8
Cookware Recommendations Select Avoid Flat, smooth-bottom Pans with grooved or warped bottoms. pans. Pans with uneven bottoms do not cookefficiently and sometimes may notboil liquid. Heavy-gauge pans. Very thin-gauge metal or glass pans. Pans that are the Pans smaller or larger than the same size as the element by 1 inch. element. Secure handles. Cookware with loose or broken handles.Heavy handles that tilt the pan. Tight-fitting lids. Loose-fitting lids. Flat bottom woks. Woks with a ring-stand bottom.Using the right cookware can prevent many problems, suchas food taking longer to cook or achieving inconsistentresults. Proper pans will reduce cooking times, use lessenergy, and cook food more evenly. Flat Pan Tests See if your pans are flat. The Ruler Test: 1. Place a ruler across the bottom of the pan.2. Hold it up to the light.3. Little or no light should be visible under the ruler. The Bubble Test: 1. Put 1 inch of water in the pan. Place on cooktop and selectHigh on the Temperature Selector Bar.2. Watch the formation of the bubbles as the water heats.Uniform bubbles mean good performance, and unevenbubbles indicate hot spots and uneven cooking. Wok Cooking Use Jenn-Air’s flat bottom wok (Model AO142) for optimumresults. The wok has a nonstick finish, wood handles, cover,steaming rack, rice paddles, cookingtips and recipes. To order call1-800-JENNAIR (1-800-536-6247). Canning and Oversize Cookware All canners and large pots must have flat bottoms andmust be made from heavy-gauge materials. This is criticalon smoothtop surfaces. The base must not be more than1 inch larger than the element.When canners and pots do not meet these standards, cookingtimes may be longer, and cooktops may be damaged.Some canners are designed with smaller bases for use onsmoothtop surfaces.When canning, use the High heat setting only until thewater comes to a boil or pressure is reached in the canner.Reduce to the lowest heat setting that maintains the boil orpressure. If the heat is not turned down, the cooktop may bedamaged.9 CARE & CLEANING PART PROCEDURE CAUTION Cleaning Procedures
- Be sure appliance is off and all parts are cool beforehandling or cleaning. This is to avoid damage andpossible burns. Smoothtop - Never use oven cleaners, chlorine bleach, ammonia or glass cleaners with ammonia. NOTE: Call an authorized Glass-Ceramic servicer if the glass-ceramic top should crack, break or if metal or aluminum foil should melt on the cooktop.
- Allow the cooktop to cool before cleaning.
- General – Clean cooktop after each use, with a damp paper towel and Cooktop Cleaning Creme* (Part No. 20000001)**. Then, buff with a clean dry cloth. NOTE: Permanent stains will develop if soil is allowed to cook on by repeatedly using the cooktop when soiled.
- Heavy Soils or Metal Marks – Dampen a “scratchless” or “never scratch” scrubber sponge. Apply Cooktop Cleaning Creme* (Part No. 20000001)** and scrub to remove as much soil as possible. Apply athin layer of the creme over the soil, cover with a damp paper towel and let stand 30-45 minutes (2-3hours for very heavy soil). Keep moist by covering the paper towel with plastic wrap. Scrub again, thenbuff with a clean dry cloth.NOTE: Only use a CLEAN, DAMP “scratchless” pad that is safe for non-stick cookware. Thepattern and glass will be damaged if the pad is not damp, if the pad is soiled, or if another type ofpad is used.
- Burned-on or Crusty Soils – Scrub with a “scratchless” or “never scratch” scouring pad and Cooktop Cleaning Creme*. Hold a razor blade scraper at 30° angle and scrape any remaining soil. Then, clean as described above.NOTE: Do not use the razor blade for daily cleaning as it may wear the patternon the glass.
- Melted Sugar or Plastic – Immediately turn element to LOW and scrape sugar or plastic from hot surface to a cool area. Then turn element OFF andallow to cool. Clean residue with razor blade scraper and Cooktop Cleaning Creme*. Cooktop Trim • DO NOT USE ANY CLEANING PRODUCT CONTAINING CHLORINE BLEACH. Stainless Steel • ALWAYS WIPE WITH THE GRAIN WHEN CLEANING. (select models) • DO NOT USE ORANGE OR ABRASIVE CLEANERS.
- Daily Cleaning/Light Soil –– Wipe with one of the following - soapy water, white vinegar/water solution, Formula 409 Glass and Surface Cleaner* or a similar glass cleaner - using a sponge or soft cloth.Rinse and dry. To polish and help prevent fingerprints, follow with Stainless Steel Magic Spray* (Jenn-AirModel A912, Part No. 20000008)**.
- Moderate/Heavy Soil –– Wipe with one of the following - Bon Ami*, Smart Cleanser*, or Soft Scrub* - using a damp sponge or soft cloth. Rinse and dry. Stubborn soils may be removed with a damp multi-purpose Scotch-Brite* pad; rub evenly with the grain. Rinse and dry. To restore luster and remove streaks,follow with Stainless Steel Magic Spray*.
- Discoloration –– Using a damp sponge or soft cloth, wipe with Cameo Stainless Steel Cleaner*. Rinse immediately and dry. To remove streaks and restore luster, follow with Stainless Steel Magic Spray*.* Brand names are registered trademarks of the respective manufacturers.** To order call 1-800-JENNAIR (1-800-536-6247).• To prevent staining or discoloration, clean appliance aftereach use.10 Nothing on the cooktop operates. • Check for a blown circuit fuse or a tripped main circuit breaker.
- Check if cooktop is properly connected to electric circuit in house.
- Check to see if cooktop controls are locked. See page 5. Cooktop elements do not • Surface controls may not be set properly. get hot enough. • Voltage to house may be low.
- Cookware may not be flat or the correct size or shape. Elements emit a slight odor and/or • This is normal. smoke when first turned on. Smoothtop surface shows 1. Tiny scratches or abrasions. wear. • Make sure cooktop and pan bottom are clean. Do not slide glass or metal pans across top. Make sure pan bottom is not rough. Use the recommended cleaning agents. See page 9.
- Do not slide metal pans across top. When cool, clean with Cooktop Cleaning Creme. See page 9.
3. Brown streaks and specks.
- Remove spills promptly. Never wipe with a soiled cloth or sponge. Make sure cooktop and pan bottom are clean.
4. Areas with a metallic sheen.
- Mineral deposits from water and food. Use recommended cleaning agents. See page 9.
5. Pitting or flaking.
- Remove sugary boilovers promptly. See page 9. A fan sound can be heard. • This is the cooling fan and is normal. The fan will run when any element is turned on. With heavy use, the fan may continue to run after the controls are turned off until the cooktop has cooled. Elements shut down during • Food soil/spill on touchpads. Clean the surface, see page 9. operation, light flashes and • Object placed on touchpad area. Remove object from the area. three short beeps are heard. • Cooktop internal temperature too high. Make sure that cooktop has been installed according to the installation instructions. PROBLEM SOLUTION TROUBLESHOOTINGJENN-AIR
COOKING APPLIANCE WARRANTY
LIMITED WARRANTY For one year from the date of purchase, when this major appliance is operated and maintained according to instructions attached to or furnished with the product, Jenn-Air brand of Whirlpool Corporation or Whirlpool Canada LP (hereafter “Jenn-Air”) will pay for factory specified parts and repair labor to correct defects in materials or workmanship. Service must be provided by a Jenn-Air designated service company. This limited warranty is valid only in the United States or Canada and applies only when the major appliance is used in the country in which it was purchased. Outside the 50 United States and Canada, this limited warranty does not apply. Proof of original purchase date is required to obtain service under this limited warranty. SECOND THROUGH FIFTH YEAR LIMITED WARRANTY ON CERTAIN COMPONENT PARTS In the second through fifth years from the date of purchase, when this appliance is operated and maintained according to instructions attached to or furnished with the product, Jenn-Air will pay for factory specified parts for the following components (if applicable to the product) if defective in materials or workmanship:
ITEMS EXCLUDED FROM WARRANTY
This limited warranty does not cover: 1. Service calls to correct the installation of your major appliance, to instruct you on how to use your major appliance, to replace or repair house fuses, or to correct house wiring or plumbing. 2. Service calls to repair or replace appliance light bulbs, air filters or water filters. Consumable parts are excluded from warranty coverage. 3. Repairs when your major appliance is used for other than normal, single-family household use or when it is used in a manner that is contrary to published user or operator instructions and/or installation instructions. 4. Damage resulting from accident, alteration, misuse, abuse, fire, flood, acts of God, improper installation, installation not in accordance with electrical or plumbing codes, or use of consumables or cleaning products not approved by Jenn-Air. 5. Cosmetic damage, including scratches, dents, chips or other damage to the finish of your major appliance, unless such damage results from defects in materials or workmanship and is reported to Jenn-Air within 30 days from the date of purchase.
6. Any food loss due to refrigerator or freezer product failures.
7. Costs associated with the removal from your home of your major appliance for repairs. This major appliance is designed to be repaired in the home and only in-home service is covered by this warranty.
8. Repairs to parts or systems resulting from unauthorized modifications made to the appliance.
9. Expenses for travel and transportation for product service if your major appliance is located in a remote area where service by an authorized Jenn-Air servicer is not available. 10. The removal and reinstallation of your major appliance if it is installed in an inaccessible location or is not installed in accordance with published installation instructions. 11. Major appliances with original model/serial numbers that have been removed, altered or cannot be easily determined. This warranty is void if the factory applied serial number has been altered or removed from your major appliance. The cost of repair or replacement under these excluded circumstances shall be borne by the customer. DISCLAIMER OF IMPLIED WARRANTIES; LIMITATION OF REMEDIES CUSTOMER'S SOLE AND EXCLUSIVE REMEDY UNDER THIS LIMITED WARRANTY SHALL BE PRODUCT REPAIR AS PROVIDED HEREIN. IMPLIED WARRANTIES, INCLUDING WARRANTIES OF MERCHANTABILITY OR FITNESS FOR A PARTICULAR PURPOSE, ARE LIMITED TO ONE YEAR OR THE SHORTEST PERIOD ALLOWED BY LAW. JENN-AIR SHALL NOT BE LIABLE FOR INCIDENTAL OR CONSEQUENTIAL DAMAGES. SOME STATES AND PROVINCES DO NOT ALLOW THE EXCLUSION OR LIMITATION OF INCIDENTAL OR CONSEQUENTIAL DAMAGES, OR LIMITATIONS ON THE DURATION OF IMPLIED WARRANTIES OF MERCHANTABILITY OR FITNESS, SO THESE EXCLUSIONS OR LIMITATIONS MAY NOT APPLY TO YOU. THIS WARRANTY GIVES YOU SPECIFIC LEGAL RIGHTS, AND YOU MAY ALSO HAVE OTHER RIGHTS WHICH VARY FROM STATE TO STATE OR PROVINCE TO PROVINCE. If outside the 50 United States and Canada, contact your authorized Jenn-Air dealer to determine if another warranty applies. If you need service, first see the “Troubleshooting” section of the Use & Care Guide. After checking “Troubleshooting,” you may find additional help by checking the “Assistance or Service” section or by calling Jenn-Air. In the U.S.A., call 1-800-688-1100. In Canada, call 1-800-807-6777. 9/07 ■ Electric element ■ Touch Pad and microprocessor ■ Glass ceramic cooktop: if due to thermal breakage ■ Electronic controls ■ Magnetron tube ■ Sealed gas burnersTABLES DE CUISSON ÉLECTRIQUES