
HealthProtect 7700i - Air purifier BLUEAIR - Free user manual and instructions
Find the device manual for free HealthProtect 7700i BLUEAIR in PDF.
| Product Type | Air Purifier |
| Brand | Blueair |
| Model | HealthProtect 7700i |
| Series | 7700 (model 70) |
| Power Supply | 100-127 VAC / 220-240 VAC, 50/60 Hz |
| Power Consumption | 72 W |
| Sound Level (min/max) | 27 dB(A) - 55 dB(A) |
| Recommended Room Size | 62 m² |
| CADR Smoke | 735 m³/h |
| CADR Dust | > 675 m³/h |
| CADR Pollen | 735 m³/h |
| Filters | Pre-filters (2) + SmartFilter main filter |
| GermShield Function | Yes, prevents bacterial growth in the filters |
| Connectivity | Built-in Wi-Fi, Blueair app |
| Display | Dynamic control display (model 70) |
| Sensors | Particles (PM1, PM2.5, PM10), gases (tVOC), temperature, relative humidity |
| Filter Replacement Indicator | Yes, with countdown |
| Auto Mode | Yes, adjusts airflow according to air quality |
| Cable Winder | Yes, built-in under the unit |
| Casters | Yes, for easy movement |
| Pre-filter Maintenance | Regular cleaning with a cloth or vacuum cleaner |
| Main Filter Replacement | Every 6 to 12 months depending on usage |
Frequently Asked Questions - HealthProtect 7700i BLUEAIR
User questions about HealthProtect 7700i BLUEAIR
0 question about this device. Answer the ones you know or ask your own.
Ask a new question about this device
Download the instructions for your Air purifier in PDF format for free! Find your manual HealthProtect 7700i - BLUEAIR and take your electronic device back in hand. On this page are published all the documents necessary for the use of your device. HealthProtect 7700i by BLUEAIR.
USER MANUAL HealthProtect 7700i BLUEAIR
Hereby, Blueair AB, declares that the radio equipment types in the above table is in compliance with Directive 2014/53/EU.
The full text of the EU declaration of conformity is available at the following internet address:
www.blueair.com/customer-support
Please read this user manual carefully and keep it for future reference.
The latest version of this user manual can be found on www.blueair.com
Note: There may be local variations of these models.
Contents
Blueair HealthProtect™ 6
Safety instructions 8
Get started 10
Control panel 11
Filters 20
Move the air purifier 22
Cable winder 22
Care and maintenance 23
Troubleshooting 24
Disposal and recycling 25
Help and support 25
Warranty information 25
Specifications 26
Blueair HealthProtect™
Blueair HealthProtect™ air purifiers are available in three models, the 10-models, the 40-models and the 70-models. All models are Wi-Fi enabled, have a GermShield™ function to prevent bacterial growth, pre-filters and a main filter to purify air.
All HealthProtect™ models have control functions and built in sensors. The 40-models and the 70-models have additional indications for air quality data. The 40-models have a display for particulate matter data. The 70-models have a dynamic screen control, with additional functions for particles, gases (tVOC), temperature, relative humidity and filter lifetime.
You can change the air purifier settings at any time, using the control panel on the air purifier or remotely using the Blueair app. Additional functions are available for all models through the Blueair app.
Recommendations for best performance
- Use the air purifier in a room that does not exceed the room size recommendation.
- Place the air purifier in a location where air can circulate freely in, out and around the air purifier.
- Do not place the air purifier closer than 10cm to another object.
- During operation, keep doors and windows in the room with the air purifier closed.
- Run the air purifier 24 hours per day with the GermShield ^TM function on.
- Only use genuine Blueair filters.
- Change the main filter when the filter replacement indicator appears on the control panel.
- Follow the maintenance instructions in this user manual.
Blueair air purifiers are mainly composed of a motor, a fan and a filter. The air purifier removes contaminants from the air in a room to improve indoor air quality.
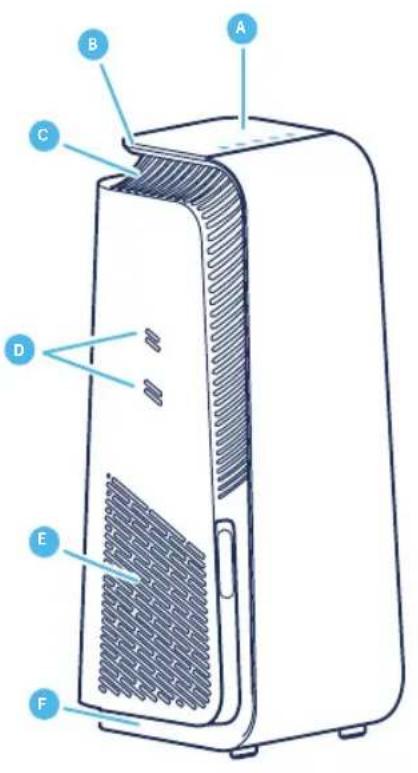
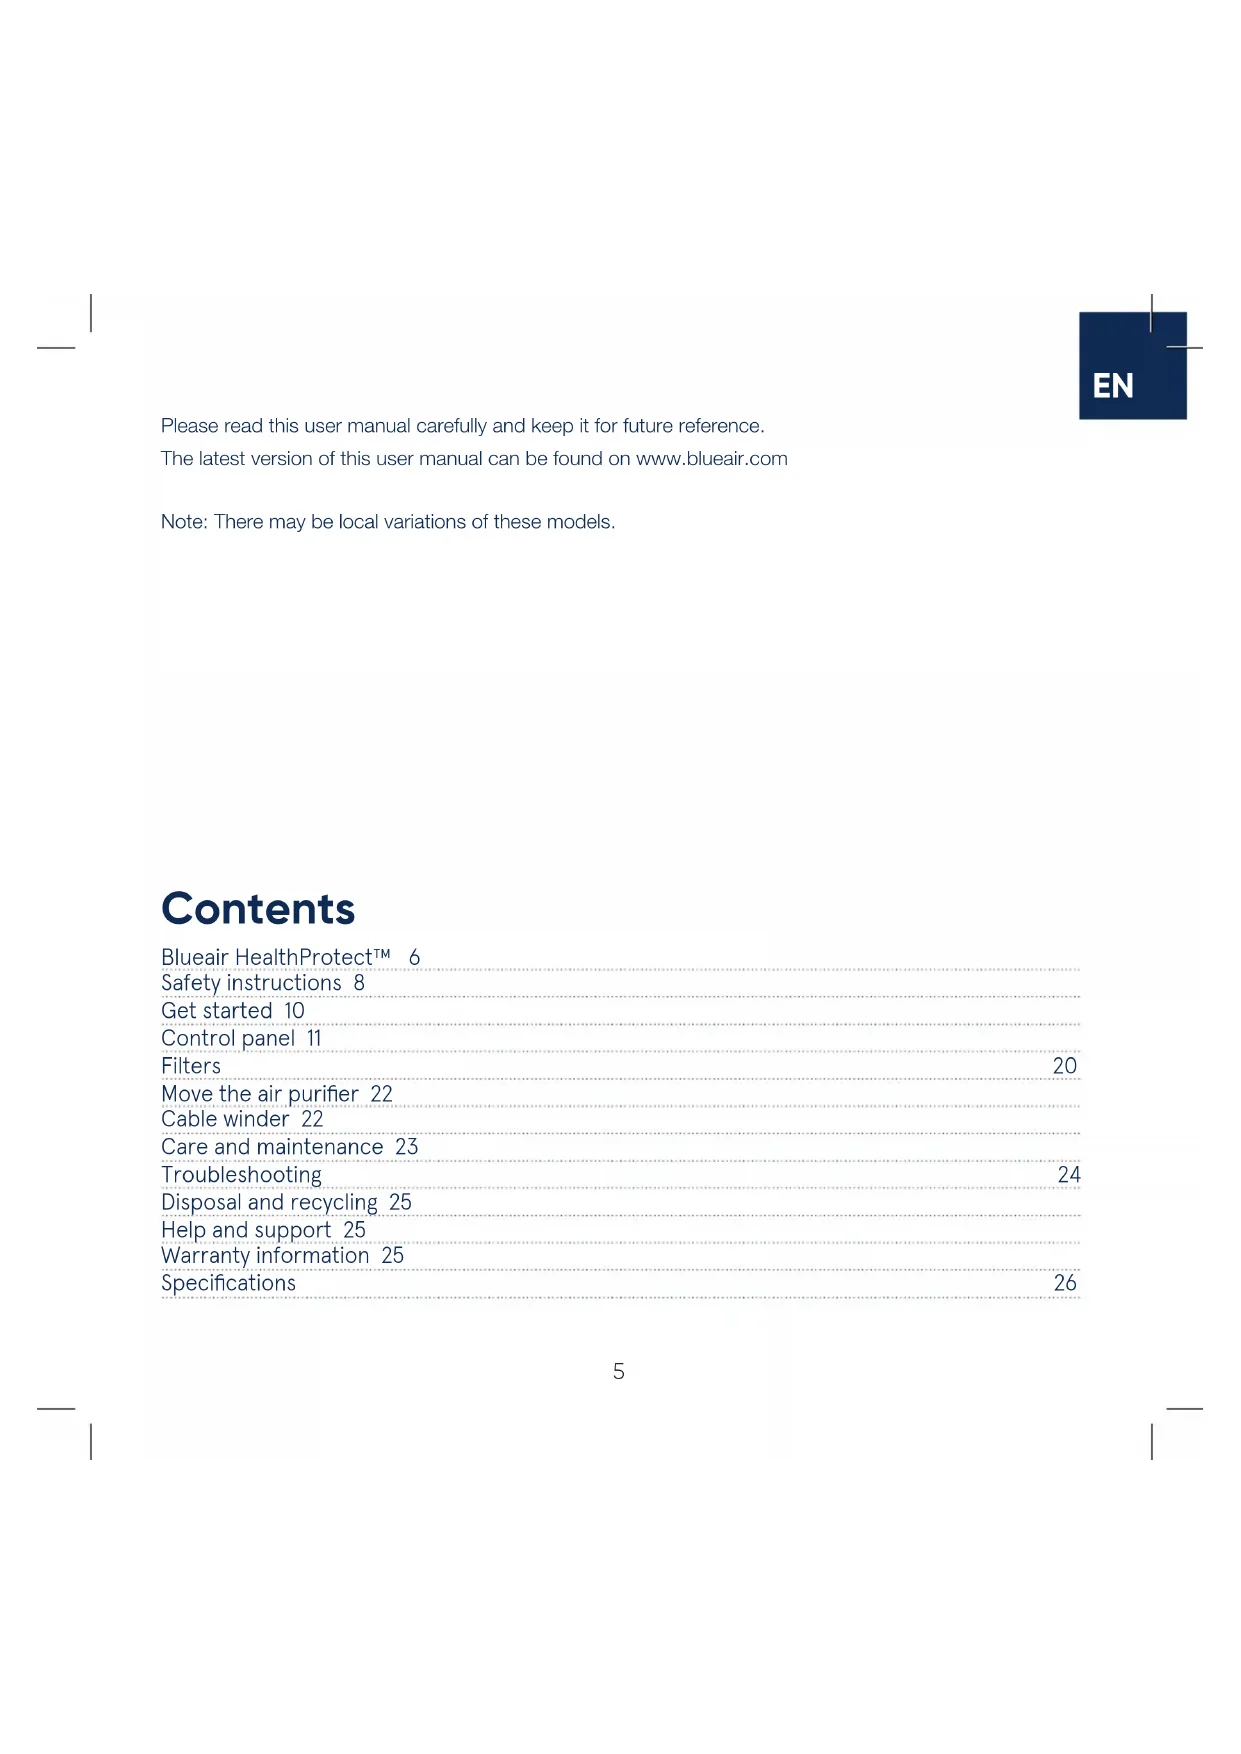
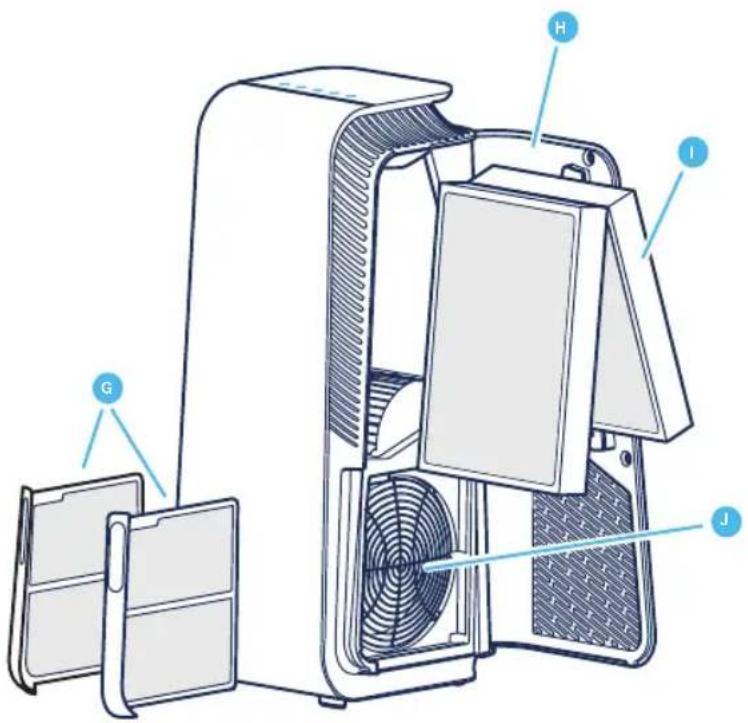
A Control panel G Pre-filters
C Air outlet I Main filter
D Air quality sensor inlets
E Air inlet K Power cable (not in picture)
F Feet and wheels
J Fan and motor
L User Manual (not in picture)
Safety instructions Safety instructions
Blueair HealthProtect™ air purifiers are electrical appliances for indoor use only, take the necessary precautions to reduce the risk of fire, electric shock or injury.
- This appliance can be used by children aged from 8 years and above and persons with reduced physical, sensory or mental capabilities or lack of experience and knowledge if they have been given supervision or instruction concerning use of the appliance in a safe way and understand the hazards involved.
• Children shall not play with the appliance.
- Always disconnect the appliance from the power supply before maintenance.
- Do not alter the power plug in any way and do not attempt to open or service the appliance yourself. Service must be done by the manufacturer, service agent or similarly qualified person using only genuine Blueair spare parts.
- Ensure that the power cable and the power plug are not at risk of getting damaged. To avoid hazard, a damaged power cable must always be replaced by the manufacturer, service agent or similarly qualified person.
- If the appliance is damaged or malfunctions, turn it off, disconnect it from the power supply and contact Blueair.
- The power plug must be firmly inserted in the power socket.
- When disconnecting the unit from the power supply, do not pull the power cord, pull the power plug.
- Use the grounded power cable provided with your Blueair air purifier to plug directly and firmly into an appropriate, grounded electrical outlet. Refer to the rating label on your appliance.
- Do not use an extension cord or a power strip. Refer to the rating label on your appliance.
- Do not alter the power plug in any way. If the plug does not fit into the outlet, contact qualified personnel to install the proper outlet.
- Do not use the included power cord for anything else but the appliance.
- Do not allow objects to enter or block the air inlets and air outlets as this can cause electric shock or damage the appliance.
- Do not place any objects on top of or directly against the appliance.
- Do not sit on, stand, climb onto or hang from the appliance.
- Keep the appliance, including the power cable, at a safe distance from heated surfaces and open fire.
- Keep the appliance and power plug away from water and other liquids.
- Keep the appliance and power plug away from chemicals such as pesticides and deodorants.
- Place the appliance on the floor. The appliance must be placed on a stable surface.
- Do not use the appliance outdoors or in wet environments such as bathrooms, laundry rooms or pool areas.
- Cleaning and maintenance shall not be made by children without supervision.
Get started
Step 1
Open the filter door, pull out the main filter and remove the protective wrapping.
Step 2
Put the main filter back into the air purifier and close the filter door.
See section Filters for more information regarding filter handling.
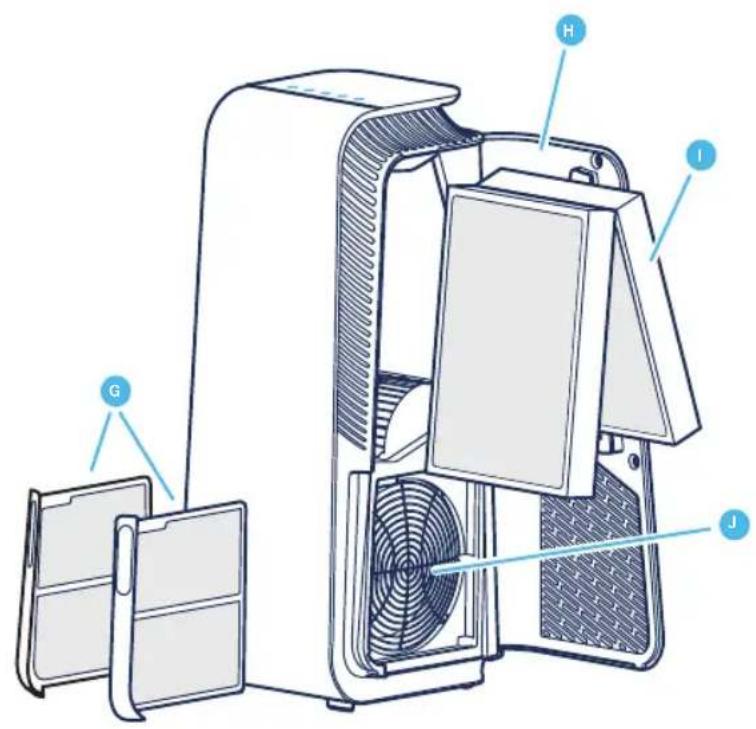
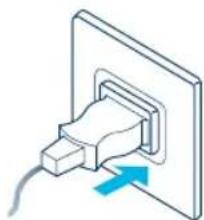
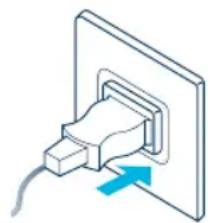
Plug into the power supply
Step 1
If your air purifier has a removable power cable, plug the cable firmly into the power cable socket on the air purifier.
natural_image
Diagram of a mechanical component with a blue arrow indicating a force or movement (no text or symbols present)Step 2
Plug the power cable into a grounded wall outlet.
Step 3
Press the On/Off button to turn the air purifier on.
natural_image
Illustration of a plug inserted into a wall socket with a blue arrow indicating direction (no text or symbols)Note! For some markets, the air purifier is equipped with a fixed power cable due to regulatory requirements.
Tip! Store any excess cable length in the cable winder under the air purifier.
Connect to the Blueair app
Connecting the air purifier to the Blueair app allows you to control the air purifier and change the settings remotely. The app adds additional functions to the air purifier.
Step 1
Download the Blueair app from the App store or Google play.
Step 2
Open the Blueair app and follow the instructions to connect the air purifier.
Control panel
All HealthProtect™ models have controls, a filter indicator and air quality information.
The 40-models and the 70-models have additional indications for air quality data.
The 40-models have a display for particulate matter data. The 70-models have a dynamic screen control, with additional functions for particles, gases (tVOC), temperature, relative humidity and filter lifetime.
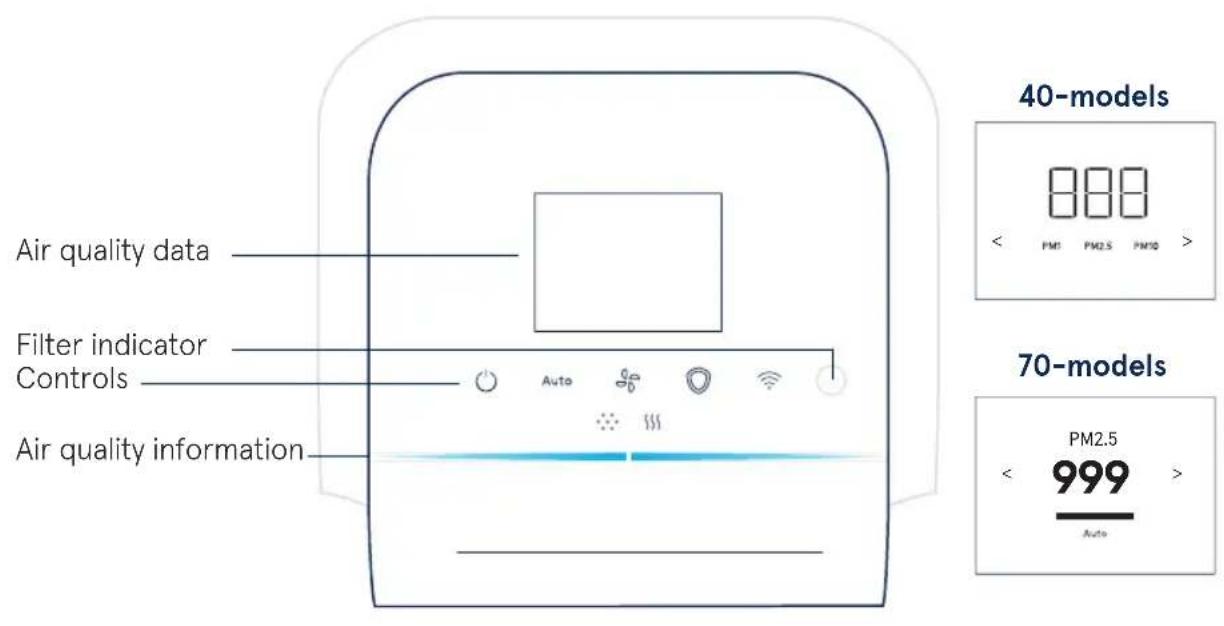
Controls
Control the air purifier using the buttons on the control panel or by using the Blueair app.

On/Off
Auto
Auto mode

Airflow speed

GermShield™

Wi-Fi
On/Off

Press to turn On or Off.
Note! Wi-Fi, sensors and the GermShield™ function continue to be in operation when the air purifier is turned off.
Auto mode
In auto mode the air purifier automatically controls the airflow based on air quality information from the sensor.
Auto Press to Activate or Deactivate.
Indicators 10-models/40-models

Status White light On.

Status No light Off.
Indicators 70-models

Status checkmark On.
Status cross Off.
Airflow speed
Available airflow speed options are: 1, 2, 3 and 0.

Press to switch between the different airflow speeds.
Indicators 10-models/40-models Indicators 70-models
Speed: 1 2 3 0
GermShield™
The air purifier has a GermShield™ function that activates when a germ-prone environment is detected. The 70-models have an additional indicator on the screen for showing when the GermShield™ function is in operation.

Press to Activate or Deactivate.
Indicators 10-models/40-models

Status White light On.

Status No light Off.
Indicators 70-models

Status checkmark On.

Status cross Off.
Note! When GermShield™ is activated, a light draft can come from the air purifier when detecting a germ prone environment.
Wi-Fi Connection
A Wi-Fi function is available on all models and allows the air purifier to connect to the Blueair app and to receive functional updates. If you do not wish to be connected to Wi-Fi, press the Wi-Fi button to disable the Wi-Fi function.
Button

Press for >15s to turn Wi-Fi on or off.
Indicators (10-models and 40-models)

Status White light Connected to Wi-Fi network.

Status White fast "blinking" light Failed to connect.

Status White "pulsating" light Wi-Fi On, ready for onboarding.

Status No light Wi-Fi functionality Off.
Indicators LCD screen (70-models) Indicators Buttons (70-models)

Status Green checkmark On.

Status White light Connected to Wi-Fi network.

Status Red cross Off.

Status White "pulsating" light Wi-Fi On, ready for onboarding.

Status Red exclamation Connection error.

Status dimmed light Wi-Fi functionality Off.

Status White fast "blinking" light Connection error.
See the Blueair app for further information regarding Wi-Fi connection. For support, visit www.blueair.com/customer-support
Filter indicator
The air purifier calculates the remaining lifetime of the filter based on usage and sensor readings, and indicates when it is time to replace the filter.
Indicators (10-models and 40-models) Indicators (70-models)

Status Filter replacement No lifetime left of the filter.
Status Filter replacement No lifetime left of the filter.

Status Filter replacement "blinking" Cannot recognize a Blueair filter /No filter detected.

Status New filter Filter change completed.

Status Filter warning Cannot detect a Blueair filter.
Status No filter No filter detected.
See Troubleshooting for more information on filter indicators.
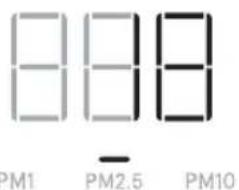
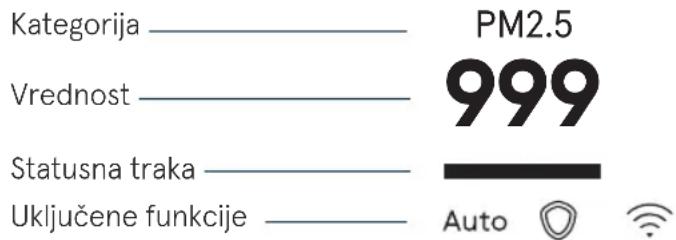
Category indicators (70-models)
The categories of the different functions are indicated on the top of the screen- press the buttons on the control panel or on the left and right arrow to view the data for the chosen category.
PM1 Particle data

Gas data

Temperature

Filter lifetime

Relative humidity
Air quality information
The air quality levels for particulate matter (PM) and gases (tVOC) are indicated using a color scale on the control panel.
PM1
Particulate matter, particles with diameter of size 1 micrometer or less.
PM2.5
Particulate matter, particles with diameter of size 2.5 micrometers or less.
PM10
Particulate matter, particles with diameter of size 10 micrometers or less.
VOC
Volatile organic compounds, gases found in both outdoor and indoor air.
Indicators

Particulate matter indicator
§§§
Gases (tVOC) indicator
Air quality level
The air quality indicator bar for particles will show the highest pollution level out of PM1, PM2.5 and PM10.
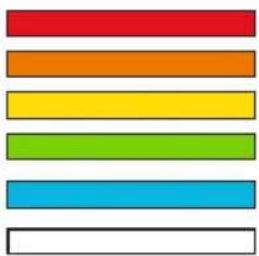
natural_image
Five horizontal color bars in red, orange, yellow, green, and cyan with a white border (no text or symbols)Very Polluted
Slightly Polluted
Moderate
Good
Excellent
Data not available
See the Blueair app for further information regarding air quality.
Air quality data 40-models and 70-models
The 40-models have an additional display that shows measured values for PM1, PM2.5 and PM10. Press the left or right arrow to switch between the different particulate matter sizes.

Indicators
Status Air quality Value of 18 g/m ^3 for PM2.5.
The 70-models have a dynamic screen control that shows additional values and statuses for different categories, and have additional indications to show active functions. Press the left or right arrow to switch between the different categories.
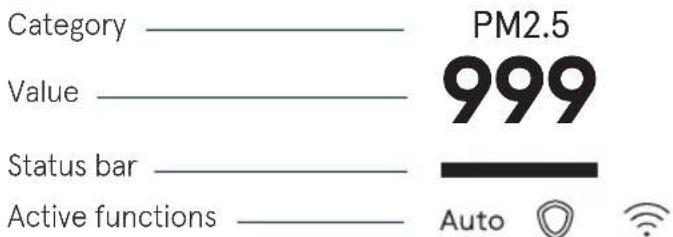
Particle data indicator
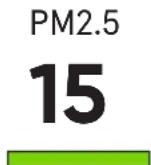
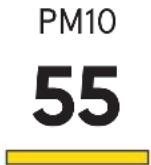
The air quality data for particles are indicated on the screen. Press the left or right arrow to switch to the Particle data category page. The screen shows measured values for PM1, PM2.5 and PM10, with its related air quality information indicated in the status bar.
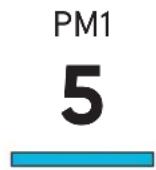
Category PM1 Value of 5 g/m^3 . Status Excellent air quality.
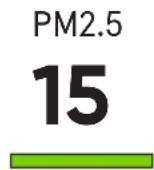
Category PM2.5 Value of 15 g/m^3 . Status Good air quality.

Category PM10 Value of 55 g/m^3 . Status Moderate air quality.

Loading data /No data available.
See the Blueair app for more information.
Temperature indicator
The room temperature is indicated on the screen. Press the left or right arrow to switch to the Temperature category page.

Category Temperature Value of 17 degrees Celsius/63 degrees Fahrenheit in the room.
Relative humidity indicator
The relative humidity of the room is indicated on the screen. Press the left or right arrow to switch to the Relative humidity category page.

Category Relative humidity Value of 36% in the room.
Gas data indicator
The air quality data for gases (tVOC) is indicated on the screen. Press the left or right arrow to switch to the Gas data category page. The screen shows the different sensor readings of gases over time.

natural_image
Simple line drawing of a wavy yellow-orange line with a blue base, emitting steam above (no text or symbols)Category Gas data
Value of air quality levels for gases (tVOC) in the room over time.
Status Excellent air quality.
Filter lifetime indicator
The remaining lifetime of the filter is indicated on the screen. Press the left or right arrow to switch to the Filter lifetime category page. The air purifier will count down from 100% with a new filter, and indicate when it is time to change filter.

Category Filter lifetime
Value of 90% left of the filter.
Status bar counting down.
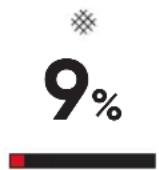
Category Filter lifetime
Value of 9% left of the filter.
Status bar counting down.
Filters
The air purifier is delivered with two pre-filters and one SmartFilter installed. The filters purify the air from both particles and gases. For best performance, clean the pre-filters regularly and change the main filter when the air purifier indicates filter change. To find the correct main filter for your air purifier, use the Blueair app or visit www.blueair.com.
The model number of your air purifier can be found on the rating label on the air purifier.
Blueair filter subscription program
Use the Blueair app or visit www.blueair.com to sign up for the Blueair filter subscription program. (Not available in all markets)
Important! Always turn off and disconnect the appliance from the power supply before changing filters, cleaning or carrying out maintenance procedures.
Clean the pre-filters
For best performance, clean the pre-filters regularly.
Step 1
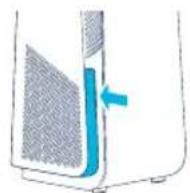
Push the left or right side frame indent of the air purifier to release the pre-filter.
Step 3
Clean the pre-filter, by wiping with a dust cloth or vacuuming with a soft brush attachment.
Step 5
Push the pre-filter to lock it in position.

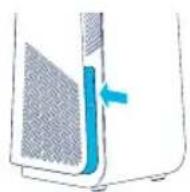
Step 2
Pull out the pre-filter from the slot.
Step 4
Place the pre-filter back into the slot.
natural_image
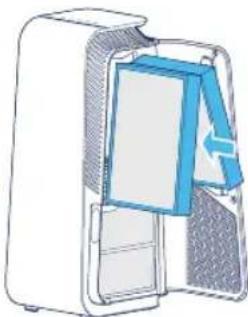
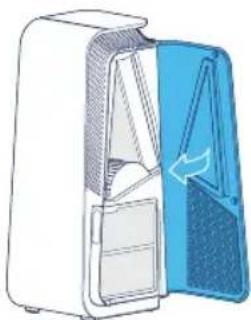
Diagram of a blue rectangular object partially submerged in a gray mesh container, with an arrow pointing to it (no text or symbols present)Change the main filter
The air purifier calculates the remaining lifetime of the filter based on usage and sensor readings, and indicates when it is time to change filter. The recommended time for filter change is between 6-12 months depending on the indoor conditions. A filter replacement indicator appears on the control panel when it is time to change filter.

Filter replacement indicator (10-models and 40-models)

Filter replacement indicator (70-models)
Important! Use only original Blueair filters suitable for the model to ensure proper function and performance of the air purifier, and to qualify for full warranty coverage.
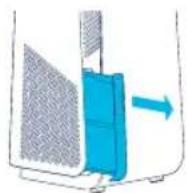
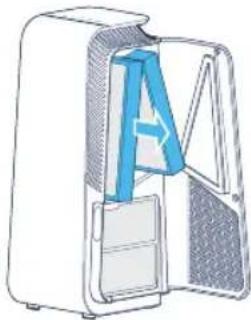
Step 1
Open the filter door.
Note! The air purifier will turn off when the filter door is opened.
natural_image
Illustration of a white electronic device with a blue cover and airflow arrow indicating direction (no text or symbols)Step 2
Remove the old main filter by pulling gently on to the two tabs.
Close the main filter to seal the pollutants inside.
natural_image
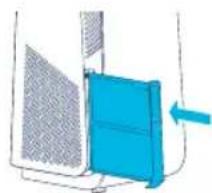
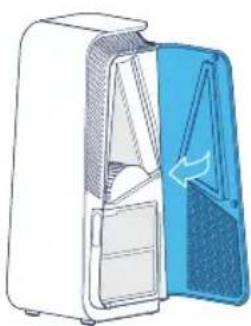
Diagram of a refrigerator interior showing the door, vent, and side panel (no text or labels)Step 3
Note! Remember to remove the protective plastic from the new main filter before use.
Insert the new main filter.

natural_image
Cross-sectional diagram of a computer case showing internal components (no text or labels)Step 4
Close the filter door.
Note! The filter door needs to be closed for the air purifier to start again.
natural_image
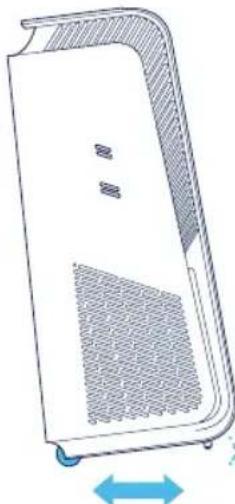
Diagram of a refrigerator with open door and side compartments (no text or symbols)Move the air purifier
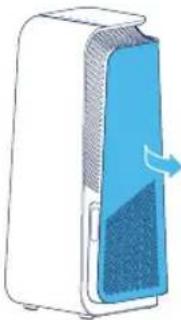
The air purifier has feet and wheels to enable moving.
Important!
- Unplug the air purifier before moving it.
- Make sure that the filter door on the air purifier is securely closed.
- Move the air purifier by holding onto the handle at the top of the air purifier with two hands.
- Move the air purifier by tilting it backwards and rolling it on its wheels.
natural_image
Technical line drawing of a computer monitor with ventilation slots and a blue double-headed arrow indicating left motion (no text or symbols)Cable winder
The air purifier has a manual cable winder to store away any excess cable length. The cable winder is at the bottom of the air purifier. Store any excess cable by wrapping it around the cable winder.
Care and maintenance
General
- Disconnect the air purifier from the power supply before maintenance.
- Do not allow foreign objects to enter the air inlets or air outlets. This may cause electric shock or damage the air purifier.
- Never clean with gasoline, chemical solvents or corrosive materials as these agents may damage the air purifier.
- Make sure the air purifier is completely dry before connecting it to power.
- Do not wash the main filter. The main filter is not washable or reusable.
Cleaning
- Clean the pre-filters by wiping with a dust cloth or vacuuming with a soft brush attachment.
- Wipe the exterior of the air purifier with a soft, clean, damp cloth.
- Open the door, clean the inside of the door with a soft, clean cloth.
• Vacuum the small air inlets with a soft brush attachment.
• Vacuum the inside of the air purifier with a soft brush attachment. - Clean and check the power cable and power plug for wear or damages.
- Clean the sensor when changing the main filter.
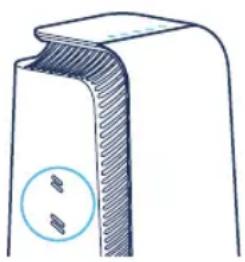
Air quality sensor
The inlet for the air quality sensor is located on the side of the air purifier. Vacuum the inlet with a soft brush attachment.
natural_image
Diagram of a mechanical component with a circular inset showing two small features (no text or symbols)Troubleshooting
Trouble Possible cause Action
| The air purifier does not work. The power cable is not connected to the power supply. | Connect the power cable to the power supply. |
| The filter door is not closed on the air purifier. | Gently close the filter door completely. |
| The connection is not working. The Wi-Fi does not meet the requirements of the device. | Contact Blueair customer service. |
| The Blueair app does not have an updated version or have a temporary bug. | Check for updates. |
| The Blueair app has user account issues. | Contact Blueair customer service. |
| The air purifier is indicating that no data is available. | The sensor values are updating. Wait 30 seconds for update. |
| Disconnect the power cable from the wall outlet and wait approximately five seconds before reconnecting the power cable. | |
| The filter indicator is blinking on the control panel and/or the air purifier has reduced airflow speed /or a filter warning is indicated on the screen. | Insert a main filter and/or check it is inserted properly in the air purifier. |
| Change to an original Blueair filter. | |
| The buttons on the control panel are blinking when pressed or the display indicates Child lock (not on all models). | The Child lock function is activated. Turn off Child lock in the Blueair app. |
| The air purifier have lost Wi-Fi connection and Child lock is activated in the app. | - Disconnect the power cable from the wall outlet and wait approximately five seconds before reconnecting the power cable. |
For further support, please visit www.blueair.com/customer-support
Disposal and recycling
This air purifier should be disposed or recycled as electrical waste and the filter may be recycled as plastic. If you have questions regarding the disposal and recycling of this air purifier, please contact your local recycling facility for availability or Blueair dealer and ask for the correct method of recycling.
The crossed-out waste bin symbol on the appliance or on its packaging means that at the end of its useful lifespan, the product must be disposed of separately from ordinary household wastes.
Help and support
If you have questions about your product, please visit www.blueair.com or contact your local Blueair retailer.
To contact Blueair for personalized support, please visit www.blueair.com/customer-support
Warranty information
The Blueair Limited Warranty applies only if the air purifier is installed, used and maintained according to the instructions in this manual.
For warranty conditions visit www.blueair.com/warranty
Warranty and returns
If you purchased the air purifier at one of our authorized retailers, please contact the same store to request assistance.
Specifications
7400-series 7700-series
| Input voltage, Frequency 100-127VAC/ | 220-240VAC, 50/60Hz 100-127VAC/220- | 240VAC, 50/60Hz |
| Power consumption1 | 43W 72W | |
| Operating frequency 2402-2480 MHz | 13.56 MHz 2402-2480 MHz, 13.56 MHz | |
| Output power Max 5mW Max 5mW | ||
| Sound level (min-max)2 | 25dB(A)-45dB(A) 27dB(A)-55dB(A) | |
| Recommended room size3 | 38 m2 | 62 m2 |
| CADR Smoke3 | 455 m3/h 735 m | 3/h |
| CADR Dust3 | 465 m3/h >675 m | 3/h |
| CADR Pollen3 | 475 m3/h 735 m | 3/h |
According to IEC 60335-1:2010
^2 Sound pressure according to GB4214.1-2017
^3 According to ANSI/AHAM AC-1-2019


Blueair HealthProtect™, séries 7400/7700

natural_image
Diagram of a device component with a blue cable inserted, showing no text or symbolsÉtape 2
natural_image
Isometric illustration of a plug inserted into a wall socket with a blue arrow indicating direction (no text or symbols)natural_image
Five horizontal color bars in red, orange, yellow, green, blue, and white (no text or symbols)Très pollué
Légèrement pollué
Modéré
Bonne
Excellente
natural_image
Simple line drawing of a wavy yellow-orange line with a blue dot at the end, above a horizontal blue bar (no text or symbols)natural_image
Diagram of a blue mechanical component with a blue arrow indicating direction (no text or symbols)Étape 5
natural_image
Illustration of a white rectangular device with a blue interior panel and a blue arrow indicating rotation (no text or symbols)Étape 2
natural_image
Diagram of a refrigerator interior showing the door, drawer, and seat (no text or labels)Étape 3
natural_image
Cross-sectional diagram of a computer case showing internal components and a blue arrow indicating a flow or movement (no text or symbols present)Étape 4
natural_image
Diagram of a refrigerator interior showing open door and side panel, with no visible text or symbolsnatural_image
Diagram of a device casing with mesh pattern and directional arrows (no text or symbols)Enrouleur de câble
natural_image
Diagram of a mechanical component with two circular features, no text or symbols presentDépannage
A Panel de control G Prefiltros
B Asa H Puerta del filtro
C Salida de aire I Filtro principal
natural_image
Diagram of a car interior showing a blue cable inserted into a rectangular housing (no text or symbols)Paso 2
natural_image
Isometric illustration of a plug inserted into a wall socket with a blue arrow indicating direction (no text or symbols)natural_image
Five horizontal color bars in red, orange, yellow, green, blue, and white (no text or symbols)Muy contaminado
Ligeramente contaminado
Regular
Bueno
Excelente
natural_image
Simple line drawing with a rainbow gradient and a blue dot at the end, no text or symbols present.natural_image
Diagram of a cleaning or cleaning process with a blue tool inserted into a container (no text or symbols visible)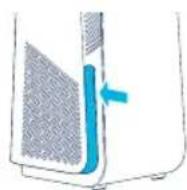
Paso 2
natural_image
Diagram of a blue mechanical component with a blue arrow indicating direction (no text or symbols)natural_image
Illustration of a white industrial air purifier with a blue cover and airflow arrow (no text or symbols)Paso 2
natural_image
Diagram of a computer oven with a blue letter 'A' on the side panel, showing internal components (no text or symbols)Paso 3
natural_image
Diagram of a refrigerator interior showing internal compartments and storage (no text or labels)Paso 4
natural_image
Diagram of a refrigerator with open door and internal compartments (no text or symbols)natural_image
Diagram of a computer monitor with ventilation slots and a blue double-headed arrow indicating leftward motion (no text or symbols)Enrollador de cable
natural_image
Diagram of a mechanical component with a circular inset showing two small features (no text or symbols)www.blueair.com/customer-support
G Filtri preliminari
natural_image
Diagram of a mechanical component with a blue arrow indicating a specific part (no text or symbols present)Punto 2
natural_image
Isometric line drawing of a plug inserted into a wall socket with a blue arrow indicating direction (no text or symbols)natural_image
Simple line drawing of a wavy yellow-orange line with a blue base and smoke above (no text or symbols)natural_image
Diagram of a blue rectangular object partially submerged in a gray mesh container, with an arrow pointing to it (no text or symbols present)natural_image
Illustration of a portable air conditioner unit with a blue cover and airflow arrow (no text or symbols)Punto 2
natural_image
Diagram of a refrigerator with a blue letter 'A' on the door, showing internal compartments and exterior panel (no text or symbols)Punto 3
natural_image
Cross-sectional diagram of a refrigerator showing internal compartments and ventilation slots (no text or labels)Punto 4
natural_image
Illustration of a refrigerator with open door and blue interior panel (no text or symbols)natural_image
Diagram of a computer monitor with ventilation slots and a blue double-headed arrow indicating left side (no text or symbols)Avvolgicavo
natural_image
Diagram of a mechanical component with two circular features, no text or symbols presentBlueair HealthProtect 102
Blueair HealthProtect
natural_image
Technical line drawing of a mechanical component with a blue arrow indicating a specific part (no text or symbols present)Schritt 2
natural_image
Isometric illustration of a plug inserted into a wall socket with a blue arrow indicating direction (no text or symbols)natural_image
Simple line drawing of a wavy yellow-orange line with a blue base, no text or symbols presentnatural_image
Diagram of a blue rectangular object interacting with a gray mesh panel, showing a directional arrow (no text or symbols)natural_image
Illustration of a white rectangular device with a blue interior and a blue arrow indicating rotation (no text or symbols)Schritt 2
natural_image
Diagram of a refrigerator interior showing the door, vent, and side panel (no text or labels)Schritt 3
natural_image
Cross-sectional diagram of a refrigerator showing internal compartments and ventilation slots (no text or labels)Schritt 4
natural_image
Illustration of a refrigerator with open door and blue interior panel (no text or symbols)natural_image
Line drawing of a computer monitor case with ventilation grilles and a blue double-headed arrow indicating left side (no text or symbols)Kabelaufwickler
natural_image
Diagram of a mechanical component with a circular inset showing two small features (no text or symbols)Fehlerbehebung
G Voorfilters
natural_image
Technical line drawing of a mechanical component with a blue arrow indicating a force or insertion (no text or symbols present)Stap 2
natural_image
Isometric illustration of a plug inserted into a wall socket with a blue arrow indicating direction (no text or symbols)natural_image
Five horizontal color bars in red, orange, yellow, green, cyan, and white (no text or symbols)Sterk vervuild
Licht vervuild
Matig
Goed
Uitstekend
natural_image
Simple line drawing of a wavy yellow-orange line with a blue base and smoke above (no text or symbols)natural_image
Diagram of a blue rectangular object partially submerged in a gray mesh container, with an arrow pointing to it (no text or symbols present)natural_image
Illustration of a white rectangular device with a blue interior panel and a blue arrow indicating rotation (no text or symbols)Stap 2
natural_image
Diagram of a refrigerator with open door and blue letter 'A' on the side panel (no text or symbols)Stap 3
natural_image
Diagram of a refrigerator interior showing internal compartments and a blue plastic cover (no text or symbols)Stap 4
natural_image
Illustration of a refrigerator with open door and side panel, showing internal compartments (no text or symbols)natural_image
Diagram of a computer monitor with ventilation slots and a blue double-headed arrow indicating left side (no text or symbols)Kabelhaspel
natural_image
Diagram of a mechanical component with a circular inset showing two small features (no text or symbols)Problemen oplossen
www.blueair.com/customer-support
PL
natural_image
Diagram of a mechanical component with a blue arrow indicating a force or movement (no text or symbols present)Krok 2
natural_image
Illustration of a plug inserted into a wall socket with a blue arrow indicating direction (no text or symbols)natural_image
Simple line drawing of a wavy yellow-orange line with a blue base, emitting steam above (no text or symbols)natural_image
Diagram of a device with a blue panel and mesh pattern, showing a directional arrow (no text or symbols)natural_image
Illustration of a white rectangular device with a blue cover and a blue arrow indicating rotation (no text or symbols)Krok 2
natural_image
Diagram of a refrigerator interior showing the door, front panel, and side arm (no text or labels)Krok 3
natural_image
Cross-sectional diagram of a refrigerator showing internal compartments and ventilation slots (no text or labels)Krok 4
natural_image
Illustration of a refrigerator with open door and blue interior panel (no text or symbols)natural_image
Line drawing of a computer monitor case with ventilation grilles and a blue double-headed arrow indicating left side (no text or symbols)Nawijarka kabla
natural_image
Diagram of a mechanical component with a circular inset showing two small features (no text or symbols)A Komandna tabla G Predfilteri
B Ručka H Vratanca za filter
C Izlazi za vazduh I Glavni filter
D Ulazi senzora za kvalitet vazduha
E Ulazi za vazduh
F Nogare i točkići
J Ventilator i motor
K Kabl za napajanje (nije prikazan na ilustraciji)
L Korisničko uputstvo (nije prikazano na ilustraciji)
natural_image
Diagram of a mechanical component with a blue arrow indicating a force or movement (no text or symbols present)Korak 2
Ukopčajte kabl za napajanje u električnu utičnicu sa uzemljenjem.
Korak 3
Pritisnite taster za uključivanje i isključivanje uređaja da biste uključili prečistač vazduha.
natural_image
Isometric line drawing of a plug inserted into a wall socket with a blue arrow indicating direction (no text or symbols)Stanje: kvalitet vazduha
Vrednost od 18 g/m ^3 zaPM2.5.
Modeli „70“ su opremljeni dinamičkim displejom koji prikazuje dodatne vrednosti i stanja za različite kategorije i poseduje dodatne indikatore putem kojih se prikazuju uključene funkcije. Pritisnite levu ili desnu strelicu da biste se prebacivali između prikaza različitih kategorija.
other
| Category | Value | | --------------------- | ----- | | Kategorija | 999 | | Vrednost | 999 | | Statusna traka | 999 | | Uključene funkcije | 999 |Prikaz informacija o česticama
Informacije o kvalitetu vazduha u odnosu na čestice prikazane su na displeju. Pritisnite levu ili desnu strelicu da biste se prebacili na prikaz kategorije sa informacijama o česticama. Na displeju su prikazane očitane vrednosti za PM1, PM2.5 i PM10 čestice uz odgovarajuće informacije o kvalitetu vazduha koje su prikazane na statusnoj traci.

Kategorija: PM1
Vrednost od 5 μg/m³.
Stanje: odličan kvalitet vazduha.
Kategorija: PM2.5
Vrednost od 15 μg/m³.
Stanje: dobar kvalitet vazduha.
Kategorija: PM10
Vrednost od 55 μg/m³.
Stanje: srednji kvalitet vazduha.

natural_image
Simple line drawing of a wavy yellow-orange line with a blue base, emitting steam above (no text or symbols)Kategorija: informacije o gasovima
Nivo kvaliteta vazduha u prostoriji u odnosu na gasove (tVOC) tokom vremena.
Stanje: odličan kvalitet vazduha.
Prikaz radnog veka filtera
Prikazuje se preostalo vreme trajanja radnog veka filtera. Pritisnite levu ili desnu strelicu da biste se prebacili na prikaz kategorije sa informacijama o radnom veku filtera. Prečistač vazduha će odbrojavati od 100% kada se postavi novi filter i prikazaće kada je neophodno obaviti zamenu filtera.

Kategorija: radni vek filtera
Preostalo je još 90% radnog veka filtera.
Statusna traka sa odbrojavanjem.

Kategorija: radni vek filtera Preostalo je još 9% radnog veka filtera.
Statusna traka sa odbrojavanjem.
Filteri
natural_image
Diagram of a blue rectangular object inserted into a container with a mesh pattern, showing a directional arrow (no text or symbols)Zamena glavnog filtera
natural_image
Illustration of a white rectangular device with a blue cover and a blue arrow indicating rotation (no text or symbols)Korak 2
natural_image
Diagram of a refrigerator interior showing the door, front panel, and side arm (no text or labels)Korak 3
Napomena! Pre korišćenja uklonite zaštitnu plastičnu ambalažu sa novog glavnog filtera.
Postavite novi glavni filter.
natural_image
Cross-sectional diagram of a refrigerator showing internal compartments and ventilation slots (no text or labels)Korak 4
Zatvorite vratanca za filter.
Napomena! Vratanca za filter moraju da se zatvore kako bi prečistač vazduha mogao ponovo da se pokrene.
natural_image
Illustration of a refrigerator with open door and blue interior panel (no text or symbols)Pomeranje prečistača vazduha
natural_image
Diagram of a computer monitor with ventilation slots and a blue double-headed arrow indicating left side (no text or symbols)Kotur za kabl
Prečistač vazduha je opremljen fiksnim koturom za kabl na kome možete da obmotate višak kabla. Kotur za kabl se nalazi na donjem delu prečistača vazduha. Obmotajte višak kabla oko kotura za kabl.
Nega i održavanje
Opšte stavke
natural_image
Diagram of a mechanical component with a circular inset showing two small features (no text or symbols)Rešavanje problema
www.blueair.com/customer-support
A Kontrol paneli G Ön filtreler
natural_image
Diagram of a mechanical component with a blue arrow indicating a force or movement (no text or symbols present)2. Adım
natural_image
Isometric line drawing of a plug inserted into a wall socket with a blue arrow indicating direction (no text or symbols)natural_image
Five horizontal color bars in red, orange, yellow, green, cyan, and white (no text or symbols)Çok Kirli
Hafif Kirli
Orta
iyi
Mükemmel
natural_image
Simple line drawing of a wavy yellow-orange line with a blue base and smoke above (no text or symbols)Kategori Gaz verileri
natural_image
Diagram of a blue rectangular object inserted into a container with a mesh pattern, showing an arrow indicating direction (no text or symbols present)5. Adim
natural_image
Illustration of a white rectangular device with a blue cover and a blue arrow indicating rotation (no text or symbols)2. Adım
natural_image
Diagram of a refrigerator interior showing the door, front panel, and side arm (no text or labels)3. Adim
natural_image
Cross-sectional diagram of a refrigerator showing internal compartments and ventilation slots (no text or labels)4. Adim
natural_image
Illustration of a refrigerator with open door and blue interior panel (no text or symbols)natural_image
Line drawing of a computer monitor case with ventilation grilles and a blue double-headed arrow indicating left side (no text or symbols)Kablo sarici
natural_image
Diagram of a mechanical component with a circular inset showing two small features (no text or symbols)Sorun giderme

natural_image
Diagram of a mechanical component with a blue arrow indicating a force or movement (no text or symbols present)Steg 2
natural_image
Illustration of a plug inserted into a wall socket with a blue arrow indicating direction (no text or symbols)natural_image
Five horizontal color bars in red, orange, yellow, green, cyan, and white (no text or symbols)Mycket förorenad
Något förorenad
Måttlig
Bra
Utmärkt
Uppgift saknas
natural_image
Simple line drawing of a wavy yellow-orange line with a blue base and smoke above (no text or symbols)Kategori Gasnivå
natural_image
Diagram of a blue rectangular object partially inserted into a container, with an arrow indicating direction (no text or symbols present)Byta huvudfilter
natural_image
Illustration of a white rectangular device with a blue cover and a blue arrow indicating rotation (no text or symbols)Steg 2
natural_image
Diagram of a refrigerator interior showing the door, front panel, and side arm (no text or labels)Steg 3
natural_image
Cross-sectional diagram of a refrigerator showing internal compartments and ventilation slots (no text or labels)Steg 4
Stäng filterluckan.
natural_image
Illustration of a refrigerator with open door and blue interior panel (no text or symbols)Flytta luftrenaren
natural_image
Diagram of a computer monitor with ventilation slots and a blue double-headed arrow indicating left side (no text or symbols)Kabelvinda
natural_image
Diagram of a mechanical component with a circular inset showing two small features (no text or symbols)Felsökning

natural_image
Diagram of a mechanical component with a blue arrow indicating a force or movement (no text or symbols present)Trinn 2
natural_image
Isometric illustration of a plug inserted into a wall socket with a blue arrow indicating direction (no text or symbols)natural_image
Five horizontal color bars in red, orange, yellow, green, cyan, and white (no text or symbols)Svært forurenset
Noe forurenset
Moderat
Bra
Utmerket
Status luftkvalitet Verdi på 18 g/m ^3 for PM2,5.
natural_image
Simple line drawing of a wavy yellow-orange line with a blue base and smoke above (no text or symbols)Kategori gassdata
natural_image
Diagram of a blue rectangular object partially inserted into a container, with a blue arrow pointing to it (no text or symbols present)Trinn 5
natural_image
Illustration of a white rectangular device with a blue cover and a blue arrow indicating rotation (no text or symbols)Trinn 2
natural_image
Diagram of a refrigerator interior showing the door, drawer, and front panel (no text or labels)Trinn 3
natural_image
Diagram of a refrigerator interior showing internal compartments and a blue directional arrow (no text or symbols)Trinn 4
Lukk filterdøren.
natural_image
Illustration of a refrigerator with open door and blue interior panel (no text or symbols)Flytte luftrenseren
natural_image
Line drawing of a computer monitor case with ventilation grilles and a blue double-headed arrow indicating left side (no text or symbols)Ledningssnelle
natural_image
Diagram of a mechanical component with a circular inset showing two small features (no text or symbols)Feilsøking
www.blueair.com/customer-support

natural_image
Diagram of a mechanical component with a blue arrow indicating a force or movement (no text or symbols present)Vaihe 2
natural_image
Illustration of a plug inserted into a wall socket with a blue arrow indicating direction (no text or symbols)natural_image
Five horizontal color bars in red, orange, yellow, green, cyan, and white (no text or symbols)Erittäin huono
Heikko
Kohtuullinen
Hyvä
Erinomainen
Ilmanlaadun tila
natural_image
Simple line drawing of a wavy yellow-orange line with a blue base and smoke above (no text or symbols)Kaasutiedot-luokka
natural_image
Diagram of a blue rectangular object partially inserted into a container, with a blue arrow pointing to it (no text or symbols present)Vaihe 5
natural_image
Illustration of a portable air purifier with blue cover and airflow arrow (no text or symbols)Vaihe 2
natural_image
Diagram of a refrigerator interior showing the door, vent, and side panel (no text or labels)Vaihe 3
Huomautus:
natural_image
Cross-sectional diagram of a refrigerator showing internal compartments and casing (no text or labels)Vaihe 4
natural_image
Diagram of a refrigerator with open door and side panel, showing interior compartments (no text or symbols)natural_image
Diagram of a computer monitor with ventilation slots and a blue double-headed arrow indicating left side (no text or symbols)Johtokela
natural_image
Diagram of a mechanical component with a circular inset showing two small features (no text or symbols)Vianmääritys
www.blueair.com/customer-support
natural_image
Diagram of a mechanical component with a blue arrow indicating a force or movement (no text or symbols present)Trin 2
natural_image
Illustration of a plug inserted into a wall socket with a blue arrow indicating direction (no text or symbols)Status Luftkvalitet
natural_image
Simple line drawing of a wavy yellow-orange line with a blue base and smoke above (no text or symbols)Kategori Gasdata
natural_image
Diagram of a blue rectangular object partially inserted into a container, with an arrow indicating direction (no text or symbols present)natural_image
Illustration of a white rectangular device with a blue cover and a blue arrow indicating rotation (no text or symbols)Trin 2
natural_image
Diagram of a refrigerator interior showing the door, drawer, and seat (no text or labels)Trin 3
natural_image
Cross-sectional diagram of a refrigerator showing internal compartments and ventilation slots (no text or labels)Trin 4
Luk filterlugen.
natural_image
Illustration of a refrigerator with open door and blue interior panel (no text or symbols)Flyt luftrenseren
natural_image
Line drawing of a computer monitor case with ventilation grilles and a blue double-headed arrow indicating left side (no text or symbols)Kabelopruller
natural_image
Diagram of a mechanical component with a circular inset showing two small features (no text or symbols)Fejlfinding
Besøg blueair.com/customer-support for at få personlig support
Garantiinformation
www.blueair.com/customer-support
AR
™Blueair HealthProtect
المرشحات الأولية G
باب المرشح H
1 مرشح رئيسي
ل مروحة ومحرك
m = 311
بدء الاستخدام
2 alخطوة
natural_image
Illustration of a plug inserted into a socket with a blue arrow indicating direction (no text or symbols)2 الخطة
natural_image
Diagram of a mechanical component with a blue arrow indicating a force or movement, no text or symbols present.1 alخطوة
natural_image
Simple line drawing of a wavy line with a small dot at the end, above a horizontal bar (no text or symbols)مؤشر عمر المرشح
natural_image
Diagram of a device with a blue panel and mesh screen, showing an arrow pointing to the next panel (no text or symbols present)4 الخطة
natural_image
Diagram of a computer case with a blue letter 'A' on the cover, showing internal components without any text or symbols.2 alخطوة
natural_image
Illustration of a white electronic device with a blue panel and airflow arrow (no text or symbols)1 alخطوة
افتح باب المرشح.
natural_image
Illustration of a refrigerator with open door and blue door, showing interior compartments (no text or symbols)4 alخطوة
اغلق باب المرشح.
natural_image
Diagram of a refrigerator interior showing internal compartments and a blue directional arrow (no text or symbols)3 alخطوة
natural_image
Diagram of a computer monitor case with ventilation grilles and a blue double-headed arrow indicating leftward motion (no text or symbols)natural_image
Diagram of a mechanical component with a circular inset showing two labeled parts (no text or symbols present)مستشعر جودة الهواء
www.blueair.com/customer-support لل九十اصل مع Blueair
معلومات الضمان
Unit 8C, 8/F, MG Tower,
133 Hoi Bun Road,
Kwun Tong, Kowloon,
Hong Kong
Tel: +852 2345 8988
blueairasia@blueair.se
Blueair Inc.
125 S Clark
Suite 2000
Chicago, IL. 60603
USA
Tel: +1 888 258 3247
info@blueair.com
Blueair AB Middle East
Jafza One, Office No. AB1503
Jebel Ali Free Zone
P.O. Box No. 263947
Dubai, United Arab Emirates
Tel:+971(4)8821244
salesme@blueair.se
Blueair (Shanghai) Trading Co. Ltd.
Room 1001, City Gateway
No. 398 North Caoxi Road
Xuhui Distr, Shanghai,
China
Tel: 400 006 9693
info@unilever-le.com
