
Flash Start Remote - Controller DENON - Free user manual and instructions
Find the device manual for free Flash Start Remote DENON in PDF.

| Product type | Remote controller (remote) |
| Brand | Denon |
| Model | Flash Start Remote |
| Power supply | Via USB cable (5V DC, 500 mA max) |
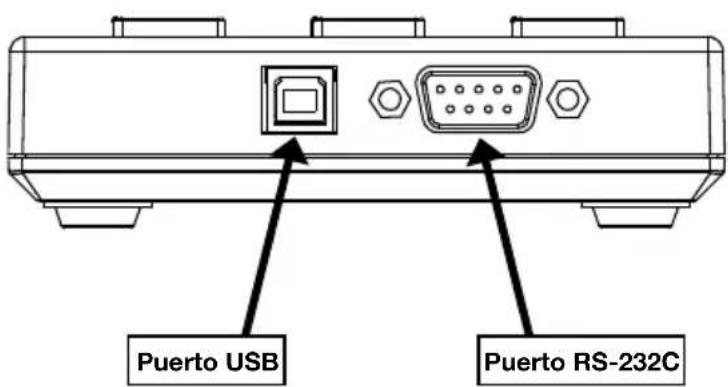
| Connectivity | RS-232C (D-sub 9-pin) and USB (type B) |
| Included cables | RS-232C cable, USB cable |
| Main functions | Control of Denon/Marantz Professional media players via RS-232; control of PC applications (Groove Music, Windows Media Player, Apple Music, iTunes, YouTube) via USB; Hot Start playback; track selection by number; play/pause/stop; search forward/backward; recording (on compatible models); repeat and shuffle (depending on application) |
| LED indicators | EOM indicator (end of track); backlighting of numeric keys |
| Adjustable baud rate | 9600, 38400 or 115200 bps (via key combinations) |
| Dimensions (approx.) | Approximately 16 x 10 x 3 cm (estimated) |
| Weight (approx.) | Approximately 200 g (estimated) |
| Operating temperature | 0 to 40 °C (estimated) |
| Operating humidity | 20% to 80% (estimated) |
| Software compatibility | Groove Music, Windows Media Player, Apple Music, iTunes, YouTube (depending on USB mode) |
| Hardware compatibility | Denon/Marantz Professional players (DN-500CB, DN-700CB, PMD-526C, DN-501C, DN-700C, DN-500R, DN-700R, DN-900R, etc.) |
| Cleaning | Use a soft, dry cloth. Do not use solvents or abrasive products. |
| Safety instructions | Do not expose to moisture or extreme temperatures. Disconnect before cleaning. Use only the supplied cables. |
| Repairability | Have any repairs carried out by a qualified technician. Spare parts available on request via denonpro.com/support. |
Frequently Asked Questions - Flash Start Remote DENON
User questions about Flash Start Remote DENON
0 question about this device. Answer the ones you know or ask your own.
Ask a new question about this device
Download the instructions for your Controller in PDF format for free! Find your manual Flash Start Remote - DENON and take your electronic device back in hand. On this page are published all the documents necessary for the use of your device. Flash Start Remote by DENON.
USER MANUAL Flash Start Remote DENON
User Guide (English)
Introduction
Thank you for purchasing the Flash Start Remote Controller. At Denon Professional, performance and reliability mean as much to us as they do to you. That's why we design our equipment with only one thing in mind—to make your performance the best it can be.
Box Contents
Flash Start Remote Controller
RS-232C Cable (9-pin D-sub)
USB Cable
User Guide
Safety & Warranty Manual
Support
For the latest information about this product (documentation, technical specifications, system requirements, compatibility information, etc.) and product registration, visit denonpro.com.
For additional product support, visit denonpro.com/support.
Features
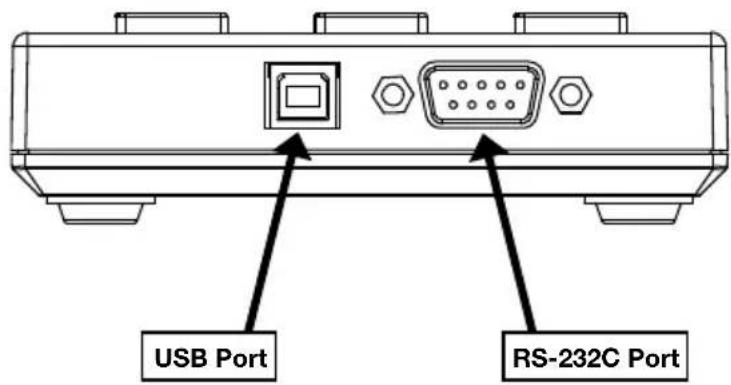
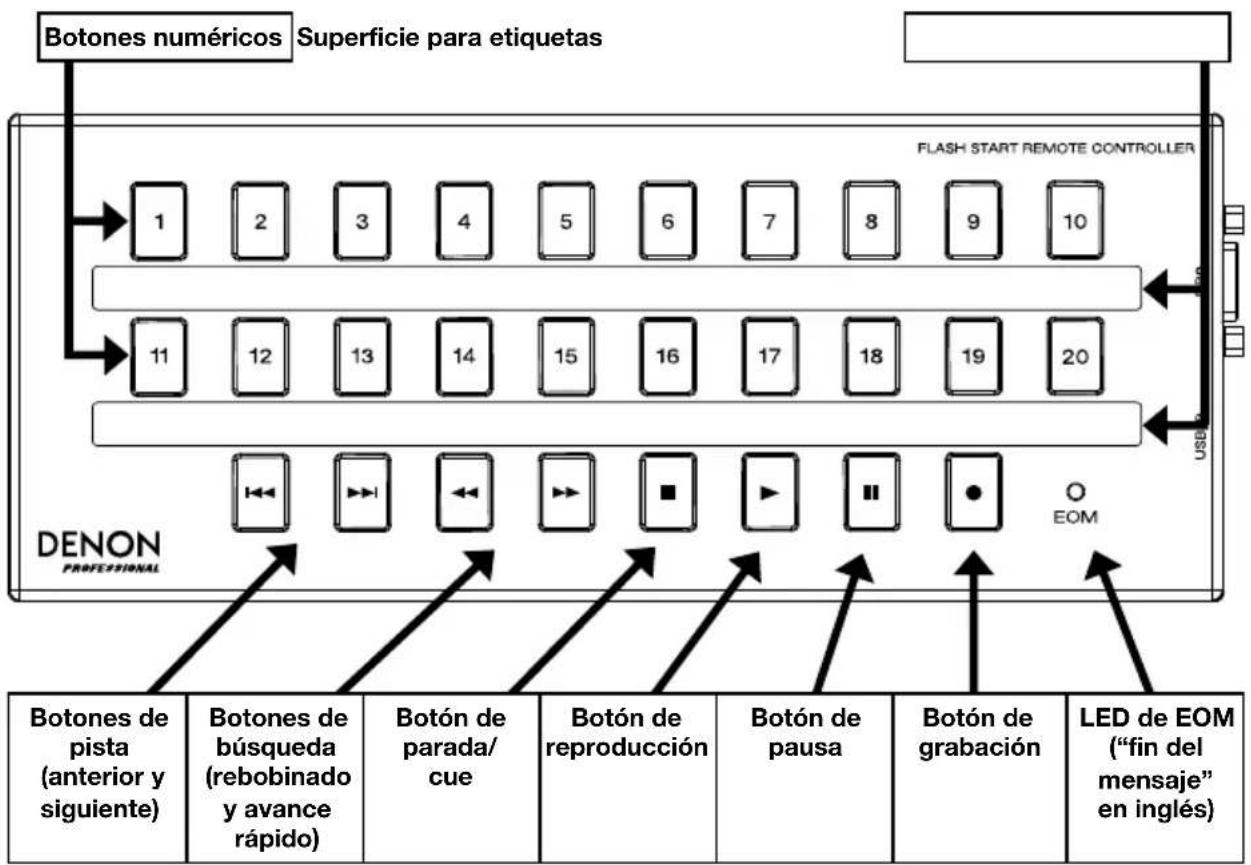
Top Panel

Side Panel
Setup
The Flash Start Remote Controller is designed to be connected to one of a select number of Denon or Marantz Professional media devices. When Flash Start and your media device are connected, you will be able to operate the device through the controls on Flash Start.
You can also connect the Flash Start Remote Controller to your computer. When connected to your computer, you can use Flash Start to operate Groove Music, Windows Media Player, Apple Music, iTunes, or YouTube.
Note: The buttons on the Flash Start Remote Controller work differently depending on what device the remote is connected to. See the Operation section to better understand how the remote will work specifically with your device or computer application. See the Appendix for a list of Denon and Marantz Professional media devices with which Flash Start is compatible.
Example 1 (Controlling a Denon or Marantz Professional Media Device)
To set up Flash Start for controlling a Denon or Marantz Professional Media Device:
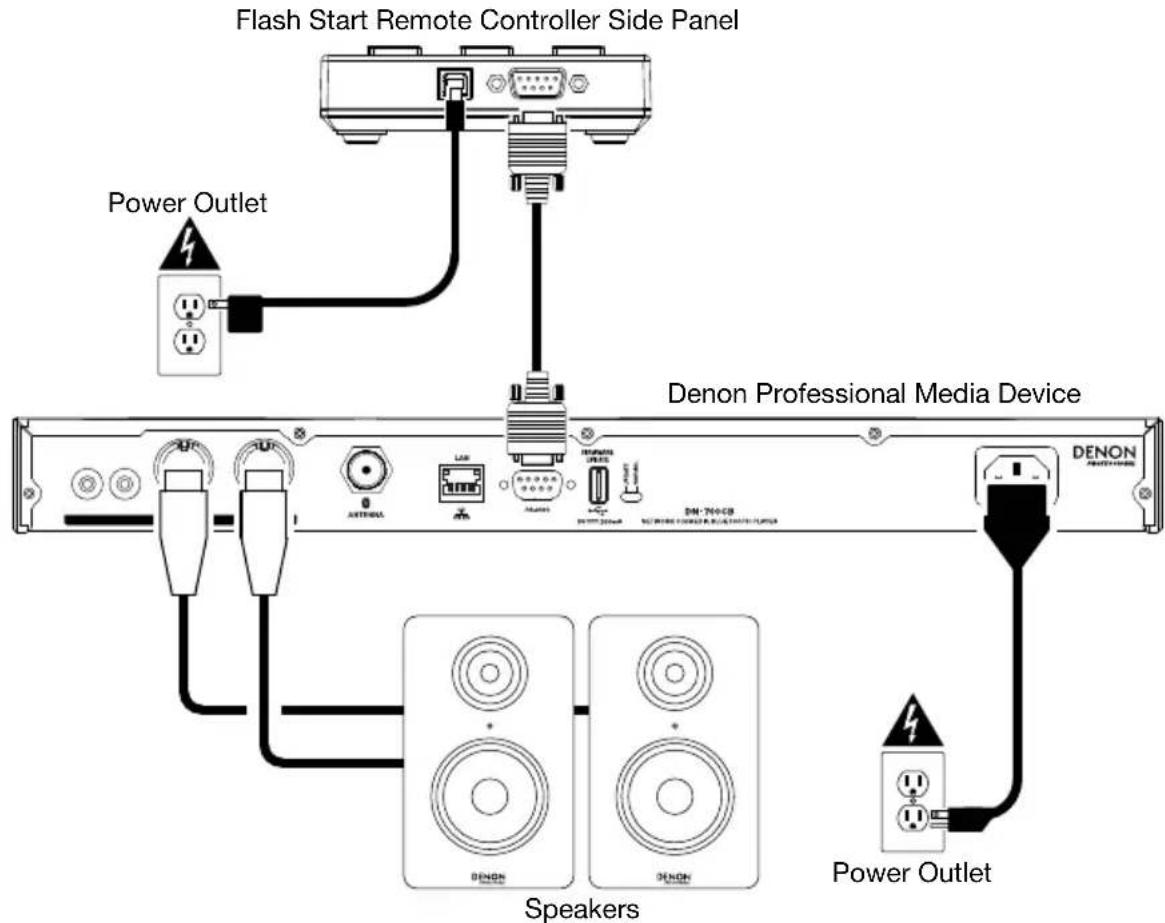
- Connect the included RS-232C cable (9-pin D-sub) from the RS-232C Port on Flash Start to the RS-232C Port on your media device. This is the connection through which Flash Start will control your media device.
- Connect the included USB cable to a power source in order to provide power to Flash Start. Plug the USB-B end of the cable into Flash Start's USB Port and the USB-A end of the cable into a USB port on your media device, to a computer USB port, or to a USB power adapter (DC 5V, not included).
- Power on your media device.
Connection Diagram
Setting the Baud Rate
In order for Flash Start to be able to control your Denon or Marantz Professional media device, the baud rate on Flash Start must be set the same as the baud rate on the device. Consult the Appendix to see the baud rates available on each Denon and Marantz Professional media device with which Flash Start is compatible.
To set Flash Start's baud rate to 9600 b/s, press the Fast-Forward and 1 buttons at the same time.
To set Flash Start's baud rate to 38400 b/s, press the Fast-Forward and 2 buttons at the same time.
To set Flash Start's baud rate to 115200 b/s, press the Fast-Forward and 3 buttons at the same time.
Note: See the "Basic Instructions" chart on Flash Start's bottom panel for a reminder on how to change the baud rate. Alternatively, you can download this chart by going to the Downloads tab of Flash Start Remote Controller's product page at denonpro.com.
Note: If the baud rate is set properly, and your media device fails to receive a command from Flash Start, the remote's button LEDs will blink three times. After they blink three times, wait one second and then retry the button you pressed.
Example 2 (Controlling a Computer Application)
To set up Flash Start for controlling a computer application:
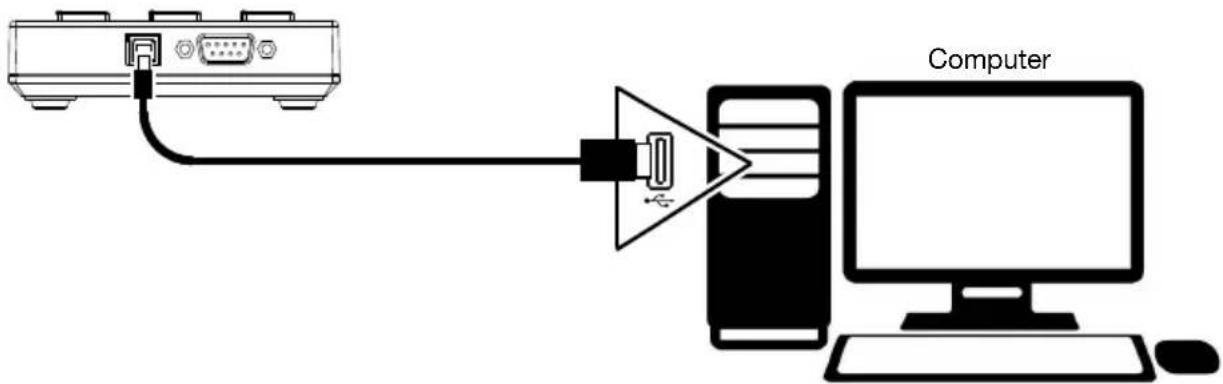
- Connect the included USB cable from Flash Start to your computer. Plug the USB-B end of the cable into Flash Start's USB port and the USB-A end of the cable into a USB port on your computer. This is the connection through which Flash Start will control your computer application, and it will also provide power to Flash Start.
- Power on your computer and open the application that you would like to control (Groove Music, Windows Media Player, Apple Music, iTunes, or YouTube).
Note: When Flash Start is recognized by your computer, it will be mounted as a disk drive. However, Flash Start cannot be used for storing files.
Connection Diagram
Flash Start Remote Controller Side Panel
Operation
Using Flash Start with a Denon or Marantz Professional Media Device
Enabling Control of Your Media Device
To enable Flash Start to control your media device, press the rewind and fast-forward buttons at the same time.
Note: If Flash Start is currently set to control a computer application, you will need to press the Stop and 11 buttons at the same time to switch from USB control to RS-232C control. After doing this, press the rewind and fast-forward buttons at the same time to enable Flash Start to control your media device.
Initiating Hot Start Playback
To play hot start tracks:
- Enter Hot Start Mode by pressing the Stop and 5 buttons at the same time.
Note: See the chart on Flash Start's bottom panel for a reminder on how to enter this mode. Alternatively, you can download this chart by going to the Downloads tab of Flash Start Remote Controller's product page at denonpro.com.
- Select the track you want to play by pressing the Number button corresponding to the track's assigned hot start number. The track will then begin playing. The Number button corresponding to the hot start number will remain brightly lit while the track is playing.
Selecting a Track for Playback by Track Number
To select and play tracks by track number:
- Enter Media Track mode by pressing the Stop and 6 buttons at the same time.
Note: See the chart on Flash Start's bottom panel for a reminder on how to enter this mode. Alternatively, you can download this chart by going to the Downloads tab of Flash Start Remote Controller's product page at denonpro.com.
- Select the track by pressing the Number button corresponding to the track number for the file you want to play. The track will then be cued for playback, and the Number button will be brightly lit.
- Press the Play button to initiate playback. The corresponding Number button will remain brightly lit while the track is playing.
Pausing, Cueing, and Stopping Tracks
To pause a track in mid-playback, press the Pause button.
To stop a track on the DN-500CB or PMD-526C, press the Stop/Cue button.
To stop or cue a track on the DN-700CB, DN-501C, DN-700C, DN-500R, DN-700R, or DN-900R, press the Stop/Cue button. The exact function of this button will depend on the Finish Mode setting of your media device:
- If Finish Mode is set to Stop, pressing the Stop/Cue button will stop playback.
- If Finish Mode is set to Next, pressing the Stop/Cue button will cue the next track in the tracklist.
- If Finish Mode is set to Recue, pressing the Stop/Cue button will cue the track time position from which playback was last started.
When a track is cued, the Number button corresponding to the cued track will be brightly lit.
To initiate playback of a paused or cued track, press the Play button.
Searching through Tracks
To rewind or fast-forward through the current track on a DN-500CB, DN-700CB, or PMD-526C, press the rewind or fast-forward button. The media device will search through the track at 30X the normal playback speed, and a second press of the Rewind or Fast-forward button will resume normal playback.
To stop rewinding or fast-forwarding at the current track time on a DN-500CB, DN-700CB, or PMD-526C, press the Play button, Pause button, or press the Rewind or Fast-forward button a second time.
To rewind or fast-forward through the current track on a DN-501C, DN-700C, DN-500R, DN-700R, or DN-900R, press the Rewind or Fast-forward button. With each press of the button, the media device will cycle through the search speeds: 2X, 10X, 50X, 100X, and 200X the normal playback speed.
To stop rewinding or fast-forwarding at the current track time on a DN-501C, DN-700C, DN-500R, DN-700R, or DN-900R, press the Play or Pause button.
Observing the EOM LED
The EOM LED is a warning light that will turn on when the currently playing track is almost finished. The light will then turn off once the track ends.
On the DN-500CB, DN-700CB, and PMD-526C, the EOM LED will have no function.
On the DN-501C, DN-700C, DN-500R, DN-700R, and DN-900R, the amount of time the EOM LED will turn on before the end of the current track will depend on the End of Message setting configured in the media device's settings menu.
Recording (DN-500R, DN-700R, and DN-900R only)
To begin recording, press the Record button. How many times you have to press the button depends on whether One Touch Recording is turned on or off on the device connected to your remote:
- If One Touch Recording is set to Off, press the remote's Record button once to enter recording mode and then press it again to start recording. A new file will be created for your recording.
- If One Touch Recording is set to On in your device's settings, press this button once to start recording. A new file will be created for your recording.
During recording, the Record button will be brightly lit.
To create another new file while recording, press the Record button. The recording will continue but it will be split between the previous and new file.
To pause an in-progress recording, press the Pause button. While a recording is paused, the Record button will flash. After pausing, you can start recording again by pressing the Record button, which will resume the same file from the point at which it is paused.
To stop recording, press the Stop button. After you press Stop, the last recorded file will be cued from the beginning.
Using Flash Start with a Computer
Enabling USB Control
To enable USB control of your computer application through Flash Start, enter the remote into the mode for controlling the application by pressing the designated button combo:
Groove Music or Windows Media Player: press the Stop and 1 buttons at the same time.
Apple Music or iTunes on a Mac computer: press the Stop and 2 buttons at the same time.
- Apple Music or iTunes on a Windows computer: press the Stop and 3 buttons at the same time.
YouTube: press the Stop and 4 buttons at the same time.
Note: You can consult the chart printed on Flash Start's bottom panel for a reminder on how to enter the modes and for a list of each button's function when controlling each computer application. Alternatively, you can download this chart by going to the Downloads tab of Flash Start Remote Controller's product page at denonpro.com.
Playing, Selecting, and Searching through Files on Groove Music, Windows Media Player, Apple Music, or iTunes
To play or pause the current file, press the Play or Pause button.
To stop the current file, press the Stop button.
Note: This control does not apply if you are using Groove Music.
To skip to the previous or next file, press the Previous or Next button.
To rewind the current file, press the Rewind button.
Note: This control does not apply if you are using Groove Music, Apple Music on a Mac computer, or iTunes on a Mac computer. If you are using Windows Media Player, this control will work only with video files.
To fast-forward the current file, press the Fast-Forward button.
Note: This control does not apply if you are using Groove Music, Apple Music on a Mac computer, or iTunes on a Mac computer.
To stop rewinding or fast-forwarding, press the Play or Pause button.
To toggle repeat on/off (Windows Media Player and Groove Music only), press the 10 button.
To toggle shuffle on/off, press the 20 button.
Note: This control does not apply if you are using Apple Music or iTunes.
Playing and Searching through YouTube Videos
To play or pause the open video, press the Play or Pause button.
To stop the open video, press the Stop button.
To skip back five seconds in the open video, press the 14 button.
To skip ahead five seconds in the open video, press the 15 button.
Controlling the Volume Level
To turn the volume up on your application, press the 1 button.
To turn the volume down on your application, press the 11 button.
To mute the application, press the Record button.
Note: This control does not apply if you are using Apple Music or iTunes on a Mac computer.
Exiting USB Control
If you would like to exit USB control so that you can use Flash Start to control a Denon or Marantz Professional media device, press the Stop and 11 buttons at the same time. After doing this, make sure you press the rewind and fast-forward buttons at the same time in order to enable Flash Start to control your media device.
Panel superior
Panel lateral
Instalación
Alternatively, you can use the Audio Quality Control (AUC) method to control the sound quality of a song. AUC is a metric that measures how much a particular song affects the sound quality of a given music. It is used to quantify the difference between the sound quality of two songs.
Registrazione (solo DN-500R, DN-700R e DN-900R)
Note bene: Anything that is not a computer or Mac, Windows Media Player, any other computer or Mac, or any other computer and Mac, is not included.
Note bene: Anything that is not a computer music, Apple Music or iTunes is not a computer Mac.
List of Compatible Denon and Marantz Professional Devices
Listed below are the Denon and Marantz Professional devices that you can control with Flash Start. Also listed are the baud rates available on each device.
Denon Professional:
DN-500CB (9600, 38400, or 115200 b/s) DN-700CB (9600, 38400, or 115200 b/s)
DN-500R (9600 or 38400 b/s) DN-700R (9600 or 38400 b/s)
DN-501C (9600 or 38400 b/s) DN-900R (9600 or 38400 b/s)
DN-700C (9600 or 38400 b/s)
Marantz Professional:
PMD-526C (9600, 38400, or 115200 b/s)
Technical Specifications
| Connectors | (1) RS-232C 9-Pin D-Sub Female Connector (1) USB-B Port | ||
| RS-232C Connectivity | Transmission System: Asynchronous full duplex Data: 8 bits (Start Bit: 1 Bit; Stop Bit: 1 Bit) Parity: None Flow Control: None Baud Rate: Selectable (9600, 38400, or 115200 b/s) | ||
| RS-232C Pin Arrangement | Pin 1: GND Pin 4: NC Pin 7: NC Pin 2: TxD Pin 5: GND Pin 8: NC Pin 3: RxD Pin 6: NC Pin 9: NC | ||
| Power | Via USB connection Consumption: 0.3 W | ||
| Environmental Requirements | Operating Temperature: 41 - 95 °F (5 - 35 °C) Storage Temperature: -4 - 140 °F (-20 - 60 °C) Operating/Storage Humidity: 25% - 85%, non-condensing | ||
| Dimensions (width x depth x height) | 10" x 4" x 1.1" 255 x 100 x 29 mm | ||
| Weight | 1.5 lbs. 0.7 kg | ||
Specifications are subject to change without notice.
Trademarks & Licenses
Denon is a trademark of D&M Holdings Inc., registered in the U.S. and other countries. Denon Professional products are produced by inMusic Brands, Inc., Cumberland, RI 02864, USA. Marantz is a trademark of D&M Holdings Inc., registered in the U.S. and other countries. Marantz Professional products are produced by inMusic Brands, Inc., Cumberland, RI 02864, USA. macOS is a trademark of Apple Inc., registered in the U.S. and other countries. Windows is a registered trademark of Microsoft Corporation in the United States and other countries. All other product names, company names, trademarks, or trade names are those of their respective owners.
denonpro.com

- User Guide (English)
- Introduction
- Box Contents
- Support
- Features
- Top Panel
- Side Panel
- Setup
- Example 1 (Controlling a Denon or Marantz Professional Media Device)
- To set up Flash Start for controlling a Denon or Marantz Professional Media Device:
- Connection Diagram
- Setting the Baud Rate
- Example 2 (Controlling a Computer Application)
- To set up Flash Start for controlling a computer application:
- Operation
- Using Flash Start with a Denon or Marantz Professional Media Device
- Enabling Control of Your Media Device
- Initiating Hot Start Playback
- To play hot start tracks:
- Selecting a Track for Playback by Track Number
- To select and play tracks by track number:
- Pausing, Cueing, and Stopping Tracks
- Searching through Tracks
- Observing the EOM LED
- Recording (DN-500R, DN-700R, and DN-900R only)
- Using Flash Start with a Computer
- Enabling USB Control
- Playing, Selecting, and Searching through Files on Groove Music, Windows Media Player, Apple Music, or iTunes
- Playing and Searching through YouTube Videos
- Controlling the Volume Level
- Exiting USB Control
- Instalación
- Registrazione (solo DN-500R, DN-700R e DN-900R)
- List of Compatible Denon and Marantz Professional Devices
- Denon Professional:
- Marantz Professional:
- Technical Specifications
- Trademarks & Licenses
- denonpro.com
Brand : DENON
Model : Flash Start Remote
Category : Controller