CurveLight CASP29BT - Speaker Cyber Acoustics - Free user manual and instructions
Find the device manual for free CurveLight CASP29BT Cyber Acoustics in PDF.

| Product Type | Bluetooth Wireless Speaker System 2.0 |
| Brand | Cyber Acoustics |
| Model | CurveLight CASP29BT (CA-SP29BT) |
| Connection Technology | Bluetooth (range 30 ft / 9 m) and AUX 3.5mm input |
| Power | AC 100-240V power adapter included |
| Auxiliary Input | 3.5mm AUX jack |
| Headphone Output | 3.5mm headphone jack (mutes speakers) |
| Controls | Main volume, power, source button (Bluetooth/AUX), light button |
| LED Lighting | Light with 6-color cycle (green, blue, red, purple, yellow, light blue) |
| Light Dimming | 50% reduction by holding Light button for 3 seconds |
| LED Indicator | Flashing blue (pairing), solid blue (connected), solid green (AUX mode) |
| Box Contents | 2 satellite speakers, power adapter, AUX cable, user guide |
| Dimensions (per speaker) | Approximately 5.9 x 3.9 x 3.9 inches (15 x 10 x 10 cm) |
| Estimated Total Weight | Approximately 2.65 lbs (1.2 kg) |
| Care | Clean with a soft, dry cloth; avoid liquids and aerosols |
| Safety | Compliant with FCC Class B and ICES-003 Canada |
| Compatibility | Smartphones, tablets, computers, iPods, MP3/CD/DVD players |
| Support | Phone: 360-883-0333 (PST) or support@cyberacoustics.com |
Frequently Asked Questions - CurveLight CASP29BT Cyber Acoustics
User questions about CurveLight CASP29BT Cyber Acoustics
0 question about this device. Answer the ones you know or ask your own.
Ask a new question about this device
Download the instructions for your Speaker in PDF format for free! Find your manual CurveLight CASP29BT - Cyber Acoustics and take your electronic device back in hand. On this page are published all the documents necessary for the use of your device. CurveLight CASP29BT by Cyber Acoustics.
USER MANUAL CurveLight CASP29BT Cyber Acoustics
text_image
C Cyber Acoustics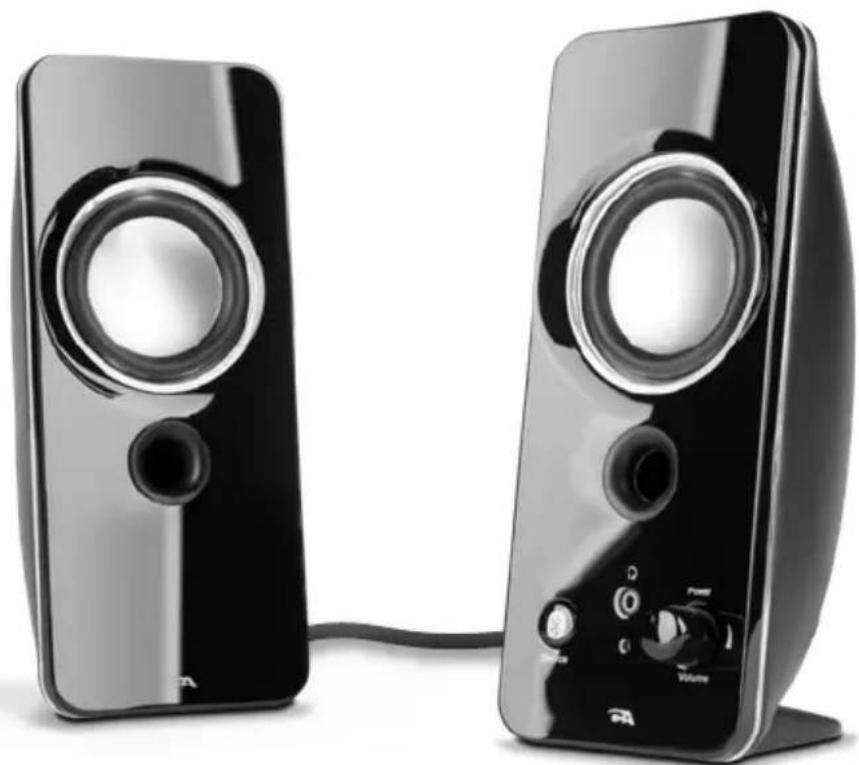
natural_image
Two black audio/video modems with speaker stands and control knobs, connected by a cable (no visible text or symbols)CA-SP29BT
Owner's Guide
Powered Multimedia Speakers
with Bluetooth and Color Changing LED Lights
Bluetooth Wireless Speaker System
Congratulations
Your “CA-SP29BT” speaker contains Bluetooth® technology, allowing you to wirelessly play music from nearly any Bluetooth enabled device. Now you can enter the room, select music to play on most smartphones, tablets, or laptops, and control your listening enjoyment from the comfort of your lap. From your device, you can easily control and change music tracks, playlists, adjust volume up or down, or even listen to podcasts, or many other audio applications available on your device.
Box Contents
- 2 x satellite speakers
• AC adapter (AC 100 - 240V) - AUX cable
- Owner's guide with connection diagram
Speaker Connection
You can connect these speakers to a variety of devices, such as laptop, computer, smartphone, iPod, MP3 player, CD player, DVD player, and other audio devices. Please read the following instructions along with the diagrams provided to identify which diagram most closely matches your connection source.
Bluetooth Connection
First time connection with new devices
- When the system is switched on it will go into the Bluetooth pairing mode by default.
- Bluetooth LED status light will begin blinking. Search your device's Bluetooth list and select "CA 2.0 BT SPEAKER" to connect/pair.
• After successful connection, a tone will sound, and the Bluetooth LED status light will stop flashing and turn solid blue.
Reconnecting with previous devices
- When the system is on, the speakers will automatically switch to previous playing mode. If it is in Bluetooth mode, the system will automatically search and attempt connect with the last paired device. If it is in Aux mode, press the Source button once; the system will automatically search and attempt connect with the last paired device.
- Make sure the Bluetooth source is nearby to automatically reconnect.
Force pairing and connection with new devices
- When the system is on, the speaker system has connected to any device. Press and hold the source button for three seconds until blue LED begins blinking. Search your device's Bluetooth list for "CA 2.0 BT SPEAKER" and tap to connect/pair.
AUX IN Connection
The Speaker system defaults to Bluetooth mode when initially turned on.
- Press the Source button once and you will hear a tone as the system switches to AUX IN mode
- The LED status light will change to solid GREEN.
- Connect your source device to the AUX IN jacks.
Controls and Features
- Power – The on/off button is on the right satellite speaker. Rotate clockwise to turn on, and increase volume. Rotate counter-clockwise to turn the system off.
- Master Volume Control – This control is on the right satellite speaker and noted by the word “volume.” Rotate clockwise to turn the volume up, or counter-clockwise to turn the volume down.
- Source Button - Press the Source button once to change from bluetooth mode to AUX IN mode.
- Auxiliary Input Jack – The auxiliary input jack is located on the back of the right speaker and allows easy connection to second audio sources.
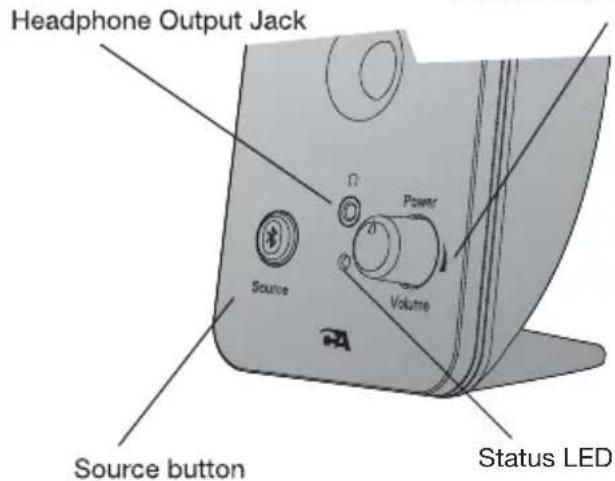
- Headphone Output Jack – Connect your favorite headphones here. Speakers will mute automatically while connected. The volume control can then be used to turn up or down the volume to your headphones.
- Status LED – Blinking Blue indicates Bluetooth pairing mode; Solid Blue indicates Bluetooth successfully connected; Solid Green indicates AUX / LINE IN mode.
- Changing the LED Color Pattern – Press the Light button each time to change the lighting cycle as follows: Green -> Blue -> Red -> Purple -> Yellow -> Light Blue -> Repeating 6 Colors -> Lights Off
- Dimming the LED Lights – Press and hold the Light button for 3 seconds to dim the LED lighting by 50%. Press the button again for 3 seconds to return the lighting to full brightness.
Power / Master Volume Control
text_image
Headphone Output Jack Power Volume Source Source button Status LED
text_image
LIGHT AUX Light button Auxiliary Input ConnectionTrouble shooting Bluetooth connections
Can't connect for the first time
- Turn off the speaker. Then turn the speaker back on. Follow the above instructions for first time Bluetooth Connection.
Can't connect when returning to the speaker system
- If the system does not automatically reconnect with your Bluetooth-enabled device, you may need to physically go to your device's Bluetooth setting and manually select again "CA 2.0 BT SPEAKER" to reconnect.
- You may also try going to your device's Bluetooth settings and select "Forget this device" to remove the speaker system from the list. You may need to turn off the Bluetooth function on your devices to fully clear the list. Then see steps above by following the Bluetooth Connection for 1st time connection.
- Check to see if any other devices are already connected to the system. The first indication for this is the speaker LED status light will show solid Blue. The speaker can only pair with one device at a time. Go to that source device to disconnect from the system first. Then you can follow the above steps for 1st time Bluetooth Connection.
Audio is choppy or keeps disconnecting
- Be sure to check your room environment. Bluetooth technology has a range limit of approximately 30 feet - line of sight. This generally means your best results will be limiting your source device and speakers to the same room. Extremely large rooms, or rooms with a lot of wireless electronics, wi-fi routers, etc., may affect the quality of sound, connection or connection consistency.
- Check for obstructions, walls, too many people, or other objects that might impede the Bluetooth signal.
- Try returning the Bluetooth source device to a closer proximity with your speakers.
Troubleshooting
Speaker system will not power on.
- Power knob is not turned on. Rotate clockwise and check for the blue LED indicator light to come on.
- Verify the AC power cord is securely plugged into the wall outlet.
- Check if the wall outlet, or power strip (if used), is actually getting power, i.e. not a switched outlet.
Speaker does not produce sound.
- Verify the speaker is getting power. Check above steps.
- Make sure the volume is turned up to an audible listening level.
- Verify that all cables are plugged into the correct jacks.
- Often the issue is not with the speakers, but the sound source. The most common is connecting to a computer using an incorrect jack/plug. Double check the speakers are connected to the audio output jack from your computer. Often this jack will be green in color.
Also make sure the media/application's volume settings are turned up and not set on mute.
- If you're still having problems, disconnect the speaker source cable and connect to a smartphone, iPod, or most anything with a 3.5mm headphone output. If your speakers then work, you know the speakers are functioning correctly and the issue likely lies with the computer or other source connections.
Sound is distorted.
- Turn the volume down by 25% or 50%. If this does not work, also check the audio source volume level and decrease there if necessary.
- Set your source device master volume to 50%, then adjust the volume level on the speakers until desired.
Additional support:
Online...
Get the latest updated video tutorials, FAQ, and product feature specifications available 24/7, or email support@cyberacoustics.com
Call in person...
Technical support is also available at 360-883-0333, M-F 8-5 United States West Coast time.
iPod, iPhone, iPad, and iPad mini are trademarks of Apple, Inc.
FCC STATEMENT
- This device complies with Part 15 of the FCC Rules. Operation is subject to the following two conditions:
(1) This device may not cause harmful interference, and
(2) This device must accept any interference received, including interference that may cause undesired operation. - Changes or modifications not expressly approved by the party responsible for compliance could void the user's authority to operate the equipment.
NOTE: This equipment has been tested and found to comply with the limits for a Class B digital device, pursuant to Part 15 of the FCC Rules. These limits are designed to provide reasonable protection against harmful interference in a residential installation.
This equipment generates, uses and can radiate radio frequency energy and, if not installed and used in accordance with the instructions, may cause harmful interference to radio communications. However, there is no guarantee that interference will not occur in a particular installation. If this equipment does cause harmful interference to radio or television reception, which can be determined by turning the equipment off and on, the user is encouraged to try to correct the interference by one or more of the following measures: Reorient or relocate the receiving antenna.
Increase the separation between the equipment and receiver.
Connect the equipment into an outlet on a circuit different from that to which the receiver is connected.
Consult the dealer or an experienced radio/TV technician for help.
Canada ICES-003 - This Class B digital apparatus complies with Canadian ICES-003.
Merci!
CA-SP29BT