
BFBD30216SSIML - Fridge BEKO - Free user manual and instructions
Find the device manual for free BFBD30216SSIML BEKO in PDF.
Download the instructions for your Fridge in PDF format for free! Find your manual BFBD30216SSIML - BEKO and take your electronic device back in hand. On this page are published all the documents necessary for the use of your device. BFBD30216SSIML by BEKO.
USER MANUAL BFBD30216SSIML BEKO
Refrigerator User manual Réfrigérateur Manuel d’utilisation Refrigerador Manual del usuario EN / FR / ES 5774451057/AA www.beko.com BFBD30216* BFBF30216* BFBF30116*Congratulations on the purchase of your new Beko Refrigerator! This refrigerator has been manufactured in modern facilities with the utmost care and meticulous quality controls. We are so condent in the quality of this product that we back it with a two year parts and labor warranty, and ve years on the sealed system! Please read this entire user manual before using your product, to ensure you understand all of its features and benets and know how to operate it properly. This manual should be kept in an easily accessible location and passed on to any future owners.
- Always observe the applicable safety instructions.
- Please read any other documents provided with the product. Important information and useful tips. The product’s packaging is made of recyclable materials, in accordance with the National Environment Legislation. Serial Number Model Risk of life and property. Risk of electric shock. This guide will help you use the product quickly and safely. Please read the user guide carefully before installing and operating the product. Fill this out and keep for future reference Model Serial No Date of Purchase Original Purchase Dealer City State Zip Code Country XX-XXXXXX-XX Remove the right crisper drawer to see the serial tag.Content Read the “Safety Instructions” section rst! The manufacturer will not be liable for any event caused by disregarding the information supplied in this user manual.
2. Important instructions for safety
2.1.2 For Product with a water disperser
2.3 Children’s Safety
3.2 Appropriate installation location
3.3 Inset Installations
3.4 Electical connection
3.5 Adjusting the feet
3.6 Illumination lamp
3.7 Door/Drawer open warning
3.8 Installing the handle
3.9 Transportion of the product
4.1 Placing and installation
4.2 Door and drawer removal
5.1 Food Storage and Compartment
5.1.1 Freezing fresh food
5.1.2 Recommendations for preserving
5.1.3 Placing the food
5.1.7 Crisper bins (In some model)
5.1.9 Humidity controlled crisper
6. Maintenance and cleaning
6.1 Avoiding bad odors
6.2 Protecting the plastic surfaces
1. Fridge Compartment2. Freezer Compartment3. *Wi Board 4. Celing Display5. Adjustable Glass Shelf6. Crisper7. Chiller8. Half Door Shelf9. Gallon Door Shelf10. Top Drawer11. Bottom Drawer12. *Ice box / Ice-Making (in Freezer Compartment) *Option Your Refrigerator
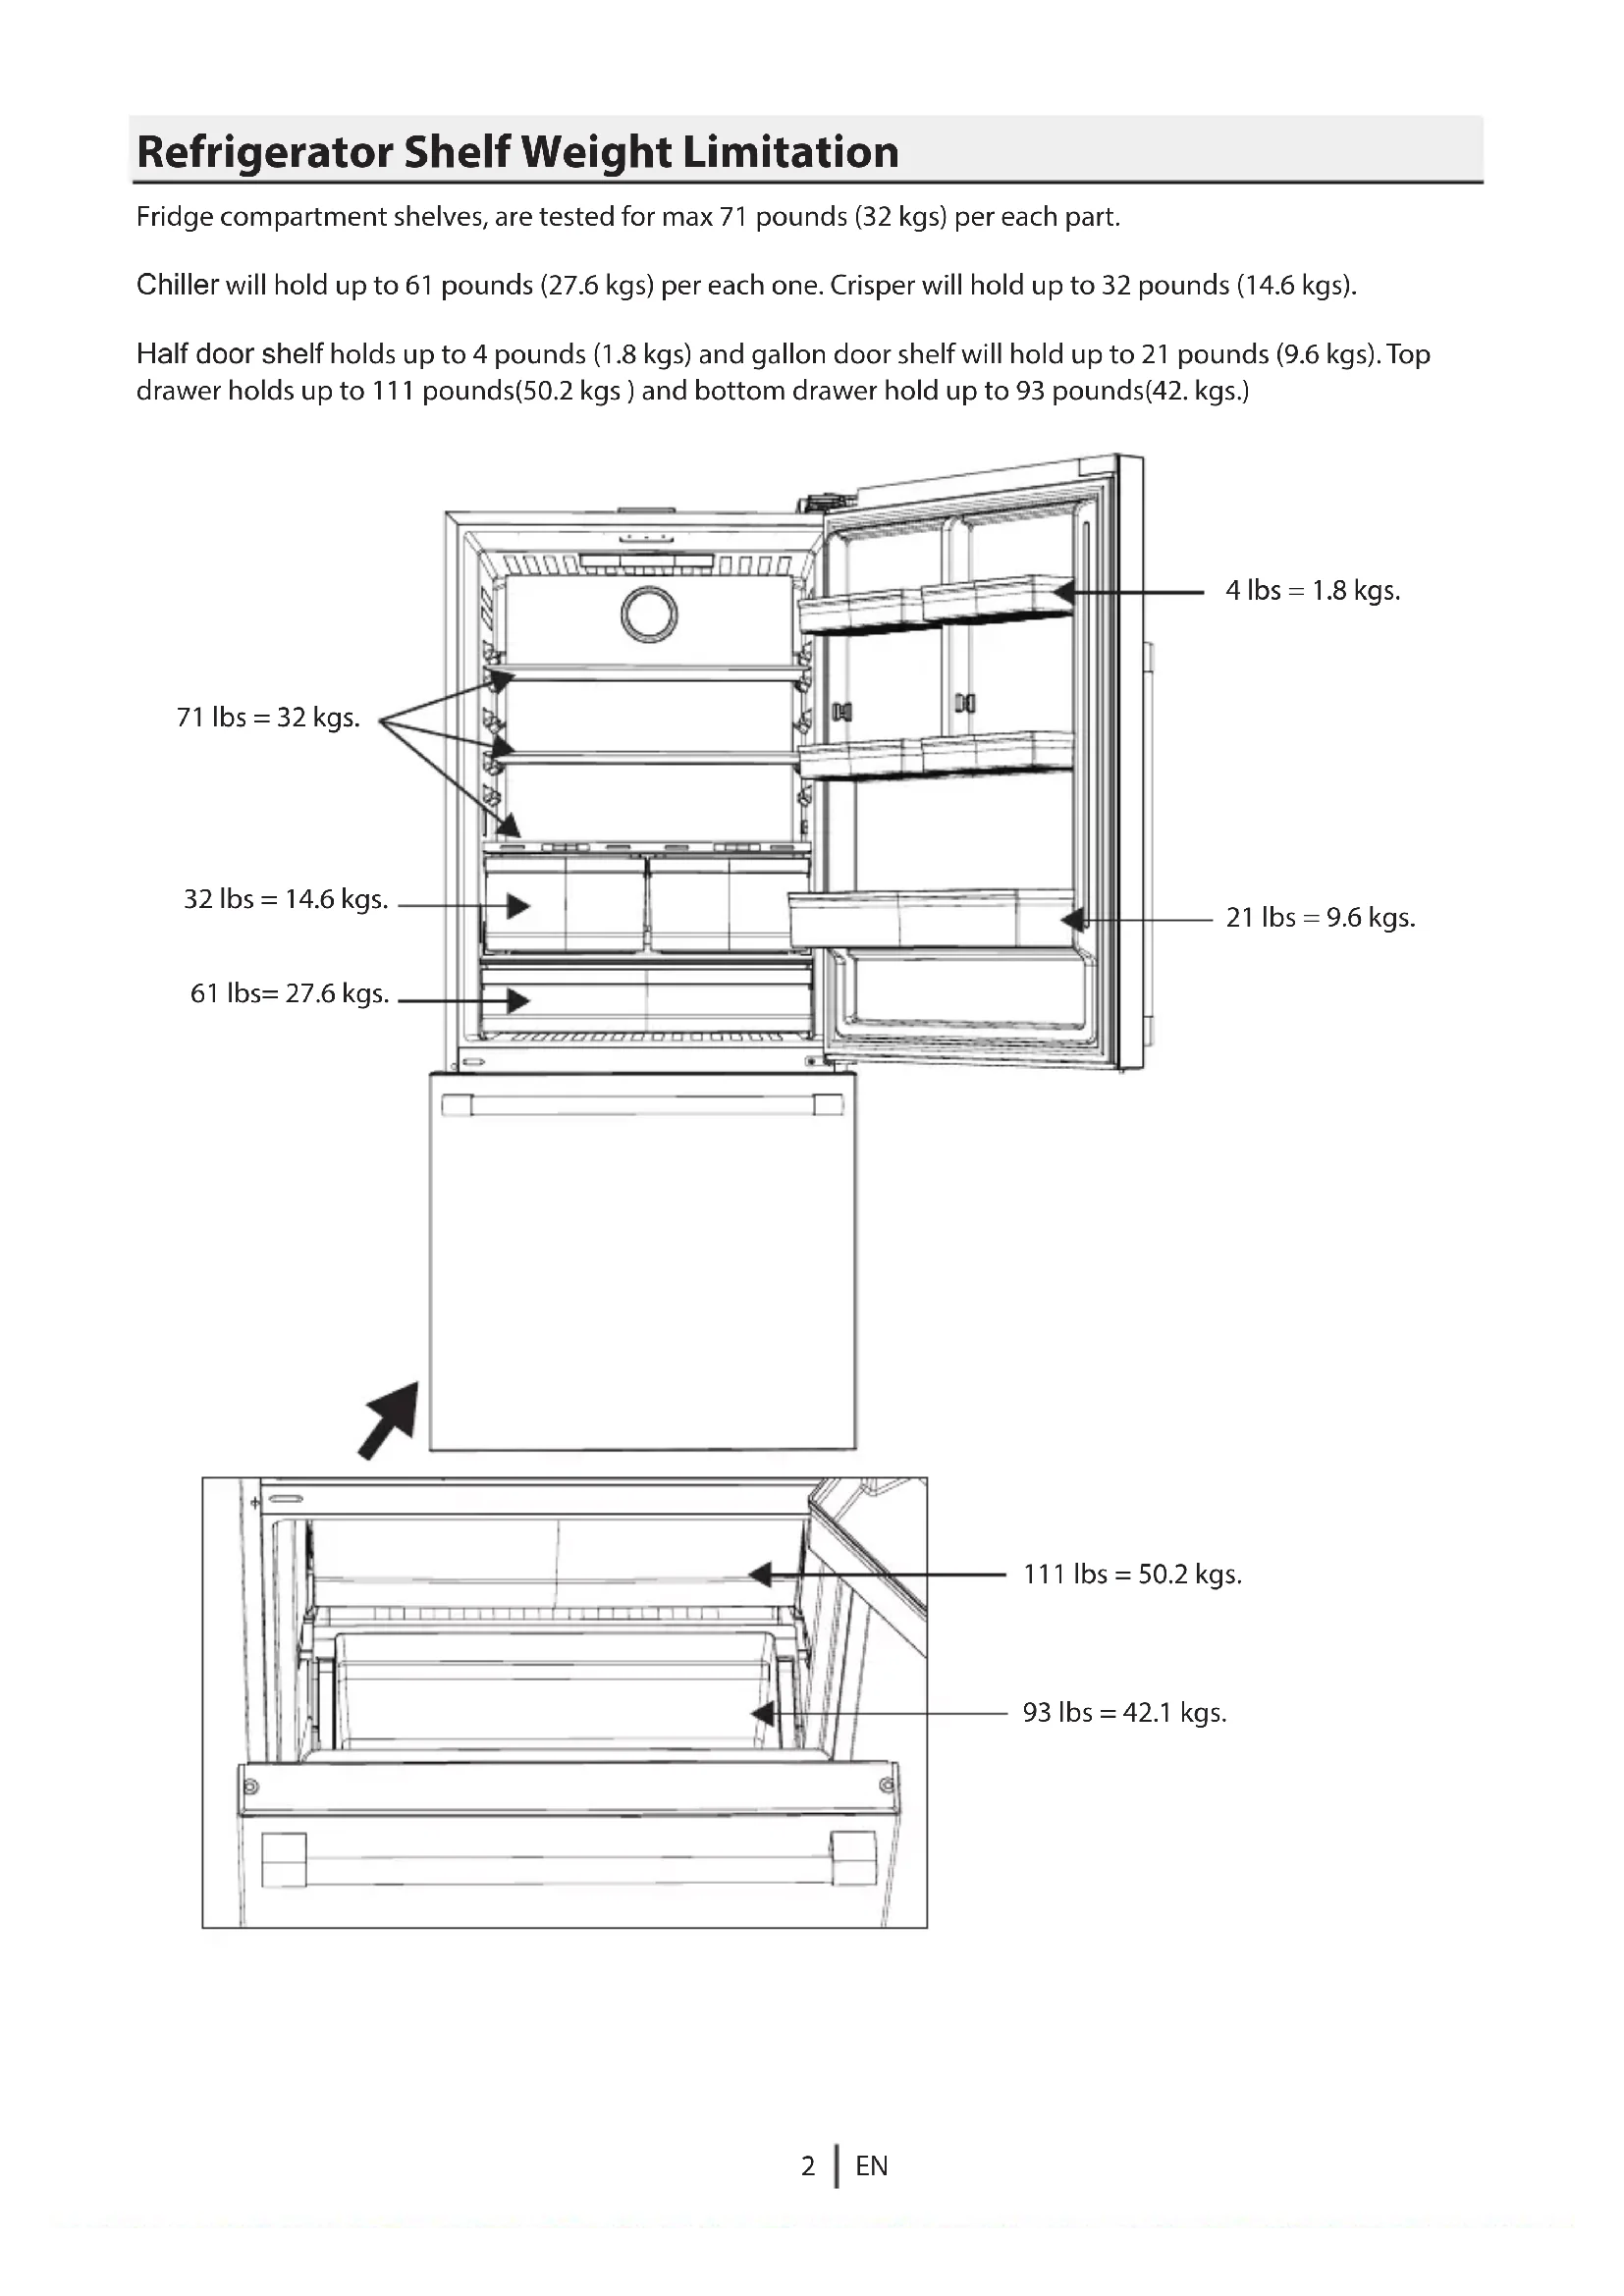
Refrigerator Shelf Weight Limitation Fridge compartment shelves, are tested for max 71 pounds (32 kgs) per each part. Chiller will hold up to 61 pounds (27.6 kgs) per each one. Crisper will hold up to 32 pounds (14.6 kgs). Half door shelf holds up to 4 pounds (1.8 kgs) and gallon door shelf will hold up to 21 pounds (9.6 kgs). Top drawer holds up to 111 pounds(50.2 kgs ) and bottom drawer hold up to 93 pounds(42. kgs.) 32 lbs = 14.6 kgs. 71 lbs = 32 kgs. 61 lbs= 27.6 kgs. 111 lbs = 50.2 kgs. 93 lbs = 42.1 kgs. 21 lbs = 9.6 kgs. 4 lbs = 1.8 kgs.This section contains safety instructions that will help protect from risk of personal injury or property damage. Failure to follow these instructions shall void any warranty.
- If the product has a failure, is should not be operated unless it is repaired by the Authorized Service Agent. There is the risk of electric shock!
- Connect the product to a grounded outlet protected by a fuse complying with the values on the rating plate. Have the grounding installation made by a qualied electrician. Our company shall not be liable for any damages that or arise when the product is used without grounding in accordance with the local regulations.
- Do not tuck the power cord under the product. Do not put heavy items on the power cord. The power cord should not be bent, crushed, come into contact with any heat source.
- Never wash the product by spreading or pouring water onto it! There is the risk of electric shock!
- Never touch the plug with wet hand! Never unplug by pulling on the cable, always pull out by grabbing the plug.
- Do not plug in refrigerator if the wall outlet is loose.
- Never connect your refrigerator to electricity-saving systems. Such systems are harmful for the product.
- Unplug the product during installation, maintenance, cleaning and repairing procedures.
- Always have the installation and repairing procedures carried out by the Authorized Service Agent. The Manufacturer shall not be held liable for damages that may arise from procedures carried out by authorized persons.
- Do not put bottled and canned liquid beverage in the freezer compartment. They may burst!
- Never use the parts on your refrigerator such as the door and drawer as a means of support or step. This will cause the product to tip over or parts of it get damaged.
- Do not use gaseous sprays near the product since there is the risk of re or explosion!
- Flammable items or product that contain ammable gases (e.g. spray) as well as the explosive materials should never be kept in the appliance.
- Do not place containers lled with liquid on top of the product. Spilling water on an electrical component may cause electric shocks or risk of re.
- Do not store product (vaccines, temperature-sensitive medicines, scientic materials and etc.) that require a precise temperature control in the refrigerator.
- If you will not operate the product for a long period of time, unplug and unload the food in it.
- Do not overload the product. It may fall when the door is opened, and cause injury or damage. Similar problems may occur in case of putting things on top of the product.
- Pay attenton not to have your hand or any part of your body get caught by the moving parts inside theproduct. and the risks it brings out. Children must not play with the product. Cleaning and maintenance works should not be performed by children unless they are supervised by someone.
- Unplug the product if a failure occurs while it is in use.
openings, in the appliance enclosure or in the built-in structure, clear of obstruction.
WARNING : Do not use
mechanical devices or other means to accelerate the defrosting process, other than those recommended by the manufacturer.
WARNING : Do not damage the
appliances inside the food storage compartments of the appliance, unless they are of the type recommended by the manufacturer.
- This product can be used by children at and above 8 years old and by persons whose physical, sensory or mental capabilities were not fully developed or who lack experience and knowledge provided that they are supervised or trained on the safe usage of the product Important instructions for safety and environment
- If your product’s cooling system contains R600a: This gas is ammable. Therefore, pay attention to not damaging the cooling system and piping during usage and transportation. In the event of damage, keep your product away from potential re sources that can cause the product catch a re and ventilate the room in which the unit is placed. The type of refrigerant used in your product can be found on the serial tag, located on the left side wall, inside the Fresh Food Compartment.
WARNING : Never dispose of the
2.1.2 For products with a water dispenser
- Pressure for cold water inlet shall be maximum 90 psi (620 kPa). If your water pressure exceeds 80 psi(550kPa), use a pressure limiting valve in your mains system. If you do not know how to check your water pressure, ask for the help of a professional plumber.
- If there is risk of water hammer eect in your installation, always use a water hammer prevention equipment in your installation. Consult Professional plumbers if you are not sure that there is no water hammer eect in your installation.
- Do not install on the hot water inlet.
- Take precautions against of the risk of freezing of the hoses. Water temperature operating interval shall be 33°F (0.6°C) minimum and 100°F (38°C) maximum.
- Use only potable water.
- This product has been designed for domestic use. It is not suitable for commercial use and it must not be used out of its intended use.
- Product must be used only for storing food.
- The manufacturer waives any responsibility arising from incorrect usage or transportation.
2.3 Children’s safety
- Children must be supervised to prevent them from tampering with the product.
2.4 Package information
- Packaging materials of the product are manuafacturered from recyclable materials in accordance with our National Environment Regulations. Do not dispose of the packaging materials together with the domestic or other wastes. Take them to the packaging material collection points designated by the local authorities. « Contact qualied personnel for disposal. »
2.5 HomeWhiz (May not be applicable for all
- Follow the safety warnings even if you are away from the product while operating the product via HomeWhiz app. Also, pay attention to the warnings in the app.
DANGER: Risk of child entrapment.
Before you throw away your old refrigerator or freezer:
- Leave the shelves in place so that children may not easily climb inside.
Important instructions for safety and environment
Overall Top of cabinet Include handle Not includehandle Cabinet
Depth-Cabinet only “C” “M” (24 / ”)620mm
Depth-Cabinet only “C” “I” (24 / ”)620mm
Overall Top of cabinet Include handle Not includehandle Cabinet
24 ”(620mm) Cabinet 25 / ”(650mm) Countertop Top View Recessed electrical outlet Allow 1 ” (30 mm) min, clearance at rear for proper air circulation and water/electrical connections 1/2’’ on EACH side. Minimum Clearances - 2” on the top, 1/2” on each side, and 1 3/16 in the back.
Allow 2” (50 mm) min. clearance between the top of refrigerator and bottom of cabinetry.• Installation should be performed by an Authorized Installer with the necessary equipment. If electrical supply does not meet the listed requirments above, an Authorized Electrician should make all necessary changes.
- Make sure that sucient room is provided around the appliance to ensure free air circulation.
- For proper functionality, there should be a gap of at least 1 3/16” (30 mm) between the refrigerator and the rear wall. To ensure this, attach the gray, rectangular buers, to be installed on the top rear of the refrigerator. These are shipped inside the crisper drawer in the Fresh Food compartment.
3.1 Before Installation
Preparation of the location and electrical installation at the place of installation is the customer's responsibility. Plumbing: The refrigerator should only be connected to the cold water line.
WARNING : Installation and
electrical connections of the product must be carried out by the AuthorizedService Agent. Manufac- turer shall not be held liable for damages that may arise from procedures carried out by unautho- rised persons.
WARNING : Prior to installation,
visually check if the product has any defects on it. If so, do not have it installed. Damaged products cause risks for your safety. If two refrigerators are to be installed side by side, there should be at least 4 cm 1 1/2”distance between them.
3.2 Appropriate installation location
- Install the product at least 12”(30 cm) away from heat sources such as cooktops, ovens, space heaters, radiators and stoves at least 2” (5 cm) away from electrical ovens. Product must not be subjected to direct sun light and kept in humid places after installation.
- Do not place the product on the materials such as rugs or carpets.
- Place the product on an even oor surface to prevent wobbling.
- Do not install the product in places where the temperature falls below 50F°/10ºC.
3.3 Inset installations
- If the product will be installed within surrounding cabinetry or in an alcove, be sure there is adequate airow around the product for proper functionality. This refrigerator requires at least 2” from the top of the unit to the ceiling or enclosure, 1/2” on each side and 1 3/16” in the back.
- the spacer is shipped with the product
3.4 Electrical connection
- 120VAC, 60Hz, Dedicated 15Amp Circuit.
- GFCI outlets will provide added protection, but any failure of the GFCI could cause food spoilage, which is not covered by the manufacturer’s warranty.
- Electrical connection must comply with national regulations.
- Power cable plug must be within easy reach after installation.
- Do not make connections via extension cables or multi-plu gs.
- Before installing, be sure the opening measurements are sucient to receive the product and that the appropriate electrical and plumbing connections are present. Max Operating pressure :Max pressurefor limting valve devicerequirement :
Unscrew before installing the spacer.Install the spacer and screw.Rear of unit with installed spacers.
3WARNING : Damaged power cord must be replaced by the Authorized Service Agents.
WARNING : If the product has a
failure, it should not be operated unless it is repaired by the Authorized Service Agent! There is the risk of electric shock!
WARNING : First unplug the
product. Product must not be plugged in when adjusting the feet. There is the risk of electric shock!
3.6 Illumination lamp
Do not attempt to repair yourself but call the Authorized Service Agent if the LED lights do not go on or are out of order. The lights used in this appliance is not suitable for household room illumination. The intended purpose of this lights is to assist the user to place foodstus in the refrigerator/freezer in a safe and comfortable way.
3.5 Adjusting the feet
After moving the refrigerator into place, we recommend lowering the feet to secure the product in place. You can also adjust the feet if the product is not balanced. Twist the feet in the desired direction according to the illustration below.
3.7 Door/Drawer Open Warning
An audio warning signal will be given when the door of your product is left open for 1 minute. This warning will be muted when the door is closed. Installing door handles Step 1 : Position the top handle over handle mounts.Step 2 : Tighten the set screw on the top pedestal in clockwise direction to secure the handle onto the door.
1. Handle Assemblies x 2
Step 3 : Tighten the set screw on the bottom pedestal in clockwise direction to secure the handle onto the door. Step 5 : Tighten the set screw on the left pedestal in clockwise direction to secure the handle onto the door. Step 6 : Tighten the set screw on the right pedestal in clockwise direction to secure the handle onto the door. Step 7 : Assembly completed Step 4 : Position the lower handle over handle mounts.3.9 Transportation of the product
1. Unplug the product before transporting it.
2. Remove water connections.
3. Secure the shelves, accessories, crisper and etc. in
the refrigerator by adhesive tape before repackaging it. Packaging must be tied with thick tape or strong ropes and the rules of transportation printed on the package must be followed.
WARNING : Packaging materials
are dangerous for the children. Keep packaging materials in a safe place away from reach of the children.
Points to be paid attention to when the relocation of the refrigerator
1. Your refrigerator should be unplugged.Before
transportation of your refrigerator, it should be emptied and cleaned.
2. Before it is re-packaged, shelves, accessories, crisper,
etc. inside your refrigerator should be xed with adhesive tape and secured against impacts. Package should be bound with a thick tape or sound ropes and the transportation rules on the package should be strictly observed.
3. Original packaging and foam materials should be
kept for future transportations or moving. Connecting the water hose to the refrigerator
- Connect the water line to a water supply valve. If a valve is not present or you are not sure, consult a qualied plumber. Connecting the water line to the water supply
1. Slip the union (B) on to the water hose (A)
2. Push the water hose downwards rmly to slip it onto the
water inlet valve (C). 3.Tighten the union (C) by hand to ecure it onto the water inlet valve.Normally, you are not required to tighten the union with a tool.However, you can use a wrench or pliers to tighten the union if there is a leakage.
WARNING: Connect to potable
WARNING: Fill With Potable
Water Only. Before you start the refrigerator, Check the following before you start to use your refrigerator:
1. Clean the interior of the refrigerator as
recommended in the “Maintenance and cleaning” section.
2. Connect the plug of the refrigerator to the wall
socket. When the fridge door is opened, fridge internal lamp will turn on.
3. When the compressor starts to operate, a sound will
be heard. The liquid and gases sealed within the refrigeration system may also give rise to noise, even if the compressor is not running and this is quite normal.
4. Front edges of the refrigerator may feel warm. This is
normal. These areas are designed to be warm to avoid condensation.
4.1 Placing and Installation
If the entrance door of the room where the refrigerator will be installed is not wide enough for the refrigerator to pass through, then carefully remove the doors of your refrigerator and pass it sideways through the door.Preparation
1.With the upper door closed, remove the single screw in the hinge cover. 3.Close the upper door and remove the 3 screws securing the hinge plate and disconnect reed switch cable. 4.Open the door and tilt it 10-15 degrees and lift it o the bottom hinge. 2.Open the door, take o the hinge cover remove ambient sensor from cover.
3. Open upper door then tilt-up top drawer and
4.2 Door and Drawer Removal
1. Open drawer door to maximum position
2. Remove ice container from top drawer6. Fault Condition Indicator:
This indicator ( ) shall be active when your refrigerator cannot perform adequate cooling or in case of any sensor error. “E” shall be displayed on
7. Fresh Food Compartment Symbol:
The temperature values of the cooling compartment is displayed on the screen when this symbol is active.
8. Ice Maker O icon (*optional):
The ice cubes with a slash through them will be illuminated when the ice maker is turned on.
9. Fresh Food Compartment Temperature Setting
Key: Allows setting of temperature for Fresh Food Compartment Pressing this key will enable the Fresh Food Compartment temperature to be set at 46, 44, 43, 41,39, 37, 36 and 34 Fahrenheit. 10.QuickFreezing Key: When the quick reeze key is pressed, the quickfreeze symbol ( ) shall be illuminated and the quickfreeze function shall be activated. Freezing compartment temperature is set to 16 Fahrenheit. Function is cancelled when the key is pressed again. The quick freezing function shall be automatically cancelled after 24 hours. To freeze a large amount of fresh food, press the quick freeze key before placing the food in the freezer compartment.
Press the Fresh Food Temp Set Function key for 3 seconds to activate or deactivate the Sabbath Mode. When Sabbath Mode is activated, the display, alarm, door opening or light buttons will not function. "SA" will appear in the display. The cooling algorithm is set according to the sabbath fashion. If the user does not deactivate the Sabbath mode, the refrigerator will automatically cancel it in 72 hours.
12. Ice Maker on/o key (*optional):
Press and hold the Freezer Temp Set key for 3 seconds to turn the Ice Maker on and on. 1.On/O Function: This function ( ) allows you to make the Fridge turn o when pressed for 3 seconds. The fridge could be turned on by pressing On/O button for 3 seconds again . When the function is active, all indicators turn o.
2. Wireless connection (*optional) key:
A long press on the button(3seconds) starts the product’s rst introduction to the homenetwork. During the connection establishment process, the wireless network icon ( ) will ash at 0.5 sec intervals. When the connection to the home network is success- ful,the wireless network icon lights up continuously. After the rst connection has been established, the connection can be activated/deactivated by briey pressing this button. After turning the power o and on, it will automatically remember and establish a connection to your network. The wireless network icon will ash briey (at 0.2 sec intervals) until the connection is established.
Press the key for 3 seconds to activate the vacation function. Vacation mode is activated and the vacation symbol ( ) is illuminated. “- -” shall be displayed on the Fresh Food Compartment temperature indicator and the Fresh Food Compartment does not actively perform cooling. You shall not keep your food in the Fresh Food Compartment when this function is activated. The Freezer Comparment will continue to operate at its set temperature. Press the key for 3 seconds again to cancel this function.
4. Freezing Compartment Temperature Setting
Key: Temperature setting is made for cooler compartment. Pressing this key will enable the freezer compartment temperature to be set at 0, -4, -6, -8, -9, -11 Fahrenheit
5. Freezing Compartment Symbol:
The temperature values of the freezing compartment is displayed on the screen when this symbol is active.
Touch-control indicator panel allows you to set the temperature and control the other functions of the refrigerator. Just press the relevant buttons for function settings.5.1.3 Placing the food
5.1.4 Deep-freeze information
You can keep the freshness of food for many months (at 5°F / -15°C or lower temperatures in the deep freeze).
5.1.5 Removing door shelves
You can remove the door shelves to clean them. Push the desired shelf up to remove it. Do not remove the door shelf when there is food in it. First, empty the food inside them.
You can remove the glass shelves to clean them. Be careful when removing the shelves since they are heavy.
(in some models) Crisper bins allow you to prepare the food for freezing. You can also use these compartments to store your food at a temperature a few degrees below the fridge compartment. You can increase the inner volume of your refrigerator by removing any of the chiller compartments:
1. Pull the compartment towards yourself until it stops.
2. Lift the compartment about 7/16’’ (1cm) up and pull
towards yourself to remove it from its seating.
- Pen Various frozen food such as meat, sh, ice cream, vegetables and etc. Food in pans, covered plates and closed containers Small and packaged food or beverage (such as milk, fruit juice, beer and etc.) Vegetables and fruits Delicatessen products (cheese,butter, salami and etc.) Freezer compartment shelves Fridge compartment shelves Fridge compartment door shelves Fresh zone compartment Crisper Pack the food in an airtight manner to prevent them from drying even if they are going to be stored for a short time.
5.1.1 Freezing fresh food
- Wrap the food or place them in a covered container before putting them in the refrigerator.
- Hot food and beverages must cool down to room temperature before putting them in the refrigerator.
- The food that you want to freeze must be fresh and in good quality.
- Pack the food in an airtight manner to prevent them from drying even if they are going to be stored for a short time.
- Materials to be used for packaging must be tear-proof and resistant to cold, humidity, oils and acids and they must also be airtight. All packaging must be completely sealed.
- Frozen food must be used immediately after they are thawed and they should never be refrozen.
- Do not freeze excessively large quantities of food at one time.The quality of the food is best preserved when it is frozen right through to the core as quickly as possible.
- Placing warm food into the freezer compartment causes the cooling system to operate continuously until the food is frozen solid.
5.1.2 Recommendations for preserving frozen food
To ensure the quality achieved by the frozen food manufacturer and food retailler is maintained, follow the steps listed below:
1. Put packets in the freezer as quickly as possible
2. Make sure that contents of the package are labelled
on he packaging are exceeded or not. Divided the food into portions according to your family’s daily or meal based consumption needs.
Food Storage and Compartment Usage
5.15.1.8 Deli Drawer
The Deli Drawer is designed with cool air circulation intensied around it. This allows for items stored in the drawer to be generally fresh food compartment than average Fresh Food temperatures. If required, remove door shelves prior to Deli Drawer removal
5.1.9 Humidity controlled crisper (EverFresh+)
Humidity levels of the vegetables and fruit are kept under control with the feature of humiditycontrolled crisper and the food is ensured to stay fresh longer. We recommend you to place the leafy vegetables such as lettuce, spinach and the vegetables which are sensitive to humidity loss, in a horizontal manner as much as possible inside the crisper, not on their roots in a vertical position. Certain fruits such as pears, apricots, peaches or apples generate high levels of ethylene gas. Do not place them with other fruits and vegetables which do not, as this will cause them to decompose faster.
5.1.10 Harvest Fresh
Crispers of the refrigerator are illuminated with blue light. Food stored in the crispers continue their photosynthesis by means of the wavelength eect of blue light and thus, preserve their freshness and preserves their vitamin content.
Odor lter in the air duct of the fridge compartment prevents build-up of unpleasant odors in the refrigerator. While the vegetables are being placed, individual weights of the vegetables should be taken into consideration. Heavy and hard vegetables should be put at the bottom of the crisper and the lightweight and soft vegetables should be placed on top. Never leave vegetables inside the crisper in their bags. This will cause them to decompose prematuraly. If you wish to keep vegetables separate, use perforated paper bags or similar materials to do so.
Food Storage and Compartment Usage 5.1Using HomeWhiz.
HomeWhiz - Refrigerator Wireless Connection Steps The steps below are for adding your refrigerator to your network for the rst time. If you have installed before, you can skip to the 10th and 11th steps. Warnings : Bluetooth and Wireless network connections must be turned on in your phone to connect to the product. Location permission must be given when making a wireless connection with the product. Application notications must be turned on when the application is downloaded and used. (If warning notications are o, information such as door open, high temperature alarm will not be sent to your mobile device as a notication.) AppStore application store for your From the IPhone, IPad mobile device, IPad mobile device, for your Android mobile device from the Google Play store You can download the latest version of HomeWhiz application and install it on your mobile device and you can install it by following the following step.
1. Open the HomeWhiz application on your device. If you have not created an account, click on “
Create Account ” and follow the instructions to set up a HomeWhiz account. If you already have an account, login by entering your e-mail and password associated with that account When the connection is active, the wireless network icon will light up continuously. If the connection cannot be established for a certain period of time, check your modem/connection settings. HomeWhiz application is used as the connection interface. The connection steps are described in the HomeWhiz QUICK INSTALLATION GUIDE that comes with the product. See the troubleshooting section for answers to basic questions.Note that the WiFi card consumes an average of 0.1 W when the WiFi is button is o, and an average of 0.4 W when the product is connected to a strong signal WiFi network.EN
6. Refrigerator Product Code is found on the label
located on the side wall of the refrigerator. Go to the next step by entering the 10-digit code on the label. 7.Installation steps are also explained in the application. After reading the relevant texts, go to the next step.
2. Make sure that Location Services and Bluetooth are
turned on while using the application.
3. Click the ADD DEVICE button on the My Devices
4. Select Refrigerator under the Kitchen Devices title.
5. Select Wi-Fi and Bluetooth as the connection
9. Select the wireless home network to which the
refrigerator will be connected and enter the network password.
10. Complete the setup by giving a name for the
product and adding the device to a group.
8. To bring the device to setup mode : The wireless
connection button on the display on the product must be pressed for 3 seconds. In this way, the product setup mode is opened. In the meantime, the wireless connection icon on the display blinks slowly (0.5 second intervals). Note : Your mobile device’s Location Services and Bluetooth must be turned on im order to proceed with the next step.EN
12. By pressing the button shown in the picture, you
can access the options. (Information, Settings etc.)
13. Once your product is set up it will save the
wireless network information. If there is a power outage, the network information will be retained in memory and a connection will automatically be reestablished.
14. You can turn the wireless connection feature o
and on by pressing the wireless connection button on the sidplay of your refrigerator. After turning it o and on, it will automatically remember your network and establish a connection.
11. You can check and monitor the status of your product on
the DEVICES screen.Check this list before contacting a servicer. Doing so will save you time and money. This list includes frequent complaints that are not related to faulty workmanship or materials. The refrigerator is not working.
- The power plug is not fully seated. >>> Plug it in outlet completely.
- The Fuse/Circuit Breaker connected to the socket powering the product or the main Fuse/Circuit Breaker is blown. >>> Check the Fuse/Circuit Breaker. Condensation on the side wall of the Fresh Food Compartment.
- The door is opened too frequently >>> Take care not to open the product’s door too frequently.
- The environment is too humid. >>> Do not install the product in humid environments.
- Foods containing liquids are kept in unsealed holders. >>> Keep the foods containing liquids in sealed holders.
- The product’s door is left open. >>> Do not keep the product’s door open for long periods.
- The thermostat is set to too low temperature. >>> Set the thermostat to appropriate temperature. Compressor is not working.
- In case of sudden power failure or pulling the power plug o and putting back on, the gas pressure in the product’s cooling system is not balanced, which triggers the compressor thermic safeguard. The product will restart after approximately 6 minutes. If the product does not restart after this period, contact a servicer.
- Defrosting is active. >>> This is normal for a fully-automatic defrosting product. The defrosting is carried out periodically.
- The product is not plugged in. >>> Make sure the power cord is plugged in. The life of the product is extended and service problems are decreased if the product is cleaned at regular intervals.
- Never use gasoline, benzene or similar substances for cleaning purposes.
- Never use any sharp and abrasive tools, soap, household cleaners, detergent and wax polish for cleaning.
- Dissolve one teaspoon of baking soda in half litre of water. Soak a cloth with the solution and wring it thoroughly. Wipe the interior of the refrigerator with this cloth and dry thoroughly.
- Make sure that no water enters the lamp housing and other electrical items.
- If you will not use the refrigerator for a long period of time, unplug it, remove all food inside, clean it and leave the door ajar.
- Check regularly that the door gaskets are clean. If not, clean them.
- To remove door and body shelves, remove all of its contents.
- Remove the door shelves by pulling them up. After cleaning, slide them from top to bottom to install.
- Never use cleaning agents or water that contain chlorine to clean the outer surfaces and chromium coated parts of the product. Chlorine causes corrosion on such metal surfaces
6.1 Avoiding bad odors
Materials that may cause odor are not used in the production of our refrigerators. However, due to inappropriate food preserving conditions and not cleaning the inner surface of the refrigerator as required can cause the problem of odor . Pay attention to following to avoid this problem :
- Keeping the refrigerator clean is important. Food residuals, stains, etc. can cause odor. Therefore, clean the refrigerator with baking soda dissolved in water every 15 days. Never use detergents or soap.
- Keep the food in closed containers. Microorganisms spreading out from uncovered containers can cause unpleasant odors.
- Never keep the food that is past its expiration date or has spoiled in the refrigerator.
6.2 Protecting the plastic surfaces
Do not put liquid oils or oil-cooked meals in your refrigerator in unsealed containers as they damage the plastic surfaces of the refrigerator. If oil is spilled or smeared onto the plastic surfaces, clean and rinse the relevant part of the surface at once with warm water. Maintenance and cleaning
20• The temperature setting is incorrect. >>> Select the appropriate temperature setting.
- The power is out. >>> The product will continue to operate normally once the power is restored. The refrigerator’s operating noise is increasing while in use.
- The product’s operating performance may vary depending on the ambient temperature variations. This is normal and not a malfunction. The refrigerator runs too often or for too long.
- The new product may be larger than the previous one. Larger products will run for longer periods.
- The room temperature may be high. >>> The product will normally run for long periods in higher room temperature.
- The product may have been recently plugged in or a new food item is placed inside. >>> The product will take longer to reach the set temperature when recently plugged in or a new food item is placed inside. This is normal.
- Large quantities of hot food may have been recently placed into the product. >>> Do not place hot food into the product.
- The doors were opened frequently or kept open for long periods. >>> The warm air moving inside will cause the product to run longer. Do not open the doors too frequently.
- The freezer or Fresh Food Compartment door may be ajar. >>> Check that the doors are fully closed.
- The product may be set to temperature too low. >>> Set the temperature to a higher degree and wait for the product to reach the adjusted temperature.
- The Fresh Food Compartment or freezer door washer may be dirty, worn out, broken or not properly settled. >>> Clean or replace the washer. Damaged / torn door washer will cause the product to run for longer periods to preserve the current temperature. The freezer temperature is very low, but the Fresh Food Compartment temperature is adequate.
- The freezer compartment temperature is set to a very low degree. >>> Set the freezer compartment temperature to a higher degree and check again. The Fresh Food Compartment temperature is very low, but the freezer temperature is adequate.
- The Fresh Food Compartment temperature is set to a very low degree. >>> Set the freezer compartment temperature to a higher degree and check again. The food items kept in Fresh Food Compartment drawers are frozen.
- The Fresh Food Compartment temperature is set to a very low degree. >>> Set the freezer compartment temperature to a higher degree and check again. The temperature in the Fresh Food Compartment or the freezer is too high.
- The Fresh Food Compartment temperature is set to a very high degree. >>> Temperature setting of the Fresh Food Compartment has an eect on the temperature in the freezer compartment. Wait until the temperatureof relevant parts reach the sucient level by changing the temperature of Fresh Food Compartment or freezer compartments.
- The doors were opened frequently or kept open for long periods. >>> Do not open the doors too frequently.
- The door may be ajar. >>> Fully close the door.
- The product may have been recently plugged in or a new food item is placed inside. >>> This is normal. The product will take longer to reach the set temperature when recently plugged in or a new food item is placed inside.
- Large quantities of hot food may have been recently placed into the product. >>> Do not place hot food into the product. Shaking or noise.
- The ground is not level or durable. >>> If the product is shaking when moved slowly, adjust the stands to balance the product. Also make sure the ground is suciently durable to bear the product.
- Any items placed on the product may cause noise. >>> Remove any items placed on the product. The product is making noise of liquid owing, spraying etc.
- The product’s operating principles involve liquid and gas ows. >>> This is normal and not a malfunction. There is sound of wind blowing coming from the product.
- The product uses a fan for the cooling process. This is normal and not a malfunction.
There is condensation on the product’s internal walls.
- Hot or humid weather will increase icing and condensation. This is normal and not a malfunction.
- The doors were opened frequently or kept open for long periods. >>> Do not open the doors too frequently; if open, close the door.
- The door may be ajar. >>> Fully close the door. There is condensation on the product’s exterior or between the doors.
- The ambient weather may be humid, this is quite normal in humid weather. >>> The condensation will dissipate when the humidity is reduced. The interior smells bad.
- The product is not cleaned regularly. >>> Clean the interior regularly using sponge, warm water and carbonated water.
- Certain holders and packaging materials may cause odour. >>> Use holders and packaging materials without free of odour.
- The foods were placed in unsealed holders. >>> Keep the foods in sealed holders. Micro-organisms may spread out of unsealed food items and cause malodour. Remove any expired or spoilt foods from the product. The door is not closing.
- Food packages may be blocking the door. >>> Relocate any items blocking the doors.
- The product is not standing in full upright position on the ground. >>> Adjust the stands to balance the product.
- The ground is not level or durable. >>> Make sure the ground is level and suciently durable to bear the product. The vegetable bin is jammed.
- The food items may be in contact with the upper section of the drawer. >>> Reorganize the food items in the drawer. If The Surface Of The Product Is Hot.
- High temperatures may be observed between the two doors, on the side panels and at the rear grill while the product is operating. This is normal and does not require service maintenance!Be careful when touching these areas.
If the problem persists after following the instructions in this section, contact your vendor or an Authorised Service. Do not try to repair the product.
- This product can expose you to chemicals including Nickel (Metallic) which is know to the state of California to cause cancer.
- For more information go to www.P65Warnings.ca.gov
- Note : Nickel is a component in all stainless steel and some other metal components.FCC Notice The following notice covers the transmitter module contrained in this product. This equipment has been tested and found to comply with the limits for a Class B digital device, pursuant to
Part 15 of the FCC rules. These limits are designed to
provide reasonable protection against harmful interference in a residental installed. This equipment generates, uses, and can radiate radio frequency energy and, if not installed and used in accordance with the insttructions, may cause harmful interfer- ence to radio communications. However, there is no guarantee that interference will not occur in a particular installation. If this equipment does cause harmful interference to radion or television reception, which can be determined by turning the equipment o and on, the user is encouraged to try to correct the interference by one ro more of the following measure
- Reorient or relocate the receiving antenna.
- Increase the separation between the equipment and the receiver.
- Connect the equipment into an outlet on a circuit dierent from that to which the receiver is connected.
- Consult the dealer or an experienced radio/TV technician for help. This device complies with part 15 of the FCC rules. Operation is sucject to the following two conditions : (1) This device may not cause harmful interference and (2) This device must accept any interterence received, including interference that may cause undesired operation. Any changes or modications in construction of this device which are not expressly approved by the party responsible for compliance could void that user’s authority to operate the equipment. FCC RF Radiation Exposure Statement This equipment complies with FCC radiation exposure limits set forth for an uncontrolled environment. This transmitter must not be colocated or operating in conjunction with any other antenna or transmitter. This equipment should be installed and operated with a minimum distance of 20 cm (7.8 inches) between the antenna and your body. Users must follow the specic operating instructions for satisfying RF exposure compliance. Industry Canada Statement This device contains licence-exempt transmitter(s) receiver(s) that comply with Innovation, Science and Economic Debelopment Canada’s licence exempt RSS(s). Operation is sucject to the following two conditions : (1) This device may not cause interference. (2) This device must accpet any interference, including interference that may cause undersired operation of the device. IC Radiation Exposure Statement This equipment complies with IC radiation exposure limits set forth for an uncontrolled environment. This equipment should be installed and operated with a minimum distance of 20 cm (7.8 inches) between the antenna and your body. NOTE
- THE MANUFACTURER IS NOT RESPONSIBLE FOR ANY RADIO OR TV INTERFERENCE CAUSE BY
THE USER’S AUTHORITY TO OPERATE THE EQUIPMENT.The warranties provided by Beko in these statements only apply to Beko appliance sold to the original purchaser or homeowner in the US (Including Alaska and Hawaii). The warranty is not transferable. To obtain warranty service, please contact your dealer or contact us at www.beko.us/support/ You will need your product model number, serial number, retailer name and address, where purchased and purchase date / installation date. This warranty gives you specic legal rights, and you may also have other rights which vary from state to state. Also, please make sure you register your product for warranty at www.beko.us/product-registration-en/ 2 year (*) full warranty from date of rst Installation Beko will repair or replace at no cost to the consumer any defective parts product if used under normal household conditions(warranty is void if the product is used commercially e.g., bed + breakfast, nursing home etc.) Service must also be performed by an authorized Beko service agency. (Cosmetic defects must be reported within 10 business days from installation). 1 year warranty on the accessories is for the parts only and does not include labor. 3rd thru 5th year (*, **) Sealed System Warranty on refrigerators - Parts Only Beko will provide (No Charge) any compressor, evaporator, condenser and lter Dryer to the consumer if material defects or workmanship have caused the damage or failure of these components. (Trip and Labor charges are the responsibility of the consumer) Disclaimers of warranties and exclusions: Warranty does not cover service costs by an authorized service agent to correct installation, electrical problems or educational instruction on the use of the electric and gas ranges. The warranty also does not cover defects or damage caused by an act of God (such as storms, oods, res, mudslides, etc.), damage cause by use of the electric and gas ranges for purposes other than those for which it was designed, misuse, abuse, accident, alteration, improper installation, maintenance, travel fees, service calls outside normal service hours, pick up and delivery, any food loss due to product failure, unauthorized service work or work. This product is fully tested and went through ocial quality assurance inspections before leaving the original manufacturing site. Warranty terms for this Beko household appliance is not valid if the product is altered, tampered, modied, additional parts assembled, xed and re-packed by an authorized distributor, servicer, a third party retailer, reseller or by any other unauthorized person(s). TO THE EXTENT PERMITTED BY LAW, THIS WARRANTY IS IN LIEU OF ALL OTHER EXPRESSED
AND IMPLIED WARRANTIES, INCLUDING THE
QUALITY OF THIS PRODUCT EXCEPT AS
BUYING THIS PRODUCT, EXCEPT AS OTHERWISE
PROVIDED IN THIS WARRANTY STATEMENT. Beko does not assume any responsibility for incidental or consequential damages. Such damages include, but are not limited to, loss of prots, loss of savings or revenue, loss of use of the electric and gas ranges or any associated equipment, cost of capital, cost of any substitute equipment, facilities or services, downtime, the claims of third parties, and injury to property. Some states do not allow the exclusion or limitation of incidental or consequential damages, so the above limitations or exclusion may not apply to you. (*) Installation date shall refer to either purchase date or 5 business days after delivery of the product to the home, whichever is later. (**) Parts replaced will assume the identity of the original parts + their original warranty. No Other Warranties. This Warranty Statement is the complete and exclusive warranty from the manufacturer. No employee of Beko or any other party is authorized to make any warranty statements in addition to those made in this Warranty Statement. Please keep this warranty card, user manual and your sales slip for future reference.
Please contact your local authorized Beko dealer, or call our Toll Free Customer Hotline number at 1-888-352 BEKO (2356) for direction to an Authorized Beko Service Agent or contact via http://www.beko.us . You can also look up for authorized dealer list at “Where To Buy” section at the website for further reference. WARRANTY STATEMENT FOR THE BEKO REFRIGERATORSRéfrigérateur Manuel d’utilisation
- The freezer compartment temperature is set to a very low degree. >>> Set the freezer compartment temperature to a higher degree and check again. The Fresh Food Compartment temperature is very low, but the freezer temperature is adequate.
- The Fresh Food Compartment temperature is set to a very low degree. >>> Set the freezer compartment temperature to a higher degree and check again. The food items kept in Fresh Food Compartment drawers are frozen.