Esperto Abile - Coffee machine LA PAVONI - Free user manual and instructions
Find the device manual for free Esperto Abile LA PAVONI in PDF.
Download the instructions for your Coffee machine in PDF format for free! Find your manual Esperto Abile - LA PAVONI and take your electronic device back in hand. On this page are published all the documents necessary for the use of your device. Esperto Abile by LA PAVONI.
USER MANUAL Esperto Abile LA PAVONI
Instructions for use of models ESPERTO Dear Customer, Thank you for having purchased one of our products, which has been manufactured using the latest technological innovations. By carefully following some simple instructions regarding the correct use of our product in compliance with the essential safety instructions indicated in this manual, you will be able to obtain the best performance and enjoy the remarkable reliability of this product over the years. In case of faults, please contact one of our Service Centres that are at your disposal from now on.
SYMBOLS USED IN THIS MANUAL
Important information is indicated by these symbols. It is imperative that you comply with these instructions. Please read the instructions manual carefully before using the appliance. Caution! Particularly important and / or dangerous operations. Information (useful for using the appliance). Advice. Operations that can be carried out by the user Operations that should only be carried out by a qualied technician. Electrical appliances must not be disposed of together with household waste. Devices marked with this symbol are subject to European Directive 2012/19/EU All waste electrical and electronic appliances must be disposed of separately from domestic waste and taken to authorised waste disposal facilities. Disposing of the used appliance correctly, will help to safeguard the environment and human health. For further information regarding the disposal of used appliances, please contact your local authorities, the waste disposal department or the shop where the appliance was purchased.
4–6. TOPPING UP THE BOILER WITH WATER 26
5–3. CLEANING THE STEAM PIPE 29
MANUAL 1–1. INTRODUCTION This instructions manual is an integral part of the machine. It should be read carefully and kept readily available for reference for the entire service life of the machine. If the manual is lost or damaged, you can request a replacement from an authorised SERVICE CENTRE. The manual contains information regarding the proper use of the machine, its cleaning and maintenance. It also provides information about operations to be carried out that require particular attention and possible residual risks. The manual reects the technological innovations at the time it was drafted. The manufacturer reserves the right to make any necessary technical modications to its products and to update the manuals with no obligation to revise previous versions. LA PAVONI S.p.A. declines any liability for damage or injury that may be caused directly or indirectly to people or property due to:
- the failure to comply with all the requirements of current safety regulations;
- incorrect installation;
- defective power supply;
- improper or incorrect use of the machine;
- uses other than those specied in this manual;
- lack of or incorrect maintenance;
- unauthorised modications or repairs;
- the use of non original or non model- specic spare parts;
- complete or partial failure to follow the instructions;
- exceptional events. 1–2. MACHINE FUNCTION This machine has been designed for the home preparation of espresso coee using coee blends, the production of hot water and/or steam, and the preparation of hot milk. In order to use the machine properly, the user must carefully read and understand the instructions provided in this manual.
1–3. INTENDED USE OF THE MACHINE
The LEVA models can dispense: - drinks made from ground coee - hot water and steam for preparing and warming drinks - warm milk - milk and coee drinks. 1–4. IDENTIFICATION PLATE The identication plate bears the technical data, serial number and brand name of the appliance. Do not remove the identication plate for any reason.
2–1. SAFETY INSTRUCTIONS This appliance is intended for household use. Moreover, it cannot be used: - in kitchen areas provided for employees in shops, oces and other working environments; - in farms/farm stay facilities - by guests in hotels, motels and residential environments; - in bed and breakfasts.
- The user must comply with the safety regulations in force in the country where the machine is used, in addition21
to using common sense and the instructions provided in this manual.
- To ensure that machine works correctly and provides a long service, we recommend that you make sure that the environmental conditions are correct (room temperature should be between 5°C and 35°C). Avoid using the machine in places where jets of water are used or in outdoor environments that are exposed to the weather (sun, rain etc.).
- After removing the machine from its packaging, make sure that it is intact and has not been damaged.
- The packaging should be taken to a proper waste disposal centre. Under no circumstances should it be left unattended where children, animals or unauthorized persons may have access to it.
- Before switching on the machine, make sure that the power supply indicated on the data plate, located under the base of the machine, is the same as the one used in your country.
- Put the machine in a safe position on a solid surface, away from heat sources and out of the reach of children.
- The machine must not be used in a recess.
- Before connecting or disconnecting the machine, make sure that the ON/OFF switch is in the OFF position.
- Unplug the machine from the power outlet when it is not in use and before cleaning it, without pulling the power cable.
- Do not use the machine if it is not working properly or if the power cable or plug are damaged; if the power is damaged, contact an authorised SERVICE CENTRE.
- Do not touch the hot surfaces (boiler, group head, lter holder, steam supply nozzle) to avoid burns.
- The surfaces (boiler, group head, lter holder, steam nozzle) remain very hot after use due to residual heat. Do not touch the hot surfaces in order to avoid burns.
- Do not remove the lter holder while coee is being dispensed to avoid possible burns.
- Do not open the boiler cap when the machine is in operation or still under pressure to avoid possible burns. First switch the machine o, then slowly unscrew the steam knob and wait until all the steam has been discharged via the relative pipe. Then remove the cap.
- Under no circumstances place your hands under the group head or the steam supply nozzle as the liquids or steam delivered are hot and may cause burns.
- Do not remove the lter holder immediately after having dispensed coee, wait for a few seconds to allow any residual pressure to be released in order to avoid possible burns.
- Make sure there is water in the reservoir before switching on the coee machine to avoid damaging the heating element.
- To avoid damaging the machine, only use accessories or replacement parts approved by the manufacturer.
- In the case of faults or malfunction, switch of the machine. Do not attempt to repair it yourself. Contact an authorised SERVICE CENTRE to have any worn or damaged parts replaced.
- Unauthorized repairs or the use of non-original spare parts will void the warranty and relieve the manufacturer of all liability.
- Do not use the machine outdoors.
- To avoid re, electric shock or injury, do not immerse the machine, the power cable or any other electrical22
components in water.
- Before carrying out cleaning or maintenance, switch o the machine by placing the ON/ OFF switch on the OFF position and remove the plug from the power socket without pulling the power cable.
- This espresso machine has been designed for household use only. Any servicing or repairs, with the exception of normal cleaning and maintenance must be carried out by an authorized Service Centre.
- Do not ll the reservoir with warm or hot water. Use cold water only.
- Do not immerse the machine in water.
- This appliance may be used by children from the age of 8 provided they are supervised or instructed on the safe use of the appliance and they understand the associated risks.
- Cleaning and maintenance may be performed by children from the age of 8 as long as they are appropriately supervised.
- Keep the appliance and its cord out of reach of children under the age of 8 years.
- Children must never play with the appliance.
- The appliance may be used by people with reduced physical, sensory or mental capabilities or who lack experience and knowledge if they are supervised or instructed on the safe use of the appliance by someone who is responsible for their safety and if they understand the hazards involved. 2–2. IMPROPER USE Any improper use of the machine will void the warranty and relieve the manufacturer of all liability for damage to property and / or injury to persons. Improper use includes:
- any use other than the one specied in the instructions manual
- any intervention carried out on the machine that does not comply with the instructions given in this manual
- any use following unauthorized modications to components or safety devices
- use of the machine outdoors. 2–3. RESIDUAL RISKS It is not possible to safeguard the user against direct jets of steam or hot water. He/she should therefore be extremely careful when using the machine to avoid scalds or burns.
- The manufacturer declines any liability for damage to property or injury to people or animals, due to interventions on the machine by unqualied or unauthorized persons.
2–4. INSTRUCTIONS REGARDING THE
POWER CABLE A short power-supply cable is provided to reduce the risk of it becoming twisted or tripping over it. Any extension cables should be used with great care. If an extension cable is used, make sure that:
- The voltage indicated on the extension cable is at least equal to the voltage of the appliance.
- It is tted with a three-pin grounded plug (if the appliance cable is of this type).
- The cable does not hang from the table to avoid the risk of becoming caught in it.23
The base mat is fastened to the machine with a special Torx screw to prevent tampering with electrical parts. For any type of maintenance or if the power cable has to be replaced, please contact an authorised SERVICE CENTRE. 2–5. IMPORTANT INSTRUCTIONS When using household electrical appliances, several precautions should be taken to reduce the risk of re, electric shock, and/or accidents.
not immerse the power cable, plugs, or the appliance in water or in any other liquid.
3. Take special care when using the
espresso machine when children are present.
4. Remove the plug from the power
outlet when the machine is not in use and before cleaning. Allow the appliance to cool before installing or removing parts and before cleaning.
5. Do not use the machine if it is faulty
or malfunctioning or if the power cable or plug is damaged. Have the appliance checked or repaired at the nearest service centre.
6. The use of accessories not approved
by the manufacturer may cause damage or personal injury.
7. Make sure that the espresso
machine is switched o before putting the plug into the power outlet. To switch it o, make sure that the relative switch has not been pressed (button ush with the frame).
8. Take great care when using steam.
9. When the machine is switched o
and cooling down, the lever may move upwards by itself. This is caused by a vacuum forming inside the boiler.
10. If the machine is not used very
often, switch it o by placing the ON/OFF switch in the OFF position and remove the power plug from the outlet without pulling the cable.
2. Safety valve – condensation
8. Grid and drip tray
18. Measuring scoop for one cup of
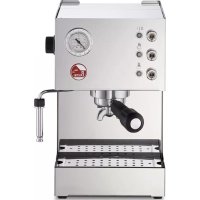
4–1. ELECTRICAL CONNECTION Before connecting the machine, make sure that the mains power voltage is the same as the one indicated on the data plate located under the base of the machine. 4–2. INSTALLING COMPONENTS
- Place the grid (8) on the base of the product, making sure that the notch faces towards the body of the machine.
- Screw the knob onto the lever by turning it clockwise.
- Unscrew the boiler cap (3) by turning it anticlockwise.
- Prepare a solution of water and two teaspoons of bicarbonate of soda in a container. Wait for the bicarbonate of soda to dissolve completely; then pour the solution into the boiler (9). Alternatively, instead of using bicarbonate of soda, prepare a solution of water with one tablespoon of white vinegar in a container and pour it into the boiler.
- Make sure that the lever (1) is down; if necessary pull it down fully.
- Screw the boiler cap (3) onto the boiler by turning it clockwise and make sure that the cap and the steam knob (4) are properly closed.
- Place the lter holder (10) into the group head (11) and secure it by moving it from right to left.
- Insert the power plug into an electric socket having a suitable voltage.
- Place the switch (6) to ON and wait for the machine to reach the required pressure (approximately 5 minutes).
- Place a container under the group head (11) and slowly lift the lever (1) until it is fully raised. Hold it in this position in order to discharge all the water contained in the boiler.
- Next, switch the machine o and remove the plug from the power outlet. Turn the steam knob (4) anticlockwise and wait until all the steam has been discharged from the steam pipe (12).
- Fill the boiler again with clean water and rinse the inside of the machine to eliminate any residues left by the solution.
4–4. STARTING THE MACHINE
- Fill the boiler (9) with a sucient quantity of water for the amount of coee you wish to make. The water should not exceed the top of the level glass (5) and should not fall below the lower part of the level glass.
- Press the switch (6). It will light up to indicate that the machine is powered. At the same time, the indicator light (7) will also switch on to indicate that the heating element has been activated.
- When the pointer of the pressure gauge (13) reaches the green zone, slowly open the steam knob (4) by turning it anticlockwise to discharge the “false pressure caused by air left in the boiler. Then close it by turning it clockwise and wait for the pointer of the pressure gauge to move back into the green zone.
- The machine has now reached the correct pressure and is ready for use.
- It is normal for the light (7) to switch on and o. This is due to the pressure switch that is automatically regulating the pressure of the boiler.25
- If the machine runs out of water while in operation, the safety thermostat will trigger and disconnect power to the machine. In this case, the thermostat has to be reset (see section 6 - Troubleshooting). 4–5. DISPENSING COFFEE
- Select the correct lter basket, small (19) for 1 cup and large (20) for 2 cups and place it into the lter holder (10). Only use the 20 g lter (21) with the “Fascino" lter holder (22).
- Insert the lter holder and wait for the group head (11) to reach the correct temperature (90°C-95°C), indicated on the plate (15). In the meantime, get the cups, coee, milk ready.
- After it has reached the right temperature, remove the lter holder (10 or 22) and ll a lter basket (19- 20-21) with ground coee using the measuring scoop (18) provided. Consider one scoop for each cup of coee.
- Press the coee the coee using the tamper (17) provided and clean any residue from the edge of the lter (Fig. A). The 1-cup lter basket (19) is suitable for pods. When putting the pod into the lter basket, make sure that the lter paper does not extend beyond the edge of the lter holder.
- Hold the machine steady by holding the handgrip of the lever (1) and insert the lter holder (10-22) into the group head (11). Secure it by turning it slightly from right to left.
- Position the cup or cups under the spouts of the lter holder.
- Move the lever (1) upwards (while holding the handle of the lter holder with your left hand to keep the machine steady). Hold it in this position for a few seconds (Fig. C).
- Then lower it as far as it will go in order to dispense coee (Fig. D).
- The pressure gauge (14) allows the pressure exerted on the coee to be controlled and modied while it is being dispensed in order to obtain the best possible result with every kind of coee or blend.
- Repeat this procedure according to the amount of coee required.
- After having dispensed a coee, make sure that the temperature indicated on the plate (15) is between 90°C and 95°C. If it is higher, we recommended that you wait a few minutes to allow the group head to return to the right temperature in order not to dispense burnt coee.
- After having prepared the coee, leave the lever (1) in the down (rest) position so that any water remaining in the boiler does not leak out from the group head (11), and switch the machine o. Before dispensing one or more cups of coee, make sure that the level of the water in the boiler does not fall below the minimum.
- To obtain a good cup of coee, it is important that you use a good quality, well roasted and correctly ground coee.
- The espresso coee machine requires nely ground coee. If the coee is too coarsely ground, the coee will be light coloured and weak without froth and if the coee is too nely ground the espresso will be dark and strong and have little froth.26
- To obtain steady coee delivery, the pressure exerted on the lever must be proportional to the resistance met by the lever when the coee is dispensed.
- Before dispensing the rst cup of coee, we suggest that you lift the lever (1) completely and dispense a cup of hot water. This will heat the group head (11), the lter holder and the lter.
- It is normal for water to drip from the lter holder after the coee has been dispensed.
- Do not remove the lter holder immediately after dispensing coee. Wait a few seconds to allow any residual pressure between the lter and the shower screen to discharge.
- After a coee has been dispensed, the lter holder (10-22) should be slowly removed from the group head (11), moving it from left to right and exerting a light downwards pressure, to help release any residual pressure and avoid possible burns.
4–6. TOPPING UP THE BOILER WITH
WATER Once the water in the boiler has run out, rell it as follows:
- Place the switch (6) in the o position before unscrewing the cap (3).
- Slowly turn the steam knob (4) anticlockwise and wait for all the steam in the boiler to be discharged from the specic pipe (12).
- Remove the lter holder (10-22) and slowly lift the lever (1). Keep the lever raised to allow the steam and water contained in the boiler to discharge through the group head.
- We recommend that you use a container to collect the steam and water and that you take great care since the steam and water that are discharged are very hot and may cause scalding.
- When the steam and water stop discharging, slowly unscrew the boiler (3). Then ll the boiler.
- Before screwing the boiler cap (3) back on, move the lever (1) to the rest position and close the steam knob (4) by turning it clockwise.
- Do not open the boiler cap (3) when the machine is in operation or still under pressure in order to avoid possible burns.
- Regularly check the amount of water in the boiler through the level glass (5). The lack of water when the machine is in operation may cause the heating element to burn out. 4–7. DISPENSING STEAM
- After having made sure that there is the correct amount of water in the boiler and having followed the procedure for bringing the machine to the correct pressure, make sure that the lever (1) is in the down (rest) position and leave it in this position. Before heating any drinks:
- Place a container under the steam pipe (12).
- Turn the steam knob (4) anticlockwise to eliminate any condensation that has formed in the boiler.
- Then open the steam knob further to allow the required amount of steam to be dispensed (Fig. B).
- When nished, close the steam knob by turning it clockwise.
- To obtain a large amount of steam, the level of the water in the boiler should be about halfway up27
- We recommend that you dispense steam for a maximum of 2 minutes to obtain maximum steam delivery performance.
- The user is not protected against direct jets of steam or hot water. Take great care when carrying out these operations.
- The temperature of the steam is approximately 100°C. Take great care when carrying out this procedure, to avoid possible scalding.
4–8. PREPARING A CAPPUCCINO WITH
- Half ll a tall narrow container with the milk to be prepared.
- Immerse the steam pipe (12-12a) until it touches the bottom of the container and slowly turn the steam knob (4) anticlockwise.
- Move the container slowly up and down for a few seconds until you obtain a froth.
- To make a cappuccino, add the hot frothed milk to the coee that is already in the cup.
CAPPUCCINO MAKER The traditional steam pipe (12) should be replaced with the Automatic Cappuccino maker (23) (an optional accessory on the models with a black base) before starting the machine. Proceed as follows:
- Make sure the machine is switched o
- Make sure that the steam knob (4) is closed.
- Using the tool (F) provided, turn the headless screw on the tap body clockwise (Fig. E1) to release the steam nozzle.
- Turn the steam pipe (12) clockwise until it stops. Then remove the steam pipe from its seat by pulling it towards the right (Fig. E2).
- Insert the Automatic Cappuccino maker (23) onto the steam nozzle, pushing it upwards until the nozzle rests against the tting. Then tighten the locking ring by turning it clockwise.
- Insert the Automatic Cappuccino maker (23) into its seat by pushing it towards the left (Fig. F). Turn the Automatic Cappuccino maker (23) anticlockwise until it stops.
- Using the tool (F) provided, turn the headless screw (E) on the tap body anticlockwise (Fig. E3) to lock the automatic cappuccino maker in position. Make sure that the headless screw (F) is always in the locked position during operation. CAPPUCCINO PREPARATION After the machine has reached the required pressure, as descried in section 4.4, proceed as follows:
- Insert the suction tube (26) (B-Fig. F) into the milk container next to the machine.
- Place the cup containing the previously prepared coee under the nozzle of the Automatic Cappuccino maker and open the steam knob (4) by turning it anticlockwise. This will start to dispense hot milk, with abundant froth.
- To stop dispensing, close the steam knob (4) by turning it clockwise.
- You can regulate the froth by adjusting the pin (C) (Fig. F), of the28
Automatic Cappuccino maker to get the required consistency of the froth.
- Move the pin upwards to obtain a froth with a greater volume.
- Remove any milk residues each time the Automatic Cappuccino maker is used. To replace the steam pipe (12), carry out the same procedure described above for installing the automatic cappuccino maker.
4–10. PREPARING OTHER HOT DRINKS
Before heating any drinks:
- Place a container under the steam pipe (12).
- Turn the steam knob (4) anticlockwise to eliminate any condensation that has formed in the boiler.
- Place the amount of water needed for the required drink into a container.
- Immerse the steam pipe (12-12a) into the liquid and slowly turn the steam knob (4) anticlockwise.
- Then open the steam knob completely to allow a large quantity of steam to be dispensed, which will bring the liquid to boiling point.
- Then add the contents of sachet of the drink you wish to prepare. HOT CHOCOLATE
- Place the contents of the sachet, already dosed, into a container and slowly add a cup of milk a little at a time whilst mixing carefully.
- Immerse the steam pipe (12-12a) until it touches the bottom of the container, slowly turn the steam knob (4) anticlockwise and bring the drink to boiling point.
- Allow the drink to boil longer if you wish to make it denser. The temperature of the steam is approximately 100°C. Do not for any reason place your hands under the steam pipe. Take great care when doing this in order to avoid possible scalding. 4–11. HOT WATER
- When the machine has reached the correct pressure, hot water can also be obtained by using the Automatic Cappuccino maker (23).
- After having installed the device as described in section 4.9, insert the suction tube (26) into a recipient containing water. Place a container under the nozzle of the Automatic Cappuccino maker and open the steam knob (4) by turning it anticlockwise.
- Once the required amount of hot water has been dispensed, close the steam knob. Do not for any reason place your hands under the Automatic Cappuccino maker because the hot liquid may cause scalding.
5. CLEANING AND MAINTENANCE
Before carrying out any cleaning or maintenance, unplug the power cable from the power outlet without pulling the cable.
5–1. CLEANING THE OUTSIDE OF THE
MACHINE Clean the outside of the machine, the drip tray (8) and the drain well on the base into which it is inserted using a damp cloth and then dry it. Do not use alcohol, solvents, abrasives or detergents, in order to avoid damaging29
the treated surfaces.
5–2. CLEANING THE FILER HOLDER
Regularly clean the lter holder (10-22), the lter (19-20-21) and the shower screen located in the group head (11) with warm water and a neutral detergent to prevent scale and to remove any coee deposits.
Warning: To prevent damaging
the machine, do not use the blind lter for cleaning the group head.
5–3. CLEANING THE STEAM PIPE
To avoid altering the taste of the drinks to be heated and to prevent the holes in the end of the steam pipe from becoming clogged, clean the steam pipe thoroughly with a damp cloth after every use.
5–4. CLEANING THE AUTOMATIC
CAPPUCCINO MAKER Remove any milk residues each time the Automatic Cappuccino maker is used.
- Place a full glass of water next to the machine in which to immerse the Suction tube.
- Proceed as if you were preparing a normal cappuccino, allowing the dirty water to drain into a suitable container.
- To replace the steam pipe (12-12a), follow the instructions in section 4.9.
- In addition to cleaning the Automatic Cappuccino maker after each use, every now and again clean it more thoroughly.
- Turn the threaded locking ring (A) anticlockwise until the steam nozzle is released (Fig. F)
- Remove the cover (D), the pin (C) and the pipe (B) and wash them thoroughly under warm running water to eliminate residues or hardened lumps of milk. Then replace the components in the reverse order.30
The machine does not work and the light of the ON/OFF switch does not turn on
2. The machine is not
plugged in correctly
3. The power cable is
1. Switch the power on
2. Insert the power plug
correctly into the power socket
3. Contact the SERVICE
CENTRE for replacement The light on the ON/OFF switch is lit and the water does not heat up
1. The safety thermostat
2. The heating element is
CENTRE No coffee is dispensed 1. There is no water in the boiler.
2. The coffee is too finely
3. There is too much coffee
4. The coffee has been
1. Put water into the boiler
2. Replace with a coarser
3. Reduce the amount of
coffee in the filter basket
4. Tamp the coffee less
PROBLEM CAUSE SOLUTION
The coffee is dispensed in drops
1. The coffee is too finely
2. There is too much coffee
3. The coffee has been
1. The coffee should be
ground more coarsely
2. Reduce the amount of
3. Tamp the coffee less
The coffee is dispensed too quickly
1. The coffee is too coarsely
2. There is not enough
3. The coffee has not been
4. The coffee is stale or
1. The coffee should be
2. Increase the amount of
3. Tamp the coffee more
4. Replace the coffee
Coffee leaks between boiler unit and the filter holder
1. The filter holder is not
2. There is too much coffee
in the filter basket
3. The edge of the filter
holder has not been cleaned
4. The gasket of the boiler
2. Reduce the amount of
from the edge of the filter holder
No froth forms on the coffee
1. The coffee blend is not
suitable for this type of machine
2. The grinding is unsuitable
3. There is not enough
2. Adjust the coffee grind
3. Increase the amount of
coffee The coffee is too cold 1. The machine had not reached the correct temperature
2. The filter holder had not
3. Scale on the heating
4. Heating element partially
5. The pressure switch is
not working within the required range
1. Follow the instructions
given in section 4.4
2. The filter holder should
be heated at the same time as the water
CENTRE The coffee is too hot 1. The pressure switch is not working within the required range
1. Contact the SERVICE
CENTRE The safety valve whistles and steam is leaking from the valve or from the condensation basin
1. The spring that regulates
the safety valve is blocked
2. The pressure switch is
not working within the required range
CENTRE The machine does not dispense steam
1. The machine has not
reached the correct pressure
2. The holes at the end
of the steam pipe are clogged
3. There is no water in the
4. The steam pipe has not
been inserted properly
5. There is scale on the
2. Clean the holes with a
3. Put water into the boiler
The machine is noisy (vibrates)
1. The coils of the heating
element are too close
2. There is scale on the
1. INTRODUCTION AU MANUEL 34
1. INTRODUCTION AU MANUEL
4–5. KOFFIEAFGIFTE 71
4–6. WATER IN DE KETEL BIJVULLEN 72
4–7. STOOMAFGIFTE 73