
TurboHybrid Vacuum Cleaner - Vacuum Cleaner Klarstein - Free user manual and instructions
Find the device manual for free TurboHybrid Vacuum Cleaner Klarstein in PDF.
| Product type | Cordless stick vacuum with portable function |
| Brand | Klarstein |
| Model | TurboHybrid Vacuum Cleaner |
| Article numbers | 10032944, 10032945 |
| Power supply | 220-240 V ~ 50/60 Hz |
| Battery type | Built-in rechargeable lithium-ion |
| Charging time | Approximately 5 hours for a full charge |
| Runtime | 30 to 50 minutes of continuous use |
| Dustbin capacity | Approximately 0.5 L |
| Weight (approx.) | 2.5 kg |
| Dimensions (approx.) | 110 x 25 x 15 cm |
| Suction speeds | 2 speeds (low and high) |
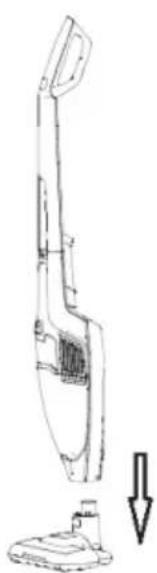
| Portable function | Yes, detachable upper part |
| Included accessories | Motorized brush, crevice tool, small brush, charging station, power adapter |
| Filter | Cyclone filter washable with warm water |
| Maintenance | Clean dustbin, filter and brush after each use |
| Safety | Automatic shutdown in case of overheating (battery >70°C), battery protection |
| Recycling | Do not dispose of with household waste; take to a collection point |
| Manufacturer | Chal-Tec GmbH, Wallstraße 16, 10179 Berlin, Germany |
| UK importer | Chal-Tec UK Limited |
Frequently Asked Questions - TurboHybrid Vacuum Cleaner Klarstein
User questions about TurboHybrid Vacuum Cleaner Klarstein
0 question about this device. Answer the ones you know or ask your own.
Ask a new question about this device
Download the instructions for your Vacuum Cleaner in PDF format for free! Find your manual TurboHybrid Vacuum Cleaner - Klarstein and take your electronic device back in hand. On this page are published all the documents necessary for the use of your device. TurboHybrid Vacuum Cleaner by Klarstein.
USER MANUAL TurboHybrid Vacuum Cleaner Klarstein
CLEANINGCI LEANINGLE ANINGLEAN NINGCLEAN NGCLEANINGCI CLEANINGLE LEANINGLE ANINGLEAN
KLARSTEIN
www.klarstein.com

bar
| Category | Value | | :--- | :--- | | Category 1 | 100 | | Category 2 | 100 | | Category 3 | 100 | | Category 4 | 100 | | Category 5 | 100 | | Category 6 | 100 | | Category 7 | 100 | | Category 8 | 100 | | Category 9 | 100 | | Category 10 | 100 | | Category 11 | 100 | | Category 12 | 100 | | Category 13 | 100 | | Category 14 | 100 | | Category 15 | 100 | | Category 16 | 100 | | Category 17 | 100 | | Category 18 | 100 | | Category 19 | 100 | | Category 20 | 100 | | Category 21 | 100 | | Category 22 | 100 | | Category 23 | 100 | | Category 24 | 100 | | Category 25 | 100 | | Category 26 | 100 | | Category 27 | 100 | | Category 28 | 100 | | Category 29 | 100 | | Category 30 | 100 | | Category 31 | 100 | | Category 32 | 100 | | Category 33 | 100 | | Category 34 | 100 | | Category 35 | 100 | | Category 36 | 100 | | Category 37 | 100 | | Category 38 | 100 | | Category 39 | 100 | | Category 40 | 100 | | Category 41 | 100 | | Category 42 | 100 | | Category 43 | 100 | | Category 44 | 100 | | Category 45 | 100 | | Category 46 | 100 | | Category 47 | 100 | | Category 48 | 100 | | Category 49 | 100 | | Category 50 | 100 | | Category 51 | 100 | | Category 52 | 100 | | Category 53 | 100 | | Category 54 | 100 | | Category 55 | 100 | | Category 56 | 100 | | Category 57 | 100 | | Category 58 | 100 | | Category 59 | 100 | | Category 60 | 100 | | Category 61 | 100 | | Category 62 | 100 | | Category 63 | 100 | | Category 64 | 100 | | Category 65 | 100 | | Category 66 | 100 | | Category 67 | 100 | | Category 68 | 100 | | Category 69 | 100 | | Category 70 | 100 | | Category 71 | 100 | | Category 72 | 100 | | Category 73 | 100 | | Category 74 | 100 | | Category 75 | 100 | | Category 76 | 100 | | Category 77 | 100 | | Category 78 | 100 | | Category 79 | 100 | | Category 80 | 100 | | Category 81 | nan | | Category 82 | nan | | Category 83 | nan | | Category 84 | nan | | Category 85 | nan | | Category 86 | nan | | Category 87 | nan | | Category 88 | nan | | Category 89 | nan | | Category 90 | nan | | Category 91 | nan | | Category 92 | nan | | Category 93 | nan | | Category 94 | nan | | Category 95 | nan | | Category 96 | nan | | Category 97 | nan | | Category 98 | nan | | Category 99 | nan | | Total (Total) | nan | | Total (Category) | nan | | Total (Category) | nan | | Total (Category) | nan | | Total (Category) | nan | | Total (Category) | nan | | Total (Category) | nan | | Total (Category) | nan | | Total (Category) | nan | | Total (Category) | nan | | Total (Category) | nan | | Total (Category) | nan | | Total (Category) | nan | | Total (Category) | nan |INHALTSVERZEICHNIS
Unit 6 Riverside Business Centre
Brighton Road
Shoreham-by-Sea
BN43 6RE
United Kingdom
SICHERHEITSHINWEISE
natural_image
Line drawings of three different vacuum cleaner designs, showing front, side, and side views with no text or symbols.natural_image
Technical line drawing of two hand tools with arrows indicating process flow (no text or symbols)natural_image
Line drawing of a handheld vacuum cleaner with internal mesh structure (no text or symbols)natural_image
Three technical line drawings of mechanical components or assemblies, showing different assembly or assembly states (no text or symbols present)natural_image
Technical line drawing of a mechanical device with internal components and an arrow indicating direction (no text or symbols)natural_image
Technical line drawings of three mechanical components: a housing, a pressure relief device, and a tool holder (no text or symbols present)natural_image
Symbol of a trash bin crossed with a diagonal line, no text or numbers presentCongratulations on purchasing this equipment. Please read this manual carefully and take care of the following hints to avoid damages. Any failure caused by ignoring the items and cautions mentioned in the instruction manual is not covered by our warranty and any liability. Scan the QR code to get access to the latest user manual and other information about the product

CONTENT
Safety Instructions 14
Product Overview 15
Assembly 16
Charging the Vacuum Cleaner 17
Operation 18
Cleaning and Care 19
Hints on Disposal 21
TECHNICAL DATA
| Item number 10032944, 10032945 | |
| Power supply 220-240 V ~ 50/60 Hz |
MANUFACTURER & IMPORTER (UK)
Manufacturer:
Chal-Tec GmbH, Wallstrasse 16, 10179 Berlin, Germany.
Importer for Great Britain:
Chal-Tec UK limited
Unit 6 Riverside Business Centre
Brighton Road
Shoreham-by-Sea
BN43 6RE
United Kingdom
SAFETY INSTRUCTIONS
- Read all instructions before using the vacuum cleaner and save for future reference. To reduce the risk of personal injury or damage to your vacuum, use only recommended accessories.
- Do not leave vacuum unattended when it is plugged in and/or operating. Unplug unit when not in use.
- Never operate this unit when flammable materials or when vapors are present because electrical devices produce arcs or sparks that can cause a fire or explosion.
• Always disconnect the plug from the wall outlet before removing the tank cover.
- Do not allow to be used as a toy. Close attention is necessary when vacuum is in use by or near children.
- Use only as described in this manual. Use only manufacturer's recommended attachments.
- Do not use with a damaged cord, plug, or other parts.
- If your vacuum is not working as it should, has missing parts, has been dropped, damaged, left outdoors, or dropped into water, call customer service.
- Sparks inside the motor can ignite flammable vapors or dust. To reduce the risk of fire or explosion, do not use near combustible liquids, gases, dusts, gasoline or other fuels, lighter fluid, cleaners, oil-based paints, natural gas, coal dust, magnesium dust, grain dust, aluminum dust or gun powder.
- Do not pull or carry the appliance by cord, close a door on cord, or pull cord around sharp edges or corners.
- Do not unplug by pulling on cord. To unplug, grasp the plug firmly.
- Do not handle plug or appliance with wet hands.
- Do not put any object into ventilation openings. Do not vacuum with any ventilation openings blocked; keep free of dust, lint, hair, or anything that can reduce air flow.
- Keep hair, loose clothing, fingers, and all parts of body away from openings and moving parts.
- Turn off the control before unplugging.
- Use extra care when cleaning stairs.
- Do not use to pick up flammable or combustible liquids such as gasoline or use in areas where they may be present.
- Do not pick up anything that is burning or smoking, such as cigarettes, matches, or hot ashes.
- Do not use without filters in place.
• Always unplug this appliance before connecting or disconnecting vacuum hose.
- Store the vacuum indoors. Put the vacuum away after use to prevent tripping accidents.
PRODUCT OVERVIEW
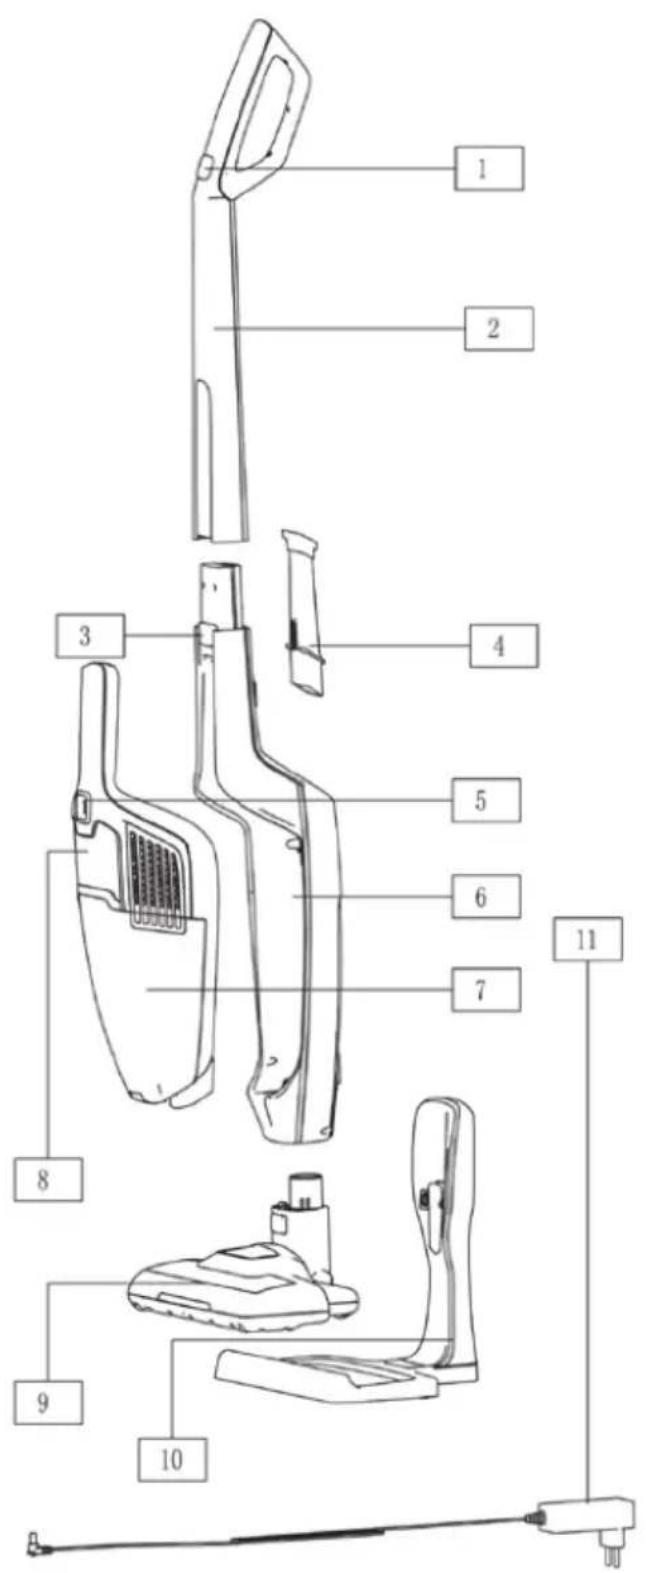
1 Switch button on handle
2 Handle assembly
3 Release button of handy vac
4 Accessories
5 Switch button on
handy vac
6 VC Body assembly
7 Dust cup
8 Front decorative block on handy
9 Electrical brush assembly
10 Charging base
11 Charger
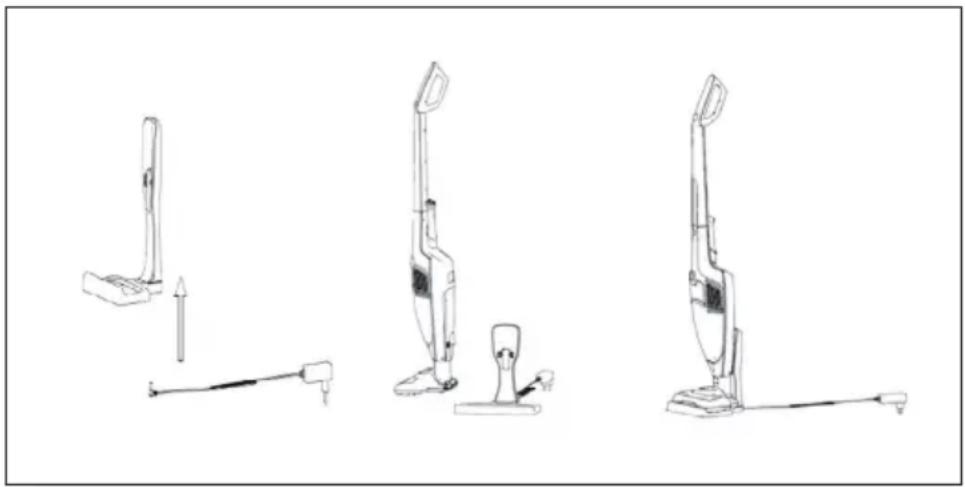
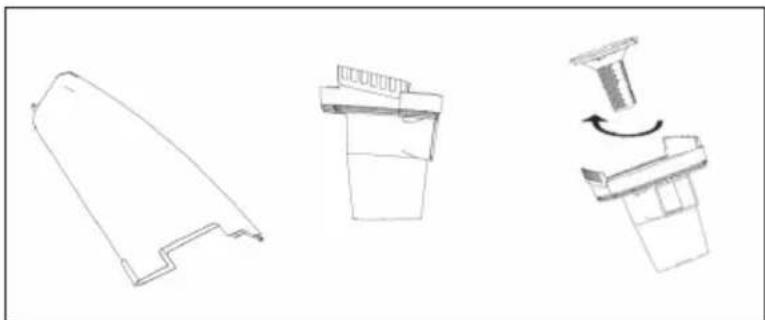
ASSEMBLY
| 1 | |
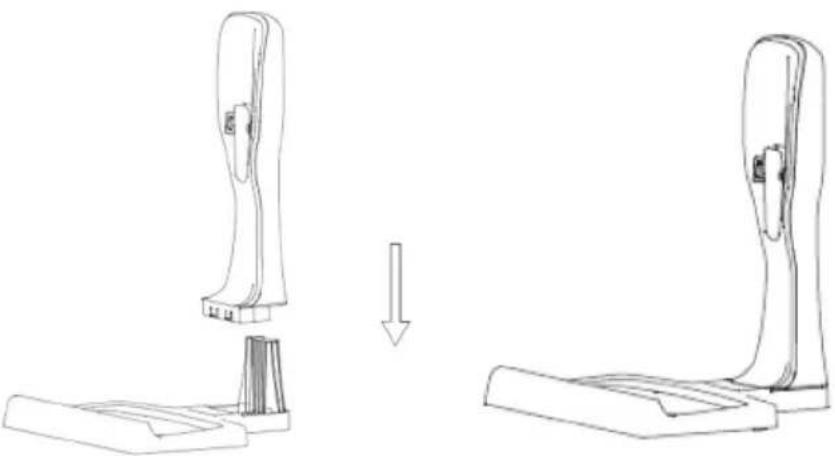 | |
| Install the charging station closely | |
| 2 | 3 |
 |  |
| Install the electrical brush by carefully inserting it into the vacuum compartment. | Position the charging station close to a mains socket (well away from heat sources or wet places). Insert the adaptor into the mains socket and connect the charging station. |
CHARGING THE VACUUM CLEANER
Note: Before using your vacuum cleaner for first time, charging the vacuum cleaner for approximately 5 hours. A fully charged battery will give approximately 30\~50 mins of continuous vacuum cleaning.
- Put the base on a flat, horizontal, stable surface that is not exposed to direct sunlight or humidity, and far from any heat source.
natural_image
Line drawings of three different vacuum cleaner designs with no text or symbols- Make sure the appliance is set to off, put the charger into base, then, plug it into a wall socket.
- The LED light on the handy vac will start blinking to show that the battery is charging, when the battery is fully charged, the LED indicator light should glow solid white (No longer blink)
Notes and tips
- The Charger might warm up during charging, this is normal, it will cool down as soon as the charging process is over
- When you notice the motor is turning less quickly, it means that the battery needs to be charged completely.
- It can be useful from time to time (Once a month) to completely discharge the battery, and then completely recharge it, to maintain optimal performance.
• Recharge after every use - When start to charge the battery, The LED Light start flash, after the electricity is full, the three lights will keep bright for 50 seconds, afterwards, the LED lights will turn off automatically.
Notice About Discharging
The light keep blinking if the battery is with full electricity, when the battery is discharged, the lights will turn off gradually till last one light extinguished.
Note: During discharging process, If the battery surface temperature exceeds 70, the light will keep blinking for 5 seconds, afterwards, the battery will enter into self-protection procedure, battery will cut off the electricity to main vacuum cleaner. When the battery surface temperature goes back to 65, the battery could work again.
OPERATION
- Once your appliance is fully charged. Remove it from the base, hold it by it's handle.
- Switch it on by pressing Switch button on handle or handy vac for cleaning job.
- After complete the cleaning job, press the switch button on handle or handy vac to switch off the appliance, before putting it back into the charging base.
Note: there are two working speed for this appliance, after first switch on, it will run at low speed. After twice pressing the switch button, the appliance will run at high speed.
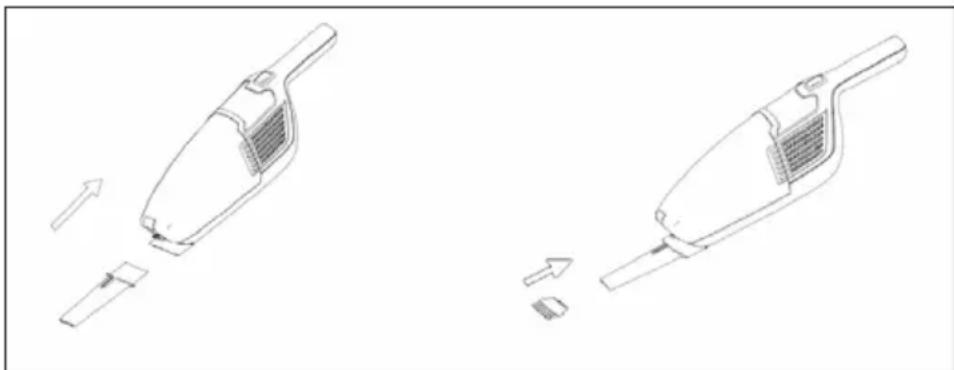
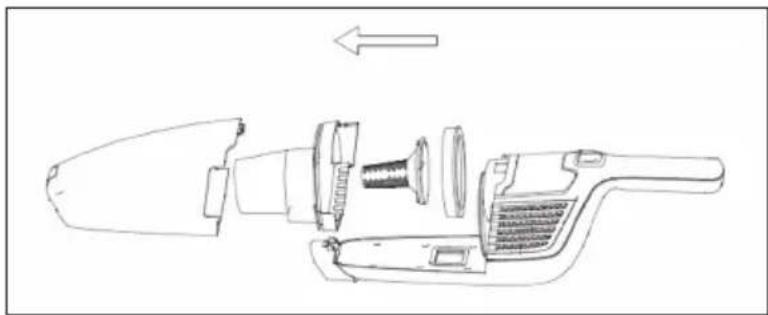
Using the accessories
- Use the motorized brush to clean floors and carpets.
- There are crevice nozzle and small brush as accessories at the backside of handle part, install the nozzle firstly, then install the small brush into crevice nozzle as below picture for cleaning narrow, hard to reach places etcs.
- You should regularly check that brush and accessories are cleaning after next time using.
natural_image
Technical line drawing of two disassembled vacuum cleaner designs with arrows indicating process flow (no text or symbols)Notes: Remove accessories before attempting to place the vacuum cleaner back into it's base, after use, you can store the accessories into their storage on the back side of the body.
CLEANING AND CARE
Cleaning the dust container, filters and brush after each use is extremely important as it allows for optimal use of your appliance and eliminates the unpleasantness of bad smells.
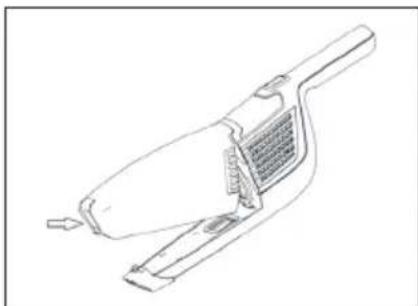
Cleaning of the dust container and filters
- Remove the whole dust container by pressing the release button
natural_image
Line drawing of a handheld vacuum cleaner with internal mesh structure (no text or symbols)- Pulling out the filters and emptying the contents of the dust container into dust bin properly. The filters can be rinsed by warm water if necessary. Make sure that filters are completely dry before assembled again.
natural_image
Three technical line drawings of mechanical components or assemblies, showing front, side, and top views with no visible text or symbols.- Re-install the components as below steps: Firstly, Put the cyclone cover into dust cup, then, re-stall the filters (centrum filter, combed contton) into cyclone cover as below picture. Secondly, Install the dust container following up the opposite procedures as detaching the dust container.
natural_image
Technical line drawing of a handheld device with internal components and an arrow indicating direction (no text or symbols)Cleaning the roller brush
- If the roller brush becomes blocked or jammed for any reason, the vacuum pressure will be lower down. The roller brush may then need to be cleaned.
- First turn off the appliance, then, disconnect the brush from whole unit. You can see bottom of brush as below, take one small tool like a pair of scissors or a sharp knife to remove any items such as threads that may have become entangled.
- If the roller brush needs to be taken out for cleaning, push slip button on the bottom of brush by finger or a coin, remove slip button as below picture, take out the roller brush for cleaning, afterwards, Put the slip button on roller brush and lock it by finger.
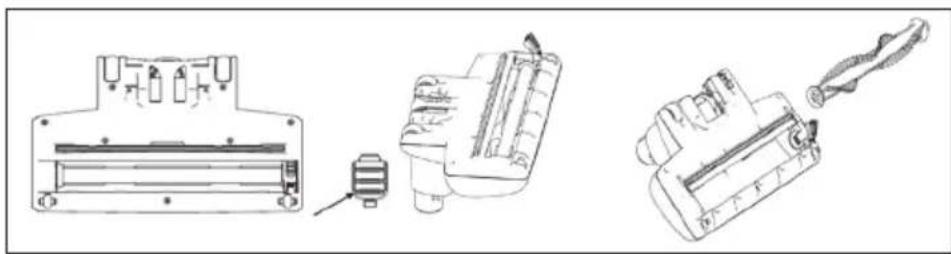
natural_image
Technical line drawings of three mechanical components: a housing, a tool, and a drill bit (no text or symbols present)Note: Keep the range button within your eye sight and keep it out of reach of Children.
HINTS ON DISPOSAL

natural_image
Symbol of a trash bin crossed with a diagonal line, no text or numbers presentIf there is a legal regulation for the disposal of electrical and electronic devices in your country, this symbol on the product or on the packaging indicates that this product must not be disposed of with household waste. Instead, it must be taken to a collection point for the recycling of electrical and electronic equipment. By disposing of it in accordance with the rules, you are protecting the environment and the health of your fellow human beings from negative consequences. For information about the recycling and disposal of this product, please contact your local authority or your household waste disposal service.
This product contains batteries. If there is a legal regulation for the disposal of batteries in your country, the batteries must not be disposed of with household waste. Find out about local regulations for disposing of batteries. By disposing of them in accordance with the rules, you are protecting the environment and the health of your fellow human beings from negative consequences.
Estimado cliente:
ÍNDICE DE CONTENIDOS
Unit 6 Riverside Business Centre
Brighton Road
Shoreham-by-Sea
BN43 6RE
United Kingdom
natural_image
Line drawings of three different vacuum cleaner designs, showing front, side, and side views with no text or symbols.natural_image
Technical line drawing of two hand tools with arrows indicating movement or assembly (no text or symbols)natural_image
Line drawing of a handheld vacuum cleaner with mesh grille and handle (no text or symbols)natural_image
Three technical line drawings of mechanical components or assemblies, showing different shapes and motion indicators (no text or symbols)natural_image
Technical line drawing of a mechanical device with internal components and an arrow indicating direction (no text or symbols)natural_image
Technical line drawings of three mechanical components: a housing, a pressure sensor, and a drill bit (no text or symbols present)natural_image
Symbol of a trash bin crossed with a diagonal line, no text or numbers presentSOMMAIRE
Unit 6 Riverside Business Centre
Brighton Road
Shoreham-by-Sea
BN43 6RE
United Kingdom
CONSIGNES DE SÉCURITÉ
natural_image
Line drawings of three different vacuum cleaner designs with no text or symbolsnatural_image
Technical line drawing of two hand tools with arrows indicating movement or assembly (no text or symbols)natural_image
Line drawing of a handheld vacuum cleaner with internal mesh structure (no text or symbols)natural_image
Technical line drawings of three mechanical components with no visible text or symbolsnatural_image
Technical line drawing of a disassembled tool or device with internal components and an arrow indicating direction (no text or symbols present)natural_image
Technical line drawings of three mechanical components: a housing, a tool, and a drill bit (no text or symbols present)natural_image
Symbol of a trash bin crossed with a diagonal line, no text or numbers presentINDICE
PRODUTTORE E IMPORTATORE (UK)
Produttore:
Chal-Tec GmbH, Wallstraße 16, 10179 Berlino, Germania.
Unit 6 Riverside Business Centre
Brighton Road
Shoreham-by-Sea
BN43 6RE
United Kingdom
AVVERTENZE DI SICUREZZA
natural_image
Line drawings of three different vacuum cleaner designs, showing front, side, and side views with no text or symbols.natural_image
Technical line drawing of two disassembled vacuum cleaner designs with arrows indicating process flow (no text or symbols)natural_image
Line drawing of a handheld vacuum cleaner with a mesh grille and handle (no text or symbols)natural_image
Technical line drawings of three mechanical components with no visible text or symbolsnatural_image
Technical line drawing of a mechanical device with internal components and an arrow indicating direction (no text or symbols)Pulire la spazzola
natural_image
Technical line drawings of three mechanical components: a housing, a pressure sensor, and a tool holder (no text or symbols present)natural_image
Symbol of a trash bin crossed with a diagonal line, no text or numbers presentINHOUDSOPGAVE
Unit 6 Riverside Business Centre
Brighton Road
Shoreham-by-Sea
BN43 6RE
United Kingdom
VEILIGHEIDSINSTRUCTIES
natural_image
Line drawings of three different vacuum cleaner designs, showing front, side, and side views with no text or symbols.natural_image
Technical line drawing of two disassembled vacuum cleaner designs with arrows indicating process flow (no text or symbols)natural_image
Line drawing of a handheld vacuum cleaner with internal mesh structure (no text or symbols)natural_image
Technical line drawings of three mechanical components with no visible text or symbolsnatural_image
Exploded view diagram of a hairbrush and screwdriver (no text or labels)natural_image
Technical line drawings of mechanical components including a housing, spring, and drill bit (no text or symbols)INSTRUCTIES VOOR AFVOER

natural_image
Symbol of a trash bin crossed with a diagonal line, no text or numbers present
- INHALTSVERZEICHNIS
- SICHERHEITSHINWEISE
- CONTENT
- MANUFACTURER & IMPORTER (UK)
- SAFETY INSTRUCTIONS
- PRODUCT OVERVIEW
- ASSEMBLY
- CHARGING THE VACUUM CLEANER
- Notes and tips
- Notice About Discharging
- OPERATION
- Using the accessories
- CLEANING AND CARE
- Cleaning of the dust container and filters
- Cleaning the roller brush
- HINTS ON DISPOSAL
- Estimado cliente:
- ÍNDICE DE CONTENIDOS
- SOMMAIRE
- CONSIGNES DE SÉCURITÉ
- INDICE
- PRODUTTORE E IMPORTATORE (UK)
- AVVERTENZE DI SICUREZZA
- Pulire la spazzola
- INHOUDSOPGAVE
- VEILIGHEIDSINSTRUCTIES
- INSTRUCTIES VOOR AFVOER
Brand : Klarstein
Model : TurboHybrid Vacuum Cleaner
Category : Vacuum Cleaner