
GNE60531XN - Freezer BEKO - Free user manual and instructions
Find the device manual for free GNE60531XN BEKO in PDF.
| Product type | Combined refrigerator-freezer |
| Brand | Beko |
| Model | GNE60531XN |
| Power supply | 220-240 V, 50 Hz, grounded outlet with 10-16 A circuit breaker |
| Refrigerant | R600a (flammable) |
| Climate classes | Ambient temperature between -5 °C and 43 °C (according to standard) |
| Cooling functions | Quick freeze, quick cool, holiday mode, eco mode, Eco-Fuzzy, AutoEco |
| Display and controls | Touch screen with compartment-by-compartment temperature adjustment, key lock |
| Interior lighting | LED (energy class G, replacement by professional) |
| Special compartments | Zero-degree compartment, controlled humidity vegetable drawer, telescopic drawer, adjustable central section |
| Preservation technologies | HarvestFresh (blue, green, red light simulating day/night cycle), ionizer, odor filter (annual cleaning in sunlight) |
| Ice maker | Built-in, with dedicated ice bucket and on/off function |
| Water dispenser | Can be connected to water supply or water bottle with pump (optional), internal/external water filter (replace every 6 months) |
| Alerts | Door open alarm, high temperature alarm, malfunction indicator with codes |
| Maintenance and cleaning | Clean with soft cloth and warm water, use baking soda for odors; do not use solvents, steam or abrasive tools |
| Safety | Disconnect before cleaning, do not use extension cords, do not damage the cooling circuit, keep away from heat sources |
| Spare parts and repairability | Original spare parts available for 10 years; self-repair possible for handles, hinges, shelves, door gaskets; other repairs by authorized service |
| Warranty | 24 months (minimum) |
| Freezing capacity | 4.5 kg per 100 liters of freezer volume in 24 hours (according to IEC 62552) |
Frequently Asked Questions - GNE60531XN BEKO
User questions about GNE60531XN BEKO
0 question about this device. Answer the ones you know or ask your own.
Ask a new question about this device
Download the instructions for your Freezer in PDF format for free! Find your manual GNE60531XN - BEKO and take your electronic device back in hand. On this page are published all the documents necessary for the use of your device. GNE60531XN by BEKO.
USER MANUAL GNE60531XN BEKO
natural_image
Simple line drawing of a pear and a carrot (no text or symbols)GNE60531XN
EN/PT/ES
58 4678 0000/AG-1/6-EN-PT-ES
Please read this manual before using the product!
Dear Customer,
We'd like you to make the best use of our product, which has been manufactured in modern facilities with care and meticulous quality controls.
Thus, we advice you to read the entire user manual before you use the product. In case the product changes hands, do not forget to hand the guide to its new owner along with the product.
This guide will help you use the product quickly and safely.
- Please read the user guide carefully before installing and operating the product.
• Always observe the applicable safety instructions. - Keep the user guide within easy reach for future use.
- Please read any other documents provided with the product.
Keep in mind that this user guide may apply to several product models. The guide clearly indicates any variations of different models.
 | Important information and useful tips. |
 | Risk of life and property. |
 | Risk of electric shock. |
 | The product's packaging is made of recyclable materials, in accordance with the National Environment Legislation. |
| i INFORMATION | ||
 ENERG ENERG  SUPPLIER'S NAME MODEL IDENTIFIER (*)A SUPPLIER'S NAME MODEL IDENTIFIER (*)A  | .The model information as stored in the product data base can be reached by entering following website and searching for your model identifier (*) found on energy label.https://eprel.ec.europa.eu/ | |
1- Safety Instructions 3
⚠️ 1.1 Intended Use .... 3
⚠️ 1.2 - Safety for children, vulnerable persons and pets ..... 3
⚠️ 1.3 - Electrical safety ..... 4
⚠️ 1.4 - Transportation safety ..... 4
⚠️ 1.5 - Installation safety. . . . . . . . . . . 4
⚠️ 1.6- Operational safety ..... 5
⚠️ 1.7- Maintenance and cleaning safety . 6
⚠️ 1.8- HomeWhiz ..... 7
⚠️ 1.9- Lighting....7
2 Refrigerator 8
3 Installation 9
3.1. Right place for installation ..... 9
3.2. Attaching the plastic wedges ..... 9
3.3. Adjusting the stands ..... 10
3.4. Power connection ..... 10
3.5. Water connection ..... 10
3.6. Connecting water hose to the product . . . . 11
3.7. Connecting to water mains ..... 11
3.8. For products using water carboy ..... 12
3.9 Water filter 12
3.9.1. Fixing external filter on the wall (Optional) 13
3.9.2. Internal filter ..... 14
4 Preparation 16
4.1. What to do for energy saving ..... 16
4.2. First use ..... 16
5 Using the product 17
5.1. Indicator panel ..... 17
5.2. Zero degree compartment.....24
5.3. Vegetable bin 24
5.4. Blue light/HarvestFresh 25
5.5. Description and cleaning of odour filter . . . 25
5.6. Telescopic drawer 26
5.7. Ionizer 26
5.8. Humidity controlled crisper ..... 26
5.9. Movable middle section ..... 27
5.10. Ice container 27
5.11. Ice box 28
5.12. Ice maker ..... 28
5.13. Freezing fresh food ..... 29
5.14. Recommendations for storing frozen foods 29
5.15. Deep freezer details ..... 29
5.16. Placing the food. 30
5.17. Door open alert 30
5.18. Interior light 30
6 Maintenance and cleaning 31
6.1 Avoiding bad odours ..... 31
6.2 Protecting the plastic surfaces ..... 31
7. Troubleshooting 32
1- Safety Instructions
- This section contains safety instructions that will help get protected against risks of personal injury or property damage.
- Our company shall not be responsible for damages that may arise when these instructions are not followed.

Installation and repair procedures must always be performed by the manufacturer, authorised service agent or a qualified person specified by the importer.

Only use original parts and
accessories.

Original spare parts will be provided for 10 years, following the product purchasing date.

Do not repair or replace any part of the product unless specified expressly in the user manual.

Do not make any technical modifications to the product.

1.1 Intended Use
- This product is not suitable for commercial use and it must not be used out of its intended use. This product is designed to be used in houses and indoor places.
For example:
- Personnel kitchens in stores, offices and other working environments,
- Farm houses,
- Areas used by customers at hotels, motels and other types of accommodation,
- Bed&breakfast type hotels, boardinghouses,
- Catering and similar non-retail applications.
This product should not be used outdoors with or without a tent above it such as boats, balconies or terraces. Do not expose the product to rain, snow, sun or wind.
There is the risk of fire!

1.2 - Safety for children, vulnerable persons and pets
- This product can be used by children at and above 8 years old and by persons with limited physical, sensory or mental capabilities or who lack experience and knowledge provided that they are supervised or trained on the safe use of the product and the risks it brings out.
- Children aged from 3 to 8 years are allowed to load and unload refrigerating products.
- Electrical products are dangerous for children and pets. Children and pets must not play with, climb or enter the product.
- Cleaning and user maintenance should not be performed by children unless they are supervised by someone.
-
Keep packaging materials away from children. There is the risk of injury and suffocation!
• Before disposing of the old or obsolete product: -
Unplug the product by gripping from the plug.
-
Cut the power cable and remove it from the appliance together with its plug
-
Do not remove the shelves or drawers so that it is harder for children to enter the product.
-
Remove the doors.
-
Keep the product in a way that it will not tip over.
-
Do not allow children play with the old product.
- Never throw the product into fire for disposal. There is the risk of explosion!
- If there is a lock on the door of the product, the key should be kept out of the reach of children.

1.3 - Electrical safety
- The product must be unplugged during installation, maintenance, cleaning, repairing and moving procedures.
- If the power cable is damaged, it must be replaced by a qualified person specified by the manufacturer, authorised service agent or importer in order to avoid potential dangers.
- Do not squeeze the power cable under or behind the product. Do not place heavy objects on the power cable. Power cable must not be bent excessively, pinched or get in contact with any heat source.
- Do not use extension cords, multi-sockets or adapters to operate the product.
- Portable multi-sockets or portable power sources can overheat and cause fire. Therefore, do not keep any multi-sockets behind or near the product.
- Plug must be easily accessible. If this is not possible, the electrical installation to which the product is connected must contain a device (such as a fuse, switch, circuit breaker, etc.) which conforms to the electrical regulations and disconnects all poles from the grid.
- Do not touch the power plug with wet hands.
- Remove the plug from the socket by gripping the plug and not the cable.

1.4 - Transportation safety
• Product is heavy; do not move it alone.
- Do not hold its door when moving the product.
- Pay attention not to damage the cooling system or the piping during transportation. If the piping is damaged, do not operate the product and call the authorised service agent.

1.5 - Installation safety
- Call the authorised service agent for installation of the product. To make the product ready for use, check the information in the user manual to make sure that the electricity and water installations are suitable. If they are not, call a qualified electrician and plumber to have the necessary arrangements made. Otherwise, there is the risk of electric shock, fire, problems with the product, or injury!
- Prior to installation, check if the product has any defects on it. If the product is damaged, do not have it installed.
- Place the product on a clean, flat and solid surface and balance it with adjustable feet. Otherwise, the product may tip over and cause injuries.
- The installation location must be dry and well ventilated. Do not place carpets, rugs or similar covers under the product. Insufficient ventilation causes the risk of fire!
- Do not cover or block the ventilation openings. Otherwise, power consumption increases and your product may get damaged.
- Product must not be connected to supply systems such as solar power supplies. Otherwise, your product may get damaged due to sudden voltage changes!
- The more refrigerant a refrigerator contains, the larger the installation location must be. If the installation location is too small, flammable refrigerant and air mixture will accumulate in cases of refrigerant leakage in cooling system. The required space for each 8 gr of refrigerant is 1 m ^3 minimum. The amount of refrigerant in your product is indicated on the Type Label.
- Product must not be installed in places exposed to direct sunlight and it must be kept away from heat sources such as hobs, radiators, etc.
If it is inevitable to install the product close to a heat source, a suitable insulation plate must
Safety and environment instructions
be used in between and the following minimum distances must be kept to the heat source:
- Minimum 30 cm away from heat sources such as hobs, ovens, heater units or stoves, - Minimum 5 cm away from electric ovens.
- Protection class of your product is Type I. Plug the product in a grounded socket that conforms the voltage, current and frequency values stated on the type label of the product. The socket must be equipped with a 10 A – 16 A circuit breaker. Our company shall not be liable for any damages that will arise when the product is used without grounding and electrical connection in accordance with the local and national regulations.
- Product must not be plugged in during installation. Otherwise, there is the risk of electric shock and injury!
- Do not plug the product in sockets that are loose, dislocated, broken, dirty, greasy or bear the risk of getting in contact with water.
- Route the power cable and hoses (if any) of the product in a way that they do not cause risk of tripping over.
- Exposing the live parts or power cable to humidity may cause short circuit. Therefore, do not install the product in places such as garages or laundry rooms where humidity is high or water may splash. If the refrigerator gets wet with water, unplug it and call the authorised service agent.
- Never connect your refrigerator to energy saving devices. Such systems are harmful to your product.

1.6- Operational safety
- Never use chemical solvents on the product. There is the risk of explosion!
- If the product malfunctions, unplug it and do not operate until it is repaired by the authorised service agent. There is the risk of electric shock!
- Do not place flame sources (lit candles, cigarettes, etc.) on or close to the product.
- Do not climb on the product. There is the risk of falling and getting injured!
- Do not damage the pipes of the cooling system with sharp or penetrating objects. The refrigerant that might come out when the refrigerant pipes, pipe extensions or surface coatings are punctured causes skin irritations and eye injuries.
- Unless recommended by the manufacturer, do not place or use electrical devices inside the refrigerator/deep freezer.
- Be careful not to trap your hands or any other part of your body in the moving parts inside the refrigerator. Pay attention not to squeeze your fingers between the door and the refrigerator. Be careful when opening and closing the door particularly if there are children around.
- Never eat ice cream, ice cubes or frozen food right after removing them from the refrigerator. There is the risk of frostbite!
- When your hands are wet, do not touch the inner walls or metal parts of the freezer or the food stored therein. There is the risk of frostbite!
- Do not place tins or bottles that contain carbonated drinks or freezable liquids in the freezer compartment. Tins and bottles may burst. There is the risk of injury and material damage!
- Do not place or use flammable sprays, flammable materials, dry ice, chemical substances or similar heat-sensitive materials near the refrigerator. There is the risk of fire and explosion!
- Do not store explosive materials that contain flammable materials, such as aerosol cans, in your product.
Safety and environment instructions
- Do not place containers filled with liquid onto the product. Splashing water on an electrical part may cause electric shock or the risk of fire.
- This product is not intended for storing medicines, blood plasma, laboratory preparations or similar medical substances and products subject to Medical Products Directive.
- Using the product against its intended purpose may cause the products stored inside it to deteriorate or spoil.
- If your refrigerator is equipped with blue light, do not look at this light with optical tools. Do not stare at UV LED lamp directly for a long time. Ultraviolet light may cause eye strain.
- Do not overload the product. Objects in the refrigerator may fall down when the door is opened, causing injury or damage. Similar problems may arise if any object is placed onto the product.
- To avoid injuries, make sure that you have cleaned all the ice and water that may have fallen or splashed on the floor.
- Change the position of the shelves/bottle holders on the door of your refrigerator only when they are empty. There is the risk of injury!
- Do not place objects that can fall down/tip over onto the product. Such objects may fall down when the door is opened and cause injuries and/or material damage.
- Do not hit or exert excessive force on glass surfaces. Broken glass may cause injuries and/or material damage.
- Cooling system of your product contains R600a refrigerant: Type of the refrigerant used in the product is indicated on the type label. This refrigerant is flammable. Therefore, pay attention not to damage the cooling system or the piping while the product is in use. If the piping is damaged:
- Do not touch the product or the power cable,
- Keep away potential sources of fire that may cause the product to catch fire.
- Ventilate the area where the product is located. Do not use fans.
- Call the authorised service agent.
- If the product is damaged and you see refrigerant leak, please stay away from the refrigerant. Refrigerant may cause frostbite in case of skin contact.
For products with a Water Dispenser/Ice Machine
- Use only potable water. Do not fill the water tank with any liquids -such as fruit juice, milk, carbonated beverages or alcoholic drinks- that are not suitable for use in the water dispenser.
• There is the risk for health and safety! - Do not allow children play with the water dispenser or ice machine (Icematic) in order to prevent accidents or injuries.
- Do not insert your fingers or other objects into the water dispenser hole, water channel or ice machine container. There is the risk of injury or material damage!

1.7- Maintenance d cleaning safety
- Do not pull from the door handle if you need to move the product for cleaning purposes. Handle may break and cause injuries if you exert excessive force on it.
- Do not spray or pour water on or inside the product for cleaning purposes. There is the risk of fire and electric shock!
- Do not use sharp or abrasive tools when cleaning the product. Do not use household cleaning products, detergent, gas, gasoline, thinner, alcohol, varnish etc.
Safety and environment instructions
- Only use cleaning and maintenance products inside the product that are not harmful for food.
- Never use steam or steam assisted cleaners to clean or defrost the product. Steam gets into contact with the live parts in your refrigerator, causing short circuit or electric shock!
- Make sure that no water enters the electronic circuits or lighting elements of the product.
- Use a clean and dry cloth to wipe the foreign materials or dust on the pins of the plug. Do not use a wet or damp cloth to clean the plug. There is the risk of fire and electric shock!

1.8- HomeWhiz
- When you operate your product through HomeWhiz application, you must observe the safety warnings even when you are away from the product. You must also follow the warnings in the application.

1.9- Lighting
- Call the authorised service when it is required to replace the LED/bulb used for lighting.
2 Refrigerator

A- Cooler compartment
B- Freezer compartment
1. Butter-cheese shelf
2. Cooler compartment shelves
3. Shelter wire
- Frozen food storing compartments
- Vegetable bins
- Breakfast compartment
- Odour filter
- Adjustable glass shelves
- Fan

*Optional: Figures in this user guide are schematic and may not exactly match your product. If your product does not comprise the relevant parts, the information pertains to other models.
3 Installation
3.1. Right place for installation
Contact the Authorized Service for the product's installation. To ready the product for installation, see the information in the user guide and make sure the electric and water utilities are as required. If not, call an electrician and plumber to arrange the utilities as necessary.
 | WARNING: The manufacturer assumes no responsibility for any damage caused by the work carried out by unauthorized persons. |
 | WARNING: The product's power cable must be unplugged during installation. Failure to do so may result in death or serious injuries! |
 | WARNING: If the door span is too narrow for the product to pass, remove the door and turn the product sideways; if this does not work, contact the authorized service. |
- Place the product on a flat surface to avoid vibration.
- Place the product at least 30 cm away from the heater, stove and similar sources of heat and at least 5 cm away from electric ovens.
- Do not expose the product to direct sunlight or keep in damp environments.
- Your product requires adequate air circulation to function efficiently. If the product will be placed in an alcove, remember to leave at least 5 cm clearance between the product and the ceiling, rear wall and the side walls.
- If the product will be placed in an alcove, remember to leave at least 5 cm clearance between the product and the ceiling, rear wall and the side walls. Check if the rear wall clearance protection component is present at its location (if provided with the product). If the component is not available, or if it is lost or fallen, position the product so that at least 5 cm clearance shall be left between the rear surface of the product and the wall of the room. The clearance at the rear is important for efficient operation of the product.
- Do not install the product in environments with temperatures below -5°C.
3.2. Attaching the plastic wedges
Use the plastic wedges provided with the product to provide sufficient space for air circulation between the product and the wall.
- To attach the wedges, remove the screws on the product and use the screws provided with the wedges.

natural_image
Line drawing of a hand inserting a screwdriver into a device panel (no text or symbols)- Attach 2 plastic wedges on the ventilation cover as shown in the figure.

natural_image
Line drawing of a hand using a screwdriver to adjust or install a device panel (no text or symbols visible)3.3. Adjusting the stands
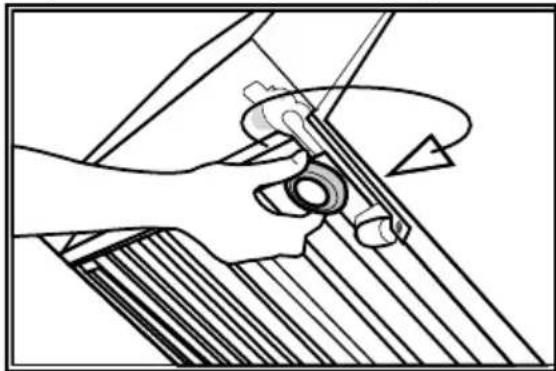
If the product is not in balanced position, adjust the front adjustable stands by rotating right or left.
natural_image
Mechanical diagram showing a hand operating a tool with a rotating component (no text or symbols)3.4. Power connection
| WARNING: Do not use extension or multi sockets in power connection. | |
| WARNING: Damaged power cable must be replaced by Authorized Service. | |
| When placing two coolers in adjacent position, leave at least 4 cm distance between the two units. |
- Our firm will not assume responsibility for any damages due to usage without earthing and power connection in compliance with national regulations.
- The power cable plug must be easily accessible after installation.
- Connect the refrigerator to an earthed socket with 220-240V/50 Hz voltage. The socket must comprise a 10-16A fuse.
- Do not use multi-group plug with or without extension cable between the wall socket and the refrigerator.
3.5. Water connection
(Optional)
WARNING: Unplug the product and the water pump (if available) during connection.
The product's water mains, filter and carboy connections must be rendered by authorized service.
The product can be connected to a carboy or directly to the water mains, depending on the model. To establish the connection, the water hose must first be connected to the product.
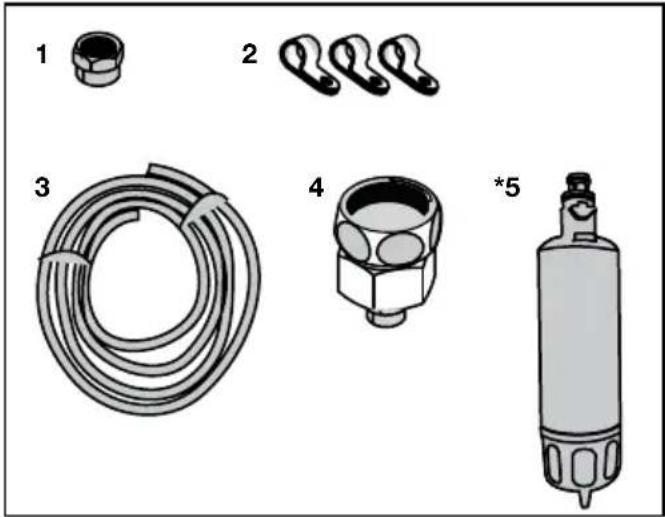
Check to see the following parts are supplied with your product's model:
natural_image
Illustration of five different types of industrial equipment: a cylindrical component, coiled tubing, a mechanical component, and a pressure vessel (no text or symbols present)- Connector (1 piece): Used to attach the water hose to the rear of the product.
- Hose clip (3 pieces): Used to fix the water hose on the wall.
- Water hose (1 piece, 5 meter diameter 1/4 inches): Used for the water connection.
- Faucet adapter (1 piece): Comprises a porous filter, used for connection to the cold water mains.
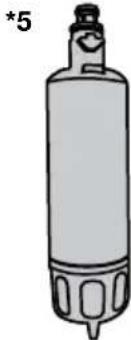
- Water filter (1 piece *Optional): Used to connect the mains water to the product. Water filter is not required if carboy connection is available.
Installation
3.6. Connecting water hose to the product
To connect the water hose to the product, follow the instructions below.
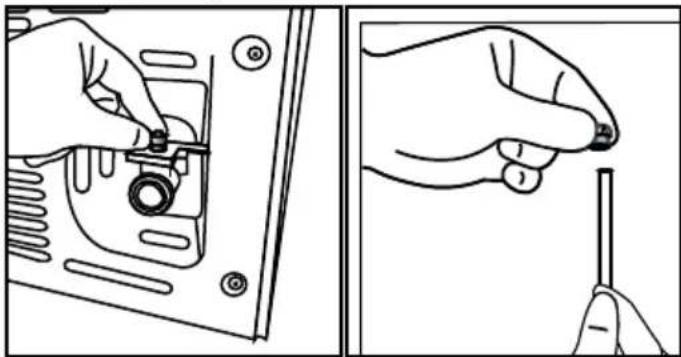
- Remove the connector on the hose nozzle adaptor in the back of the product and run the hose through the connector.
natural_image
Illustration showing two-step installation: one of a hand holding a screwdriver, the other of a hand holding a tool (no text or symbols present)- Push the water hose down tightly and connect to the hose nozzle adaptor.

natural_image
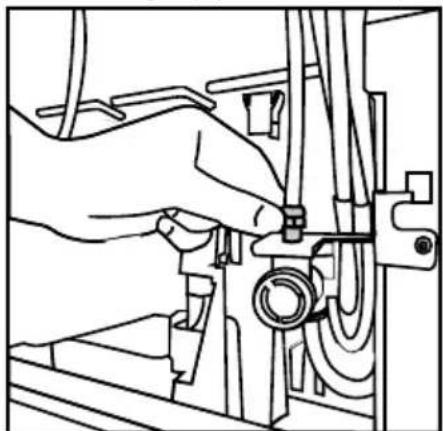
Line drawing of a computer monitor rear panel with a hand inserting a cable (no text or symbols)- Tighten the connector manually to fix on the hose nozzle adaptor. You may also tighten the connector using a pipe wrench or pliers.
natural_image
Line drawing of a hand adjusting a mechanical component with no visible text or symbols3.7. Connecting to water mains (Optional)
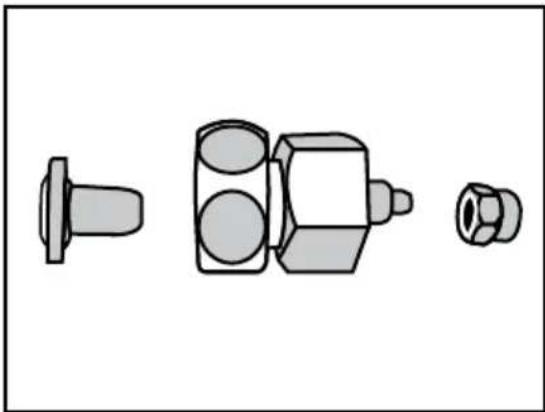
To use the product by connecting to the cold water mains, a standard 1/2" valve connector must be installed to the cold water mains in your home. If the connector is not available or if you are unsure, consult a qualified plumber.
- Detach the connector (1) from the faucet adaptor (2).
natural_image
Technical illustration of three mechanical components: a bolt, a hexagonal nut, and a separate nut (no text or symbols)- Connect the faucet adaptor to the water mains valve.

natural_image
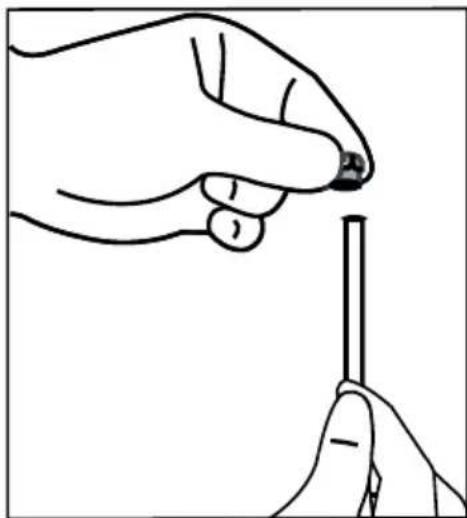
Simple line drawing of a mechanical or electrical component with no text or symbols- Attach the connector around the water hose.
natural_image
Line drawing of a hand holding a pen tip, no text or symbols presentInstallation
- Attach the connector into the faucet adaptor and tighten by hand / tool.
natural_image
Simple line drawing of a mechanical or electrical component with no text or symbols- To avoid damaging, shifting or accidentally disconnecting the hose, use the clips provided to fix the water hose appropriately.

natural_image
Illustration of hands holding a cable with a connector attached (no text or symbols)
WARNING: After turning the faucet on, make sure there is no water leak on either end of the water hose. In case of leakage, turn the valve off and tighten all connections using a pipe wrench or pliers.
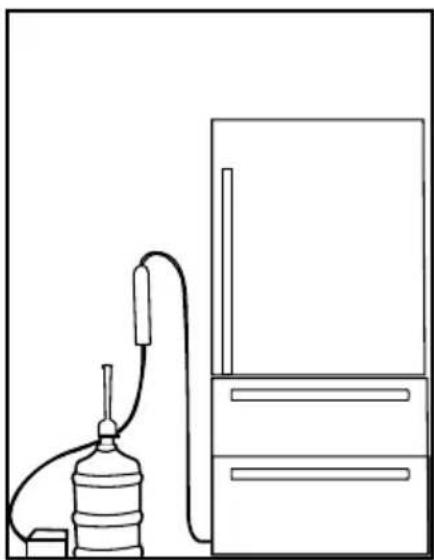
3.8. For products using water carboy (Optional)
To use a carboy for the product's water connection, the water pump recommended by the authorized service must be used.
- Connect one end of the water hose provided with the pump to the product (see 3.6) and follow the instructions below.
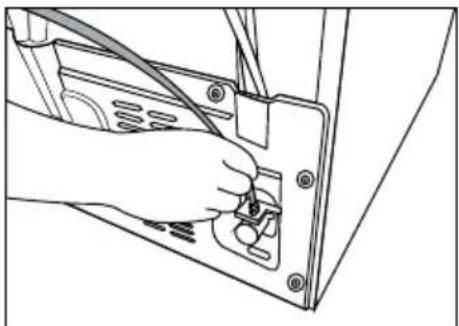
natural_image
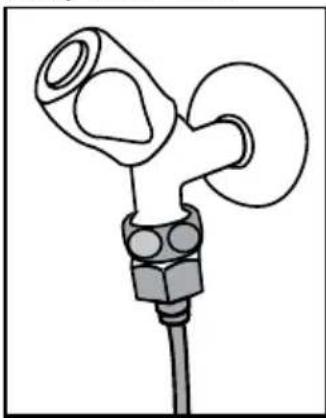
Line drawing of a hand inserting cables into a device panel (no text or symbols)- Connect the other end of the water hose to the water pump by pushing the hose into the pump's hose inlet.
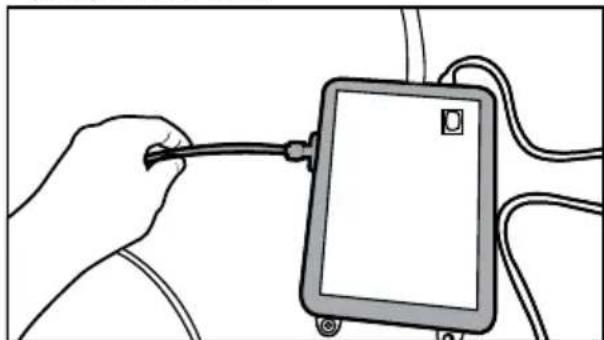
natural_image
Hand holding a cable inserted into a device with cables, no visible text or symbols- Place and fasten the pump hose inside the carboy.
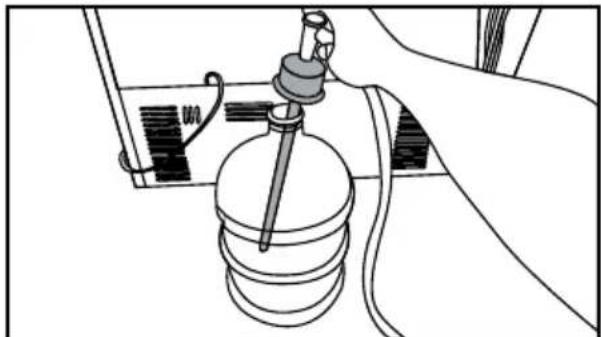
natural_image
Line drawing of a mechanical device with a cylindrical component and a handle (no text or symbols)- Once the connection is established, plug in and start the water pump.
 | Please wait 2-3 minutes after starting the pump to achieve the desired efficiency. |
 | See also the pump's user guide for water connection. |
 | When using carboy, water filter is not required. |
3.9 Water filter
(Optional)
The product may have internal or external filter, depending on the model. To attach the water filter, follow the instructions below.
Installation
3.9.1. Fixing external filter on the wall (Optional)
WARNING: Do not fix the filter on the product.
Check to see the following parts are supplied with your product's model:

- Connector (1 piece): Used to attach the water hose to the rear of the product.
- Faucet adapter (1 piece): Used for connection to the cold water mains.
- Porous filter (1 piece)
- Hose clip (3 pieces): Used to fix the water hose on the wall.
- Filter connecting apparatus (2 pieces): Used to fix the filter on the wall.
- Water filter (1 piece): Used to connect the mains water to the product. Water filter is not required if carboy connection is available.
- Connect the faucet adaptor to the water mains valve.
natural_image
Pure mechanical component diagram without any text, numbers, or symbols- Determine the location to fix the external filter. Fix the filter's connecting apparatus (5) on the wall.
natural_image
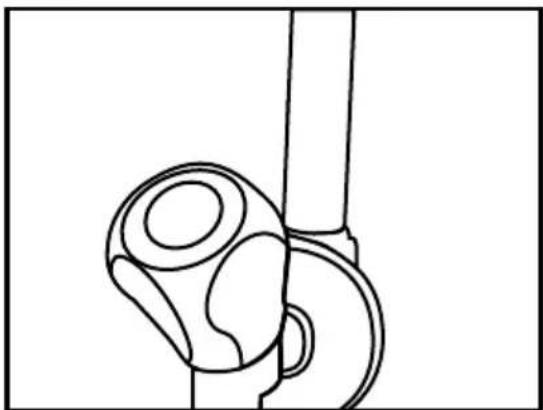
Line drawing of a hand holding a tool with a curved handle, no text or symbols present- Attach the filter in upright position on the filter connecting apparatus, as indicated on the label. (6).
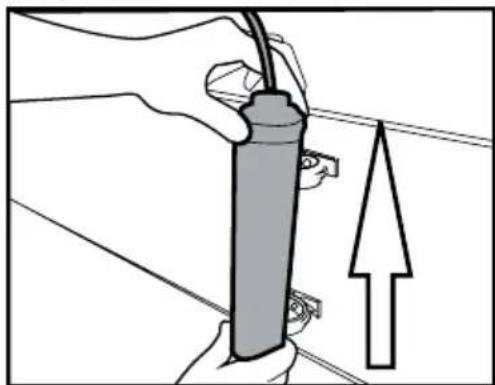
natural_image
Illustration of a hand holding a cylindrical device with wires, next to an upward arrow (no text or symbols)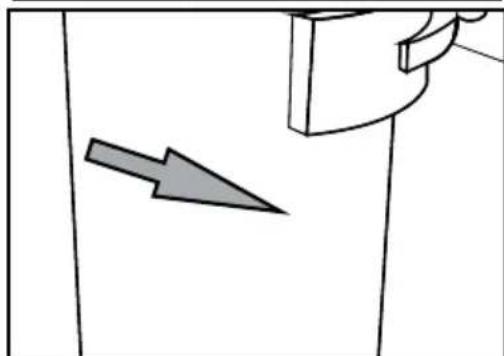
natural_image
Simple line drawing of a door with an arrow pointing to the side panel (no text or symbols)- Attach the water hose extending from the top of the filter to the product's water connection adaptor (see. 3 6).
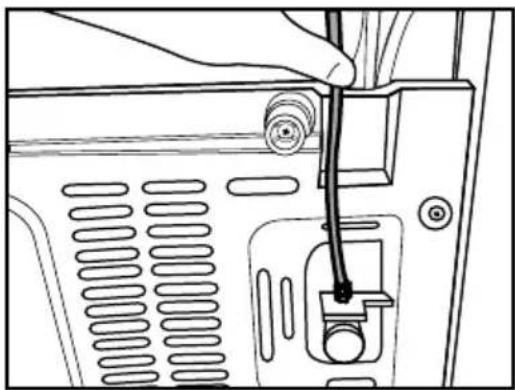
natural_image
Line drawing of a hand inserting a cable into a computer drive (no text or symbols)After the connection is established, it should look like the figure below.
Water line:
natural_image
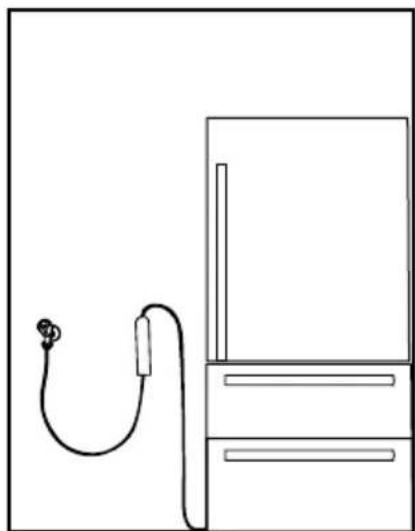
Simple line drawing of a cordless cable connected to a cabinet (no text or symbols)Carboy line:

natural_image
Line drawing of a water pump connected to a refrigerator (no text or symbols)3.9.2. Internal filter
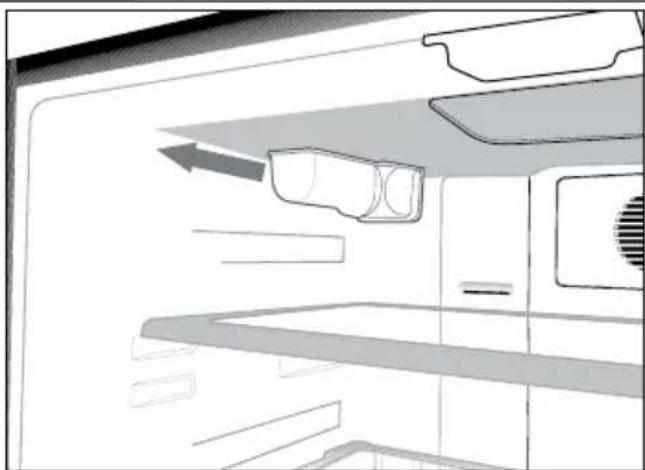
The internal filter provided with the product is not installed upon delivery; please follow the instructions below to install the filter.
- "Ice Off" indicator must be active while installing the filter. Switch the ON-OFF indicator using the "Ice" button on the screen.
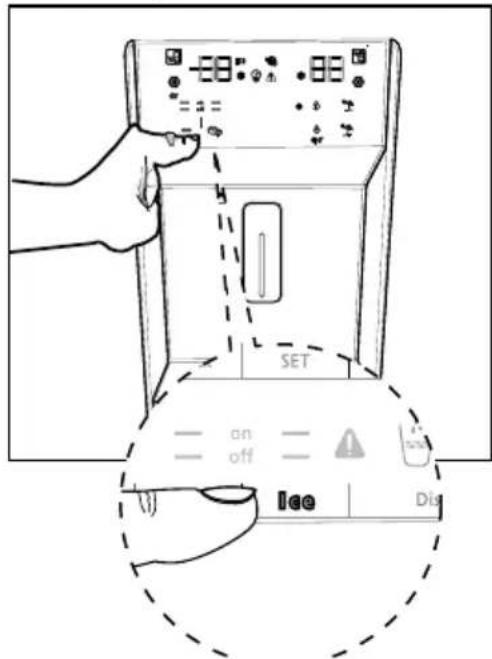
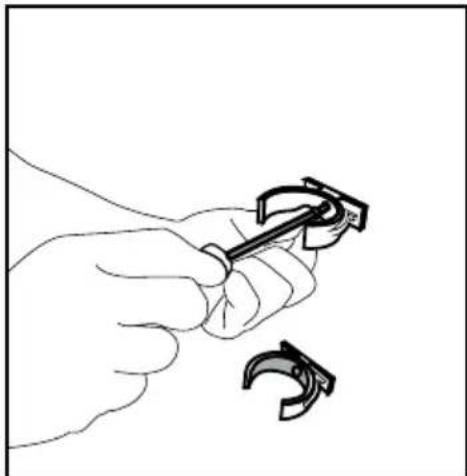
- Remove the water filter by-pass cover by pulling.

A few drops of water may flow out after removing the cover; this is normal.
natural_image
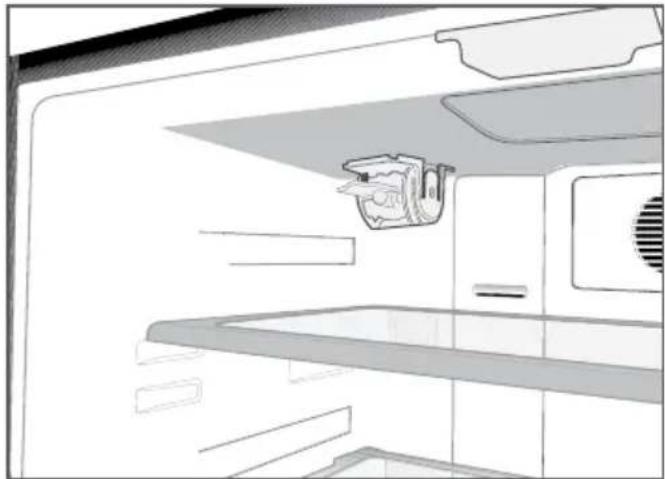
Diagram of a refrigerator interior showing airflow direction and storage compartments (no text or symbols)- Place the water filter cover into the mechanism and push to lock in place.
Installation
natural_image
Interior view of a kitchen appliance with shelves, cabinets, and a kitchen sink (no text or symbols visible)- Push the "Ice" button on the screen again to cancel the "Ice Off" mode.
 | The water filter will clear certain foreign particles in the water. It will not clear the microorganisms in the water. |
 | The filter replacement period of your product is 6 months. |
4 Preparation
4.1. What to do for energy saving
Connecting the product to electronic energy-saving systems is harmful, as it may damage the product.
- za samostojeći uređaj; „Ovaj rashladni uređaj nije predviđen da se koristi kao ugradni uređaj“;
- For a freestanding appliance; ‘this refrigerating appliance is not intended to be used as a built-in appliance.
- Do not keep the refrigerator doors open for long periods.
- Do not place hot food or beverages into the refrigerator.
- Do not overfill the refrigerator; blocking the internal air flow will reduce cooling capacity.
- To be able store maximum food in the freezer compartment of your refrigerator, the upper drawers have to be removed and placed on top of wire rack. The net volume and energy consumption values specified in the energy label of the refrigerator was tested after removing the freezer compartment's upper shelf and the ice container which can easily be removed manually. Using the lower drawer while loading is highly recommended.
- Depending on the product's features; defrosting frozen foods in the cooler compartment will ensure energy saving and preserve food quality.
- Make sure the foods are not in contact with the cooler compartment temperature sensor described below.
-
Since hot and humid air will not directly penetrate into your product when the doors are not opened, your product will optimize itself in conditions sufficient to protect your food. Functions and components such as compressor, fan, heater, defrost, lighting, display and so on will operate according to the needs to consume minimum energy under these circumstances.
-
Food must be stored in drawers inside the cooler compartment in order to provide energy saving and preserve the food in a better ambient.
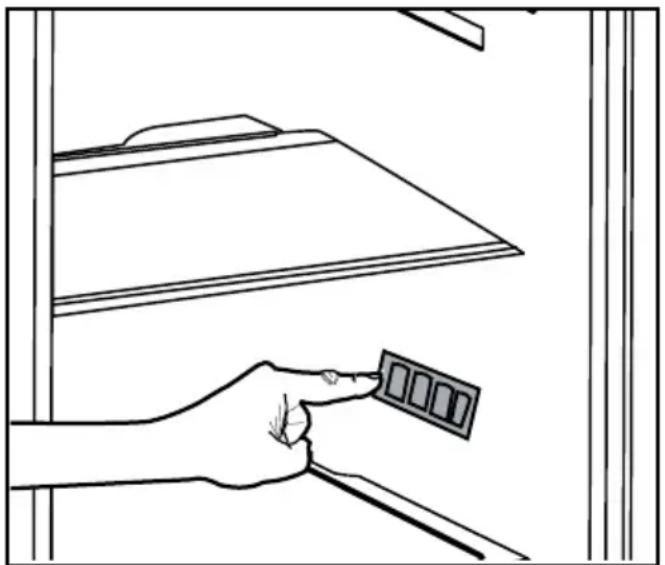
- Prevent direct contact between the temperature sensor in the freezer compartment and the food packages. Energy consumption may increase in case of a contact with the sensor.
natural_image
Line drawing of a hand holding a small object above a shelf (no text or symbols)4.2. First use
Before using your refrigerator, make sure the necessary preparations are made in line with the instructions in “Safety and environment instructions” and “Installation” sections.
- Keep the product running with no food inside for 6 hours and do not open the door, unless absolutely necessary.
 | A sound will be heard when the compressor is engaged. It is normal to hear sound even when the compressor is inactive, due to the compressed liquids and gasses in the cooling system. |
 | It is normal for the front edges of the refrigerator to be warm. These areas are designed to warm up in order to prevent condensation. |
 | In some models, indicator panel is dimmed automatically 5 minutes after the door is closed. It will be activated again when the door is opened or any key is pressed. |
5 Using the product
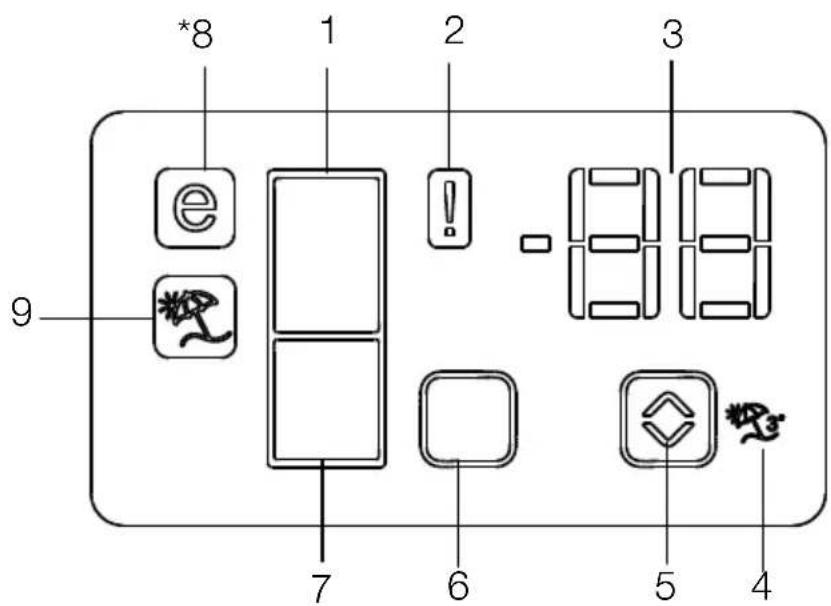
5.1. Indicator panel
Indicator panels may vary depending on the model of your product.
Audio and visual functions of the indicator panel will assist in using the refrigerator.
- Cooler compartment indicator
- Error status indicator
- Temperature indicator
- Vacation function button
- Temperature adjustment button
- Compartment selection button
- Freezer compartment indicator
- Economy mode indicator
- Vacation function indicator
*optional

*Optional: The figures in this user guide are intended as drafts and may not perfectly match your product. If your product does not comprise the relevant parts, the information pertains to other models.
Using the product
1. Cooler compartment indicator
The cooler compartment light will turn on when adjusting the cooler compartment temperature.
2. Error status indicator
This sensor will activate if the refrigerator is not cooling adequately or in case of sensor fault. When this indicator is active, the freezer compartment temperature indicator will display "E" and the cooler compartment temperature indicator will display "1, 2, 3..." etc. numbers. The numbers on the indicator serve to inform the service personnel about the fault. (!)
3. Temperature indicator
Indicates the temperature of the freezer and cooler compartments.
4. Vacation function button
To activate this function, press and hold the Vacation button for 3 seconds. When the Vacation function is active, the cooler compartment temperature indicator displays the inscription "-" and no cooling process will be active in the cooling compartment. This function is not suitable to keep food in the cooler compartment. Other compartments will remain cooled with the respective temperature set for each compartment.
Push the Vacation button (💡) again to cancel this function.
5. Temperature adjustment button
Respective compartment's temperature varies in -24^ ... -18^ and 8^ ... 1^ ranges. (☐)
6. Compartment selection button
Use the refrigerator compartment selection button to toggle between the cooler and freezer compartments. (☐)
7. Freezer compartment indicator
The freezer compartment light will turn on when adjusting the freezer compartment temperature.
8. Economy mode indicator
Indicates the refrigerator is running on energy-saving mode. This indicator will be active when the temperature in the freezer compartment is set to -18°C. (☐)
9. Vacation function indicator
Indicates the vacation function is active. (图)
Using the product
Indicator panel
This touch-control indicator panel allows you to set the temperature without opening the door of your refrigerator. Just touch the relevant button with your finger to set the temperature.
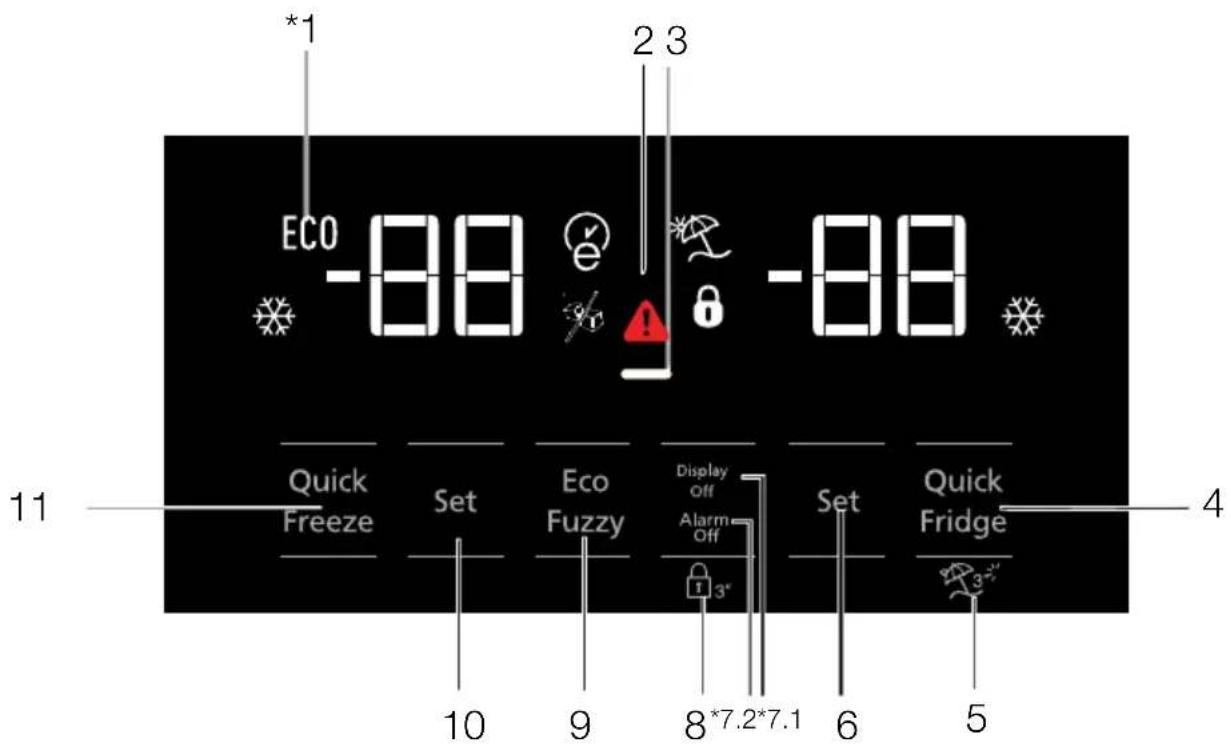
- Economic use
2- High temperature / fault alert
3- Energy saving function (display off)
4- Rapid cooling
5- Vacation function
6- Cooler compartment temperature setting
7- Energy saving (display off) / Alarm off warning
8- Keypad lock
9- Eco-fuzzy
10- Freezer compartment temperature setting
11- Rapid freezing

*Optional: The figures in this user guide are intended as drafts and may not perfectly match your product. If your product does not comprise the relevant parts, the information pertains to other models.
Using the product
1. Economic use
This sign will light up when the freezer compartment is set to -18^' , the most economical setting. (ECO economic use indicator will turn off when rapid cooling or rapid freezing function is selected.
2. High temperature / fault alert
This indicator (⚠️) will light up in case of temperature faults or fault alerts. This indicator illuminates during power failure, high temperature failures and error warnings. During sustained power failures, the highest temperature that the freezer compartment reaches will flash on the digital display. After checking the food located in the freezer compartment press the alarm off button to clear the warning.
3. Energy saving function (display off)
If the product doors are kept closed for a long time energy saving function is automatically activated and energy saving symbol is illuminated. When energy saving function is activated, all symbols on the display other than energy saving symbol will turn off. When the Energy Saving function is activated, if any button is pressed or the door is opened, energy saving function will be cancelled and the symbols on display will return to normal. Energy saving function is activated during delivery from factory and cannot be cancelled.
4. Rapid cooling
When the rapid cooling function is turned on, the rapid cool indicator will light up (✗) and the cooler compartment temperature indicator will display the value 1. Push the Rapid cool button again to cancel this function. The Rapid cool indicator will turn off and return to normal setting. The rapid cooling function will be automatically cancelled after 1 hour, unless cancelled by the user. Too cool a large amount of fresh food, press the rapid cool button before placing the food in the cooler compartment.
5. Vacation function
To activate the Vacation function, press the button for (3 seconds; this will activate the vacation mode indicator). When the Vacation function is active, the cooler compartment temperature indicator displays the inscription "-" and no cooling process will be active in the cooling compartment. This function is not suitable to keep food in the cooler compartment. Other compartments will remain cooled with the respective temperature set for each compartment. Push the vacation function button again to cancel this function
6. Cooler compartment temperature setting
After pressing the button, the cooler compartment temperature can be set to 8,7,6,5,4,3,2 and 1 respectively.
7.1. Energy saving (display off)
Pressing this button (—) will light up the energy saving sign (.) and the Energy-saving function will activate. Activating the energy-saving function will turn off all other signs on the display. When the energy-saving function is active, pressing any button or opening the door will deactivate the energy-saving function and the display signals will return to normal. Pressing this button (.) again will turn off the energy-saving sign and deactivate the energy-saving function.
7.2. Alarm off warning:
In case of power failure/high temperature alarm, after checking the food located in the freezer compartment press the alarm off button to clear the warning.
8. Keypad lock
Press the keypad lock button (8) simultaneously for 3 seconds. The keypad lock sign
(8) will light up and the keypad lock will be activated. The buttons will be inactive when the Keypad lock is activated. Press the Keypad lock button again simultaneously for 3 seconds. The keypad lock sign will turn off and the keypad lock mode will be disengaged.
Using the product
Press the keypad lock button (6) to prevent changing the refrigerator's temperature settings.
9. Eco-fuzzy
To activate the eco-fuzzy function, press and hold the eco-fuzzy button for 1 second. When this function is active, the freezer will switch to the economic mode after at least 6 hours and the economic use indicator will light up. To deactivate the (e) eco-fuzzy function, press and hold the eco-fuzzy function button for 3 seconds.
The indicator will light up after 6 hours when the eco-fuzzy function is active.
10. Freezer compartment temperature setting
The temperature in the freezer compartment is adjustable. Pressing the button will enable the freezer compartment temperature to be set at -18,-19, -20,-21,-22,-23 and -24.
11. Rapid freezing
For rapid freezing, press the button; this will activate the rapid freezing indicator (✗).
When the rapid freezing function is turned on, the rapid freeze indicator will light up and the freezer compartment temperature indicator will display the value -27. Press the Rapid freeze button (※) again to cancel this function. The Rapid freeze indicator will turn off and return to normal setting. The rapid freezing function will be automatically cancelled after 24 hours, unless cancelled by the user. To freeze a large amount of fresh food, press the rapid freeze button before placing the food in the freezer compartment.
- Freezer compartment temperature setting
- Economic use
3- Energy saving function (display off) - Error status
- Cooler compartment temperature setting
- Rapid cooling
- Vacation function
- Keypad lock / filter replacing alert cancellation
- Ice making on/off
- Display on/off /Alarm off
- Autoeco
- Rapid freezing

*Optional: The figures in this user guide are intended as drafts and may not perfectly match your product. If your product does not comprise the relevant parts, the information pertains to other models.
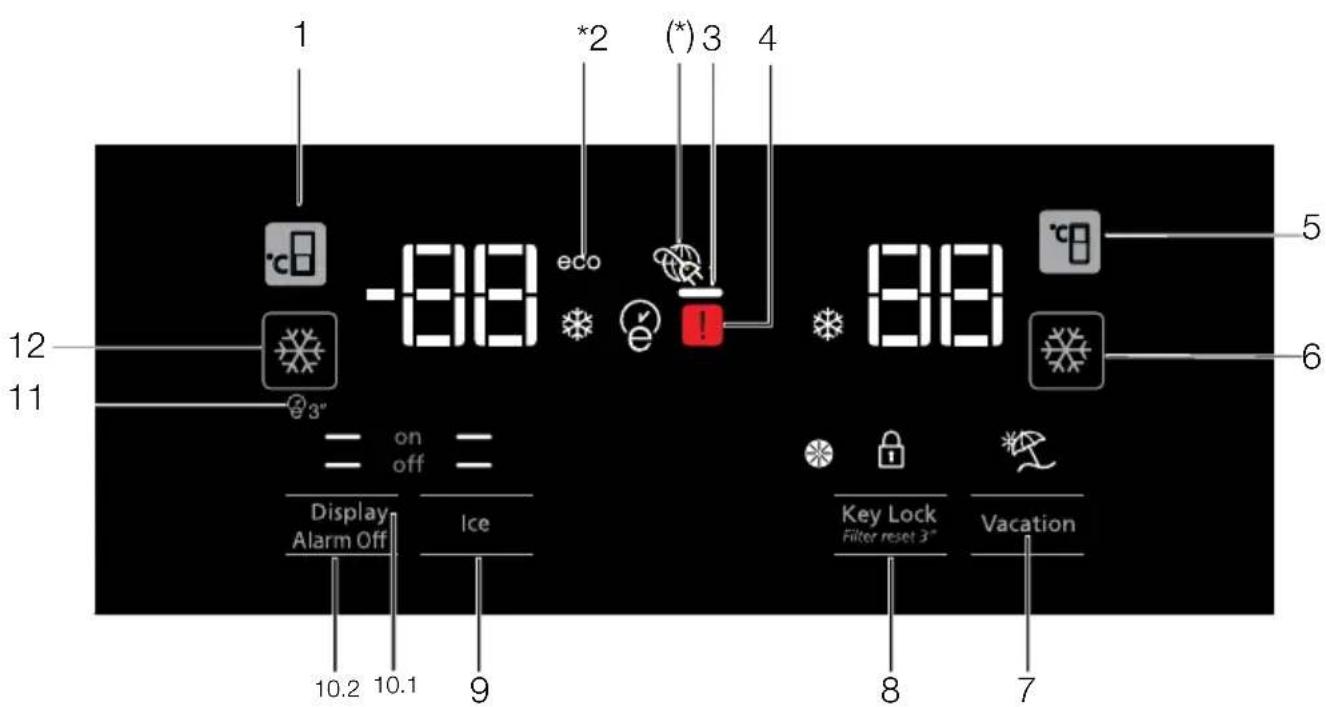
Using the product
1. Freezer compartment temperature setting
Pressing the button (☐) will enable the freezer compartment temperature to be set at -18,-19,-20,-21,-22,-23,-24,-18...
2. Economic use
This sign will light up when the freezer compartment is set to -18^' , the most economical setting. (ECO) Economic use indicator will turn off when rapid cooling or rapid freezing function is selected.
3. Energy saving function (display off)
If the product doors are kept closed for a long time energy saving function is automatically activated and energy saving symbol is illuminated. When energy saving function is activated, all symbols on the display other than energy saving symbol will turn off. When the Energy Saving function is activated, if any button is pressed or the door is opened, energy saving function will be cancelled and the symbols on display will return to normal. Energy saving function is activated during delivery from factory and cannot be cancelled.
4. Error status
This sign will activate if the refrigerator is not cooling adequately or in case of sensor fault. (⚠️) When this indicator is activated, the freezer compartment temperature indicator will display "E" and the cooler compartment temperature indicator will display "1, 2, 3..." etc. numbers. The numbers on the indicator serve to inform the service personnel about the fault.
5. Cooler compartment temperature setting
After pressing the button (☐), the cooler compartment temperature can be set to 8,7,6,5,4,3,2... respectively.
6. Rapid cooling
For rapid cooling, press the button; this will activate the rapid cooling indicator (✿).
Press this button again to deactivate this function. Use this function when placing fresh foods into the cooler compartment or to rapidly cool the food items. When this function is activated, the refrigerator will be engaged for 1 hour.
7. Vacation function
When the Vacation function (✗) is active, the cooler compartment temperature indicator displays the inscription "- - " and no cooling process will be active in the cooling compartment. This function is not suitable to keep food in the cooler compartment. Other compartments will remain cooled with the respective temperature set for each compartment.
Press the vacation function button again to cancel this function. (1)
8. Keypad lock / Keypad lock / filter replacing alert cancellation
Press keypad lock button (💡) to activate the keypad lock. You may also use this function to prevent changing the refrigerator's temperature settings. The refrigerator's filter must be replaced every 6 months. If you follow the instructions in the section 5.2, the refrigerator will automatically calculate the remaining period and the filter replacing alert indicator (💡) will light up when filter expires.
Press and hold the button ( 3^* ) for 3 seconds to turn off the filter alert light.
9. Ice making on/off
Press the button ( ) to cancel ( ) for activate ( ) once-making.
10.1 Display on/off
Press the button to cancel (— off) or activate (-) display on/off.
10.2 Alarm off warning
In case of power failure/high temperature alarm, after checking the food located in the freezer compartment press the alarm off button to clear the warning.
Using the product
11. Autoeco
Press the auto eco button (e3"), for 3 seconds to activate this function. If the door remains closed for a long time when this function is activated, the cooler section will switch to economic mode. Press the button again to deactivate this function.
The indicator will light up after 6 hours when the auto eco function is active. (e)
12. Rapid freezing
Press the button (✗) for rapid freezing. Press the button again to deactivate the function.
5.2. Zero degree compartment (Optional)
Use this compartment to keep delicatessen at lower temperatures or meat products for immediate consumption. Do not place fruits and vegetables in this compartment.
You can expand the product's internal volume by removing any of the zero degree compartments. To remove the compartment, simply pull forth, lift up and pull out.
5.3. Vegetable bin
The refrigerator's vegetable bin is designed to keep vegetables fresh by preserving humidity. For this purpose, the overall cold air circulation is intensified in the vegetable bin. Keep fruits and vegetables in this compartment. Keep the greenleaved vegetables and fruits separately to prolong their life.
Using the product
5.4. Blue light/HarvestFresh
\*May not be available in all models
For the blue light,
Fruits and vegetables stored in the crispers that are illuminated with a blue light continue their photosynthesis by means of the wavelength effect of blue light and thus preserve their vitamin content.
ForHarvestFresh,
Fruits and vegetables stored in crispers illuminated with the HarvestFresh technology preserve their vitamins for a longer time thanks to the blue, green, red lights and dark cycles, which simulate a day cycle.
If you open the door of the refrigerator during the dark period of the HarvestFresh technology, the refrigerator will automatically detect this and enable the blue-green or red light to illuminate the crisper for your convenience. After you have closed the door of the refrigerator, the dark period will continue, representing the night time in a day cycle.
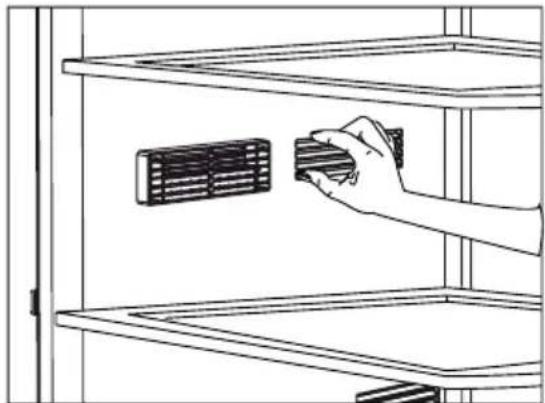
5.5. Description and cleaning of odour filter (Optional)
Odor filter prevents unpleasant odour build-up in your product.
- Pull the cover into which the odour filter is installed downwards from the front section and remove as illustrated.
- Leave the filter under sunlight for one day. Filter will be cleaned during this time.
- Install the filter back to its place.
natural_image
Line drawing of a hand inserting a component into a rack with a vented air conditioner (no text or symbols)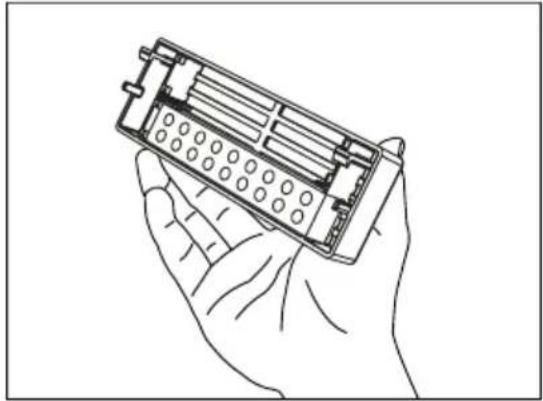
natural_image
Line drawing of a hand holding an open battery pack (no text or symbols)
natural_image
Line drawing of two hands holding a mechanical device with a screwdriver inserted (no text or symbols)
Odor filter must be cleaned once in a year.
Using the product
5.6. Telescopic drawer
Pay attention not to squeeze any parts of your body such as hands, feet and etc. between the movable parts while the drawer is in use in order to avoid any injury.
You can remove the partition in the drawer as illustrated when you want to clean it.
You can remove the drawers only for cleaning. It is not possible to group the drawers in their places after loading them with food when they are removed.
5.7. Ionizer
(Optional)
The ionizer system in the cooler compartment's air duct serves to ionize the air. The negative ion emissions will eliminate bacteria and other molecules causing odour in the air.

natural_image
Technical line drawings of a mechanical device with two views: top shows front view, bottom shows side view (no text or symbols)5.8. Humidity controlled crisper (FreSHelf)
(This feature is optional)
Humidity rates of the vegetables and fruit are kept under control with the feature of humidity-controlled crisper and the food is ensured to stay fresh for longer.
We recommend you to place the leafy vegetables such as lettuce, spinach and the vegetables which are sensitive to humidity loss, in a horizontal manner as much as possible inside the crisper, not on their roots in a vertical position. While the vegetables are being placed, specific gravity of the vegetables should be taken into consideration. Heavy and hard vegetables should be put at the bottom of the crisper and the lightweight and soft vegetables should be placed over.
Never leave the vegetables inside the crisper in their bags. If the vegetables are left inside their bags, this will cause them to decompose in a short period of time. In case contacting with other vegetables is not preferred for hygiene concerns, use a perforated paper and other similar packaging materials instead of a bag.
Do not place together the pear, apricot, peach, etc. and apple in particular which have a high level of generation of ethylene gas in the same crisper with the other vegetables and fruit. The ethylene gas which is emitted by these fruit may cause the other fruit to ripen faster and decompose in a shorter time.
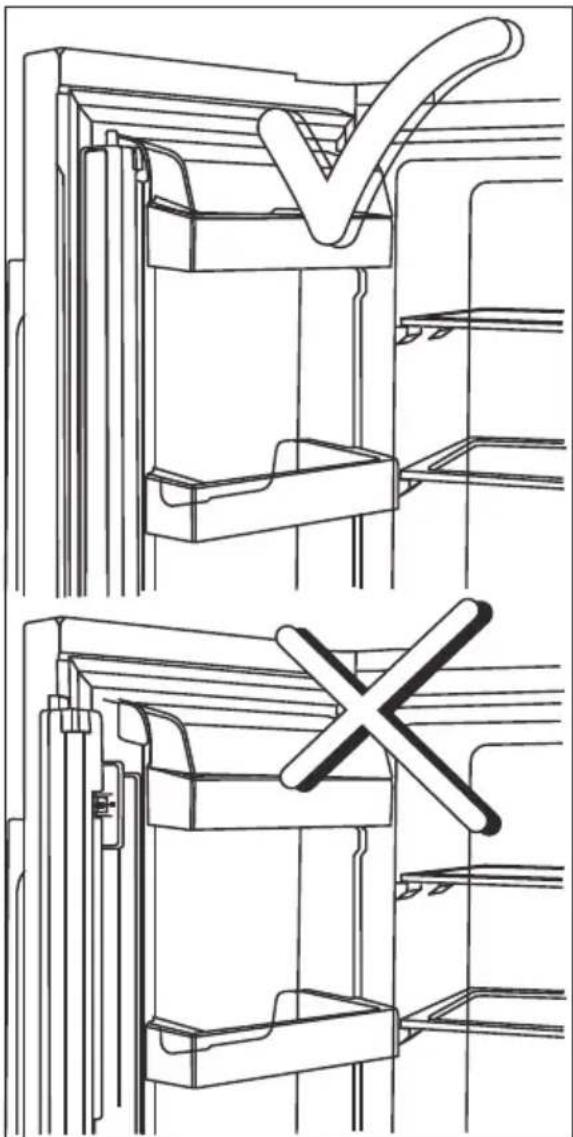
5.9. Movable middle section
Movable middle section is intended to prevent the cold air inside your refrigerator from escaping outside.
Sealing is provided when the gaskets on the door presses on the surface of the movable middle section while the cooler compartment doors are closed.
Another reason that your refrigerator is equipped with a movable middle section is that it increases the net volume of the cooler compartment. Standard middle sections occupy some non-usable volume in the refrigerator.
Movable middle section is closed when the left door of the cooler compartment is closed.
It must not be opened manually. It moves under the guidance of the plastic part on the body while the door is closed.
natural_image
Technical line drawing of a mechanical assembly with no visible text or symbols5.10. Ice container
(Optional)
Ice container allows you to obtain ice from the product easily.
Using the ice container
- Remove the ice container from the freezer compartment.
- Fill the ice container with water.
- Place the ice container in the freezer compartment. About two hours later, the ice is ready.
- Remove the ice container from the freezer compartment and bend it over the service plate. Ice cubes will easily fall down to the service plate.
Using the product
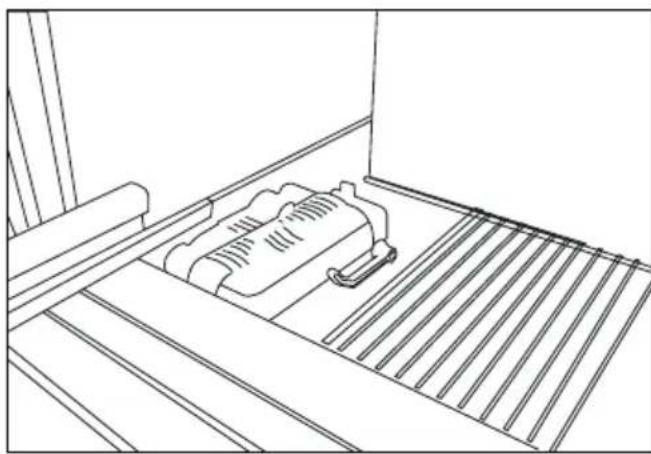
5.11. Ice box
Please read the warnings carefully on the ice container. The ice container is used for ice collection poured ice machine. Do not put water in it to make ice as it may break. The ice container is not used for storing foods.
Warning: Do not change the location of the ice container.
natural_image
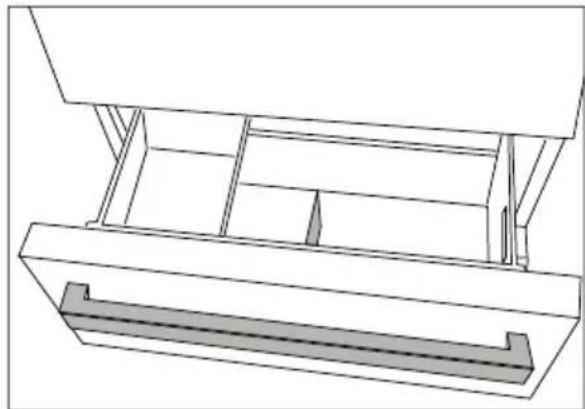
Line drawing of a mechanical component on a conveyor belt (no text or symbols)5.12. Ice maker
The ice machine is nonremovable. There must be ice container at the bottom of the ice machine.
natural_image
Technical line drawing of a mechanical assembly with no visible text or symbolsUsing the product
5.13. Freezing fresh food
- To preserve food quality, the food items placed in the freezer compartment must be frozen as quickly as possible, use the rapid freezing for this.
- Freezing the food items when fresh will extend the storage time in the freezer compartment.
- Pack the food items in air-tight packs and seal tightly.
-
Make sure the food items are packed before putting in the freezer. Use freezer holders, tinfoil and damp-proof paper, plastic bag or similar packaging materials instead of traditional packaging paper.
-
Mark each food pack by writing the date on the package before freezing. This will allow you to determine the freshness of each pack every time the freezer is opened. Keep the earlier food items in the front to ensure they are used first.
- Frozen food items must be used immediately after defrosting and should not be frozen again.
- Do not froze large quantities of food at once.
| Freezer Compartment Setting | Cooler compartment Setting | Descriptions |
| -18°C 4°C This is the default, recommended setting. | ||
| -20,-22 or -24°C | 4°C | These settings are recommended for ambient temperatures exceeding 30°C. |
| Rapid Freeze 4°C | Use this to freeze food items in a short time. The product will reset to previous settings when the process is completed. | |
| -18°C or colder | 2°C | Use these settings if you believe the cooler compartment is not cold enough due to ambient temperature or frequently opening the door. |
5.14. Recommendations for storing frozen foods
The compartment must be set to at least -18^ C.
- Place the food items in the freezer as quickly as possible to avoid defrosting.
- Before freezing, check the "Expiry Date" on the package to make sure it is not expired.
- Make sure the food's packaging is not damaged.
5.15. Deep freezer details
As per the IEC 62552 standards, the freezer must have the capacity to freeze 4.5 kg of food items at -18°C or lower temperatures in 24 hours for each 100 litres of freezer compartment volume.
Food items can only be preserved for extended periods at or below temperature of -18^ . You can keep the foods fresh for months (in deep freezer at or below temperatures of 18^ ).
The food items to be frozen must not contact the already-frozen food inside to avoid partial defrosting.
Using the product
Boil the vegetables and filter the water to extend the frozen storage time. Place the food in air-tight packages after filtering and place in the freezer. Bananas, tomatoes, lettuce, celery, boiled eggs, potatoes and similar food items should not be frozen. When these foods are frozen, only their nutritional value and taste shall be affected negatively. They shall not be spoiled so that they would create a risk for human health.
5.16. Placing the food
| Freezer compartment shelves | Various frozen foods including meat, fish, ice cream, vegetables etc. |
| Cooler compartment shelves | Food items inside pots, capped plate and capped cases, eggs (in capped case) |
| Cooler compartment door shelves | Small and packed food or beverages |
| Vegetable bin | Fruits and vegetables |
| Fresh food compartment | Delicatessen (breakfast food, meat products to be consumed in short notice) |
5.17. Door open alert
(Optional)
An audible alert will be heard if the product's door remains open for 1 minute. The audible alert will stop when the door is closed or any button on the display (if available) is pressed.
5.18. Interior light
Interior light uses a LED type lamp. Contact the authorized service for any problems with this lamp. Interior light used in this product is not intended for home lighting and not suitable for such purposes. Interior lights in cooler or freezer compartments are intended to help safe and convenient food placement into the refrigerator. The lamp(s) used in this appliance is not suitable for household room illumination. The intended purpose of this lamp is to assist the user to place foodstuffs in the refrigerator/freezer in a safe and comfortable way.
6 Maintenance and cleaning
Cleaning your fridge at regular intervals will extend the service life of the product.
WARNING:
Unplug the product before cleaning it.
- Never use gasoline, benzene or similar substances for cleaning purposes.
- Never use any sharp and abrasive tools, soap, household cleaners, detergent and wax polish for cleaning.
- For non-No Frost products, water drops and frosting up to a fingerbreadth occur on the rear wall of the Fridge compartment. Do not clean it; never apply oil or similar agents on it.
- Only use slightly damp microfiber cloths to clean the outer surface of the product. Sponges and other types of cleaning cloths may scratch the surface
- Dissolve one teaspoon of bi-carbonate in half litre of water. Soak a cloth with the solution and wrung it thoroughly. Wipe the interior of the refrigerator with this cloth and the dry thoroughly.
- Make sure that no water enters the lamp housing and other electrical items.
- If you will not use the refrigerator for a long period of time, unplug it, remove all food inside, clean it and leave the door ajar.
- Check regularly that the door gaskets are clean. If not, clean them.
-
To remove door and body shelves, remove all of its contents.
-
Remove the door shelves by pulling them up. After cleaning, slide them from top to bottom to install.
- Never use cleaning agents or water that contain chlorine to clean the outer surfaces and chromium coated parts of the product. Chlorine causes corrosion on such metal surfaces.
6.1 Avoiding bad odours
- Materials that may cause odour are not used in the production of our refrigerators. However, due to inappropriate food preserving conditions and not cleaning the inner surface of the refrigerator as required can bring forth the problem of odour. Pay attention to following to avoid this problem:
- Keeping the refrigerator clean is important. Food residuals, stains, etc. can cause odour. Therefore, clean the refrigerator with bi-carbonate dissolved in water every few months. Never use detergents or soap.
- Keep the food in closed containers. Microorganisms spreading out from uncovered containers can cause unpleasant odours.
- Never keep the food that have passed best before dates and spoiled in the refrigerator.
6.2 Protecting the plastic surfaces
Do not put liquid oils or oil-cooked meals in your refrigerator in unsealed containers as they damage the plastic surfaces of the refrigerator. If oil is spilled or smeared onto the plastic surfaces, clean and rinse the relevant part of the surface at once with warm water.
7. Troubleshooting
Check this list before contacting the service. Doing so will save you time and money. This list includes frequent complaints that are not related to faulty workmanship or materials. Certain features mentioned herein may not apply to your product.
The refrigerator is not working.
- The power plug is not fully settled.
Plug it in to settle completely into the socket.
- The fuse connected to the socket powering the product or the main fuse is blown. >>> Check the fuses.
Condensation on the side wall of the cooler compartment (MULTI ZONE, COOL, CONTROL and FLEXI ZONE).
- The door is opened too frequently >>> Take care not to open the product's door too frequently.
- The environment is too humid. >>> Do not install the product in humid environments.
- Foods containing liquids are kept in unsealed holders. >>> Keep the foods containing liquids in sealed holders.
- The product's door is left open. >>> Do not keep the product's door open for long periods.
- The thermostat is set to too low temperature. >>> Set the thermostat to appropriate temperature.
Compressor is not working.
- In case of sudden power failure or pulling the power plug off and putting back on, the gas pressure in the product's cooling system is not balanced, which triggers the compressor thermic safeguard. The product will restart after approximately 6 minutes. If the product does not restart after this period, contact the service.
- Defrosting is active. >>> This is normal for a fully-automatic
defrosting product. The defrosting is carried out periodically.
- The product is not plugged in. >>> Make sure the power cord is plugged in.
- The temperature setting is incorrect. >>> Select the appropriate temperature setting.
- The power is out. >>> The product will continue to operate normally once the power is restored.
The refrigerator's operating noise is increasing while in use.
- The product's operating performance may vary depending on the ambient temperature variations. This is normal and not a malfunction.
The refrigerator runs too often or for too long.
- The new product may be larger than the previous one. Larger products will run for longer periods.
- The room temperature may be high. >>> The product will normally run for long periods in higher room temperature.
- The product may have been recently plugged in or a new food item is placed inside. >>> The product will take longer to reach the set temperature when recently plugged in or a new food item is placed inside. This is normal.
- Large quantities of hot food may have been recently placed into the product. >>> Do not place hot food into the product.
- The doors were opened frequently or kept open for long periods. >>> The warm air moving inside will cause the product to run longer. Do not open the doors too frequently.
- The freezer or cooler door may be ajar. >>> Check that the doors are fully closed.
Troubleshooting
- The product may be set to temperature too low. >>> Set the temperature to a higher degree and wait for the product to reach the adjusted temperature.
- The cooler or freezer door washer may be dirty, worn out, broken or not properly settled. >>> Clean or replace the washer. Damaged / torn door washer will cause the product to run for longer periods to preserve the current temperature.
The freezer temperature is very low, but the cooler temperature is adequate.
- The freezer compartment temperature is set to a very low degree. >>> Set the freezer compartment temperature to a higher degree and check again.
The cooler temperature is very low, but the freezer temperature is adequate.
- The cooler compartment temperature is set to a very low degree. >>> Set the freezer compartment temperature to a higher degree and check again.
The food items kept in cooler compartment drawers are frozen.
- The cooler compartment temperature is set to a very low degree. >>> Set the freezer compartment temperature to a higher degree and check again.
The temperature in the cooler or the freezer is too high.
- The cooler compartment temperature is set to a very high degree. >>> Temperature setting of the cooler compartment has an effect on the temperature in the freezer compartment. Wait until the temperature of relevant parts reach the sufficient level by changing the temperature of cooler or freezer compartments.
- The doors were opened frequently or kept open for long periods. >>> Do not open the doors too frequently.
- The door may be ajar. >>> Fully close the door.
- The product may have been recently plugged in or a new food item is placed inside. >>> This is normal. The product will take longer to reach the set temperature when recently plugged in or a new food item is placed inside.
- Large quantities of hot food may have been recently placed into the product. >>> Do not place hot food into the product.
Shaking or noise.
- The ground is not level or durable. >>> If the product is shaking when moved slowly, adjust the stands to balance the product. Also make sure the ground is sufficiently durable to bear the product.
- Any items placed on the product may cause noise. >>> Remove any items placed on the product.
The product is making noise of liquid flowing, spraying etc.
- The product's operating principles involve liquid and gas flows. >>> This is normal and not a malfunction.
There is sound of wind blowing coming from the product.
- The product uses a fan for the cooling process. This is normal and not a malfunction.
There is condensation on the product's internal walls.
- Hot or humid weather will increase icing and condensation. This is normal and not a malfunction.
- The doors were opened frequently or kept open for long periods. >>> Do not open the doors too frequently; if open, close the door.
Troubleshooting
- The door may be ajar. >>> Fully close the door.
There is condensation on the product's exterior or between the doors.
- The ambient weather may be humid, this is quite normal in humid weather. >>> The condensation will dissipate when the humidity is reduced.
The interior smells bad.
- The product is not cleaned regularly. >>> Clean the interior regularly using sponge, warm water and carbonated water.
- Certain holders and packaging materials may cause odour. >>> Use holders and packaging materials without free of odour.
- The foods were placed in unsealed holders. >>> Keep the foods in sealed holders. Micro-organisms may spread out of unsealed food items and cause malodour. Remove any expired or spoilt foods from the product.
The door is not closing.
- Food packages may be blocking the door. >>> Relocate any items blocking the doors.
- The product is not standing in full upright position on the ground. >>> Adjust the stands to balance the product.
- The ground is not level or durable. >>> Make sure the ground is level and sufficiently durable to bear the product.
The vegetable bin is jammed.
- The food items may be in contact with the upper section of the drawer. >>> Reorganize the food items in the drawer.
If The Surface Of The Product Is Hot.
- High temperatures may be observed between the two doors, on the side panels and at the rear grill while the product is operating. This is normal and does not require service maintenance! Be careful when touching these areas.

WARNING:
If the problem persists after following the instructions in this section, contact your vendor or an Authorised Service. Do not try to repair the product.
DISCLAIMER / WARNING
Some (simple) failures can be adequately handled by the end-user without any safety issue or unsafe use arising, provided that they are carried out within the limits and in accordance with the following instructions (see the “Self-Repair” section).
Therefore, unless otherwise authorized in the “Self-Repair” section below, repairs shall be addressed to registered professional repairers in order to avoid safety issues. A registered professional repairer is a professional repairer that has been granted access to the instructions and spare parts list of this product by the manufacturer according to the methods described in legislative acts pursuant to Directive 2009/125/EC.
However, only the service agent (i.e. authorized professional repairers) that you can reach through the phone number given in the user manual/warranty card or through your authorized dealer may provide service under the guarantee terms. Therefore, please be advised that repairs by professional repairers (who are not authorized by Beko) shall void the guarantee.
Self-Repair
Self-repair can be done by the end-user with regard to the following spare parts: door handles,door hinges, trays, baskets and door gaskets (an updated list is also available in support.beko.com as of 1st March 2021).
Moreover, to ensure product safety and to prevent risk of serious injury, the mentioned self-repair shall be done following the instructions in the user manual for self-repair or which are available in support.beko.com. For your safety, unplug the product before attempting any self-repair.
Repair and repair attempts by end-users for parts not included in such list and/or not following the instructions in the user manuals for self-repair or which are available in support.beko.com, might give raise to safety issues not attributable to Beko, and will void the warranty of the product.
Therefore, it is highly recommended that end-users refrain from the attempt to carry out repairs falling outside the mentioned list of spare parts, contacting in such cases authorized professional repairers or registered professional repairers. On the contrary, such attempts by end-users may cause safety issues and damage the product and subsequently cause fire, flood, electrocution and serious personal injury to occur.
By way of example, but not limited to, the following repairs must be addressed to authorized professional repairers or registered professional repairers: compressor, cooling circuit, main board, inverter board, display board, etc.
The manufacturer/seller cannot be held liable in any case where end-users do not comply with the above.
The spare part availability of the refrigerator that you purchased is 10 years.
During this period, original spare parts will be available to operate the refrigerator properly
The minimum duration of guarantee of the refrigerator that you purchased is 24 months.
This product is equipped with a lighting source of the "G" energy class.
The lighting source in this product shall only be replaced by professional repairers.
Caro Cliente,
https://eprel.ec.europa.eu/
natural_image
Technical line drawing of a mechanical component with labeled part '1' (no text or symbols beyond label)natural_image
Diagram showing a device with a lightning bolt and wiring, no text or symbols presentnatural_image
Line drawing of a hand inserting a screwdriver into a device panel (no text or symbols)natural_image
Line drawing of a hand using a screwdriver to adjust or install a device panel (no text or symbols visible)3.3. Ajustar os pés
natural_image
Mechanical diagram showing a hand operating a tool with a curved handle (no text or symbols present)natural_image
Diagram of a coiled wire or filament with no text or symbols
natural_image
Simple line drawing of a cylindrical object with a side port and a knob, no text or symbols present.natural_image
Illustration showing two hand positions: one holding a small component, the other holding a pen (no text or symbols present)natural_image
Line drawing of a computer monitor rear panel with a hand inserting a cable (no text or symbols)natural_image
Line drawing of a hand adjusting a mechanical component (no text or symbols)natural_image
Technical illustration of a mechanical component with three views: a bolt, a hexagonal nut, and a separate nut (no text or symbols)natural_image
Simple line drawing of a mechanical component with no text or symbolsnatural_image
Line drawing of a hand holding a pen tip, no text or symbols presentInstalação
natural_image
Simple line drawing of a mechanical or electrical component with no text or symbolsnatural_image
Illustration of hands holding a cable with a connector attached (no text or symbols)
natural_image
Line drawing of a hand inserting a cable into a device panel (no text or symbols)natural_image
Illustration of a hand holding a tool next to a device with cables (no text or symbols visible)natural_image
Line drawing of a gas cylinder connected to a valve and tubing (no text or symbols)natural_image
Pure mechanical component diagram without any text, numbers, or symbolsnatural_image
Line drawing of a hand holding a tool with a hook and a separate curved object (no text or symbols)natural_image
Illustration of a hand holding a cylindrical device with wires, next to an upward arrow (no text or symbols)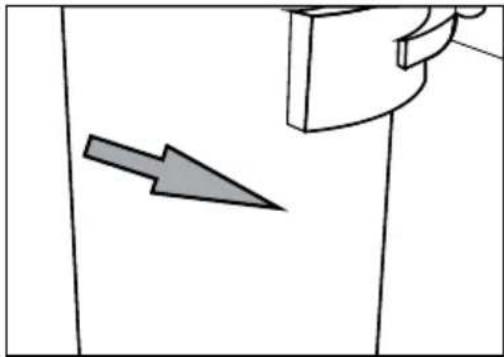
natural_image
Simple line drawing of a door with an arrow pointing to the side panel (no text or symbols)natural_image
Line drawing of a hand inserting a cable into a computer drive (no text or symbols)natural_image
Simple line drawing of a cordless cable connected to a refrigerator (no text or symbols)Linha do bocal:

natural_image
Line drawing of a water pump connected to a refrigerator (no text or symbols)3.9.2. Filtro interno
natural_image
Interior view of a refrigerator with shelves and air ducts (no text or symbols visible)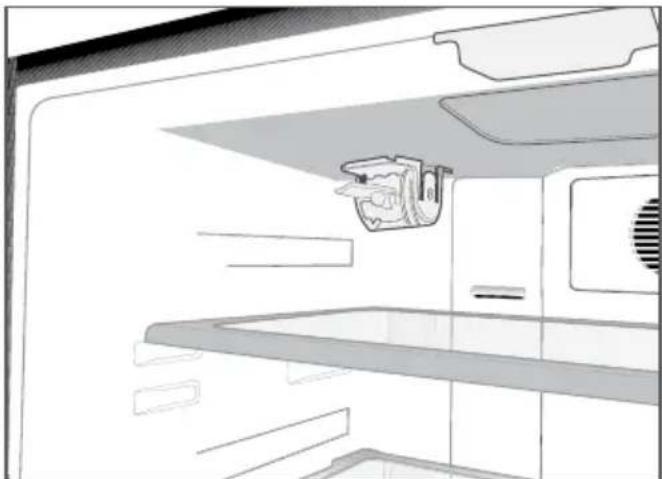
natural_image
Interior view of a refrigerator with built-in shelves and a kitchen appliance (no text or symbols visible)natural_image
Line drawing of a hand holding a small object above a shelf (no text or symbols)Para a HarvestFresh,
natural_image
Technical line drawings showing two views of a vehicle's side table, one with hand positioning and the other with legs (no text or symbols)natural_image
Line drawing of a mechanical component placed on a slatted base (no text or symbols)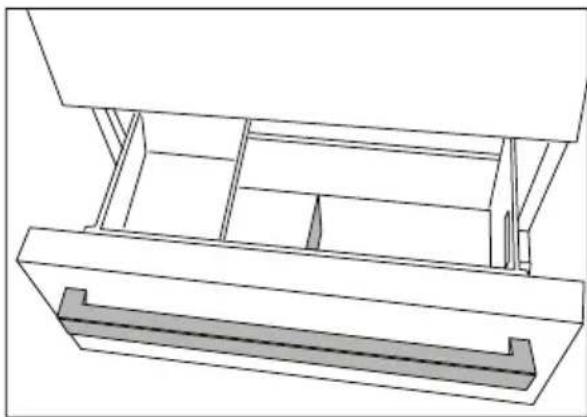
natural_image
Technical line drawing of a mechanical assembly with no visible text or symbolsnatural_image
Technical line drawing of a mechanical assembly with two views (top and bottom), no text or symbols present.natural_image
Simple line drawing of a mechanical component with no text or symbols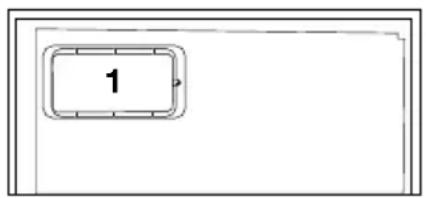
natural_image
Diagram showing a device with a lightning bolt and cable, no text or symbols present1.1.1 Aviso HC
natural_image
Line drawing of a hand inserting a screwdriver into a device panel (no text or symbols)natural_image
Line drawing of a hand using a screwdriver to adjust or install a device panel (no text or symbols visible)Instalación
natural_image
Mechanical diagram showing a hand operating a tool with a circular component, no text or symbols presentnatural_image
Illustration of five different types of industrial equipment: a coiled hose, two plastic clips, a pressure regulator, and a cylindrical water pump (no text or symbols present)natural_image
Illustration showing two-step hand tool application: adding a component to a device, then holding a pen (no text or symbols present)natural_image
Line drawing of a computer monitor rear panel with a hand inserting a cable (no text or symbols)natural_image
Line drawing of a hand adjusting a mechanical component with no visible text or symbolsnatural_image
Technical illustration of a mechanical component with three views: a flat bolt, a hexagonal nut, and a separate nut (no text or symbols)natural_image
Simple line drawing of a mechanical or electrical component with no text or symbolsnatural_image
Line drawing of a hand holding a pen tip, no text or symbols presentInstalación
natural_image
Simple line drawing of a mechanical or electrical component with no text or symbolsnatural_image
Illustration of hands holding a cable with a connector attached (no text or symbols)
natural_image
Line drawing of a hand inserting a cable into a device panel (no text or symbols)natural_image
Illustration of a hand holding a cable connected to a device with cables (no text or symbols visible)natural_image
Line drawing of a gas cylinder connected to a valve and tubing (no text or symbols)natural_image
Line drawing of a mechanical joint or connector (no text or symbols)natural_image
Line drawing of a hand holding a tool with a curved handle, no text or symbols presentnatural_image
Illustration of a hand holding a cylindrical device with wires, next to an upward arrow (no text or symbols)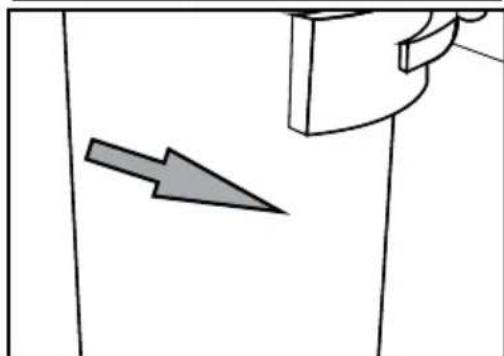
natural_image
Simple line drawing of a door with an arrow pointing to the side panel (no text or symbols)natural_image
Line drawing of a hand inserting a cable into a computer drive (no text or symbols)natural_image
Simple line drawing of a cordless cable connected to a cabinet (no text or symbols)Tubo de garrafón:
natural_image
Line drawing of a water pump connected to a refrigerator (no text or symbols)3.9.2. Filtro interno
natural_image
Diagram of a refrigerator interior showing airflow direction and storage compartments (no text or symbols)natural_image
Interior view of a kitchen appliance with shelves, cabinets, and a kitchen sink (no text or symbols visible)natural_image
Line drawing of a hand holding a small object near a window (no text or symbols)natural_image
Line drawing of a hand inserting a component into a rack with a gridded vent (no text or symbols)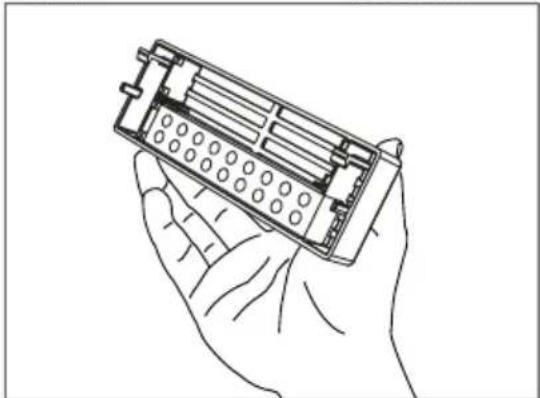
natural_image
Line drawing of a hand holding an electronic device with a grid-like internal structure (no text or symbols)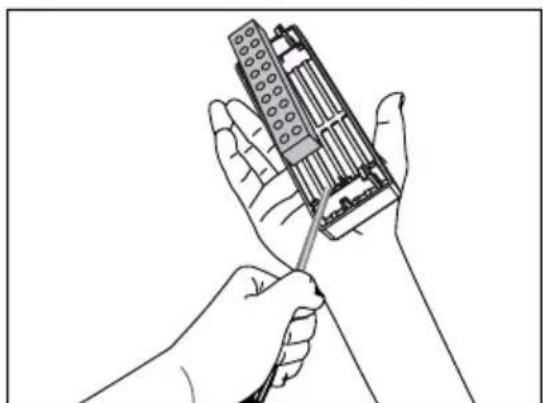
natural_image
Illustration of hands using a screwdriver to adjust a mechanical component (no text or symbols visible)Uso del producto
natural_image
Technical line drawings showing two views of a vehicle door frame, one with hand positioning and the other with seatbelt (no text or symbols)5.7. Ionizador
(Opcional)
natural_image
Technical line drawings of a mechanical assembly with no visible text or symbolsnatural_image
Technical line drawing of a mechanical assembly with no visible text or symbolsnatural_image
Simple line drawing of a pear and a carrot (no text or symbols)GNE60531XN
EL/SL/HR
CE
58 4678 0000/AG 2/6-EL-SL-HR
natural_image
Technical line drawing of a mechanical component with labeled part '1' (no text or symbols beyond label)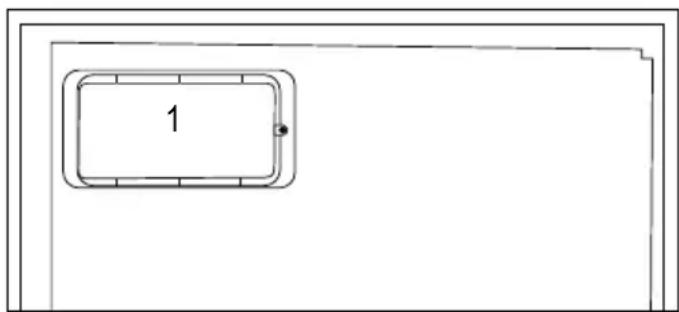
natural_image
Diagram showing a device with a lightning bolt and wiring, no text or symbols presentnatural_image
Line drawing of a hand inserting a screwdriver into a device panel (no text or symbols)natural_image
Line drawing of a hand using a screwdriver to adjust or install a device panel (no text or symbols visible)natural_image
Mechanical diagram showing a hand operating a tool with a circular arrow indicating rotation (no text or symbols present)natural_image
Circular diagram with intersecting lines and a numbered label '3' (no text or symbols within the diagram itself)4
*5

natural_image
Two-step diagram showing hand tool application on a device, one being inserted and the other holding a screwdriver (no text or symbols present)natural_image
Line drawing of a device rear panel with a screwdriver inserted, showing internal components and wiring (no text or symbols)natural_image
Line drawing of a hand adjusting a mechanical component with hoses and a central hub (no text or symbols)natural_image
Three mechanical components labeled 1, 2, and 3, shown in grayscale without any text or symbols.natural_image
Simple line drawing of a mechanical component with no text or symbolsnatural_image
Line drawing of a hand holding a small object next to a vertical line (no text or symbols)Εγκατάσταση
natural_image
Simple line drawing of a mechanical component with no text or symbolsnatural_image
Illustration of hands holding a cable with a connector attached (no text or symbols)
natural_image
Line drawing of a hand inserting cables into a device panel (no text or symbols)natural_image
Illustration of a hand holding a tool next to a tablet device with cables (no text or symbols visible)natural_image
Line drawing of a gas cylinder connected to a valve and tubing (no text or symbols)natural_image
Pure mechanical diagram showing a linkage mechanism without any text, numbers, or symbolsnatural_image
Line drawing of a hand holding a tool with a hook and a separate hook (no text or symbols)natural_image
Illustration of a hand holding a cylindrical device with wires, next to an upward arrow (no text or symbols)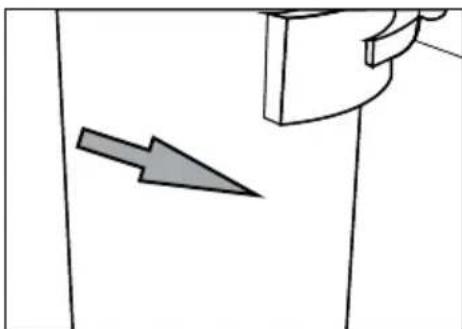
natural_image
Simple line drawing of a door with an arrow pointing to the side panel (no text or symbols)Εγκατάσταση
natural_image
Line drawing of a computer monitor with a hand inserting a cable to the right panel (no text or symbols)Γραμμή νερού:
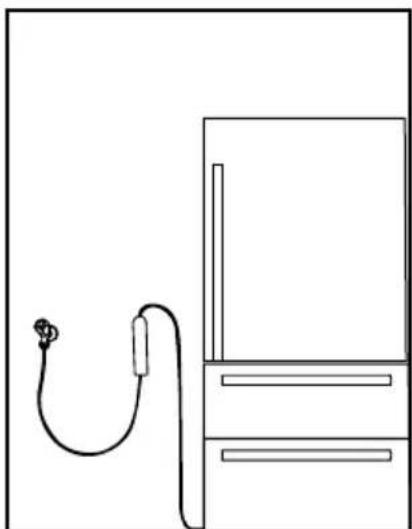
natural_image
Simple line drawing of a cordless cable connected to a rectangular device (no text or symbols)natural_image
Line drawing of a water pump connected to a refrigerator (no text or symbols)
natural_image
Diagram of a refrigerator interior showing airflow direction and storage compartments (no text or symbols)
natural_image
Interior view of a kitchen appliance with shelves, cabinets, and a microwave oven (no text or symbols visible)
natural_image
Line drawing of a hand holding a small object above a shelf (no text or symbols)4.2. Πρώτη χρήση
natural_image
Line drawing of a hand inserting a component into a rack with a grid-patterned vent (no text or symbols)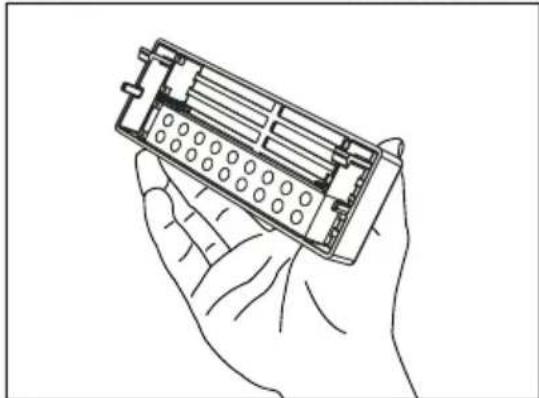
natural_image
Line drawing of a hand holding an electronic device with a grid-like internal structure (no text or symbols)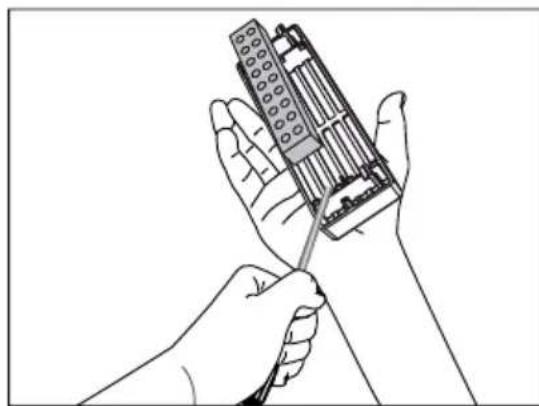
natural_image
Line drawing of two hands holding a mechanical component, no text or symbols presentnatural_image
Technical line drawings showing a hand installing or adjusting a vehicle door panel, with no visible text or symbols.5.8. Παγοθήκη
(Προαιρ.)
natural_image
Line drawing of a mechanical component placed on a slatted base (no text or symbols)
natural_image
Technical line drawing of a mechanical assembly with no visible text or symbolsΧρήση του προϊόντος
natural_image
Technical line drawing of a mechanical assembly with two views (top and bottom), no text or symbols present.Χρήση του προϊόντος
https://eprel.ec.europa.eu/
Kazalo vsebine
1 Varnost in okoljska navodila 3
1.1. Splošna varnost .... 3
1.1.1 HC opozorilo 4
1.1.2 Pri modelih z vodno fontano. 4
1.2. Predvidena uporaba ..... 5
1.3. Varnost otrok ..... 5
1.4. Skladnost z direktivo OEEO in odstranjevanjem odpadnih izdelkov: 5
1.5. Skladnost z direktivo RoHS: ..... 5
1.6. Podatki o embalaži 5
2 Hladilnik 6
3 Namestitev 7
natural_image
Technical line drawing of a mechanical assembly with two components, no text or symbols present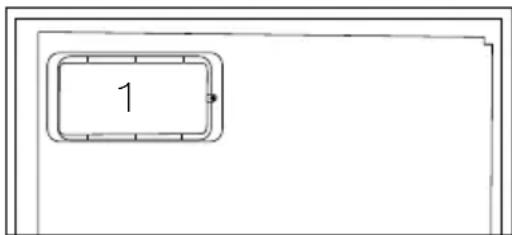
natural_image
Diagram showing a mechanical or electrical component with a lightning bolt and lever mechanism (no text or symbols)1.1.1 HC opozorilo
natural_image
Line drawing of a hand inserting a screwdriver into a device panel (no text or symbols)natural_image
Line drawing of a hand inserting a screwdriver into a device panel (no text or symbols)Namestitev
natural_image
Mechanical diagram showing a hand operating a tool with a circular component, no text or symbols presentnatural_image
Illustration of five different types of hair connectors and tubing, including a coiled hose, a connector, a pressure vessel, and a cylindrical device (no text or symbols present)natural_image
Two-step diagram showing hand tool application: one to press a component, the other to hold a pen (no text or symbols present)natural_image
Line drawing of a computer monitor rear panel with a hand inserting a cable (no text or symbols)natural_image
Line drawing of a hand adjusting a mechanical component with no visible text or symbolsnatural_image
Three mechanical components labeled 1, 2, and 3, shown in grayscale without any text or symbols on the parts themselves.natural_image
Simple line drawing of a mechanical component with no text or symbols- Pritrdite priključek okoli cevi za vodo.
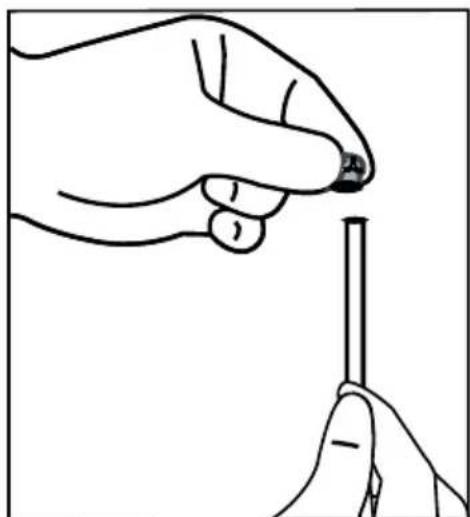
natural_image
Line drawing of a hand holding a pen, no text or symbols presentNamestitev
- Pritrdite priključek v vmesnik pipe in zategnite ročno ali z orodjem.
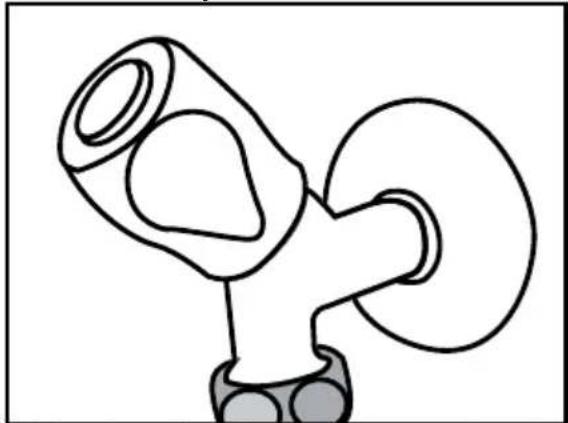
natural_image
Simple line drawing of a mechanical component with no text or symbolsnatural_image
Illustration of hands holding a curved cable or wire with a connector (no text or symbols)
natural_image
Line drawing of a hand inserting a cable into a device panel (no text or symbols)natural_image
Illustration of a hand holding a cable connected to a tablet device (no text or symbols visible)- Namestite in pritrdite cev črpalke v notranjost balona.
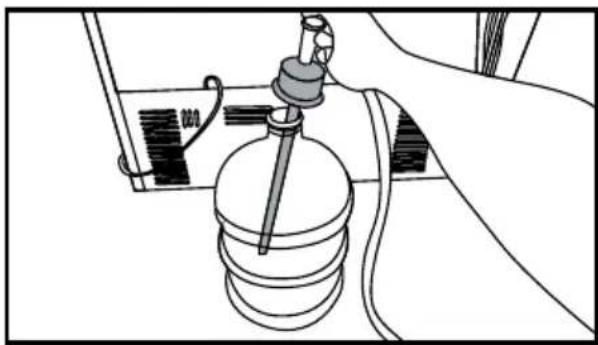
natural_image
Line drawing of a gas cylinder connected to a valve and tubing (no text or symbols)natural_image
Technical line drawing of a mechanical joint or bracket (no text or symbols)natural_image
Line drawing of a hand holding a tool with a hook, next to a separate curved object (no text or symbols)natural_image
Illustration of a hand holding a cylindrical device with wires, next to an upward arrow (no text or symbols)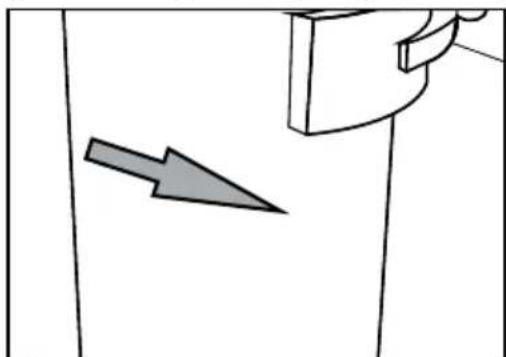
natural_image
Simple line drawing of a door with an arrow pointing to the side panel (no text or symbols)Namestitev
3.9.2.Notranji filter
natural_image
Line drawing of a computer monitor with a hand inserting a cable to the right panel (no text or symbols)Vodna linija:
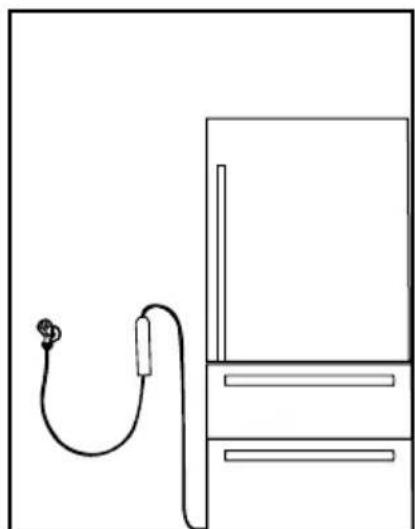
natural_image
Simple line drawing of a cordless cable connected to a refrigerator (no text or symbols)Linija do balona:
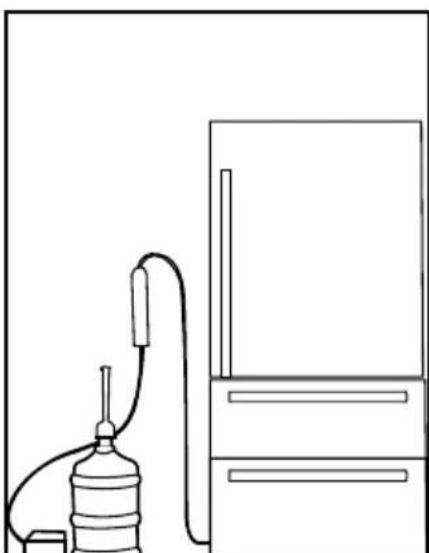
natural_image
Line drawing of a water pump connected to a refrigerator (no text or symbols)
- Odstranite vodni filter z izvlečenjem pokrova za obvod.
Namestitev

natural_image
Diagram of a refrigerator interior showing airflow direction and storage compartments (no text or symbols)natural_image
Interior view of a kitchen appliance with shelves and a mounted kitchen unit (no visible text or symbols)
natural_image
Line drawing of a hand holding a small object near a shelf (no text or symbols)natural_image
Technical line drawing of a mechanical assembly with no visible text or symbols5.4. Ice box
natural_image
Line drawing of a mechanical component or device on a slatted base (no text or symbols)natural_image
Line drawing of a hand inserting a component into a storage cabinet (no text or symbols)
natural_image
Line drawing of a hand holding an electronic device with ports and buttons (no text or symbols)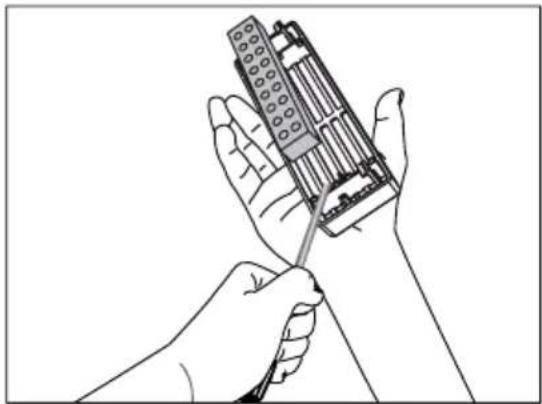
natural_image
Line drawing of hands using a screwdriver to adjust or install a mechanical component (no text or symbols present)Uporaba naprave
5.9. Iztegljiv predal
natural_image
Technical line drawings showing two views of a mechanical device with hands adjusting parts (no text or symbols present)natural_image
Technical line drawing of a mechanical assembly with two views (top and bottom), no text or symbols present.https://eprel.ec.europa.eu/
1. Važne upute za sigurnost i očuvanje okoliša 3
1.1. Općenite informacije o sigurnosti3
1.1.1 HCA upozorenje .... 5
1.1.2 Za proizvode s dispenzerom za vodu....5
1.2. Namjena....6
1.3. Sigurnost djece....6
1.4. Usklađenost s Direktivom o električnom i elektroničkom opremom (WEEE) i zbrinjavanju otpada:....6
1.5. Usklađenost s Direktivom o zabrani uporabe određenih opasnih tvari u električnoj i elektroničkoj opremi (RoHS): 7
1.6. Informacije o pakiranju .....7
2 Vaš uređaj 8
3 Ugradnja 9
3.1. Adekvatno mjesto za ugradnju. 9
3.2. Postavljanje plastičnih klinova . 9
3.3. Podešavanje postolja.....10
3.4. Priključak za opskrbu električnom energijom ....10
3.5. Priključak za vodu ..... 10
3.6. Povezivanje crijeva za vodu na proizvod ....11
3.7. Povezivanje na vodovodnu mrežu ....11
3.8. Za proizvode koji koriste bocu za vodu....12
3.9 Filtar za vodu....13
3.9.1. Učvršćivanje vanjskog filtra na zid (neobvezno)....13
3.9.2. Unutarnji filtar .....15
4 Priprema 17
4.1. Radnje za uštedu energije.....17
4.2. Prva uporaba .....17
natural_image
Line drawing of a hand inserting a screwdriver into a device panel (no text or symbols)- Pričvrstite 2 plastična klina na poklopcu za ventilaciju kao na slici.
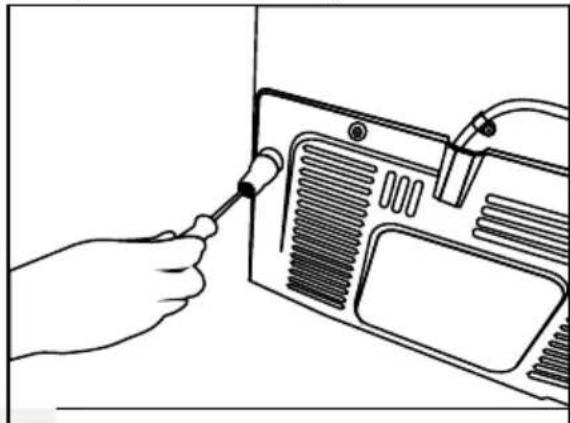
natural_image
Line drawing of a hand using a screwdriver to adjust or install a device component (no text or symbols visible)Postavljanje
3.3. Podešavanje postolja
natural_image
Mechanical diagram showing a hand operating a tool with a rotating arrow (no text or symbols)3.4. Priključak za opskrbu električnom energijom
| POZOR: Ne koristite produžni kabel ili kabel sa više utičnica u priključak za napajanje. | |
| POZOR: Oštećeni kabel za napajanje mora biti zamijenjen sa stane ovlaštenog servisa. | |
| Prilikom postavljanja dva hladnjaka u susjednoj poziciji, ostaviti najmanje 4 cm udaljenosti između dvije jedinice. |
- Naša firma ne preuzima odgovornost za bilo kakvu štetu zbog korištenja bez uzemljenja i bez priključka u skladu sa nacionalnim propisima.
- Napojni kabel mora biti lako dostupan nakon instalacije.
- Hladnjak priključite u uzemljenu utičnicu s naponom 220-240V/50
Hz. Utičnica mora sadržavati osigurač od 10-16A.
- Nemojte koristiti utikač s više grupa s ili bez produžnog kabela između zidne utičnice i hladnjaka.
natural_image
Illustration of five different types of industrial equipment: a cylindrical component, coiled tubing, a pressure regulator, a pressure vessel, and a cylindrical device (no text or symbols present)natural_image
Two-step diagram showing hand tool application on a device component, no text or symbols present- Čvrsto gurnite nadolje crijevo za vodu i spojite na adapter mlaznice crijeva.
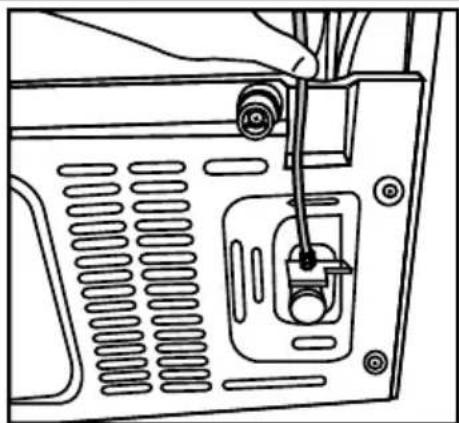
natural_image
Line drawing of a computer monitor rear panel with a hand inserting a cable (no text or symbols)natural_image
Line drawing of a hand adjusting a mechanical component with no visible text or symbols3.7. Povezivanje na vodovodnu mrežu (Neobvezno)
Da biste proizvod koristili s priključkom na mrežu hladne vode, na mrežu opskrbe hladnom vodom u vašem domaćinstvu mora bit ugrađen standardni priključak s ventilom od 1/2". Ako priključak nije dostupan ili niste sigurni, obratite se kvalificiranom vodoinstalateru.
- Odvojite priključak (1) od adaptera slavine (2).
Postavljanje
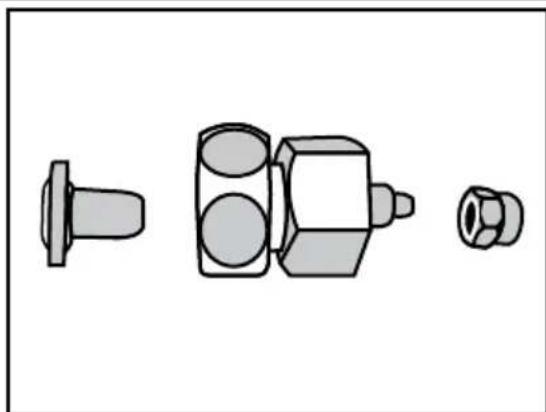
natural_image
Technical illustration of three mechanical components: a bolt, a hexagonal nut, and a separate hexagonal nut (no text or symbols)- Spojite adapter slavine na ventil mreže.
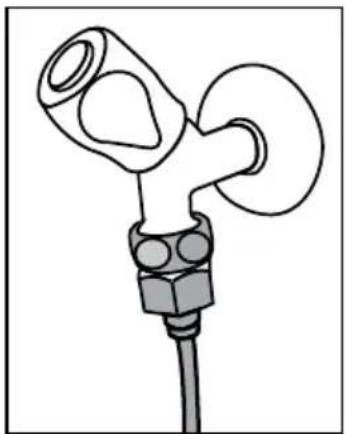
natural_image
Simple line drawing of a mechanical component with no text or symbolsnatural_image
Line drawing of a hand holding a pen, no text or symbols present- Pričvrstite priključak u adapter slavine i zategnite ga rukom/alatom.
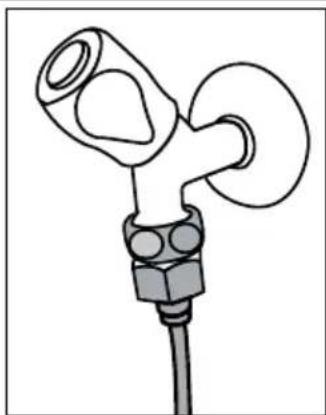
natural_image
Simple line drawing of a mechanical or electrical component with no text or symbols- Kako ne biste oštetili, pomjerili ili slučajno iskopčali crijevo, koristite obujmice za učvršćivanje crijeva za vodu na odgovarajući način.
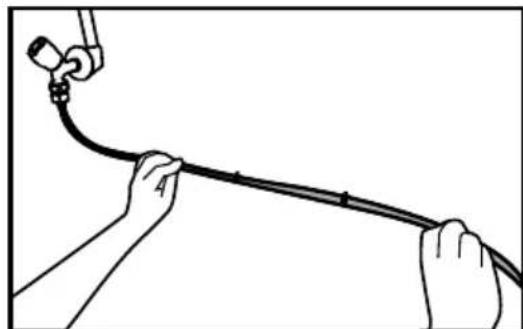
natural_image
Illustration of hands holding a cable with a connector attached (no text or symbols)
natural_image
Line drawing of a hand inserting cables into a device panel (no text or symbols)natural_image
Illustration of a hand holding a cable connected to a device with cables (no text or symbols visible)natural_image
Line drawing of a gas stove with a pressure gauge and tubing (no text or symbols)natural_image
Pure mechanical component diagram without any text, numbers, or symbols- Odredite mjesto za učvršćivanje vanjskog filtra. Učvrstite uređaj za spajanje filtra (5) na zid.
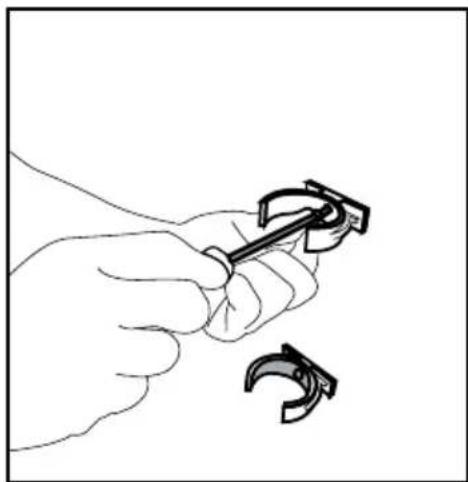
natural_image
Line drawing of a hand holding a tool with a hook attachment (no text or symbols)- Pričvrstite filtar u uspravnom položaju na uređaj za spajanje filtra, kao što je naznačeno na naljepnici. (6).
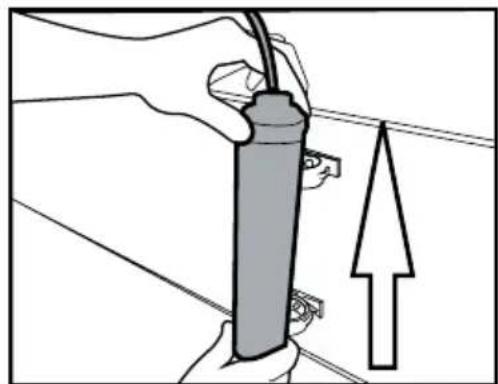
natural_image
Illustration of a hand holding a cylindrical device with wires, next to an upward arrow (no text or symbols)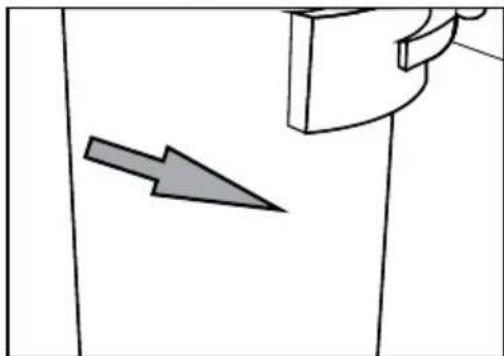
natural_image
Simple line drawing of a door with an arrow pointing to the side (no text or symbols)- Pričvrstite crijevo za vodu koje se proteže od vrha filtra do adaptera za priključak vode na proizvod (vidi. 36).
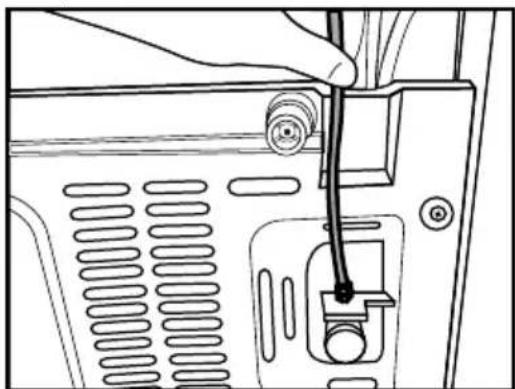
natural_image
Line drawing of a hand inserting a plug into a device panel (no text or symbols)natural_image
Simple line drawing of a cord with a plug and attached box (no text or symbols)Dovod iz boce:

natural_image
Line drawing of a gas collection apparatus with a water bottle connected to a control panel (no text or symbols)3.9.2. Unutarnji filtar
natural_image
Interior view of a refrigerator with shelves and doorways, showing airflow direction (no text or symbols)- Postavite poklopac filtra za vodu u mehanizam i gurnite ga da se čvrsto uklopi na svoje mjesto.
Postavljanje

natural_image
Interior view of a refrigerator with built-in shelves and a kitchen appliance (no text or symbols visible)- Pritisnite opet tipku „Ice“ na zaslonu da biste otkazali režim „Ice Off“.

natural_image
Line drawing of a hand holding a small object inside a cabinet (no text or symbols)osigurala ušteda energije i očuvala hrana u boljem ambijentu.
natural_image
Line drawing of a hand placing a component into a storage shelf (no text or symbols)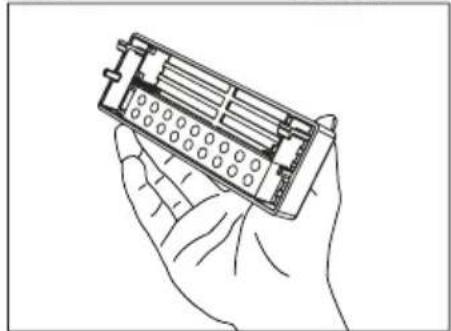
natural_image
Line drawing of a hand holding an electronic device with a grid-like internal structure (no text or symbols)
natural_image
Illustration of hands using a tool to adjust or install a mechanical component (no text or symbols visible)5.6. Teleskopskaladica
natural_image
Technical line drawings showing two views of a vehicle door handle assembly, with no visible text or symbols.Rukovanje uređajem
5.7. Ionizator
(Neobvezno)
natural_image
Technical line drawing of a mechanical assembly with two views (top and bottom), no text or symbols present.5.10. Spremnik za led
(Neobvezno)
Spremnik za led omogućuje vam jednostavno dobivanje leda iz proizvoda.
Uporaba spremnika za led
natural_image
Technical line drawing of a mechanical assembly with no visible text or symbols5.12. Kutija za led
natural_image
Line drawing of a mechanical component mounted on a slatted base (no text or symbols)5.13. Zamrzavanje svježih namirnica
- Za očuvanje kvalitete hrane, hrana stavljena u odjeljak zamrzivača se mora zamrznuti što je brže moguće, za ovo možete koristiti brzo zamrzavanje.
- Zamrzavanje prehrambenih proizvoda kada su svježi produžiće vrijeme skladištenja u zamrzivaču.
- Prehrambene proizvode pakirajte u hermetički zatvorena pakiranja i čvrsto ih zalijepite.
- Pobrinite se da prehrambeni proizvodi budu spakirani prije stavljanja u zamrzivač. Koristite držala za zamrzavanje, staniol i vodootporni papir, plastične
natural_image
Simple line drawing of a pear and a carrot (no text or symbols)GNE60531XN
NL/FR
CE
58 4678 0000/AG-3/6-NL-FR
natural_image
Diagram showing a device with a lightning bolt striking a surface and connected to an electrical plug (no text or symbols present)1.1.1 HC waarschuwing
natural_image
Line drawing of a hand inserting a screwdriver into a device panel (no text or symbols)natural_image
Line drawing of a hand using a screwdriver to adjust or install a device panel (no text or symbols visible)Installatie
natural_image
Simple line drawing of a two-panel cabinet or enclosure with mounting feet (no text or symbols)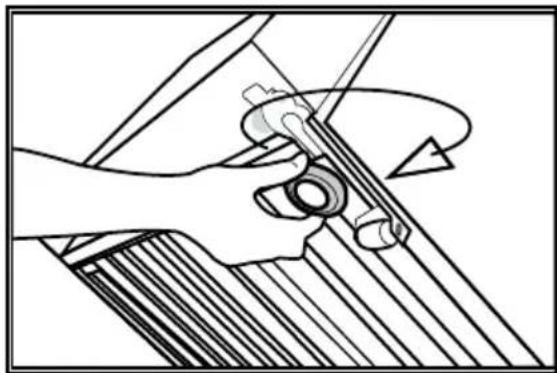
natural_image
Illustration of a hand holding a tool with a circular component, no text or symbols presentnatural_image
Illustration of five different types of hair connectors and tubing, including a coiled tube, a connector, a water dispenser, and a cylindrical device (no text or symbols present)natural_image
Illustration showing a hand inserting a component into a device, with no visible text or symbolsnatural_image
Line drawing of a computer monitor rear panel with a hand inserting a screwdriver into the case (no text or symbols)natural_image
Line drawing of a hand adjusting mechanical components (no text or symbols)natural_image
Three mechanical components labeled 1, 2, and 3, shown in grayscale without any text or symbols on the parts themselves.natural_image
Simple line drawing of a mechanical or electrical component with no text or symbols- Bevestig de connector rond de waterslang.
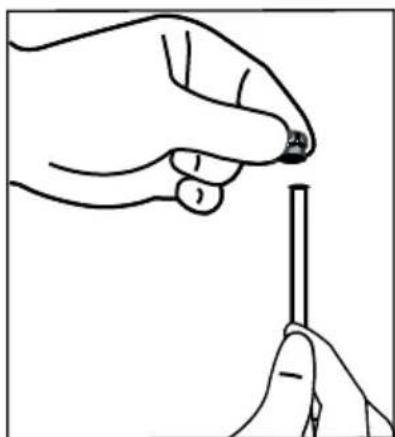
natural_image
Line drawing of a hand holding a small object near a vertical rod (no text or symbols)Installatie
natural_image
Simple line drawing of a mechanical or electrical component with no text or symbolsnatural_image
Illustration of hands holding a curved cable or wire with a connector (no text or symbols)
natural_image
Line drawing of a hand inserting a component into a device panel (no text or symbols)natural_image
Illustration of a hand holding a cable inserted into a device with cables (no text or symbols visible)natural_image
Line drawing of a gas collection apparatus with a cylindrical tank and tubing (no text or symbols)natural_image
Pure mechanical component diagram without any text, numbers, or symbolsnatural_image
Line drawing of a hand holding a tool with a hook and a separate curved clip (no text or symbols)natural_image
Two-panel illustration showing a hand holding a cylindrical device with an upward arrow and a separate close-up of a tool (no text or symbols)Installatie
3.9.2. Interne filter
natural_image
Line drawing of a hand inserting a cable into a device panel (no text or symbols)Waterleiding:

natural_image
Simple line drawing of a cordless cable connected to a cabinet (no text or symbols)Mandflesleiding:
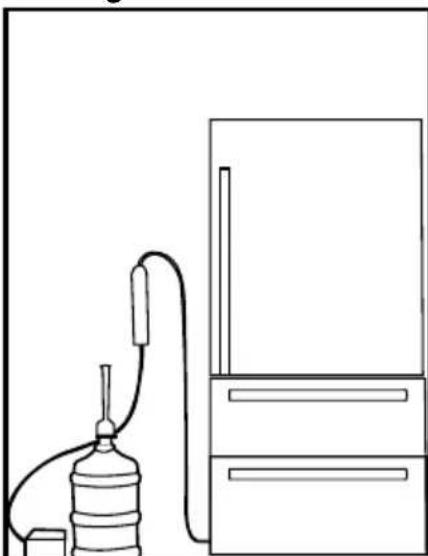
natural_image
Line drawing of a water pump connected to a refrigerator (no text or symbols)
Installatie
natural_image
Diagram of a refrigerator interior showing airflow direction and storage compartments (no text or symbols)natural_image
Interior view of a refrigerator with built-in door and shelf (no visible text or symbols)natural_image
Line drawing of a hand holding a small object inside a cabinet (no text or symbols)4.2. Eerste gebruik
natural_image
Technical line drawings showing two views of a vehicle door frame, one with hand placement and the other with seatbelt (no text or symbols)5.8. IJsdispenser (Optioneel)
natural_image
Technical line drawing of a mechanical assembly with no visible text or symbols5.10. Ice box
natural_image
Line drawing of a mechanical assembly with rollers and slats (no text or symbols)natural_image
Technical line drawing of a mechanical assembly with two views (top and bottom) showing internal components and alignment, no text or symbols present.DISCLAIMER / WAARSCHUWING
natural_image
Line drawing of a hand inserting a screwdriver into a device panel (no text or symbols)natural_image
Line drawing of a hand using a screwdriver to adjust or install a device panel (no text or symbols visible)Installation
natural_image
Mechanical diagram showing a hand operating a tool with a circular component, no text or symbols presentnatural_image
Illustration of five different types of industrial components or fittings, including a coiled hose, flange, connector, and cylindrical device (no text or symbols present)natural_image
Illustration showing two-step installation: one of a hand holding a screwdriver, the other of a hand holding a pen (no text or symbols present)natural_image
Line drawing of a computer monitor rear panel with a hand inserting a cable to the right panel (no text or symbols)natural_image
Line drawing of a hand adjusting a mechanical component with no visible text or symbolsnatural_image
Technical illustration of three mechanical components: a bolt, a hexagonal nut, and a separate nut (no text or symbols)natural_image
Simple line drawing of a mechanical or electrical component with no text or symbolsnatural_image
Line drawing of a hand holding a pen, no text or symbols presentnatural_image
Simple line drawing of a mechanical component with no text or symbolsnatural_image
Illustration of hands holding a cable with a connector attached (no text or symbols)
natural_image
Line drawing of a hand inserting a component into a device panel (no text or symbols)natural_image
Illustration of a hand holding a device with wires, no text or symbols presentnatural_image
Line drawing of a gas cylinder connected to a valve and tubing (no text or symbols)natural_image
Technical line drawing of a mechanical component or bracket (no text or symbols)natural_image
Line drawing of a hand holding a hook-shaped tool, with a separate curved component attached (no text or symbols)natural_image
Illustration of a hand holding a cylindrical device with wires, next to an upward arrow (no text or symbols)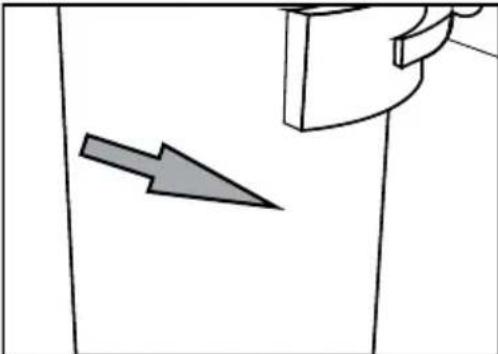
natural_image
Simple line drawing of a door with an arrow pointing to the side panel (no text or symbols)natural_image
Line drawing of a hand inserting a cable into a device panel (no text or symbols)natural_image
Simple line drawing of a cord with a connector attached to a cabinet (no text or symbols)natural_image
Line drawing of a water pump connected to a refrigerator (no text or symbols)3.9.2. Filtre interne
natural_image
Diagram of a refrigerator interior showing airflow direction and storage compartments (no text or labels)natural_image
Interior view of a refrigerator with built-in shelves and a mounted appliance (no visible text or symbols)natural_image
Line drawing of a hand holding a small object above a shelf (no text or symbols)natural_image
Line drawing of a hand inserting a component into a rack with a gridded vent (no text or symbols)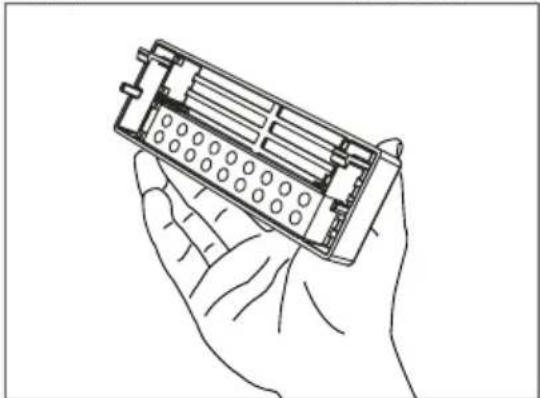
natural_image
Line drawing of a hand holding a battery pack (no text or symbols)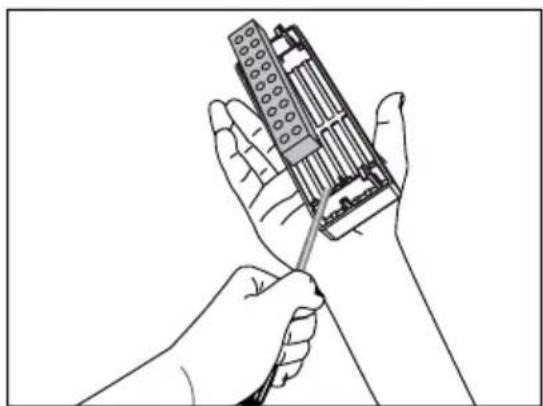
natural_image
Line drawing of two hands holding a mechanical device with a screwdriver (no text or symbols)natural_image
Technical line drawings showing two views of a vehicle door frame, one with hand positioning and the other with foot (no text or symbols)5.7. Ioniseur
(En option)
natural_image
Line drawing of a mechanical component with ribbed base and guide rails (no text or symbols)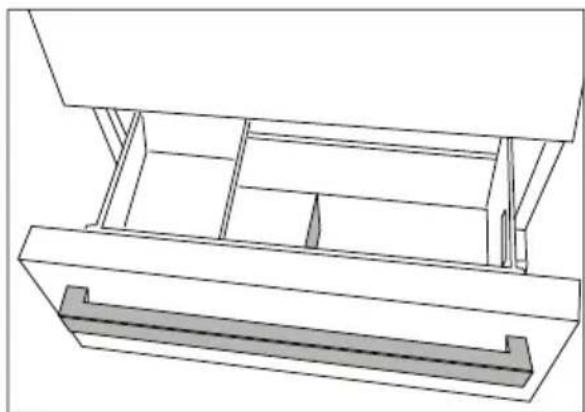
natural_image
Technical line drawing of a mechanical assembly with no visible text or symbols5.10. Section centrale modulable
natural_image
Technical line drawing of a mechanical assembly with no visible text or symbolsnatural_image
Simple line drawing of a pear and a carrot (no text or symbols)GNE60531XN
BO/SQ
CE
58 4678 0000/AG-4/6-BO-SQ
Dragi kupce,
Mi želimo da se postigne optimalna efikasnost od našeg proizvoda, koji je proizveden u modernim objektima s pedantnom kontrole kvalitete.
Za tu svrhu, molimo vas da u potpunosti pročitate korisnički vodič prije korištenja proizvoda i zadržati ga kao izvor referenca. Ako date proizvod drugoj osobi, predati ovaj vodič uz proizvod.
Korisnički priručnik osigurava brzu i sigurnu upotrebu proizvoda.
- Molimo pročitajte korisnički vodič prije instaliranja i upotrebe proizvoda.
- Obavezno se pridržavati važećih sigurnosnih uputa.
- Držite korisničkog vodiča na dohvat ruke za buduću upotrebu.
- Molimo vas da pročitate sve ostale dokumente koje ste dobili uz proizvod.
natural_image
Line drawing of a hand inserting a screwdriver into a device panel (no text or symbols)- Da biste priključili klinove, uklonite vijke na proizvodu i koristiti vijke priložene sa klinovima.
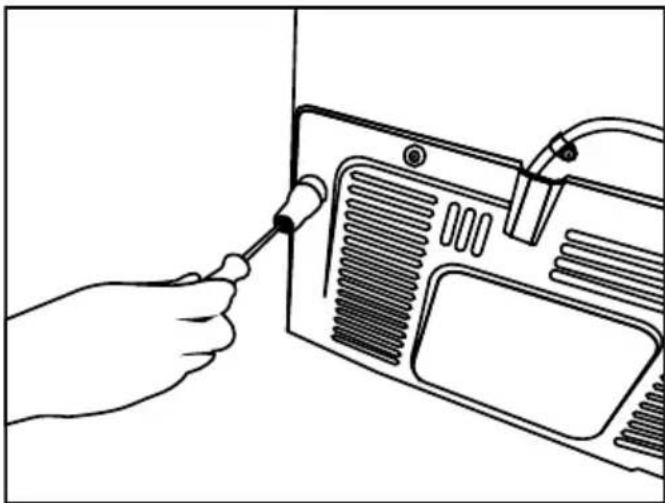
natural_image
Line drawing of a hand using a screwdriver to adjust or install a device panel (no text or symbols visible)- Pričvrstite 2 plastičnih klinova na poklopcu ventilaciju kao (j) na slici.
Instalacija
3.3. Podešavanje postolja
Ako proizvod nije u uravnotežen položaj, podesite prednja podesiva postolja okretanjem na desno ili lijevo.

natural_image
Simple line drawing of a two-panel cabinet or enclosure with two side supports and a vertical divider (no text or symbols)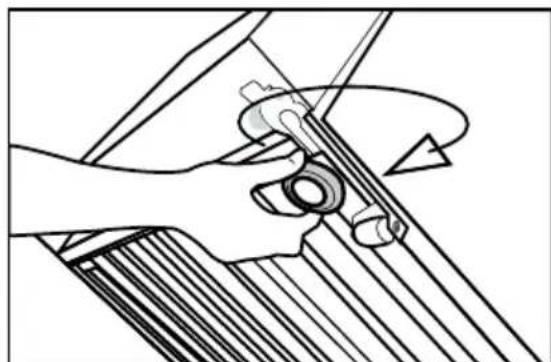
natural_image
Mechanical assembly diagram showing hands operating a tool with a curved handle (no text or symbols)natural_image
Illustration of five different types of industrial equipment or connectors, including a coiled hose, coiled clips, a pressure regulator, and a cylindrical device (no text or symbols present)Instalacija
3.6. Povezivanje crijevo za vodu na proizvod
Da biste povjezali crijevo za vodu na proizvod, slijedite upute u nastavku.
- Uklonite priključak na crijevo mlaznica adapter u zadnje strane uređaja i crijevo kroz konektor.
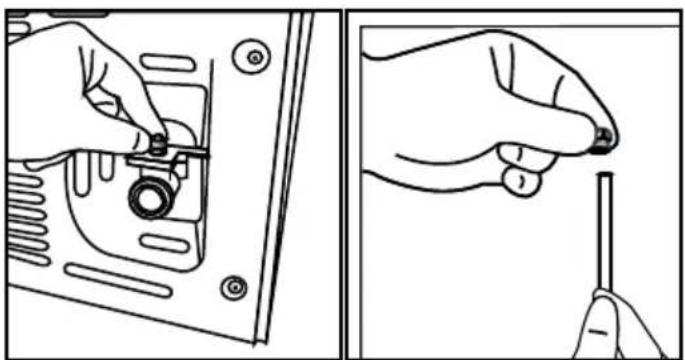
natural_image
Illustration showing two hand positions: one holding a small component, the other holding a tool (no text or symbols present)- Gurnite crijevo za vodu čvrsto ka dole i povezite na crijevo adapter mlaznice.
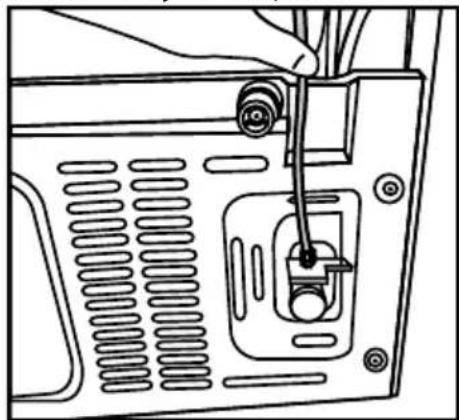
natural_image
Line drawing of a computer monitor rear panel with a cable inserted, showing internal components and ventilation slots (no text or symbols)natural_image
Line drawing of a hand adjusting a mechanical component with no visible text or symbols- Spojite drugi kraj crijeva u vodovodu mrežu (vidi poglavlje 3.7) ili, kod flaše za vode, na pumpu za vodu (vidi odjeljak 3.8).
3.7. Povezivanje na vodovod (Opcionalno)
Da biste koristili proizvod povezivanjem na mrežu hladne vode, na vodovodnu mrežu hladne vode u vaš dom mora biti instaliran standardni 1/2 "priključak ventila. Ako konektor nije dostupan ili ako niste sigurni, obratite se kvalificiranom vodoinstalateru.
natural_image
Three mechanical components labeled 1, 2, and 3, shown in grayscale without any text or symbols on the parts themselves.natural_image
Simple line drawing of a mechanical component with no text or symbolsnatural_image
Line drawing of a hand holding a pen tip, no text or symbols presentInstalacija
- Pričvrstite priključak na adapter slavine i zategnite rukom / alatom.
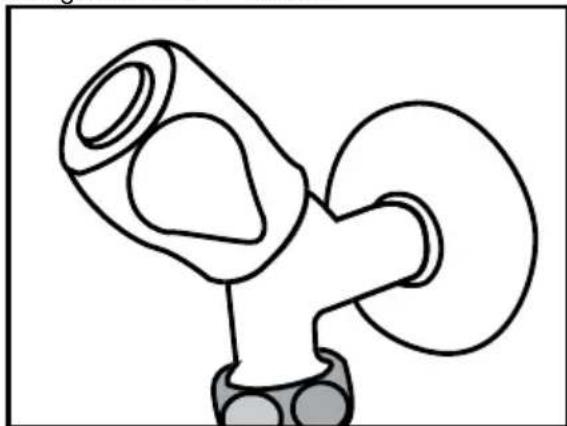
natural_image
Simple line drawing of a mechanical component with no text or symbols- Da biste izbjegli oštećenja, prebacivanje ili slučajno isključivanja crijeva, koriste spojnice za fiksirati crijevo za vodu na odgovarajući način.

natural_image
Illustration of hands holding a cable with a connector attached (no text or symbols)
natural_image
Line drawing of a hand inserting cables into a device panel (no text or symbols)- Spojite drugi kraj crijeva na pumpu za vodu guranjem crijeva u pumpin dovod za crijevo.
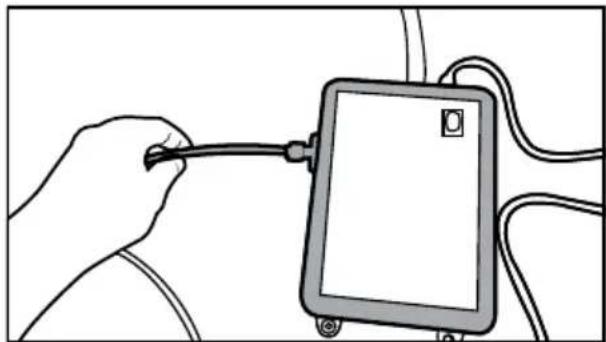
natural_image
Illustration of a hand holding a cable connected to a tablet device (no text or symbols visible)natural_image
Line drawing of a gas cylinder connected to a valve and tubing (no text or symbols)- Kada je veza uspostavljena, priključite i uključite pumpu za vodu.
natural_image
Pure mechanical component diagram without any text, numbers, or symbols- Pričvrstite crijevo za vodu koje se proteže od vrha filtra do adaptera priključka vode proizvoda (vidi 3.6.)

natural_image
Line drawing of a hand holding a tool with a hook, no text or symbols presentNakon što je veza uspostavljena, ona treba da izgleda kao na slici.
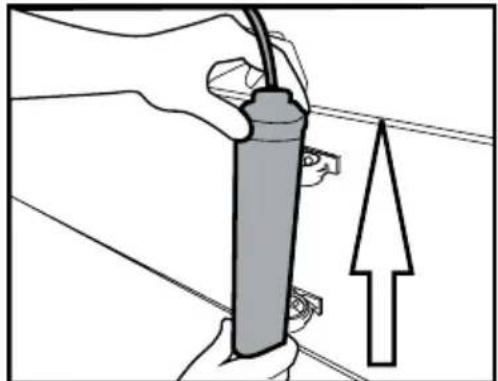
natural_image
Illustration of a hand holding a cylindrical device with wires, next to an upward arrow (no text or symbols)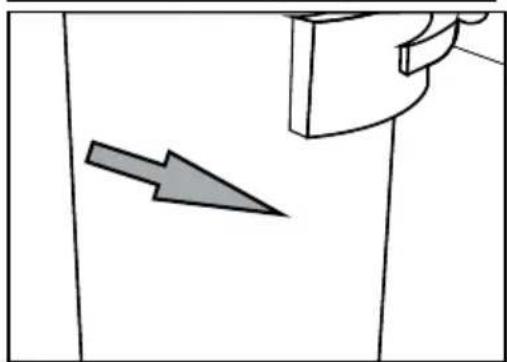
natural_image
Simple line drawing of a door with an arrow pointing to the side panel (no text or symbols)Instalacija
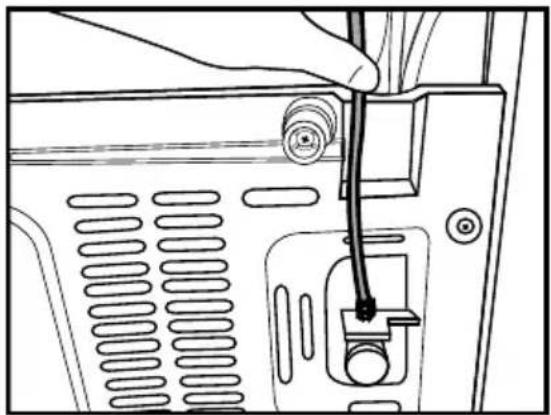
natural_image
Line drawing of a hand inserting a cable into a device panel (no text or symbols)Vodna linija:
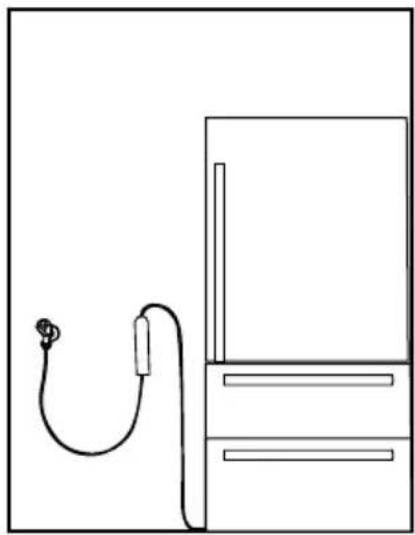
natural_image
Simple line drawing of a cordless cable connected to a refrigerator (no text or symbols)Linija flaše:
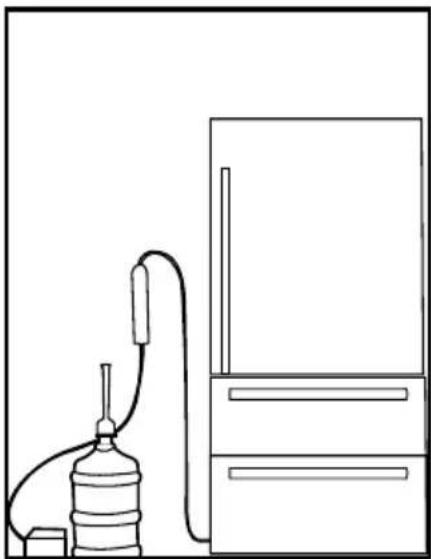
natural_image
Line drawing of a gas collection apparatus with a water bottle connected to a refrigerator (no text or symbols)3.9.2.Interni filter
natural_image
Diagram of a refrigerator interior showing airflow direction and storage compartments (no text or symbols)- Stavite poklopac filtera za vodu u mehanizam i pritisnite da biste ga zaključali.
Instalacija
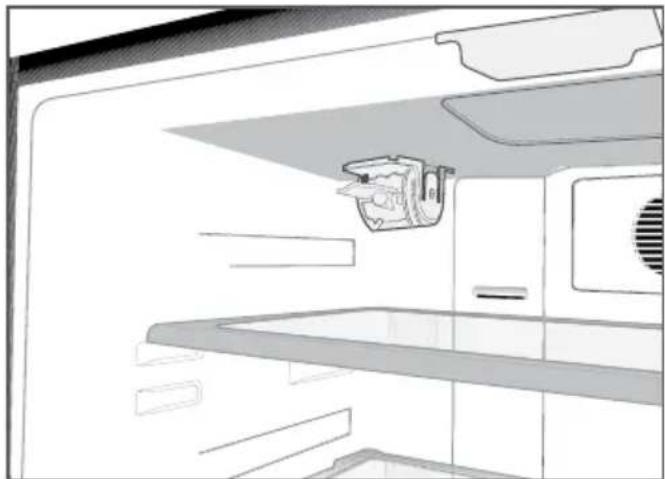
natural_image
Interior view of a kitchen appliance with shelves, cabinets, and a microwave oven (no text or symbols visible)- Pritisnite ponovo dugme“Led” na ekranu da biste poništili način rada “”isključivanje leda”.
natural_image
Line drawing of a hand holding a small object near a shelf (no text or symbols)4.2. Prvo korištenje
natural_image
Line drawing of a hand placing a component into a storage cabinet shelf (no text or symbols)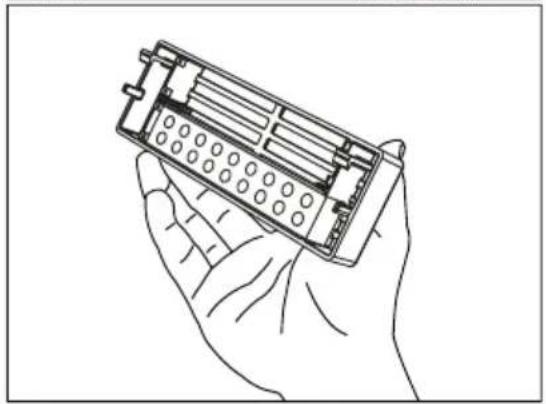
natural_image
Line drawing of a hand holding an electronic device with a grid-like internal structure (no text or symbols)
natural_image
Line drawing of a hand holding a handheld electronic device with a screwdriver (no text or symbols)Korištenje proizvoda
5.8. Teleskopska ladica
natural_image
Technical line drawings of a vehicle door frame and interior space, showing hand positioning and mounting details (no text or symbols)5.9. Pokretni srednji dio
natural_image
Technical line drawing of a mechanical assembly with two views (top and bottom) showing internal components and directional arrows, no text or symbols present.Korištenje proizvoda
natural_image
Technical line drawing of a mechanical assembly with no visible text or symbols5.11. Kutija za led
Molimo pročitajte pažljivo upozorenje na posudi za led. Posuda za led koristi se za skupljanje leda iz mašine za led. Nemojte stavljati vodu u njega da bi napravili led jer može doći do lomljenja. Posuda za led se ne koristi za spremanje hrane.
natural_image
Line drawing of a mechanical assembly with rollers and slats (no text or symbols)5.12. Ladica sa kontrolisanom vlažnosti
(FreSHelf)
(Ova funkcija je neobavezna)
Vlažnost voća i povrća se drži pod kontrolom sa karakteristikom vlage pod kontrolom u kutiji i hrana je osigurana da duže ostane svježa.
https://eprel.ec.europa.eu/
Përmbajtja
natural_image
Line drawing of a hand inserting a screwdriver into a device panel (no text or symbols)natural_image
Line drawing of a hand using a screwdriver to adjust or install a device panel (no text or symbols visible)Montimi
natural_image
Simple line drawing of a two-decker cabinet with two doors and two base feet (no text or symbols)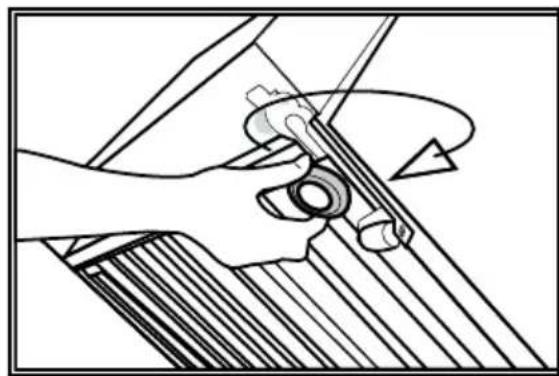
natural_image
Mechanical diagram showing a hand operating a tool with a circular component, no text or symbols present3.4. Lidhja elektrike
natural_image
Illustration of five different types of industrial equipment: a coiled hose, two clamps, a pressure regulator, and a cylindrical device (no text or symbols present)natural_image
Illustration showing a hand inserting a screw into a device, with no text or symbols present.natural_image
Line drawing of a computer monitor rear panel with a hand inserted, showing internal components and ventilation slots (no text or symbols)natural_image
Line drawing of a hand adjusting a mechanical component with no visible text or symbolsnatural_image
Three mechanical components labeled 1, 2, and 3, shown in grayscale without any text or symbols.natural_image
Simple line drawing of a mechanical device with no text or symbols- Lidheni bashkuesin te tubi i ujit.
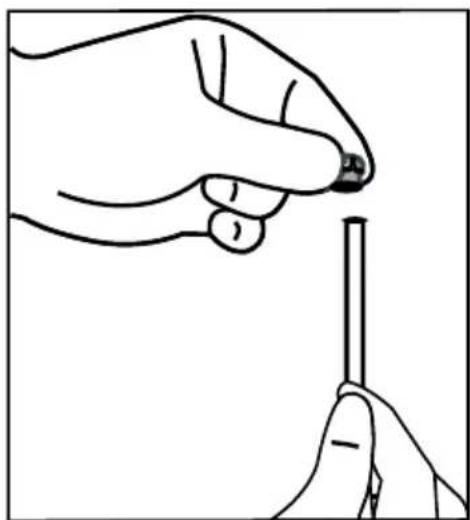
natural_image
Line drawing of a hand holding a pen, no text or symbols presentMontimi
natural_image
Simple line drawing of a mechanical component with no text or symbolsnatural_image
Illustration of hands holding a cable with a connector (no text or symbols)
natural_image
Line drawing of a hand inserting a cable into a device panel (no text or symbols)natural_image
Line drawing of a hand holding a cable inserted into a device (no text or symbols visible)natural_image
Line drawing of a gas cylinder connected to a valve and tubing (no text or symbols)natural_image
Pure mechanical component diagram without any text, numbers, or symbolsnatural_image
Line drawing of a hand holding a tool with a hook, no text or symbols presentnatural_image
Illustration of a hand holding a cylindrical device with wires, next to an upward arrow (no text or symbols)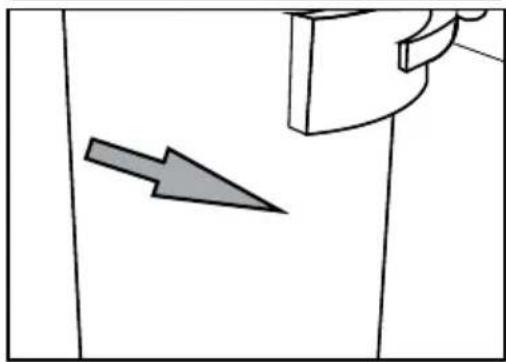
natural_image
Simple line drawing of a door with an arrow pointing to the side panel (no text or symbols)Montimi

natural_image
Line drawing of a hand inserting a cable into a device panel (no text or symbols)Linja e ujit:
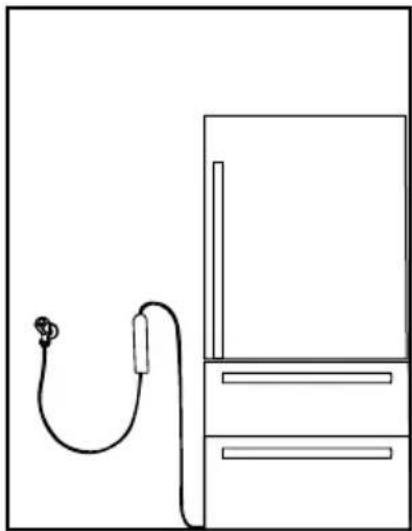
natural_image
Simple line drawing of a cordless cable connected to a refrigerator (no text or symbols)Linja e shishes:

natural_image
Line drawing of a gas washing bottle connected to a refrigerator (no text or symbols)3.9.2.Filtri i brendshëm
natural_image
Interior view of a refrigerator with shelves and air ducts (no text or symbols visible)
natural_image
Interior view of a refrigerator with visible shelves and a mounted appliance (no text or symbols)natural_image
Line drawing of a hand inserting a card into a cabinet (no text or symbols)natural_image
Line drawing of a hand inserting a component into a rack (no text or symbols)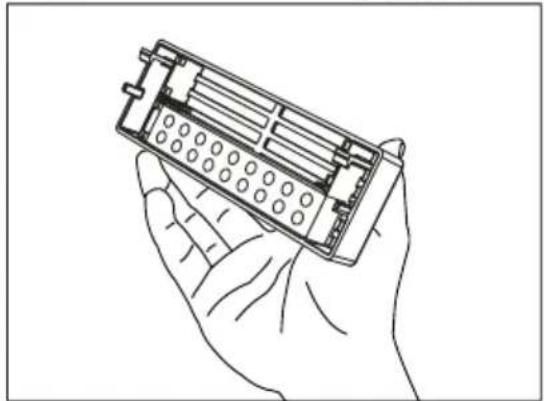
natural_image
Line drawing of a hand holding an electronic device with a grid-like internal structure (no text or symbols)
natural_image
Line drawing of two hands holding a handheld electronic device (no text or symbols visible)natural_image
Technical line drawings of a vehicle door frame and hand positioning (no text or symbols)natural_image
Technical line drawing of a mechanical assembly with no visible text or symbolsnatural_image
Line drawing of a mechanical component with ribbed base and roller rack (no text or symbols)natural_image
Simple line drawing of a pear and a carrot (no text or symbols)GNE60531XN
MK/SB
CE
58 4678 0000/AG-5/6-MK-SB
https://eprel.ec.europa.eu/
Содржина
natural_image
Simple line drawing of a rectangular frame with a numbered label '1' and an arrow pointing to it (no text or symbols beyond the label)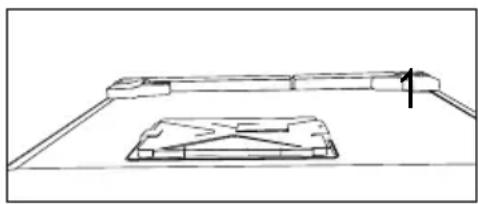
natural_image
Simple line drawing of a mechanical component with a base and top view, no text or symbols presentnatural_image
Diagram showing a lightning bolt striking a wall-mounted device with wires and cables (no text or symbols)natural_image
Pure electrical circuit lines without any symbolsnatural_image
Line drawing of a hand inserting a screwdriver into a device panel (no text or symbols)natural_image
Line drawing of a hand using a screwdriver to adjust or install a device panel (no text or symbols visible)natural_image
Illustration of a hand holding a tool with a circular component, no text or symbols presentnatural_image
Illustration of five different types of industrial equipment: a cylindrical component, coiled tubing, a mechanical component, and a pressure vessel (no text or symbols present)natural_image
Illustration showing two-step hand tool application: adding a screw into a component, then adjusting a screwdriver (no text or symbols present)Поставување
natural_image
Line drawing of a computer monitor rear panel with a hand inserting a cable to the screen (no text or symbols)natural_image
Line drawing of a hand adjusting a mechanical component with no visible text or symbolsnatural_image
Three mechanical components labeled 1, 2, and 3, shown in grayscale without any text or symbols on the parts themselves.natural_image
Simple line drawing of a mechanical or electrical component with no text or symbols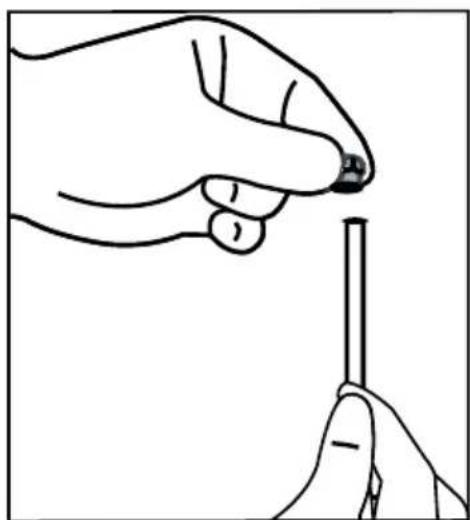
natural_image
Line drawing of a hand holding a pen, no text or symbols presentПоставување
natural_image
Simple line drawing of a mechanical or electrical component with no text or symbols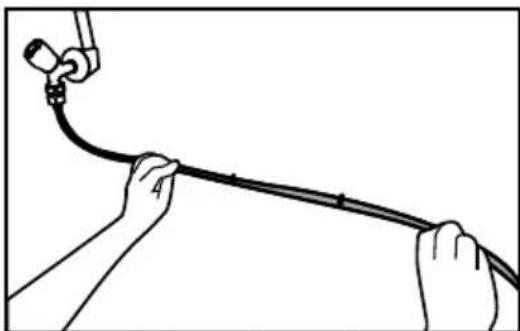
natural_image
Illustration of hands holding a cable with a connector attached (no text or symbols)natural_image
Line drawing of a hand inserting a plug into a device panel (no text or symbols)natural_image
Line drawing of a hand holding a cable inserted into a device (no text or symbols visible)natural_image
Line drawing of a gas cylinder connected to a valve and tubing (no text or symbols)natural_image
Pure mechanical component diagram without any text, numbers, or symbolsnatural_image
Line drawing of a hand holding a tool with a curved handle, no text or symbols presentnatural_image
Illustration of a hand holding a cylindrical device with wires, next to an upward arrow (no text or symbols)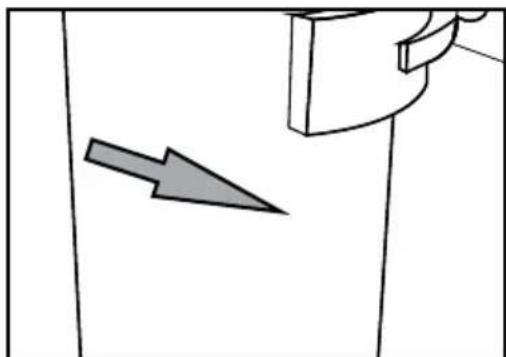
natural_image
Simple line drawing of a door with an arrow pointing to the side panel (no text or symbols)Поставување
natural_image
Line drawing of a hand inserting a cable into a device panel (no text or symbols)Довод на вода:
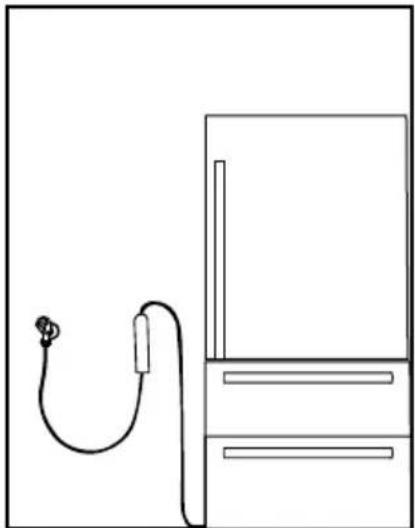
natural_image
Simple line drawing of a cordless cable connected to a refrigerator (no text or symbols)Црево за бардакот:
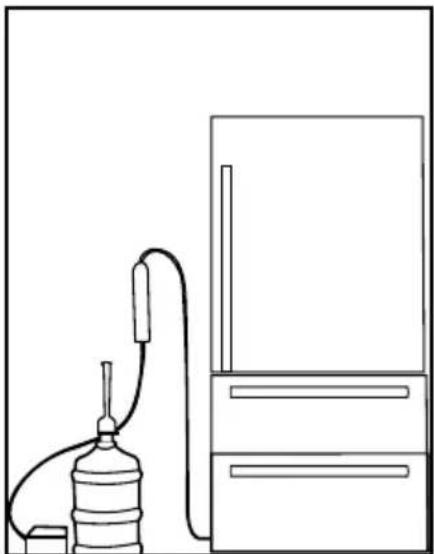
natural_image
Line drawing of a water pump connected to a refrigerator (no text or symbols)
natural_image
Line drawing of a hand inserting a USB into a device panel (no text or symbols)natural_image
Line drawing of a hand inserting a component into a device (no text or symbols visible)The filter replacement period of your product is 6 months.
4 Подготовка
natural_image
Line drawing of a hand inserting a small rectangular object into a cabinet (no text or symbols)Pay attention not to squeeze any parts of your body such as hands, feet and etc. between the movable parts while the drawer is in use in order to avoid any injury.
You can remove the partition in the drawer as illustrated when you want to clean it.
You can remove the drawers only for cleaning. It is not possible to group the drawers in their places after loading them with food when they are removed.
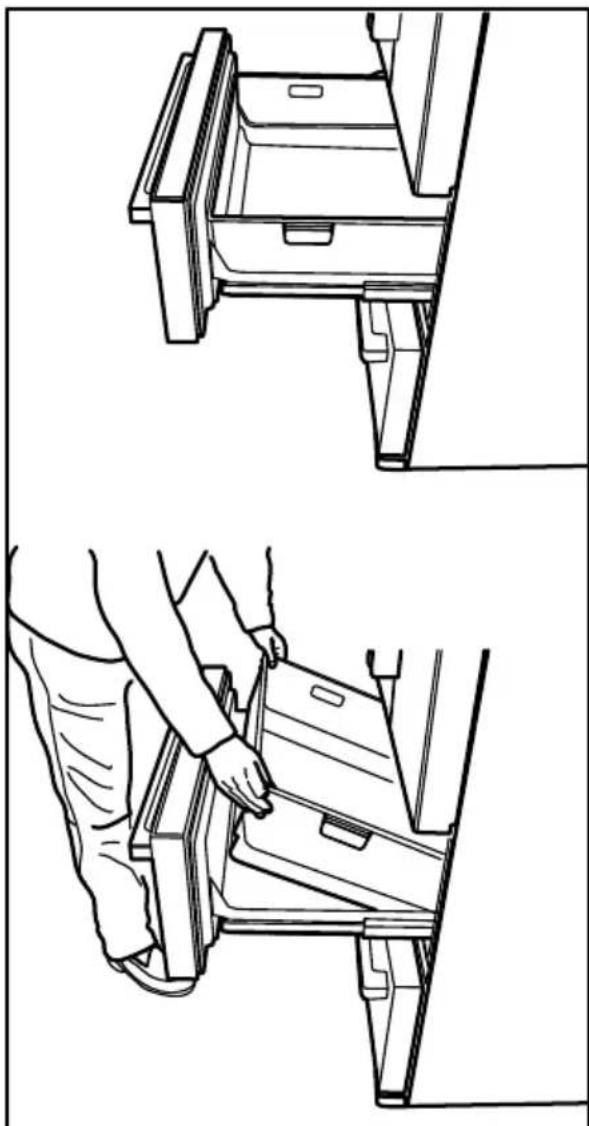
natural_image
Technical line drawings showing two views of a vehicle door frame with a person adjusting the seat (no text or symbols present)natural_image
Line drawing of a hand placing a component into a storage cabinet (no text or symbols)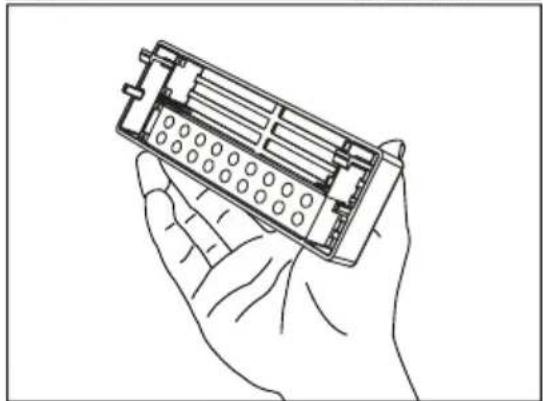
natural_image
Line drawing of a hand holding an electronic device with a grid-like internal structure (no text or symbols)
natural_image
Line drawing of a hand holding a handheld electronic device with a screwdriver inserted (no text or symbols)
natural_image
Technical line drawing of a mechanical assembly with two views (top and bottom), no text or symbols present.natural_image
Technical line drawing of a mechanical assembly with no visible text or symbolsnatural_image
Line drawing of a mechanical component or device inside a structural frame (no text or symbols). The model information as stored in the product data base can be reached by entering following website and searching for your model identifier (*) found on energy label.
A

https://eprel.ec.europa.eu/
natural_image
Line drawing of a hand inserting a screwdriver into a device panel (no text or symbols)- Pričvrstite 2 plastična klina za poklopac ventilatora kao što je prikazano na slici.

natural_image
Line drawing of a hand using a screwdriver to adjust or install a device panel (no text or symbols visible)natural_image
Mechanical diagram showing a hand operating a tool with a rotating arrow (no text or symbols)3.4. Priključivanje napajanja
| UPOZORENJE: Ne povezujte produžni kabl sa jednom ili više utičnica sa priključkom za napajanje. | |
| UPOZORENJE: Oštećeni kabl za napajanje mora biti zamenjen od strane ovlašćenog servisa. | |
| Prilikom postavljanja dva frižidera jedan pored drugog, ostaviti najmanje 4 cm rastojanja između njih. |
- Naša kompanija ne preuzima odgovornost za bilo kakvu štetu zbog upotrebe bez uzemljenja i bez priključka u skladu sa nacionalnim propisima.
- Napojni kabl mora biti lako dostupan nakon instalacije.
- Povežite rižider na uzemljenu utičnicu koja ima napon od 220-240V/50 Hz. Utičnica mora imati osigurač od 10-16A.
- Ne koristite razvodni utikač, sa ili bez produžnog kabla, između zidne utičnice i frižidera.
3.5. Priključak za vodu (Opcionalno)

UPOZORENJE: Isključite proizvod i vodnu pumpu (ako je dostupna) tokom uspostavljanja povezivanja.
Povezivanje na vodovodnu mrežu proizvoda, povezivanje filtera i flašu za vode mora biti urađeno sa strane ovlašćenog servisera.
Proizvod može biti povezan na flašu za vodu ili direktno na vodovod, ovisno o modelu. Da biste uspostavili vezu, crevo za vodu prvo mora biti povezano na proizvod.
natural_image
Illustration of five different types of industrial equipment: a coiled hose, a cylindrical component with a valve, a mechanical device, and a cylindrical tank (no text or symbols present)- Konektor (1 komad): Koristi se za priključivanje creva za vodu na zadnjoj strani uređaja.
- Spojnica za crevo (3 komada): Koristi se za fiksiranje creva za vodu na zidu.
- Crevo za vodu (1 komad, 5 metra, promjer 1/4 inča): Koristi se za priključak vode.
- Adapter za slavinu (1 komad): Sadrži porozni filter, koristi za povezivanje na mrežu hladne vode.
- Filter za vodu (1 komad * Opcionalno): Koristi se za povezivanje vode iz vodovodne mreže na proizvod. Filter za vodu nije potreban ako uređaj ima flašu za vode.
Instalacija
natural_image
Illustration showing two hand positions: one holding a small component, the other holding a tool (no text or symbols present)- Gurnite crevo za vodu čvrsto ka dole i povezite na adapter mlaznice creva.
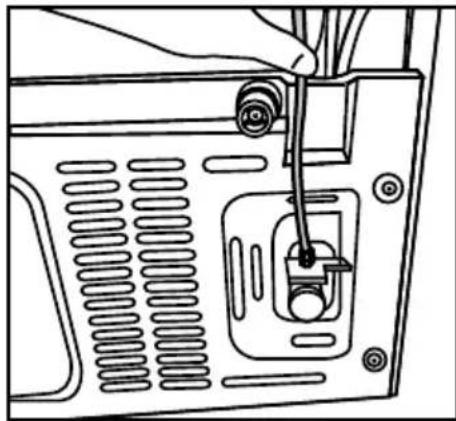
natural_image
Line drawing of a computer monitor with a cable inserted, showing internal panel layout (no text or symbols)natural_image
Line drawing of a hand adjusting a mechanical component with no visible text or symbols3.7. Povezivanje na vodovodnu mrežu (Opcionalno)
Da biste koristili proizvod povezivanjem na mrežu hladne vode, na vodovodnu mrežu hladne vode u vašu kuću mora biti instaliran standardni priključak ventila od 1/2". Ako nemate takav konektor ili ako niste sigurni, obratite se kvalificiranom vodoinstalateru.
natural_image
Technical illustration of a mechanical component with three views: a flat bolt, a hexagonal nut, and a separate nut (no text or symbols)natural_image
Simple line drawing of a mechanical device with no text or symbolsnatural_image
Line drawing of a hand holding a pen tip, no text or symbols presentInstalacija
- Pričvrstite priključak na adapter slavine i zategnite rukom / alatom.
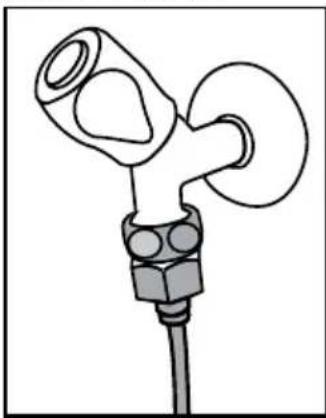
natural_image
Simple line drawing of a mechanical or electrical component with no text or symbols- Da biste izbegli štete, prebacivanje ili slučajno isključivanja creva, koriste spojnice da bi pričvrstili crevo za vodu na ispravni način.
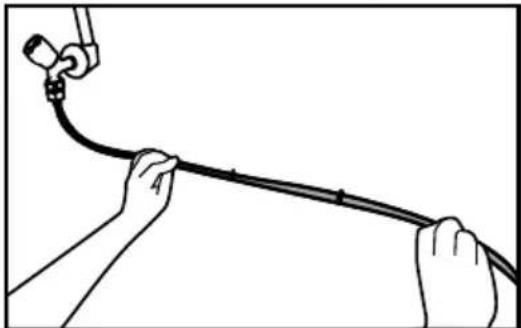
natural_image
Illustration of hands holding a cable with a connector attached (no text or symbols)
UPOZORENJE: Nakon uključivanja slavine, vodite računa da na oba kraja creva voda ne curi. U slučaju curenja, isključite ventil i zategnite sve veze pomoću ključa za cevi ili kliješta.
3.8. Za proizvode koje imaju balon za vodu
(Opcionalno)
Kako biste koristili bocu za vodu za priključak proizvoda na sistem napajanja vodom, mora se koristiti pumpa za vodu preporučena od strane ovlaštenog servisa.
- Priključite jedan kraj creva isporučenog s pumpom na proizvod (vidi 3. 6) i sledite uputstva u nastavku.
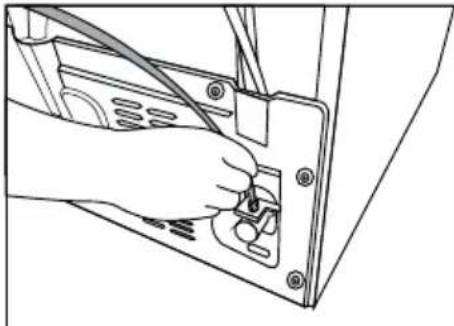
natural_image
Line drawing of a hand inserting a cable into a device panel (no text or symbols)- Spojite drugi kraj creva na pumpu za vodu guranjem creva u dovod pumpe.
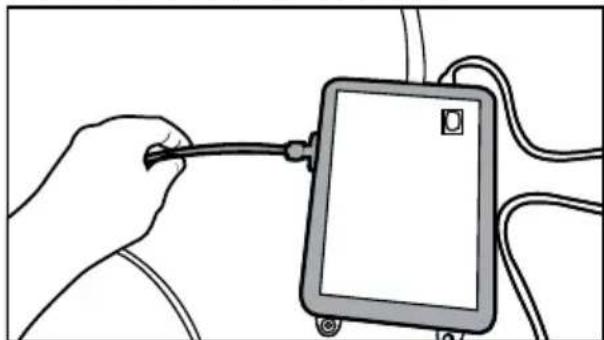
natural_image
Illustration of a hand holding a device with wires, no text or symbols presentnatural_image
Line drawing of a gas cylinder connected to a valve and tubing (no text or symbols)natural_image
Pure mechanical component diagram without any text, numbers, or symbols- Odredite lokaciju fiksiranja spoljašnog filtera. Fiksimajte aparat za povezivanje filtera (5) na zidu.
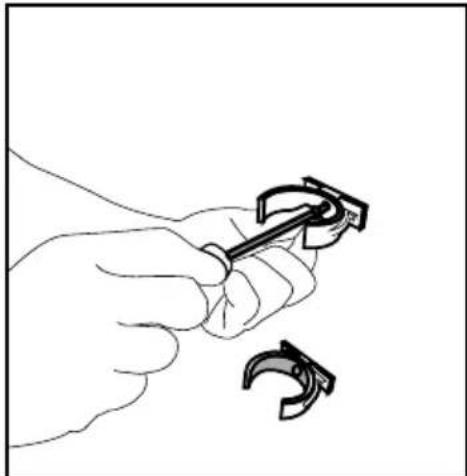
natural_image
Line drawing of a hand holding a tool with a hook, next to a separate curved object (no text or symbols)- Postavite filter u uspravnom položaju na aparat za povezivanje filtera, kao što je prikazano na etiketi. (6).
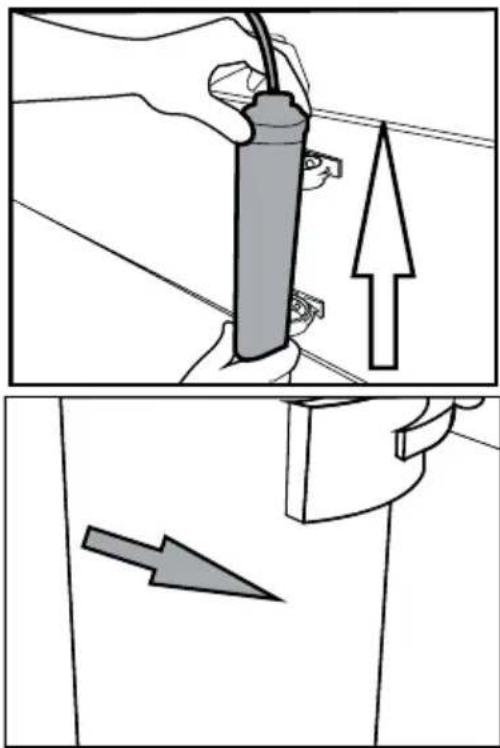
natural_image
Two-panel illustration showing a hand holding a cylindrical device with an upward arrow, and a close-up of a tool with a downward arrow (no text or symbols)- Prikačite crevo za vodu koje se postavlja od vrha filtera do adaptera priključka proizvoda na sistem za napajanje vodom (vidi 3 6).
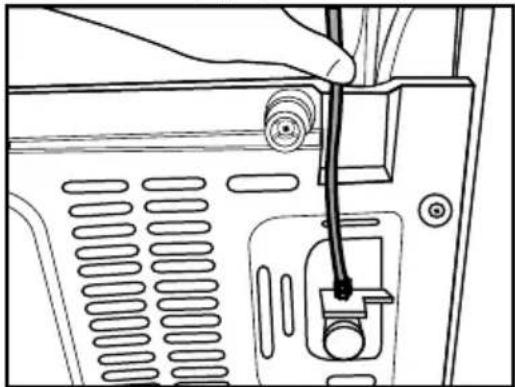
natural_image
Line drawing of a hand inserting a cable into a device panel (no text or symbols)Nakon što ste uspostavili vezu, ona treba izgledati kao na slici.
Linija vodovoda:
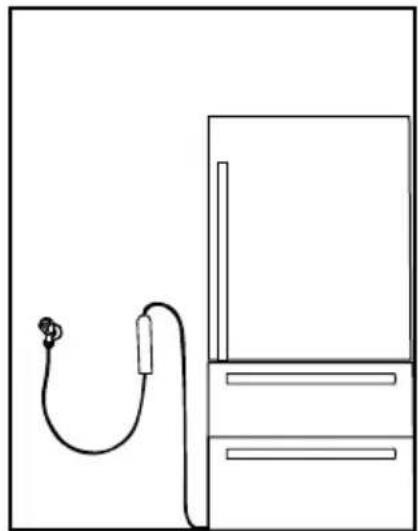
natural_image
Simple line drawing of a cordless cable connected to a refrigerator (no text or symbols)Linija flaše:
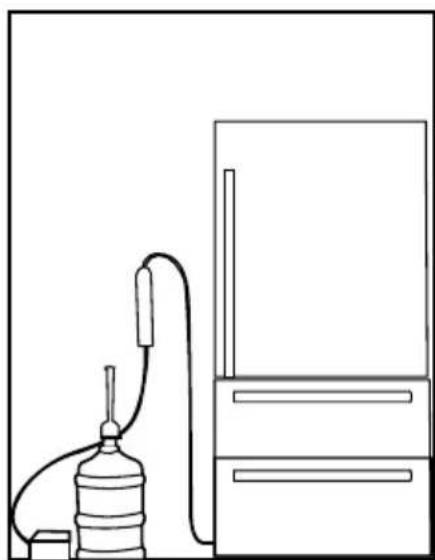
natural_image
Line drawing of a water pump connected to a refrigerator (no text or symbols)3.9.2. Unutrašnji filter
Unutrašnji filter dobili uz proizvod nije instaliran kod isporuke; molimo sledite upute u nastavku da bi instalirali filter.
- Izvadite prolazni poklopac filtera za vodu povlačenjem na njega.

Normalno je da nekoliko kapi vode poteče nakon skidanja poklopca.
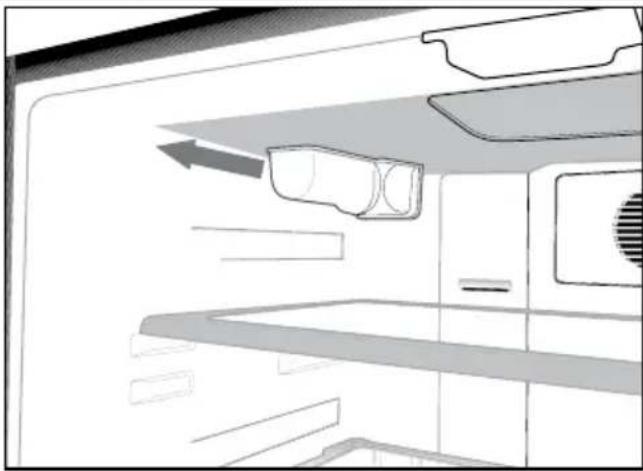
natural_image
Diagram of a refrigerator interior showing airflow direction and storage compartments (no text or labels)- Postavite poklopac filtera za vodu u mehanizam i gurnite da se zaključa u tom položaju.

natural_image
Interior view of a refrigerator with built-in door and shelf (no visible text or symbols)- Pritisnite opet dugme „Ice“ na ekranu kako bi otkazali režim „Ice Off“.

natural_image
Line drawing of a hand holding a small electronic component above a shelf (no text or symbols)4.2. Prva upotreba
Pre korišćenja frižidera, proverite da li su obavljene sve neophodne pripreme u skladu sa uputstvima u odeljcima „Bezbednosna uputstva i zaštita životne sredine“ i „Instalacija“.
natural_image
Line drawing of a hand placing a component into a rack with a vented air conditioner (no text or symbols)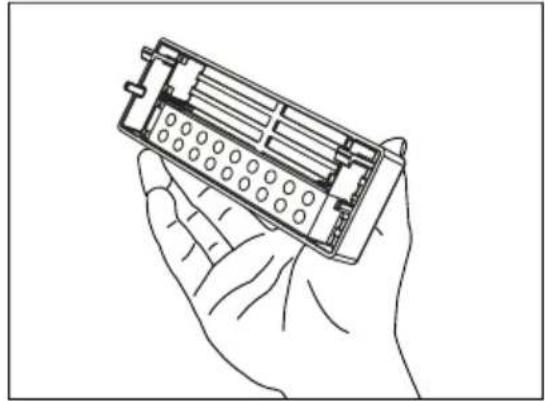
natural_image
Line drawing of a hand holding an open battery pack (no text or symbols)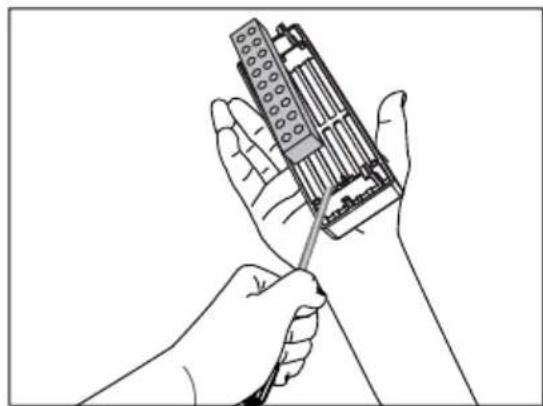
natural_image
Line drawing of two hands holding a mechanical component, no text or symbols present
Filter neprijatnih mirisa mora da se čisti jednom godišnje.
Upotreba proizvoda
natural_image
Technical line drawings showing a hand operating a vehicle seat frame, with no visible text or symbols.5.8. Fioka za povrće sa kontrolom vlage
(FreSHelf)
natural_image
Technical line drawing of a mechanical assembly with two views (top and bottom), no text or symbols present.5.10. Posuda za led (Opcionalno)
natural_image
Line drawing of a room interior with a bed, rack, and slatted floor (no text or symbols)5.12. Aparat za led
natural_image
Technical line drawing of a mechanical assembly with no visible text or symbolsUpotreba proizvoda
natural_image
Simple line drawing of a pear and a carrot (no text or symbols)GNE60531XN
CZ/SK
CE
58 4678 0000/AF-6/6-CZ-SK
Vážení zákazníci,
natural_image
Technical line drawing of a mechanical component with labeled part '1' (no text or symbols beyond label)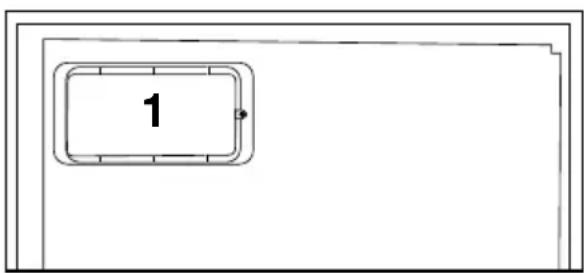
natural_image
Diagram showing a device with a lightning bolt and cable, no text or symbols present1.1.1 Varování HC
natural_image
Line drawing of a hand inserting a screwdriver into a device panel (no text or symbols)natural_image
Line drawing of a hand using a screwdriver to adjust or install a device panel (no text or symbols visible)Instalace
natural_image
Simple line drawing of a two-decker cabinet with mounting feet (no text or symbols)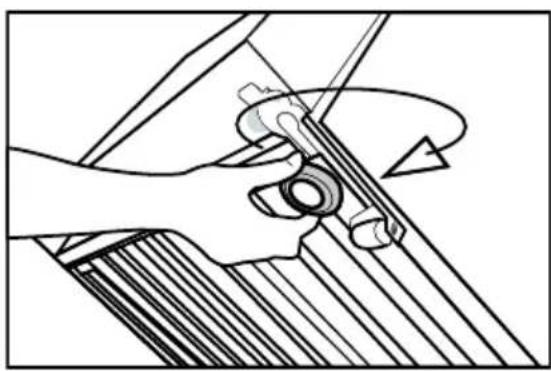
natural_image
Mechanical assembly diagram showing hands operating a tool with a rotating wheel (no text or symbols)natural_image
Illustration of five different types of industrial equipment or connectors, including a coiled hose, coiled fittings, a pressure regulator, and a cylindrical device (no text or symbols present)natural_image
Illustration showing two-step installation: one of a hand holding a screwdriver, the other of a finger inserting a screwdriver into a slot (no text or symbols present)natural_image
Line drawing of a computer monitor with a hand inserted, showing internal components and ventilation slots (no text or symbols)natural_image
Line drawing of a hand adjusting a mechanical component with no visible text or symbolsnatural_image
Three mechanical components labeled 1, 2, and 3, shown in separate views with no text or symbols beyond labels.natural_image
Simple line drawing of a mechanical device with no text or symbolsnatural_image
Line drawing of a hand holding a pen tip, no text or symbols presentInstalace
natural_image
Simple line drawing of a mechanical component with no text or symbolsnatural_image
Illustration of hands holding a curved cable or wire with a connector attached (no text or symbols)
natural_image
Line drawing of a hand inserting cables into a device panel (no text or symbols)natural_image
Illustration of a hand holding a cable inserted into a tablet device (no text or symbols visible)natural_image
Line drawing of a gas cylinder connected to a valve and tubing (no text or symbols)natural_image
Pure mechanical component diagram without any text, numbers, or symbolsnatural_image
Line drawing of a hand holding a tool with a hook, next to a separate curved clip (no text or symbols)natural_image
Illustration of a hand holding a cylindrical device with wires, next to an upward arrow (no text or symbols)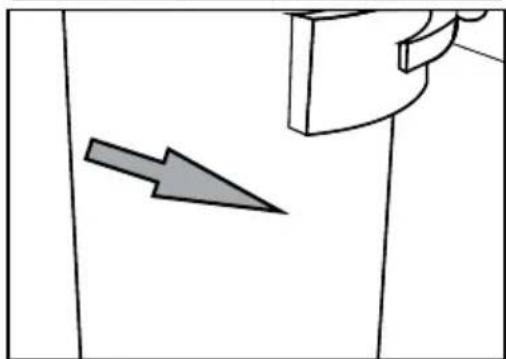
natural_image
Simple line drawing of a door with an arrow pointing to the side panel (no text or symbols)Instalace
3.9.2.Vnitřní filtr
natural_image
Line drawing of a hand inserting a cable into a device panel (no text or symbols)Připojení vodovodu:
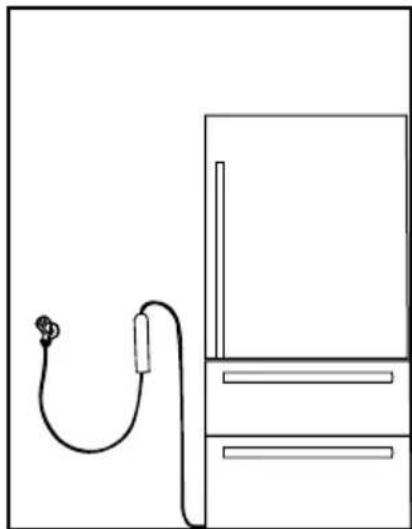
natural_image
Simple line drawing of a cordless cable connected to a cabinet (no text or symbols)natural_image
Line drawing of a water pump connected to a refrigerator (no text or symbols)
natural_image
Line drawing of an open refrigerator with doors, shelves, and a drawer (no text or symbols)Instalace
natural_image
Interior view of a refrigerator with built-in door and side table (no visible text or symbols)natural_image
Interior view of a refrigerator with air ducts and ventilation slots (no text or symbols visible)natural_image
Line drawing of a hand holding a small object near a window (no text or symbols)- Freezer compartment temperature setting
- Economy mode
- Energy saving function (display off)
- Error status
- Cooler compartment temperature setting
- Rapid cooling
- Vacation function
- Keypad lock / filter replacing alert cancellation
- Ice making on/off
- Display on/off /Alarm off
- Autoeco
- Rapid freezing

natural_image
Three-panel line drawing showing hands installing a component on a shelf, with no visible text or symbols.natural_image
Technical line drawings of a mechanical device with two views: top shows a tray, bottom shows a hand inserting a component (no text or symbols)natural_image
Illustration of a hand inserting a circular component into a rectangular device with an arrow indicating rotation (no text or symbols)Používání výrobku
5.8. Box na led
(Volitelně)
natural_image
Line drawing of a mechanical component or housing with ribbed base and internal structure (no text or symbols)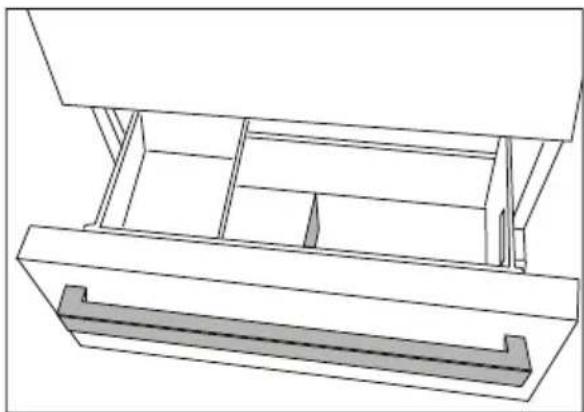
natural_image
Technical line drawing of a mechanical assembly with no visible text or symbolsnatural_image
Simple line drawing of a rectangular frame with an arrow labeled '1' pointing to the top-left corner (no text or symbols beyond the number)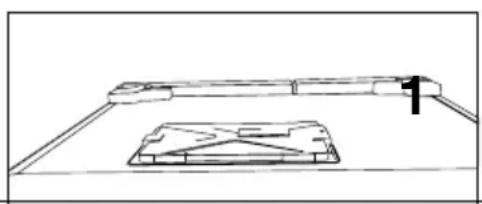
natural_image
Technical line drawing of a mechanical component with a base and mounting bracket (no text or symbols)natural_image
Diagram showing a device with a lightning bolt and cable, no text or symbols present1.1.1 Varovanie HC
natural_image
Line drawing of a hand inserting a screwdriver into a device panel (no text or symbols)natural_image
Line drawing of a hand using a screwdriver to adjust or install a device panel (no text or symbols visible)Inštalácia
3.3. Nastavenie stojanov
natural_image
Simple line drawing of a two-decker cabinet with two side legs and two mounting feet (no text or symbols)
natural_image
Mechanical diagram showing a hand operating a tool with a curved handle (no text or symbols present)natural_image
Illustration of five different types of industrial equipment: a coiled hose, two clamps, a pressure regulator, and a cylindrical device (no text or symbols present)natural_image
Illustration showing a hand inserting a component into a device, with no visible text or symbols.natural_image
Line drawing of a device rear panel with ventilation slots and a screwdriver inserted (no text or symbols)natural_image
Line drawing of a hand adjusting a mechanical component with no visible text or symbolsnatural_image
Three mechanical component diagrams labeled 1, 2, and 3, showing different assembly forms (no text or symbols beyond labels)natural_image
Simple line drawing of a mechanical or electrical component with no text or symbolsnatural_image
Line drawing of a hand holding a pen tip, no text or symbols presentInštalácia
- Pripojte prípojku na adaptér na kohútik a dotiahnite ho ručne/nástrojom.
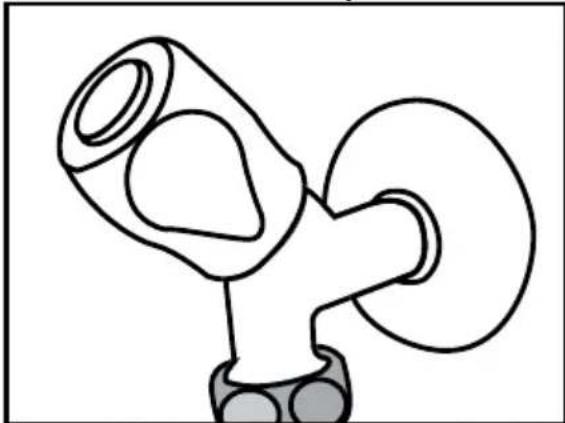
natural_image
Simple line drawing of a mechanical component with no text or symbolsnatural_image
Illustration of hands holding a cable with a connector attached (no text or symbols)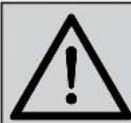
natural_image
Line drawing of a hand inserting cables into a device panel (no text or symbols)natural_image
Illustration of a hand holding a tool next to a device with cables (no text or symbols visible)natural_image
Line drawing of a gas cylinder connected to a valve and tubing (no text or symbols)natural_image
Pure mechanical component diagram without any text, numbers, or symbolsnatural_image
Line drawing of a hand holding a tool with a hook, next to a separate curved object (no text or symbols)natural_image
Illustration of a hand holding a cylindrical device with wires, next to an upward arrow (no text or symbols)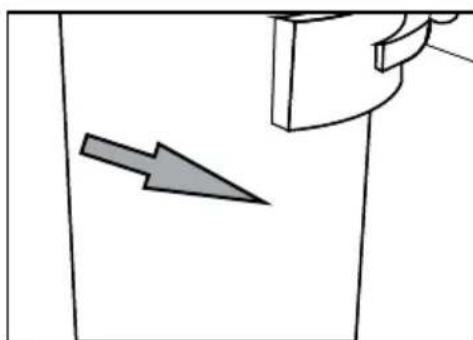
natural_image
Simple line drawing of a door with an arrow pointing to the side panel (no text or symbols)Inštalácia
3.9.2.Vnútorný filter
natural_image
Line drawing of a hand inserting a cable into a computer monitor (no text or symbols)natural_image
Simple line drawing of a cordless cable connected to a rectangular device (no text or symbols)natural_image
Line drawing of a water pump connected to a refrigerator (no text or symbols)
Inštalácia
natural_image
Diagram of a refrigerator interior showing airflow direction and storage compartments (no text or symbols)natural_image
Interior view of a kitchen appliance showing shelves, cabinets, and a microwave oven (no text or symbols visible)natural_image
Line drawing of a hand holding a small object above a shelf, no text or symbols presentnatural_image
Line drawing of a rectangular device with internal components and a base, no text or symbols presentnatural_image
Line drawing of hands pouring liquid from a container into a tank on a tray (no text or symbols)Používanie výrobku
natural_image
Line drawing of a hand using a tool to adjust or install a wooden frame (no text or symbols present)
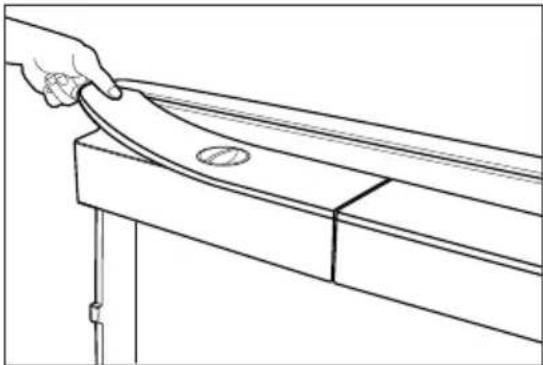
natural_image
Line drawing of a hand holding a curved object on a wooden table (no text or symbols)5.6. Čerpanie l'adu/vody (Volitel'né)
natural_image
Technical line drawings showing two views of a vehicle door frame, one with hand positioning and the other with seatbelt (no text or symbols)natural_image
Technical line drawing of a mechanical assembly with no visible text or symbolsnatural_image
Line drawing of a mechanical component or device on a slatted base (no text or symbols)natural_image
Technical line drawing of a mechanical assembly with no visible text or symbols
- Please read this manual before using the product!
- This guide will help you use the product quickly and safely.
- 1- Safety Instructions 3
- Refrigerator 8
- Installation 9
- Preparation 16
- Using the product 17
- Maintenance and cleaning 31
- Troubleshooting 32
- 1- Safety Instructions
- Intended Use
- - Safety for children, vulnerable persons and pets
- - Electrical safety
- - Transportation safety
- - Installation safety
- Safety and environment instructions
- 1.6- Operational safety
- For products with a Water Dispenser/Ice Machine
- 1.7- Maintenance d cleaning safety
- 1.8- HomeWhiz
- 1.9- Lighting
- Refrigerator
- Installation
- Right place for installation
- Attaching the plastic wedges
- Adjusting the stands
- Power connection
- Water connection
- (Optional)
- Installation
- Connecting water hose to the product
- Connecting to water mains (Optional)
- For products using water carboy (Optional)
- Water filter
- Fixing external filter on the wall (Optional)
- Internal filter
- Preparation
- What to do for energy saving
- First use
- Using the product
- Indicator panel
- Using the product
- Cooler compartment indicator
- Error status indicator
- Temperature indicator
- Vacation function button
- Temperature adjustment button
- Compartment selection button
- Freezer compartment indicator
- Economy mode indicator
- Vacation function indicator
- Indicator panel
- Economic use
- High temperature / fault alert
- Energy saving function (display off)
- Rapid cooling
- Vacation function
- Cooler compartment temperature setting
- Energy saving (display off)
- Alarm off warning:
- Keypad lock
- Eco-fuzzy
- Freezer compartment temperature setting
- Rapid freezing
- Freezer compartment temperature setting
- Economic use
- Error status
- Cooler compartment temperature setting
- Rapid cooling
- Vacation function
- Keypad lock / Keypad lock / filter replacing alert cancellation
- Ice making on/off
- Display on/off
- Alarm off warning
- Autoeco
- Rapid freezing
- Zero degree compartment (Optional)
- Vegetable bin
- Blue light/HarvestFresh
- \*May not be available in all models
- For the blue light,
- ForHarvestFresh,
- Description and cleaning of odour filter (Optional)
- Telescopic drawer
- Ionizer
- Humidity controlled crisper (FreSHelf)
- (This feature is optional)
- Movable middle section
- Ice container
- Using the ice container
- Ice box
- Ice maker
- Freezing fresh food
- Recommendations for storing frozen foods
- Deep freezer details
- Door open alert
- Interior light
- Maintenance and cleaning
- WARNING:
- Avoiding bad odours
- Protecting the plastic surfaces
- Troubleshooting
- The refrigerator is not working.
- Condensation on the side wall of the cooler compartment (MULTI ZONE, COOL, CONTROL and FLEXI ZONE).
- Compressor is not working.
- The refrigerator's operating noise is increasing while in use.
- The refrigerator runs too often or for too long.
- Troubleshooting
- The freezer temperature is very low, but the cooler temperature is adequate.
- The cooler temperature is very low, but the freezer temperature is adequate.
- The food items kept in cooler compartment drawers are frozen.
- The temperature in the cooler or the freezer is too high.
- Shaking or noise.
- The product is making noise of liquid flowing, spraying etc.
- There is sound of wind blowing coming from the product.
- There is condensation on the product's internal walls.
- There is condensation on the product's exterior or between the doors.
- The interior smells bad.
- The door is not closing.
- The vegetable bin is jammed.
- If The Surface Of The Product Is Hot.
- DISCLAIMER / WARNING
- Self-Repair
- Ajustar os pés
- Instalação
- Filtro interno
- Para a HarvestFresh,
- Aviso HC
- Instalación
- Uso del producto
- Ionizador
- (Opcional)
- Εγκατάσταση
- Πρώτη χρήση
- Παγοθήκη
- (Προαιρ.)
- Χρήση του προϊόντος
- Kazalo vsebine
- Varnost in okoljska navodila 3
- Hladilnik 6
- Namestitev 7
- HC opozorilo
- Namestitev
- 3.9.2.Notranji filter
- Ice box
- Uporaba naprave
- Iztegljiv predal
- Važne upute za sigurnost i očuvanje okoliša 3
- Vaš uređaj 8
- Ugradnja 9
- Priprema 17
- Postavljanje
- Podešavanje postolja
- Priključak za opskrbu električnom energijom
- Povezivanje na vodovodnu mrežu (Neobvezno)
- Dovod iz boce:
- Unutarnji filtar
- Teleskopskaladica
- Rukovanje uređajem
- Ionizator
- (Neobvezno)
- Spremnik za led
- Uporaba spremnika za led
- Kutija za led
- Zamrzavanje svježih namirnica
- HC waarschuwing
- Installatie
- Interne filter
- Eerste gebruik
- IJsdispenser (Optioneel)
- Ice box
- DISCLAIMER / WAARSCHUWING
- Filtre interne
- Ioniseur
- (En option)
- Section centrale modulable
- Korisnički priručnik osigurava brzu i sigurnu upotrebu proizvoda.
- Instalacija
- Povezivanje crijevo za vodu na proizvod
- Povezivanje na vodovod (Opcionalno)
- 3.9.2.Interni filter
- Prvo korištenje
- Korištenje proizvoda
- Teleskopska ladica
- Pokretni srednji dio
- Kutija za led
- Ladica sa kontrolisanom vlažnosti
- (FreSHelf)
- (Ova funkcija je neobavezna)
- Përmbajtja
- Montimi
- Lidhja elektrike
- 3.9.2.Filtri i brendshëm
- Содржина
- Поставување
- Подготовка
- Priključivanje napajanja
- Priključak za vodu (Opcionalno)
- Povezivanje na vodovodnu mrežu (Opcionalno)
- Za proizvode koje imaju balon za vodu
- (Opcionalno)
- Unutrašnji filter
- Prva upotreba
- Upotreba proizvoda
- Fioka za povrće sa kontrolom vlage
- Posuda za led (Opcionalno)
- Aparat za led
- Varování HC
- Instalace
- 3.9.2.Vnitřní filtr
- Používání výrobku
- Box na led
- (Volitelně)
- Varovanie HC
- Inštalácia
- Nastavenie stojanov
- 3.9.2.Vnútorný filter
- Používanie výrobku
- Čerpanie l'adu/vody (Volitel'né)
Brand : BEKO
Model : GNE60531XN
Category : Freezer