YIED7300WW - Tumble drier IGNIS - Free user manual and instructions
Find the device manual for free YIED7300WW IGNIS in PDF.
User questions about YIED7300WW IGNIS
0 question about this device. Answer the ones you know or ask your own.
Ask a new question about this device
Download the instructions for your Tumble drier in PDF format for free! Find your manual YIED7300WW - IGNIS and take your electronic device back in hand. On this page are published all the documents necessary for the use of your device. YIED7300WW by IGNIS.
USER MANUAL YIED7300WW IGNIS
Additional Features. 6
Changing Cycles and Settings 6
DRYER CARE 7
TROUBLESHOOTING 8
WARRANTY 10
ASSISTANCE OR SERVICE BACK COVER
TABLE DES MATIÈRES
Page
SECURITE DE LA SÉCHEUSE 11
GUIDE DE DÉMARRAGE RAPIDE/
UTILISATION DE LA SÉCHEUSE. 13
Programmes 15
ASSISTANCE OU SERVICE COUVERTURE ARRIERE
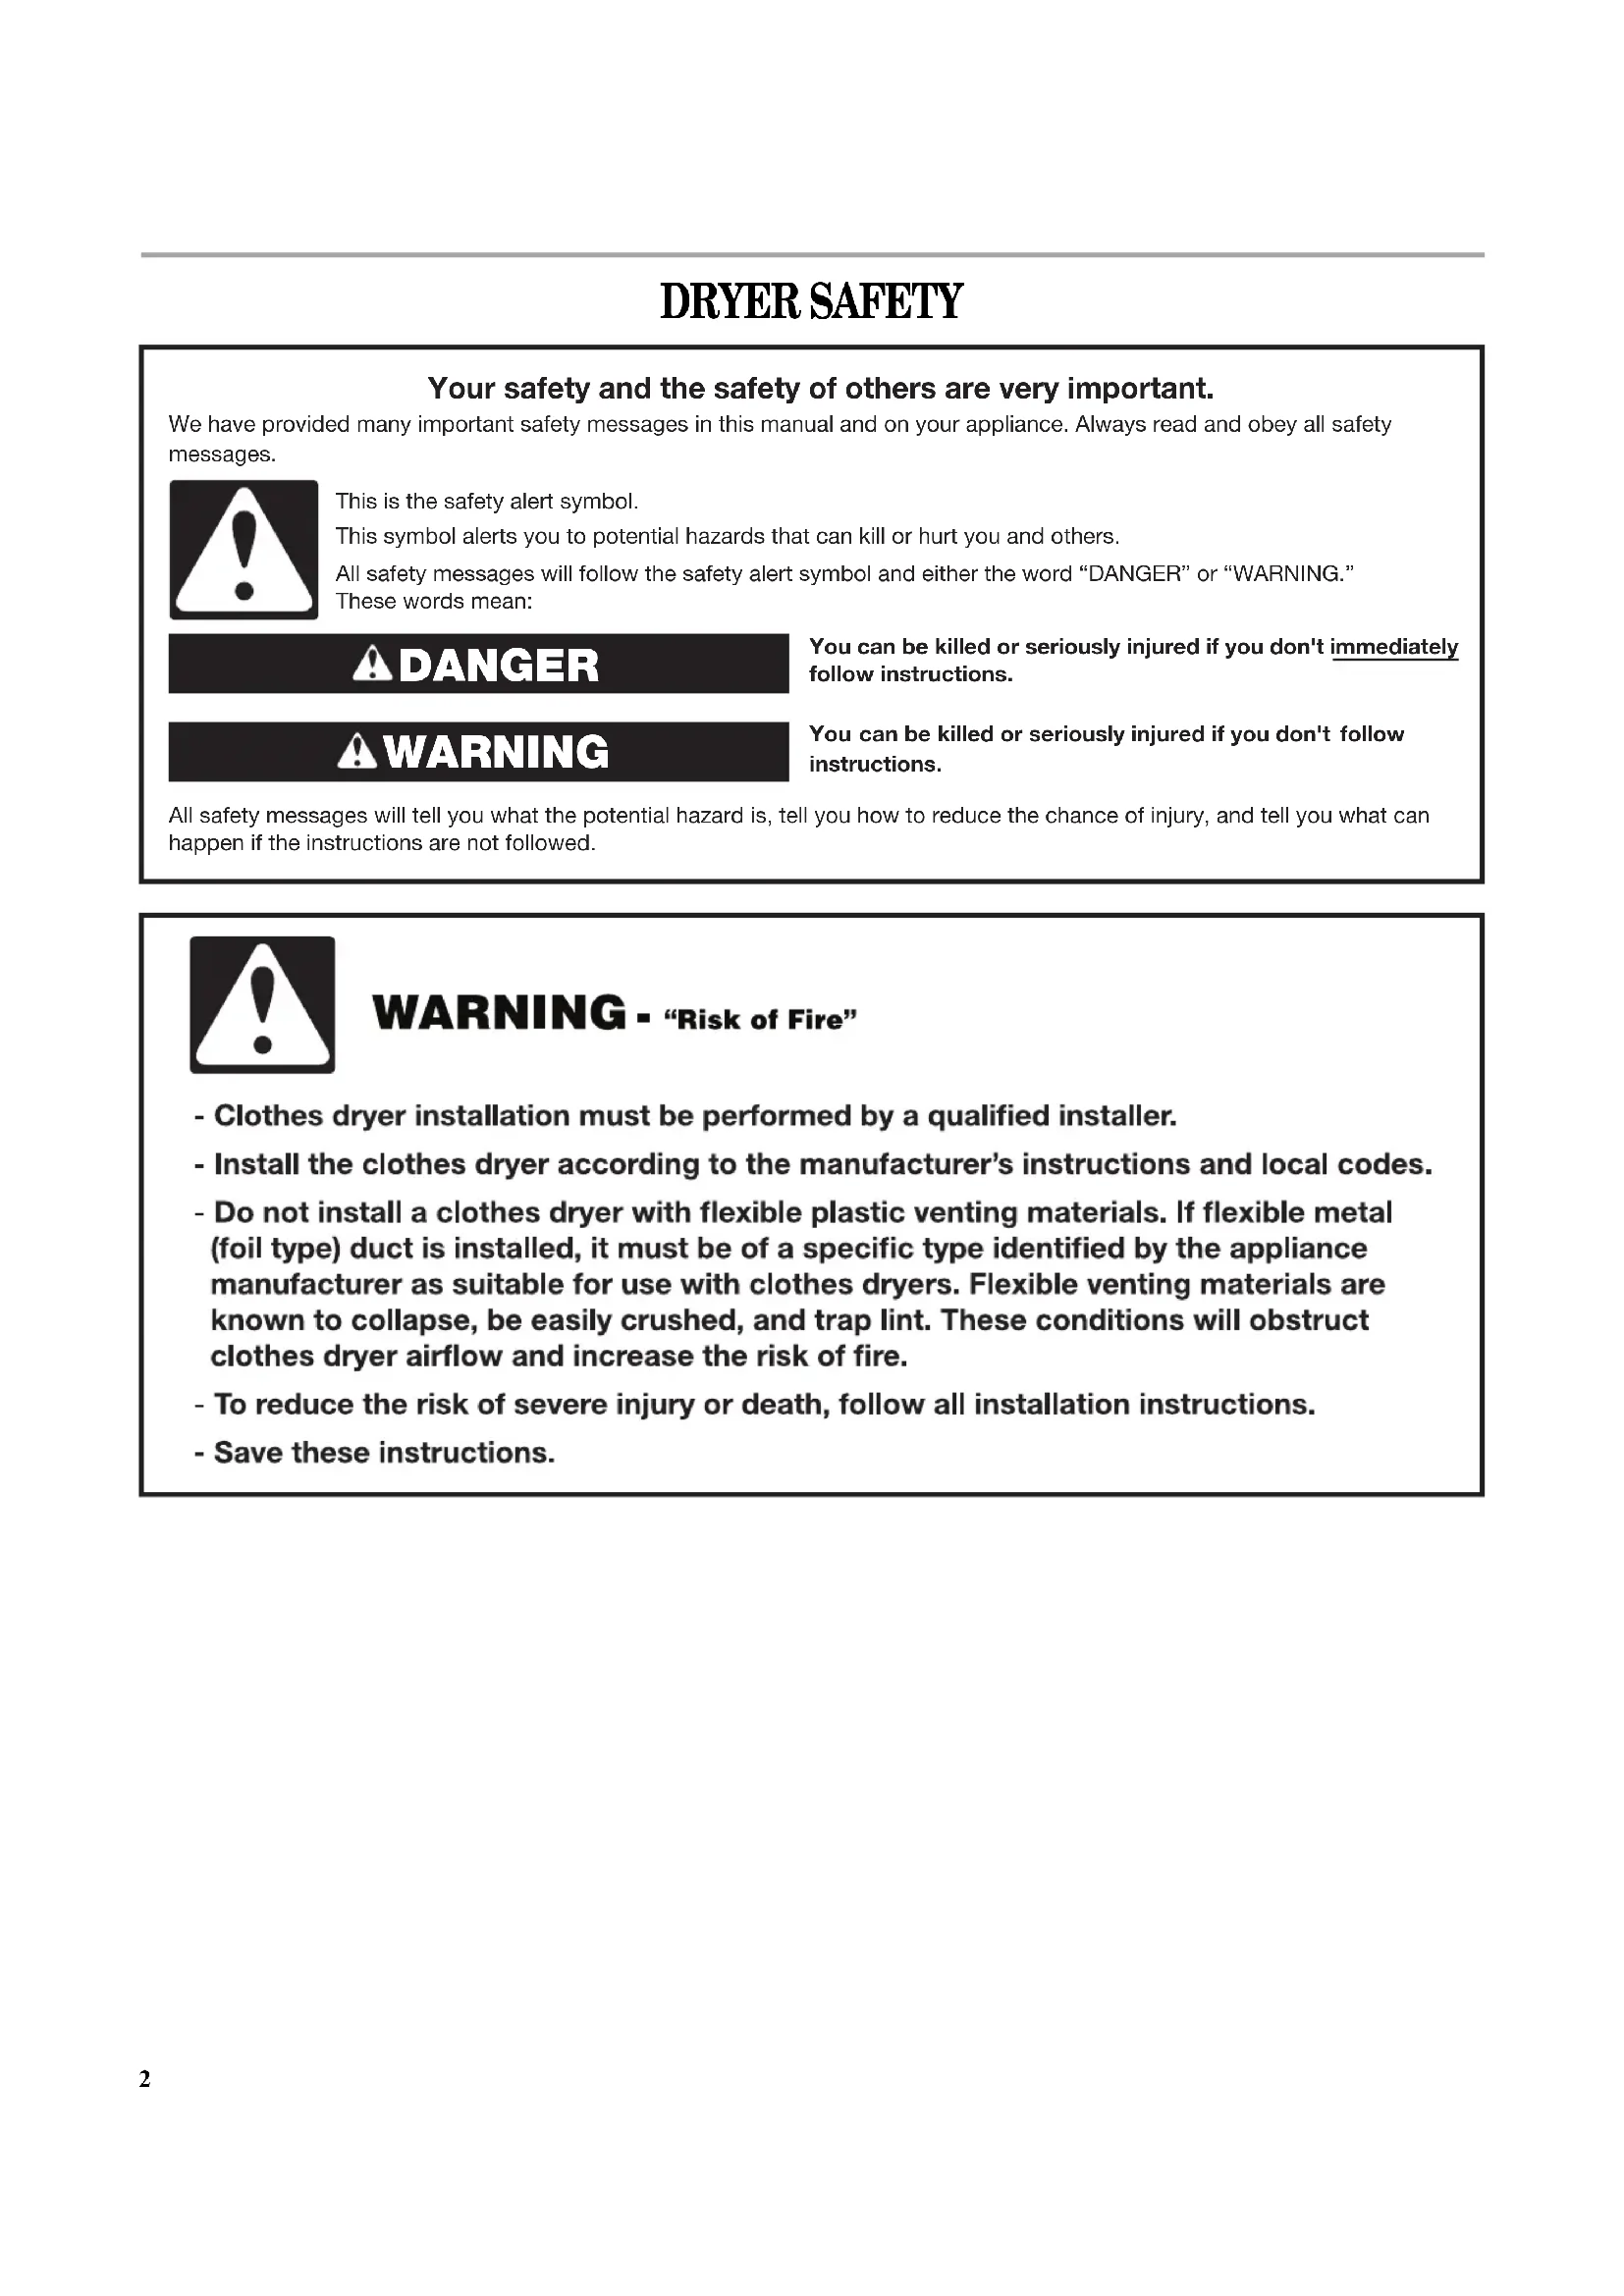
DRYERSAFETY
Your safety and the safety of others are very important.
We have provided many important safety messages in this manual and on your appliance. Always read and obey all safety messages.

This is the safety alert symbol.
This symbol alerts you to potential hazards that can kill or hurt you and others.
All safety messages will follow the safety alert symbol and either the word "DANGER" or "WARNING." These words mean:
DANGER
You can be killed or seriously injured if you don't immediately follow instructions.
WARNING
You can be killed or seriously injured if you don't follow instructions.
All safety messages will tell you what the potential hazard is, tell you how to reduce the chance of injury, and tell you what can happen if the instructions are not followed.

WARNING - "Risk of Fire"
- Clothes dryer installation must be performed by a qualified installer.
- Install the clothes dryer according to the manufacturer's instructions and local codes.
- Do not install a clothes dryer with flexible plastic venting materials. If flexible metal (foil type) duct is installed, it must be of a specific type identified by the appliance manufacturer as suitable for use with clothes dryers. Flexible venting materials are known to collapse, be easily crushed, and trap lint. These conditions will obstruct clothes dryer airflow and increase the risk of fire.
- To reduce the risk of severe injury or death, follow all installation instructions.
- Save these instructions.
IMPORTANT: The gas installation must conform with local codes, or in the absence of local codes, with the National Fuel Gas Code, ANSI Z223.1/NFPA 54.
The dryer must be electrically grounded in accordance with local codes, or in the absence of local codes, with the National Electrical Code, ANSI/NFPA 70.
WARNING: For your safety, the information in this manual must be followed to minimize the risk of fire or explosion, or to prevent property damage, personal injury, or death.
-
Do not store or use gasoline or other flammable vapors and liquids in the vicinity of this or any other appliance.
-
WHAT TO DO IF YOU SMELL GAS:
-
Do not try to light any appliance.
- Do not touch any electrical switch; do not use any phone in your building.
- Clear the room, building, or area of all occupants.
- Immediately call your gas supplier from a neighbor's phone. Follow the gas supplier's instructions.
-
If you cannot reach your gas supplier, call the fire department.
-
Installation and service must be performed by a qualified installer, service agency, or the gas supplier.
WARNING: Gas leaks cannot always be detected by smell.
Gas suppliers recommend that you use a gas detector approved by UL or CSA.
For more information, contact your gas supplier.
If a gas leak is detected, follow the "What to do if you smell gas" instructions.
In the State of Massachusetts, the following installation instructions apply:
Installations and repairs must be performed by a qualified or licensed contractor, plumber, or gasfitter qualified or licensed by the State of Massachusetts.
If using a ball valve, it shall be a T-handle type.
A flexible gas connector, when used, must not exceed 3 feet.
State of California Proposition 65Warnings:
WARNING: This product contains a chemical known to the State of California to cause cancer.
WARNING: This product contains a chemical known to the State of California to cause birth defects or other reproductive harm.
QUICK START GUIDE /DRYER USE
WARNING

Explosion Hazard
Keep flammable materials and vapors, such as gasoline, away from dryer.
Do not dry anything that has ever had anything flammable on it (even after washing).
Failure to follow these instructions can result in death, explosion, or fire.
WARNING

Fire Hazard
No washer can completely remove oil.
Do not dry anything that has ever had any type of oil on it (including cooking oils).
Items containing foam, rubber, or plastic must be dried on a clothesline or by using an Air Cycle.
Failure to follow these instructions can result in death or fire.
For a summary of how to use your dryer following installation, see the QUICK START GUIDE on the next page.
QUICK START GUIDE
WARNING: To reduce the risk of fire electric shock, or injury to persons, read the IMPORTANT SAFETY INSTRUCTIONS before operating this appliance.
This Use and Care Guide covers several different models. Your dryer may not have all the cycles and features described.
USING AUTO DRY CYCLES
Auto Dry Cycles automatically match the cycle setting to the type of load and adjust drying time for optimal performance.
See the Cycles information on the following pages for more detail on each cycle.

- Clean the lint screen.
- Place laundry in the dryer. Shut the door.
- Press POWER or press the cycle selector button.
- Select an AUTO DRY cycle.
- Select the CYCLE SIGNAL feature, if desired.
- Press and hold START/PAUSE to begin.
To add or remove options during an AUTO DRY Cycle: You may select or deselect the CYCLE SIGNAL feature at any time during the cycle, if desired.
USING TIMED DRY CYCLES
Use Timed Dry cycles to set a drying time and temperature.
See the Cycles information on the following pages for more detail on each cycle.

- Clean the lint screen.
- Place laundry in the dryer. Shut the door.
- Press POWER or press the cycle selector button.
- Select a TIMED DRY cycle.
- Press the TEMP button until the desired temperature is lit.
- Select the CYCLE SIGNAL feature, if desired.
- Press and hold START/PAUSE to begin.
To add or remove options during an TIMED DRY Cycle: You may select or deselect the CYCLE SIGNAL feature at any time during the cycle, if desired.
Stopping Your Dryer
To stop your dryer at any time
Press POWER.
Pausing or Restarting
To pause the dryer at any time
Open the door or press START/PAUSE once.
To restart the dryer
Close the door and press and hold START/PAUSE until dryer starts.
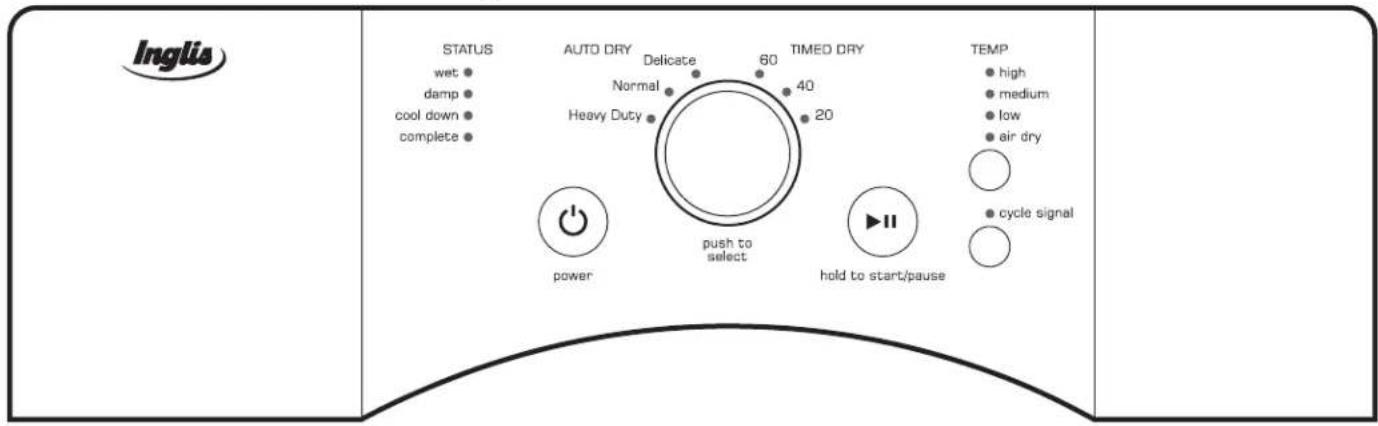
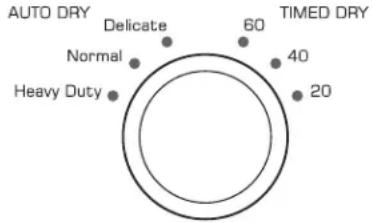
Cycles
NOTE: Not all cycles are available on all models.
Press the cycle selector button to select the drying cycle that matches the type of load you are drying. See AUTO DRY or TIMED DRY Cycle Settings chart.
push to
select
Cycle selection button
AUTO DRY Cycles
AUTO DRY Cycles allow you to match the cycle to the load you are drying. See the following AUTO DRY Preset Cycle Settings chart. Each cycle dries certain fabrics at the recommended temperature.
A sensor detects the moisture in the load and automatically adjusts the drying time for optimal drying.
AUTO DRY Cycle Settings
| AUTO DRY Cycles Load Type | Temperature Est. Cycle Time (Minutes) |
| HEAVY DUTY Heavyweight items, towels, jeans | High 45 |
| NORMAL Corduroys, work clothes, sheets | Medium 35 |
| DELICATE Lingerie, blouses, washable woolens | Low 30 |
TIMED DRY Cycles
Use TIMED DRY Cycles to select a specific amount of drying time and a drying temperature. Press the TEMP button to change the drying temperature from the default setting. The default drying temperature is High.
TIMED DRY Cycle Settings
| TIMED DRY Cycles Load Type | Temperature Cycle Time* (Minutes) |
| TIMED DRY Heavyweight items, bulky items, bedspreads, work clothes | High 60, 40, 20 |
*Reset time to complete drying, if needed.
Air Dry
Use the Air Dry temperature setting with TIMED DRY cycles for items that require drying without heat such as rubber, plastic, and heat-sensitive fabrics. This chart shows examples of items that can be dried using Air Dry.
Type of Load Est.
Time* (Minutes)
| Foam rubber - pillows, padded bras, stuffed toys 20 - 30 |
| Plastic - shower curtains, tablecloths 20 - 30 |
| Rubber-backed rugs 40 - 50 |
| Olefin, polypropylene, sheer nylon 10 - 20 |
*Reset time to complete drying, if needed.
When using Air Only
Check that coverings are securely stitched.
- Shake and fluff pillows by hand periodically during the cycle.
Dry item completely. Foam rubber pillows are slow to dry.
NOTE: AUTO DRY Cycles are not available when using the Air Only setting.
Additional Features
Cycle Signal
The Cycle Signal produces an audible sound when the drying cycle is finished. Press CYCLE SIGNAL to turn On or Off at any time before or during a cycle.

cycle signal
Changing Cycles and Settings
You can change AUTO DRY Cycles, TIMED DRY Cycles, and the drying temperature on TIMED DRY Cycles at any time before pressing START/PAUSE.
Three short tones sound if an unavailable combination is selected. The last selection will not be accepted.
Changing Cycles after starting dryer
- Press the POWER button. This ends the current cycle and turns the dryer OFF.
- Press the POWER button again or press the cycle selector to turn on the dryer.
- Select the desired cycle and options.
- Press and hold START/PAUSE. The dryer starts at the beginning of the new cycle.
Changing Drying Temperature
You can change the drying temperature on Timed Dry cycles at any time by pressing the TEMP button until the desired drying temperature is lit.
DRYER CARE
Cleaning the Dryer Location
Keep dryer area clear and free from items that would obstruct the flow of combustion and ventilation air.
WARNING
Explosion Hazard
Keep flammable materials and vapors, such as gasoline, away from dryer.
Place dryer at least 18 inches (460 mm) above the floor for a garage installation.
Failure to do so can result in death, explosion, or fire.
Cleaning the Lint Screen
Every load cleaning
The lint screen is located in the door opening of the dryer. A screen blocked by lint can increase drying time.
To clean
- Pull the lint screen straight up. Roll lint off the screen with your fingers. Do not rinse or wash screen to remove lint. Wet lint is hard to remove.
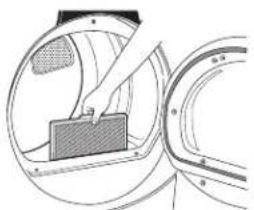
- Push the lint screen firmly back into place.
IMPORTANT:
- Do not run the dryer if the lint screen is loose, damaged, blocked, or missing. Doing so can cause overheating and damage to both the dryer and fabrics.
If lint falls off the screen into the dryer during removal, check the exhaust hood and remove the lint. See "Venting Requirements."
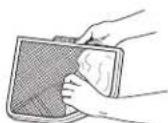
As needed cleaning
Laundry detergent and fabric softener residue can build up on the lint screen. This buildup can cause longer drying times for your clothes, or cause the dryer to stop before your load is completely dry.
Clean the lint screen with a nylon brush every 6 months, or more frequently, if it becomes clogged due to a residue buildup.
To wash
- Roll int off the screen with your fingers.
-
W et both sides of lint screen with hot water.
-
W et a nylon brush with hot water and liquid detergent. Scrub lint screen with the brush to remove residue buildup.
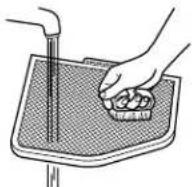
- Rinse screen with hot water.
- Thoroughly dry lint screen with a clean towel. Replace screen in dryer.
Cleaning the Dryer Interior
To clean dryer drum
- Make a paste with powdered laundry detergent and very warm water.
- Apply paste to a soft cloth.
OR
Apply a liquid, nonflammable household cleaner to the stained area and rub with a soft cloth until all excess dye and stains are removed.
- Wipe drum thoroughly with a damp cloth.
- Tumble a load of clean cloths or towels to dry drum.
NOTE: Garments that contain unstable dyes, such as denim blue jeans or brightly colored cotton items, may discolor the dryer interior. These stains are not harmful to your dryer and will not stain future loads of clothes. Dry unstable dye items inside out to avoid transfer of dye.
Removing Accumulated Lint
From Inside the Dryer Cabinet
Lint should be removed every 2 years, or more often, depending on dryer usage. Cleaning should be done by a qualified person.
From the Exhaust Vent
Lint should be removed every 2 years, or more often, depending on dryer usage.
Vacation, Storage, and Moving Care
Non-Use or Storage Care
Operate your dryer only when you are at home. If you will be on vacation or not using your dryer for an extended period of time, you should:
- Unplug dry er or disconnect power.
- Clean lint screen. See "Cleaning the Lint Screen."
Moving care
For power supply cord-connected dryers:
- Unplug the power supply cord.
- Ma ke sure leveling legs are secure in dryer base.
- Use masking tape to secure dryer door.
For direct-wired dryers:
WARNING

Electrical Shock Hazard
Disconnect power before servicing.
Replace all parts and panels before operating.
Failure to do so can result in death or electrical shock.
- Disconnect power.
- Disconnect wiring.
- Make sure leveling legs are secure in dryer base.
- Use masking tape to secure dryer door.
Reinstalling the dryer
Follow the "Installation Instructions" to locate, level, and connect the dryer.
Changing the Drum Light
The dryer light automatically turns on inside the dryer drum when you open the door.
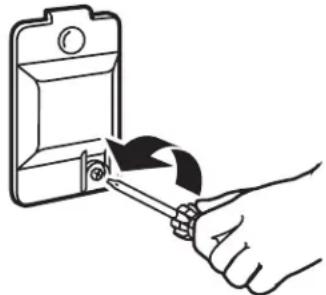
To change the drum light
- Unplug dryer or disconnect power.
- Open the dryer door. Locate the light bulb cover on the back wall of the dryer. Remove the screw located in the lower right corner of the cover. Remove the cover.
- T urn bulb counterclockwise. Replace the bulb with a 10-watt appliance bulb only. Replace the cover and secure with the screw.
- Plug in dryer or reconnect power.
TROUBLESHOOTING
First try the solutions suggested here and possibly avoid the cost of a service call...
For additional recommendations, refer to your Installation Instructions.
Dryer Operation
Dryer will not run
■ Is the dryer door firmly closed?
Was the START/PAUSE button firmly pressed?
Large loads may require pressing and holding the Start button for 2-5 seconds.
Has a household fuse blown, or has a circuit breaker tripped?
There may be 2 household fuses or circuit breakers for the dryer. Check that both fuses are intact and tight, or that both circuit breakers have not tripped. Replace the fuse or reset the circuit breaker. If the problem continues, call an electrician.
Is the correct power supply available?
Electric dryers require 240-volt power supply. Check with a qualified electrician.
Was a regular fuse used?
Use a time-delay fuse.
Unusual sounds
Has the dryer had a period of non-use?
If the dryer hasn't been used for a while, there may be a thumping sound during the first few minutes of operation.
Is a coin, button, or paper clip caught between the drum and front or rear of the dryer?
Check the front and rear edges of the drum for small objects. Clean out pockets before laundering.
Are the four legs installed, and is the dryer level front to back and side to side?
The dryer may vibrate if not properly installed. See the Installation Instructions.
Is the clothing knotted or balled up?
When balled up, the load will bounce, causing the dryer to vibrate. Separate the load items and restart the dryer.
No heat
Has a household fuse blown, or has a circuit breaker tripped?
The drum may be turning, but you may not have heat. Electric dryers use 2 household fuses or circuit breakers. Replace the fuse or reset the circuit breaker. If the problem continues, call an electrician.
Dryer displaying error message (WET indicator flashing)
WET indicator is flashing:
If the WET indicator on the dryer control panel is flashing, with a pause between flashes, the dryer control has detected a problem that requires service. Call for service.
Dryer Results
Clothes are not drying satisfactorily, drying times are too long, or load is too hot
Is the lint screen clogged with lint?
Lint screen should be cleaned before each load.
Has the Air Dry temperature setting been selected?
Select the right temperature for the types of garments being dried. See "Additional Features."
Is the load too large and heavy to dry quickly?
Separate the load to tumble freely.
Is the exhaust vent or outside exhaust hood clogged with lint, restricting air movement?
Run the dryer for 5-10 minutes. Hold your hand under the outside exhaust hood to check air movement. If you do not feel air movement, clean exhaust system of lint or replace exhaust vent with heavy metal or flexible metal vent. See the Installation Instructions.
Are fabric softener sheets blocking the grille?
Use only one fabric softener sheet, and use it only once.
Are drying times too long or are clothes too dry?
AUTO DRY default settings may have been changed. See Changing the AUTO DRY Default Settings.
Is the exhaust vent the correct length?
Check that the exhaust vent is not too long or has too many turns. Long venting will increase drying times. See the Installation Instructions. See also Changing the AUTO DRY Default Settings, if you are unable to shorten the vent length.
Is the exhaust vent diameter the correct size?
Use 4" (102 mm) diameter vent material.
Is the dryer located in a room with temperature below 45^ (7^) ?
Proper operation of dryer cycles requires temperatures above 45^ (7^)
Is the dryer located in a closet?
Closet doors must have ventilation openings at the top and bottom of the door. The front of the dryer requires a minimum of 1" (25 mm) of airspace, and, for most installations, the rear of the dryer requires 5" (127 mm). See the Installation Instructions.
Cycle time too short
■ Is the automatic cycle ending early?
The load may not be contacting the moisture sensor strips. Level the dryer.
Change the dryness level setting on Automatic Cycles. Increasing or decreasing the dryness level will change the amount of drying time in a cycle. If loads are consistently ending too early, see also Changing the AUTO DRY Default Settings.
Lint on load
■ Is the lint screen clogged?
Clean lint screen. Check for air movement.
Stains on load or drum
Was dryer fabric softener properly used?
Add dryer fabric softener sheets at the beginning of the cycle. Fabric softener sheets added to a partially dried load can stain your garments.
Drum stains are caused by dyes in clothing (usually blue jeans). These will not transfer to other clothing.
Loads are wrinkled
Was the load removed from dryer at the end of the cycle?
Remove garments promptly to prevent wrinkling.
Was the dryer overloaded?
Dry smaller loads that can tumble freely.
Odors
Have you recently been painting, staining, or varnishing in the area where your dryer is located?
If so, ventilate the area. When the odors or fumes are gone from the area, rewash and dry the clothing.
Changing the AUTO DRY Default Settings
IMPORTANT: Your dryness level settings can be adjusted to adapt to different installations, environmental conditions or personal preference. This change is retained and will affect all of your AUTO DRY cycles, not just the current cycle/load.
If all your loads on all AUTO DRY cycles are consistently not as dry as you would like, you may change the default settings to increase the default dryness level. This change will affect all of your AUTO DRY cycles.
There are 3 drying settings, which are displayed using the WET, DAMP, and COOL DOWN indicators:
STATUS
wet
damp
coal down
- (Factory pr eset dryness level) - WET indicator lit.
- (S lightly drier clothes, 15% more drying time) - WET and DAMP indicators lit.
- (Mu ch drier clothes, 30% more drying time) - WET, DAMP, and COOL DOWN indicators lit.
To change the AUTO DRY default settings:
NOTE: The AUTO DRY default settings cannot be changed while the dryer is running.
- Press and hold the TEMP button for at least 6 seconds. The dryer will beep, and the current drying mode will be displayed.
- To select a new drying setting, press the TEMP button again until the desired drying setting is shown.
NOTE: While cycling through the settings, the current setting will be lit solid, but the other settings will flash.
- Pr ess the START/PAUSE button to save the drying setting and exit to standby mode.
NOTE: To exit without saving, press the POWER button. - The drying setting you selected will become your new preset drying setting for all AUTO DRY cycles.
INGLIS® LAUNDRY WARRANTY
LIMITED WARRANTY
For one year from the date of purchase, when this major appliance is operated and maintained according to instructions attached to or furnished with the product, Inglis brand of Whirlpool Corporation or Whirlpool Canada LP (hereafter "Inglis") will pay for factory specified parts and repair labor to correct defects in materials or workmanship that existed when this major appliance was purchased. Service must be provided by an Inglis designated service company. YOUR SOLE AND EXCLUSIVE REMEDY UNDER THIS LIMITED WARRANTY SHALL BE PRODUCT REPAIR AS PROVIDED HEREIN. This limited warranty is valid only in the United States or Canada and applies only when the major appliance is used in the country in which it was purchased. Proof of original purchase date is required to obtain service under this limited warranty.
ITEMS EXCUSED FROM WARRANTY
This limited warranty does not cover:
- Replacement parts or repair labor if this major appliance is used for other than normal, single-family household use or when it is used in a manner that is inconsistent to published user or operator instructions and/or installation instructions.
- Service calls to correct the installation of your major appliance, to instruct you on how to use your major appliance, to replace or repair house fuses, or to correct house wiring or plumbing.
- Service calls to repair or replace appliance light bulbs, air filters or water filters. Consumable parts are excluded from warranty coverage.
- Damage resulting from accident, alteration, misuse, abuse, fire, flood, acts of God, improper installation, installation not in accordance with electrical or plumbing codes, or use of products not approved by Inglis.
- Cosmetic damage, including scratches, dents, chips or other damage to the finish of your major appliance, unless such damage results from defects in materials or workmanship and is reported to Inglis within 30 days from the date of purchase.
- Pick up and delivery. This major appliance is intended to be repaired in your home.
- Repairs to parts or systems resulting from unauthorized modifications made to the appliance.
- Expenses for travel and transportation for product service if your major appliance is located in a remote area where service by an authorized Inglis servicer is not available.
- The removal and reinstallation of your major appliance if it is installed in an inaccessible location or is not installed in accordance with Inglis' published installation instructions.
- Replacement parts or repair labor on major appliances with original model/serial numbers that have been removed, altered, or cannot be easily determined.
DISCLAIMER OF IMPLIED WARRANTYES
IMPLIED WARRANTY, INCLUDING ANY IMPLIED WARRANTY OF MERCHANTABILITY OR IMPLIED WARRANTY OF FITNESS FOR A PARTICULAR PURPOSE, ARE LIMITED TO ONE YEAR OR THE SHORTEST PERIOD ALLOWED BY LAW. Some states and provinces do not allow limitations on the duration of implied warranties of merchantability or fitness, so this limitation may not apply to you. This warranty gives you specific legal rights, and you also may have other rights that vary from state to state or province to province.
LIMITATION OF REMEDIES; EXCLUSION OF INCIDENTAL AND CONSEQUENTIAL DAMAGES
YOUR SOLE AND EXCLUSIVE REMEDY UNDER THIS LIMITED WARRANTY SHALL BE PRODUCT REPAIR AS PROVIDED HEREIN. INGLIS SHALL NOT BE LIABLE FOR INCIDENTAL OR CONSEQUENTIAL DAMAGES. Some states and provinces do not allow the exclusion or limitation of incidental or consequential damages, so these limitations and exclusions may not apply to you. This warranty gives you specific legal rights, and you also may have other rights that vary from state to state or province to province.
If outside the 50 United States and Canada, contact your authorized Inglis dealer to determine if another warranty applies.
If you think you need repair service, first see the "Troubleshooting" section of the Use & Care Guide. If you are unable to resolve the problem after checking "Troubleshooting," additional help can be found by checking the "Assistance or Service" section or by calling Inglis. In the U.S.A., call 1-800-843-0304. In the Canada, call 1-800-807-6777. 12/08
Keep this book and your sales slip together for future reference. You must provide proof of purchase or installation date for in-warranty service.
Write down the following information about your major appliance to better help you obtain assistance or service if you ever need it. You will need to know your complete model number and serial number. You can find this information on the model and serial number label located on the product.
Dealer name
Address
Phone number
Model number
Serial number
Purchase date
SECURITE DE LA SECHEUSE
ASSISTANCE OR SERVICE
Before calling for assistance or service, please check "Troubleshooting" or visit www.whirlpool.com/help. It may save you the cost of a service call. If you still need help, follow the instructions below.
When calling, please know the purchase date and the complete model and serial number of your appliance. This information will help us to better respond to your request.
If you need replacement parts or to order accessories
We recommend that you use only FSP® Factory Specified Parts.
These parts will fit right and work right because they are made with the same precision
used to build every new WHIRLPOOL® appliance.
To locate FSP replacement parts, assistance in your area, or accessories:
Whirlpool Corporation Customer eXperience Center
1-800-253-1301 www.whirlpool.com
1-800-442-9991 (Accessories)
www.whirlpool.com/accessories
Whirlpool Canada LP
Customer eXperience Centre
1-800-807-6777
www.whirlpool.ca
or call your nearest designated service center or refer to your Yellow Pages telephone directory.
Our consultants provide assistance with
In the U.S.A.
Features and specifications on our full line of appliances.
Installation information.
Specialized customer assistance (Spanish speaking, hearing impaired, limited vision, etc.).
In the U.S.A. and Canada
Use and maintenance procedures.
■ Accessory and repair parts sales
Referrals to local dealers, repair parts distributors, and service companies. Whirlpool designated service technicians are trained to fulfill the product warranty and provide after-warranty service, anywhere in the United States and Canada.
You can write with any questions or concerns at:
Whirlpool Corporation
Customer eXperience Center
553 Benson Road
Benton Harbor, MI 49022-2692
Customer eXperience Centre
Whirlpool Canada LP
1901 Minnesota Court
Mississauga, Ontario L5N 3A7
Please include a daytime phone number in your correspondence.