
GBD62PZYFN - Freezer LG - Free user manual and instructions
Find the device manual for free GBD62PZYFN LG in PDF.
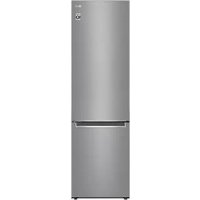



| Product type | Upright freezer |
| Brand | LG |
| Model | GBD62PZYFN |
| Dimensions (W x H x D) | 595 mm x 1860 mm x 675 mm |
| Power supply | 220-240 V, 50 Hz |
| Climate class | SN-T (10 °C to 43 °C) |
| Refrigerant | R600a (isobutane) |
| Water tank capacity | 2.3 L (model with dispenser) |
| Main features | Express Freeze, Fast Cool, Eco Mode, Open Door Alarm, Smart Diagnosis, Wi-Fi (LG ThinQ), Control Lock |
| Temperature setting | Freezer: -15 °C to -23 °C (default -18 °C) |
| Defrost type | Automatic |
| Folding shelf | Yes (for storing tall items) |
| Fresh converter | Adjustable compartment for meat/fish/vegetables |
| Ice cube tray | Built-in |
| Water dispenser | Interior (depending on model) |
| Lighting | LED |
| Shelf material | Tempered glass |
| Child safety | Button lock (Lock) |
| Maintenance | Clean with a soft cloth and mild detergent; do not use abrasive products |
| Spare parts and reparability | Parts available via LG (door gaskets guaranteed 10 years, others 7 years) |
| Connectivity | Wi-Fi 2.4 GHz (LG ThinQ app) |
Frequently Asked Questions - GBD62PZYFN LG
User questions about GBD62PZYFN LG
0 question about this device. Answer the ones you know or ask your own.
Ask a new question about this device
Download the instructions for your Freezer in PDF format for free! Find your manual GBD62PZYFN - LG and take your electronic device back in hand. On this page are published all the documents necessary for the use of your device. GBD62PZYFN by LG.
USER MANUAL GBD62PZYFN LG
Read this owner's manual thoroughly before operating the appliance and keep it handy for reference at all times.
EN ENGLISH ES ESPAÑOL IT ITALIANO PL POLSKI SR SRPSKI
| BG | БЪЛГАРСКИ | ET | EESTI | LT | LIETUVIŲ | PT | PORTUGUĖS | SV | SVENSKA |
| CZ | ČEŠTINA | FI | SUOMI | LV | LATVIEŠU | RO | ROMĂNĂ | ||
| DA | DANSK | FR | FRANÇAIS | MK | MAKEDОНСКИ | SK | SLOVENČINA | ||
| DE | DEUTSCH | HR | HRVATSKI | NL | NEDERLANDS | SL | SLOVENŠČINA | ||
| EL | ЕЛАННИКА | HU | MAGYAR | NO | NORSK | SQ | SHQIP |
MFL70584303
Rev.06_201210
www.lg.com
TABLE OF CONTENTS
This manual may contain images or content different from the model you purchased.
This manual is subject to revision by the manufacturer.
SAFETY INSTRUCTIONS ....3
IMPORTANT SAFETY INSTRUCTIONS ....3
Disposal of Your Old Appliance ....10
INSTALLATION ....11
Dimensions and Clearances ...... 11
Ambient Temperature 11
Accessories....12
Reversing Doors 12
Leveling the Appliance 12
Connecting the Appliance 12
Moving the Appliance 12
OPERATION 13
Parts and Functions 13
Notes for Operation 15
Control Panel 17
Water Dispenser (*) 19
Water Dispenser Tank 19
Ice Tray 20
Fresh Converter (*) 20
Fresh Vegetable Drawer (*) 21
Folding Shelf 21
Other Functions 22
SMART FUNCTIONS ......23
LG ThinQ Application 23
Using Smart Diagnosis™ 25
MAINTENANCE ....26
Notes for Cleaning 26
Cleaning the Door Basket 26
Cleaning the Shelf 27
Cleaning the Vegetable Drawer 27
Cleaning the Crisper Cover ....27
Cleaning the Freezer Drawer 28
Cleaning the Water Dispenser 28
TROUBLESHOOTING....29
The following safety guidelines are intended to prevent unforeseen risks or damage from unsafe or incorrect operation of the appliance.
The guidelines are separated into ‘WARNING’ and ‘CAUTION’ as described below.

This symbol is displayed to indicate matters and operations that can cause risk. Read the part with this symbol carefully and follow the instructions in order to avoid risk.

WARNING
This indicates that failure to follow the instructions can cause serious injury or death.

CAUTION
This indicates that failure to follow the instructions can cause minor injury or damage to the product.
IMPORTANT SAFETY INSTRUCTIONS

WARNING
To reduce the risk of explosion, fire, death, electric shock, injury or scalding to persons when using this product, follow basic precautions, including the following:
Children in the Household
- This appliance is not intended for use by persons (including children) with reduced physical, sensory or mental capabilities, or lack of experience and knowledge, unless they have been given supervision or instruction concerning use of the appliance by a person responsible for their safety. Children should be supervised to ensure that they do not play with the appliance.
- If the appliance is equipped with a lock (some models only), keep the key out of reach of children.
For use in Europe:
This appliance can be used by children aged from 8 years and above and persons with reduced physical, sensory or mental capabilities or lack of experience and knowledge if they have been given supervision or instruction concerning use of the appliance in a safe way and understand the hazards involved. Children shall not play with the appliance. Cleaning and user maintenance shall not be made by children without supervision.
Installation
- This appliance should only be transported by two or more people holding the appliance securely.
- Ensure that the socket outlet is properly grounded, and that the earth pin on the power cord is not damaged or removed from the power plug. For more details on grounding, inquire at an LG Electronics customer information centre.
- This appliance is equipped with a power cord having an equipment-grounding conductor and a grounding power plug. The power plug must be plugged into an appropriate socket outlet that is installed and grounded in accordance with all local codes and ordinances.
- If the power cord is damaged or the hole of the socket outlet is loose, do not use the power cord and contact an authorized service centre.
- Do not plug the appliance into a multi socket adapter which does not have a power cable (mounted).
- Do not modify or extend the power cable.
- The appliance should be connected to a dedicated power line which is separately fused.
- Do not use a multi socket outlet which is not properly grounded (portable). In case of using a properly-grounded multi socket outlet (portable), use the multi socket outlet with the current capacity of the power code rating or higher and use the multi socket outlet only for the appliance.
- Install the appliance in a place where is easy to unplug the power plug of the appliance.
- Be careful not to point the power plug up or let the appliance lean against the power plug. Install the appliance on a firm and level floor.
- Do not install the appliance in a damp and dusty place. Do not install or store the appliance in any outdoor area, or any area that is subject to weathering conditions such as direct sunlight, wind, rain, or temperatures below freezing.
- Do not place the appliance in direct sunlight or expose it to the heat from heating appliances such as stoves or heaters.
- Be careful not to expose the rear of the appliance when installing.
- Be careful not to let the appliance door fall during assembly or disassembly.
- Be careful not to pinch, crush, or damage the power cable during assembly or disassembly of the appliance door.
- Do not connect a plug adapter or other accessories to the power plug.
Operation
- Do not use the appliance for any purpose (storage of medical or experimental materials or shipping) other than any domestic household food storage use.
- Unplug the power plug during a severe thunderstorm or lightning or when not in use for a long period of time.
- Do not touch the power plug or the appliance controls with wet hands.
- Do not bend the power cable excessively or place a heavy object on it.
- If water penetrates electrical parts of the appliance, disconnect power plug and contact an LG Electronics customer information centre.
- Do not place hands or metallic objects inside the area emitting the cold air, cover or heat releasing grille on the back.
- Do not apply excessive force or impact to the back cover of the appliance.
- Do not put animals, such as pets into the appliance.
- Be careful of nearby children when you open or close the appliance door. The door may bump the child and cause injury.
- Avoid the danger of children getting trapped inside the appliance. A child trapped inside the appliance can cause suffocation.
- Do not place heavy or fragile objects, containers filled with liquid, combustible substances, flammable objects (such candles, lamps, etc.), or heating devices (such as stoves, heaters, etc.) on the appliance.
- If there is a gas leakage (isobutane, propane, natural gas, etc.), do not touch the appliance or power plug and ventilate the area immediately. This appliance uses a refrigerant gas (isobutane, R600a). Although it uses a small amount of the gas, it is still combustible gas. Gas leakage during appliance transport, installation or operation can cause fire, explosion or injury if sparks are caused.
- Do not use or store flammable or combustible substances (ether, benzene, alcohol, chemical, LPG, combustible spray, insecticide, air freshener, cosmetics, etc.) near the appliance.
- Immediately unplug the power plug and contact an LG Electronics customer information centre if you detect a strange sound, odour, or smoke coming from the appliance.
- Fill with potable water only into icemaker or dispenser water tank.
- Do not damage the refrigerant circuit.
- Do not place any electronic appliance (such as heater and mobile phone) inside the appliance.
Maintenance
- Disconnect the power cord before cleaning the appliance or replacing the inside lamp (where fitted).
- Securely plug the power plug in the socket outlet after completely removing any moisture and dust.
- Never unplug the appliance by pulling on the power cable. Always grip the power plug firmly and pull straight out from the socket outlet.
- Do not spray water or inflammable substances (toothpaste, alcohol, thinner, benzene, flammable liquid, abrasive, etc.) over the interior or exterior of the appliance to clean it.
- Do not clean the appliance with brushes, cloths or sponges with rough surfaces or which are made of metallic material.
- Only qualified service personnel from LG Electronics service centre should disassemble, repair, or modify the appliance. Contact an LG Electronics customer information centre if you move and install the appliance in a different location.
- Do not use a hair drier to dry the inside of the appliance or place a candle inside to remove the odours.
- Do not use mechanical devices or other means to accelerate the defrosting process.
Disposal
- When discarding the appliance, remove the door gasket while leaving the shelves and baskets in place and keep children away from the appliance.
- Dispose of all packaging materials (such as plastic bags and styrofoam) away from children. The packaging materials can cause suffocation.
Technical Safety
- Keep ventilation openings, in the appliance enclosure or in the built-in structure, clear of obstruction.
- Do not use electrical appliances inside the refrigerator.
- The refrigerant and insulation blowing gas used in the appliance require special disposal procedures. Consult with service agent or a similarly qualified person before disposing of them.
- Refrigerant leaking out of the pipes could ignite or cause an explosion.
- The amount of refrigerant in your particular appliance is shown on the identification plate inside the appliance.
- Never start up an appliance showing any signs of damage. If in doubt, consult your dealer.
- This appliance is intended to be used in household and similar applications only. It should not be used for commercial, or catering purposes, or in any mobile application such as a caravan or boat.
- Do not store explosive substances such as aerosol cans with a flammable propellant in this appliance.
- Children aged from 3 to 8 years are allowed to load and unload refrigerating appliances.
- This refrigerating appliance is not intended to be used as a built-in appliance.
Risk of Fire and Flammable Materials
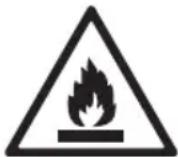
This symbol alerts you to flammable materials that can ignite and cause a fire if you do not take care.
This appliance contains a small amount of isobutane refrigerant (R600a), which is combustible. When transporting and installing the appliance, care should be taken to ensure that no parts of the refrigerating circuit are damaged.
- If a leak is detected, avoid any naked flames or potential sources of ignition and air the room in which the appliance is standing for several minutes. To avoid the creation of a flammable gas-air mixture if a leak in the refrigerating circuit occurs, the size of the room in which the appliance is used should correspond to the amount of refrigerant used. The room must be 1 m² in size for every 8 g of R600a refrigerant inside the appliance.
- When positioning the appliance, ensure the supply cord is not trapped or damaged.
- Do not locate multiple portable socket-outlets or portable power supplies at the rear of the appliance.

CAUTION
To reduce the risk of minor injury to persons, malfunction, or damage to the product or property when using this product, follow basic precautions, including the following:
Installation
- Do not tilt the appliance to pull or push it when transporting.
- Make sure not to get a body part such as a hand or foot stuck while moving the appliance.
Operation
- Do not touch frozen food or the metal parts in the freezer compartment with wet or damp hands. It may cause frostbite.
- Do not place glass containers, bottles or cans (especially those containing carbonated drinks) in the freezer compartment, shelves or ice bin that will be exposed to temperatures below freezing.
- The tempered glass on the front side of the appliance door or the shelves can be damaged by an impact. If it is broken, do not touch it with your hands.
- Do not hang from the appliance doors, storage room, shelf, or climb up into it.
- Do not store an excessive amount of water bottles or containers for side dishes on the door baskets.
- Prevent animals from nibbling on the power cable or water hose.
- Do not open or close the appliance door with excessive force.
- If the hinge of the appliance door is damaged or operates improperly, stop using the appliance and contact an authorized service centre.
- Do not clean glass shelves or covers with warm water when they are cold.
- Never eat frozen foods immediately after they have been taken out of the freezer compartment.
- Make sure not to get a hand or foot stuck upon opening or closing the appliance door.
Maintenance
- Do not insert the shelves upside down. The shelves may fall.
- To remove frost from the appliance, contact an LG Electronics customer information centre.
Disposal of Your Old Appliance
- This crossed-out wheeled bin symbol indicates that waste electrical and electronic products (WEEE) should be disposed of separately from the municipal waste stream.
- Old electrical products can contain hazardous substances, so correct disposal of your old appliance will help prevent potential negative consequences for the environment and human health. Your old appliance may contain reusable parts that could be used to repair other products, and other valuable materials that can be recycled to conserve limited resources.
- You can take your appliance either to the shop where you purchased the product, or contact your local government waste office for details of your nearest authorised WEEE collection point. For the most up-to-date information for your country, please see www.lg.com/global/recycling.
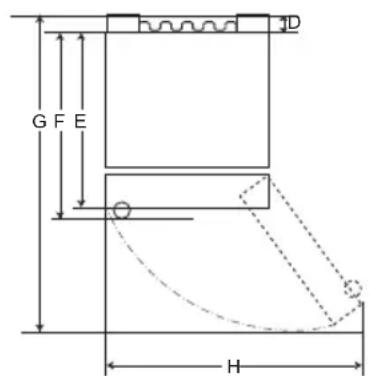
Dimensions and Clearances
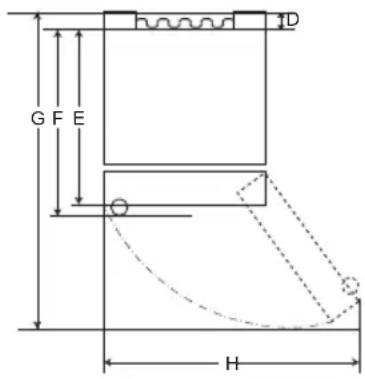
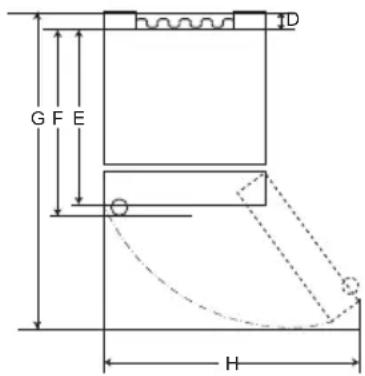
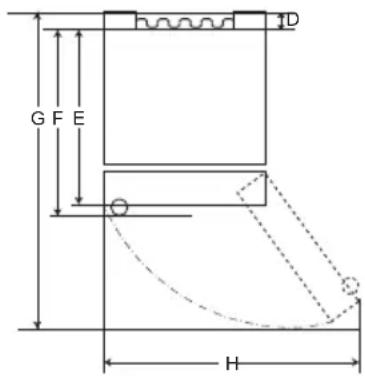
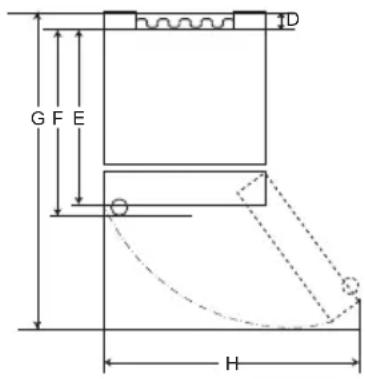
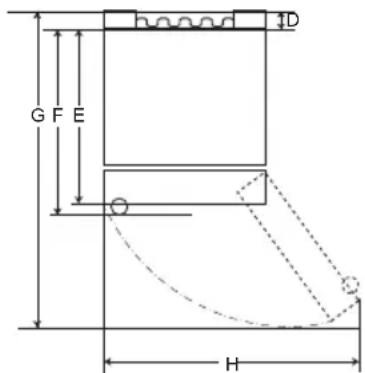
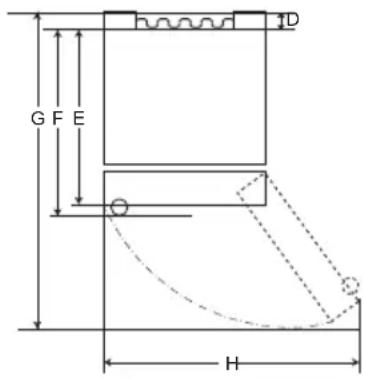
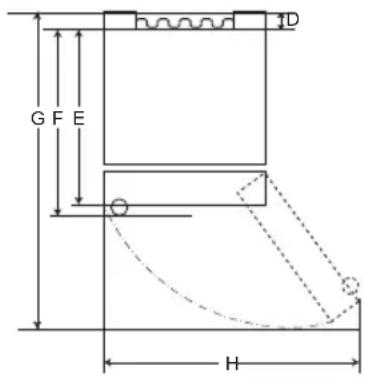
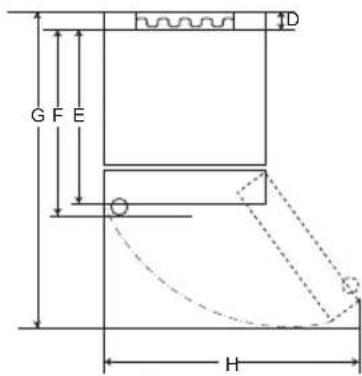
Too small a distance from adjacent items may result in the degradation of freezing capability and increased electricity costs. Allow over 50 mm of clearance from each adjacent wall when installing the appliance.
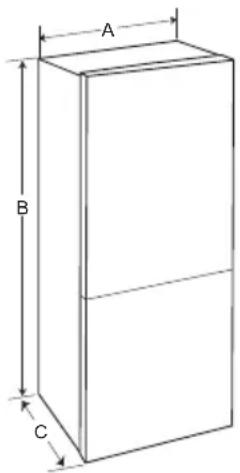
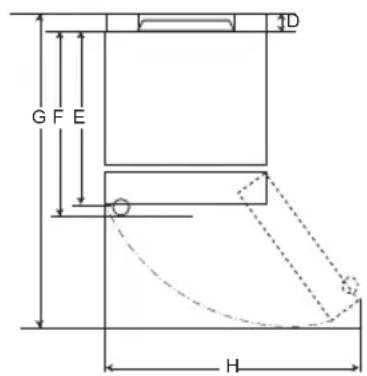
Type A
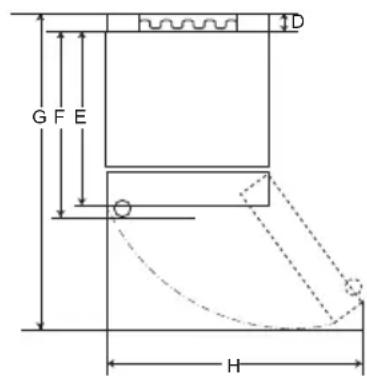
Type B
| Type A Type B | ||||||||
| Pocket Handle Bar | Handle Pocket Handle | Bar Handle | ||||||
| Size [mm] | ||||||||
| A | 595 595 5 | 95 595 595 | 595 595 595 | |||||
| B | 1860 | 2030 | 1860 | 2030 | 1860 | 2030 | 1860 | 2030 |
| C | 675 675 7 | 12 712 682 | 682 718 718 | |||||
| D | 9 | 9 | 9 | 9 | 15 | 15 | 15 | 15 |
| E | 667 667 6 | 67 667 667 | 667 667 667 | |||||
| F | - | - | 703 | 703 | - | - | 703 | 703 |
| G | 1124 | 1124 | 1124 | 1124 | 1130 | 1130 | 1130 | 1130 |
| H | 995 995 9 | 95 995 995 | 995 995 995 | |||||
Ambient Temperature
- The appliance is designed to operate within a limited range of ambient temperatures, depending on the climate zone.
- The internal temperature could be affected by the location of the appliance, the ambient temperature, the frequency of door opening, and so on.
- The climate class can be found on the rating label.
| Climate Class | Ambient Temperature Range °C |
| SN (Extended Temperate) | +10 - +32 |
| N (Temperate) | +16 - +32 |
| ST (Subtropical) | +16 - +38 |
| T (Tropical) | +16 - +43 / +10 - +43* |
*Australia, India, Kenya
NOTE
The appliances rated from SN to T are intended to be used at an ambient temperature between 10 °C and 43 °C.
Accessories
1
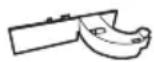
2

3

1 Hinge cover ② Lower hinge 3 Sticker
Reversing Doors
Your appliance is designed with reversible doors, so that they may open from either the left or right hand side to suit your kitchen design.
NOTE
- Reversing the doors must be performed by the qualified personnel of LG Electronics. If not, the doors will not be covered by the warranty.
Leveling the Appliance
To avoid vibration, the unit must be leveled.
If required, adjust the leveling screws to compensate for the uneven floor.
The front should be slightly higher than the rear to aid in door closing.
Leveling screws can be turned easily by tipping the cabinet slightly.
Turn the leveling screws counterclockwise to raise the unit, clockwise to lower it.

Connecting the Appliance
After installing the appliance, connect the power plug into a socket outlet.
NOTE
- After connecting the power supply cord (or plug) to the outlet, wait 2 or 3 hours before you put food into the appliance. If you add food before the appliance has cooled completely, your food may spoil.
Moving the Appliance
1. Remove all food from inside the appliance. 2. Pull the power plug out, insert and fix it into the power plug hook at the rear or on top of the appliance. 3. Tape parts such as shelves and the door handle to prevent them from falling off while moving the appliance. 4. Move the appliance with more than two people carefully. When transporting the appliance over a long distance, keep the appliance upright. 5. After installing the appliance, connect the power plug into a socket outlet to switch on the appliance.
Parts and Functions
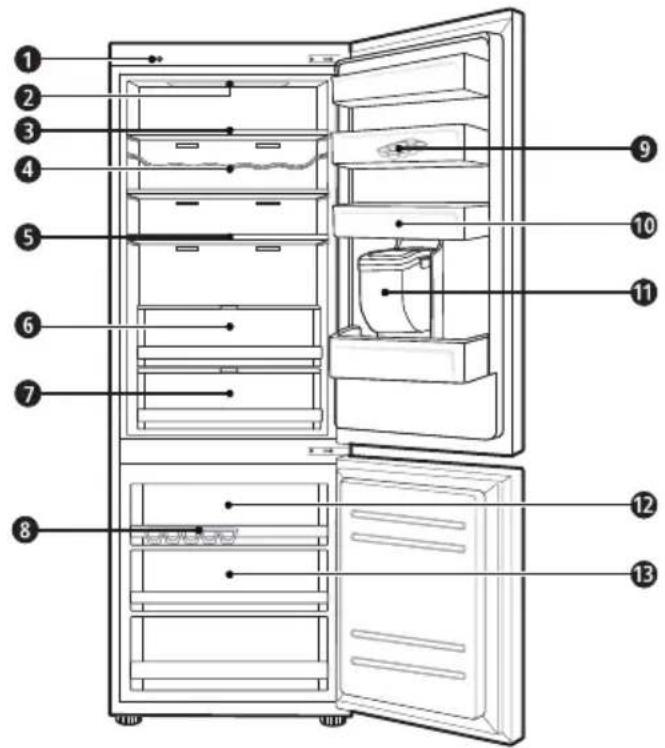
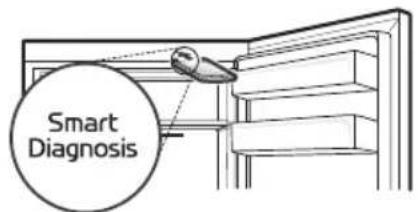
① Smart Diagnosis Unit (*)
This function is used when contacting LG Electronics customer information centre to help make an accurate diagnosis when the appliance operates abnormally or a failure occurs.
② LED Lamp
The LED lamps inside the appliance light up when you open the door.
③ Fridge Shelf
This is where refrigerated foods and other items are stored.
- The shelf height can be adjusted by inserting the shelf in another groove of different height.
- Store the foods with higher moisture content at the front of the shelf.
- The actual number of shelves will differ from model to model.
④ Bottle Rack (*)
This is where drinks, tall bottles, or containers are stored.
⑤ Folding Shelf (*)
This is where refrigerated foods and high items are stored.
⑥ Fresh Vegetable Drawer (*)
This is where fruits and vegetables are stored to help maintain freshness by adjusting the humidity controller.
- The appearance or components of the appliance may differ from model to model.
⑦ Fresh Converter (*)
As a chill compartment, this is where meat, fish, and vegetables are stored. Help maintain freshness by adjusting the humidity controller located in the back of the fridge compartment.
- For more space, you can use the chill area without the chill compartment drawer.
8 Ice Tray
This is where ice is produced and stored.
- For more space, you can remove the ice tray or ice cubes bucket.
9 Movable Egg Tray
This is where eggs are stored.
- You can move it to and use it at a desired position as needed. However, do not use it as the ice bin or place it on the shelf on top of the fridge or the vegetables drawer.
10 Fridge Door Basket
This is where small packages of refrigerated foods, drinks and sauce containers are stored.
⑪ Water Dispenser Tank (*)
This is where water to supply the dispenser or the automatic icemaker is stored. It requires manual filling. (Non plumbed models only)
⑫ Top drawer
To freeze food items quickly, store the food in the top drawer. Food items will freeze most quickly in the drawer.
13 Freezer Drawer
This is for long-term storage of frozen items.
CAUTION
- Do not store short bottles or containers on the bottle rack. The items may fall and cause an injury or appliance damage.
NOTE
• (*): This feature varies depending on the model purchased.
Notes for Operation
- Users should keep in mind that frost can form. If the door is not closed completely, if the humidity is high during the summer, or if the freezer door is opened frequently.
- Ensure there is sufficient space between food stored on the shelf or door basket to allow the door to close completely.
- Opening the door for long periods can cause a significant increase of the temperature in the compartments of the appliance.
- If the refrigerating appliance is left empty for long periods, switch off, defrost, clean, dry, and leave the door open to prevent mould developing within the appliance.
Suggestion for Energy Saving
- Ensure there is sufficient space between stored foods. This allows cold air to be circulated evenly and lowers electricity bills.
- Store hot food only after it has cooled in order to prevent dew or frost.
- When storing food in the freezer compartment, set the freezer temperature lower than the temperature indicated on the food.
- Do not put food near the temperature sensor of the fridge compartment. Keep a distance of at least 3 cm from the sensor.
- Note that a temperature rise after defrosting has a permissible range in the appliance specifications. If you wish to minimise the impact this may have on the food storage due to a temperature rise, seal or wrap the stored food in several layers.
- The automatic defrosting system in the appliance ensures that the compartment remains free of ice buildup under normal operating conditions.
- For the most efficient use of energy, make sure that door bins, drawers and shelves are assembled properly.
Storing Foods Effectively
- Store frozen food or refrigerated food inside sealed containers.
- Check the expiration date and label (storage instructions) before storing food in the appliance.
- Do not store food for a long period of time (more than four weeks) if it spoils easily at a low temperature.
- Place the refrigerated or frozen food in each fridge or freezer compartment immediately after purchasing.
- Place the refrigerated or frozen food in each fridge or freezer compartment immediately after purchasing.
- Avoid refreezing any food that has been completely thawed. Refreezing completely thawed food will lower its taste and nutritional value.
- Do not wrap and store vegetables in newspaper. The printing ink or other foreign substances on the newspaper may smear and contaminate the food.
- Do not overfill the appliance. Cold air cannot circulate properly if the appliance is overfilled.
- If you set an excessively low temperature for food, it may become frozen. Do not set a temperature lower than the required temperature for the food to be stored correctly.
- For more space, you can remove the bottle rack, egg tray, ice tray, and fresh converter drawer.
- Store raw meat and fish in suitable containers in the refrigerator, so that they do not come into contact with or drip onto other food.
Max Freezing Capacity
- The Express Freeze function will set the freezer to its maximum freezing capacity. This generally takes up to 24 hours and automatically switches off.
- Express freeze must be switched on for 7 hours before fresh products are placed in the freezer compartment.
Maximum Storage
- To get better air circulation, insert all drawers.
- If large quantities of food are to be stored, all the freezer drawers shall be taken out of the appliance and the food shall be stacked directly on the freezer shelves in the freezer compartment.
NOTE
- To remove the drawers, first take out the food. Then, using the drawer handles, pull the drawers out carefully. This may cause injury.
- The shape of each drawer may be different; insert them in the correct position.
Control Panel
Units and Functions
On the Refrigerator Door Inside the Refrigerator
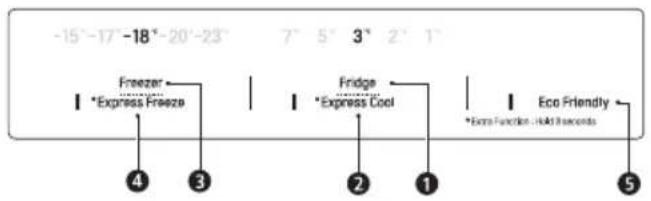
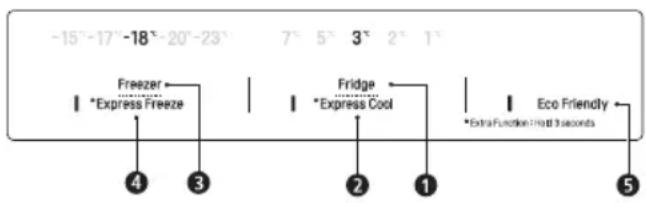
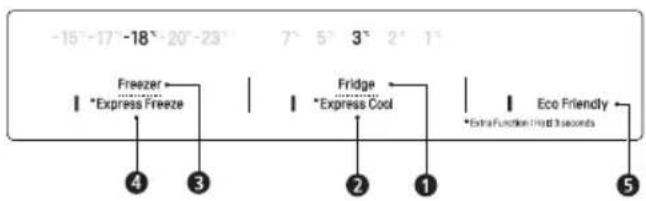
① Fridge Temperature
• This sets the fridge target temperature.
② * Express Cool
• This sets the Express Cool function.
③ Freezer Temperature
• This sets the freezer target temperature.
④ * Express Freeze
• This sets the Express Freeze function.
⑤ Eco Friendly
- This controls the Power Save mode for lowering energy consumption.
6 * Wi-Fi
- This sets the refrigerator to connect to your home's Wi-Fi network.
⑦ *Lock
- This locks the buttons on the control panel.
NOTE
- The actual control panel may differ from model to model.
- The control panel will turn off automatically for energy saving.
- If there is any finger or skin contacts to the control panel while cleaning it, the button function may operate.
Setting the Temperature
This sets the fridge temperature or freezer temperature.
- Press the Fridge button or Freezer button to adjust the temperature.
• The temperature can be adjusted.
- Fridge : from 1 °C to 7 °C
– Freezer : from -15 °C to -23 °C
• The initial temperature is set.
- Fridge: 3 °C
- Freezer: -18 °C
The actual inner temperature varies depending on the food status, as the indicated setting temperature is a target temperature, not the actual temperature within the appliance.
NOTE
- The default temperature setting may vary depending on the appliance.
- Wait until 2 or 3 hours have passed after connecting the appliance to the outlet before storing food in the appliance.
- For ice making in normal climates, the freezer temperatures should be set to -18°C or colder.
Setting Express Freeze
The function can quickly freeze a large amount of ice or frozen foods.
- When you press and hold the Express Freeze button for three seconds, the Express Freeze icon lights on the control panel.
- The function is enabled and disabled in turn each time you press the button.
- The Express Freeze function automatically terminates after a specific period has passed.
NOTE
- When Express Freeze is switched on, noise may occur and energy consumption may increase.
Setting Express Cool
The function can quickly cool a large amount of foods such as vegetables, fruits, and so on.
- When you press and hold the Express Cool button for three seconds, the Express Cool icon lights up on the control panel.
- The function is enabled and disabled in turn each time you press the button.
- The Express Cool function automatically terminates after a specific period has passed.
NOTE
- When Express Cool is switched on, noise may occur and energy consumption may increase.
Setting Eco Friendly
- The function makes the fridge-freezer work in the power saving mode, which is useful when you are away on a holiday as it reduces energy consumption.
- Pressing the Eco Friendly button starts the operation with the lamp on, and pressing it again stops the operation.
- When the Eco Friendly mode is on, the other buttons will not operate. When you finish using the Eco Friendly mode, turn it off so that other buttons work and the refrigerator returns to its previous temperature setting.
Setting and Resetting Lock
This locks the buttons on the control panel.
- Press and hold the Lock button for three seconds. When the Lock function is set, all buttons are locked.
NOTE
- You must deactivate the Lock function before you can access any other functions.
High Temperature Alarm
When the freezer temperature goes too high due to power failure, the freezer temperature LED lamp blinks and an alarm sounds.
- Press the Freezer button to stop.
- If the temperature is sufficiently cold, the blinking and alarm will automatically stop. • This function operates:
- When the refrigerator is turned on.
- When the freezer compartment gets too warm.
- When there is a power outage that lasts for a long period of time.
- When large amounts of warm food are placed in the freezer compartment.
- When the freezer door is left open for too long or too frequently.
Water Dispenser (*)
Press the lever 1 of the water dispenser to get cold water.

CAUTION
- Keep children away from the dispenser to prevent children playing with or damaging the controls.
- To clean the water dispensing system, flush the water through the dispenser for about 5 minutes and discard the first few batches of ice.
- Clean regularly surfaces that may come into contact with food and accessible drainage systems.
NOTE
- (*): This feature varies depending on the model purchased.
- If you open the freezer door while water is being dispensed, the water supply will stop.
- If you open the fridge door while water is being dispensed, dispensing will pause.
- If the cup rim is small, water may splash out of the glass or miss it completely.
- Use a cup with a rim of over 68 mm in diameter when dispensing water.
Water Dispenser Tank
1 Open the cap (small cover) on the top of the water tank.
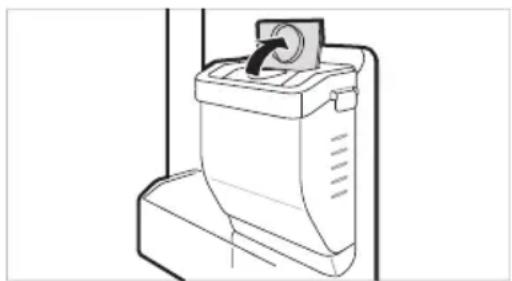
2 Fill the water tank with potable water and close the cap (small cover).
• The water tank can hold up to 2.3 L.
CAUTION
- Children should not be allowed near the dispenser tank. If a child drops the water dispenser tank while it is completely filled with water, injury may occur. Do not fill the water tank with drinks other than water or with hot water.
- Do not apply excessive force or impact when removing or assembling the water dispenser tank. Doing so can cause appliance damage or injury.
NOTE
- Before using the water dispenser tank after installing the appliance, it should be washed before filling it with water.
- Check if the water dispenser tank has been placed on the appliance correctly. If it is not assembled correctly, water may leak from the tank into the appliance.
- If there is no water in the water dispenser tank, the cold water function of the dispenser cannot be used. Check if there is water in the water dispenser tank and then fill it with water if there is not.
- Wait at least 15 seconds before removing the water tank after having dispensed water.
• Sound from the water tank will be normal when supplying water to the dispenser. It is not a sign of malfunction.
Ice Tray
Fill the ice tray with water.
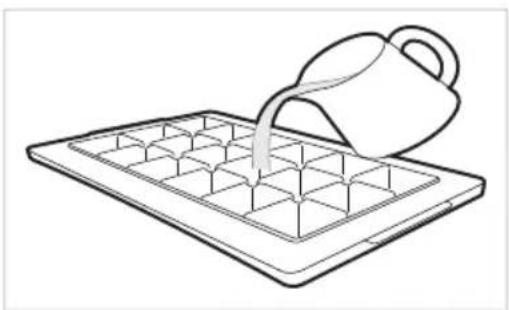
WARNING
• Fill with potable water only.
CAUTION
- Check whether there is any ice remaining in the ice tray before putting water into it.
- Do not slam the freezer door after filling the ice tray with water.
- If you open and close the freezer door frequently, it may take longer for the water to freeze.
- The time it takes for the water to freeze may vary according to the season.
- The temperature inside the appliance can take up to 24 hours to stabilize after initial installation. Water may take longer to freeze because of this.
- Be careful when handling the ice as the edges of the ice may be sharp.
NOTE
- If the ice tray is overfilled, the ice may stick together and be difficult to remove.
- Press the Express Freeze button on the control panel to make ice quickly.
- Do not store ice that has not frozen completely. Unfrozen water could cause the ice to clump together.
- Be careful not to use excessive force when twisting the ice tray. Doing so could break the ice tray.
• To easily remove ice, fill water up the tray in advance.
Fresh Converter ( * )
As a chill compartment, the temperature in the fresh converter can be controlled by sliding the lever 1, where located in front of compartment, in either direction.
When keeping vegetables after setting up Meat or Fish, the cold injury may occur.
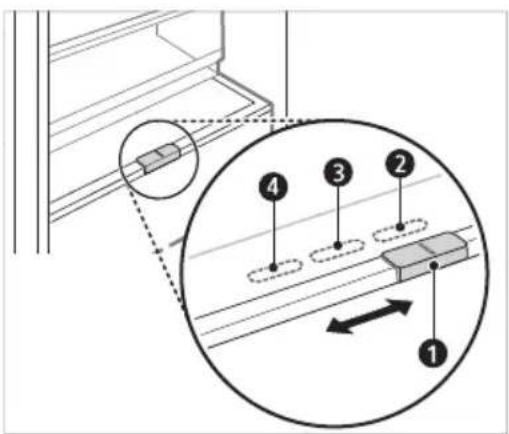
② For storing vegetables.(Recommended)
③ For storing fish.
4 For storing meat.
NOTE
• (*): This feature varies depending on the model purchased.
Fresh Vegetable Drawer ( * )
The vegetable compartment can adjust humidity by moving knob 1.
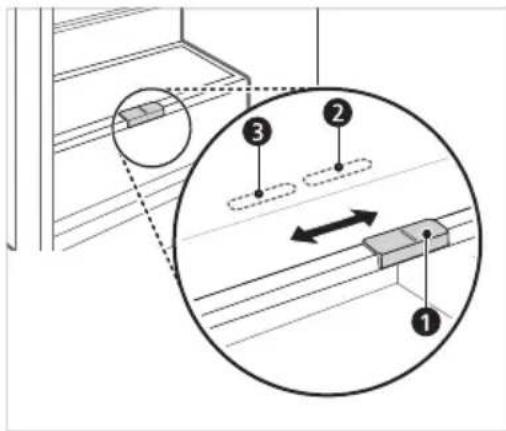
② For storing vegetables. (Recommended) ③ For storing fruit.
NOTE
• (*): This feature varies depending on the model purchased.
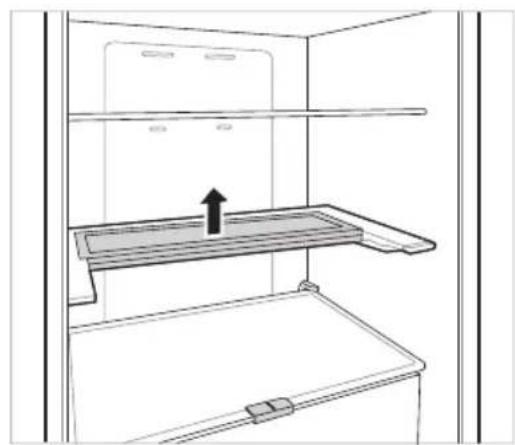
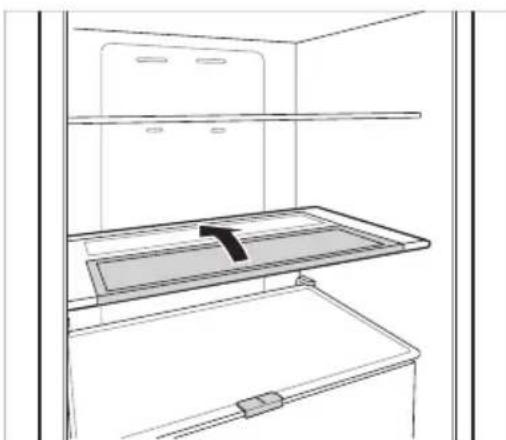
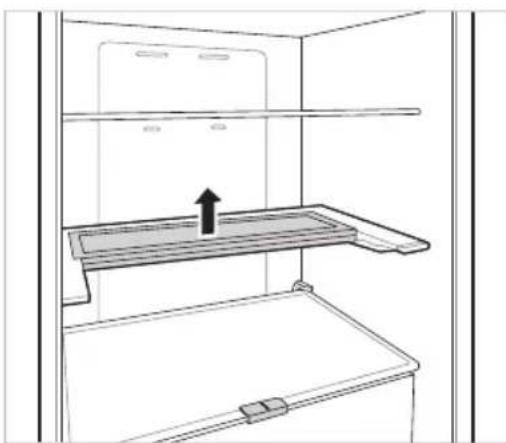
Folding Shelf
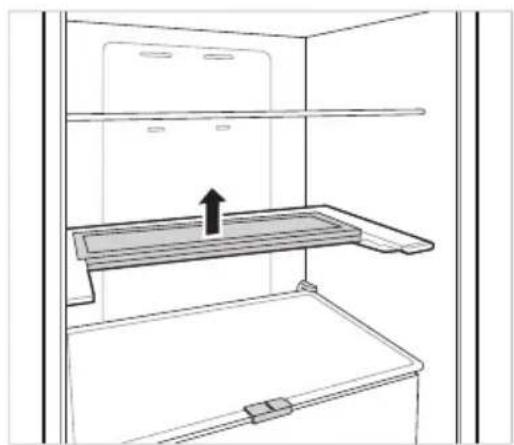
Store taller items, such as a gallon container or bottles, by pushing the front half of the shelf underneath the back half of the shelf. Pull the front of the shelf forward to return to a full shelf.
1. Lift the front side of the shelf and shift it onto its back side.
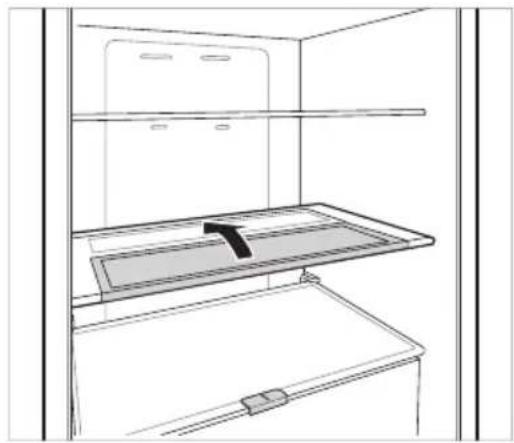
2. Lift the front side of the shelf and shift it under its back side. From this position, both sides of the shelf can be lifted up to free more space.
Other Functions
Door Open Alarm
The alarm sounds 3 times at 30-second intervals if the door (fridge compartment) is left open or not completely closed for one minute.
- Contact an LG Electronics customer information centre if the alarm sound continues even after closing the door.
Failure Detection
The appliance can automatically detect problems during operation.
- If a problem is detected, the appliance does not operate and an error code is displayed even when any button is pressed.
- When this occurs, do not turn off the power and immediately contact an LG Electronics customer information centre. If you turn off the power, the repair technician from an LG Electronics customer information center may have difficulty finding the problem.
LG ThinQ Application
This feature is only available on models with Wi-Fi.
The LG ThinQ application allows you to communicate with the appliance using a smartphone.
LG ThinQ Application Features
Communicate with the appliance from a smartphone using the convenient smart features.
Smart Diagnosis
- If you experience a problem while using the appliance, this smart diagnosis feature will help you diagnose the problem.
Settings
- Allows you to set various options on the appliance and in the application.
NOTE
- If you change your wireless router, internet service provider, or password, delete the registered appliance from the LG ThinQ application and register it again.
- The application is subject to change for appliance improvement purposes without notice to users. • Functions may vary by model.
Before Using LG ThinQ Application
1 Check the distance between the appliance and the wireless router (Wi-Fi network).
- If the distance between the appliance and the wireless router is too far, the signal strength becomes weak. It may take a long time to register or installation may fail.
2 Turn off the Mobile data or Cellular Data on your smartphone.
3 Connect your smartphone to the wireless router.
NOTE
- To verify the Wi-Fi connection, check that the icon on the control panel is lit.
- The appliance supports 2.4 GHz Wi-Fi networks only. To check your network frequency, contact your Internet service provider or refer to your wireless router manual.
- LG ThinQ is not responsible for any network connection problems or any faults, malfunctions, or errors caused by network connection.
- If the appliance is having trouble connecting to the Wi-Fi network, it may be too far from the router. Purchase a Wi-Fi repeater (range extender) to improve the Wi-Fi signal strength.
- The Wi-Fi connection may not connect or may be interrupted because of the home network environment.
- The network connection may not work properly depending on the Internet service provider.
- The surrounding wireless environment can make the wireless network service run slowly.
- The appliance cannot be registered due to problems with the wireless signal transmission. Unplug the appliance and wait about a minute before trying again.
- If the firewall on your wireless router is enabled, disable the firewall or add an exception to it.
- The wireless network name (SSID) should be a combination of English letters and numbers. (Do not use special characters.)
- Smartphone user interface (UI) may vary depending on the mobile operating system (OS) and the manufacturer.
- If the security protocol of the router is set to WEP, you may fail to set up the network. Please change it to other security protocols (WPA2 is recommended) and register the product again.
Installing the LG ThinQ Application
Search for the LG ThinQ application from the Google Play Store or Apple App Store on a smart phone.
- Follow instructions to download and install the application.
Connecting to Wi-Fi
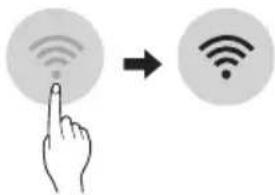
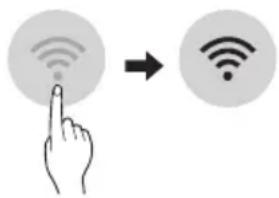
The Wi-Fi button, when used with the LG ThinQ application, allows the appliance to connect to a home Wi-Fi network. The icon shows the status of the appliance's network connection. The icon illuminates when the appliance is connected to the Wi-Fi network.
Initial Appliance Registration
- Run the LG ThinQ application and follow the instructions in the application to register the appliance.
Re-registering the Appliance or Registering Another User
- Press and hold the Wi-Fi button for 3 seconds to temporarily turn it off. Run the LG ThinQ application and follow the instructions in the application to register the appliance.
NOTE
- To disable the Wi-Fi function, press and hold the Wi-Fi button for 3 seconds. The icon will be turned off.
Open Source Software Notice Information
To obtain the source code under GPL, LGPL, MPL, and other open source licenses, that is contained in this product, please visit http://opensource.lge.com.
In addition to the source code, all referred license terms, warranty disclaimers and copyright notices are available for download.
LG Electronics will also provide open source code to you on CD-ROM for a charge covering the cost of performing such distribution (such as the cost of media, shipping, and handling) upon email request to opensource@lge.com. This offer is valid for a period of three years after our last shipment of this product. This offer is valid to anyone in receipt of this information.
Smart Diagnosis
This feature is only available on models with the 🎨 or 📞 logo.
Use this feature to help you diagnose and solve problems with your appliance.
NOTE
- For reasons not attributable to LGE's negligence, the service may not operate due to external factors such as, but not limited to, Wi-Fi unavailability, Wi-Fi disconnection, local app store policy, or app unavailability.
- The feature may be subject to change without prior notice and may have a different form depending on where you are located.
Using LG ThinQ to Diagnose Issues
If you experience a problem with your Wi-Fi equipped appliance, it can transmit troubleshooting data to a smartphone using the LG ThinQ application.
- Launch the LG ThinQ application and select the Smart Diagnosis feature in the menu. Follow the instructions provided in the LG ThinQ application.
Using Audible Diagnosis to Diagnose Issues
Follow the instructions below to use the audible diagnosis method.
- Launch the LG ThinQ application and select the Smart Diagnosis feature in the menu. Follow the instructions for audible diagnosis provided in the LG ThinQ application.
Display panel is on the Fridge door.
1 Close the freezer and fridge doors, then press and hold the Lock button to activate the lock function.
- If the display has been locked for over 5 minutes, you must deactivate the lock and then reactivate it.
2 Press and hold the Freezer button for 3 seconds or longer.
- The control panel will be turned off, and then '3' will be displayed on the fridge temperature display part.
3 Open the fridge door and then hold the phone near the speaker hole.
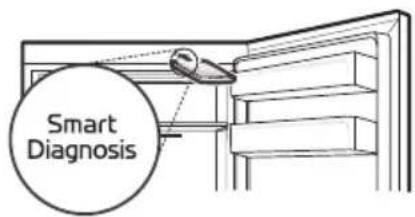
4 After the data transfer is complete, the diagnosis will be displayed in the application.
Display panel is inside the Fridge door
1 Open the fridge door.
2 Press the Eco Friendly button.
- If the door has been open for longer than 60 seconds, close the door and repeat steps 1 and 2.
3 Hold the phone near the speaker hole.
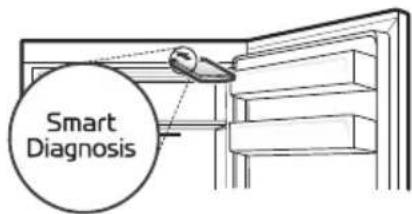
4 Press and hold the Freezer button for 3 seconds while holding your phone in front of the speaker.
5 After the data transfer is complete, the diagnosis will be displayed in the application.
NOTE
- For best results, do not move the phone while the tones are being transmitted.
Notes for Cleaning
- When removing a shelf or drawer from inside the appliance, remove all stored foods from the shelf or drawer to prevent injury or damage to the appliance.
- Otherwise, injury may occur due to the weight of stored foods.
- If cleaning the outside air vents of the appliance by means of vacuuming, then the power cord should be unplugged from the outlet to avoid any static discharge that can damage the electronics or cause an electric shock.
- Detach the shelves and drawers and clean them with water, and then dry them sufficiently, before replacing them.
- Regularly wipe the door gaskets with a wet soft towel.
- Door basket spills and stains should be cleaned as they can compromise storage ability of the basket and could even be damaged.
- After cleaning, check if the power cable is damaged, warm or improperly plugged.
- Keep the air vents on the exterior of the appliance clean.
- Blocked air vents can cause fire or appliance damage.
- When cleaning the inside or outside of the appliance, do not wipe it with a rough brush, toothpaste, or flammable materials. Do not use cleaning agents containing flammable substances.
- This may cause discoloration or damage to the appliance.
- Flammable substances: alcohol (ethanol, methanol, isopropyl alcohol, isobutyl alcohol, etc.), thinner, bleach, benzene, flammable liquid, abrasive, etc.
- For the appliance exterior, use a clean sponge or soft cloth and a mild detergent in warm water. Do not use abrasive or harsh cleaners. Dry thoroughly with a soft cloth.
- Never clean the shelves or containers in the dishwasher.
- The parts may become deformed due to the heat.
- If the appliance is equipped with an LED lamp, do not remove lamp cover and LED lamp in any attempt to repair or service it. Please, contact an LG Electronics customer information centre.
- Clean regularly surfaces that can come in contact with food and accessible drainage systems.
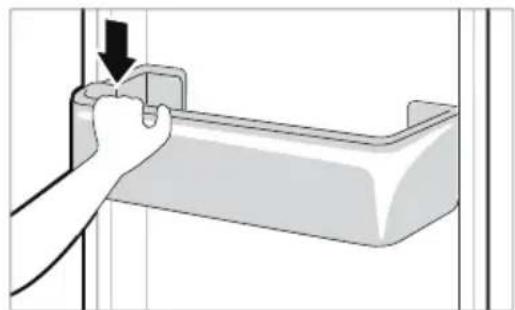
Cleaning the Door Basket
Removing the Fridge Door Basket
Hold both edges of the basket and remove it by lifting it upward.
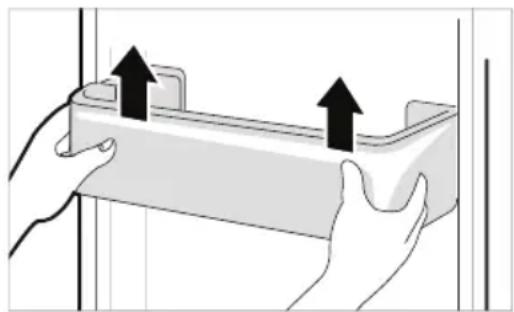
Refitting the Fridge Door Basket
1 Hold both edges of the door basket, gently push one edge to assemble, and then in the same manner assemble the other edge.
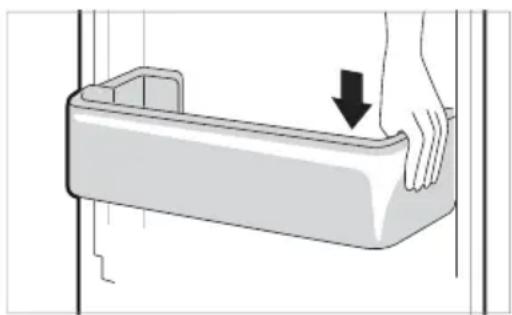
2 After assembling, tap the door basket gently to fix it horizontally.
Cleaning the Shelf Removing the Fridge Shelf
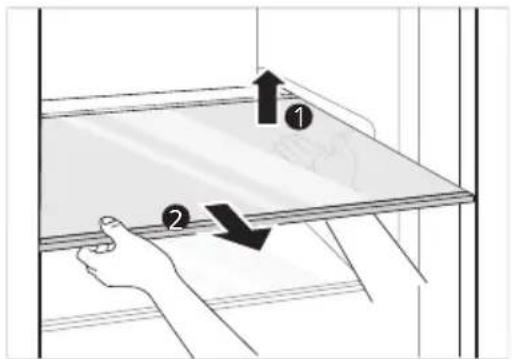
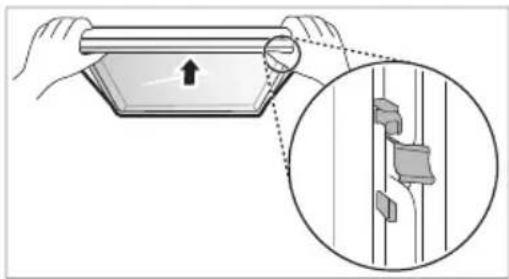
Lift the rear edge of the fridge shelf and then pull it out.
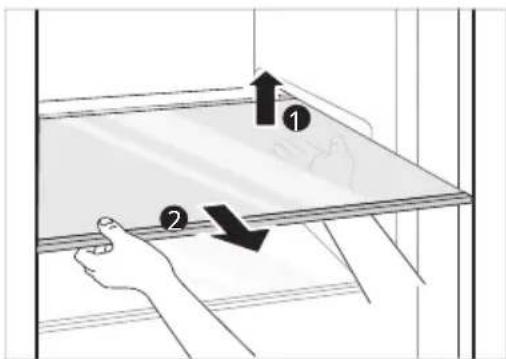
Refitting the Fridge Shelf
Refit the shelf in the reverse order of the removal process.
Cleaning the Vegetable Drawer
Removing the Vegetable Drawer
1. Remove the contents of the drawer. Hold the handle of the vegetable drawer and pull it out completely until it stops.
2. Lift the vegetable drawer up and remove it by pulling it out.
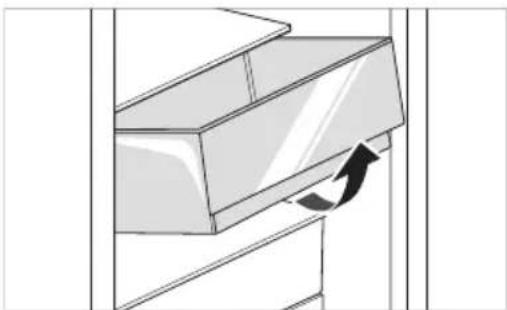
CAUTION
- Note that injuries can be caused by the weight of stored foods when removing the vegetable drawer.
Refitting the Vegetable Drawer
Refit the vegetable drawer in the reverse order of the removal process.
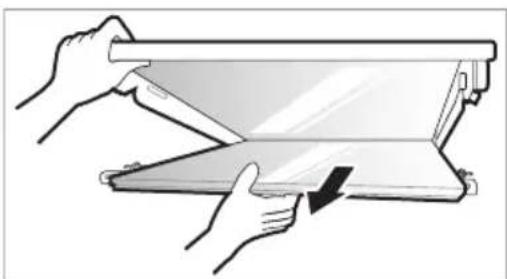
Cleaning the Crisper Cover Removing the Crisper Cover
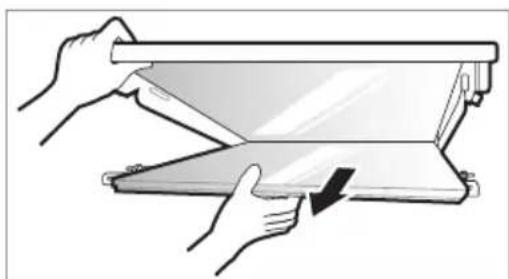
1. After removing the vegetable drawer cover, pull the top section of the crisper cover down.
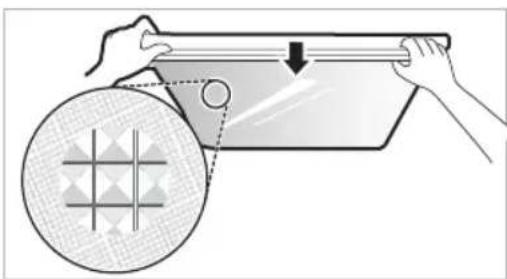
2. Remove the crisper cover by pulling it out.
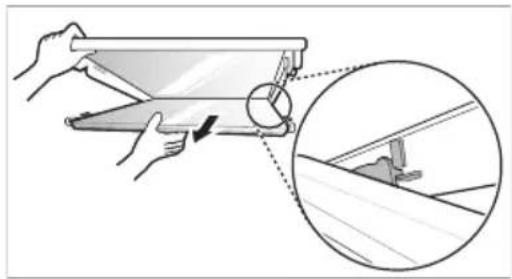
Refitting the Crisper Cover
1 Place the protrusions inside the crisper cover on the grooves inside the shelf.
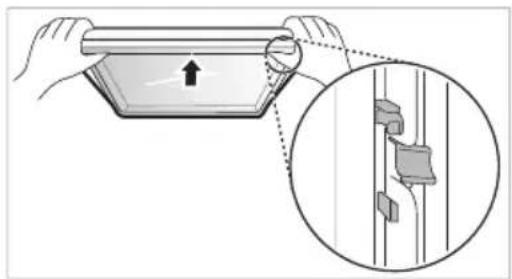
2 Insert the protrusions in front of the crisper cover into the grooves in front of the shelf and push the crisper cover up to assemble.
Cleaning the Freezer Drawer
1 Remove the contents of the drawer. Hold the handle of the freezer drawer and pull it out completely until it stops.
2 Lift the freezer drawer up and remove it by pulling it out.
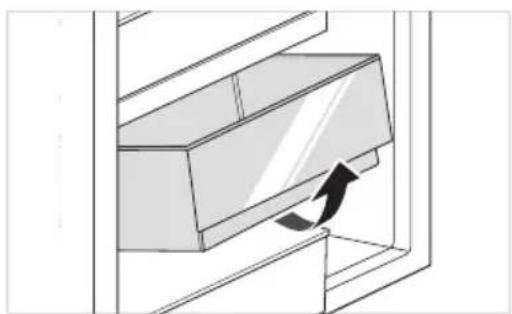
Refitting the Freezer Drawer
Refit the freezer drawer in the reverse order of the removal process.
Cleaning the Water Dispenser Cleaning the Dispenser Tray
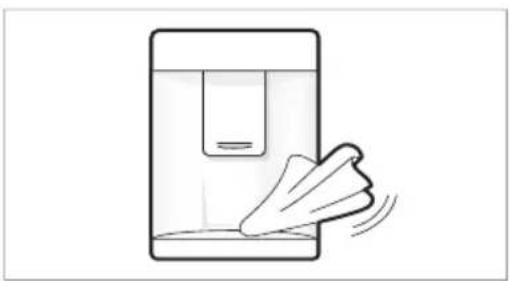
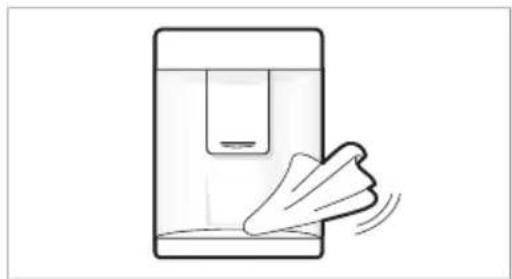
The dispenser tray may become wet easily due to spilled ice or water. Wipe the entire area with a damp cloth.
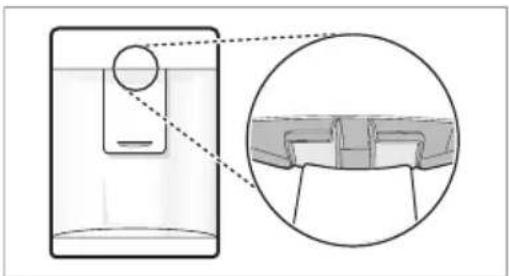
Cleaning the Water and Ice Outlet
Wipe the water or ice outlet frequently with a clean cloth as it may get dirty easily. Please note that lint from a cloth may adhere to the outlet.
| Symptoms Reason&Solution | |
| There is no refrigeration or freezing. | Is there a power interruption?Check the power of other appliances. |
| If the power plug unplugged from the outlet?Plug the power plug in the outlet properly. | |
| A fuse in your homeOr the appliance is connected to a GFCI (Ground Fault Circuit Interrupter) outlet, and the outlet's circuit breaker has tripped.Check the main electrical box and replace the fuse or reset the circuit breaker. Do not increase fuse capacity. If the problem is a circuit overload, have it corrected by a qualified electrician.Reset the circuit breaker on the GFCI. If the problem persists, contact an electrician. | |
| There is poor refrigeration or freezing. | Is the fridge or freezer temperature set to its warmest setting?Set the fridge or freezer temperature to 'Medium'. |
| Is the appliance in direct sunlight, or is it near a heat generating object such as cooking oven or heater?Check the installation area and reinstall it away from heat generating objects. | |
| Did you store hot food without cooling it first?Cool the hot food first before putting it in the fridge or freezer compartment. | |
| Did you put in too much food?Maintain an appropriate space between food. | |
| Are the appliance doors completely closed?Completely close the door and make sure that stored food is not obstructing in the door. | |
| Is there enough space around the appliance?Adjust the installation position to make enough space around the appliance. | |
| The appliance contains a bad smell. | Is the fridge or freezer temperature set to 'Warm'?Set the fridge or freezer temperature to 'Medium'. |
| Did you put in food with a strong smell?Store foods with strong smells in a sealed containers. | |
| Vegetables or fruit may have spoiled in the drawer?Throw away rotten vegetables and clean the vegetable drawer. Do not store vegetables too long in the vegetable drawer. | |
| The inside lamp in the appliance does not turn on. | Does the inside lamp in the appliance turn off?It is hard for customers to replace the inside lamp in the appliance as they are not serviceable. If the inside lamp does not turn on, please contact the LG Electronics customer information centre. |
| The appliance door is not closed tightly. | Is the appliance leaning forward?Adjust the front feet to raise the front side slightly. |
| Were the shelves properly assembled?Refit the shelves if needed. | |
| Did you close the door with excessive force?If you apply too much force or speed when closing the door, it may remain briefly open before closing. Make sure that you do not slam the door closed. Close without force. | |
| Вратата на уреда не е плътно затворена. | Уредът наклонен ли е напред?Коригирайте предните крачета, за да повдигнете леко предната част. |
| Рафтовете правилно ли са сглобени?Ако е нужно, поставете отново рафтовете. | |
| Вероятно сте затворили вратата с прекомерна сила?Ако затваряте вратата твърде силно или рязко, тя може да остане отворена за момент, преди да се затвори. Уверете се, че не блъскате вратата при затваряне. Затваряйте без сила. | |
| It is difficult to open the appliance door. | Did you open the door right after you closed it?If you try to open the appliance door within one minute after you closed it, you may have difficulties because of the pressure inside the appliance. Try to open the appliance door again in a few minutes so that the internal pressure stabilizes. |
| There is condensation inside the appliance or on the bottom of the vegetable drawer cover. | Did you store hot food without cooling it first?Cool the hot food first before putting it in the fridge or freezer compartment. |
| Did you leave the appliance door open?Although the condensation will disappear soon after you close the appliance door, you can wipe it with a dry cloth. | |
| Do you open and close the appliance door too frequently?Condensation can form due to the temperature difference from the outside. Wipe out the dampness with a dry cloth. | |
| Did you put warm or moist food inside without sealing it in a container?Store food in a covered or sealed container. | |
| Frosts has formed in the freezer compartment. | Doors may not be closed properly?Check if the food item inside the appliance is blocking the door and make sure that the door is tightly closed. |
| Did you store hot food without cooling it first?Cool the hot food first before putting it in the fridge or freezer compartment. | |
| Frosts has formed in the freezer compartment. | Is the air entry or exit of the freezer compartment blocked?Make sure that air entry or exit is not blocked so that the air can circulate inside. |
| Is the freezer compartment overfilled?Maintain an appropriate space between items. | |
| Frost or condensation has formed inside or outside the appliance. | Did you open and close the appliance door frequently or is the appliance door improperly closed?Frosts or condensation can form if the outside air penetrates inside the appliance. |
| Is the installation environment humid?Condensation can appear on the exterior of the appliance if the installation area is too humid or on a humid day such as a rainy day. Wipe off any moisture with a dry cloth. | |
| The appliance is noisy and generates abnormal sounds. | Is the appliance installed on a weak floor or improperly leveled?Install the appliance on a solid and flat area. |
| Does the rear of the appliance touch the wall?Adjust the installation position to allow enough clearance around the appliance. | |
| Are objects scattered behind the appliance?Remove the scattered objects from behind the appliance. | |
| Is there an object on top of the appliance?Remove the object on top of the appliance. | |
| The side or front of the appliance is warm. | There are anti condensation pipes fitted to these areas of the appliance to reduce condensation forming from around the door area.The heat releasing pipe to prevent condensation is installed on the front and side of the appliance. You may feel it particularly hot right after the appliance is installed or during the summer. You can be assured that this is not a problem and is quite normal. |
| There is water inside or outside of the appliance. | Is there water leakage around the appliance?Check if the water has leaked from a sink or another place. |
| Is there water on the bottom of the appliance?Check if the water is from the thawed frozen food or a broken or dropped container. | |
| Clicking noises | The defrost control will click when the automatic defrost cycle begins and ends. The thermostat control (or appliance control on some models) will also click when cycling on and off.Normal Operation |
| Rattling noises | Rattling noises may come from the flow of appliance, the water line on the back of the unit (for plumbed models only), or items stored on top of or around the appliance.Normal Operation |
| Appliance is not resting evenly on the floor.Floor is weak or uneven or leveling legs need to be adjusted. See the Door Alignment section. | |
| Appliance with linear compressor was moved while operating.Normal operation. If the compressor does not stop rattling after three minutes, turn the power to the appliance off and then on again. | |
| Whooshing noises | Evaporator fan motor is circulating air through the fridge and freezer compartments.· Normal Operation |
| Air is being forced over the condenser by the condenser fan.· Normal Operation | |
| Gurgling noises | Appliance flowing through the cooling system· Normal Operation |
| Popping noises | Contraction and expansion of the inside walls due to changes in temperature.· Normal Operation |
| Vibrating | If the side or back of the appliance is touching a cabinet or wall, some of the normal vibrations may make an audible sound.· To eliminate the noise, make sure that the sides and back do not make any contact with any wall or cabinet. |
| Your home appliance and smartphone is not connected to the Wi-Fi network. | The password for the Wi-Fi that you are trying to connect to is incorrect.· Find the Wi-Fi network connected to your smartphone and remove it, then register your appliance on LG ThinQ |
| Mobile data for your smartphone is turned on.· Turn off the Mobile data of your smartphone and register the appliance using the Wi-Fi network. | |
| The wireless network name (SSID) is set incorrectly.· The wireless network name (SSID) should be a combination of English letters and numbers. (Do not use special characters.) | |
| The router frequency is not 2.4 GHz.· Oal2.4 GHz router frequency is supported. Set the wireless router to 2.4 GHz and connect the appliance to the wireless router. To check the router frequency, check with your Internet service provider or the router manufacturer. | |
| The distance between the appliance and the router is too far.· If the distance between the appliance and the router is too far, the signal may be weak and the connection may not be configured correctly. Move the location of the router so that it is closer to the appliance. | |
Customer Care and Service
Contact an LG Electronics customer information centre.
- To find information on LG authorized service centre, visit our website at www.lg.com.
- Only qualified service personnel from LG authorized service centre should disassemble, repair, or modify the appliance.
- To purchase spare parts, contact an LG Electronics customer information centre or visit our website at www.lg.com.
- Spare parts referenced in Regulation EU 2019/2019 are available for 7 years (only door gaskets are available for 10 years).
NOTE
- For more information about the energy efficiency of the appliance, visit https://ec.europa.eu and search using the model name (valid from 1st March 2021).
- Regulation EU 2019/2019, valid from 1st March 2021, is related to the Energy Efficiency classes by Regulation EU 2019/2016.
- Scan the QR code on the energy label supplied with the appliance, which provides a web link to the information related to the performance of the appliance in the EU EPREL database. Keep the energy label for reference and all other documents supplied with the appliance (valid from 1st March 2021).
- The model name can be found on the rating label of the appliance.
Memo
OPERATING
INSTRUCTIONS
REFRIGERATOR AND
FREEZER
Type A

Type B
| Тип А Тип В | ||||||||
| Джобна дръжка Лостова дръжка | Джобна дръжка | Лостова дръжка | ||||||
| Размер [mm] | ||||||||
| A | 595 595 5 | 95 595 595 | 595 595 595 | |||||
| B | 1860 2030 | 1860 2030 | 1860 | 2030 1860 2030 | ||||
| C | 675 675 7 | 12 712 682 | 682 718 718 | |||||
| D | 9 | 9 | 9 | 9 | 15 | 15 | 15 | 15 |
| E | 667 667 6 | 67 667 667 | 667 667 667 | |||||
| F | - | - | 703 | 703 | - | - | 703 | 703 |
| G | 1124 | 1124 | 1124 | 1124 | 1130 | 1130 | 1130 | 1130 |
| H | 995 995 9 | 95 995 995 | 995 995 995 | |||||
Ambient temperature
① Smart Diagnosis module (*)
① Fridge Temperature
WARNING
CAUTION
Other functions
NOTE
Cleaning the shelf
WARNING
⚠ WARNING
⚠️ CAUTION
Other functions
NOTE
Cleaning the shelf
⚠ WARNING
Type A
Type B
| Type A Type B | ||||||||
| Lommehåndtag Stanghåndtag | Lommehåndtag | Stanghåndtag | ||||||
| Størrelse [mm] | ||||||||
| A | 595 595 5 | 95 595 595 | 595 595 595 | 5 | ||||
| B | 1860 2030 | 1860 2030 | 1860 | 2030 1860 2030 | ||||
| C | 675 675 7 | 12 712 682 | 682 718 718 | |||||
| D | 9 | 9 | 9 | 9 | 15 | 15 | 15 | 15 |
| E | 667 667 6 | 667 667 667 | 667 667 667 | |||||
| F | - | - | 703 | 703 | - | - | 703 | 703 |
| G | 1124 | 1124 | 1124 | 1124 | 1130 | 1130 | 1130 | 1130 |
| H | 995 995 9 | 95 995 995 | 995 995 995 | |||||
Ambient temperature
① Smart Diagnosis unit (*)
① Fridge Temperature
▲ CAUTION
WARNING
• Always use only drinking water.
▲ CAUTION
2 Lift the front of the shelf and slide it under its back. From this position, both sides of the shelf can be lifted to free up more space.
Other functions
Open door alarm
NOTE
▲ CAUTION
Reassembling the freezer drawer
Type A
Type B
| Typ A Typ B | ||||||||
| Griffmulde StangenGriff | Griffmulde | StangenGriff | ||||||
| Größe [mm] | ||||||||
| A | 595 595 595 | 595 595 595 | 595 595 595 | 5 | ||||
| B | 1860 2030 | 1860 2030 | 1860 | 2030 1860 2030 | ||||
| C | 675 675 712 | 682 718 718 | 682 718 718 | |||||
| D | 9 | 9 | 9 | 9 | 15 | 15 | 15 | 15 |
| E | 667 667 667 | 667 667 667 | 667 667 667 | |||||
| F | -- | 703 703 | -- | 703 703 | ||||
| G | 1124 | 1124 | 1124 | 1124 | 1130 | 1130 | 1130 | 1130 |
| H | 995 995 995 | 995 995 995 | 995 995 995 | |||||
Ambient temperature
① Smart Diagnosis unit (*)
⚠️ CAUTION

WARNING
Other functions
Door open alarm
NOTE
CAUTION
Type A
Type B
① Smart Diagnosis unit (*)
⚠️ CAUTION
⚠️ WARNING
Other functions
NOTE
⚠️ CAUTION
Type A
Type B
| Tipo A Tipo B | ||||||||
| Asa de bolsillo | Asa de barra Asa | de bolsillo | Asa de barra | |||||
| Tamaño [mm] | ||||||||
| A | 595 595 5 | 95 595 595 | 595 595 595 | |||||
| B | 1860 2030 | 1860 2030 | 1860 | 2030 1860 | 2030 | |||
| C | 675 675 7 | 12 712 682 | 682 718 718 | |||||
| D | 9 | 9 | 9 | 9 | 15 | 15 | 15 | 15 |
| E | 667 667 6 | 67 667 667 | 667 667 667 | |||||
| F | - | - | 703 | 703 | - | - | 703 | 703 |
| G | 1124 | 1124 | 1124 | 1124 | 1130 | 1130 | 1130 | 1130 |
| H | 995 995 9 | 95 995 995 | 995 995 995 | |||||
Ambient temperature
① Fridge Temperature
⑤ Eco-Friendly (Eco Mode)
CAUTION
WARNING
Other functions
3 Connect the smartphone to the wireless router.
NOTE
CAUTION

DANGER
Type A
Type B
| Tüüp A Tüüp B | ||||||||
| Süviskäepide Eenduv käepide | Süviskäepide | Eenduv käepide | ||||||
| Suurus [mm] | ||||||||
| A | 595 595 595 595 595 595 595 | |||||||
| B | 1860 2030 | 1860 2030 | 1860 | 2030 1860 2030 | ||||
| C | 675 675 712 712 682 682 718 718 | |||||||
| D | 9 | 9 | 9 | 9 | 15 | 15 | 15 | 15 |
| E | 667 667 667 667 667 667 667 667 | |||||||
| F | - | - | 703 | 703 | - | - | 703 | 703 |
| G | 1124 | 1124 | 1124 | 1124 | 1130 | 1130 | 1130 | 1130 |
| H | 995 995 995 995 995 995 995 | |||||||
Ambient air temperature
1 Hinge cover ② Lower hinge ③ Label
Reversing the door
① Smart Diagnosis unit (*)
CAUTION
DANGER
Other functions
Open door alarm
WARNING
2 Press the Eco Friendly button.
CAUTION
Replacing the freezer drawer
Type A
Type B
| Tyyppi A Tyyppi B | ||||||||
| Taskukahva Vedin | Taskukahva | Vedin | ||||||
| Koko [mm] | ||||||||
| A | 595 595 595 | 595 595 595 | 595 595 595 | |||||
| B | 1860 2030 | 1860 2030 | 1860 | 2030 1860 | 2030 | |||
| C | 675 675 712 | 682 718 718 | ||||||
| D | 9 | 9 | 9 | 9 | 15 | 15 | 15 | 15 |
| E | 667 667 667 | 667 667 667 | 667 667 667 | |||||
| F | - | - | 703 | 703 | - | - | 703 | 703 |
| G | 1124 | 1124 | 1124 | 1124 | 1130 | 1130 | 1130 | 1130 |
| H | 995 995 995 | 995 995 995 | 995 995 995 | |||||
▲ WARNING
⚠️ WARNING
Other functions
Door open alarm
NOTE
WARNING
Type A
Type B
② * Express Cool
4 * Express Freeze
ATTENTION
WARNING
Other functions
LG ThinQ Application
NOTE
CAUTION
SAFETY INSTRUCTIONS ....3
IMPORTANT SAFETY INSTRUCTIONS 3
Disposal of old appliance....10
INSTALLATION....11
Dimensions and clearances 11
Ambient temperature 11
Accessories 12
Reversing the door 12
IMPORTANT SAFETY INSTRUCTIONS

WARNING
Type A
Type B
| Vrsta A Vrsta B | ||||||||
| Usađena ručka Metalna ručka | Usađena ručka | Metalna ručka | ||||||
| Veličina [mm] | ||||||||
| A | 595 595 5 | 95 595 595 | 595 595 595 | |||||
| B | 1860 2030 | 1860 2030 | 1860 | 2030 18 | 60 2030 | |||
| C | 675 675 7 | 12 712 682 | 682 718 718 | |||||
| D | 9 | 9 | 9 | 9 | 15 | 15 | 15 | 15 |
| E | 667 667 6 | 67 667 667 | 667 667 667 | |||||
| F | - | - | 703 | 703 | - | - | 703 | 703 |
| G | 1124 | 1124 | 1124 | 1124 | 1130 | 1130 | 1130 | 1130 |
| H | 995 | 995 | 995 | 995 | 995 | 995 | 995 | 995 |
Ambient temperature
- The appliance is designed to operate within a limited range of ambient temperatures, depending on the climate zone.
- The internal temperature of the appliance can be affected by the appliance's location, ambient temperature, frequency of door openings, and similar factors.
- The climate class is indicated on the appliance's rating label.
| Klimatski razred | Raspon temperature okoline °C |
| SN (Produženo Umjereno) | +10 – +32 |
| N (Umjereno) | +16 – +32 |
| ST (Suptropsko) | +16 – +38 |
| T (Tropsko) | +16 - +43 / +10 - +43* |
① Smart Diagnosis Unit (*)
① Fridge Temperature
- This sets the target temperature for the fridge.
② * Express Cool
- This sets the Express Cool functions.
③ Freezer Temperature
- This sets the target temperature for the freezer.
④ * Express Freeze
- This sets the Express Freeze functions.
⑤ Eco Friendly
▲ CAUTION
Fill the water tank with drinking water and close the cap (small lid).
The water tank can hold up to 2.3 L of water.
▲ CAUTION
- Do not allow children access to the dispenser tank. If a child drops the water dispenser tank while it is full of water, injury may occur. Do not fill the water tank with beverages other than water, and do not fill it with hot water.
- Do not use excessive force and do not hit the appliance when removing or attaching the water dispenser tank. Doing so may damage the appliance or cause injury.
NOTE
- Before using the water dispenser tank after installing the appliance, wash the tank before filling it with water.
- Make sure the water dispenser tank is correctly placed on the appliance. If it is not properly attached, water may leak from the tank into the appliance.
⚠ WARNING
Fill only with drinking water.
CAUTION
② for storing vegetables. (Recommended)
3 for storing fish.
4 for storing meat.
NOTE
2 for storing vegetables. (Recommended) 3 for storing fruit.
NOTE
• (*): This feature varies depending on the purchased model.
Foldable shelf
Store larger items, such as large containers and bottles, by pushing the front half of the shelf under the rear half. Pull the front part of the shelf forward to return the shelf to its original state.
1 Lift the front side of the shelf and move the rear side of the shelf.
2 Lift the front side of the shelf and move it under its rear side. From this position, both sides of the shelf can be lifted to free up more space.
Other functions
Door open alarm
3 Connect your smartphone to the wireless router.
NOTE
- To check the Wi-Fi connection, check that the 📞 icon lights up on the control panel.
- The device supports only 2.4 GHz Wi-Fi networks. To check the network frequency, contact your internet service provider or see the wireless router manual.
- LG ThinQ is not responsible for any network connection problems or any errors, malfunctions, or failures caused by the network connection.
- If the device has problems connecting to the Wi-Fi network, it may be too far from the router. Get a Wi-Fi repeater (range extender) to improve the Wi-Fi signal strength.
- The Wi-Fi connection may not be established or may be interrupted due to the home network environment.
- The network connection may not work properly, depending on the internet service provider.
- The surrounding wireless environment may cause the wireless network to operate slowly.
- The device cannot be registered due to problems with wireless signal transmission. Turn off the device and wait about a minute before trying again.
- If the firewall is enabled on the wireless router, disable the firewall or add an exception.
- The wireless network name (SSID) should be a combination of Latin letters and numbers. (Do not use special characters)
- The smartphone user interface (UI) may vary depending on the mobile operating system (OS) and manufacturer.
- If the router's security protocol is set to WEP, you may not be able to set up the network. Change it to other security protocols (WPA2 is recommended) and register the product again.
2 Press the Eco Friendly button.
3 If the door remains open for more than 60 seconds, close the door and repeat steps 1 and 2.
4 Hold the phone near the speaker hole. Press and hold the Freezer button for 3 seconds while holding the phone in front of the speaker.
Cleaning the shelf Removing the refrigerator shelf
Lift the rear edge of the refrigerator shelf and then pull it out.
Inserting the refrigerator shelf
Insert the shelf in the reverse order of removal.
Cleaning the vegetable drawer Removing the vegetable drawer
1 Remove the contents of the drawer. Hold the handle of the vegetable drawer and pull it out all the way until it stops.
CAUTION
- Keep in mind that the weight of stored food can cause injury when removing the vegetable drawer.
Reinstalling the vegetable drawer
Insert the vegetable shelf in the reverse order of removal.
2 Remove the crisper cover by pulling it out.
2 Insert the protrusions at the front of the crisper cover into the slots at the front of the shelf and push the crisper cover upward to attach it.
Cleaning the freezer drawer
Inserting the freezer drawer
Insert the freezer shelf in the reverse order of removal.
Cleaning the water dispenser Cleaning the dispenser tray
| Simptomi Razlozi i rješenja | |
| Uređaj ne hladi ili ne zamrzava. | Je li došlo do prekida napajanja?Provjerite napajanje drugih uređaja. |
| Je li strujni utikač isključen iz utičnice?Išpravno priključite strujni utikač u utičnicu. | |
| Možda je pregorio osigurač u vašem domu ili se aktivirao prekidač strujnog kruga. Ili je uređaj priključen na GFCI utičnicu (eng. Ground Fault Circuit Interrupter, prekidač kruga uzemljenja), s prekidač strujnog kruga utičnice je iskočio.Provjerite glavni električni razvodni ormarić i zamijenite osigurač ili resetirajte prekidač strujnog kruga. Ne povećavajte kapacitet osigurač.Ako je problem preopterećenost strujnog kruga, popravak prepustite ovlaštenom električaru.Resetirajte prekidač strujnog kruga na GFCI. Ako se problem nastavi obratite se električaru. | |
| Uređaj slabo hladi ili zamrzava. | Je li temperatura hladnjaka ili zamrzivača postavljena na najtopliju postavku?Postavite temperaturu hladnjaka ili zamrzivača na „Srednje”. |
| Je li uređaj izložen izravnom sunčevom svjetlu ili se nalazi blizu predmeta koji proizvode toplinu, kao što su štednjak ili grijač?Provjerite prostor na kojem je uređaj postavljen te ga ponovno postavite podalje od predmeta koji proizvode toplinu. | |
| Jeste li u uređaj stavili vruću hranu koju niste prethodno ohladili?Ohladite vruću hranu prije nego što je stavite u hladnjak ili zamrzivač. | |
| Jeste li stavili previše hrane?Održavajte odgovarajuću količinu slobodnog prostora između namirnica. | |
| Jesu li vrata uređaja posve zatvorena?Zatvorite vrata do kraja i pobrinite se da spremljena hrana ne smeta vratima. | |
| Ima li dovoljno prostora oko uređaja?Prilagodite položaj na kojem je postavljen da biste osigurali dovoljno prostora oko uređaja. | |
| Uređaj ima neugodan miris. | Je li temperatura hladnjaka ili zamrzivača postavljena na „Toplo”?Postavite temperaturu hladnjaka ili zamrzivača na „Srednje”. |
| Jeste li stavili hranu jakoga mirisa?Hranu s jakim mirisom čuvajte u dobro zatvorenim posudama. | |
| Je li se povrće ili voće pokvarilo u ladici?Bacite gnjilo povrće i očistite ladicu za povrće. Nemojte predugo čuvati povrće u ladici za povrće. | |
| Unutrašnja žarulja u uređaju ne svijetli. | Je li unutrašnja žarulja u uređaju isključena?Korisnicima nije jednostavno zamijeniti unutrašnju žarulju u uređaju jer se ne servisira. Ako unutrašnja žarulja ne svijetli, obratite se informacijskom centru za korisnike tvrtke LG Electronics. |
| Vrata uređaja nisu čvrsto zatvorena. | Je li uređaj nagnut prema naprijed?Podesite prednje nožice kako biste malo podigli prednju stranu. |
| Jesu li police pravilno sastavljene?Ponovno namjestite police ako je to potrebno. | |
| Jeste li presnažno zatvorili vrata?Ako primijenite previše sile ili brzine prilikom zatvaranja vrata, ona mogu nakratko ostati otvorena prije zatvaranja. Pripazite da ne gurnete vrata presnažno. Nježno zatvorite vrata. | |
| Vrata proizvoda teško se otvaraju. | Jeste li otvorili vrata odmah nakon što ste ih zatvorili?Ako pokušate otvoriti vrata uređaja unutar 1 minute nakon zatvaranja, možda ćete imati poteškoća zbog pritiska u uređaju. Pokušajte otvoriti vrata uređaja ponovno za nekoliko minuta kada se unutrašnji pritisak ujednači. |
| Kondenzacija se javlja u uređaju ili na dnu ladice za povrće. | Jeste li u uređaj stavili vruću hranu koju niste prethodno ohladili?Ohladite vruću hranu prije nego što je stavite u hladnjak ili zamrzivač. |
| Jeste li vrata uređaja ostavili otvorena?Kondenzacija će nestati kada zatvorite vrata uređaja, a kapljice možete i obrisati suhom krpom. | |
| Otvarate li i zatvarate vrata uređaja prečesto?Kondenzacija se može pojaviti zbog razlike u temperaturi koja dolazi izvana. Vlagu obrišite suhom krpom. | |
| Jeste li staviti toplu ili vlažnu hranu koju niste zatvorili u spremnik unutra?Hranu čuvajte u pokrivenim ili dobro zatvorenim posudama. | |
| U zamrzivaču se stvorio led. | Jesu li vrata dobro zatvorena?Provjerite blokira li neka hrana vrata iznutra i pobrinite se da su vrata čvrsto zatvorena. |
| Jeste li u uređaj stavili vruću hranu koju niste prethodno ohladili?Ohladite vruću hranu prije nego što je stavite u hladnjak ili zamrzivač. | |
| U zamrzivaču se stvorio led. | Je li ulaz ili izlaz zraka zamrzivača blokiran?Pobrinite se da ulaz ili izlaz zraka nije blokiran kako bi zrak mogao slobodno kružiti u unutrašnjosti. |
| Je li zamrzivač prepun?Održavajte odgovarajuću količinu slobodnog prostora između namirnica. | |
| U unutrašnjosti ili na vanjštini uređaja stvorio se led ili kondenzacija. | Jeste li prečesto otvarali i zatvarali vrata uređaja ili su vrata uređaja neispravno zatvorena?Led ili kondenzacija mogu se pojaviti ako zrak izvana uđe u uređaj. |
| Je li okruženje uređaja vlažno?Kondenzacija se može pojaviti na vanjskoj strani uređaja ako je prostor u kojem je on postavljen previše vlažan ili pak ako je visok postotak vlage u zraku, primjerice za kišnih dana. Vlagu obrišite suhom krpom. | |
| Uređaj je bučan i proizvodi neuobičajene zvukove. | Je li uređaj postavljen na slaboj podlozi ili nije ravan?Postavite uređaj na čvrst i ravan pod. |
| Dodiruje li stražnja strana uređaja zid?Prilagodite položaj na kojem je postavljen da biste osigurali dovoljno prostora oko uređaja. | |
| Ima li razasutih predmeta iza uređaja?Uklonite razasute predmete koji se nalaze iza uređaja. | |
| Nalazi li se na uređaju neki predmet?Uklonite predmet koji se nalazi na uređaju. | |
| Zagrijana je bočna ili prednja strana uređaja. | Cijevi za zaštitu od kondenzacije nalaze se na tom području kako bi se smanjila kondenzacija oko područja vrata.Cijev za otpuštanje topline koja sprječava kondenzaciju postavljena je na prednjoj i bočnoj strani uređaja. Možete osjetiti da je posebno zagrijana nakon postavljanja uređaja ili ljeti. Ovo nije problem i sasvim je uobičajeno. |
| Ima vode u uređaju ili izvan njega. | Je li došlo do istjecanja vode oko uređaja?Provjerite istječe li voda iz umivaonika ili nekog drugog mjesta. |
| Ima li vode u donjem dijelu uređaja?Provjerite je li voda nastala zbog odmrzavanja zamrznute hrane ili lomljenja ili ispuštanja posude. | |
| Zvukovi škljocanja | Kontrola odmrzavanja škljocnut će kada započne i završi ciklus automatskog odmrzavanja. Kontrola termostata (ili kontrola uređaja u nekim modelima) također će škljocnuti kada ciklus započne i završi.Uobičajen rad |
| Zvukovi zveckanja | Zvuk zveckanja može se stvarati zbog protoka u uređaju, cijevi za vodu na stražnjoj strani uređaja (samo za modele s cijevima) ili predmeta postavljenih na uređaj ili oko njega.Uobičajen rad |
| Uređaj ne stoji ravno na tlu.Pod je nedostatne nosivosti ili je neravan, ili treba podesiti nožice za poravnanje. Vidi odjeljak za poravnanje vrata. | |
| Uređaj s linearnim kompresorom premješten je tijekom rada.Uobičajeni rad. Ako kompresor ne prestane zveckati nakon 3 minute, isključite napajanje uređaja, potom ga ponovno uključite. | |
| Šumeći zvukovi | Motor ventilatora isparivača pokreće zrak koji kruži kroz odjeljak hladnjaka i zamrzivača.Uobičajen rad |
| Ventilator kondenzatora gura zrak preko kondenzatora.Uobičajen rad | |
| Zvukovi klokotanja | Rashladno sredstvo protječe kroz sustav za hlađenjeUobičajen rad |
| Zvukovi pucketanja | Stezanje i rastezanje unutrašnjih stijenki zbog promjena temperature.Uobičajen rad |
| Vibriranje | Ako bočna ili stražnja strana uređaja dodiruje ormarić ili zid, uobičajene vibracije mogu uzrokovati jasne zvukove.Da biste otklonili zvukove, pobrinite se da bočne strane i stražnja strana ne dodiruju zid ili ormarić. |
| Vaš kućanski aparat i pametni telefon nisu spojeni na Wi-Fi mrežu. | Lozinka za Wi-Fi mrežu na koju se pokušavate spojiti nije ispravna.Pronadite Wi-Fi mrežu na koju je spojen Vaš pametni telefon i uklonite je, pa zatim registrirajte svoj uređaj na LG ThinQ. |
| Mobilni podaci za Vaš pametni telefon su uključeni.Isključite značajku Mobilni podaci na pametnom telefonu i registrirajte uređaj putem Wi-Fi mreže. | |
| Naziv bežične mreže (SSID) je pogrešno postavljen.Naziv bežične mreže (SSID) trebao bi biti kombinacija latiničnih slova i brojeva. (Nemojte koristiti posebne znakove) | |
| Frekvencija usmjerivača nije 2,4 GHz.Podržani su samo usmjerivači frekvencije od 2,4 GHz. Postavite bežični usmjerivač na 2,4 GHz i spojite uređaj na bežični usmjerivač. Za provjeru frekvencije usmjerivača, kontaktirajte davatelja internetskih usluga ili proizvođača usmjerivača. | |
| Udaljenost između uređaja i bežičnog usmjerivača je prevelika.Ako je udaljenost između uređaja i bežičnog usmjerivača prevelika, signal može biti preslab i veza se možda neće uspješno konfigurirati. Premjestite usmjerivač tako da je bliže uređaju. | |
Customer care and service
Contact the LG Electronics customer information center.
- To find information about an LG authorized service center, visit our website at www.lg.com.
- Only qualified service personnel from an LG authorized service center should disassemble, repair, or modify the appliance.
- To purchase spare parts, contact the LG Electronics customer information center or contact us via the website at www.lg.com.
- Spare parts listed in EU Regulation 2019/2019 are available for 7 years (only door gaskets are available for 10 years).
NOTE
Type A
Type B
| 'A' típus 'B' típus | ||||||||
| Zseb fogantyú Rúd fogantyú | Zseb fogantyú | Rúd fogantyú | ||||||
| Méret [mm] | ||||||||
| A | 595 595 5 | 95 595 595 | 595 595 595 | |||||
| B | 1860 | 2030 | 1860 | 2030 | 1860 | 2030 | 1860 | 2030 |
| C | 675 675 7 | 12 712 682 | 682 718 718 | |||||
| D | 9 | 9 | 9 | 9 | 15 | 15 | 15 | 15 |
| E | 667 667 6 | 67 667 667 | 667 667 667 | |||||
| F | - | - | 703 | 703 | - | - | 703 | 703 |
| G | 1124 | 1124 | 1124 | 1124 | 1130 | 1130 | 1130 | 1130 |
| H | 995 995 9 | 95 995 995 | 995 995 995 | |||||
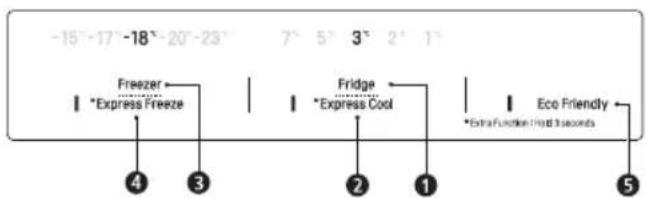
CAUTION
⚠️ WARNING
Other functions
NOTE
Cleaning the shelf
CAUTION
Type A
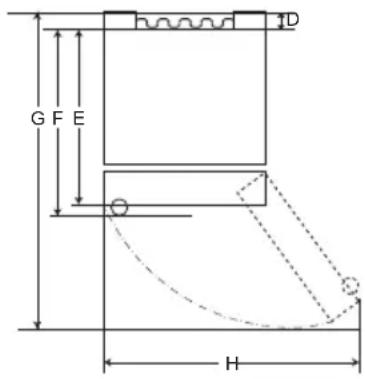
Type B
| Tipo A Tipo B | ||||||||
| Maniglia a tasca Ma | Maniglia a barra | Maniglia a tasca | Maniglia a barra | |||||
| Dimensioni [mm] | ||||||||
| A | 595 595 5 | 95 595 595 | 595 595 595 | |||||
| B | 1860 2030 | 1860 2030 | 1860 | 2030 1860 | 2030 | |||
| C | 675 675 7 | 12 712 682 | 682 718 718 | |||||
| D | 9 | 9 | 9 | 9 | 15 | 15 | 15 | 15 |
| E | 667 667 6 | 67 667 667 | 667 667 667 | |||||
| F | - | - | 703 | 703 | - | - | 703 | 703 |
| G | 1124 | 1124 | 1124 | 1124 | 1130 | 1130 | 1130 | 1130 |
| H | 995 995 9 | 95 995 995 | 995 995 995 | |||||
Ambient temperature
① Fridge Temperature
ATTENTION
WARNING
Other functions
3 Connect the smartphone to the wireless router.
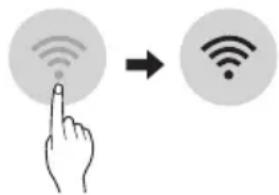
NOTE
Cleaning the shelf
ATTENTION
Type A
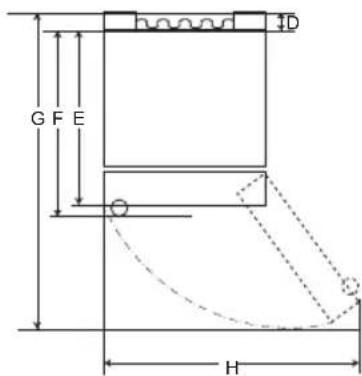
Type B
| A tipas B tipas | ||||||||
| Jleista rankena lšs | ikišusi rankena | Jleista rankena | Išsikišusi rankena | |||||
| Dydis (mm) | ||||||||
| A | 595 595 5 | 95 595 595 | 595 595 595 | |||||
| B | 1860 2030 | 1860 2030 | 1860 | 2030 1860 | 2030 | |||
| C | 675 675 7 | 12 712 682 | 682 718 718 | |||||
| D | 9 | 9 | 9 | 9 | 15 | 15 | 15 | 15 |
| E | 667 667 6 | 67 667 667 | 667 667 667 | |||||
| F | - | - | 703 | 703 | - | - | 703 | 703 |
| G | 1124 | 1124 | 1124 | 1124 | 1130 | 1130 | 1130 | 1130 |
| H | 995 995 9 | 95 995 995 | 995 995 995 | |||||
① Smart Diagnosis device (*)
CAUTION
⚠️ WARNING
Other functions
NOTE
CAUTION
Type A
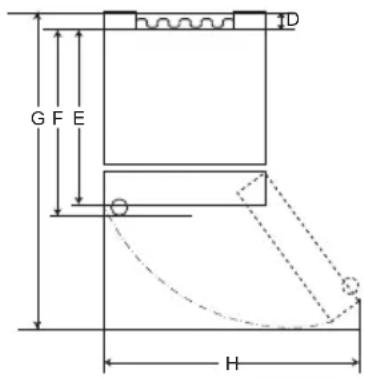
Type B
| A tips B tips | ||||||||
| legremdēts rokturis Stienveida rokturis | legremdēts rokturis | Stienveida rokturis | ||||||
| Izmērs (mm) | ||||||||
| A | 595 595 595 595 595 595 595 | |||||||
| B | 1860 | 2030 | 1860 | 2030 | 1860 | 2030 | 1860 | 2030 |
| C6 | 76 676 712 712 682 682 718 718 | |||||||
| D | 9 | 9 | 9 | 9 | 15 | 15 | 15 | 15 |
| E6 | 67 667 667 667 667 667 667 667 | |||||||
| F | - | - | 703 | 703 | - | - | 703 | 703 |
| G | 1124 | 1124 | 1124 | 1124 | 1130 | 1130 | 1130 | 1130 |
| H9 | 95 995 995 995 995 995 995 995 | |||||||
⚠ ATTENTION!
⚠ WARNING!
Other functions
NOTE
Type A
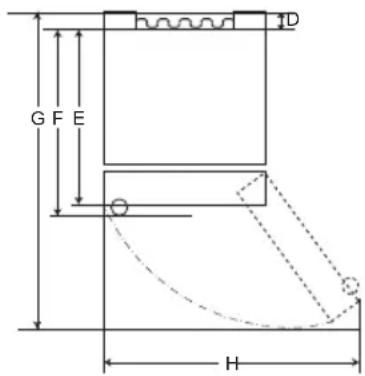
Type B
| Тип А Тип В | ||||||||
| Вградена рачка Шипка Рачка | Вградена рачка | Рачка-шипка | ||||||
| Големина [mm] | ||||||||
| A | 595 595 5 | 95 595 595 | 595 595 595 | |||||
| B | 1860 | 2030 | 1860 | 2030 | 1860 | 2030 | 1860 | 2030 |
| C6 | 76 676 71 | 2 712 682 6 | 82 718 | 718 | ||||
| D | 9 | 9 | 9 | 9 | 15 | 15 | 15 | 15 |
| E | 667 667 6 | 67 667 667 | 667 | 667 | 667 | |||
| F | - | - | 703 | 703 | - | - | 703 | 703 |
| G | 1124 | 1124 | 1124 | 1124 | 1130 | 1130 | 1130 | 1130 |
| H | 995 | 995 | 995 | 995 | 995 | 995 | 995 | 995 |
⚠️ ATTENTION
⚠ WARNING
Other functions
NOTE
Cleaning the shelf
CAUTION
SMART FUNCTIONS ......23
TROUBLESHOOTING....30
Type A
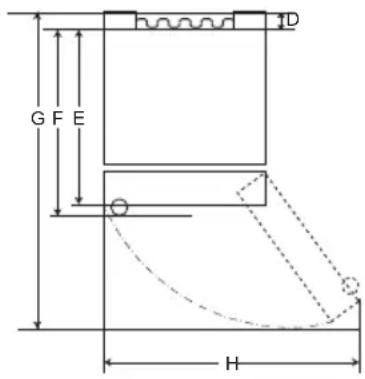
Type B
| Type A Type B | ||||||||
| Zaktype handvat Staaftype handvat | Zaktype handvat | Staaftype handvat | ||||||
| Grootte [mm] | ||||||||
| A | 595 595 595 | 595 595 595 | 595 595 595 | |||||
| B | 1860 2030 | 1860 2030 | 1860 | 2030 1860 | 2030 | |||
| C | 676 676 712 | 682 718 718 | ||||||
| D | 9 | 9 | 9 | 9 | 15 | 15 | 15 | 15 |
| E | 667 667 667 | 667 667 667 | 667 667 667 | |||||
| F | - | - | 703 | 703 | - | - | 703 | 703 |
| G | 1124 | 1124 | 1124 | 1124 | 1130 | 1130 | 1130 | 1130 |
| H | 995 995 995 | 995 995 995 | 995 995 995 | |||||
① Smart Diagnosis unit (*)
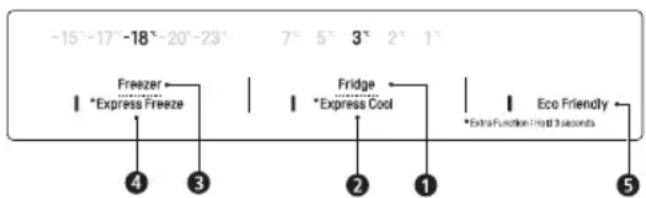
NOTE
⚠ WARNING
Other functions
NOTE
Cleaning the shelf
CAUTION
Type A
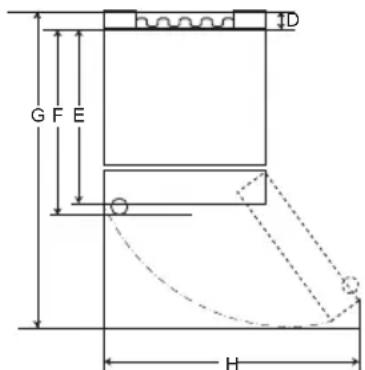
Type B
| Type A Type B | ||||||||
| Integrert håndtak Eksternt Håndtak | Integrert håndtak | Eksternt håndtak | ||||||
| Størrelse [mm] | ||||||||
| A | 595 595 5 | 95 595 595 | 595 595 595 | |||||
| B | 1860 2030 | 1860 2030 | 1860 | 2030 1860 2030 | ||||
| C | 676 676 7 | 12 712 682 | 682 718 718 | |||||
| D | 9 | 9 | 9 | 9 | 15 | 15 | 15 | 15 |
| E | 667 667 6 | 667 667 667 | 667 667 667 | |||||
| F | - | - | 703 | 703 | - | - | 703 | 703 |
| G | 1124 | 1124 | 1124 | 1124 | 1130 | 1130 | 1130 | 1130 |
| H | 995 995 9 | 995 995 995 | 995 995 995 | |||||
Ambient temperature
① Smart Diagnosis unit (*)
Recommendations for energy saving

DANGER
WARNING
Other functions
Open door alarm
NOTE
Cleaning the shelf
DANGER
Installing the freezer drawer
Type A
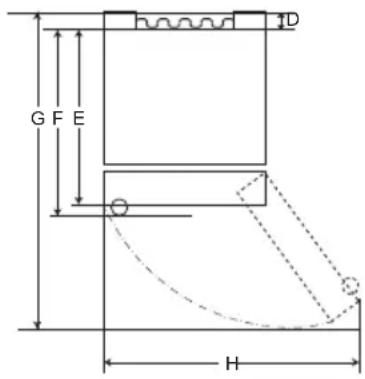
Type B
| Typ A Typ B | ||||||||
| Uchwyt wpuszczany | Uchwyt drązkowy | Uchwyt wpuszczany | Uchwyt drązkowy | |||||
| Wymiary [mm] | ||||||||
| A | 595 595 5 | 95 595 595 | 595 595 595 | |||||
| B | 1860 | 2030 | 1860 | 2030 | 1860 | 2030 | 1860 | 2030 |
| C | 676 676 7 | 12 712 682 | 682 718 718 | |||||
| D | 9 | 9 | 9 | 9 | 15 | 15 | 15 | 15 |
| E | 667 667 6 | 67 667 667 | 667 667 667 | |||||
| F | - | - | 703 | 703 | - | - | 703 | 703 |
| G | 1124 | 1124 | 1124 | 1124 | 1130 | 1130 | 1130 | 1130 |
| H | 95 995 995 | 95 995 995 | 95 995 995 | |||||
① Smart Diagnosis unit (*)
⚠ CAUTION

WARNING
Other functions
CAUTION
Cleaning the shelf
⚠ CAUTION
Reversing the Doors 12
Type A
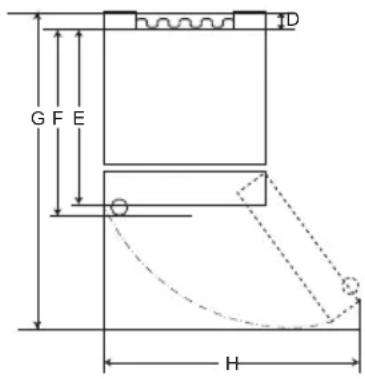
Type B
| Tipo A Tipo B | ||||||||
| Alça Portátil Barra | Alça | Alça Portátil | Alça da Barra | |||||
| Tamanho [mm] | ||||||||
| A | 595 595 595 595 595 595 595 | |||||||
| B | 1860 2030 | 1860 | 2030 | 1860 | 2030 1860 | 2030 | ||
| C | 676 676 712 712 682 682 718 718 | |||||||
| D | 9 | 9 | 9 | 9 | 15 | 15 | 15 | 15 |
| E | 667 667 667 667 667 667 667 667 | |||||||
| F | - | - | 703 | 703 | - | - | 703 | 703 |
| G | 1124 | 1124 | 1124 | 1124 | 1130 | 1130 | 1130 | 1130 |
| H | 995 995 995 995 995 995 995 | |||||||
Ambient temperature
To reverse the doors
① Smart Diagnosis Unit (*)
WARNING
CAUTION
② Use to store vegetables. (Recommended)
Other Functions
Door Open Alarm
NOTE
Clean the shelf
Remove the shelf from the refrigerator
Reinstall the refrigerator shelf
WARNING
Reinstall the vegetable cover
Clean the freezer drawer
Reinstall the freezer/drawer
SAFETY INSTRUCTIONS....3
IMPORTANT SAFETY INSTRUCTIONS....3
Type A
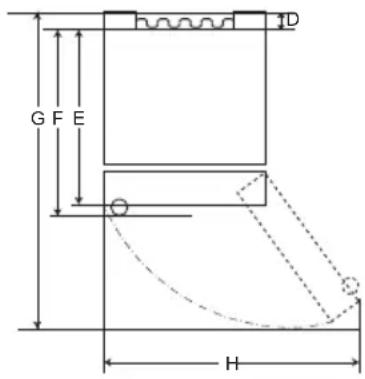
Type B
| Tip A Tip B | ||||||||
| Mâner de buzunar M | Mâner de bară | Mâner de buzunar | Mâner de bară | |||||
| Dimensiune [mm] | ||||||||
| A | 595 595 5 | 95 595 595 | 595 595 595 | |||||
| B | 1860 | 2030 | 1860 | 2030 | 1860 | 2030 1860 | 2030 | |
| C | 676 676 7 | 12 712 682 | 682 718 718 | |||||
| D | 9 | 9 | 9 | 9 | 15 | 15 | 15 | 15 |
| E | 667 667 6 | 67 667 667 | 667 667 667 | |||||
| F | - | - | 703 | 703 | - | - | 703 | 703 |
| G | 1124 | 1124 | 1124 | 1124 | 1130 | 1130 | 1130 | 1130 |
| H | 995 995 9 | 95 995 995 | 995 995 995 | |||||
① Fridge Temperature
⑤ Eco Friendly
ATTENTION
WARNING
Other functions
NOTE
Cleaning the shelf
ATTENTION
IMPORTANT SAFETY INSTRUCTIONS....3
Disposal of old appliance ....10
INSTALLATION 11
Dimensions and distances 11
Ambient temperature....11
Reversible door 12
Leveling the appliance 12
IMPORTANT SAFETY INSTRUCTIONS

WARNING
Do not place the shelf upside down. It could fall.
Type A
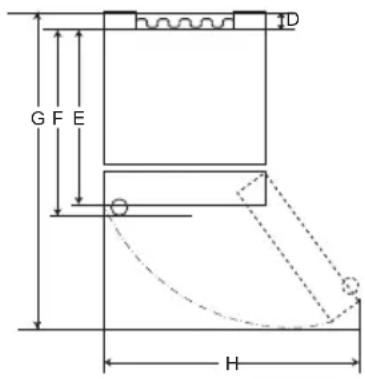
Type B
| Typ A Typ B | ||||||||
| Zapustená rukovät' | Tyčová rukovät' | Zapustená rukovät' | Tyčová rukovät' | |||||
| Rozmer [mm] | ||||||||
| A | 595 595 5 | 95 595 595 | 595 595 595 | |||||
| B | 1860 | 2030 | 1860 | 2030 | 1860 | 2030 | 1860 | 2030 |
| C | 676 676 7 | 12 712 682 | 682 718 718 | |||||
| D | 9 | 9 | 9 | 9 | 15 | 15 | 15 | 15 |
| E | 667 667 6 | 67 667 667 | 667 667 667 | |||||
| F | - | - | 703 | 703 | - | - | 703 | 703 |
| G | 1124 | 1124 | 1124 | 1124 | 1130 | 1130 | 1130 | 1130 |
| H | 995 995 9 | 95 995 995 | 995 995 995 | |||||
Ambient temperature
① Fridge Temperature
This sets the target temperature of the fridge.
⚠ WARNING
WARNING
• Fill only with drinking water.
⚠ WARNING
2 Lift the front of the shelf and slide it under the back. From this position, both sides of the shelf can be lifted to create more space.
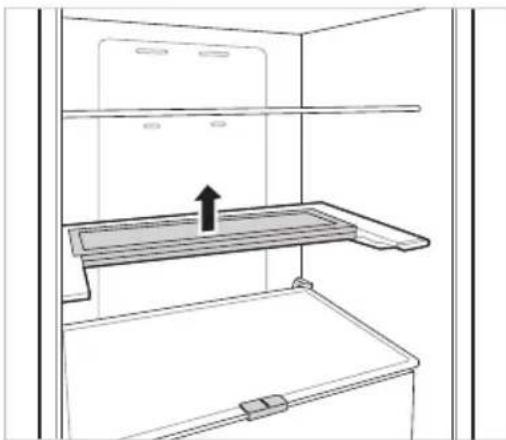
Additional functions
NOTE
Cleaning the shelf
Removing the shelf from the fridge
WARNING
2 Pull the fruit and vegetable drawer cover out by pulling it towards you.
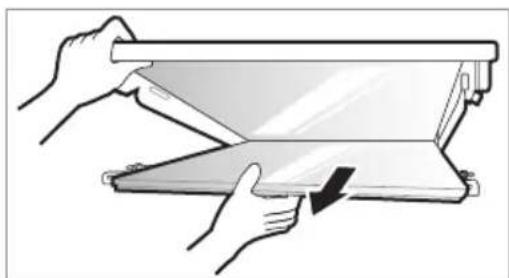
Refitting the fruit and vegetable drawer cover
2 Insert the tabs on the front of the fruit and vegetable cover into the grooves on the front of the shelf and push the cover onto the fruit and vegetable drawer to assemble it.
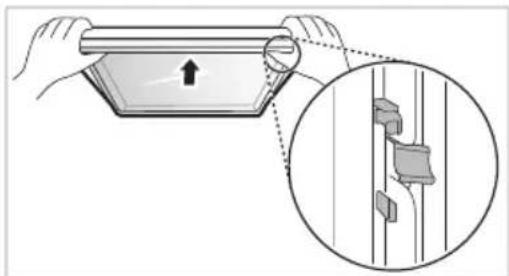
Layer A
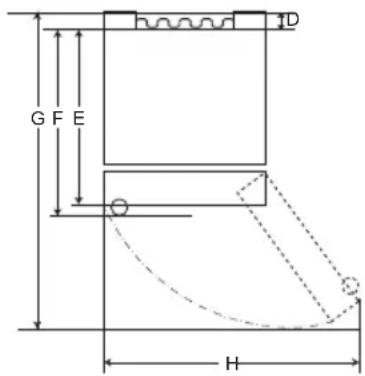
Layer B
| Vrsta A Vrsta B | ||||||||
| Stranski ročaj Zun | anji ročaj | Stranski ročaj | Zunanji ročaj | |||||
| Velikost [mm] | ||||||||
| A | 595 595 5 | 95 595 595 | 595 595 595 | |||||
| B | 1860 | 2030 | 1860 | 2030 | 1860 | 2030 | 1860 | 2030 |
| C | 676 676 7 | 12 712 682 | 682 718 718 | |||||
| D | 9 | 9 | 9 | 9 | 15 | 15 | 15 | 15 |
| E | 667 667 6 | 67 667 667 | 667 667 667 | |||||
| F | - | - | 703 | 703 | - | - | 703 | 703 |
| G | 1124 | 1124 | 1124 | 1124 | 1130 | 1130 | 1130 | 1130 |
| H | 995 | 995 995 995 | 995 995 | 995 | 995 | |||
Ambient temperature
CAUTION
2 Fill the water dispenser with drinking water and close the cap (small cover).
- The water dispenser holds up to 2.3 L.
CAUTION
WARNING
• Only fill it with drinking water.
CAUTION
- Check that there is no ice residue on the ice tray before pouring water into it.
Do not slam the freezer door after placing the ice tray with water inside.
Other functions
Door open alarm
The alarm beeps three times at 30-second intervals if the refrigerator door is left open or not completely closed for one minute.
Contact the LG Electronics customer information center if the alarm does not stop ringing even after closing the door.
Error detection
NOTE
2 Press the Eco Friendly button.
2 After installation, gently press the drawer to align it horizontally.
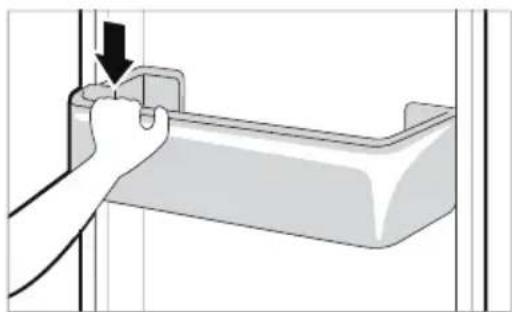
Cleaning the shelves
CAUTION
2 Insert the protrusions on the front of the glass shelf into the grooves and push the glass container upward to adjust it.
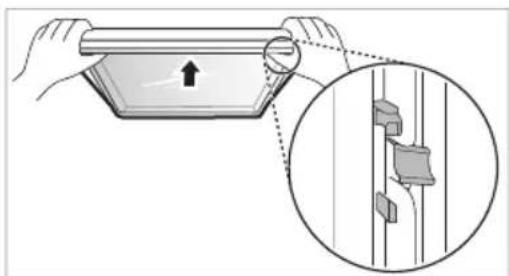
Layer A
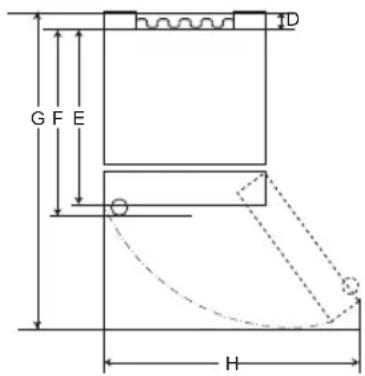
Layer B
| Lloji A Lloji B | ||||||||
| Dorezë xhepi Dorezë Shufër | Dorezë xhepi | Dorezë shufër | ||||||
| Madhësia [mm] | ||||||||
| A | 595 595 595 595 595 595 595 | |||||||
| B | 1860 | 2030 | 1860 | 2030 | 1860 | 2030 | 1860 | 2030 |
| C | 676 676 712 712 682 682 718 718 | |||||||
| D | 9 | 9 | 9 | 9 | 15 | 15 | 15 | 15 |
| E | 667 667 667 667 667 667 667 | |||||||
| F | - | - | 703 | 703 | - | - | 703 | 703 |
| G | 1124 | 1124 | 1124 | 1124 | 1130 | 1130 | 1130 | 1130 |
| H | 995 995 995 995 995 995 995 | |||||||
Ambient temperature
① Smart Diagnosis Unit (*)
CAUTION

WARNING
Other functions
NOTE
2 Press the Eco Friendly button.
Cleaning the shelf
CAUTION
IMPORTANT SAFETY INSTRUCTIONS 3
Disposal of the old appliance....10
INSTALLATION 11
Dimensions and clearances 11
Room temperature 11
IMPORTANT SAFETY INSTRUCTIONS

WARNING
Tip A
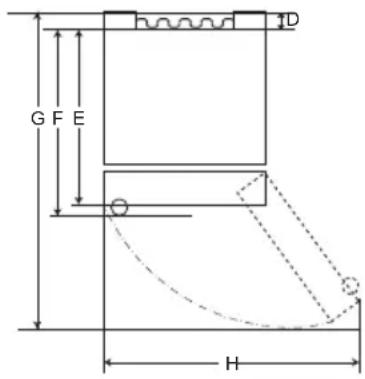
Tip B
| Tip A Tip B | ||||||||
| Uvučena drška Izdvojena drška | Uvučena drška | Izdvojena drška | ||||||
| Veličina [mm] | ||||||||
| A5 | 95 595 59 | 95 595 595 5 | 95 595 595 | |||||
| B | 1860 | 2030 1860 | 2030 | 1860 | 2030 | 1860 | 2030 | |
| C | 676 676 7 | 12 712 682 | 682 718 718 | |||||
| D | 9 | 9 | 9 | 9 | 15 | 15 | 15 | 15 |
| E | 667 667 6 | 67 667 667 | 667 667 667 | |||||
| F | - | - | 703 | 703 | - | - | 703 | 703 |
| G | 1124 | 1124 | 1124 | 1124 | 1130 | 1130 | 1130 | 1130 |
| H9 | 95 995 99 | 95 995 995 9 | 95 995 995 | |||||
Room temperature
- This appliance is designed to operate at a limited temperature range depending on the current climate zone.
- The internal temperature of the appliance can be affected by the location where the appliance is installed, the room temperature, the frequency of door openings, and so on.
- Information about the climate class of this appliance can be found on the label with technical data.
| Klimatska klasa | Opseg temperature prostora izražen u °C |
| SN (Produženo Umereno) | +10 - +32 |
| N (Umereno) | +16 - +32 |
| ST (Suptropsko) | +16 - +38 |
| T (Tropsko) | +16 - +43 / +10 - +43* |
① Smart Diagnosis unit (*)
This function is used when contacting the LG Electronics customer center to help in making an accurate diagnosis in cases where the appliance is not working properly or if a malfunction occurs.
② LED lamp
The LED lamps inside the appliance turn on when you open the door.
③ Refrigerator shelf
① Fridge Temperature
- This sets the refrigerator to the target temperature.
② * Express Cool
- This sets the Express Cool functions.
③ Freezer Temperature
▲ CAUTION
- Keep children away from the appliance to prevent them from playing with the controls or damaging them.
2 Fill the water tank with drinking water and close the cap (small lid).
- The water tank can hold 2.3 L.
CAUTION

WARNING
• Fill only with drinking water.

CAUTION
- Check for any remaining ice in the ice tray before pouring water into it.
- Do not slam the freezer door after filling the ice tray with water.
- If you open and close the freezer door frequently, the water may take longer to freeze.
- The time required for the water to freeze may vary depending on the season.
- It may take up to 24 hours for the temperature inside the appliance to stabilize after initial installation. The water may take longer to freeze due to this.
- Be careful when handling ice, as the edges of the ice may be sharp.
NOTE
- If the ice container is overfilled, the ice may stick together and be difficult to remove.
- Press the Express Freeze button on the control panel to make ice quickly.
2 Lift the front of the shelf and slide it under the rear part. From that position, both sides of the shelf can be lifted to create more space.
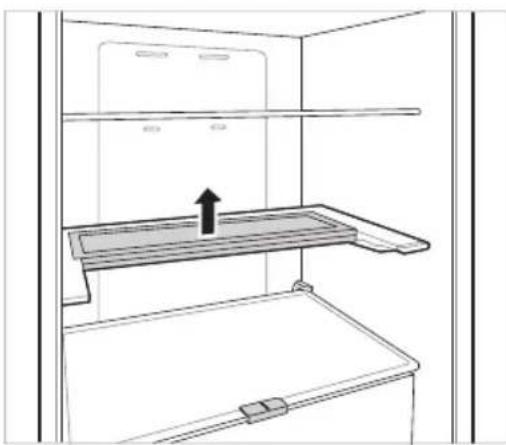
Other Functions
Door Open Alarm
The alarm sounds 3 times at 30-second intervals if the door (refrigerator compartment) is left open or not completely closed for one minute.
- Contact the LG Electronics customer information center if the alarm continues after the door is closed.
Fault Detection
The appliance can automatically detect problems during operation.
- If a problem is detected, the appliance stops working and an error code is displayed even if a button is pressed.
- When this happens, do not disconnect the power and immediately call the LG Electronics customer center. If you disconnect the power, the service technician from the LG Electronics customer support center may have difficulty finding the problem.
LG ThinQ Application
This feature is available only on models with Wi-Fi.
The LG ThinQ application allows you to communicate with the appliance using a smartphone.
LG ThinQ application features
Ability to communicate with the device via a smartphone using appropriate smart features.
Smart Diagnosis
- If you encounter a problem while using the device, this Smart Diagnosis feature will help you diagnose the issue.
Settings
- Allows you to set various options on the device and in the application.
NOTE
- If you replace the wireless router, internet service provider, or password, delete the registered device from the LG ThinQ application and register it again.
- The application is subject to changes to improve device operation without prior notice to users.
- Functions may vary depending on the model.
Before using the LG ThinQ application
1 Check the distance between the device and the wireless router (Wi-Fi network).
- If the distance between the device and the wireless router is too large, the signal will be weaker. Therefore, registration may take a long time or installation may not be possible.
2 Turn off the Mobile Data option on your smartphone.
NOTE
- To check the Wi-Fi connection, check whether the indicator light is illuminated on the control panel.
- The device only supports 2.4 GHz Wi-Fi networks. To check the network frequency, contact your internet service provider or refer to the wireless router manual.
- LG ThinQ is not responsible for any network connection problems or any interference, malfunctions, or errors caused by network connections.
Reinstalling the basket in the refrigerator door
1 Hold both edges of the door basket, slowly push one edge to fit it in, and then fit the other edge in the same way.
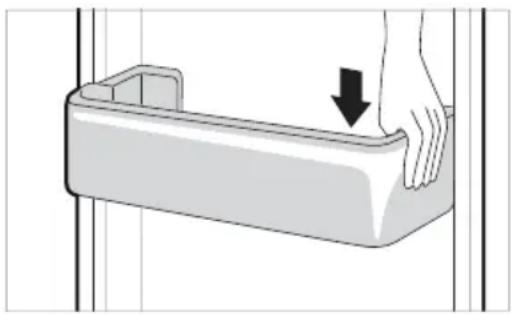
2 After assembly, gently tap the door basket to fix it horizontally.
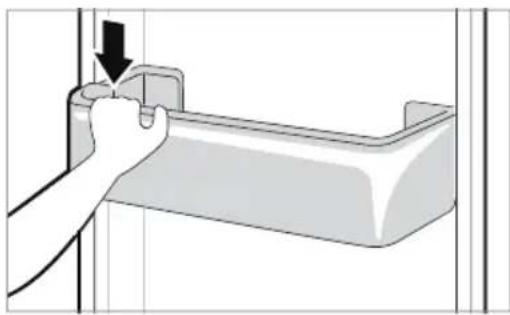
Cleaning the shelf
Removing the refrigerator shelf
Lift the rear edge of the refrigerator shelf, and then pull it out.
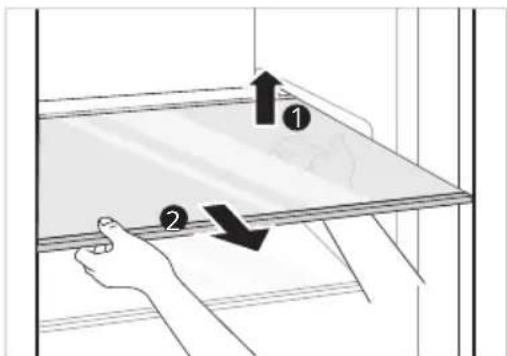
Reinstalling the refrigerator shelf
Reinstall it by following the reverse order of the removal procedure.
Cleaning the vegetable drawer - Removing the vegetable drawer
CAUTION
- Be aware that injuries may be caused by the weight of stored food when removing the vegetable drawer.
2 Remove the fresh produce cover by pulling it out.
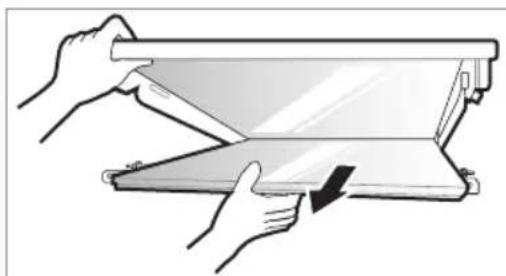
Reinstalling the Fresh Produce Cover
1 Place the protrusions inside the fresh produce cover onto the notches inside the shelf.
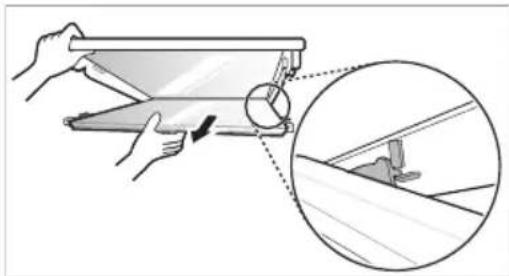
2 Insert the protrusions at the front of the fresh produce cover into the slots at the front of the shelf and push the fresh produce cover upward to assemble it.
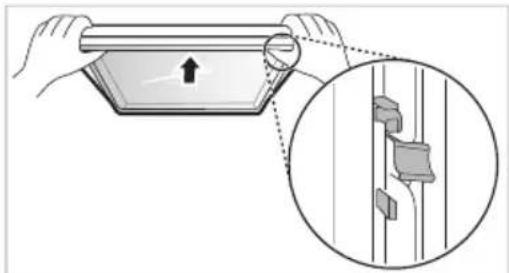
The dispenser tray can easily get wet due to spilled ice or water. Wipe the entire area with a damp cloth.
| Simptomi Razlog | i rešenje |
| Nema hlađenja ili zamrzavanja. | Da li je došlo do nestanka struje?Proverite da li drugi uređaji rade. |
| Da li je utikač za napajanje iskopčan iz utičnice?Išpravno prikopčajte utikač za napajanje u utičnicu. | |
| Moguće je da je pregoreo osigurač ili je došlo do iskakanja automatskog prekidača. Ili je uređaj uključen u utičnicu koja ima GFCI (prekidač uzemljenja), a automatski prekidač utičnice je iskočio.Proverite glavnu razvodnu kutiju i zamenite osigurač ili resetujte automatski prekidač. Nemojte da povećavate kapacitet osigurača.Ako je problem u preopterećenju strujnog kola, kvalifikovani električar treba da ga popravi.Resetujte automatski prekidač na GFCI-ju. Ako se problem nastavi, pozovite električara. | |
| Hlađenje ili zamrzavanje je slabo. | Da li je temperatura frižidera ili zamrzivača postavljena na najtoplije podešavanje?Postavite temperaturu frižidera ili zamrzivača na „Srednje". |
| Da li je uređaj na direktnoj sunčevoj svetlosti ili je blizu objekta koji stvara toplotu, npr. rerna ili grejalica?Proverite oblast instalacije i ponovo ga instalirajte dalje od objekata koji stvaraju toplotu. | |
| Da li ste unutra stavili vruću hranu bez prvobitnog hlađenja hrane?Ohladite hranu pre nego što je stavite u frižider ili zamrzivač. | |
| Da li ste stavili previše hrane?Održavajte odgovarajuću razdaljinu između hrane. | |
| Da li su vrata na uređaju potpuno zatvorena?Skroz zatvorite vrata i proverite da skladištena hrana ne smeta vratima. | |
| Da li ima dovoljno prostora oko uređaja?Podesite položaj instalacije da biste obezbedili dovoljno prostora oko uređaja. | |
| U uređaju je neprijatan miris. | Da li je temperatura frižidera ili zamrzivača postavljena na „Toplo“?Postavite temperaturu frižidera ili zamrzivača na „Srednje". |
| Da li ste unutra stavili hranu koja ima jak miris?Hranu koja ima jak miris čuvajte u zatvorenim posudama. | |
| Možda se voće ili povrće pokvarilo u fioci?Bacite pokvareno povrće i očistite fioku za povrće. Nemojte previše dugo da čuvate povrće u fioci za povrće. | |
| Lampa koja je unutar uređaja se ne uključuje. | Da li se lampa koja je unutar uređaja isključuje?Korisnicima je teško da zamene unutrašnju lampu u uređaju jer nisu pogodne za popravku. Ako se unutrašnja lampa ne pali, molimo vas da se obratite centru za podršku korisnika LG Electronics. |
| Vrata uređaja nisu čvrsto zatvorena. | Da li je uređaj nagnut prema napred?Podesite prednje nožice da biste malo uzdigli prednju stranu. |
| Da li su police pravilno sastavljene?Ponovo postavite police ako je potrebno. | |
| Da li ste vrata zatvorili upotrebom prekomerne sile?Ako upotrebite preveliku silu ili brzinu tokom zatvaranja vrata, ona mogu na kratko ostati otvorena pre zatvaranja. Postarajte se da ne lupate vratima. Zatvorite ih bez upotrebe sile. | |
| Vrata uređaja se teško otvaraju. | Da li ste vrata otvorili odmah nakon zatvaranja?Ako vrata uređaja pokušate da otvorite u roku od 1 minuta nakon zatvaranja, možete imati poteškoće zbog pritiska unutar uređaja.Pokušajte da ponovo otvorite vrata uređaja nakon nekoliko minuta kako bi se stabilizovao unutrašnji pritisak. |
| Kondenzacija se javlja unutar uređaja ili na dnu poklopca fioke za povrće. | Da li ste unutra stavili vruću hranu bez prvobitnog hlađenja hrane?Ohladite hranu pre nego što je stavite u frižider ili zamrzivač. |
| Da li ste ostavili otvorena vrata uređaja?Iako će kondenzacija nestati brzo nakon što zatvorite vrata uređaja, možete da je obrišete pomoću suve tkanine. | |
| Da li često otvarate i zatvarate vrata uređaja?Kondenzacija može da nastane zbog temperaturne razlike u odnosu na spoljašnjost. Obrišite vlagu suvom tkaninom. | |
| Da li ste unutra stavili toplu ili vlažnu hranu koju niste je zatvorili u posudu?Hranu čuvajte u pokrivenoj ili zatvorenoj posudi. | |
| Led se formirao u zamrzivaču. | Možda vrata nisu zatvorena kako treba?Proverite da namirnica unutar uređaja ne blokira vrata i proverite da li su vrata čvrsto zatvorena. |
| Da li ste unutra stavili vruću hranu bez prvobitnog hlađenja hrane?Ohladite hranu pre nego što je stavite u frižider ili zamrzivač. | |
| Led se formirao u zamrzivaču. | Da li je ulaz ili izlaz za vazduh u zamrzivaču blokiran?Uverite se da ulaz ili izlaz za vazduh nije blokiran tako da vazduh može unutra da cirkuliše. |
| Da li je zamrzivač prepunjen?Održavajte odgovarajuću razdaljinu između hrane. | |
| Sa unutrašnje ili spoljašnje strane uređaja formirao se led ili kondenzacija. | Da li ste često otvarali i zatvarali vrata uređaja ili su vrata uređaja nepravilno zatvorena?Led ili kondenzacija mogu da se formiraju ako vazduh spolja uđe u uređaj. |
| Da li je okruženje instalacije vlažno?Kondenzacija može da se pojavi na spoljnoj strani uređaja ako je prostorija u kojoj je instaliran previše vlažna ili ako je vlažnost vazduha povećana, npr. kada pada kiša. Obrišite vlagu koja se pojavi suvom tkaninom. | |
| Uređaj je bučan i proizvodi čudne zvukove. | Da li je uređaj instaliran na tankom ili neravnom podu?Instalirajte uređaj na čvrstom i ravnom podu. |
| Da li zadnja strana uređaja dodiruje zid?Podesite položaj instalacije da biste napravili dovoljno prostora oko uređaja. | |
| Da li ima raštrkanih predmeta iza uređaja?Uklonite raštrkane predmete koji se nalaze iza uređaja. | |
| Da li je neki predmet na uređaju?Uklonite predmet sa uređaja. | |
| Strane ili prednja strana uređaja su vrući. | U ovim delovima uređaja su ugrađene antikondenzacijske cevi da bi se smanjila kondenzacija koja se formira u delu oko vrata.Cev za oslobađanje toplote i sprečavanje kondenzacije instalirana je sa prednje strane uređaja, i sa strane. Ona može da bude izrazito vruća odmah nakon instaliranja uređaja ili tokom leta. Budite uvereni da to nije problem već sasvim normalno. |
| Ima vode van ili unutar uređaja. | Da li negde oko uređaja curi voda?Proverite da voda ne curi iz sudopere ili drugog mesta. |
| Da li ima vode na dnu uređaja?Proverite da li voda dolazi od topljenja smrznute hrane ili polomljene ili prevrnute posude. | |
| Zvukovi škljocanja | Kontrola odmrzavanja škljocnuće kada automatski ciklus odmrzavanja počne i završi se. Kontrola termostata (ili kontrola uređaja na nekim modelima) takođe će škljocnuti tokom uključivanja i isključivanja ciklusa.Normalan rad |
| Zvukovi klepetanja | Klepetanje može da dolazi od toka rada uređaja, cevi za vodu sa zadnje strane uređaja (samo za modele za priključkom za vodu) ili predmeta koji se drže na uređaju ili oko njega.Normalan rad |
| Uređaj nije ravno postavljen na pod.Pod je slab ili neravan ili je potrebno poravnati nogice za nivelisanje. Pogledajte odeljak „Nivelisanje vrata“. | |
| Uređaj sa linearnim kompresorom je premeštan dok radi.Normalan rad. Ako kompresor ne prestane da klepeće nakon 3 minuta isključite napajanje na uređaju i zatim ga ponovo uključite. | |
| Zvukovi šištanja | Motor ventilatora za isparavanje pokreće vazduh kroz odeljke frižidera i zamrzivača.Normalan rad |
| Vazduh se usmerava preko isparivača pomoću ventilatora za isparavanje.Normalan rad | |
| Zvukovi krkljanja | Tečnost uređaja teče kroz sistem za hlađenjeNormalan rad |
| Zvukovi pucketanja | Skupljanje i širenje unutrašnjih zidova zbog temperaturnih promena.Normalan rad |
| Vibriranje | Ako strane ili zadnja strana uređaja dodiruju plakar ili zid, neke od normalnih vibracija mogu praviti zvukove.Da biste otklonili buku, obezbedite da strane i zadnja strana ne budu u dodiru sa zidom ili plakarom. |
| Vaš aparat i pametni telefon nisu priključeni na Wi-Fi mrežu. | Lozinka za Wi-Fi mrežu na koju pokušavate da se priključite nije ispravna.Pronađite Wi-Fi mrežu na koju je priključen vaš pametni telefon i uklonite je, a zatim registrujte svoj uređaj na LG ThinQ. |
| Mobilni podaci na vašem pametnom telefonu su uključeni.Isključite opciju Mobilni podaci na svom pametnom telefonu i registrujte uređaj pomoću Wi-Fi mreže. | |
| Naziv bežične mreže (SSID) nije ispravno podešen.Naziv bežične mreže (SSID) treba da se sastoji od kombinacije latiničnih slova i brojeva. (Nemojte da koristite posebne znakove) | |
| Frekvencija rutera nije 2,4 GHz.Podržani su samo ruteri čija je frekvencija 2,4 GHz. Podesite bežični ruter na 2,4 GHz i priključite uređaj na bežični ruter. Da biste proverili frekvenciju rutera, obratite se provajderu internet usluga ili proizvođaču rutera. | |
| Udaljenost između uređaja i bežičnog rutera je suviše velika.Ako je udaljenost između uređaja i bežičnog rutera suviše velika, signal može da bude suviše slab i veza možda neće biti ispravno konfigurisana. Stavite ruter bliže uređaju. |
TABLE OF CONTENTS
Type A
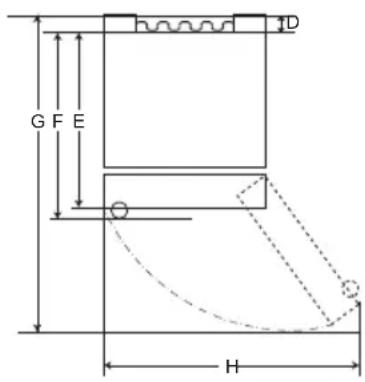
Type B
| Typ A Typ B | ||||||||
| Fickhandtag Stånghandtag | Fickhandtag | Stånghandtag | ||||||
| Storlek [mm] | ||||||||
| A | 595 595 595 | 595 595 595 | 595 595 595 | |||||
| B | 1860 2030 | 1860 2030 | 1860 | 2030 1860 | 2030 | |||
| C | 676 676 712 | 682 718 718 | ||||||
| D | 9 | 9 | 9 | 9 | 15 | 15 | 15 | 15 |
| E | 667 667 667 | 667 667 667 | 667 667 667 | |||||
| F | - | - | 703 | 703 | - | - | 703 | 703 |
| G | 1124 | 1124 | 1124 | 1124 | 1130 | 1130 | 1130 | 1130 |
| H | 995 995 995 | 995 995 995 | 995 995 995 | |||||
Ambient temperature
① Smart Diagnosis unit (*)
① Fridge Temperature
⚠ CAUTION
WARNING
Other functions
Door open alarm
3 Connect your smartphone to the wireless router.
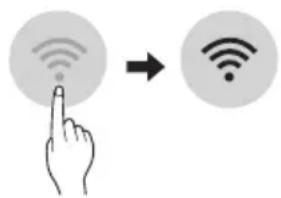
NOTE
Clean the shelf
⚠ CAUTION
- TABLE OF CONTENTS
- SAFETY INSTRUCTIONS
- INSTALLATION
- OPERATION
- SMART FUNCTIONS
- MAINTENANCE
- TROUBLESHOOTING
- WARNING
- CAUTION
- IMPORTANT SAFETY INSTRUCTIONS
- CHILDREN IN THE HOUSEHOLD
- FOR USE IN EUROPE
- DISPOSAL
- TECHNICAL SAFETY
- RISK OF FIRE AND FLAMMABLE MATERIALS
- DISPOSAL OF YOUR OLD APPLIANCE
- DIMENSIONS AND CLEARANCES
- AMBIENT TEMPERATURE
- NOTE
- ACCESSORIES
- REVERSING DOORS
- LEVELING THE APPLIANCE
- CONNECTING THE APPLIANCE
- MOVING THE APPLIANCE
- PARTS AND FUNCTIONS
- ① SMART DIAGNOSIS UNIT (*)
- ② LED LAMP
- ③ FRIDGE SHELF
- ④ BOTTLE RACK (*)
- ⑤ FOLDING SHELF (*)
- ⑥ FRESH VEGETABLE DRAWER (*)
- ⑦ FRESH CONVERTER (*)
- ICE TRAY
- MOVABLE EGG TRAY
- FRIDGE DOOR BASKET
- ⑪ WATER DISPENSER TANK (*)
- ⑫ TOP DRAWER
- FREEZER DRAWER
- NOTES FOR OPERATION
- SUGGESTION FOR ENERGY SAVING
- STORING FOODS EFFECTIVELY
- MAX FREEZING CAPACITY
- MAXIMUM STORAGE
- CONTROL PANEL
- UNITS AND FUNCTIONS
- ① FRIDGE TEMPERATURE
- ② * EXPRESS COOL
- ③ FREEZER TEMPERATURE
- ④ * EXPRESS FREEZE
- ⑤ ECO FRIENDLY
- WI-FI
- ⑦ *LOCK
- SETTING THE TEMPERATURE
- SETTING EXPRESS FREEZE
- SETTING EXPRESS COOL
- SETTING ECO FRIENDLY
- SETTING AND RESETTING LOCK
- HIGH TEMPERATURE ALARM
- WATER DISPENSER (*)
- WATER DISPENSER TANK
- FRESH CONVERTER ( * )
- FRESH VEGETABLE DRAWER ( * )
- FOLDING SHELF
- OTHER FUNCTIONS
- DOOR OPEN ALARM
- FAILURE DETECTION
- LG THINQ APPLICATION
- LG THINQ APPLICATION FEATURES
- SMART DIAGNOSIS
- SETTINGS
- BEFORE USING LG THINQ APPLICATION
- INSTALLING THE LG THINQ APPLICATION
- CONNECTING TO WI-FI
- INITIAL APPLIANCE REGISTRATION
- RE-REGISTERING THE APPLIANCE OR REGISTERING ANOTHER USER
- OPEN SOURCE SOFTWARE NOTICE INFORMATION
- USING LG THINQ TO DIAGNOSE ISSUES
- USING AUDIBLE DIAGNOSIS TO DIAGNOSE ISSUES
- DISPLAY PANEL IS ON THE FRIDGE DOOR
- DISPLAY PANEL IS INSIDE THE FRIDGE DOOR
- NOTES FOR CLEANING
- CLEANING THE DOOR BASKET
- REMOVING THE FRIDGE DOOR BASKET
- REFITTING THE FRIDGE DOOR BASKET
- CLEANING THE SHELF REMOVING THE FRIDGE SHELF
- REFITTING THE FRIDGE SHELF
- CLEANING THE VEGETABLE DRAWER
- REMOVING THE VEGETABLE DRAWER
- REFITTING THE VEGETABLE DRAWER
- CLEANING THE CRISPER COVER REMOVING THE CRISPER COVER
- REFITTING THE CRISPER COVER
- CLEANING THE FREEZER DRAWER
- REFITTING THE FREEZER DRAWER
- CLEANING THE WATER DISPENSER CLEANING THE DISPENSER TRAY
- CLEANING THE WATER AND ICE OUTLET
- CUSTOMER CARE AND SERVICE
- MEMO
- OPERATING
- INSTRUCTIONS
- REFRIGERATOR AND
- FREEZER
- ① SMART DIAGNOSIS MODULE (*)
- CLEANING THE SHELF
- ⚠ WARNING
- ⚠️ CAUTION
- ▲ CAUTION
- OPEN DOOR ALARM
- REASSEMBLING THE FREEZER DRAWER
- ⚠️ WARNING
- DANGER
- AMBIENT AIR TEMPERATURE
- REVERSING THE DOOR
- REPLACING THE FREEZER DRAWER
- ▲ WARNING
- ATTENTION
- FOLDABLE SHELF
- CLEANING THE SHELF REMOVING THE REFRIGERATOR SHELF
- INSERTING THE REFRIGERATOR SHELF
- CLEANING THE VEGETABLE DRAWER REMOVING THE VEGETABLE DRAWER
- REINSTALLING THE VEGETABLE DRAWER
- INSERTING THE FREEZER DRAWER
- ⚠ ATTENTION
- ⚠️ ATTENTION
- RECOMMENDATIONS FOR ENERGY SAVING
- INSTALLING THE FREEZER DRAWER
- ⚠ CAUTION
- TO REVERSE THE DOORS
- CLEAN THE SHELF
- REMOVE THE SHELF FROM THE REFRIGERATOR
- REINSTALL THE REFRIGERATOR SHELF
- REINSTALL THE VEGETABLE COVER
- CLEAN THE FREEZER DRAWER
- REINSTALL THE FREEZER/DRAWER
- ADDITIONAL FUNCTIONS
- REMOVING THE SHELF FROM THE FRIDGE
- REFITTING THE FRUIT AND VEGETABLE DRAWER COVER
- ERROR DETECTION
- CLEANING THE SHELVES
- ROOM TEMPERATURE
- FAULT DETECTION
- BEFORE USING THE LG THINQ APPLICATION
- REINSTALLING THE BASKET IN THE REFRIGERATOR DOOR
- REMOVING THE REFRIGERATOR SHELF
- REINSTALLING THE REFRIGERATOR SHELF
- CLEANING THE VEGETABLE DRAWER - REMOVING THE VEGETABLE DRAWER
- REINSTALLING THE FRESH PRODUCE COVER
Brand : LG
Model : GBD62PZYFN
Category : Freezer