
BDRC140 - Battery charger BLACK & DECKER - Free user manual and instructions
Find the device manual for free BDRC140 BLACK & DECKER in PDF.

| Product type | Battery charger with radio |
| Brand | Black & Decker |
| Model | BDRC140 |
| Input voltage | 120 V AC, 60 Hz |
| Charging output voltage | 18 V (for 18 V battery packs) |
| Initial charge time | 9 hours |
| Normal charge time | 3 to 6 hours |
| Compatible battery types | Black & Decker 18 V battery packs (Ni-Cd) |
| Main functions | Battery charging, AM/FM radio, speaker, tool support |
| Battery radio runtime | Up to 12 hours (with 18 V battery pack) |
| Power supply | 120 V AC adapter or 18 V battery pack |
| Maintenance and cleaning | Clean with a dry cloth only. Repairs by an authorized service center. |
| Safety | Do not expose to water or moisture. Do not open the device. Use only recommended accessories. |
| Warranty | 2 years for residential use |
| General information | Double insulation, FCC certified, battery recycling via RBRC program |
Frequently Asked Questions - BDRC140 BLACK & DECKER
User questions about BDRC140 BLACK & DECKER
0 question about this device. Answer the ones you know or ask your own.
Ask a new question about this device
Download the instructions for your Battery charger in PDF format for free! Find your manual BDRC140 - BLACK & DECKER and take your electronic device back in hand. On this page are published all the documents necessary for the use of your device. BDRC140 by BLACK & DECKER.
USER MANUAL BDRC140 BLACK & DECKER
GO TO WWW.BLACKANDDECKER.COM/NEWOWNER
TO REGISTER YOUR NEW PRODUCT.
BEFORE RETURNING THIS PRODUCT FOR ANY REASON PLEASE CALL 1-800-544-6986
BEFORE YOU CALL HAVE THE CATALOG No. AND DATE CODE AVAILABLE IN MOST CASES.A BLACK & DECKER REPRESENTATIVE CAN RESOLVE THE PROBLEM OVER THE PHONE IF YOU HAVE A SUGGESTION OR COMMENT, GIVE US A CALL YOUR FEEDBACK IS VITAL TO BLACK & DECKER.
SAVE THIS MANUAL FOR FUTURE REFERENCE.
VEA EL ESPÁNOL EN LA CONTRAPORTADA.
INSTRUCTIVO DE OPERACION, CENTROS DE SERVICIO Y POLIZA DE GARANTIA. ADVERTENCA: LEASE ESTE INSTRUCTIVO ANTES DE USAR EL PRODUCTO.

Catalog #s.BDRC18, BDRC140
Form #90504125 Rev. 1
(DEC.06)
Printed in China
Copyright © 2008 Black & Decker
Important Safety Warnings and Instructions 1 Read those instructions.
Here these instructions:
-Keep these instructions
Heed all warnings:
Follow all instructions
- To reduce the risk of fire or electric shock, do not expose this apparatus to rain or moisture. Do not use this apparatus near water.
Clean only with a dry cloth.
- Do not block any ventilation openings. Install in accordance with the manufacturer's instructions.
- Do not install near any heat sources such as radiators, heat registers, stoves or other apparatus (including amplifiers) that produce heat.
- Do not defeat the safety purpose of the polarized or grounding-type plug. A polarized plug has two blades with one wider than the other. A grounding type plug has two blades and a third grounding prong. The wide blade or the third prong are provided for your safety. If the provided plug does not fit into your outlet, consult an electrician for replacement of the obsolete outlet.
- Protect the power cord from being walked on or pinched particularly at plugs, convenience receptacles and the point where they exit from the apparatus.
Only use attachments/accessories specified by the manufacturer. - Use only with the cart, stand, tripod, bracket, or table specified by the manufacturer, or sold with the apparatus. When a cart is used, use caution moving the cart/apparatus combination to avoid injury from tip-over.
- Unlike this approach during lightning starmas or when used for long periods of time.
Do not expose this appellation by using such a water-dried mouse oil or petroleum-wet with water. Do not allow the application of any kind of cleaning or drying or splashing. Do not place objects filled with liquids, such as vases, on the apparatus. - Refer all servicing to qualified service personnel. Servicing is required when the apparatus has been damaged in any way, such as power-supply cord or plug is damaged, liquid has been spilled or objects have fallen into the apparatus, the apparatus has been exposed to rain or moisture, does not operate normally, or has been dropped.
WARNING
Do not permit children to use the unit. It is not a toy.
- Keep the work area clean, Cluttered areas and benches invite accidents.
- Check damaged parts before further use. A part that has been damaged should be checked carefully to determine that it will operate properly and perform its intended function. Do not use the unit if it does not function properly.
- Before using radio charger, read all instructions and cautionary markings on (1) radio charger, (2) power pack, and (3) product using power pack.
- To reduce the risk of injury, charge only 18 volt Black & Decker Power Packs. Other types of batteries may burst causing personal injury and damage.
To reduce the risk of fire or electric shock, do not expose this apparatus to rain or moisture or snow.
- Use of an attachment not recommended or sold by Black & Decker may result in a risk of fire, electric shock, or Injury to persons.
- To reduce risk of damage to adaptor plug and cord, pull by plug rather than cord when disconnecting from radio charger.
- Make sure cord is located so that it will not be stepped on, tripped over, or otherwise subjected to damage or stress.
- An extension cord should not be used unless absolutely necessary. Use of improper extension cord could result in a risk of fire, electric shock or electrocution.
a. Two-wire cords can be used with 2-wire or 3-wire extension cords. Only round jacketed extension cords should be used, and we recommend that they be listed by Underwriters Laboratories (U.L.). If the extension is to be used outside, the cord must be suitable for outdoor use. Any cord marked for outdoor use can also be used for indoor work. The letters "W" or "WA" on the cord jacket indicate that the cord is suitable for outdoor use.
b. An extension cord must have adequate wire size (AWG or American Wire Gauge) for safety, and to prevent loss of power and overheating. The smaller the gauge number of the wire, the greater the capacity of the cable; that is, 16 gauge has more capacity than 18 gauge. When using more than one extension to make up the total length, be sure each extension contains at least the minimum wire size.
| Volts | Minimum Gage for Cord Sets | ||||
| Total Length of Cord in Feet | |||||
| 120V | 0-25 | 26-50 | 51-100 | 101-150 | |
| 240V | 0-50 | 51-100 | 101-200 | 201-300 | |
| Ampere Rating | |||||
| More | Not more | American Wire Gauge | |||
| Than | Than | ||||
| 0 | 6 | 18 | 16 | 16 | 14 |
| 6 | 10 | 18 | 16 | 14 | 12 |
| 10 | 12 | 16 | 16 | 14 | 12 |
| 12 | 16 | 14 | 12 | Not Recommended | |
DO NOT incinerate power packs even if they are severely damaged or completely worn out. The batteries can explode in a fire.
- A small leakage of liquid from the battery cells may occur under extreme usage, charging or temperature conditions. This does not indicate a failure. However, if the outer seal is broken and this leakage gets on your skin:
a. Wash quickly with soap and water.
b. Neutralize with a mild acid such as lemon juice or vinegar
c. If the battery liquid gets in your eyes, flush them with clean water for a minimum of 10 minutes and seek immediate medical attention. MEDICAL NOTE: The liquid is a 25 - 35% solution of potassium hydroxide.
The label on your radio charger may include the following symbols.
V volts A. amperes
Hz hertz W. watts
min.........minutes
direct current
Class II Construction
A .safety alert symbol
A. ……shock hazard symbol
DC.........direct current


The lightning flash with arrow head within a triangle is intended to tell the user that parts inside the product are a risk of electric shock to persons.
The exclamation point within a triangle is intended to tell the user that important operating and servicing instructions are in the papers with the appliance.
The double insulation symbol (a square within a square) is intended to alert qualified service personnel to use only identical replacement parts in this apparatus.
Terminals are hazardous live and the external wiring connected to the terminals requires installation by an instructed person or the use of ready-made leads or
CAUTION: Modifications not approved by the party responsible for compliance could void user's authority to operate the equipment in the radio charger.
NOTE: This equipment has been tested and found to comply with the limits for Class B digital device, pursuant to part 15 of the FCC Rules. These limits are designed to provide reasonable protection against harmful Interference in a residential Installation. This equipment generates, uses and can radiate radio frequency energy and, if not installed and used in accordance with the instructions, may cause harmful interference to radio or television reception, which can be determined by turning the equipment off and on, the user is encouraged to try to correct the interference by one or more of the following measures: Reorient or relocate the receiving antenna.
Increase the separation between the equipment and the receiver
. Connect the equipment into an outlet on a circuit different from that to which the receiver is connected.
Consult the dealer or an experienced radio/TV technician for help.
Battery Cap Information
Battery storage and carrying caps are provided for use whenever the battery is out of the tool or charger. Remove cap before placing battery in charger or tool.

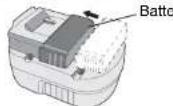
Battery Cap
WARNING: Do not store or carry battery so that metal objects can contact exposed battery terminals. For example, do not place battery in aprons, pockets, tool boxes, product kit boxes, drawers, etc. with loose nails, screws, keys, etc. without battery cap. Transporting batteries can possibly cause fires if the battery terminals inadvertently come in contact with conductive materials such as keys, coils, hand tools and the like. The US Department of Transportation Hazardous Material Regulations (HMR) actually prohibit transporting batteries in commerce or on airplanes (i.e. packed in suitcases and carryon luggage) UNLESS they are properly protected from short circuits. So when transporting individual batteries, make sure that the battery terminals are protected and well insulated from materials that could contact them and cause a short circuit.
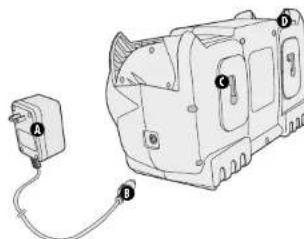
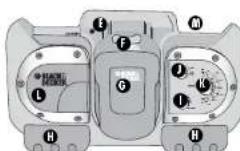
COMPONENTS
AC Power Adaptor
0-Adaptor Plug
6-Mounting Slots
D-Antenna
0-Charging Indicator
Charging Port
Rechargeable Power Pack
0-Storage Compartments
ON/OFF Volume Control
AM/FM Selector
0-Station Selector
Speaker
Tool Rest


Charging the Power Pack
THE BATTERIES IN YOUR POWER PACK ARE NOT FULLY CHARGED AT THE FACTORY. BEFORE ATTEMPTING TO CHARGE THEM, THOROUGHLY READ ALL OF THE SAFETY INSTRUCTIONS.
The radio charger is designed to use standard household 120 volt 60 Hz power.
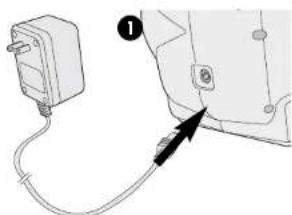
- Insert the plug of the power adaptor into the radio charger as shown in Figure 1. Insure that the charger plug is correctly aligned with the radio socket before pushing to full depth.
- Plug the power adaptor into any standard 120 Volt 60 Hz electrical outlet. NOTE: Do not charge by means of an engine generator or DC power source. Use only 120V AC.
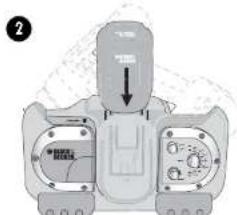
- Slide the power pack into the front of the unit as shown in Figure 2. Make sure the power pack is fully seated in the port and let the pack charge initially for 9 hours. After the initial charge, under normal usage, your power pack should be fully charged in 3 to 6 hours.
- The red charger light on the radio face (Figure 3) will light indicating that the charging process has started.
Important Charging Notes
- After normal usage, your power pack should be fully charged in 3 to 6 hours. If the pack is run-down completely, it may take up to 6 hours to become fully charged. Your power pack was sent from the factory in an uncharged condition. Before attempting to use it, it must be charged for at least 9 hours.
- DO NOT charge the power pack in an air temperature below 40^ (4.5^) or above 105^(+40.5^) . This is important and will prevent serious damage to the power pack. Longest life and best performance can be obtained if power packs are charged when air temperature is about 75^ .
- While charging, the charger may hum and become warm to touch. This is a normal condition and does not indicate a problem.
- If the power pack does not charge properly—(1) Check current at receptacle by plugging in a lamp or other appliance. (2) Check to see if receptacle is connected to a light switch which turns power off when you turn out the lights. (3) Move charger to a surrounding air temperature of 40^ (4,5^) or above 105^ (+40,5^) . (4) Check to see that the rod charging indicator light is lit on the face of the unit. (5) If the receptacle, surrounding temperature and charging indicator light are OK, and you do not get proper charging, take or send the power pad and radio charger to your local Black & Decker service center. See Tools Electric in yellow pages.
- The power pack should be recharged when it fails to produce sufficient power on jobs which were easily done previously. DO NOT CONTINUE using pack in a depleted condition.
- The power pack will reach optimum performance after being cycled 5 times during normal usage. There is no need to run the pack down completely before recharging. Normal usage is the best method of discharging and recharging.
- The exposed charging contacts of the radio charger can be accidentally shorted by foreign material. Foreign materials of a conductive nature such as, but not limited to, steel, wool, aluminum foil, or any buildup of metallic particles should be kept away from radio charger cavities. Unplug radio charger before attempting to clean it.
Maintenance Stage
The tickle charge feature of the radio charger allows the power pack to remain in the charger and ready for use. With the power adaptor connected to standard household current, the red charging indicator light will glow constantly. The radio charger will keep the power pack fully charged. A power pack will slowly lose its charge when kept out of the charger.
Using the Radio (Figure 4)
With the power adaptor connected to standard household current or a fully charged power pack inserted into the charging port of the radio charger:
-
Turn the On/Off Volume Control knob (I) clockwise to turn the radio on.
-
Turn the AM/FM Selector knob (J) to select an AM or FM station. Extend the antenna if the radio is tuned to an FM station. If reception is poor, fully extend antenna and rotate in all directions until reception improves. For AM stations try rotating the radio.
-
Turn the Station Selector knob (K) to change station frequency.
Important Radio Notes
-
The radio will run up to 12 hours on a single charge using an 18 volt power pack. (BDRC18) NOTE: The radio charger is an 18 volt only product (BDRC18) and will not accept packs of different voltages.
-
Reception will vary depending on location and strength of radio signal.
-
AM reception will most likely be clearer when powered by a battery.
Carrying the Radio Charger
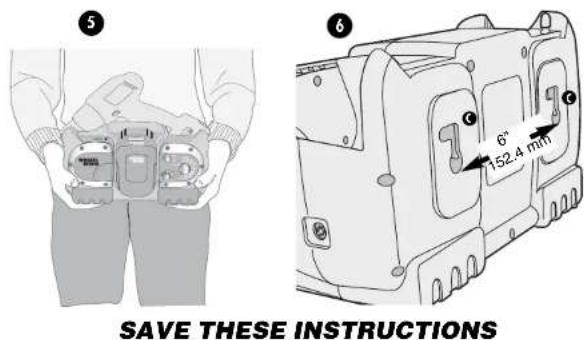
Figure 5 illustrates the recommended way to carry the radio charger
Wall Mounting
The radio charger can be hung on a vertical surface using the key hole mounting slots (C) shown in Figure 6. Mounting hardware should be installed 6 inches (152.4mm) apart.
CAUTION: Mount radio charger to a surface that will safely hold the weight of radio charger, drill and both batteries. Avoid mounting or storing your radio charger in the following areas:
- Areas that children can reach.
High traffic areas.
Humid or moist areas. - Areas subject to constant vibration.
Areas not well ventilated or dusty. - Areas exposed to direct sunlight or near appliances that generate heat.
Accessory Storage
Pull out storage trays (H) are located on the bottom front portion of the radio charger. These compartments are convenient for storing small items such as drill and screwdriver bits.
Service Notes
This product is not user serviceable. There are no user serviceable parts inside the radio/charger. Servicing at an authorized service center is required to avoid damage to static sensitive internal components.
To assure product SAFETY and RELIABILITY, repairs, maintenance and adjustment should be performed by certified service centers or other qualified service organizations, always using identical replacement parts.
The RBRC™ Seal
The RBRC™ (Rechargeable Battery Recycling Corporation) Seal on the nickel-cadmium battery (or battery pack) indicates that the costs to recycle the battery (or battery pack) at the end of its useful life have already been paid by Black & Decker. In some areas, it is illegal to place spent nickel-cadmium batteries in the trash or municipal solid waste stream and the RBRC program provides an environmentally conscious alternative.
RBRC in cooperation with Black & Decker and other battery users, has established programs in the United States and Canada to facilitate the collection of spent nickel-cadmium batteries. Help protect our environment and conserve natural resources by returning the spent nickel-cadmium battery to an authorized Black & Decker service center or to your local retailer for recycling. You may also contact your local recycling center for information on where to drop off the spent battery, or call 1-800-8-BATTERY.
Troubleshooting
Problem Possible Cause Possible Solution
- Unit will not start. - Battery not installed properly. - Check battery installation.
Battery not charged. Check battery charging
requirements.
ert battery into charger
until red LED appears.
ger into a working
outlet. Refer to "Important
Charging Notes" for more
details.
- Surrounding air temperature -Move charger and tool to a too hot or too cold, surrounding air temperature
of above 40 degree F(4,5°C)
or below 105 de
(+40,5^)
For assistance with your product, visit our website www.blackanddecker.com for the location of the service center nearest you or call the BLACK & DECKER help line at 1-800-544-6986.
Maintenance
Clean only with a dry cloth. IMPORTANT: To assure product SAFETY and RELIABILITY, repairs, maintenance and adjustment (other than those listed in this manual) should be performed by authorized service centers or other qualified service organizations, always using identical replacement parts.
Service Information
All Black & Decker Service Centers are staffed with trained personnel to provide customers with efficient and reliable power tool service. Whether you need technical advice, repair, or genuine factory replacement parts, contact the Black & Decker location nearest you. To find your local service location, refer to the yellow page directory under "Tools-Electric" or call:
1-800-544-6986 or vlslt www.blackanddecker.com
Full Two-Year Home Use Warranty
Black & Decker (U.S.) Inc. warrants this product for two years against any defects in material or workmanship. The defective product will be replaced or repaired at no charge in either of two ways.
The first, which will result in exchanges only, is to return the product to the retailer from whom it was purchased (provided that the store is a participating retailer). Returns should be made within the time period of the retailer's policy for exchanges (usually 30 to 90 days after the sale). Proof of purchase may be required. Please check with the retailer for their specific return policy regarding returns that are beyond the time set for exchanges.
The second option is to take or send the product (prepaid) to a Black & Decker owned or authorized Service Center for repair or replacement at our option. Proof of purchase may be required. Black & Decker owned and authorized Service Centers are listed under "Tools-Electric" in the yellow pages of the phone directory and available on our website www.blackanddecker.com.
This warranty does not apply to accessories. This warranty gives you specific legal rights and you may have other rights which vary from state to state. Should you have any questions, contact the manager of your nearest Black & Decker Service Center. This product is not intended for commercial use.
FREE WARNING LABEL REPLACEMENT: If your warning labels become illegible or are missing, call 1-800-544-6986 for a free replacement.
Imported by
Black & Decker (U.S.) Inc. 2017 Year Ended December 31, 2017
101E.30pp8K 7

BlackandDecker.com
1-800-544-6986
See 'Tools-Electrict
For Service & Sales

BLACK&DECKER
Chargeur radio
MODE D'EMPLOI
No de catalogue BDRC18 & BDRC140
MERCIDAVOIRCHOISIBLACK&DECKER!
VISITEZ WWW.BLACKANDDECKER.COM/NEWOWNER
POUR ENREGISTRER VOTRE NOUVEAU PRODUIT.
AVANT DE RETOURNER CE PRODUIT POUR QUELQUE
RAISON QUE CE SOIT, COMPOSER LE
1-800-544-6986
AVANT D'APPELER, AYEZ EN MAIN LE N° DE CATALOGUE ET LE CODE DE DATE. DANS LA PLUPART
DES CAS, UN REPRESENTANT DE BLACK & DECKER PEUT RÉSoudRE LE PROBÉME PAR
TELEPHONE SI VOUS AVEZ UNE SUGGESTION OU UN COMMENTAIRE, APPELEZ NOUS. VOS
IMPRESSIONS SONT CRUCIALES POUR BLACK & DECKER.
CONSERVER CE MANUEL POUR UN USAGE ULTERIEUR.
Col. Americana Sector Juarez
MEXICO.D.F. Col. Centro
Eje Central Lázaro Cardenas No. 18
(55)5588.9377
Local D.Col. Obrera
MERIDA.YUC
Calle 63 #459-A
(999) 928 5038
Col. Centro
MONTERREY, N.L.
OSQUES DE CIDROS ACCESO RADIATAS NO.42
COL. BOSQUES DE LAS LOMAS
05120 MEXICO. D.F.
TEL. (55)53-26-71-00


- BEFORE RETURNING THIS PRODUCT FOR ANY REASON PLEASE CALL 1-800-544-6986
- SAVE THIS MANUAL FOR FUTURE REFERENCE.
- WARNING
- Battery Cap Information
- COMPONENTS
- Charging the Power Pack
- Important Charging Notes
- Maintenance Stage
- Using the Radio (Figure 4)
- Important Radio Notes
- Carrying the Radio Charger
- Wall Mounting
- Accessory Storage
- Service Notes
- The RBRC™ Seal
- Troubleshooting
- Maintenance
- Service Information
- Full Two-Year Home Use Warranty
- BLACK&DECKER
- Chargeur radio
- MODE D'EMPLOI
- No de catalogue BDRC18 & BDRC140
- AVANT DE RETOURNER CE PRODUIT POUR QUELQUE
- RAISON QUE CE SOIT, COMPOSER LE
- 1-800-544-6986
- CONSERVER CE MANUEL POUR UN USAGE ULTERIEUR.
- MERIDA.YUC
Brand : BLACK & DECKER
Model : BDRC140
Category : Battery charger