
WS40SE1B - Home Theater System SONY - Free user manual and instructions
Find the device manual for free WS40SE1B SONY in PDF.
| Product type | Speaker mounting bracket for soundbar |
| Model | WS-40SE1B (compatible with WS-32SE1B, WS-46SE1B) |
| Brand | Sony |
| Intended use | Installation of the soundbar on the TV stand |
| Soundbar compatibility | SA-40SE1 (and SA-32SE1, SA-46SE1 depending on model) |
| TV compatibility | Specific Sony models (see provided compatibility list) |
| Bracket dimensions (40/46 A) | Approx. 334 x 227 x 35 mm (W x H x D) |
| Bracket dimensions (40/46 B, EU) | Approx. 332 x 232 x 35 mm (W x H x D) |
| Bracket weight (40/46 A) | Approx. 1.3 kg |
| Extension post weight (B) | Approx. 0.66 kg |
| Package contents | Mounting bracket (A), Post (B), Various screws (C, D, E, H, O), Clamp (F), Anti-tilt strap (G), Anchor bolts, manual |
| Installation method | Attachment to the TV stand using the provided screws; requires removal of the original stand |
| Anti-tilt system | Safety strap for wall or furniture attachment (included) |
| Maximum distance from wall | 25 cm (9 7/8 inches) to prevent tipping |
| Number of people required for installation | At least 2 people |
| Maintenance and cleaning | Soft cloth lightly dampened with mild detergent; avoid solvents and abrasives |
| Safety | Do not use with equipment other than specified; do not modify; do not mount on air conditioner; keep children away |
| Warranty | Refer to the provided warranty documents |
| Country of manufacture | Japan (Sony Corporation) |
Frequently Asked Questions - WS40SE1B SONY
User questions about WS40SE1B SONY
0 question about this device. Answer the ones you know or ask your own.
Ask a new question about this device
Download the instructions for your Home Theater System in PDF format for free! Find your manual WS40SE1B - SONY and take your electronic device back in hand. On this page are published all the documents necessary for the use of your device. WS40SE1B by SONY.
USER MANUAL WS40SE1B SONY
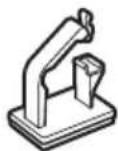
Speaker Attachment Bracket
Operating Instructions GB
Mode d'emploi FR
The instructions in this manual are for model WS-32SE1B/WS-40SE1B/WS-46SE1B. The illustrations used in this manual are of the WS-32SE1B model and they may be different from your model. Any differences in operation are marked in the manual as "WS-32SE1B model only".
Warning about installing the TV Sound Bar System to the TV stand
This WS-32SE1B/WS-40SE1B/WS-46SE1B speaker attachment bracket is used for SA-32SE1/SA-40SE1/SA-46SE1 TV Sound Bar System and the particular TV models only. Use with other products or for other purposes than those specified may cause damage or injury.
To Customers
Sufficient expertise is required for installing this product. Be sure to pay special attention to safety during the installation. Sony is not liable for any damages or injury caused by mishandling or improper installation, or installing anything other than the specified product. Your statutory rights (if any) are not affected.
On Safety
Products by Sony are designed with safety in mind. If the products are used incorrectly, however, it may result in a serious injury through fire, electric shock, the product toppling over, or the product dropping. Be sure to observe the precautions for safety to prevent such accidents.
WARNING
If the following precautions are not observed, serious injury or death through fire or electric shock, the product toppling over or falling can result.
Do not drop the products or install them where there is a possibility of them falling down.

- Be sure to subcontract installing, moving or dismounting the products to licensed contractors and keep small children away during the procedure.
- Unauthorized installation may result in serious injury or property damage.
- Having an unauthorized dealer carry or dismount the TV Sound Bar System or the TV Sound Bar System-installed TV may lead to the products' falling and result in serious injury or property damage. Make sure that two or more persons carry or dismount the product(s).
- Do not remove screws, etc., after mounting the TV Sound Bar System or the TV Sound Bar System-installed TV.
- Do not handle the products with excessive force during cleaning or maintenance.
Do not place any object on the products.

- Do not put anything on the products. If you do so, the system may fall and cause injury or property damage.
Do not lean or hang on the products.

- Do not lean or hang on the products, as they may fall on you and cause serious injury.
Pay attention to the location.

- Do not expose the products to rain or moisture, or spill liquid of any kind on them. It may cause a fire or electric shock.
- Never place the products in hot, humid or excessively dusty places, or in a place where they are subject to mechanical vibrations. Doing so may cause a fire or electric shock.
- Keep flammable objects or open flames (e.g., candles) away from the products.
- Do not install the products over or under an air conditioner. If the products are exposed to wind from the air conditioner for an extended period of time, or get wet by water leakage from the air conditioner, this may cause a fire, an electric shock, or malfunctions.
Do not allow the cords to be pinched.

- If the AC power cord (mains lead) or connecting cords are pinched between the products and the wall, floor, or other object, or bent or twisted by force, the internal conductors may become exposed and cause a short circuit or an electrical break. This may cause a fire or an electric shock.
- Do not step on the AC power cord (mains lead) or connecting cords when you carry the products. The cord may be damaged, and this may result in a fire or electric shock.
Do not cover the ventilation holes of the products.

- If you cover the ventilation holes (with a cloth, etc.), heat may build up inside and cause a fire.
Do not stumble over the cords.

- You may trip, or may cause the products to topple over and cause injury.
CAUTION
If the following precautions are not observed, injury or property damage may occur.
Do not install any equipment other than the specified product.
- The WS-32SE1B/WS-40SE1B/WS-46SE1B speaker attachment bracket is designed for use with the specified equipment only. If you install equipment other than that specified, it may fall or break, and cause injury.
- Do not modify the products.
- Do not place anything hot directly on the products. The heat may cause discoloration or deformation of the products.
Be sure to secure the TV Sound Bar System and TV.
- Secure the TV Sound Bar System and TV firmly when installing them together. Then, secure the TV Sound Bar System-installed TV firmly on the stand. If the TV Sound Bar System and TV are not installed securely, they may fall or topple over, and cause injury.
Do not apply weight to the products or subject them to any kind of impact.
- When installing the TV Sound Bar System to a TV stand, do not apply weight to the TV Sound Bar System or TV with your hand. Do not hit the TV Sound Bar System or TV with hard objects, such as a screwdriver, etc.
When moving the TV Sound Bar System-installed TV.

If you move the products forcefully, damage or injury may result. Be sure to follow the proper procedures and advice given below.
- Be sure that two or more persons carry the TV Sound Bar System-installed TV, and only after unplugging and removing the connected equipment.
-
Be careful not to allow your hands or feet to be pinched under the bottom of the TV Sound Bar System-installed TV.
-
Do not drag the TV Sound Bar System-installed TV. The base part may come off and damage the floor.
- When carrying the TV Sound Bar System-installed TV, do not hold it by the TV Sound Bar System. Doing so may cause damage or injury.
Notes on installation
- When assembling, spread a cloth on the floor to avoid damaging the floor.
- Install the products on a solid and flat floor.
- Be sure that two or more persons install the products. Doing it alone may result in an accident or injury.
- Be sure to keep children away during the process.
Be sure to install the products securely following the instructions.
- Tighten the screws securely. If the TV Sound Bar System is not installed securely, it may fall and cause damage or injury.
- Be careful not to pinch your fingers or hands when assembling the products.
Notes on cleaning
Clean with a soft cloth slightly moistened with a mild detergent solution. Do not use any type of abrasive pad, scouring powder or solvent such as thinner, benzine or alcohol.
If you have any questions or problems concerning this product, please consult your nearest Sony dealer.
Notice for customers: The following information is only applicable to equipment sold in countries applying EU Directives.
The manufacturer of this product is Sony Corporation, 1-7-1 Konan Minato-ku Tokyo, 108-0075 Japan. The Authorized Representative for EMC and product safety is Sony Deutschland GmbH, Hedelfinger Strasse 61, 70327 Stuttgart, Germany. For any service or guarantee matters please refer to the addresses given in separate service or guarantee documents.
Table of Contents
Unpacking 5
Setting Up 6
Installing the TV Sound Bar System on the TV stand 6
Preventing the TV from toppling over... 11
Adjusting the angle of the TV. 13
Specifications 14
Unpacking
- Operating Instructions (this manual)
- Compatible list (1)
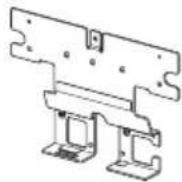
- Attachment bracket (A) - 32 A (For WS-32SE1B) (1)
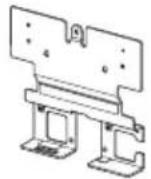
-40/46 A (For WS-40SE1B/WS-46SE1B) (1)
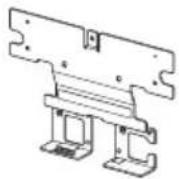
-40/46 B (For WS-40SE1B (Europe model only) /WS-46SE1B) (1)
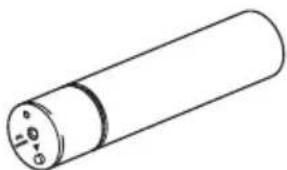
- Extension neck for TV stand (B) (1)
- Screw for attachment bracket (+PSW M5 × 12 ~mm) (C) (2)

- Screw for attachment bracket (Silver) (D) (2)

- Screw for TV stand head (+PSW M5 × 20 ~mm) (E) (3)

- Cable clamp (F) (2)
- Support belt (6) (1)
Screw for support belt (+PSWM4× 10mm) (3)1

Wood screw for support belt (M3.8× 20mm) (1)

- Anchor bolt (J) (2)

Setting Up
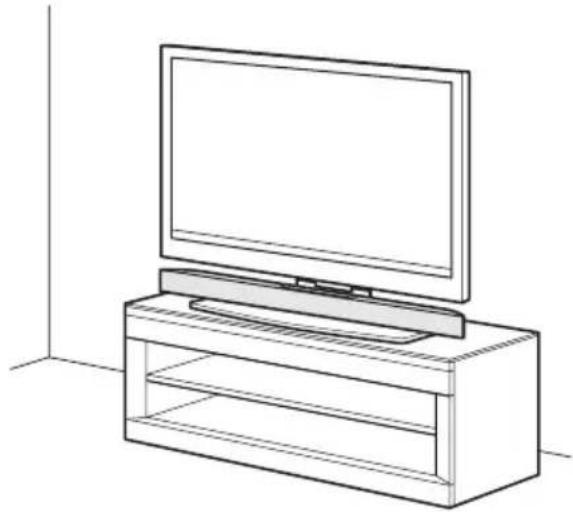
You can use this speaker attachment bracket to install the TV Sound Bar System on the TV stand.
Notes
- This speaker attachment bracket is designed for use with the stand supplied with TV only.
- This speaker attachment bracket cannot be used with the SU-FL71M/SU-FL71L floor stand.
- If you want to hang the SA-32SE1/SA-40SE1/SA-46SE1 TV Sound Bar System, hang it directly on the wall.
Installing the TV Sound Bar System on the TV stand
1 Remove the screws from the TV stand, then detach the TV from the TV stand.
2 Remove the screws from the original neck, then detach the original neck from the TV stand.
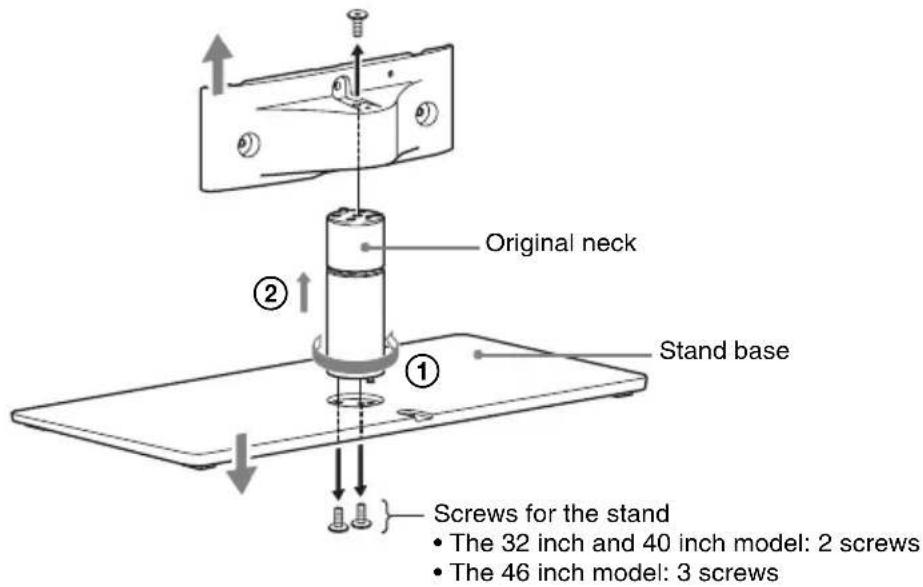
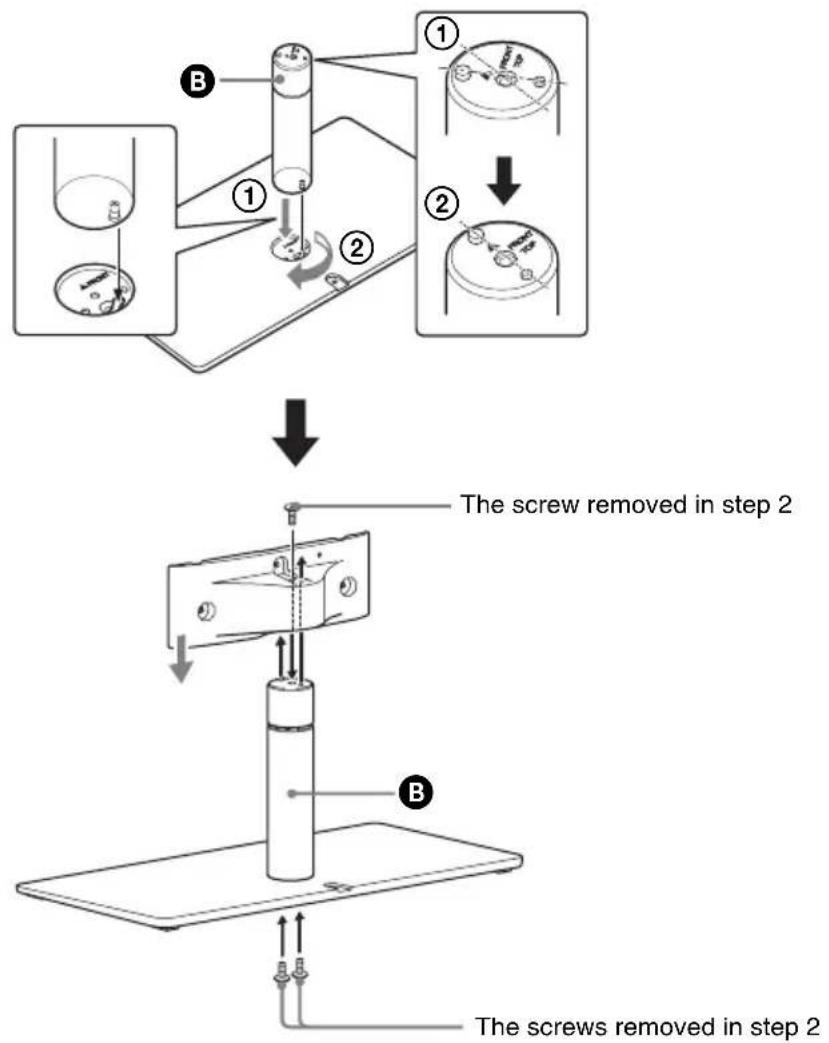
3 Install the extension neck for TV stand (B) to the TV stand using the screws removed in step 2.
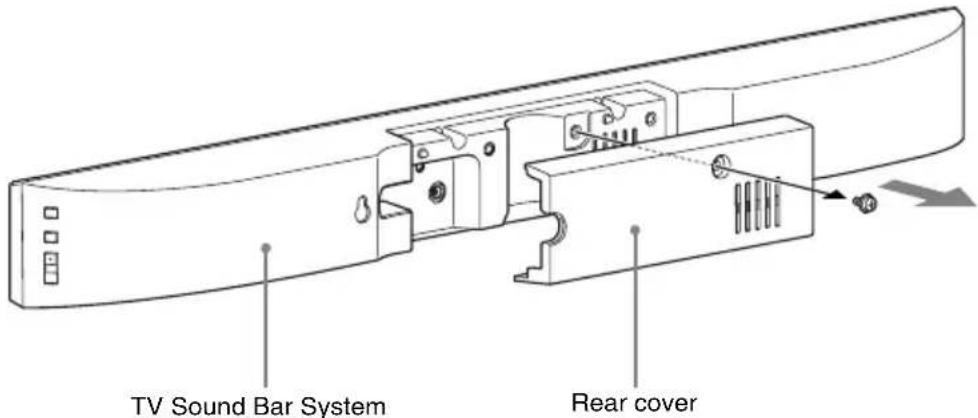
4 Remove the screw on the rear cover of the TV Sound Bar System, then remove the rear cover.
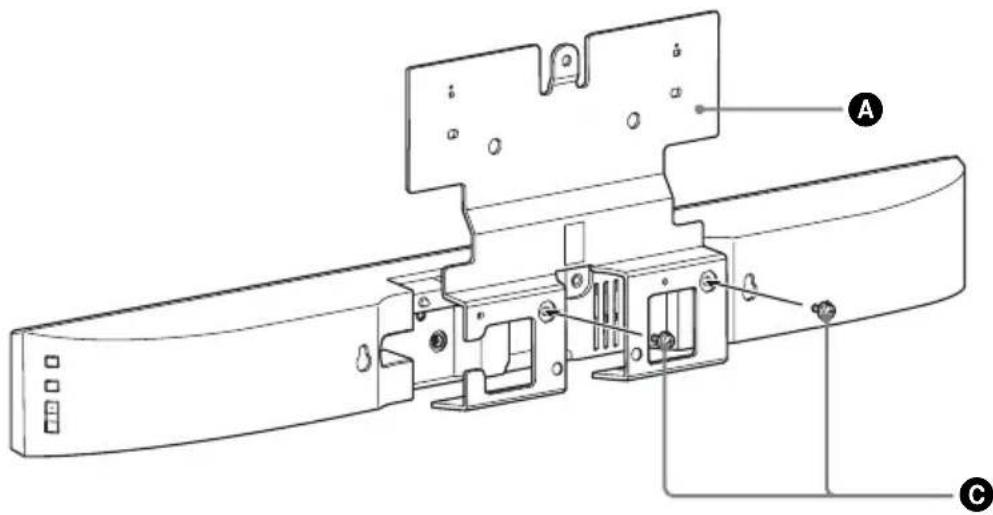
5 Mount the attachment bracket (A) to the TV Sound Bar System with the screw for attachment bracket (+PSW M5 × 12 mm) (C).
Check the engraving on the rear of the attachment bracket and use a suitable bracket for the TV. For details, refer to the supplied "Compatible list".
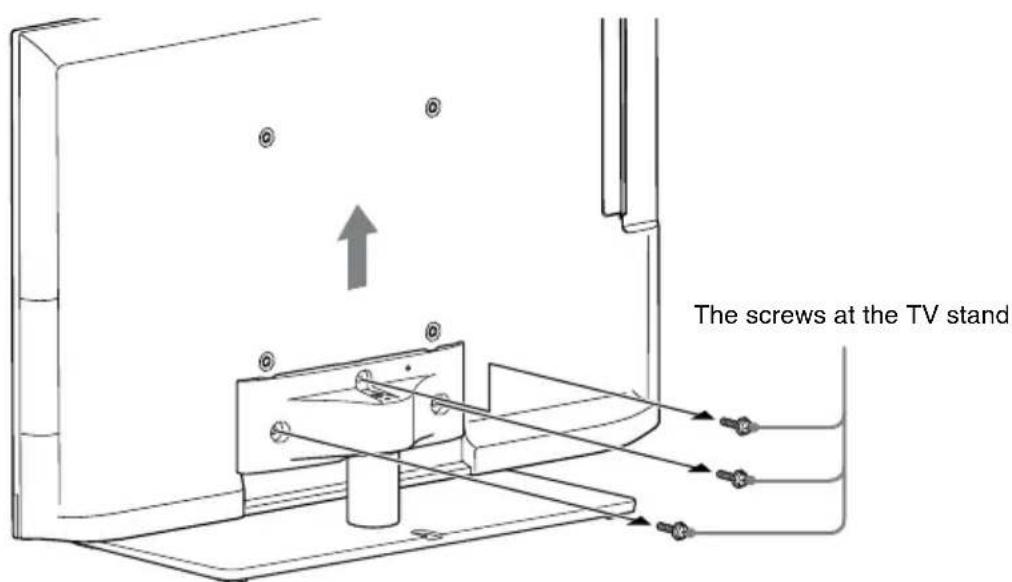
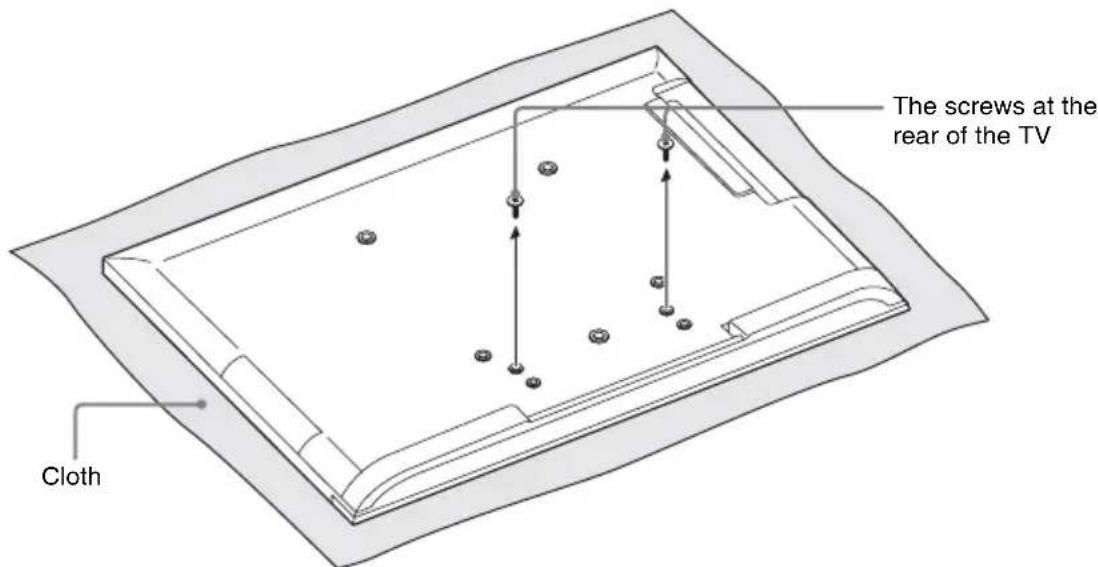
6 Remove the screws from the rear of the TV.
Be sure to place the TV on a soft thick cloth with the TV screen facing down to prevent damaging the surface of the LCD.
7 Mount the TV Sound Bar System to the TV with the screw for attachment bracket (Silver) (D).
Be sure to fasten the screws to the screw holes pointed with mark.

Notes
- After installation, the screw for attachment bracket (Silver) will protrude from the screw hole. This is not a malfunction.
- When carrying the TV Sound Bar System-installed TV, do not hold it by the TV Sound Bar System. Doing so may cause damage or injury.
8 Attach the TV to the TV stand.
Match the screw protrusion to the notch on the TV stand.
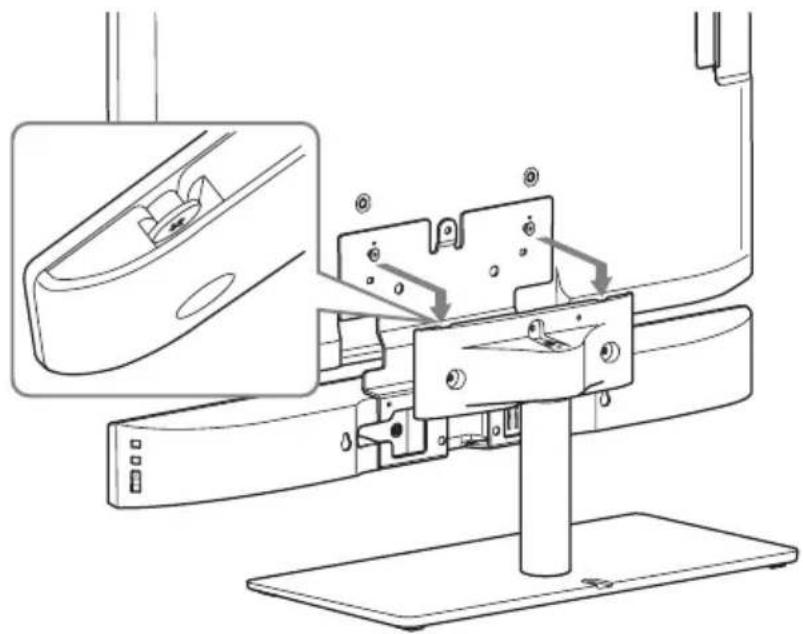
Note
When attaching the TV to the TV stand, make sure to hold the TV instead of the TV Sound Bar System.
9 Secure the TV to the TV stand with the screw for TV stand head (+PSW M5 × 20 mm) (E).
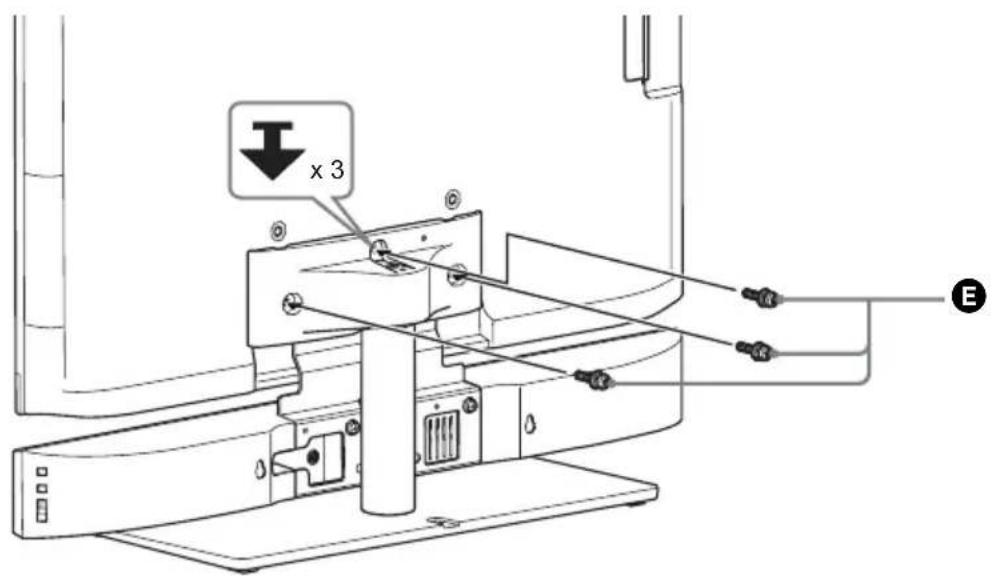
10 After you have made all connections, you can use the cable clamp (F) to neatly secure the cables.
Note
As a protective measure, secure the TV. For details, see "Preventing the TV from toppling over".
Preventing the TV from toppling over
As a protective measure, secure the TV. If you fail to do so, the TV may topple over resulting in serious injury.
Warning
To avoid injury, place the TV Sound Bar System-installed TV less than 25cm (9 7/8 in) from the wall, and firmly secure the TV to the wall.
Notes
- Be careful not to pinch your fingers when setting up the TV or rack.
- Install the TV after allowing for a space of less than 25cm (9 7/8 in) from the wall. The wall will prevent the TV from falling even if the TV leans backward towards the wall.
When installing the TV on a rack
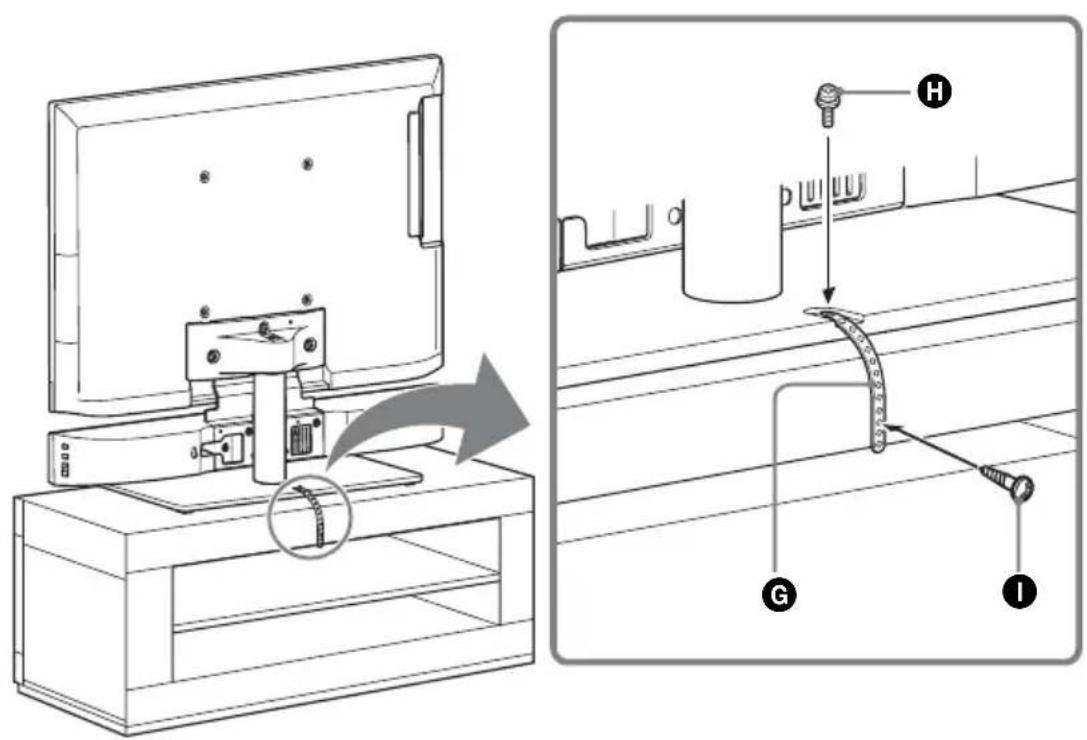
1 Place the TV on the center of the rack.
2 Fit the support belt (C) to the TV stand, then firmly fasten with the screw for support belt (+PSW M4 x 10 mm) (H) using a screw driver.
3 Fasten the support belt to the rack with the wood screw for support belt (M3.8 × 20 mm) (O).
Securing the TV to a wall
Prepare a strong string or chain (not supplied) and a fastener (not supplied) for fastening to the wall. Secure the fastener to a reinforced wall. Even if you have secured the TV to the rack, be sure to secure it to a wall by following this procedure.
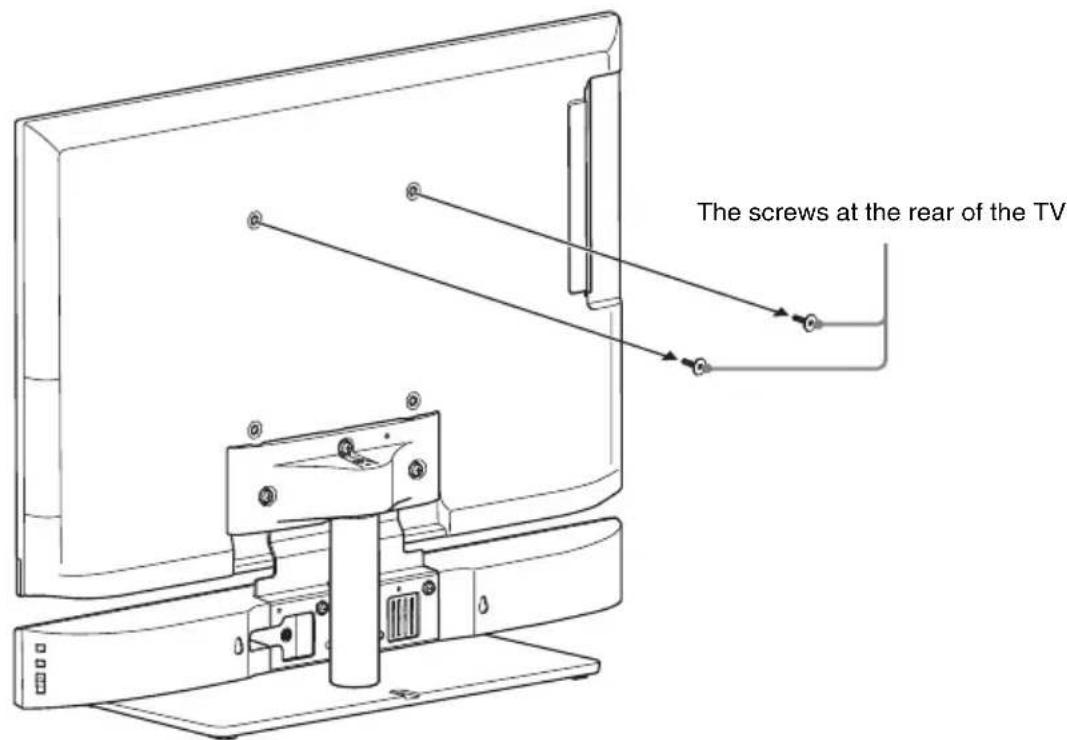
1 Remove the screws from the rear of the TV.
2 Fasten the anchor bolt () to the rear of the TV.
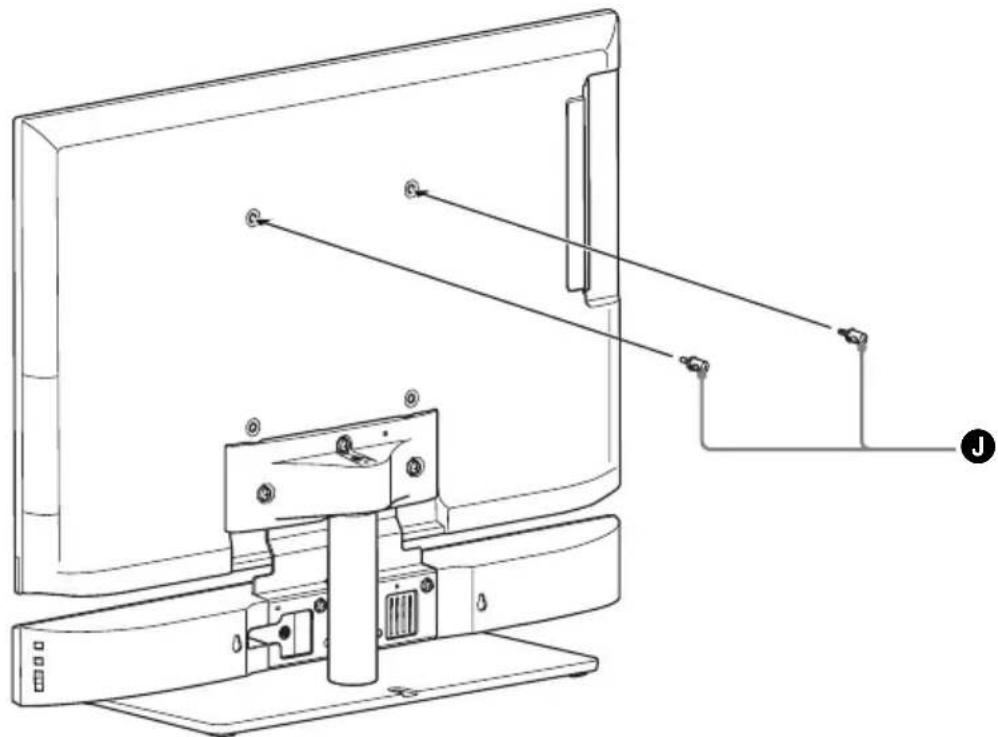
3 Secure the fastener to the reinforced wall (①), and then thread the string or chain through the holes of the anchor bolt and the fastener (②). Firmly tie both ends of the string or chain together.
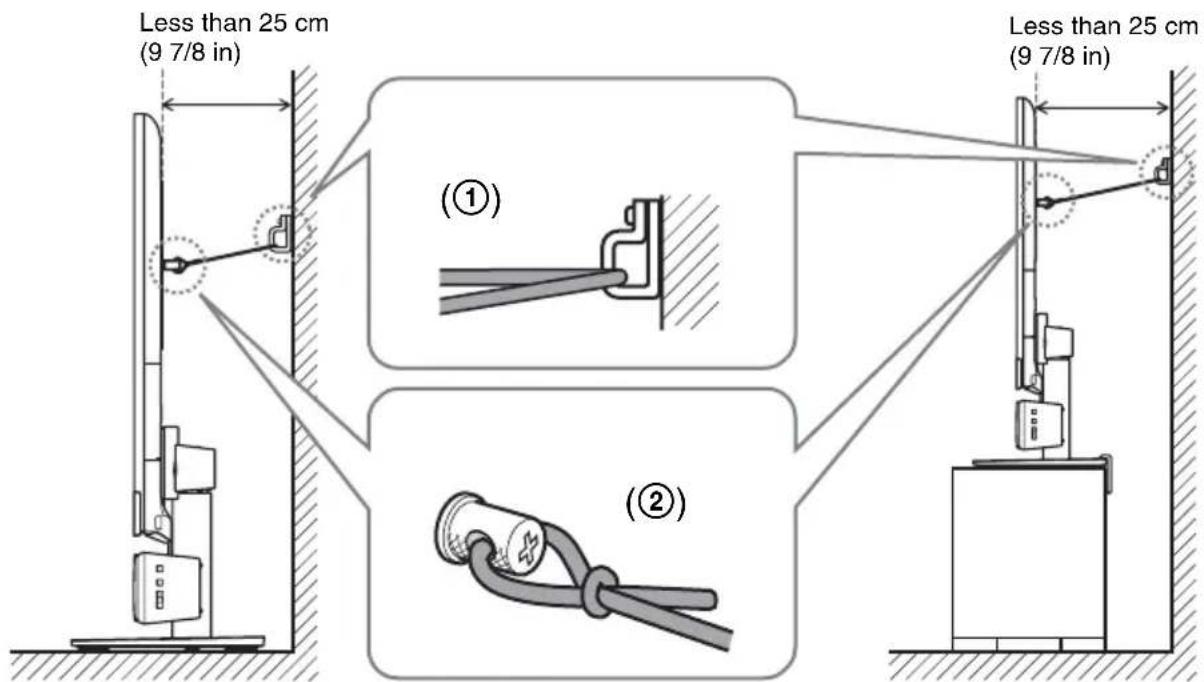
TV installed on the floor TV installed on a rack
Adjusting the angle of the TV

Specifications
Attachment bracket 32 A
Dimensions (w/h/d) (approx.)
$$ \begin{array}{l} 2 5 0 \mathrm {m m} \times 2 1 6 \mathrm {m m} \times \ 3 5 \mathrm {m m} (9 7 / 8 \mathrm {i n} \times 8 5 / 8 \mathrm {i n} \ \times 1 7 / 1 6 \text {i n}) \ \end{array} $$
Mass (approx.) 1.1kg 2 lb 7 oz
Attachment bracket 40/46 A
Dimensions (w/h/d) (approx.)
$$ \begin{array}{l} 3 3 4 \mathrm {m m} \times 2 2 7 \mathrm {m m} \times \ 3 5 \mathrm {m m} (1 3 1 / 4 \mathrm {i n} \times 9 \mathrm {i n} \ \times 1 7 / 1 6 \text {i n}) \ \end{array} $$
Mass (approx.) 1.3kg 2 lb 14 oz
Attachment bracket 40/46 B (Europe model only)
Dimensions (w/h/d) (approx.)
$$ \begin{array}{l} 3 3 2 \mathrm {m m} \times 2 3 2 \mathrm {m m} \times \ 3 5 \mathrm {m m} (1 3 1 / 8 \mathrm {i n} \times 9 1 / 4 \mathrm {i n} \ \times 1 7 / 1 6 \text {i n}) \ \end{array} $$
Mass (approx.) 1.3kg 2 lb 14 oz)
Extension neck for TV stand
Dimensions (approx.)
$$ \begin{array}{l} \phi 4 3 \mathrm {m m} \times 2 1 6. 8 \mathrm {m m} \ (\phi 1 3 / 4 \mathrm {i n} \times 8 5 / 8 \mathrm {i n}) \ \end{array} $$
Mass (approx.) 0.66kg 1 lb 8 oz)
Design and specifications are subject to change without notice.
Dimensions (environment)
43 ~mm × 216,8 ~mm
( 13 / 4 pouces × 85 / 8
pouces)

- Speaker Attachment Bracket
- Warning about installing the TV Sound Bar System to the TV stand
- To Customers
- On Safety
- WARNING
- Do not drop the products or install them where there is a possibility of them falling down.
- Do not place any object on the products.
- Do not lean or hang on the products.
- Pay attention to the location.
- Do not allow the cords to be pinched.
- Do not cover the ventilation holes of the products.
- Do not stumble over the cords.
- CAUTION
- Do not install any equipment other than the specified product.
- Be sure to secure the TV Sound Bar System and TV.
- Do not apply weight to the products or subject them to any kind of impact.
- When moving the TV Sound Bar System-installed TV.
- Notes on installation
- Be sure to install the products securely following the instructions.
- Notes on cleaning
- Notice for customers: The following information is only applicable to equipment sold in countries applying EU Directives.
- Table of Contents
- Unpacking 5
- Setting Up 6
- Specifications 14
- Unpacking
- Setting Up
- Notes
- Installing the TV Sound Bar System on the TV stand
- Remove the screws from the rear of the TV.
- Mount the TV Sound Bar System to the TV with the screw for attachment bracket (Silver) (D).
- Attach the TV to the TV stand.
- Note
- Secure the TV to the TV stand with the screw for TV stand head (+PSW M5 × 20 mm) (E).
- After you have made all connections, you can use the cable clamp (F) to neatly secure the cables.
- Preventing the TV from toppling over
- When installing the TV on a rack
- Securing the TV to a wall
- Remove the screws from the rear of the TV.
- Fasten the anchor bolt () to the rear of the TV.
- Secure the fastener to the reinforced wall (①), and then thread the string or chain through the holes of the anchor bolt and the fastener (②). Firmly tie both ends of the string or chain together.
- Adjusting the angle of the TV
- Specifications
- Attachment bracket 32 A
- Attachment bracket 40/46 A
- Attachment bracket 40/46 B (Europe model only)
- Extension neck for TV stand
Brand : SONY
Model : WS40SE1B
Category : Home Theater System