
TL7612 - Headphones AT&T - Free user manual and instructions
Find the device manual for free TL7612 AT&T in PDF.

| Product Type | Car radio with USB player, iPod/iPhone, Bluetooth and FM/AM tuner |
| Brand | AT&T |
| Model | TL7612 |
| Installation dimensions (W x H x D) | 182 x 53 x 107 mm |
| Panel dimensions (W x H x D) | 188 x 59 x 13 mm |
| Weight | 0.65 kg (without accessories) |
| Power supply | DC 14.4 V (11 to 16 V allowable), negative ground |
| Max output power | 50 W per channel |
| Load impedance | 4 Ω (4 to 8 Ω allowable) |
| Frequency response | 40 Hz to 20,000 Hz |
| Signal-to-noise ratio | 80 dB |
| FM tuner | 87.5 to 108.0 MHz (50 kHz steps) |
| AM tuner | MW: 531 to 1,611 kHz, LW: 153 to 279 kHz (9 kHz steps) |
| USB compatibility | USB 1.1/2.0, MP3/WMA/WAV files, up to 20,480 files |
| iPod/iPhone compatibility | iPod touch (1-4G), iPod classic, iPod nano (1-6G), iPhone (original to 4S) |
| Bluetooth | Via KS-BTA100 adapter (sold separately) |
| Equalizer | Presets (Flat, Natural, Dynamic, Vocal Boost, Bass Boost, User) and Pro equalizer (adjustable Bass, Middle, Treble) |
| Auxiliary input | AUX 3.5 mm jack (3-pole mini stereo plug) |
| Display | OLED or LCD (unspecified) with scrolling |
| Maintenance | Clean the faceplate with a silicone dry cloth or soft cloth; clean the connector with a cotton swab |
| Safety | Do not use distracting functions while driving; adjust volume to hear outside sounds |
| Supplied accessories | Faceplate, mounting sleeve, trim plate, wiring harness, extraction keys |
| Operating temperature | 0 °C to +40 °C |
| General information | Compliant with EMC Directive 2004/108/EC; manufactured by JVC KENWOOD Corporation |
Frequently Asked Questions - TL7612 AT&T
User questions about TL7612 AT&T
0 question about this device. Answer the ones you know or ask your own.
Ask a new question about this device
Download the instructions for your Headphones in PDF format for free! Find your manual TL7612 - AT&T and take your electronic device back in hand. On this page are published all the documents necessary for the use of your device. TL7612 by AT&T.
USER MANUAL TL7612 AT&T
MANUEL D'INSTRUCTIONS
JVC KENWOOD Corporation
Made for

iPod

iPhone
Please read all instructions carefully before operation to obtain the best possible performance from the unit.
Information on Disposal of Old Electrical and Electronic Equipment and Batteries (applicable for EU countries that have adopted separate waste collection systems)
Products and batteries with the symbol (crossed-out wheeled bin) cannot be disposed as household waste.
Old electrical and electronic equipment and batteries should be recycled at a facility capable of handling these items and their waste by-products.
Contact your local authority for details in locating a recycle facility nearest to you. Proper recycling and waste disposal will help conserve resources whilst preventing detrimental effects on our health and the environment.
Notice:
The sign "Pb" below the symbol for batteries indicates that this battery contains lead.

Warning
Do not operate any function that takes your attention away from safe driving.

Caution
Volume setting:
- Adjust the volume so that you can hear sounds outside the car to prevent accident.
- Lower the volume before playing digital sources to avoid damaging the speakers by the sudden increase of the output level.
General:
- Avoid using the USB device or iPod/iPhone if it might hinder driving safety.
- Make sure all important data has been backed up. We shall bear no responsibility for any loss of recorded data.
- Never put or leave any metallic objects (such as coins or metal tools) inside the unit, to prevent a short circuit.
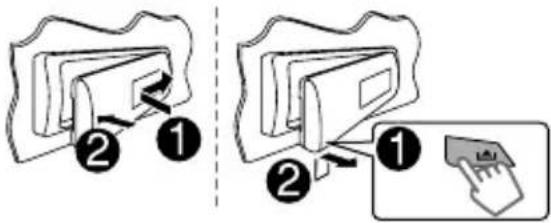
- USB rating is indicated on the main unit. To view, detach the faceplate.
How to attach/detach the faceplate
How to reset your unit
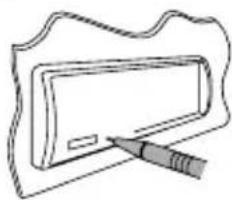
natural_image
Simple line drawing of a rectangular object with a pen inserted, no text or symbols presentYour preset adjustments will also be erased.
Maintenance
Cleaning the unit
Wipe off dirt on the faceplate with a dry silicon or soft cloth.
Cleaning the connector
Detach the faceplate and clean the connector with a cotton swab gently, taking care not to damage the connector.
How to read this manual:
- This manual mainly explains operations using the buttons on the faceplate.
- < > indicates the displays on the faceplate.
- [XX] indicates the initial setting of a menu item.
Contents
Preparation 4
Canceling the display demonstration Setting the clock
Basic operations 4
Radio 6
USB 8
iPod/iPhone 9
External components 10
Bluetooth ^® 10
Sound adjustments 11
Menu operations 11
Additional information 13
Troubleshooting 15
Specifications 16
Installation/Connection 17
Preparation
Canceling the display demonstration
The display demonstration is always turned on unless you cancel it.
1

(Hold)

2


3 Select


4 Press MENU to exit.
Setting the clock
1

(Hold)

2 Select


3 Select


4 Select the day of week.


(Initial setting)
5 Adjust the hour.


6 Adjust the minute.


7 Select <24H/12H>.


8 Select <24 HOUR> or <12 HOUR>.
9 Press MENU to exit.
Basic operations

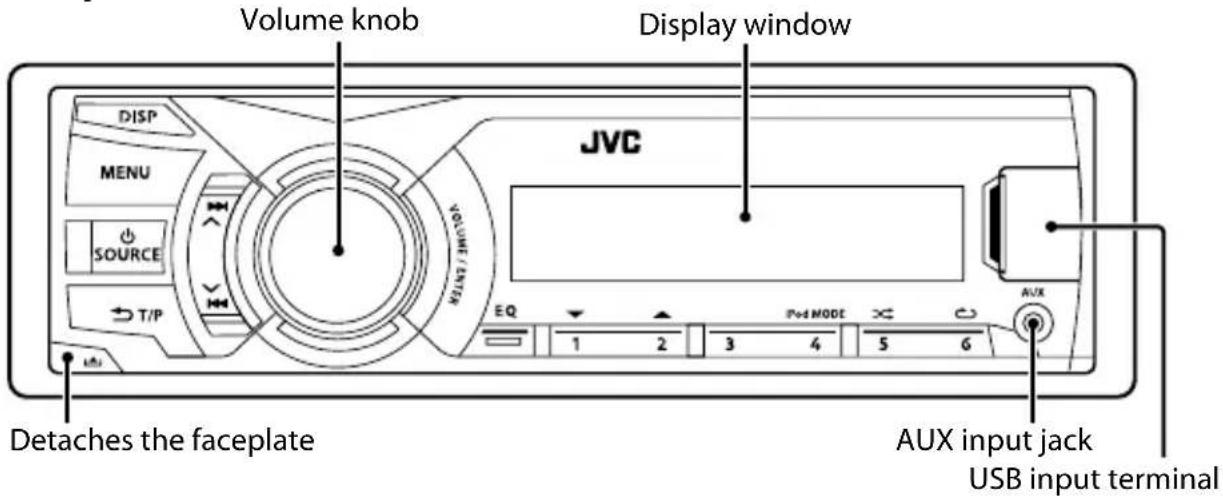
Display information

Changes the display information. (Press) Scrolls the current display information. (Hold)
| Source Display | |
| FM/AM | Station name (PS) *1 ➔ Frequency ➔ Programme type (PTY) *1 ➔ Day/Clock ➔ (back to the beginning) |
| USB | Album title/Artist ➔ Track title ➔ Track no./Playing time ➔ Day/Clock ➔ (back to the beginning) |
| USB-IPOD (HEAD MODE/IPOD MODE) | |
| USB-IPOD (EXT MODE) | EXT MODE ⇌ Day/Clock |
| AUX | AUX ⇌ Day/Clock |
| BT AUDIO | BT AUDIO ⇌ Day/Clock |
*1 For FM Radio Data System stations only.
Faceplate
When you press or hold the following button(s)...
| Button General function | |
| SOURCE | Turns on. (Hold)Turns off. (Hold)Press theSOURCEbutton on the faceplate and turn the volume knob within 2 seconds to select the source.Press repeatedly to select the source. |
| Volume knob (turn) | Adjusts the volume level.Selects items. |
| Volume knob (press) | Mutes the sound or pauses playback.Press the button again to cancel muting or resume playback.Confirms selection. |
| Number buttons (1 - 6) | Selects the preset stations.Stores the current station into the selected number button. (Hold)(page 6) |
| EQ | Selects the preset sound mode. (page 11) |
| T/P | Activates/deactivates TA Standby Reception. (page 7)Enters PTY Search mode. (Hold) (page 7)Returns to the previous menu. |
| ▲ / ▼ | Selects MP3/WMA/WAV folder. (page 8) |
| / ∧ | Searches for a station automatically. (page 6)Searches for a station manually. (Hold)Selects track. (page 8, 9)Fast-forwards or reverses track. (Hold) |
Radio
Searching for a station
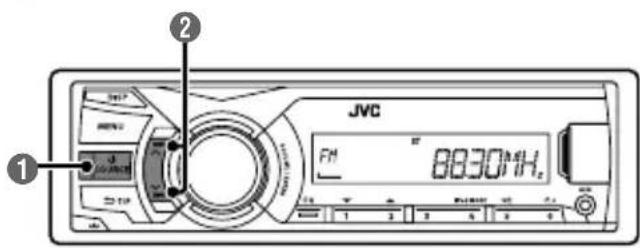
1 Select
② Auto search. (Press)
Manual search. (Hold)
"M" flashes, then press the button repeatedly.
"ST" lights up when receiving an FM stereo broadcast with sufficient signal strength.
Storing stations in memory
Manual presetting
You can preset up to 18 stations for FM and 6 stations for AM.
While listening to a station...

The preset number flashes and "MEMORY" appears. The current station is stored to the selected number button (1 - 6).
1

"PRESET MODE" flashes.
2 Select preset number.

The preset number flashes and "MEMORY" appears.
☐ Auto presetting (FM only) SSM (Strong-station Sequential Memory)
You can preset up to 18 stations for FM.
1

2

→
→
"SSM" flashes. When all the stations are stored, "SSM" stops flashing.
To preset
Selecting a preset station
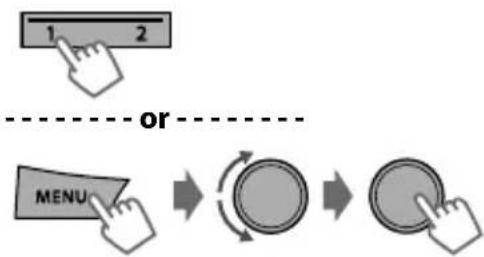
flowchart
graph LR
    A["1"] --> B["2"]
    C["MENU"] --> D["or"]
    D --> E[" rotating Circle"]
    E --> F[" rotating Circle with Arrow"]
Setting the Radio Timer
You can tune in to a preset station at a specific time regardless of the current source.
1

2

→
[OFF] Cancels Radio Timer.
ONCE Activates once.
DAILY Activates daily.
WEEKLY Activates weekly.
3 Select the preset station.

→
<01> ... <18> for FM/
<01> ... <06> for AM
4 Set the activation day and time.

5 Press MENU to exit.
• lights up after the Radio Timer has been set.
- Only one timer can be set. Setting a new timer will override the previous setting.
- The Radio Timer will not activate if the unit is turned off or if
The following features are available only for FM Radio Data System stations.
Searching for your favorite Programmes—Programme Type (PTY) Search
1 T/P (Hold)
2 Select a PTY code.

PTY Search starts.
If there is a station broadcasting a programme of the same PTY code as you have selected, that station is tuned in.

PTY codes
NEWS, AFFAIRS, INFO, SPORT, EDUCATE, DRAMA, CULTURE, SCIENCE, VARIED, POP M (music), ROCK M (music), EASY M (music), LIGHT M (music), CLASSICS, OTHER M (music), WEATHER, FINANCE, CHILDREN, SOCIAL, RELIGION, PHONE IN, TRAVEL, LEISURE, JAZZ, COUNTRY, NATION M (music), OLDIES, FOLK M (music), DOCUMENT
Activating TA/News Standby Reception
Standby Reception allows the unit to switch temporarily to Traffic Announcement (TA) or NEWS programme from any source other than AM.
TA Standby Reception

| TP indicator TA Standby Reception | |
| Lights up | The unit will temporarily switch to Traffic Announcement (TA) if available. |
| Flashes | Not yet activated. Tune in to another station providing the Radio Data System signals. |
• To deactivate, press T/P again.
NEWS Standby Reception


The unit will temporarily switch to News Programme if available.
- If the volume is adjusted during reception of Traffic Announcement or News Bulletin or Alarm, the adjusted volume is automatically memorized. It will be applied the next time the unit switches to Traffic Announcement or News.
Tracking the same programme —Network-Tracking Reception
When driving in an area where FM reception is not sufficient enough, this unit automatically tunes in to another FM Radio Data System station of the same network, possibly broadcasting the same programme with stronger signals.


| [AF ON] | Automatically searches for another station broadcasting the same programme in the same Radio Data System network with better reception when the current reception is poor. |
| AF-REG ON | Switches to another station only in the specific region using the AF control. |
| OFF | Cancels. |
* AF-REG: Alternative Frequencies-Regional
Automatic station selection—Programme Search
When the signal of a preset station you have selected is weak, this unit searches for another station possibly broadcasting the same programme as the original preset station is broadcasting.
USB
Playing a USB device
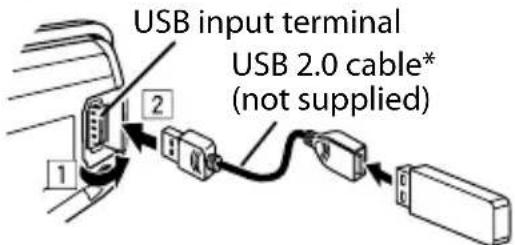
The source changes to "USB" and playback starts.
* Do not leave the cable in the car when not in use.
- This unit can play MP3/WMA/WAV files stored in USB mass storage device (such as a USB memory and Digital Audio Player).
Selecting a folder/track

Selects folder.

- Selects track. (Press)
- Fast-forwards or reverses the track. (Hold)
Selecting a track/folder from the list
1

2 Select a folder. (For MP3/WMA/WAV)

Select the desired list. (For JVC Playlist Creator (JPC) and JVC Music Control (JMC) file) ( page 14)

PLAYLISTS, ARTISTS, ALBUMS, SONGS, GENRES
3 Select a track.

If the USB device contains many folders or tracks, you can fast search for the desired folder or track by turning the volume knob quickly.
Selecting the playback modes
You can select one of the following playback modes at a time.
1

Press 6 for REPEAT. Press 5 for RANDOM.
2 Press the button repeatedly.
REPEAT

| RPT OFF Cancels repeat playback. |
| TRACK RPT Repeats current track. |
| FOLDER RPT Repeats current folder. |
- "FOLDER RPT" is not applicable for JPC/JMC file.
RANDOM

| RND OFF Cancels random playback. | |
| FOLDER RND | Randomly plays all tracks of current folder, then tracks of next folders. |
| ALL RND Randomly plays all tracks. | |
iPod/iPhone
Playing an iPod/iPhone
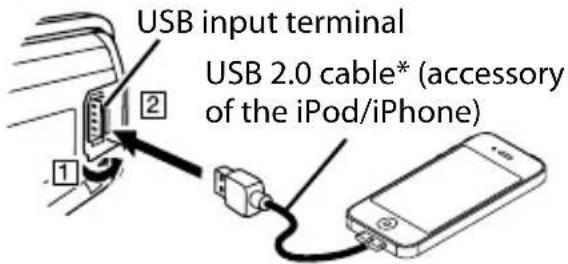
The source changes to "USB" "USB-IPOD" and playback starts (depending on the status of the connected device).
* Do not leave the cable in the car when not in use.
Selecting the control mode

/
- MANUEL D'INSTRUCTIONS
- Information on Disposal of Old Electrical and Electronic Equipment and Batteries (applicable for EU countries that have adopted separate waste collection systems)
- Notice:
- Warning
- Caution
- Volume setting:
- General:
- How to attach/detach the faceplate
- How to reset your unit
- Maintenance
- Cleaning the unit
- Cleaning the connector
- How to read this manual:
- Contents
- Preparation
- Canceling the display demonstration
- Setting the clock
- Basic operations
- Display information
- Radio
- Searching for a station
- Storing stations in memory
- Manual presetting
- ☐ Auto presetting (FM only) SSM (Strong-station Sequential Memory)
- Selecting a preset station
- Setting the Radio Timer
- Searching for your favorite Programmes—Programme Type (PTY) Search
- PTY codes
- Activating TA/News Standby Reception
- TA Standby Reception
- NEWS Standby Reception
- Tracking the same programme —Network-Tracking Reception
- Automatic station selection—Programme Search
- USB
- Playing a USB device
- Selecting a folder/track
- Selecting a track/folder from the list
- Selecting the playback modes
- iPod/iPhone
- Playing an iPod/iPhone
- Selecting the control mode
Brand : AT&T
Model : TL7612
Category : Headphones