
CDP-XA30ES - CD Player SONY - Free user manual and instructions
Find the device manual for free CDP-XA30ES SONY in PDF.


| Brand | Sony |
| Model | CDP-XA30ES |
| Product Type | CD Player |
| Dimensions (W x H x D) | 430 x 125 x 375 mm |
| Weight | 13.5 kg |
| Power Supply | 220-240 V, 50/60 Hz |
| Power Consumption | 20 W (standby < 0.5 W) |
| Signal-to-Noise Ratio | 120 dB |
| Dynamic Range | 100 dB |
| Total Harmonic Distortion | 0.0015 % |
| Frequency Response | 2 Hz - 20 kHz |
| Analog Outputs | 1 fixed stereo RCA pair, 1 variable stereo RCA pair |
| Digital Outputs | 1 coaxial, 1 optical |
| Main Functions | CD playback, 20-track programming, repeat, random play, index search, fader and balance |
| Care and Cleaning | Clean with a soft, dry cloth. Do not use solvents. |
| Safety | Do not expose to moisture or heat source. Unplug before cleaning. |
| Spare parts and repairability | Available from Sony authorized centers. Repairability index not communicated. |
Frequently Asked Questions - CDP-XA30ES SONY
User questions about CDP-XA30ES SONY
0 question about this device. Answer the ones you know or ask your own.
Ask a new question about this device
Download the instructions for your CD Player in PDF format for free! Find your manual CDP-XA30ES - SONY and take your electronic device back in hand. On this page are published all the documents necessary for the use of your device. CDP-XA30ES by SONY.
USER MANUAL CDP-XA30ES SONY
Operating Instructions
To avoid electrical shock, do not open the cabinet. Refer servicing to qualified personnel only. Do not install the appliance in a confined space, such as a bookcase or built-in cabinet.
CLASS 1 LASER PRODUCT LUOKAN 1 LASERLAITE KLASS 1 LASERAPPARAT
This appliance is classified as a CLASS 1 LASER product.
The CLASS 1 LASER PRODUCT MARKING is located on the rear exterior.
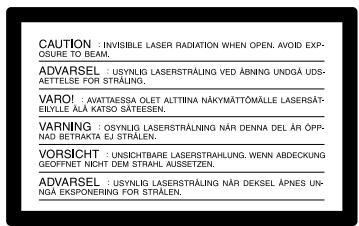
The following caution label is located inside the unit.
Welcome!
Thank you for purchasing the Sony Compact Disc Player. Before operating the unit, please read this manual thoroughly and retain it for future reference.
About This Manual
The instructions in this manual are for models CDP-XA50ES and CDP-XA30ES. The CDP-XA50ES is the model used for illustration purposes, unless otherwise mentioned. Any difference in operation is clearly indicated in the text, for example, “CDP-XA50ES only.”
Conventions
- Instructions in this manual describe the controls on the player. You can also use the controls on the remote if they have the same or similar names as those on the player.
- The following icons are used in this manual:

Indicates that you can do the task using the remote.

Indicates hints and tips for making the task easier.
TABLE OF CONTENTS
Getting Started
Unpacking....4
Hooking Up the System 4
Playing a CD 6
Playing CDs
Customising the Sound of Your Music (Digital Filter Function) 8
Using the Display 10
Locating a Specific Track 11
Locating a Particular Point in a Track 12
Playing Tracks Repeatedly 12
Playing in Random Order (Shuffle Play) 13
Creating Your Own Programme (Programme Play) 14
Playing Only Specific Tracks (Delete Play) 16
Recording From CDs
Recording Your Own Programme 17
Recording a CD by Specifying Tape Length (Time Edit/Just Edit) 18
Fading In or Out....19
Useful Tips for Recording 21
Storing Information About CDs (Custom Files)
What You Can Do With the Custom Files 22
Indexing a Disc (Custom Index) 22
Storing Specific Tracks of a Disc (Delete Bank) 24
Additional Information
Precautions 26
Notes on CDs....26
Troubleshooting 27
Specifications 27
Index
Index 28
Unpacking
Check that you received the following items:
• Audio connecting cord (1) - Remote commander (remote) (1) - Sony SUM-3 (NS) batteries (2) - Stabiliser (1)
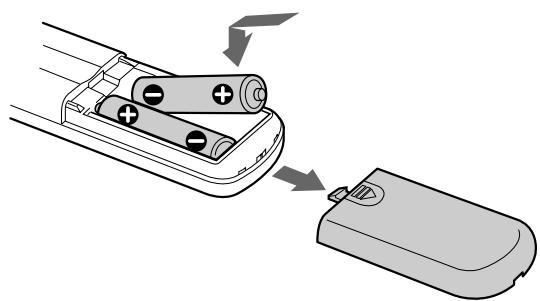
Inserting batteries into the remote
You can control the player using the supplied remote. Insert two R6 (size AA) batteries by matching the + and - on the batteries. When using the remote, point it at the remote sensor on the player.

When to replace batteries
With normal use, the batteries should last for about six months. When the remote no longer operates the player, replace all the batteries with new ones.
Notes
- Do not leave the remote near an extremely hot or humid place.
- Do not drop any foreign object into the remote casing, particularly when replacing the batteries.
- Do not expose the remote sensor to direct sunlight or lighting apparatuses. Doing so may cause a malfunction.
- If you don't use the remote for an extended period of time, remove the batteries to avoid possible damage from battery leakage and corrosion.
Hooking Up the System
Overview
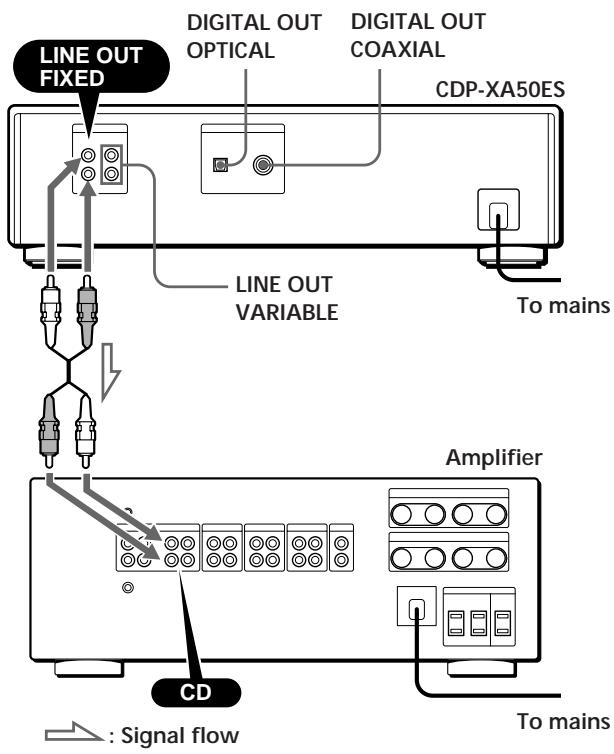
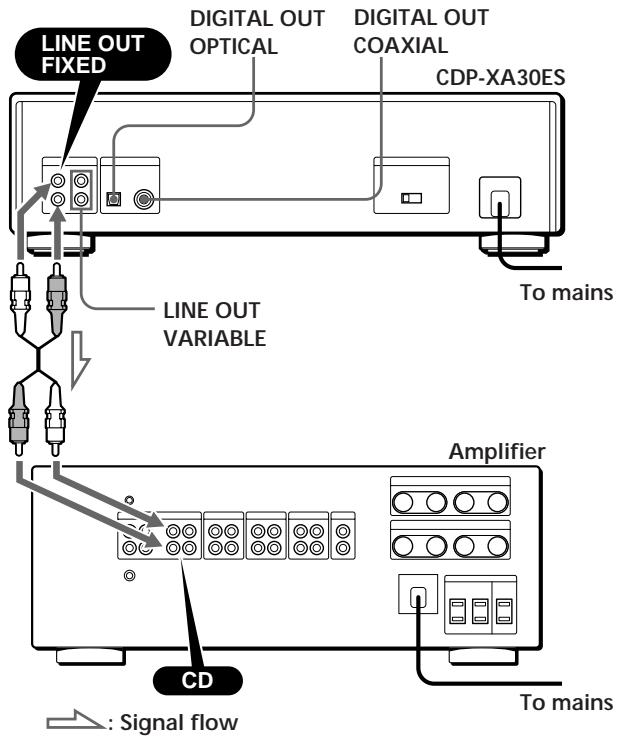
This section describes how to hook up the CD player to an amplifier. Be sure to turn off the power of each component before making the connections.
What cords will I need?
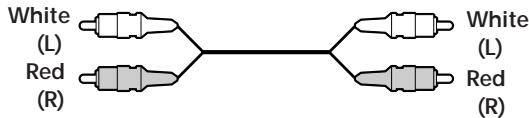
When making analog hookups
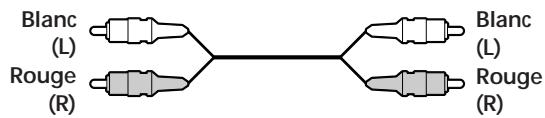
Audio cord (supplied) (1)
When making digital hookups
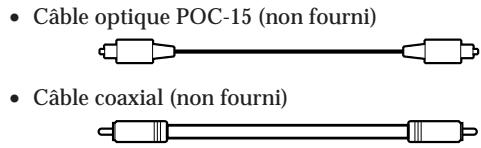
Optical cable POC-15 (not supplied)

Coaxial cable (not supplied)

Hookups
When making analog hookups
When connecting an audio cord, be sure to match the colour-coded cord to the appropriate jacks on the components: Red (right) to Red and White (left) to White. Be sure to make connections firmly to avoid hum and noise.
![graph LR A["CD player"] --> B["FIXED VARIABLE"] B --> C["L"] B --> D["R"] C --> E["L"] D --> F["R"] G["Amplifier"] --> H["INPUT"] H --> I["CD"] I --> J["L"] I --> K["R"]](/content/2020/04/50772/images/8b2777b9eae1c3407ca632174fad1526f0fe8f38a76fd107482b54b3e6387248.jpg)
If you have an analog power amplifier
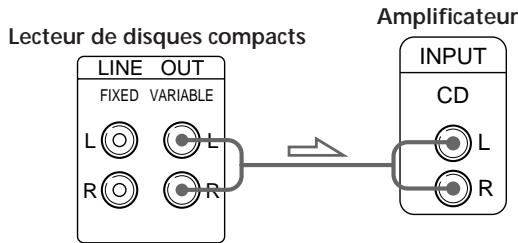
Connect the amplifier via the VARIABLE LINE OUT jacks using the supplied audio cord. You can adjust the output level with the LINE OUT/PHONE LEVEL control on the player or the LINE OUT LEVEL buttons on the remote.
![graph LR A["CD player"] --> B["Line OUT"] A --> C["FIXED VARIABLE"] A --> D["L R L"] A --> E["L R"] A --> F["R R"] G["Amplifier"] --> H["INPUT"] H --> I["CD"] I --> J["L R"] I --> K["L"]](/content/2020/04/50772/images/9ca8a2f5e69d08571c5b95bbfda4d788639b41ecee051c77f7a0c65d545d1f30.jpg)
When making digital hookups
You can avoid deterioration of the signal during transmission, since the music signal output through the digital output connectors retains digital form. You can connect a digital component such as a digital amplifier, D/A converter, DAT or MD. When you connect a DAT or MD, you can make digital recordings from CDs.
Note that you cannot use fading in or out function (page 19) when making this connection.
- If you have a digital component with an optical digital input connector
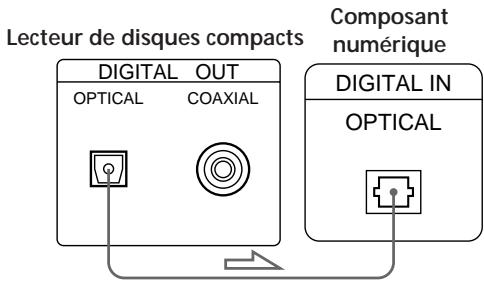
Connect the component via the DIGITAL OUT (OPTICAL) connector using the optical cable (not supplied). Take off the cap and plug in the optical cable.
![graph TD A["CD player"] --> B["DIGITAL OUT"] B --> C["OPTICAL"] B --> D["COAXIAL"] E["Digital component"] --> F["DIGITAL IN"] F --> G["OPTICAL"]](/content/2020/04/50772/images/695c54300114f911e6bca357558d0099a7ec3140fcc79b7d0dcefa2e29104c13.jpg)
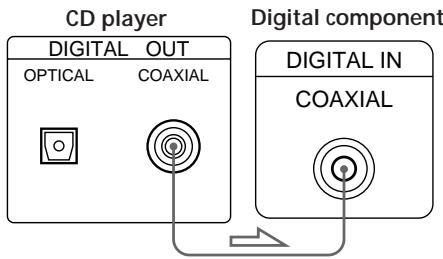
- If you have a digital component with a coaxial digital input connector
Connect the component via the DIGITAL OUT (COAXIAL) connector using the coaxial cable (not supplied).
Note
When you connect via the DIGITAL OUT connector, noise may occur when you play CD software other than music, such as a CD-ROM.
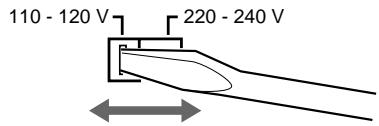
Setting the voltage selector (voltage selector equipped models only)
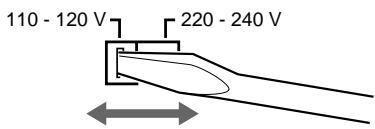
Check that the voltage selector on the rear panel of the player is set to the local power line voltage. If not, set the selector to the correct position using a screwdriver before connecting the mains lead to a wall outlet.
Connecting the mains lead
Connect the mains lead to a wall outlet.
Removing the notice sheet
The notice sheet is put on the player. Remove the sheet before you use your player.
Playing a CD
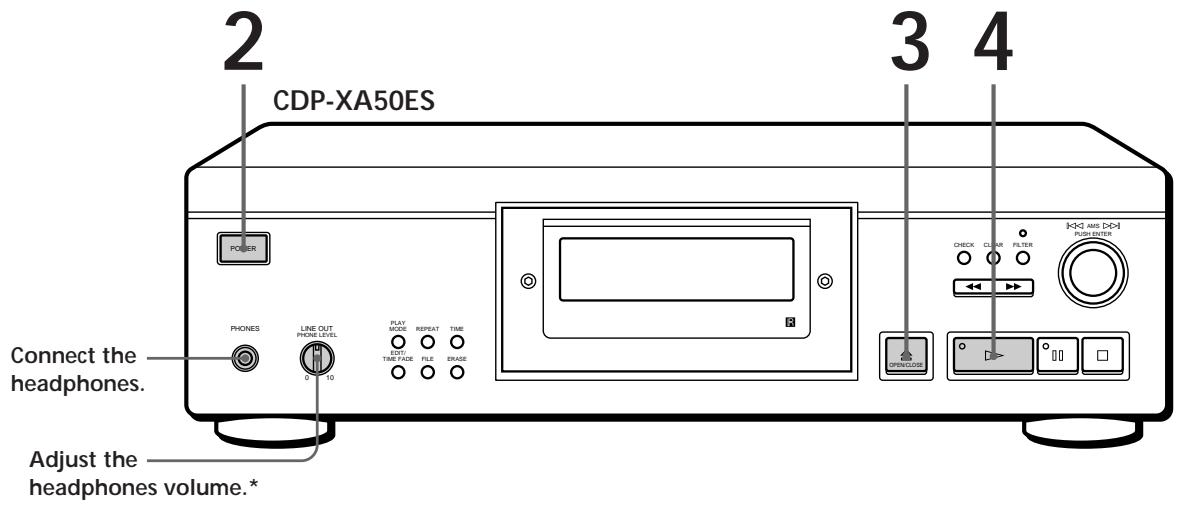
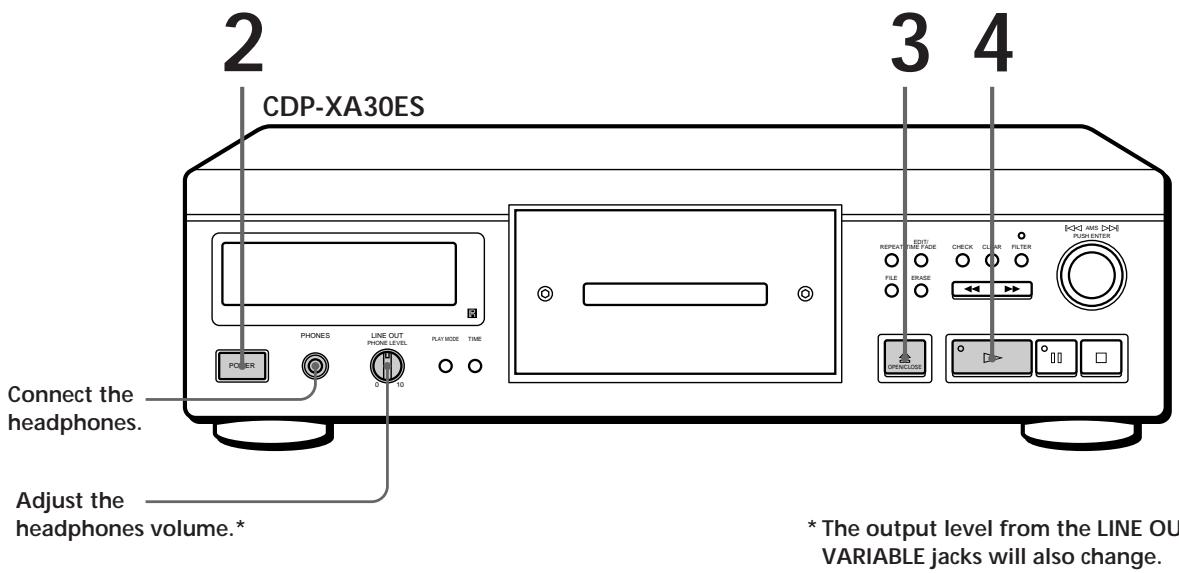
- See pages 4 – 5 for the hookup information.

If you turn on the player with a CD in the tray
You can start playing automatically from the beginning of the CD. If you connect a commercially available timer, you can start playing the CD at any time you want.
1 Turn on the amplifier and select the CD player position. 2 Press POWER to turn on the player.

If “- - - - -” appears in the display
Place the supplied stabiliser on the CD.
If you do not, this indication appears.
Note
In Step 3, do not place two or more CDs at the same time. If you do so, you may damage the discs and/or the player.

If play doesn't start from the first track Press PLAY MODE repeatedly until "SHUFFLE," "PROGRAM" and "CUSTOM INDEX" disappear from the display (or press CONTINUE on the remote).
3
Press ≜ OPEN/CLOSE, and place a CD on the tray.
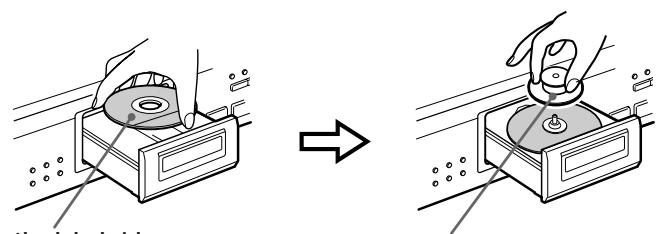
Place the supplied stabiliser on the CD. (The stabilisers supplied with the CDP-XA50ES and CDP-XA30ES are different.)
4
Press ▷.
The disc tray closes and the player plays all the tracks once (Continuous Play).
Adjust the volume on the amplifier.
To stop playback
Press □.
| When you want to | You need to |
| Pause | Press |
| Resume play after pause | Press or |
| Go to the next track | Turn AMS clockwise. (When using the remote, press .) |
| Go back to the preceding track | Turn AMS anticlockwise.(When using the remote, press .) |
| Stop play and remove the CD | Press OPEN/CLOSE |
Customising the Sound of Your Music (Digital Filter Function)
This player has a variable coefficient (V.C.) digital filter. By selecting the type of filter you want, you can adjust the sound to match your system, your room, the music source, etc.
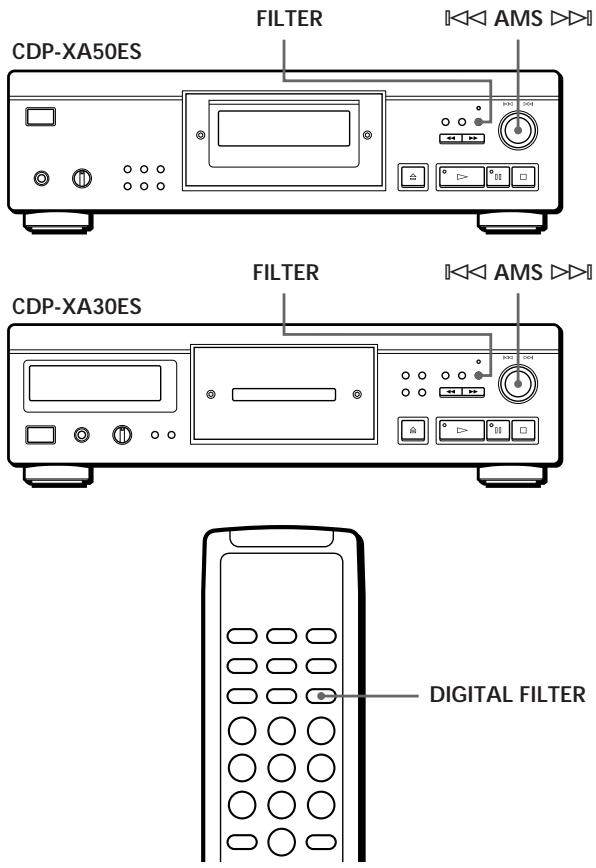
Selecting the filter directly on the player
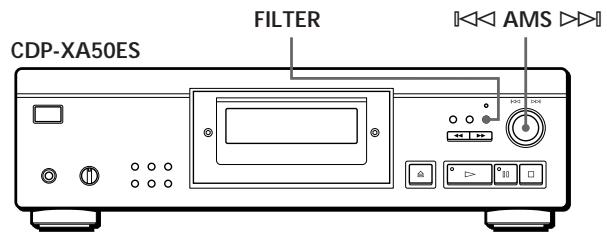
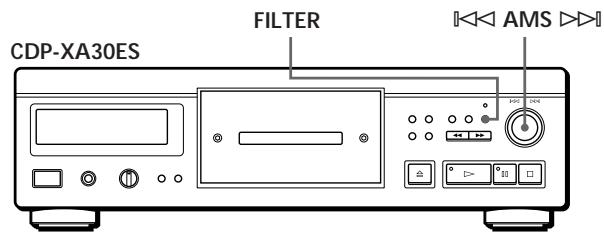
1 Press FILTER.
The display shows the currently selected filter number and the filter indicator flashes.
2 Turn ◀◀◀ AMS ▷▶▶ until the digital filter number you want appears in the display.
As you turn the ◀◀◀ AMS ▷▶▶ control, the digital filter number changes cyclically as follows:

If you are playing a disc, the sound will be interrupted momentarily.
3 Push ◀◀◀ AMS ▷▶▶ to select the filter.
The original display reappears.
The selected digital filter number is stored in memory even if you turn off the power.

You can also change the digital filter number by pressing the FILTER button while the indicator is flashing.
Selecting the filter using the remote

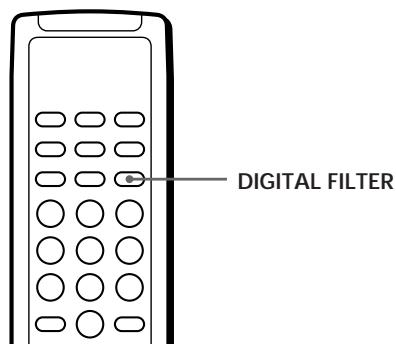
1 Press DIGITAL FILTER.
The display shows the currently selected filter number and the filter indicator flashes.
2 Press DIGITAL FILTER repeatedly until the display shows the digital filter number you want. The digital filter number is stored and the original display reappears.
What is a variable coefficient (V.C.) digital filter?
CD players use digital filters to eliminate the noise generated during sampling. You can change the tone of your music by changing the cutoff characteristics of the digital filter.
This player has five types of filters with different coefficient characteristics: “STD,” “1,” “2,” “3” and “4.” In addition, digital filters “3” and “4” each have three coefficient patterns, A–C, for more detailed adjustments.
The following explains the terms you need to know to understand the characteristics of the digital filters used in this player.
Sharp roll-off and slow roll-off
Digital filters can be roughly classified into sharp roll-off types and slow roll-off types, according to their cutoff characteristics.
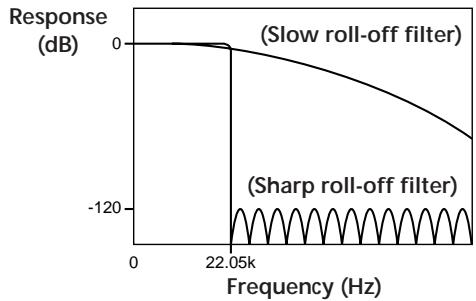
Comparison of cutoff characteristics for sharp roll-off filter and slow roll-off filter
Sharp roll-off filters steeply cut off the noise generated during sampling over 22.05 kHz. This is a superior way of completely reproducing signals below 20 kHz: the basic principle behind digital audio.
On the other hand, slow roll-off filters cut off the noise generated during sampling gradually, and are able to hold pre-ringing and post-ringing (a kind of sound smearing) in the impulse response signal to a minimum.
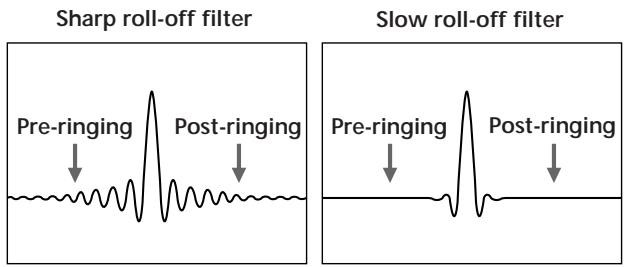
Comparison of impulse response for sharp roll-off filter and slow roll-off filter
Cascade type and direct type
There are two methods of digital filter oversampling: the cascade type and direct type. The cascade type multiplies the signal by eight in three stages, and the direct type multiplies the signal by eight in one step. Cascade filters have a high calculation efficiency, and can realise steep, high-precision sharp roll-off characteristics. Moreover, the ICs in this player use the full feed-forward (FF) method between each of the stages to improve the accuracy of the information transfer.
On the other hand, eightfold oversampling data can be obtained in one step with direct filters and there is no loss during transfer between calculation stages. However, since such circuits are extremely large, this player can only support slow roll-off filters.
![graph TD IN --> A["×2"] A --> B["×2"] B --> C["×2"] C --> D["×8"] D --> OUT A -->|FF| B B -->|FF| C C -->|FF| D D -->|FF| A](/content/2020/04/50772/images/0b58f27a245a24cb90a4648653826a432f696990a9348018499477934e2079cc.jpg)
Characteristics of each digital filter
The following are the settings and characteristics for each of the five digital filters. Use this information to select the filter you want.
STD: Standard
This is a sharp roll-off, cascade type filter. It has the same characteristics as the digital filters that have long been used in Sony's high-end units and has a sharp cutoff that reaches -120 dB at 24kHz . This filter uses the full feed-forward method between the calculation stages and gives the sound a wide range and ample spatial representation.
1: Spline
This is a slow roll-off, cascade type filter that uses a cubic spline function for interpolation. The spline function features smoother connections between points, and among spline functions, the cubic filter is the most straightforward. Ringing in the impulse response for this filter is much lower than for a sharp roll-off type filter. With this filter, the sound image is clear and sound reproduction is smooth.
2: Plain
This is a slow roll-off, direct type filter. It features an absence of quantization between the digital filter output and the D/A converter input. Direct type calculations are used within the digital filter and the bit length for the digital filter output and the D/A converter input are the same, so no requantization noise is generated between the digital filter and the D/A converter. This means that, of the 16-bit information taken from the disc, elements up to 20 kHz are input as far as the D/A converter without any nonlinear operation. This reproduces a sound with high clarity and strength.
3: Analog type
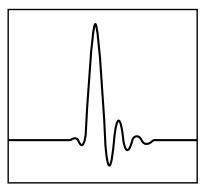
This is a slow roll-off, direct type filter that simulates a seventh-order analog Butterworth filter. This filter completely prevents pre-ringing in the impulse response. Also, since it simulates an analog filter, the high-region phase outside the audible frequency is rotated. The filters from 3A to 3C differ in degree of phase rotation. 3A is multiplied by one (the true analog characteristic), 3b is multiplied by 0.75, and 3C is multiplied by 0.5. The impulse response changes as shown in the figures below. The degree of pre-ringing and post-ringing varies with the degree of phase change. This gives the sound a feeling of warmth and depth.
3A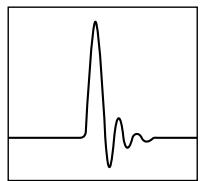
3b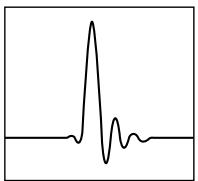
3C Comparison of filter 3 impulse response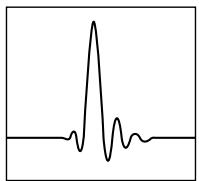
4: Butterworth
This is a slow roll-off, direct type filter and includes fifth-order through ninth-order Butterworth filters. However, the phase is linear and does not include the phase change possibilities of filter 3 (analog type). As the figure below shows, only the cutoff characteristics can be changed in the fifth-order (4A), the seventh-order (4b) and the ninth-order (4C). Ringing in the impulse response increases from the fifth-order filter to the ninth-order filter. This filter gives the sound a feeling of balance and comfort.
Response (dB)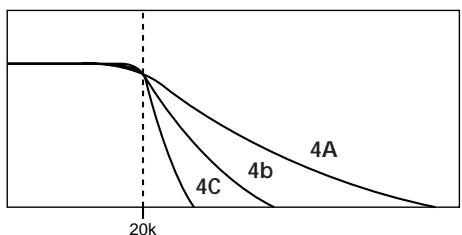
Frequency (Hz) Comparison of filter 4 cutoff characteristics
Note
The Digital Filter function primarily changes characteristics outside the audible frequency. They cannot affect changes within the audible frequency such as those provided by the tone controls of the amplifier. Therefore, with certain combinations of hardware and software, there may be no noticeable effect after switching the filter.
Using the Display
You can check information about the disc using the display.
CDP-XA50ES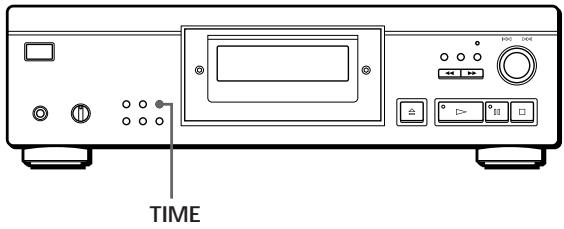
CDP-XA30ES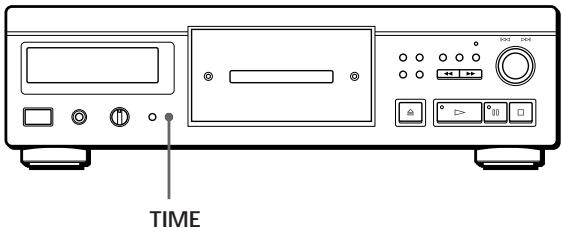
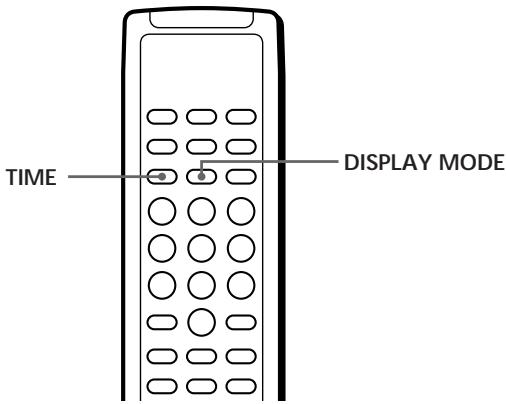
Checking the total number and playing time of the tracks
Press TIME before you start playing.
The display shows the total number of tracks, total playing time and music calendar.
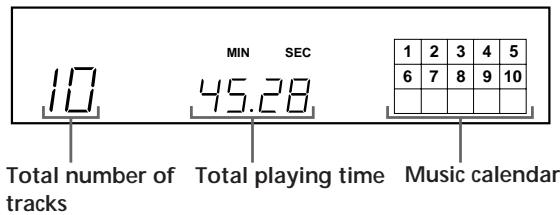
While in Shuffle Play mode (“SHUFFLE” appears in the display; see page 13), a one-second access time blank is added between each track. This increase is automatically added to the total playing time in the display.
If the disc has more than 15 tracks, the ▶ indication appears next to 15 on the music calendar.
The information also appears when you press OPEN/CLOSE to close the disc tray.
Display information while playing a disc
While playing a disc, the display shows the current track number, index number, playing time, and the music calendar.
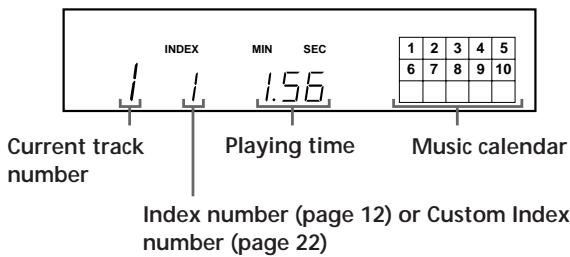
The track numbers in the music calendar disappear after they are played.
Checking the remaining time
Each time you press TIME while playing a disc, the display changes as shown in the chart below.
![graph TD A["Playing time and number of the current track"] --> B["INDEX MIN SEC 1 2 3 4 5"] A --> C["1 1 1.56"] D["Remaining time on the current track"] --> E["INDEX MIN SEC 1 2 3 4 5"] D --> F["1 1 -1.57"] G["Remaining time on the disc"] --> H["MIN SEC 1 2 3 4 5"] G --> I["-43.32"] J["If the remain…](/content/2020/04/50772/images/7ff1475ef0dccec20cc726f8ef70ebfd7c2533acc3ed4876c85489071419cc5d.jpg)
Turning off the music calendar in the display
Each time you press DISPLAY MODE on the remote while playing a disc, the music calendar turns off and on alternately in the display.
Locating a Specific Track
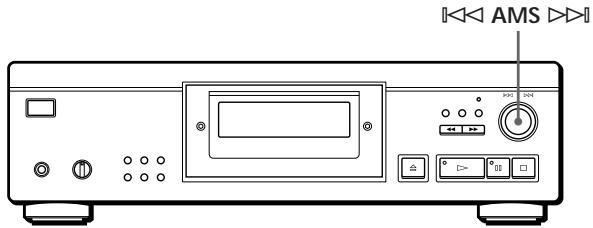
You can quickly locate any track while playing a disc using the AMS (Automatic Music Sensor) on the player or number buttons on the remote.
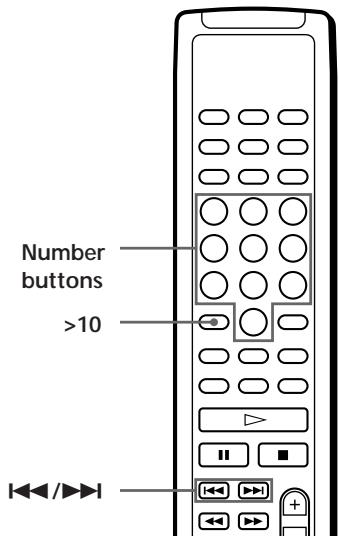
| To locate | You need to |
| The next or succeeding tracks | Turn AMS clockwise until you find the track. When using the remote, press repeatedly until you find the track. |
| The current or preceding tracks | Turn AMS anticlockwise until you find the track. When using the remote, press repeatedly until you find the track. |
| A specific track directly | Press the number button of the track on the remote |

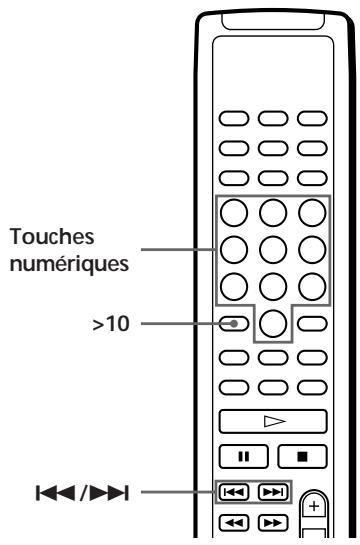
When you directly locate a track numbered over 10
Press >10 first, then the corresponding number buttons on the remote. To enter “0,” use button 10.
Example: To play track number 30
Press >10 first, then 3 and 10.
Locating a Particular Point in a Track
You can also locate a particular point in a track while playing a disc.
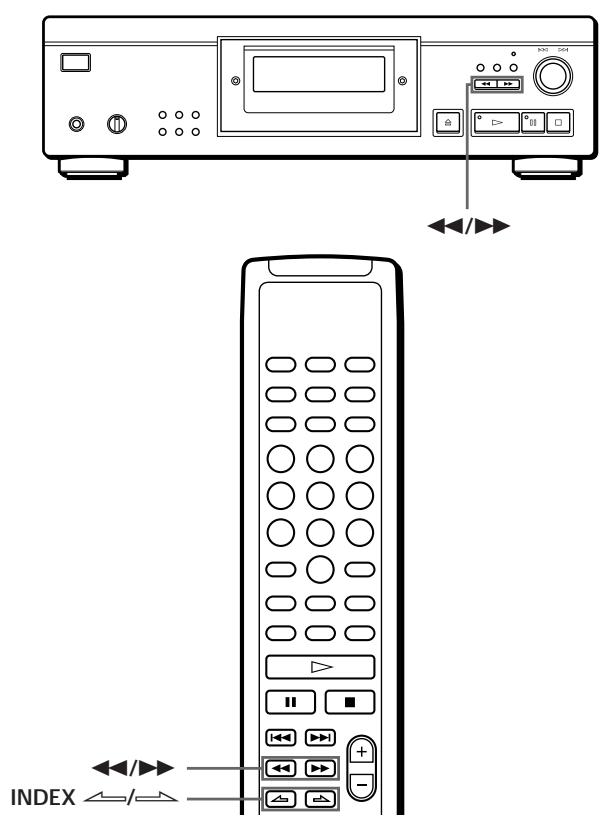
| To locate a point | Press |
| While monitoring the sound | ▶▶ (forward) or ◀◀ (backward) and hold down until you find the point |
| Quickly by observing the display during pause | ◀◀/▶▶ and hold down until you find the point. You will not hear the sound during the operation. |
| Using an index (only for indexed discs) | INDEX ⇌/⇌ on the remote repeatedly until you find the point |

What is an index?
It is a number that divides a track or a disc into sections, enabling you to easily locate a desired point. You can determine if a disc uses indexes by its packaging.
Note
If “▶” appears in the display, the disc has reached the end while you were pressing ▶▶. Press ◀◀ or turn ◀◀ AMS ▷◀ anticlockwise to go back.
Playing Tracks Repeatedly
You can play tracks repeatedly in any play mode.
CDP-XA50ES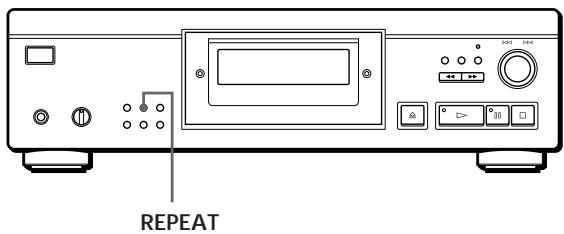
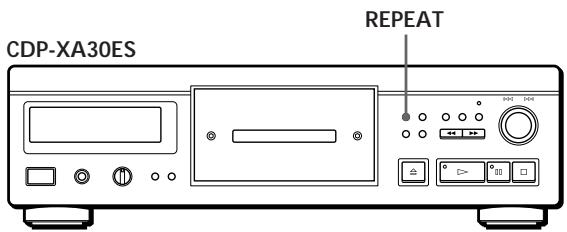
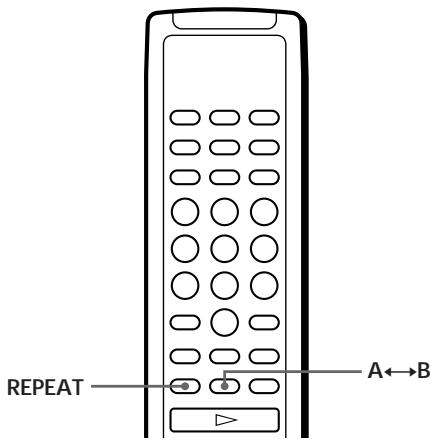
Press REPEAT while playing a disc.
“REPEAT” appears in the display. The player repeats the tracks as follows:
| When the disc is played in | The player repeats |
| Continuous Play (page 6) | All the tracks |
| Shuffle Play (page 13) | All the tracks in random orders |
| Programme Play (page 14) | The same programme |
| Delete Play (page 16) | All the remaining tracks |
| Delete Shuffle Play (page 14, 16) | All the remaining tracks in random orders |
| Custom Index Play (page 23) | The portion between two indexes |
To cancel Repeat Play
Press REPEAT repeatedly until “REPEAT” disappears from the display.
Repeating the current track
You can repeat only the current track.
While the track you want is being played, press REPEAT repeatedly until “REPEAT 1” appears in the display.
Note
You cannot repeat the current track while the disc is played in Custom Index Play mode (see page 23).
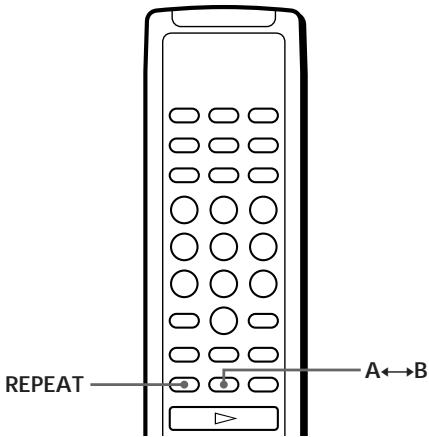
Repeating a Specific Portion (A↔B Repeat)
You can play a specific portion in a track repeatedly.
This might be useful when you want to memorise lyrics.
Note that you cannot repeat a portion extending to two tracks.
1 While playing a disc, press A↔B on the remote when you find the starting point (point A) to be played repeatedly.
“A-” of “REPEAT A-” flashes in the display.
2 When you reach the ending point (point B), press A↔B again.
“REPEAT A-B” appears. The player plays this specific portion repeatedly.
To cancel A↔B Repeat
Press REPEAT.
Setting a new starting point
You can move the repeating portion ahead by changing the starting point.
1 Press A↔B while the player is repeating the specific portion. The ending point B becomes the new starting point A. “A-” of “REPEAT A-” flashes in the display.
2 When you reach the ending point (point B), press A↔B again.
“REPEAT A-B” appears. The player repeats between the new starting and ending points.

When you want to restart from the starting point A, press ▷ during A↔B Repeat.
Playing in Random Order (Shuffle Play)
You can have the player “shuffle” tracks and play in a random order.
CDP-XA50ES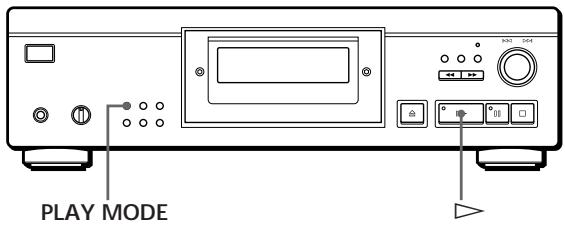
CDP-XA30ES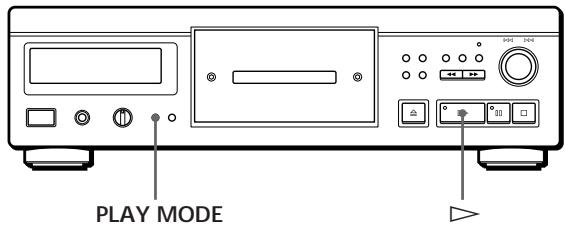
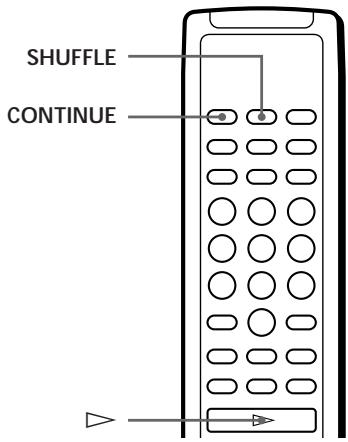
1 Press PLAY MODE repeatedly until "SHUFFLE" appears in the display.
When using the remote, press SHUFFLE.
2 Press ▷ to start Shuffle Play.
The [ ] indication appears while the player is “shuffling” the tracks.
To cancel Shuffle Play
Press PLAY MODE four times (or CONTINUE on the remote).

You can start Shuffle Play while playing
Press PLAY MODE once (or SHUFFLE on the remote), and Shuffle Play starts from the current track.

You can delete unwanted tracks during Shuffle Play (Delete Shuffle Play)
Press the number button of the track you want to delete on the remote.
The track number and “OFF” appear in the display, and then the track number disappears from the music calendar.
If you want to restore the track, press the number button again.
To restore all the tracks, press □ in stop mode.
Creating Your Own Programme (Programme Play)
You can arrange the order of the tracks on a disc and create your own programme. The programme can contain up to 24 tracks.
Creating a programme on the player
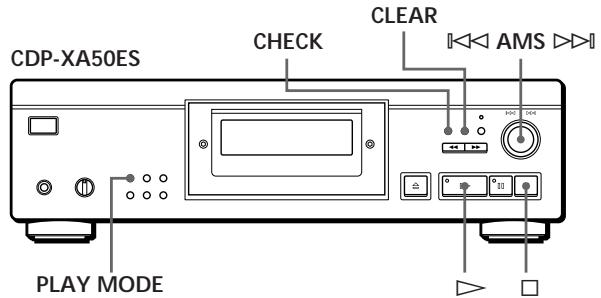
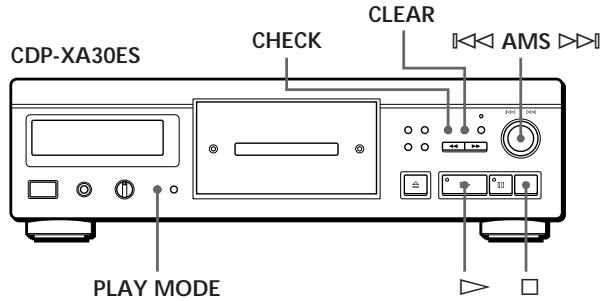
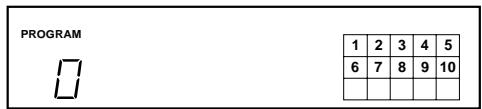
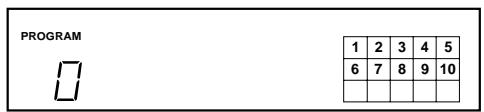
1 Press PLAY MODE repeatedly until "PROGRAM" appears in the display before you start playing.
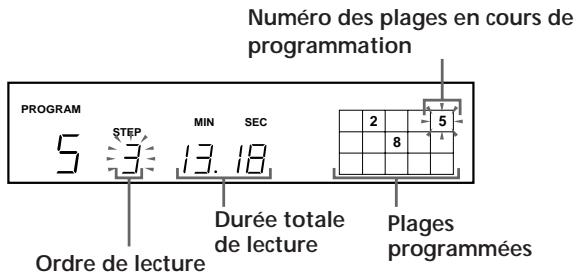
2 Turn ◀◀◀ AMS ▷▶▶ until the track number you want appears in the display.
The playing order and the track numbers being programmed flash and the total playing time including the track appears in the display.
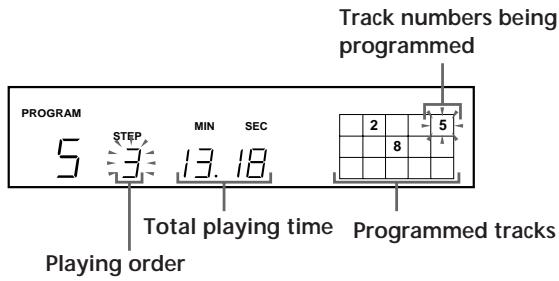
3 Push ◀◀◀ AMS ▷▶▶ to select the track.
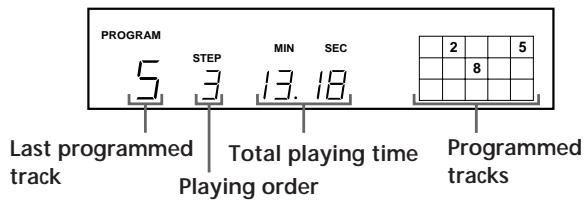
If you've made a mistake
Press CLEAR, then repeat Steps 2 and 3.
4 Repeat Steps 2 and 3 to programme the tracks in the order you want. 5 Press ▷ to start Programme Play.
To cancel Programme Play
Press PLAY MODE three times.

When tracks that are not numerically consecutive on the disc are programmed consecutively (i.e., 1, 3, 5, etc.),
a one-second access time blank is added between the tracks.

The programme remains even after the Programme Play ends.
When you press ▶, you can play the same programme again.
Notes
- "-- . --" appears instead of the total playing time in the display when it exceeds 100 minutes.
- "FULL" appears in the display when you try to add a track to a programme which already contains 24 tracks.
Creating a programme using the remote
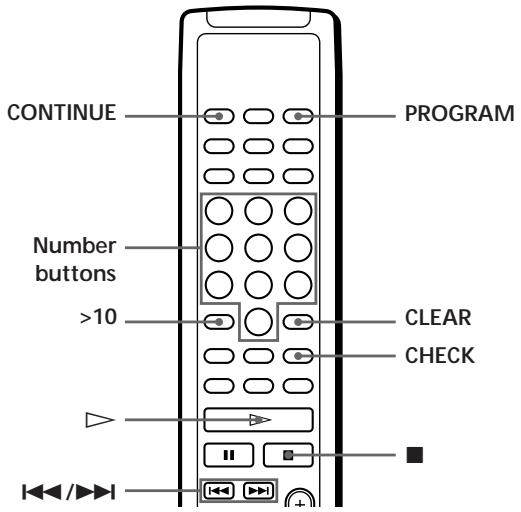
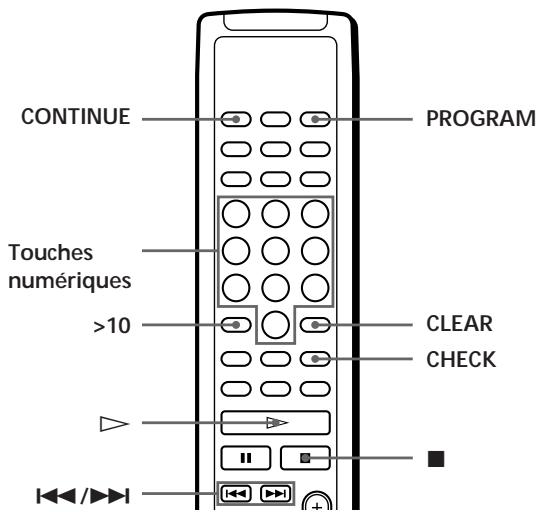
1 Press PROGRAM before you start playing. "PROGRAM" appears in the display. 2 Press number buttons of the tracks you want to programme in the order you want.
Example: To programme the tracks 2, 8 and 5, press number buttons in the order 2, 8 and 5.
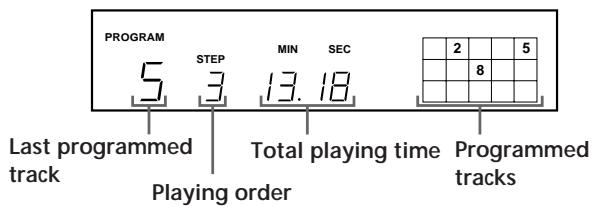
To select a track with a number over 10
Use >10 button (see page 11).
If you've made a mistake
Press CLEAR, then press the correct track number.
Press ▷ to start Programme Play.
To cancel Programme Play
Press CONTINUE.

You can check the total playing time while programming using the remote (Programme Edit).
To select a track, press ◀◀◀ or ▶▶◀ and check the total playing time. Then press PROGRAM to confirm your selection.

When tracks that are not numerically consecutive on the disc are programmed consecutively (i.e., 1, 3, 5, etc.),
a one-second access time blank is added between the tracks.

The programme remains even after the Programme Play ends.
When you press ▷, you can play the same programme again.
Notes
- “-- . --” appears instead of the total playing time in the display when it exceeds 100 minutes.
- “FULL” appears in the display when you try to add a track to a programme which already contains 24 tracks.
Checking the track order
You can check your programme before or after you start playing.
Press CHECK.
Each time you press this button, the display shows the track number in the programmed order. After the last track in the programme, the display shows “End” and returns to the original display. If you check the order after you start playing, the display shows only the remaining track numbers.
Changing the track order
You can change your programme before you start playing.
| To | You need to |
| Erase a track | Press CHECK until the track you don’t want appears in the display, then press CLEAR |
| Erase the last track in the programme | Press CLEAR. Each time you press the button, the last track will be cleared. |
| Add tracks to the end of the programme | Turn AMS until track number you want to add appears, then push AMS .When using the remote, press the number button of the tracks to be added. |
| Change the whole programme completely | Hold down CLEAR until “ALL CLr” appears in the display. Create a new programme following the programming procedure. |
Playing Only Specific Tracks (Delete Play)
You can delete unwanted tracks and play only the remaining tracks.
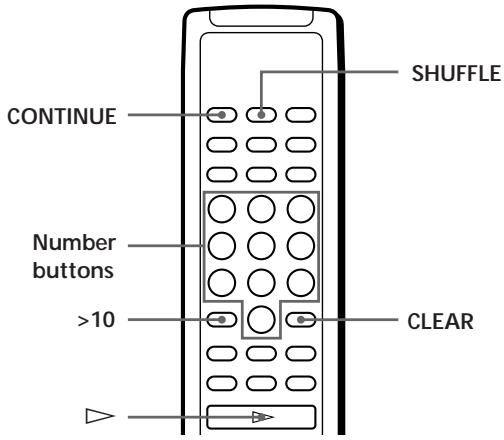
1 Press SHUFFLE.
“SHUFFLE” appears in the display.
2 Press the number buttons of the tracks you want to delete.
The track numbers disappear from the music calendar after “OFF” appears for a while.
To delete a track numbered over 10, use the >10 button (see page 11).
If you've made a mistake
Press the number button of the track. "On" appears in the display and the track will be restored.
3 After you've deleted all the tracks you don't want, press CONTINUE.
“SHUFFLE” disappears from the display.
If you press PLAY MODE on the player instead of CONTINUE on the remote
The deleted tracks will be restored. Be sure to do this step with the remote.
4 Press ▷ to start Delete Play.
To cancel Delete Play
Press ■ in stop mode.

The player keeps the deleted tracks in memory even after the Delete Play ends
When you press ▷, you can play only the remaining tracks again.

You can play the tracks in random order (Delete Shuffle Play)
Just skip Step 3 in the above procedure.

You can delete a track while playing
Press CLEAR while the track is being played. The player deletes the track and starts playing the next track.

You can store the deleted tracks of each disc
See “Storing Specific Tracks of a Disc” on page 24.
Recording Your Own Programme
You can record the programme you've created on a tape, DAT or MD. The programme can contain up to 24 tracks.
By inserting a pause during programming, you can divide the programme into two for recording on both sides of a tape.
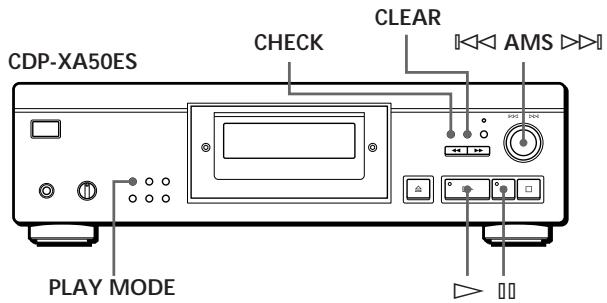
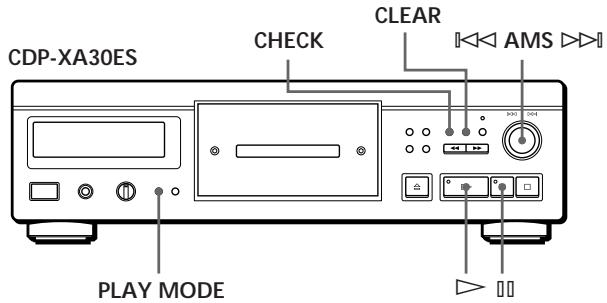
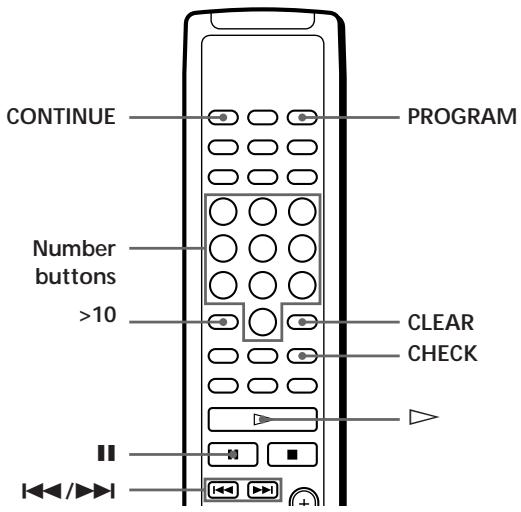
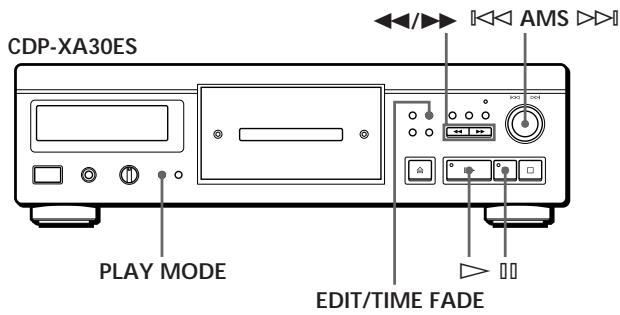
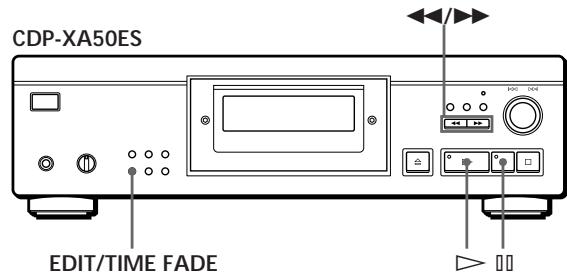
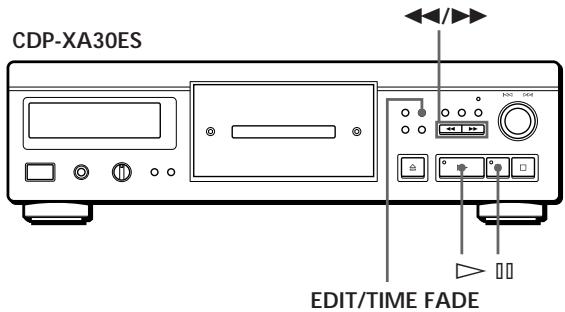
1 Press EDIT/TIME FADE before you start playing as follows:
- To select Time Edit, press the button once. "EDIT" appears and "SIDE-A" flashes in the display.
- To select Just Edit, press the button twice. "(JUST EDIT)" appears and "SIDE-A" flashes in the display.
2 Press ◀◀ or ▶▶ to specify the tape length.
Each time you press these buttons, the display changes as shown below, with the tape length of one side following each indication.

When you select "HALF"
The player sets the programme of each side to a half of the total playing time of the disc. Note that you cannot select "HALF" when the disc has more than 24 tracks.
3 Press EDIT/TIME FADE to have the player create the programme.
The display shows the tracks to be recorded.
"SIDE-B" flashes in the display.
4 When you record on both sides of the tape, press EDIT/TIME FADE again.
The player inserts a pause, then creates the programme for side B. The display shows the programmed tracks.
When you record on one side of the tape or on a DAT or MD, skip this step.
5 Start recording on the deck and then press ▷ on the player.
When you record on both sides of the tape, the player pauses at the end of the programme for side A.
6 When you record on side B, reverse the tape and press ▷ or □ on the player to resume playing.
To cancel Time Edit/Just Edit
Press PLAY MODE repeatedly until "SHUFFLE,"
“PROGRAM” and “CUSTOM INDEX” disappear from the display (or press CONTINUE on the remote).

You can programme the tracks you want in advance. Select the tracks before doing the above procedure. The player creates a programme from the remaining tracks. In this case, you cannot select “HALF” to specify the tape length.

You can freely specify the tape length.
Set the tape length using ◀◀ AMS ▷▶.
Example: When the tape length of one side is 30 minutes and 15 seconds.
1 To set the minutes, turn ◀◀ AMS ▷▶ until “30” appears in the display, then push ◀◀ AMS ▷▶. 2 To set the seconds, turn ◀◀ AMS ▷▶ until “15” appears in the display, then push ◀◀ AMS ▷▶.

When tracks, which aren't numerically consecutive on the disc, are programmed consecutively (i.e. 1, 3, 5 etc.)
A one-second access time blank is added between the tracks.

You can automatically insert a blank space of 3 seconds between each track.
Use the Auto Space function (see page 21).

You can check and change the programme.
See pages 15 and 16.
Fading In or Out
You can manually fade in or out to prevent tracks from starting or ending abruptly.
Note that you cannot use this effect when you use the DIGITAL OUT connector.
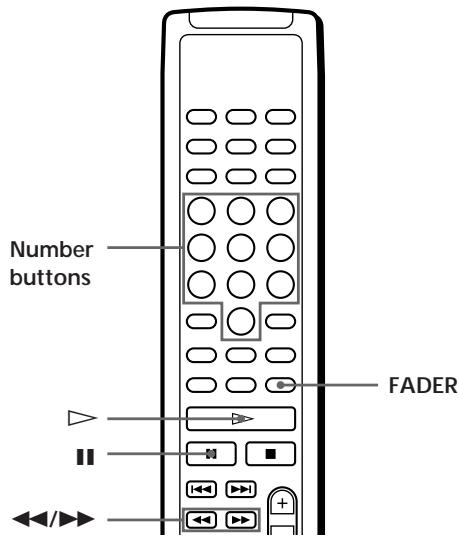
| To | Press FADER |
| Start play fading in | During pause. “FADE” flashes and play fades in. |
| End play fading out | When you want to start fading out. “FADE” flashes. The play fades out and the player pauses. |
Changing the fading time
You can change the fading time from 2 to 10 seconds before fading in or out. If you don't change it, fading lasts for 5 seconds.
1 Press FADER before you start playing.
“5 SEC” appears and “FADE” flashes in the display.
2 Press the number button to specify the fading time.
You can also specify the fading time by pressing the ◀◀/▶▶ buttons until the display shows the time you want.
Fading out at the specified time (Time Fade)
You can have the player fade out automatically by specifying the playing time. Once you set the Time Fade, it works twice, that is, the play fades out at the end of both sides of a tape.
1 Press EDIT/TIME FADE three times before you start playing.
“TIME FADE” and “SIDE-A” appear in the display.
2 Press ◀◀ or ▶▶ to specify the playing time.
Each time you press these buttons, the display changes as shown below, with the playing time of one side following each indication.

When you select "HALF"
The player sets the playing time to a half of the total playing time.
3 Press ▷ to start playing.
At the specified time the play fades out with “FADE” flashing in the display and the player pauses. “SIDE-B” appears in the display.
4 To record on side B, reverse the tape and press ▷ or ▪ on the player to resume playing.
Again, the play fades out at the specified time.
To cancel Time Fade
Press EDIT/TIME FADE.

You can freely specify the playing time
See “You can freely specify the tape length” on page 19.

You can change discs during Time Fade
If the play ends before the specified fade-out time, (for example, when you record CD-singles on a tape) change the disc. The specified fade-out time is counted only during playing.

You can fade in to resume playing in Step 4.
After you reverse the tape, press FADER.

Note
If you press ◀◀ or ▶▶ during Time Fade Play, Time Fade will be cancelled.
Useful Tips for Recording
Using these functions makes recording CDs more convenient.
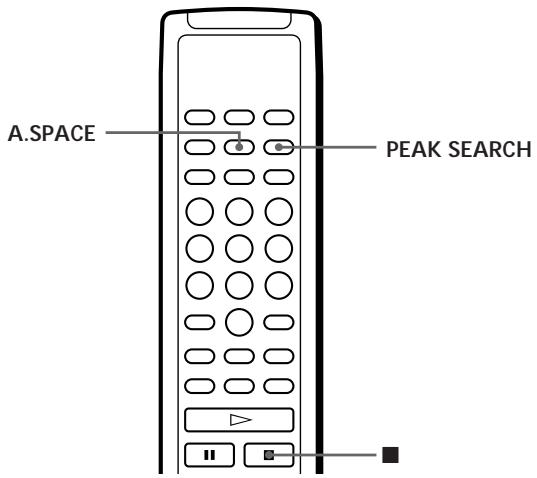
Adjusting the Recording Level (Peak Search)
The player locates the highest level among the tracks to be recorded to let you adjust the recording level before you start recording.
1 Before you start playing, press PEAK SEARCH. "PEAK" flashes in the display and the player repeats the portion of the highest level. 2 Adjust the recording level on the deck. 3 Press ■ on the player to stop Peak Search. "PEAK" disappears from the display.
Note
The portion with the highest level may differ every time you try the adjustment on the same disc. The difference is, however, so slight that you won't find any problem in adjusting the recording level precisely.
Locating each track on a tape using the AMS function (Auto Space)
The Auto Space function inserts a blank space of 3 seconds between each track while playing, and enables you to locate each track using the AMS function of the deck.
Before you start playing, press A.SPACE. "AUTO SPACE" appears in the display.
To cancel Auto Space
Press A.SPACE until “AUTO SPACE” disappears from the display.
Note
If you use the Auto Space function when recording, for example, a medley or symphony, the sound may be interrupted where the track number changes. This happens when the track numbers are assigned in the middle of the piece.
What You Can Do With the Custom Files
The player can store 2 types of information called “Custom Files” for each disc. Once you have stored Custom Files for a disc, the player automatically recalls what you have stored whenever you insert the disc. Note that Custom Files will be erased if you don’t use the player for about 1 month.
You can store this information:
| When you use | You can |
| Custom Index (page 22) | Index the disc at up to 8 points (for a disc with 32 tracks or less) or 5 points (for a disc with over 32 tracks) |
| Delete Bank (page 24) | Delete unwanted tracks and store only the tracks you want |
The Custom File indication lights up when you store the corresponding information.
![graph TD A["C.FILE"] --> B["DELETE"] B --> C["INDEX"] C --> D["Delete Bank"] C --> E["Custom Index"]](/content/2020/04/50772/images/b3c04d29b19ac38e289f7a606482108d9bc83c7324835bac0b03502b2f62d4cb.jpg)
When you store a Custom File for a disc, the player remembers how you played that disc last time even if you removed the disc from the player (last mode memory). When you insert the same disc again, therefore, the player plays in the same play mode. The player also remembers the duration of fade in/out time if you've changed the time.
Note that when you press ▷ to close the disc tray and start playing, the player plays in the play mode currently selected instead of the stored one.
Where are Custom Files stored?
Custom Files are stored not on the disc but in the player's memory. This means you cannot use Custom Files when you play the disc on other players.
How many discs can you file?
You can file up to 224 discs in the Custom File. The player counts a disc as one even when you store the Custom Index and Delete Bank at the same time.
You can check how many discs you can file
1 Remove the disc from the player. 2 Press OPEN/CLOSE to close the disc tray. 3 Press TIME while the music calendar disappears from the display.
The number of the Custom Files you can file appears.
If "FULL" appears in the display
If the memory for Custom Files becomes full, the player displays "FULL" when you press FILE to store the information and you cannot store any more disc information. If necessary, erase any unwanted Custom Files (see pages 24 and 25).
To erase all Custom Files of all discs
While holding down ERASE and FILE, press POWER to turn on the player. "FILE CLR" appears in the display and all the custom files will be erased.
Indexing a Disc (Custom Index)
You can index a disc at up to 8 points (for a disc with 32 tracks or less) or 5 points (for a disc with over 32 tracks) so that you can easily locate a desired point. This might be useful when you play discs of symphonies or concertos that divide one piece into several tracks (see the example below).
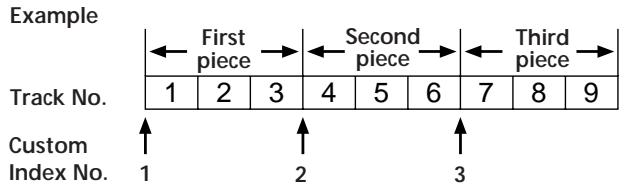
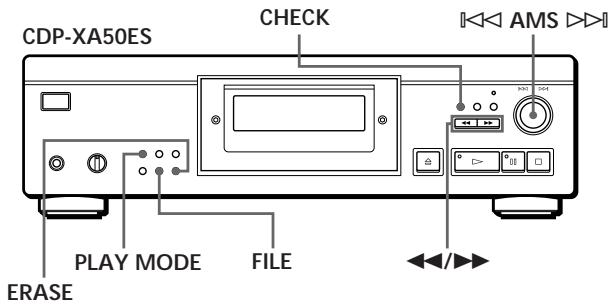
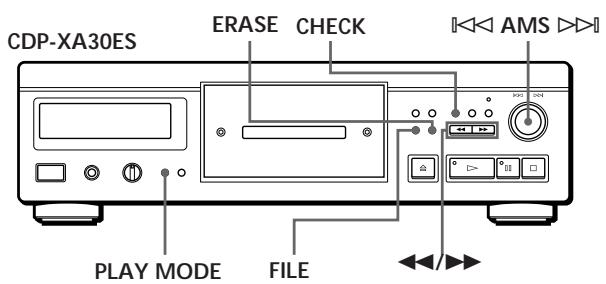
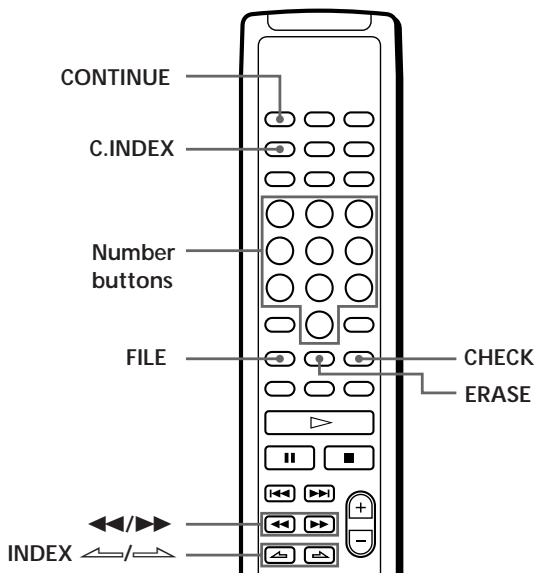
1 Insert the disc. 2 Press PLAY MODE repeatedly until "CUSTOM INDEX" appears in the display. When using the remote, press C.INDEX. The music calendar disappears. 3 Press FILE at the point you want to index. The Custom Index number flashes in the display. The player repeats the portion for 3 seconds from the point to be indexed. 4 Press ◀◀ or ▶▶ to adjust the point so that the player can repeat from the exact point you want to index. Pressing these buttons 7 times moves the point by about 1 second ahead or behind. If you don't want to index at the point, press CLEAR and search another point to be indexed. 5 Press FILE again to store the Custom Index. "INDEX" in the Custom File indication lights up in the display. 6 To mark more Custom Indexes, repeat Steps 3 to 5.
When you've already decided where to index You can directly mark an index without adjusting the point. When you find the point to be indexed, first press to pause playing and press FILE to mark an index.
Playing from an indexed point (Custom Index Play)
1 Press PLAY MODE repeatedly until "CUSTOM INDEX" appears in the display. When using the remote, press C.INDEX. 2 Locate the Custom Index you want as follows:
| To locate | Press |
| The next Custom Index | INDEX ➔ |
| The current Custom Index | INDEX ➔ |
| A specific Custom Index directly | Number button of the Custom Index |
Playback starts from the selected Custom Index to the end of the disc.
To cancel the Custom Index Play Press PLAY MODE twice (or CONTINUE on the remote).
Notes
- You cannot use the Index Search function (see page 12).
- Use INDEX ←/→ buttons to locate the next or the current Custom Indexes, instead of ◀◀/▶▶ buttons on the remote.
Playing from one index to the next one (Custom Index Single Play)
1 Press PLAY MODE repeatedly until "CUSTOM INDEX (1)" appears in the display. When using the remote, press C.INDEX. 2 Press the number button of the Custom Index you want on the remote. Playback starts from the selected Custom Index and stops at the beginning of the next index.
To cancel the Custom Index Single Play, press PLAY MODE once (or CONTINUE on the remote).
You can play the portion between two indexes repeatedly Press REPEAT.
Erasing the Custom Index
1 Insert the disc. 2 Press PLAY MODE repeatedly until "CUSTOM INDEX" appears in the display. When using the remote, press C.INDEX. 3 Press CHECK repeatedly until the Custom Index number you want to erase flashes. 4 Press ERASE while the number is flashing to erase the Custom Index. The succeeding Custom Index numbers decrease by one.
Storing Specific Tracks of a Disc (Delete Bank)
You can delete unwanted tracks and store only the tracks you want. You can start playing your favourite tracks without deleting tracks each time.
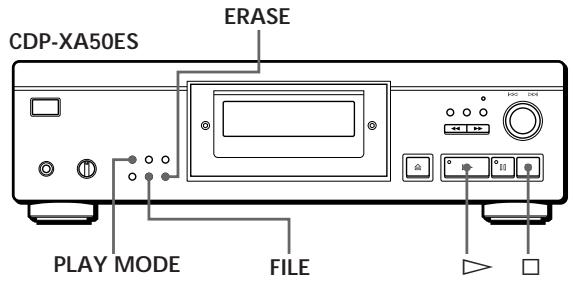
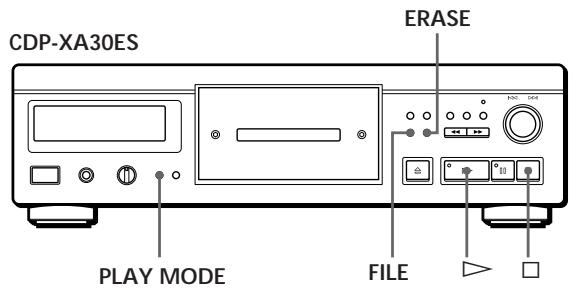
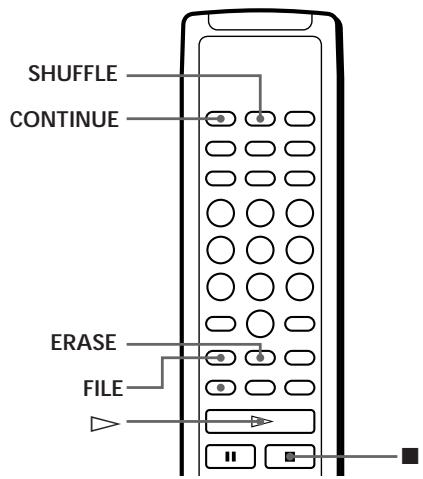
1 Insert the disc. 2 Delete tracks you don't want. Follow Steps 1 to 3 in "Playing Only Specific Tracks" on page 16. 3 Press FILE to store the remaining tracks. "DELETE" in the Custom File indication lights up in the display.
Playing using the Delete Bank
1 Press PLAY MODE repeatedly until "SHUFFLE," "PROGRAM" and "CUSTOM INDEX" disappear from the display. When using the remote, press CONTINUE. The Delete Bank is recalled and the selected track numbers appear on the music calendar.
2 Press ▷ to start playing.
To cancel playing using the Delete Bank Press □.
To start playing using the Delete Bank again
While “PROGRAM” or “CUSTOM INDEX” appears in the display, press PLAY MODE repeatedly until these indications disappear from the display or until “SHUFFLE” appears in the display. The Delete Bank is recalled and you can start playing by pressing ▷.

You can play in a random order using the Delete Bank. In Step 1, press PLAY MODE repeatedly until “SHUFFLE” appears in the display (or press SHUFFLE on the remote).
Erasing the Delete Bank
1. Insert the disc. 2. Press PLAY MODE repeatedly until "PROGRAM" and "CUSTOM INDEX" disappear from the display. When using the remote, press CONTINUE or SHUFFLE. The display shows the stored Delete Bank. 3. Press ERASE to erase the Delete Bank. "DELETE" in the Custom File indication disappears.
Precautions
On safety
- Caution — The use of optical instruments with this product will increase eye hazard.
- Should any solid object or liquid fall into the cabinet, unplug the player and have it checked by qualified personnel before operating it any further.
On power sources
- Before operating the player, check that the operating voltage of the player is identical with your local power supply. The operating voltage is indicated on the nameplate at the rear of the player.
- The player is not disconnected from the AC power source (mains) as long as it is connected to the wall outlet, even if the player itself has been turned off.
- If you are not going to use the player for a long time, be sure to disconnect the player from the wall outlet. To disconnect the AC power cord (mains lead), grasp the plug itself; never pull the cord.
- AC power cord (mains lead) must be changed only at the qualified service shop.
On placement
- Place the player in a location with adequate ventilation to prevent heat build-up in the player.
- Do not place the player on a soft surface such as a rug that might block the ventilation holes on the bottom.
- Do not place the player in a location near heat sources, or in a place subject to direct sunlight, excessive dust or mechanical shock.
On avoiding deterioration of sound quality
- Do not touch the lens inside.
On using the stabiliser
- Be sure to use the supplied stabiliser. If you use any other stabiliser, you may damage the player.
On operation
- If the player is brought directly from a cold to a warm location, or is placed in a very damp room, moisture may condense on the lenses inside the player. Should this occur, the player may not operate properly. In this case, remove the disc and leave the player turned on for about an hour until the moisture evaporates.
On adjusting volume
- Do not turn up the volume while listening to a portion with very low level inputs or no audio signals. If you do, the speakers may be damaged when a peak level portion is played.
On inserting a disc
- You may hear a whistling sound from the player. This indicates that the player is automatically adjusting its internal mechanisms according to the inserted disc.
On cleaning
- Clean the cabinet, panel and controls with a soft cloth slightly moistened with a mild detergent solution. Do not use any type of abrasive pad, scouring powder or solvent such as alcohol or benzine.
On transportation
- Be sure to remove the CD and the stabiliser.
If you have any questions or problems concerning your player, please consult your nearest Sony dealer.
Notes on CDs
On handling CDs
- To keep the disc clean, handle the disc by its edge. Do not touch the surface.
- Do not stick paper or tape on the disc.
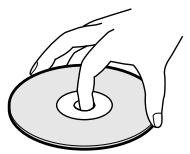
Not this way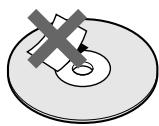
- Do not expose the disc to direct sunlight or heat sources such as hot air ducts, nor leave it in a car parked in direct sunlight as there can be considerable rise in temperature inside the car.
- Do not use any commercially available stabiliser and/or disc protector. If you do, the disc and the player may be damaged. • After playing, store the disc in its case.
On cleaning
- Before playing, clean the disc with a cleaning cloth. Wipe the disc from the centre out.
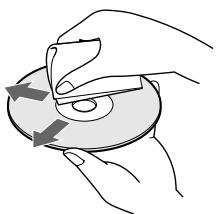
- Do not use solvents such as benzine, thinner, commercially available cleaners or anti-static spray intended for vinyl LPs.
Troubleshooting
If you experience any of the following difficulties while using the player, use this troubleshooting guide to help you remedy the problem. Should any problem persist, consult your nearest Sony dealer.
There's no sound.
→Check that the player is connected securely. →Make sure you operate the amplifier correctly. →Adjust the playback level using the LINE OUT/PHONE LEVEL control.
The CD does not play.
→There's no CD inside the player. Insert a CD. →Use the stabiliser. →Place the CD with the label side up on the disc tray correctly. →Clean the CD (see page 26). →Moisture has condensed inside the player. Remove the disc and leave the player turned on for about an hour (see page 26).
The recording level has changed.
→When you connect the amplifier via the VARIABLE LINE OUT jacks, the recording level changes if you adjust the LINE OUT/PHONE LEVEL control on the player or press LINE OUT LEVEL on the remote during recording.
The remote does not function.
→Remove the obstacles in the path of the remote and the player. →Point the remote at the remote sensor R on the player. →Replace all the batteries in the remote with new ones if they are weak.
Specifications
Compact disc player
| Laser | Semiconductor laser ( λ = 780 nm)Emission duration: continuous |
| Laser output | Max 44.6 μW * * This output is the value measured at a distance of 200 mm from the objective lens surface on the Optical Pick-up block with 7 mm aperture. |
| Frequency response | 2 Hz to 20 kHz ± 0.3 dB |
| Dynamic range | More than 100 dB |
| Harmonic distortion | CDP-XA50ES: Less than 0.0017 %CDP-XA30ES: Less than 0.0018 % |
Outputs
| Jack type | Maximum output level | Load impedance | |
| LINE OUT (FIXED) | Phono jacks | 2 V (at 50 kilohms) | Over 10 kilohms |
| LINE OUT (VARIABLE) | Phono jacks | 2 V (at 50 kilohms) | Over 50 kilohms |
| DIGITAL OUT (OPTICAL) | Optical output connector | -18 dBm | Wave length: 660 nm |
| DIGITAL OUT (COAXIAL) | Coaxial output connector | 0.5 Vp-p (75 ohms) | 75 ohms |
| PHONES | Stereo phone jack | 28 mW | 32 ohms |
General
Power requirements
| Where purchased | Power requirements |
| Europe | 220 V – 230 V AC, 50/60 Hz |
| Other countries | CDP-XA50ES 220 V – 230 V AC, 50/60 Hz |
| CDP-XA30ES 110 V – 120 V or 220 V – 240 V AC, adjustable, 50/60 Hz |
| Power consumption | CDP-XA50ES: 20 W |
| CDP-XA30ES: 20 W | |
| Dimensions (approx.) (w/h/d) | CDP-XA50ES: 430 × 125 × 375 mm( 17 × 5 × 14 7/8 in.) incl. projecting partsCDP-XA30ES: 430 × 125 × 350 mm( 17 × 5 × 13 7/8 in.) incl. projecting parts |
| Mass (approx.) | CDP-XA50ES: 15.2 kg (33 lbs 8 oz)CDP-XA30ES: 9.0 kg (19 lbs 13 oz) |
Supplied accessories
Audio cord (2 phono plugs - 2 phono plugs) (1)
Remote commander (remote) (1)
Sony SUM-3 (NS) batteries (2)
Stabiliser (1)
Design and specifications are subject to change without notice.
Index
A, B
A-B repeat 13
AMS 7,11
Automatic Music Sensor. See AMS
Auto Space 21
C
Connecting 4
Continuous Play 6
Custom Files 22
Custom Index 22
Delete Bank 24
what you can do with 22
Custom Index 22
Custom Index Play 23
Custom Index Single Play 23
D
Delete Bank 24
Delete Play 16
Delete Shuffle Play 14, 16
E
Editing. See Recording
Erasing
Custom Files 22
Custom Index 24
Delete Bank 25
F, G
Fading 19
Time Fade 20
H
Half disc (HALF) 18, 20
Handling CDs 26
Hookups 4
overview 4
|
Index 12
Custom 22
J, K
Just Edit 18
L, M, N, O
Last mode memory 22
Locating
by monitoring 12
by observing the display 12
directly 11
using AMS 11
using Custom Index 23
using index 12
P, Q
Peak Search 21
Playback
Continuous Play 6
Custom Index Play 23
Custom Index Single
Play 23
Delete Play 16
Delete Shuffle Play 14, 16
Programme Play 14
Repeat Play 12
Shuffle Play 13
Programme 14
changing 16
checking 15
for recording 17
Programme Edit 15
R
Recording 17
a programme 17
using Just Edit 18
using Time Edit 18
Remaining time 11
Remote control 4
Repeating
all 12
a specific portion 13
S
Searching. See Locating
Shuffle Play 13
Stabiliser 7
Storing
information about CDs 22
specific tracks 24
T
Time Edit 18
Time Fade 20
Total playing time 10
Troubleshooting 27
Turning off the music
calendar 11
U
Unpacking 4
V, W, X, Y, Z
Variable coefficient digital
filter 8
Names of controls
Buttons
A↔B 13
A.SPACE 21
CHECK 15
C.INDEX 23
CLEAR 16
CONTINUE 6
DISPLAY MODE 11
EDIT/TIME FADE 18,20
ERASE 22
FADER 19
FILE 23,24
FILTER 8
INDEX ↙/ 12,23
LINE OUT LEVEL 5
△ OPEN/CLOSE 7
PEAK SEARCH 21
PLAY MODE 7
PROGRAM 14
REPEAT 12
SHUFFLE 13
TIME 10
▷ 7
□□ 7
□ 7

10 11
Number 11
Switch
POWER 6
Control
AMS 7,11
LINE OUT/PHONE LEVEL
5
Jack
PHONES 6
Others
Disc tray 7
Display 10
Stabiliser 7
R 4
WARNING
To prevent fire or shock hazard, do not expose the unit to rain or moisture. To avoid electrical shock, do not open the cabinet. Refer servicing to qualified personnel only.
Do not install the appliance in a confined space, such as a bookcase or built-in cabinet.
CLASS 1 LASER PRODUCT
LUOKAN 1 LASERLAITE
KLASS 1 LASERAPPARAT
This unit is classified as a CLASS 1 LASER PRODUCT. THE LABEL INDICATING THAT THIS PLAYER BELONGS TO CLASS 1 is affixed to the rear of the cabinet.
The following caution label is affixed inside the unit.
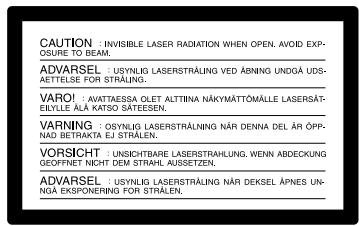
Welcome!
Thank you for purchasing this Sony compact disc player. Before operating this unit, please read this manual carefully and retain it for future reference.
About this manual
The instructions in this manual apply to the CDP-XA50ES and CDP-XA30ES models. Unless otherwise stated, the CDP-XA50ES model is shown in the illustrations. Any differences in operation are clearly indicated in the text, for example: "CDP-XA50ES only".
Conventions
- The instructions in this manual cover the controls on the player. You can also use the controls on your remote control if they have the same or similar names as those on your compact disc player.
- The following symbols appear in this manual:

This symbol indicates that you can perform the corresponding operation using the remote control.

This symbol indicates a tip or hint to make the operation easier.
TABLE OF CONTENTS
Preparation
Unpacking 4
Connecting the system 4
Playing a compact disc....6
Playing compact discs
Customizing the sound (digital filter function) 8
Using the display window 10
Locating a specific track .... 11
Locating a specific passage on a disc 12
Repeated playback of passages 12
Playing in any order (random playback) 13
Creating music programs (programmed playback) 14
Playing specific passages (selective playback) 16
Recording compact discs
Recording your own program .... 17
Recording a compact disc by specifying the recording time (time editing/precise editing)....18
Input and output crossfade 19
Some useful tips for recording 21
Storing information about compact discs (custom playback files)
What can you do with custom playback files? 22
Indexing a disc (custom index) 22
Memorizing specific passages of a disc (block deletion) ...... 24
Additional information
Precautions 26
Notes on compact discs.... 26
Troubleshooting 27
Specifications 27
Index
Index 28
Unpacking
Make sure that the following accessories were supplied:
- Audio connecting cable (1)
- Remote control (1)
- Sony SUM-3 (NS) batteries (2)
- Stabilizer (1)
Insert the batteries into the remote control
The supplied remote control allows you to operate the player from a distance.
Insert two R6 (AA) batteries, matching the + and – poles of the batteries. When using the remote control, point it at the remote sensor R on the player.
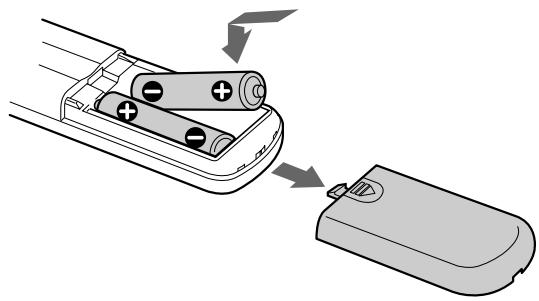

When to replace the batteries
Under normal usage conditions, the batteries should last about six months. If the remote control no longer operates the player, replace both batteries at the same time.
Notes
- Do not leave the remote control near a significant heat source or in a humid place.
- Do not let any foreign objects fall into the remote control housing, especially when replacing the batteries.
- Do not expose the remote control sensor to direct sunlight or lighting fixtures. This may cause a malfunction.
- If you do not use the remote control for an extended period, remove the batteries to prevent any risk of damage caused by corrosion or possible battery leakage.
System connections
Overview
This section describes connecting the compact disc player to an amplifier. Before making the connection, remember to turn off the power to each of the devices involved.
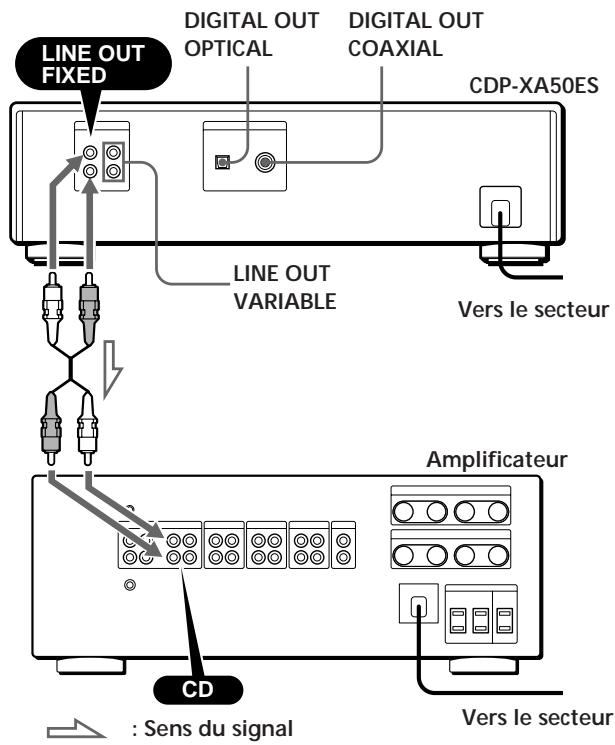
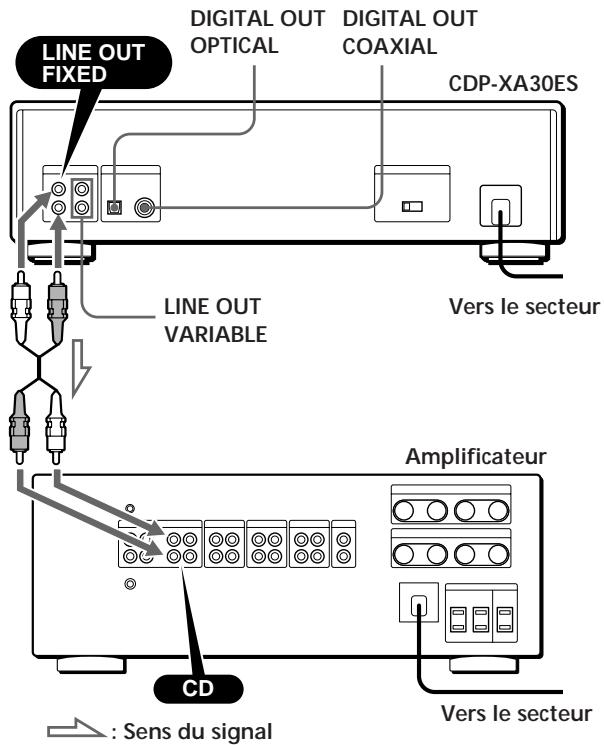
Required connection cables
■ Analog connections
• Audio cord (supplied) (1)
■ Digital connections
Connection
■ Analog connections
When connecting an audio cable, make sure that the color coding of the cable matches that of the appropriate jacks on the various connected devices: red (right) to red and white (left) to white. Ensure the quality of the connections to prevent hum and noise.
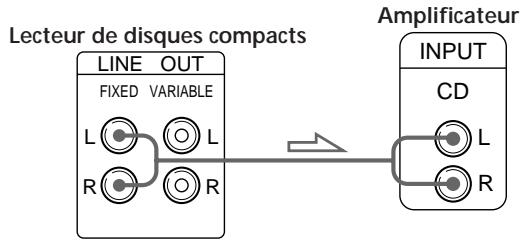
- If you have an analog power amplifier
Connect the amplifier to the VARIABLE LINE OUT jacks using the audio cable supplied with the unit. The LINE OUT/PHONE LEVEL control on the player or the LINE OUT LEVEL buttons on the remote control allow you to adjust the output level.
■ Digital connections
You can avoid signal degradation during transmission because the output of the music signal via the digital output connectors remains in digital form. You can connect a digital component such as a digital amplifier, a D/A converter, a DAT or MD recorder. If you connect a DAT or MD recorder, you can make digital recordings from compact discs.
Note that if you make this connection, you cannot use the input and output fade function (page 19).
- If you have a digital component with a digital optical input connector Connect the component via the DIGITAL OUT (OPTICAL) connector using the optical cable (not supplied). Remove the cap and plug in the optical cable.
- If you have a digital component with a digital coaxial input connector Connect the component via the DIGITAL OUT (COAXIAL) connector using the coaxial cable (not supplied).
Compact disc player Digital component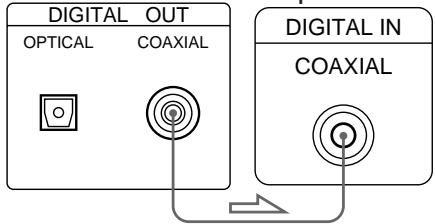
Note
If you make the connection via the DIGITAL OUT connector, noise may occur when you play a compact disc other than music, such as a CD-ROM.
Setting the voltage selector (models with a voltage selector only)
Check that the voltage selector on the rear panel of the player is set to the local power line voltage. If not, set the selector to the appropriate position using a screwdriver before connecting the power cord to a wall outlet.
Connecting the power cord
Connect the power cord to a wall outlet.
Remove the warning sheet
The warning sheet is located on the player. Remove the warning sheet before using the player.
Playing a compact disc
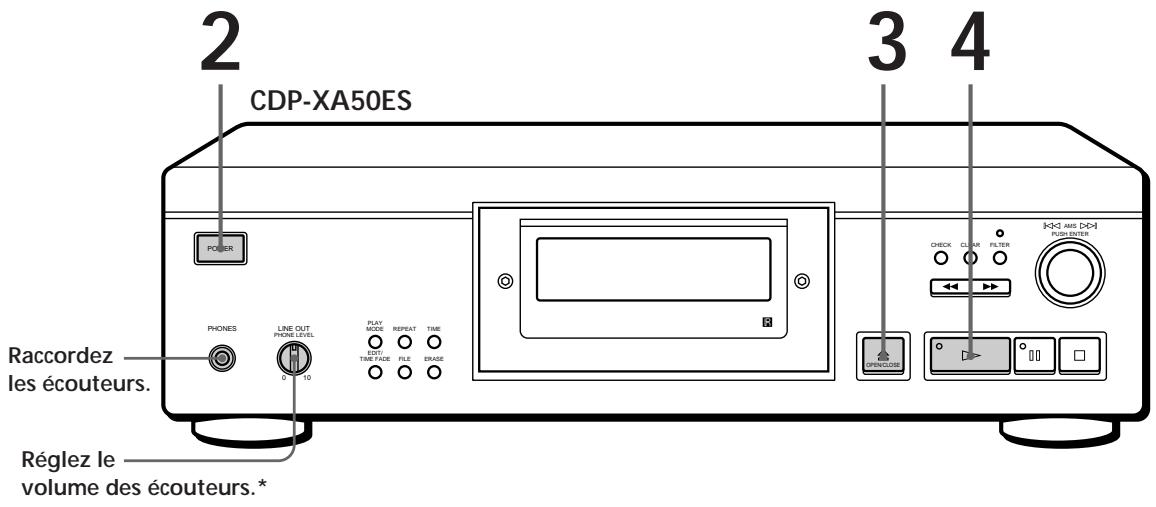
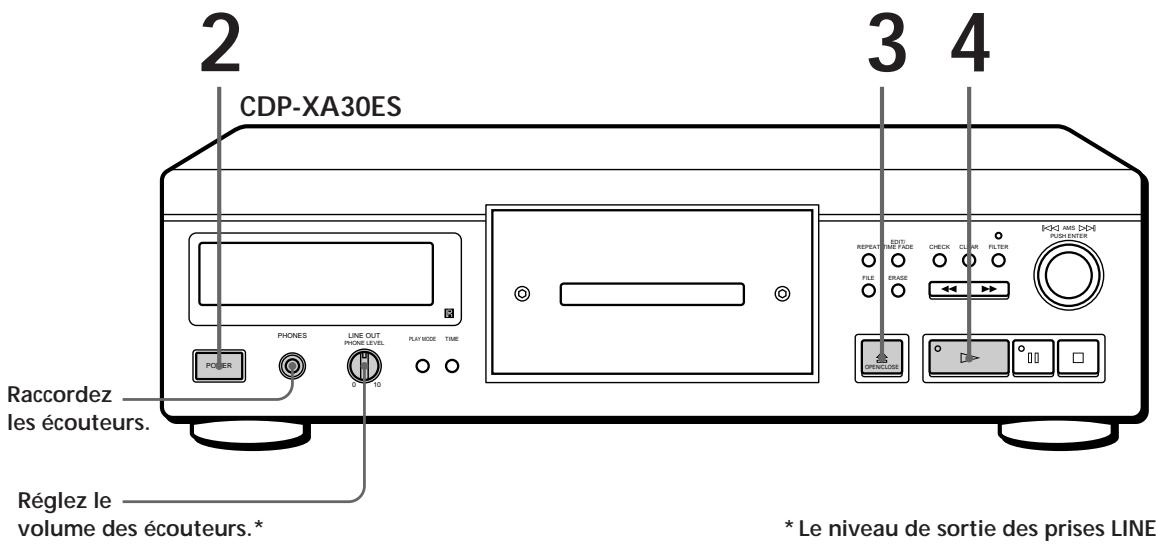
* The output level of the LINE OUT VARIABLE jacks also changes.
- See pages 4 – 5 for connections.

If you turn on the player with a compact disc on the disc tray
You can automatically start playback from the beginning of the compact disc. If you connect a commercially available timer, you can start playback of a compact disc at the time you program.
1 Turn on the amplifier and select the compact disc player position.
2 Press POWER to turn on the player.

If the indication "----" appears in the display window
Place the supplied stabilizer on the compact disc.
Otherwise, the following indication will appear.
Note
In step 3, do not place two or more compact discs at the same time.
Otherwise, you risk
damaging the discs and/or the player.

If playback does not start from the first track
Press PLAY MODE several times in succession
until "SHUFFLE", "PROGRAM", and "CUSTOM INDEX" disappear from the display window (or press CONTINUE on the remote control).
3 Press ≅ OPEN/CLOSE and place a disc on the disc tray.
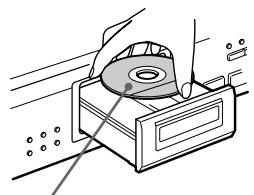
With the printed side facing up

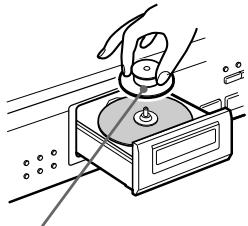
Place the supplied stabilizer on the CD. (The stabilizers supplied with the CDP-XA50ES and CDP-XA30ES are different.)
4 Press ▷.
The disc tray closes and the player plays all tracks once (continuous play).
Adjust the volume on the amplifier.
To stop playback
Press □.
| Si vous voulez | Vous devez |
| Activer la pause | Appuyer sur |
| Reprendre la lecture après la pause | Appuyer sur ou |
| Passer à la plage suivante | Tourner AMS dans le sens horaire. (Sur la télécommande, appuyez sur .) |
| Revenir à la plage précédente | Tourner AMS dans le sens antihoraire. (Sur la télécommande, appuyez sur .) |
| Arrêter la lecture et retirer le disque compact | Appuyer sur OPEN/CLOSE |
Customizing the sound (digital filter function)
This player is equipped with a variable coefficient digital filter (V.C.). By selecting the desired filter type, you can adjust the sound according to the characteristics of your system, the room, the music source, etc.
Selecting the filter directly on the player
1 Press FILTER.
The display window shows the currently selected filter number and the filter indicator flashes.
2 Turn ◀◀◀ AMS ▷▶▶ until the desired digital filter number appears in the display window.
When you turn the control |<<| AMS >>|, the digital filter number changes in the following sequence:

If you are listening to a disc, the sound is momentarily interrupted.
3 Press ◀◀ AMS ▷▶ to select the filter.
The original screen appears.
The selected digital filter number is stored in memory even if you turn off the unit.

You can also change the digital filter number by pressing the FILTER key while the indicator is flashing.
Selecting the filter using the remote control
1 Press DIGITAL FILTER.
The display window shows the currently selected filter number and the filter indicator flashes.
2 Press DIGITAL
FILTER repeatedly until the display window shows the desired filter number.
The digital filter number is memorized and the original screen reappears.
What is a variable coefficient (V.C.) digital filter?
CD players use digital filters to eliminate noise generated during sampling. You can change the tone of the sound by modifying the cutoff characteristics of the digital filter.
This player is equipped with five types of filters offering different coefficient characteristics: "STD", "1", "2", "3", and "4". Furthermore, the digital filters "3" and "4" each have three coefficient modes, A-C, for even more precise adjustments.
Below we provide some explanations to help you better understand the characteristics of the digital filters used on this player.
Fast roll-off and slow roll-off
In general, digital filters can be classified into fast roll-off and slow roll-off filters, depending on their cutoff characteristics.
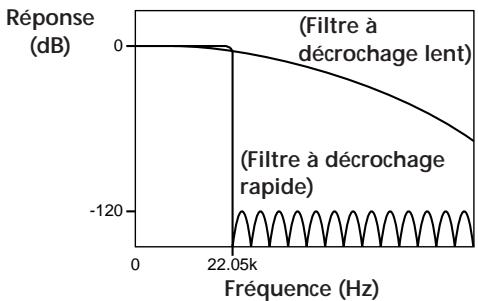
Comparison of cutoff characteristics of slow roll-off filters and fast roll-off filters
Fast roll-off filters abruptly cut the noise generated during sampling above 22.05 kHz. This is the best method to fully reproduce signals below 20 kHz: it is the basic principle of digital sound.
On the other hand, slow roll-off filters gradually cut the noise generated during sampling and are able to keep pre-echo and post-echo (a form of sound persistence) to a minimum in the impulse response signal.
Fast roll-off filter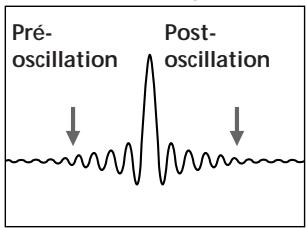
Slow roll-off filter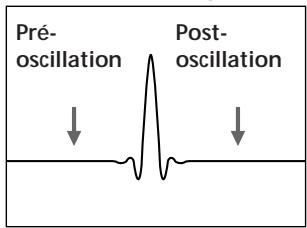
Comparison of impulse response of fast roll-off and slow roll-off filters
Cascade type and direct type
There are two methods of oversampling by digital filter: the cascade type and the direct type. The cascade type multiplies the signal by eight in three stages, and the direct type multiplies the signal by eight in one stage.
The cascaded filters offer high computational efficiency and high-precision fast roll-off characteristics. In addition, the integrated circuits in this player use the integral feed (FF) method between each of the phases to optimize data transfer accuracy.
Furthermore, octuple oversampling data can be obtained in one phase with the direct filters without any loss during transfer between calculation phases. However, since some circuits are extremely large, this player can only support slow roll-off filters.
![graph TD IN --> A["×2"] A --> B["×2"] B --> C["×2"] C --> D["×8"] D --> OUT A -->|FF| B B -->|FF| C C -->|FF| D](/content/2020/04/50772/images/1a7b146fbbe7eaa57572bfcd2f010fd6958f24ef5c2382d998a81b4db4d221aa.jpg)
Digital filter characteristics
Below we provide the settings and characteristics of each of the five digital filters. Use this information to select the filter of your choice.
STD: Standard
This is a cascaded fast roll-off filter. It has the same characteristics as the digital filters that have long been used on Sony high-end devices and ensures fast roll-off reaching -120 dB at 24 kHz. This filter uses the integral feed method between calculation phases and gives the sound an extended range and a vast spatial representation.
1: Spline
This is a cascaded slow roll-off filter that uses a cubic "spline" function for interpolation. The spline function ensures smoother connections between points, and among spline functions, the cubic filter is the most direct. The oscillation of the impulse response for this filter is less than that of a fast roll-off filter. With this filter, the sound image is clear and the sound reproduction is smooth.
2: Plain
This is a direct slow roll-off filter. It is characterized by the absence of quantization between the digital filter output and the D/A converter input.
Since direct calculations are used by the digital filter and the bit length for the digital filter output and the D/A converter input are identical, no requantization noise is generated between the digital filter and the D/A converter. This means that on 16-bit information from the disc, components up to 20 kHz are fed to the D/A converter without nonlinear operation. This results in clearer sound reproduction with greater amplitude.
3: Analog type
This is a direct slow roll-off filter that simulates a seventh-order analog Butterworth filter. This filter prevents any pre-ringing of the impulse response signal. Also, since it simulates an analog filter, it produces a high phase rotation outside the audible frequency range. Filters 3A to 3C differ in the degree of phase rotation. Filter 3A is multiplied by one (the true analog characteristic), filter 3b is multiplied by 0.75, and filter 3C by 0.5. The impulse response changes as shown in the figure below. The degree of pre-ringing and post-ringing varies with the degree of phase change. This gives the sound more warmth and depth.
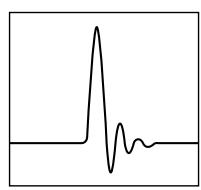
3A
3b
3C Comparison of impulse response of filter 3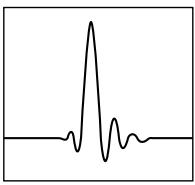
4: Butterworth
This is a direct slow roll-off filter incorporating fifth-order via ninth-order Butterworth filters. The phase, however, is linear and does not include the phase change possibilities of filter 3 (analog type). As shown in the figure below, only the cutoff characteristics can be changed in the fifth-order (4A), seventh-order (4b), and ninth-order (4C).
The oscillation of the impulse response increases from the fifth-order filter to the ninth-order filter. This filter produces a balanced and pleasant sound.
Response (dB)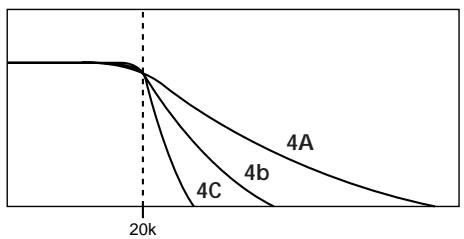
Frequency (Hz) Comparison of cutoff characteristics of filter 4
Note
The digital filter function mainly changes the characteristics outside the audible frequency range. It cannot affect changes in the audible frequency range such as those made with the amplifier's tone controls. Therefore, depending on the combination of equipment and sound sources, you may not notice a perceptible effect after switching the filter.
Using the display window
The display window allows you to check information about the disc.
CDP-XA50ES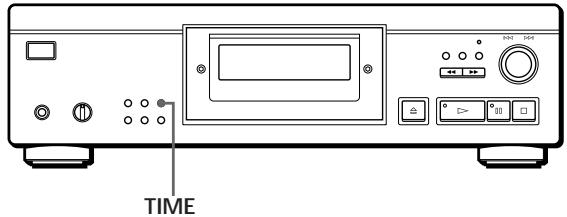
CDP-XA30ES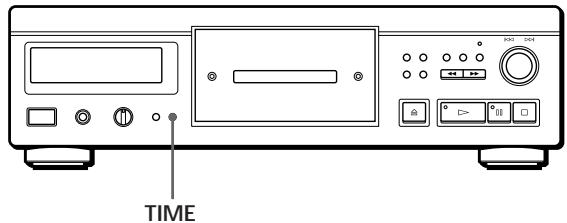
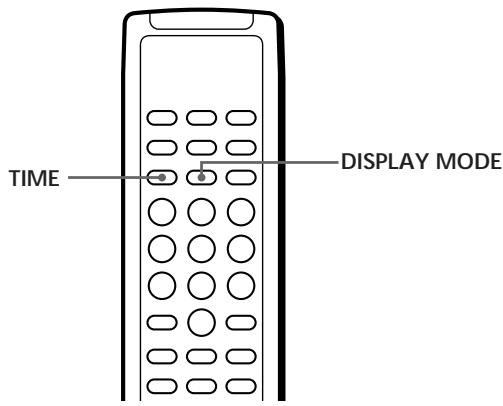
Checking the number and total playing time of tracks
Press TIME before starting playback. The display window shows the total number of tracks, total playing time, and the music calendar.
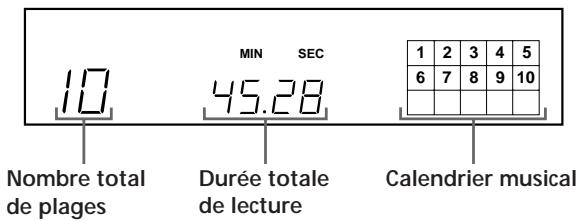
When in shuffle play mode ("SHUFFLE" appears in the display window, see page 13), a blank access time of one second is inserted between tracks. This additional time is automatically added to the total playing time shown in the display window.
If the disc has more than 15 tracks, the indication appears next to the number 15 in the music calendar. The information also appears when you press ≜ OPEN/CLOSE to close the disc tray.
Information displayed during disc playback
During disc playback, the display window shows the current track number, index number, playing time, and the music calendar.
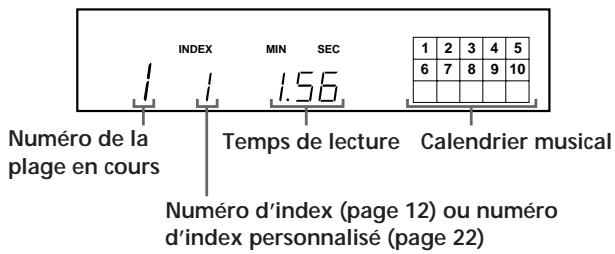
Track numbers disappear from the music calendar as soon as playback is finished.
Checking the remaining time
During disc playback, each press of the TIME button changes the indication in the display window according to the following sequence.
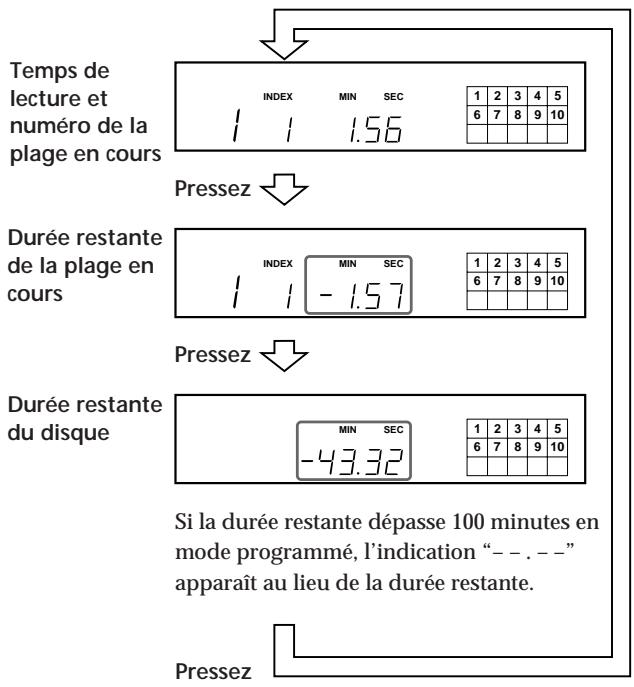
Disabling the music calendar in the display window
Each time you press DISPLAY MODE on the remote control during disc playback, the music calendar is alternately enabled and disabled in the display window.
Locating a specific track
During disc playback, you can quickly locate a track using the player's AMS (Automatic Music Sensor) or the numeric keys on the remote control.
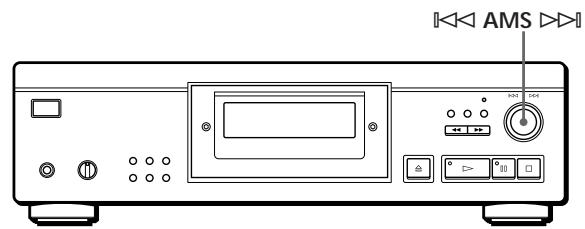
| Pour localiser | Vous devez |
| L’une des plages suivantes | Tourner AMS dans le sens horaire jusqu’à ce que vous ayez localisé la plage voulue. Si vous utilisez la télécommande, appuyez plusieurs fois de suite sur jusqu’à la plage voulue. |
| La plage en cours ou l’une des plages précédentes | Tourner AMS dans le sens antihoraire jusqu’à ce que vous ayez localisé la plage voulue. Si vous utilisez la télécommande, appuyez plusieurs fois de suite sur jusqu’à la plage voulue. |
| Directement une plage déterminée | Appuyer sur la touche numérique de la télécommande correspondant à la plage voulue. |

When directly locating a track with a number greater than 10
First press the >10 key, then press the corresponding numeric keys on the remote control. To enter "0", use the 10 key.
Example: To select the range 30
First press >10, then press 3 and 10.
Locating a specific passage within a range
You can locate a specific passage within a range while a disc is playing.
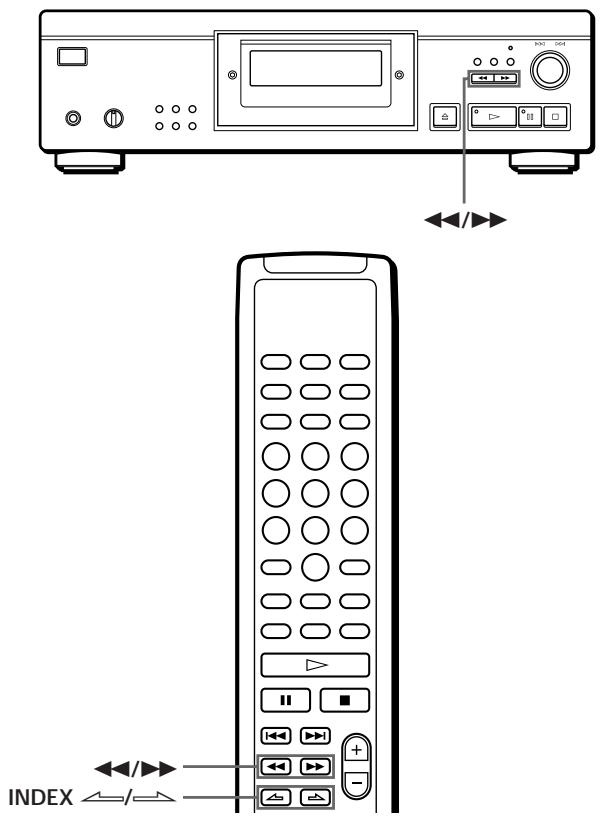
| Pour localiser un passage | Appuyez sur |
| En contrôlant le son | ▶▶ (avancer) ou sur ◀◀ (reculer) et maintenez la touche enfoncée jusqu'à ce que vous arriviez au passage voulu |
| Rapidement en observant la fenêtre d'affichage pendant une pause | ◀◀/▶▶ et maintenez la touche enfoncée jusqu'à ce que vous arriviez au passage voulu. Le son est coupé pendant cette opération. |
| A l'aide d'un index (uniquement sur les disques indexés) [IMAGE] | INDEX ⇌/↔ plusieurs fois de suite sur la télécommande jusqu'à ce que vous trouviez le passage |

What is an index?
It is a number that divides a range or a disc into several sections, allowing you to easily locate a specific point. You can identify discs that support index numbers by checking their packaging.
Note
If the indication “▶▶” appears in the display, it means the disc has reached the end of playback while you were holding down the ▶▶▶ button. Press
◀◀ or turn ◀◀◀ AMS ▷▶▶ counterclockwise to go back.
Repeating range playback
You can play ranges multiple times in any mode.
CDP-XA50ES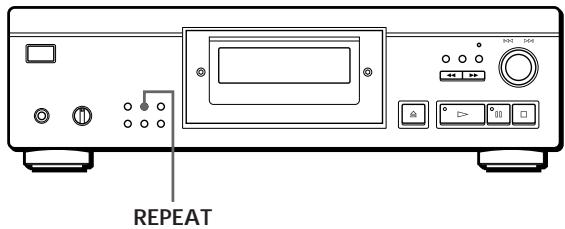
CDP-XA30ES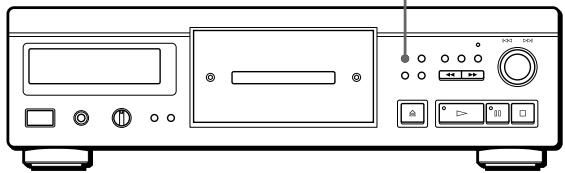
Press REPEAT during disc playback. The indication "REPEAT" appears in the display. The player repeats the ranges as follows:
| Lorsque le disque est reproduit en | Le lecteur répète la lecture |
| Lecture continue (page 6) | De toutes les plages |
| Lecture aléatoire (page 13) | De toutes les plages dans un ordre aléatoire |
| Lecture programmée (page 14) | Du même programme |
| Lecture sélective (page 16) | De l’ensemble des plages restantes |
| Lecture sélective et aléatoire (page 14, 16) | De l’ensemble des plages restantes dans un ordre quelconque |
| Lecture par index personnalisés (page 23) | De la section comprise entre deux numéros d’index |
To cancel repeat playback
Press REPEAT repeatedly until "REPEAT" disappears from the display.
Repeating the current track
You can activate repeat playback of the current track.
While playing the desired track, press REPEAT repeatedly until "REPEAT 1" appears in the display.
Note
You cannot repeat the current track if the disc is playing in custom index playback mode (see page 23).
Repeating a specific musical phrase (A↔B Repeat)
You can play a specific musical phrase within a track repeatedly.
This function can be very useful if you want to learn the music or lyrics of your favorite songs.
Note: This function cannot repeat a passage that spans two tracks.
1 While playing the desired disc, press A↔B on the remote control as soon as you reach the start point (point A) of the passage you want to repeat. The characters "A-" in the "REPEAT A-" indication flash in the display.
2 As soon as you reach the end point (point B) of the same passage, press A↔B again. The indication "REPEAT A-B" appears. The player plays this passage or specific musical phrase repeatedly.
To cancel A↔B repeat Press REPEAT.
Selecting a new start point
You can move the passage to be repeated downstream by changing the position of the start point.
1 Press A↔B while the player is repeating the previously defined musical passage. The end point B becomes the new start point A. The characters “A-” in the “REPEAT A-” indication displayed in the display window flash.
2 As soon as you reach the end point (point B) of the passage, press A↔B again. The indication "REPEAT A-B" appears. The player repeats the musical passage between the start point and the end point you have just defined.

If you want to restart playback from the start point A
Press ▷ during an A↔B repeat.
Playback in any order (random playback)
You can set the player to "mix" the tracks and play them in any order.
CDP-XA50ES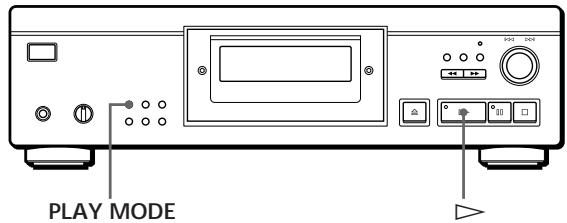
CDP-XA30ES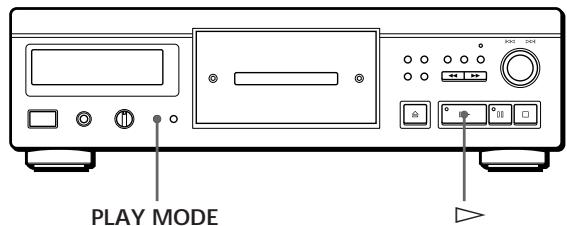
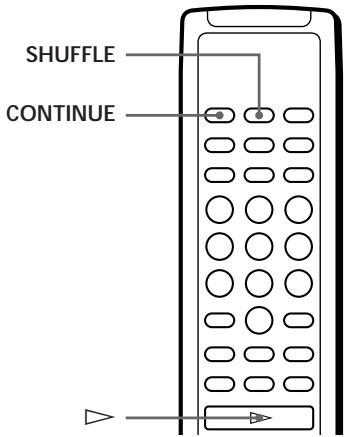
1 Press PLAY MODE repeatedly until "SHUFFLE" appears in the display window. If you are using the remote control, press SHUFFLE.
2 Press ▷ to start random playback. The indication [ ] appears while the player "mixes" the tracks.
To cancel random playback
Press PLAY MODE four times (or CONTINUE on the remote control).

You can activate random playback during playback
Press PLAY MODE once (or SHUFFLE on the remote control) and random playback starts from the current track.

You can delete the tracks you do not want to listen to during random playback (selective and random playback)
Press the numeric keys on the remote control corresponding to the track you want to erase.
The track number and the indication "OFF" appear in the display window, then that track number disappears from the music calendar.
If you want to reinsert this track, press the corresponding numeric key again.
To reinsert all tracks, press □ in stop mode.
Creating music programs (programmed playback)
You can arrange the order of tracks on a disc and thus create your own music program. The program can contain up to 24 tracks.
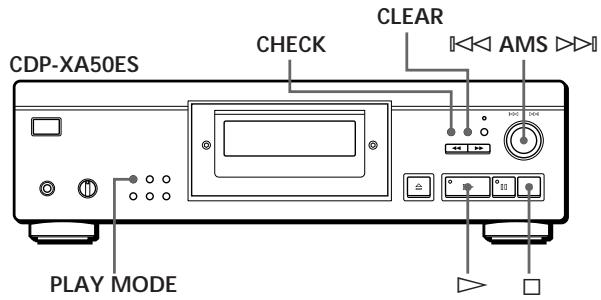
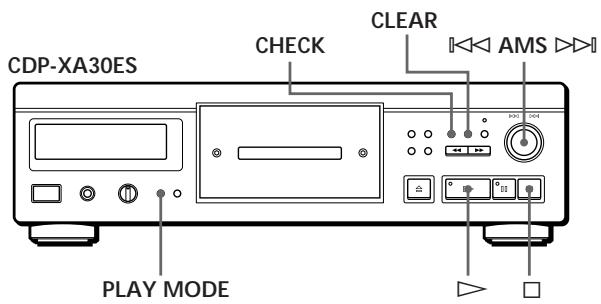
Creating a playback program on the player
1 Press PLAY MODE repeatedly until "PROGRAM" appears in the display window before starting playback.
2 Turn ≪ ≪ AMS ≪ ≪ until the desired track number appears in the display window.
The programmed playback order and the numbers of the tracks being programmed flash, and the total playback time including the track appears in the display window.
3 Press AMS to select the track.
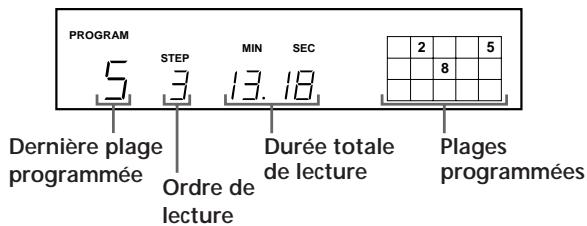
4 Repeat steps 2 and 3 to program tracks in the order of your choice. 5 Press ▷ to start programmed playback.
To cancel programmed playback Press PLAY MODE three times.

If tracks that are not consecutive on the disc are programmed consecutively (e.g., 1, 3, 5, etc.), a blank access time of one second is inserted between tracks.

The program remains active even at the end of playback You can restart the program playback by pressing ▷.
Notes
- The indication "--.-" appears in the display window instead of the total playing time if it exceeds 100 minutes.
- The indication "FULL" appears in the display window if you try to add a track to a program that already contains 24 tracks.
Creating a play program using the remote control
1 Press PROGRAM before starting playback. The indication "PROGRAM" appears in the display window.
2 Press the number keys corresponding to the tracks you want to program in the order of your choice.
Example: to program tracks 2, 8, and 5. Press the number keys 2, 8, and 5 successively.
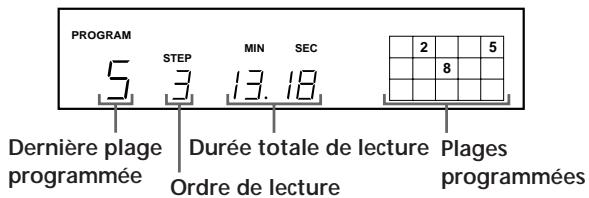
To select a track with a number greater than 10
Use the >10 key (see page 12).
If you have made a mistake
Press CLEAR and then the number of the correct track.
3 Press ▷ to start programmed playback.
To cancel programmed playback
Press CONTINUE.

You can check the total playing time during programming using the remote control (programming)
To select a range, press ◀◀◀ or ▶▶▶ and check the total playing time. Then press PROGRAM to confirm your choice.

If non-consecutive tracks on the disc are programmed consecutively (e.g., 1, 3, 5, etc.), a one-second blank access time is inserted between tracks.

The program remains active even at the end of playback. You can restart program playback by pressing ▷.
Notes
- The indication "--.--" appears in the display window instead of the total playing time if it exceeds 100 minutes.
- The indication "FULL" appears in the display window if you try to add a track to a program that already contains 24 tracks.
Checking the track order
You can check your program before or after you have started playback.
Press CHECK.
Each press of this button displays the track numbers in the programmed order in the display window. After the last track of the program, the display window shows "End" and returns to the initial indication. If you check the track order after starting playback, the display window shows only the remaining track numbers.
Changing the track order
You can modify your program before starting playback.
| Pour | Vous devez |
| Supprimer une plage | Appuyer sur CHECK jusqu’à ce que la plage jugée inutile apparaisse dans la fenêtre d’affichage et appuyez ensuite sur CLEAR. |
| Supprimer la dernière plage du programme | Appuyer sur CLEAR. Chaque fois que vous appuyez sur cette touche, la dernière plage est effacée. |
| Ajouter des plages à la fin du programme | Tourner Irish AMS >> jusqu’à ce que le numéro de la plage que vous voulez ajouter s’affiche et appuyez ensuite sur Irish AMS >> . Si vous utilisez la télécommande, appuyez sur la touche numérique des plages à ajouter. |
| Changer complètement le programme | Maintenir la touche CLEAR enfoncée jusqu’à ce que l’indication “ALL CLr” apparaisse dans la fenêtre d’affichage. Créez un nouveau programme en appliquant la procédure de programmation. |
Playing specific tracks (selective playback)
You can delete the tracks you do not wish to listen to, so that only the remaining tracks are played.
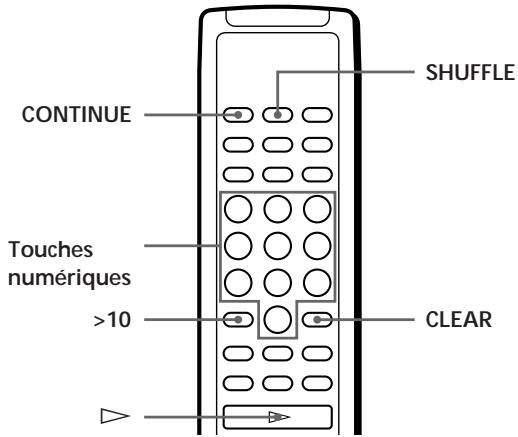
1 Press SHUFFLE. The "SHUFFLE" indication appears in the display window.
2 Press the number keys corresponding to the tracks you want to delete.
These track numbers disappear from the music calendar after the momentary display "OFF".
To delete a track with a number greater than 10, use the >10 key (see page 12).
If you made a mistake
Press the number key corresponding to the desired track. The indication "On" appears in the display window and the corresponding track is reinserted.
3 After deleting all tracks you do not want to play, press CONTINUE.
The indication "SHUFFLE" disappears from the display window.
If you press PLAY MODE on the player instead of CONTINUE on the remote control
The deleted tracks will be restored. Perform this operation using the remote control.
4 Press ▷ to start selective playback.
To cancel selective playback
Press ■ in stop mode.

The player keeps in memory the previously eliminated tracks even after the selective playback in question ends.
If you press ▷, you again have the possibility to play only the remaining tracks.

You can play these musical tracks in any order (selective and random playback).
Simply omit step 3 of the procedure described above.

You can delete a range while it is playing. Press CLEAR while the range of your choice is playing. The player deletes that range and resumes playback by playing the next range.

You can memorize the deleted ranges on each disc.
See "Memorizing specific ranges of a disc" on page 24.
Recording your own program
You can record the program you have composed onto a standard cassette, DAT, or MD. The program can contain up to 24 tracks. By inserting a pause in the programming, you can divide the program into two parts so that you can record it on both sides of a cassette.
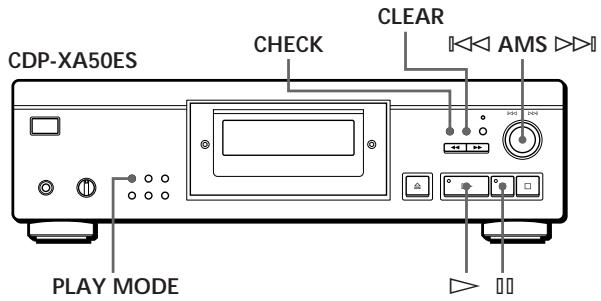
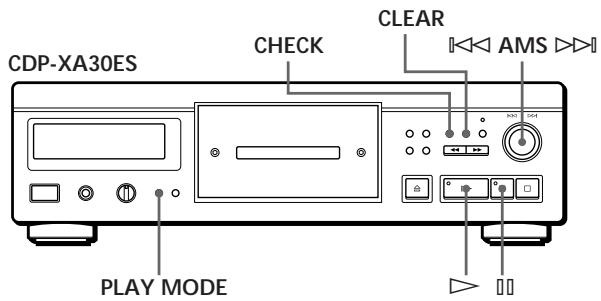
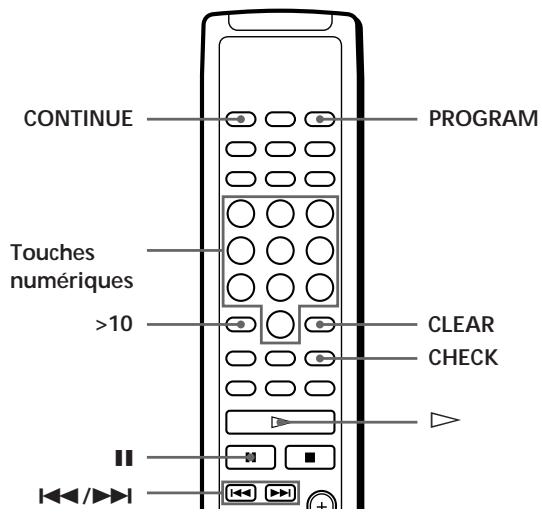
1 Create your own program (for side A when recording on a cassette) while checking the total playing time shown in the display window.
See "Creating music programs" on page 14.
2 If you are recording on both sides of the cassette, press to insert a pause.
The "P" indicator appears in the display window and the playing time is reset to "0.00".
If you are recording on one side of the cassette, or on a DAT or MD, skip this step and go directly to step 4.
A pause is counted as a track.
You can program up to 23 tracks when you insert a pause.
3 Repeat step 1 to create a program for side B.
4 Start recording on the deck and then press ▷ on the player.
If you record on both sides of the tape, the deck enters pause mode at the end of the program for side A.
5 If you record on side B, turn the tape over and press ▷ or □□ on the deck to resume playback.
To check and modify your program See pages 15 and 16.
The "SIDE-A" indication appears during program check for side A and "SIDE-B" for side B.
You can automatically insert a 3-second blank between each track
Use the automatic spacing function (see page 21).
Recording a compact disc by specifying the recording time (time editing/accurate editing)
You can have the deck create a program whose length matches the tape duration. Select one of the following options:
- Time editing: automatic creation of a program preserving the original order in which the tracks of the disc being processed are arranged.
- Accurate editing: automatic arrangement of the order in which tracks are played to take into account the length or duration of the tape.
The program can include up to 24 tracks (a pause inserted between two tracks is counted as a track).
Note that tracks with numbers greater than 24 cannot be programmed.
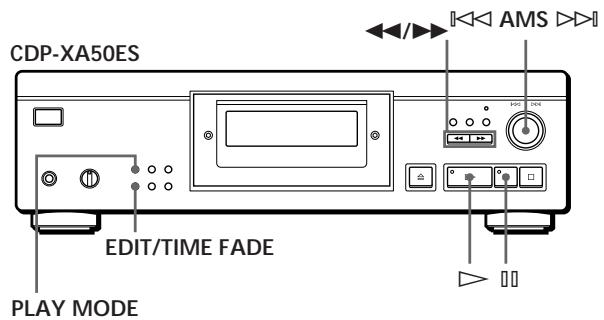
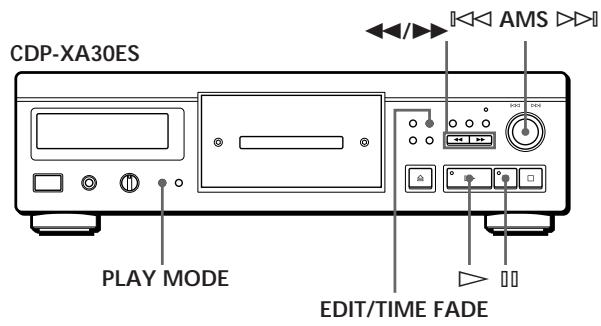
1 Press EDIT/TIME FADE before starting playback as follows:
- To select the time editing option, press the key once.
"EDIT" appears and "SIDE-A" flashes in the display window.
To select the precise editing option, press the key twice.
“(JUST)” appears and “SIDE-A” flashes in the display window.
2 Press ◀◀ or ▶▶ to specify the tape length.
Each press of these keys changes the display according to the sequence below, with the tape length for one side following each indication.

If you select "HALF"
The player sets the program for each side as half of the total playing time of the disc. Note that you cannot select “HALF” if the disc contains more than 24 tracks.
3 Press EDIT/TIME FADE to start the program creation by the player.
The display window shows the tracks to be recorded. The indication "SIDE-B" flashes in the display window.
4 If you are recording on both sides of the tape, press EDIT/TIME FADE again.
The player inserts a pause and creates the program for side B. The display window shows the programmed tracks.
If you are recording on only one side of the tape, DAT, or MD, skip this step.
5 Start recording on the deck, then press ▷ on the player.
If you are recording on both sides of the tape, the player enters pause mode at the end of the program for side A.
6 If you are also recording on side B, turn the tape over and press ▷ or □□ on the player to resume playback.
To cancel time editing/precise editing, press PLAY MODE repeatedly until “SHUFFLE”, “PROGRAM”, and “CUSTOM INDEX” disappear from the display window (or press CONTINUE on the remote control).

You can program the tracks of your choice in advance.
Select the tracks before applying the above procedure. The player creates a program with the remaining tracks. In this case, you cannot select "HALF" to specify the tape length.

You can determine the tape length of your choice.
Set the tape length using the [◀◀ AMS ▷▶] button.
Example: the tape length of one side is 30 minutes and 15 seconds.
1 To set the minutes, turn [◀◀ AMS ▷▶] until "30" appears in the display window, then press [◀◀ AMS ▷▶].
2 To set the seconds, turn [◀◀ AMS ▷▶] until "15" appears in the display window, then press [◀◀ AMS ▷▶].

If tracks that are not consecutive on the disc are programmed consecutively (e.g., 1, 3, 5, etc.)
A blank access time of one second is inserted between the tracks.

You can automatically insert a 3-second blank between each track.
Use the auto space function (see page 21).

To check and modify your program
See pages 15 and 16.
Fade-in and fade-out
You can manually perform a fade-in or fade-out to prevent tracks from starting and stopping abruptly.
Note that you cannot apply this effect if you are using the DIGITAL OUT connector.
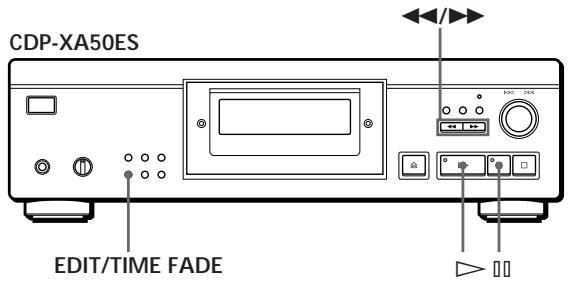
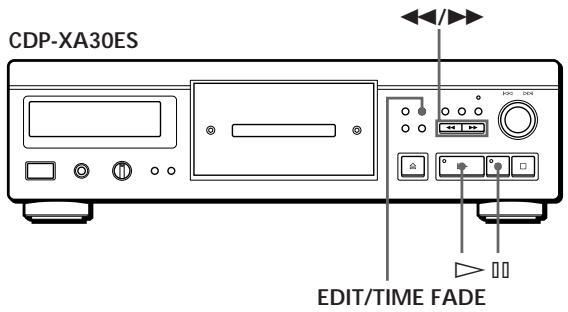
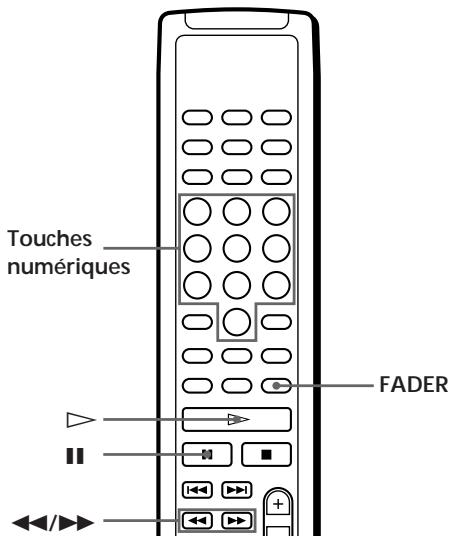
| Pour | Appuyez sur FADER |
| Créer un fondu enchaîné d'entrée | Pendant la pause. L'indication “FADE” clignote et un fondu enchaîné d'entrée est intégré. |
| Créer un fondu enchaîné de sortie | Lorsque vous voulez commencer le fondu enchaîné de sortie.L'indication “FADE” clignote. Le fondu enchaîné de sortie est intégré et le lecteur passe en mode de pause. |
Changing the fade time
You can change the fade time by setting it to a duration between 2 and 10 seconds when performing your audio fades. If you do not intervene, the default fade time is 5 seconds.
1 Press FADER before starting playback. The indication "5 SEC" appears and "FADE" flashes in the display window. 2 Press the appropriate numeric key to specify the fade time.
You can also specify the duration of the crossfade by pressing the ◀◀/
▶▶ keys until the desired duration is displayed.
Output crossfade at the specified time (programmed fade)
You can program the player to automatically include an output crossfade by specifying the playback time. Once set, the programmed fade is activated twice, in the sense that playback ends with an output crossfade at the end of each side of the cassette.
1 Press EDIT/TIME FADE three times before starting playback.
The indications "TIME FADE" and "SIDE-A" appear in the display window.
2 Press ◀◀ or ▶▶ to specify the playback time.
Each press of these keys changes the display according to the sequence below, with the tape length of one side following each indication.

If you select "HALF"
The player sets the playback time to half of the total playback duration.
3 Press ▷ to start playback. At the specified time, the playback sound fades out, the "FADE" indication flashes in the display window, and the player enters pause mode. The "SIDE-B" indication appears in the display window. 4 To record on side B, turn the cassette over and press ▷ or □□ on the player to resume playback.
In this case too, playback ends with an exit fade at the specified time.
To cancel the programmed fade
Press EDIT/TIME FADE.
You can set the playback time of your choice. Refer to the section “You can determine the tape length of your choice” on page 19.
You can change discs during a programmed fade.
If playback ends before the programmed exit fade (for example, if you are recording compact discs onto a cassette), change the disc. The exit fade time is only counted during playback.
You can include an entry fade for resuming playback in step 4.
After turning over the cassette, press FADER.
Note
If you press ◀◀ or ▶▶ during playback in programmed fade mode, the programmed fade will be canceled.
Some useful recording tips 📤
Using these functions makes recording compact discs easier.
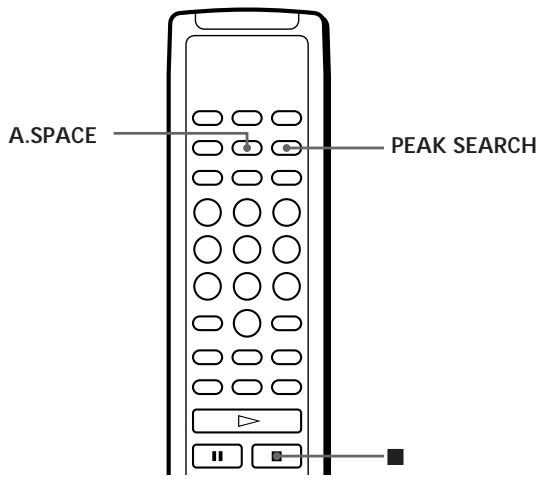
Setting the recording level (peak search)
The player searches for the maximum level among all tracks to be recorded, allowing you to set the recording level before recording begins.
1 Before starting playback, press PEAK SEARCH. The “PEAK” indicator flashes in the display window and the player plays the passage with the maximum level. 2 Set the recording level on the deck. 3 Press ■ on the player to stop the peak search. The “PEAK” indicator disappears from the display window.
Note
The peak level indication may change each time you adjust the same disc. However, this difference is negligible, so you will have no problem setting the recording level accurately.
Locating each track on a given tape using the AMS function (Automatic Music Sensor)
The automatic music sensor function inserts a 3-second blank between each musical track during playback. It allows you to locate each track using the AMS function on the deck.
Before starting playback, press A.SPACE. The "AUTO SPACE" indicator appears in the display window.
To cancel the automatic music sensor function
Press A.SPACE until the "AUTO SPACE" indicator disappears from the display window.
Note
If you use the automatic music sensor function during recording, for example, of a medley or a symphony, the music may be interrupted when changing musical tracks. This type of interruption occurs if track numbers have been assigned without considering the beginning or end of the different movements of a work.
What can you do with custom play files?
For each disc, the player can store two types of information called "custom play files." When you have stored custom play files for a disc, the player automatically recalls the stored information when you insert the disc. Note that custom play files are erased if you do not use the player for about a month.
You can store the following information:
| Lorsque vous utilisez | Vous pouvez |
| Index personnalisé(page 22) | Indexer le disque à 8 endroits (pour un disque de 32 plages ou moins)ou à 5 endroits (pour un disque de plus de 32 plages) |
| Suppression de bloc(page 24) | Supprimer certaines plages et mémoriser uniquement les plages que vous voulez écouter |
The custom play file indicator flashes when you store the corresponding information.
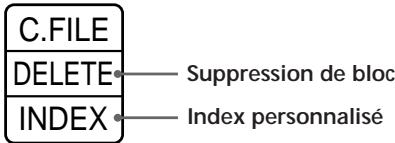
When you store a custom play file for a disc, the player reminds you how you last listened to that disc, even if you have removed it from the player (last mode memory). If you insert the same disc again, the player will play it in the same playback mode. The player also remembers the duration of the fade-in and fade-out if you have changed the duration.
Note that if you press ▷ to close the disc tray and start playback, the player plays the disc in the currently selected playback mode instead of the memorized playback mode.
Where are custom play files stored?
Custom play files are not stored on the disc but in the player's memory. In other words, you cannot use custom play files if you play the disc on other players.
How many discs can you customize?
You can program up to 224 discs in the custom file memory.
The player counts a disc once even if you save the custom index and block deletion at the same time.
You can check the number of discs you can customize.
1 Remove the disc from the player. 2 Press OPEN/CLOSE to close the disc tray. 3 Press TIME when the music calendar disappears from the display window. The number of custom play files you can store is displayed.
If "FULL" appears in the display window
When the custom file memory is full, the player displays the message "FULL" if you press the FILE button to save information, and you can no longer store data for any disc. If necessary, delete unnecessary custom files (see pages 24 and 25).
To erase custom play files for all discs
While holding down ERASE and FILE, press POWER to turn on the player. The indication "FILE CLr" appears in the display window and all custom play files are erased.
Indexing a disc (custom index)
You can index the disc at 8 points (for a disc with 32 tracks or less) or at 5 points (for a disc with more than 32 tracks) so that you can quickly locate a specific passage. This function is very useful when listening to symphony or concerto discs where certain pieces are divided into several tracks (see example below).
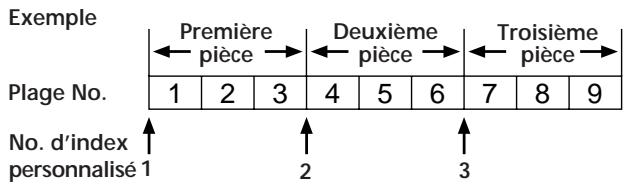
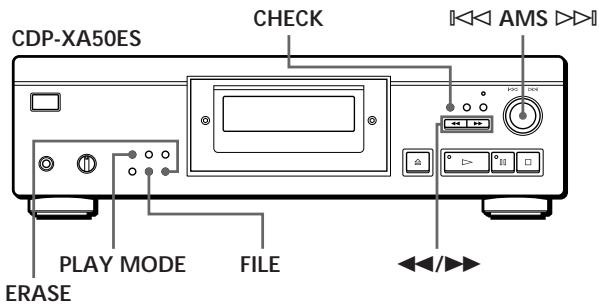
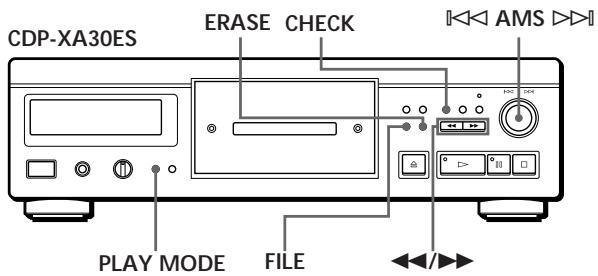
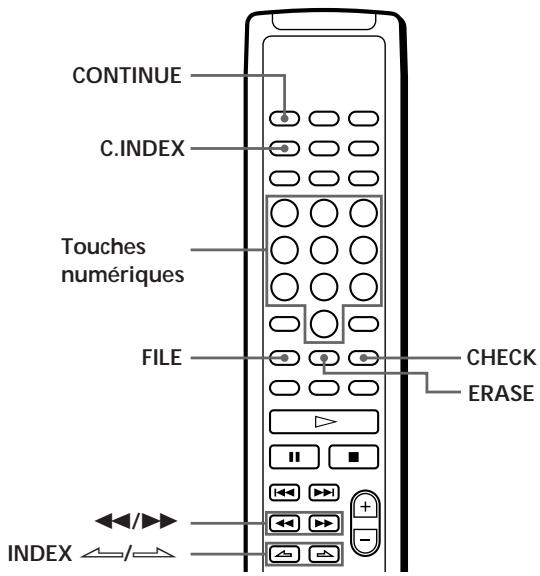
1 Insert the disc.
2 Press PLAY MODE repeatedly until "CUSTOM INDEX" appears in the display window.
If you are using the remote control, press C.INDEX.
The music calendar disappears.
3 Press FILE at the location where you want to insert an index.
The custom index number flashes in the display window. The player plays the passage for 3 seconds from the point to be indexed.
4 Press ◀◀ or ▶▶ to adjust the index point so that the player can play the disc from the exact position you want to index.
Pressing these keys 7 times shifts the indexed point approximately 1 second forward or backward.
If you do not wish to insert an index at this location, press CLEAR and search for another point to index.
5 Press FILE again to memorize the custom index.
“INDEX” of the custom playback file indication lights up in the display window.
6 To insert other custom indexes, repeat steps 3 to 5.

If you have already chosen where to insert an index You can directly insert an index without adjusting its position. When you have located the point to index, first press to activate playback pause and then press FILE to insert an index.
Playing from an index (playback by custom indexes)
1 Press PLAY MODE repeatedly until “CUSTOM INDEX” appears in the display window.
If you are using the remote control, press C.INDEX.
2 Locate the custom index of your choice:
| Pour localiser | Appuyez sur |
| L’index personnalisé suivant [IMAGE] | INDEX ⟶ |
| L’index personnalisé en cours [IMAGE] | INDEX ⟶ |
| Directement un index personnalisé spécifique [IMAGE] | La touche numérique correspondant à l’index personnalisé |
Playback starts from the selected custom index and continues to the end of the disc.
To cancel playback by custom indexes
Press PLAY MODE twice (or CONTINUE on the remote control).
Notes
- You can activate the index search function (see page 12).
- Use the INDEX ↩/¬ keys to locate the next or current custom indexes instead of the ◀◀/▶▶ keys on the remote control.
Playing from one index to the next (single custom index playback)
1 Press PLAY MODE repeatedly until "CUSTOM INDEX (1)" appears in the display window.
If using the remote control, press C.INDEX.
2 Press the numeric key on the remote control corresponding to the desired custom index. Playback starts from the selected custom index and stops at the beginning of the next index.
To cancel single custom index playback, press PLAY MODE once (or CONTINUE on the remote control).

You can activate repeated playback of the passage between two indexes.
Press REPEAT.
Deleting custom indexes
1 Insert the disc. 2 Press PLAY MODE repeatedly until "CUSTOM INDEX" appears in the display window.
If you are using the remote control, press C.INDEX.
3 Press CHECK repeatedly until the custom index number to be erased flashes. 4 Press ERASE while the number flashes to erase the custom index. The following custom index numbers decrease by one.
Memorizing specified ranges of a disc (block erase)
You can erase certain ranges and memorize only the ranges you want to listen to. You can start playing your favorite ranges without erasing the ranges each time.
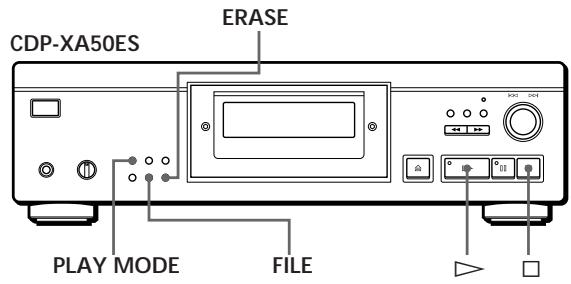
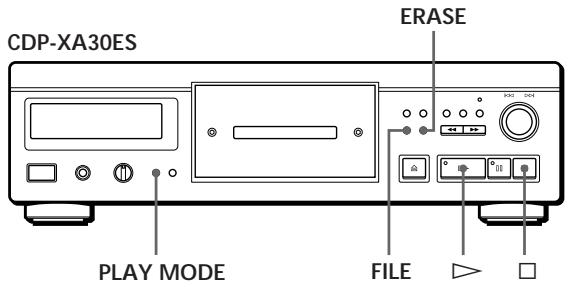
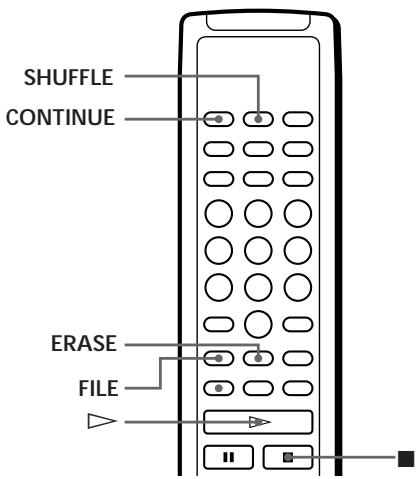
1 Insert the disc. 2 Erase the ranges you do not want to listen to.
Follow steps 1 to 3 in “Playing specific ranges” on page 16.
3 Press FILE to memorize the remaining ranges.
“DELETE” in the custom play file indication lights up in the display window.
Playing with the block erase function
1 Press PLAY MODE repeatedly until “SHUFFLE”, “PROGRAM”, and “CUSTOM INDEX” disappear from the display window. If you are using the remote control, press CONTINUE. The block erase function is reactivated and the numbers of the selected ranges appear in the music calendar.
2 Press ▷ to start playback.
To cancel playback using the block erase function
Press □.
To resume playback using the block erase function
When “PROGRAM” or “CUSTOM INDEX” appears in the display window, press PLAY MODE repeatedly until these indications disappear from the display window or until “SHUFFLE” appears in the display window. The block erase function is restored and you can start playback by pressing ▷.

You can activate shuffle play using the block erase function.
In step 1, press PLAY MODE repeatedly until "SHUFFLE" appears in the display window (or press SHUFFLE on the remote control).
Canceling the block erase function
1. Insert the disc.
2. Press PLAY MODE repeatedly until "PROGRAM" and "CUSTOM INDEX" disappear from the display window.
If you are using the remote control, press CONTINUE or SHUFFLE.
The display window shows the memorized block erase.
3. Press ERASE to cancel the block erase.
"DELETE" disappears from the custom play file indication.
Precautions
Safety
- Caution — The optical instruments in this device are hazardous to the eyes.
- If any object or liquid enters the cabinet, unplug the player and do not use it again until it has been checked by qualified personnel.
Power
- Before using the player, make sure that the operating voltage of the device is identical to that of your local power supply. The operating voltage is indicated on the nameplate on the back of the player.
- The player remains connected to the mains supply as long as it is connected to the wall outlet, even if the unit has been turned off beforehand.
- If you do not intend to use the player for an extended period, unplug it from the wall outlet. To disconnect the power cord, pull on the plug; never pull on the cord itself.
- The power cord may only be replaced by an authorized service center.
Installation
- Install the player in a well-ventilated location to prevent any risk of overheating inside the cabinet.
- Do not install the player on a soft surface such as a carpet, which could obstruct the ventilation openings on the bottom of the unit.
- Do not install the player near heat sources or in a place that is excessively dusty, exposed to direct sunlight, or subject to vibrations or significant mechanical shocks.
To avoid deterioration of sound quality
- Do not touch the lens.
Using the stabilizer
- Use the supplied stabilizer. Using another stabilizer may damage the player.
Operation
- If you suddenly move the player from a cold room to a warm room, or install it in a particularly humid room, condensation may form on the lenses inside the player. This may affect the player's operation. In such a case, remove the disc from the tray and leave the player on for about an hour to allow the moisture to evaporate.
Adjusting the volume
- Do not increase the volume when listening to a passage with a very low input level or no audio signal. You may damage the speakers when playing a passage with a very high input level.
Inserting a disc
- You may hear a whistling sound coming from the player. This sound indicates that the player is automatically adjusting its internal mechanisms to the inserted disc.
Maintenance
- Clean the cabinet, console, and controls with a soft cloth moistened with a mild detergent solution. Do not use abrasive pads, scouring powder, or solvents such as alcohol or benzene.
About transportation
- Remove the compact disc and the stabilizer.
If you experience any difficulty with your player, do not hesitate to consult your Sony dealer.
Notes on compact discs
Handling compact discs
- To keep discs clean, hold them by the edges without touching the surface.
- Do not stick paper or adhesive tape on the discs.
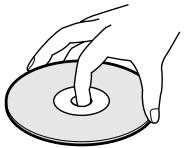
Not this way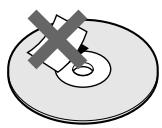
- Do not expose discs to direct sunlight or heat sources such as hot air ducts, and do not leave them in a car parked in the sun, as the temperature inside the cabin can reach high levels.
- Refrain from using any commercially available stabilizer and/or disc protector. Otherwise, you risk damaging the discs and the player.
- After playing, store the discs in their protective cases.
Maintenance
- Before playing a disc, clean it with a cloth provided for this purpose. Wipe the discs from the center outward.
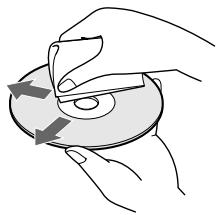
- Do not use solvents such as benzene, paint thinners, commercially available detergents, or antistatic sprays intended for black vinyl records.
Troubleshooting
If you encounter any of the following difficulties while using this player, consult this troubleshooting guide to resolve the problem. If any malfunction persists, seek advice from your Sony dealer.
No sound.
→Check that the player is properly connected. →Make sure you are using the amplifier correctly. →Adjust the playback level using the LINE OUT/PHONE LEVEL control.
Disc playback does not start.
→There is no compact disc in the player. Insert a compact disc. →Use the stabilizer. →Place the disc correctly on the playback tray with the printed side facing up. →Clean the disc (see page 26). →Moisture has condensed inside the player. Remove the disc and leave the player on for about one hour (see page 26).
The recording level has changed.
→If you connect the amplifier to the VARIABLE LINE OUT jacks, the recording level changes if you adjust the LINE OUT/PHONE LEVEL control on the player or press LINE OUT LEVEL on the remote control during recording.
The remote control does not work.
→Remove obstacles between the remote control and the player. →Point the remote control at the remote sensor R on the player. →Replace the two batteries in the remote control if they are exhausted.
Specifications
Compact disc player
| Laser | Laser à semi-conducteurs ( λ = 780 nm) |
| Durée d’émission: continue | |
| Puissance de sortie laser | Max. 44,6 μW* |
| * Cette puissance est la valeur mesurée à une distance de 200 mm de la surface de la lentille de l’objectif du bloc optique avec une ouverture de 7 mm. | |
| Réponse en fréquence | 2 Hz à 20 kHz ± 0,3 dB |
| Plage dynamique | Plus de 100 dB |
| Distorsion harmonique | CDP-XA50ES: Moins de 0,0017 %CDP-XA30ES: Moins de 0,0018 % |
Outputs
| Type de fiche | Niveau de sortie maximal | Impédance de charge | |
| LINE OUT (FIXED) | Fiche phono | 2 V(à 50 kilohms) | Plus de 10 kilohms |
| LINE OUT (VARIABLE) | Fiche phono | 2 V(à 50 kilohms) | Plus de 50 kilohms |
| DIGITAL OUT (OPTICAL) | Connecteur de sortie optique | -18 dBm | Longueur d'onde: 660 nm |
| DIGITAL OUT (COAXIAL) | Connecteur de sortie coaxial | 0,5 Vp-p(75 ohms) | 75 ohms |
| PHONES | Fiche phono stéréo | 28 mW | 32 ohms |
General characteristics
Connection power
| Lieu d'achat | Puissances de raccordement | |
| Europe | CA 220 V – 230 V, 50/60 Hz | |
| Autres pays | CDP-XA50ES | CA 220 V – 230 V, 50/60 Hz |
| CDP-XA30ES | CA 110 V – 120 V ou 220 V – 240 V,commutable, 50/60 Hz | |
| Consommation électrique | CDP-XA50ES: 20 W | |
| CDP-XA30ES: 20 W | ||
| Dimensions (approx.) | CDP-XA50ES: 430 × 125 × 375 mm( 17 × 5 × 14 7/8 pouces) parties saillantes comprises | |
| CDP-XA30ES: 430 × 125 × 350 mm( 17 × 5 × 13 7/8 pouces) parties saillantes comprises | ||
| Masse (approx.) | CDP-XA50ES: 15,2 kg (33 livres 8 onces) | |
| CDP-XA30ES: 9,0 kg (19 livres 13 onces) | ||
Supplied accessories
Audio cable (2 phono plugs - 2 phono plugs) (1)
Remote control (1)
Sony SUM-3 (NS) batteries (2)
Stabilizer (1)
Design and specifications are subject to change without notice.
Index
A, B
AMS 7,11
Cancel
custom play files 22
custom indexes 24
C
Connections 4
Presentation 4
D
Unpacking 6
Half disc (HALF) 18, 20
Troubleshooting 22
Deactivating the musical calendar 10
Automatic music detector. See AMS
Remaining time 11
Total playing time 10
E
Recording 17
of a program 17
Precise editing 18
Time editing 18
Automatic spacing 21
F, G, H
Playback files
custom 22
Custom index 22
What can you do with 22
Block deletion 24
Variable coefficient digital filter 8
Crossfade 19
Programmed fade 20
Programmed fade 17
I, J, K
Index 12
Customization 22
Custom index 22
L
Playback
Random playback 13
Continuous playback 6
Playback by custom indexes 23
Playback by single custom index 23
Programmed playback 14
Repeat playback 12
Selective playback 16
Selective and random playback 14, 16
Random playback 13
Continuous playback 6
Playback by custom indexes 23
Reading by unique custom index 23
Selective reading 16
Selective and random reading 14, 16
Location
with AMS 11
with indexes 12
with custom indexes 23
by controlling 12
by observing the display window 12
directly 11
M, N, O
CD handling 26
Memory of last mode 22
Manipulation of CDs 26
Memory of the last mode 22
Memorization
of specified ranges 20
of data on CDs 18
Editing. See Recording
Program editing 15
Precise editing 18
Time-based editing 15
P, Q
Programming 14
of recording 17
modification 16
verification 15
R
Connection 4
Search. See Locating
Searching for peak level 21
Repeat
of disc 12
of a specific passage 12
A-B repeat 13
S
Voltage selector 9
Stabilizer 5
Block deletion 24
T, U, V, W, X, Y, Z
Remote control 4
Designation of controls
Keys
A↔B 13
A.SPACE 21
CHECK 15
C.INDEX 23
CLEAR 16
CONTINUE 6
DISPLAY MODE 11
EDIT/TIME FADE 18,20
ERASE 22
FADER 19
FILE 23, 24
FILTER 8
INDEX / 12,23
LINE OUT LEVEL 5
OPEN/CLOSE 7
PEAK SEARCH 21
PLAY MODE 7
PROGRAM 14
REPEAT 12
SHUFFLE 13
TIME 10
▷ 7
□□ 7
□ 7

10 11
Numeric 11
Switch
POWER 6
Command
AMS 7,11
LINE OUT/PHONE LEVEL 5
Jack
PHONES 6
Others
Display window 10
Disc tray 7
Stabilizer 7
R 4
WARNING
To prevent fire or shock hazard, do not expose the unit to rain or moisture.
To avoid electrical shock, do not open the unit. Refer servicing to qualified personnel only.
Do not install the appliance in a confined space, such as a bookcase or built-in cabinet.
CLASS 1 LASER PRODUCT LUOKAN 1 LASERLAITE KLASS 1 LASERAPPARAT
This unit is classified as a CLASS 1 LASER PRODUCT. The label indicating this is located on the exterior of the rear panel.
The following caution label is located inside the unit.
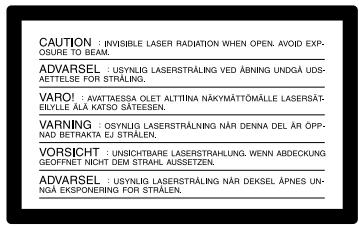
Welcome!
Congratulations on your purchase of the Sony compact disc player. Before operating the unit, please read this manual thoroughly and retain it for future reference.
About this manual
The instructions in this manual refer to models CDP-XA50ES and CDP-XA30ES. The illustrations use the CDP-XA50ES model unless another model is indicated. Differences in operation are clearly indicated in the text, for example, "only for CDP-XA50ES".
Conventions
- The instructions in this manual describe the controls of the player. You can also use the controls on the remote control if the names match or are similar to those on the player.
- The following icons are used in this manual:

Indicates that you can perform the task using the remote control.

Indicates suggestions and tips to perform the task more easily.
TABLE OF CONTENTS
Getting started
Unpacking 4
Connecting the system 4
Playing a CD 6
Playing compact discs
Customizing the sound of the music (Digital filter function) 8
Using the display....10
Locating a specific track 11
Locating a specific point in a track.... 12
Repeating tracks 12
Playing tracks in random order (Shuffle Play) 13
Creating your own program (Program Play).... 14
Playing specific tracks (Play Suppression) 16
Recording from compact discs
Recording your own program .... 17
Recording a CD specifying tape length
(Synchronized Editing/Adjusted Editing) 18
Fading in and out of sound 19
Useful recording tips 21
Storing information about compact discs (Custom Files)
Usefulness of custom files 22
Entering indexes on a disc (Custom Index).... 22
Storing specific disc topics (Bank deletion) ...... 24
Additional information
Precautions 26
Notes on compact discs 26
Troubleshooting 27
Specifications 27
Alphabetical index
Alphabetical index 28
Unpacking
Check that the following components are included:
- Audio connecting cable (1) • Remote control (1)
- Sony SUM-3 (NS) batteries (2)
- Stabilizer (1)
Inserting batteries into the remote control
You can control the player using the supplied remote control.
Insert two R6 (AA size) batteries, matching the + and - polarities of the batteries. When using the remote control, point it at the remote sensor R on the player.
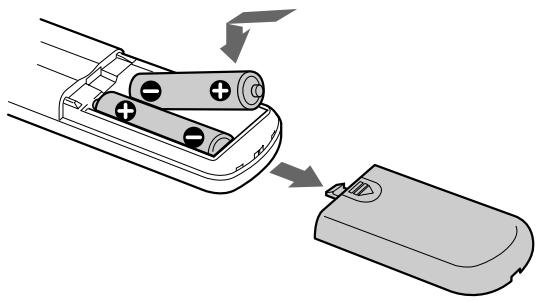

When to replace the batteries
With normal use, the batteries should last about six months. When you can no longer control the player with the remote control, replace all batteries with new ones.
Notes
- Do not leave the remote control near an extremely hot or humid place.
- Do not drop any foreign objects inside the remote control; be especially careful when replacing the batteries.
- Do not expose the remote sensor to direct sunlight or lighting fixtures, as it may not function correctly.
- If you will not use the remote control for several days, remove the batteries to prevent possible damage from leakage and corrosion.
Connecting the system
Overview
This section describes how to connect the compact disc player to an amplifier. Be sure to disconnect the power from each component before making connections.
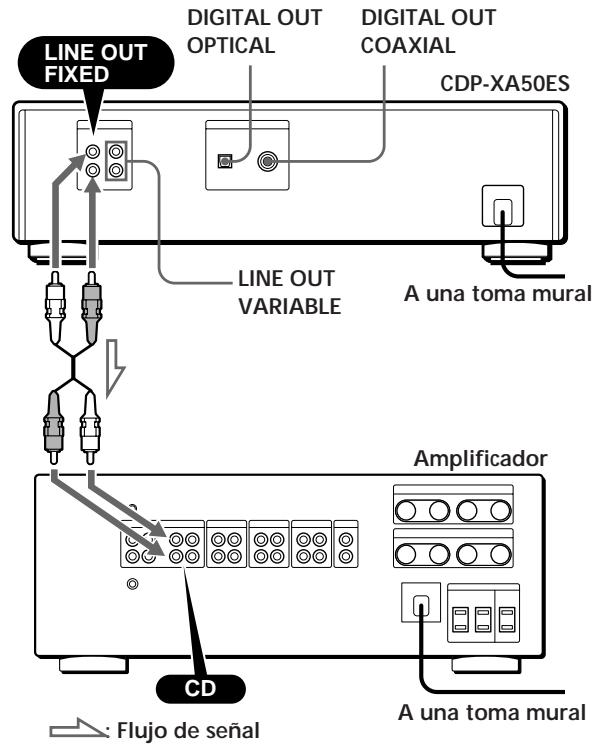
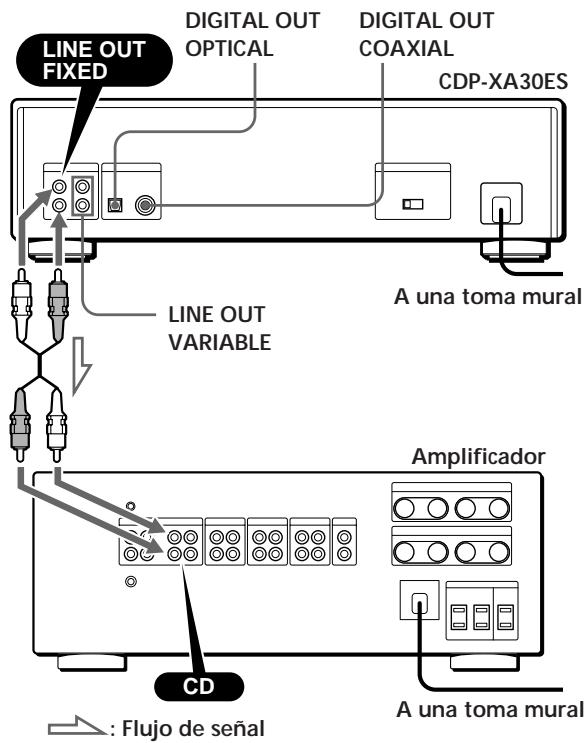
What cables do you need?
■If making analog connections
• Audio cable (supplied) (1)
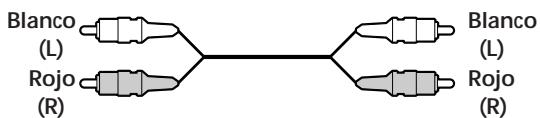
■If making digital connections
- POC-15 optical cable (not supplied)

- Coaxial cable (not supplied)

Connections
■If you make analog connections
When connecting an audio cable, make sure the color matches the corresponding jacks on the components: red (right) with red, and white (left) with white. Ensure that connections are made firmly to avoid noise and hum.
Compact disc player Amplifier![graph LR A["LINE OUT"] --> B["FIXED VARIABLE"] B --> C["L"] B --> D["R"] C --> E["L"] D --> F["R"] G["INPUT"] --> H["CD"] H --> I["L"] H --> J["R"]](/content/2020/04/50772/images/88f00da491ccb34e417a3f95930b2df830b3d082256c8fb16391b64cc08060bb.jpg)
- If you have an analog power amplifier: Connect the amplifier using the VARIABLE LINE OUT jacks with the supplied audio cable. You can adjust the output level with the LINE OUT/PHONE LEVEL control on the player or with the LINE OUT LEVEL buttons on the remote control.
Compact disc player Amplifier![graph LR A["LINE OUT"] --> B["FIXED VARIABLE"] B --> C["L ○ L"] B --> D["R ○ R"] C --> E["→"] D --> E E --> F["INPUT CD"] F --> G["L ○ R"]](/content/2020/04/50772/images/15957cc6b1d98e60a294b966c70417e9dbf5611373be9e23ee766e607ec15048.jpg)
■If you make digital connections
You can avoid signal deterioration during transmission because the musical signal output through the digital output connectors remains in digital format. You can connect a digital component such as a digital amplifier, D/A converter, DAT, or MD. If you connect a DAT or MD, you can make digital recordings from compact discs.
Note that you cannot use the fade-in/fade-out function (page 19) when making this connection.
- If you have a digital component with an optical digital input connector
Connect the component using the DIGITAL OUT (OPTICAL) connector with the optical cable (not supplied). Remove the cap and plug in the optical cable.
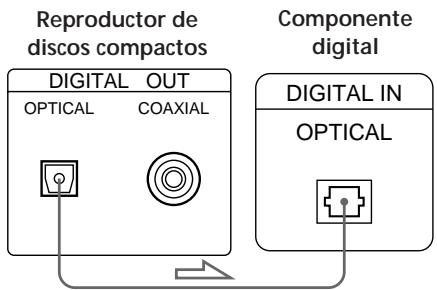
- If you have a digital component with a coaxial digital input connector
Connect the component using the DIGITAL OUT (COAXIAL) connector with the coaxial cable (not supplied).
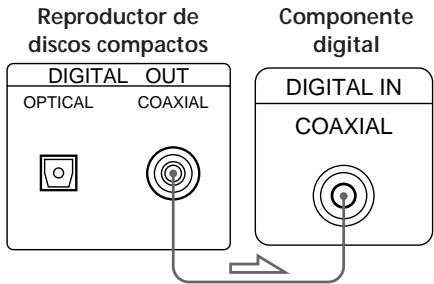
Note
When connecting via the DIGITAL OUT connector, noise may occur if you play software other than music CDs, such as CD-ROMs.
Setting the voltage selector (only for models that have one)
Check that the voltage selector on the rear of the player is set to the local power line voltage. If not, set the selector to the correct position using a screwdriver before connecting the AC power cord to a wall outlet.
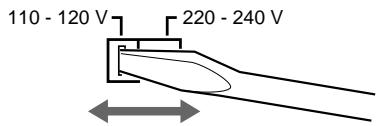
Connecting the power cord
Connect the power cord to a wall outlet.
Removing the warning indication
The warning indication is on the player. Remove it before using the player.
Playing a CD
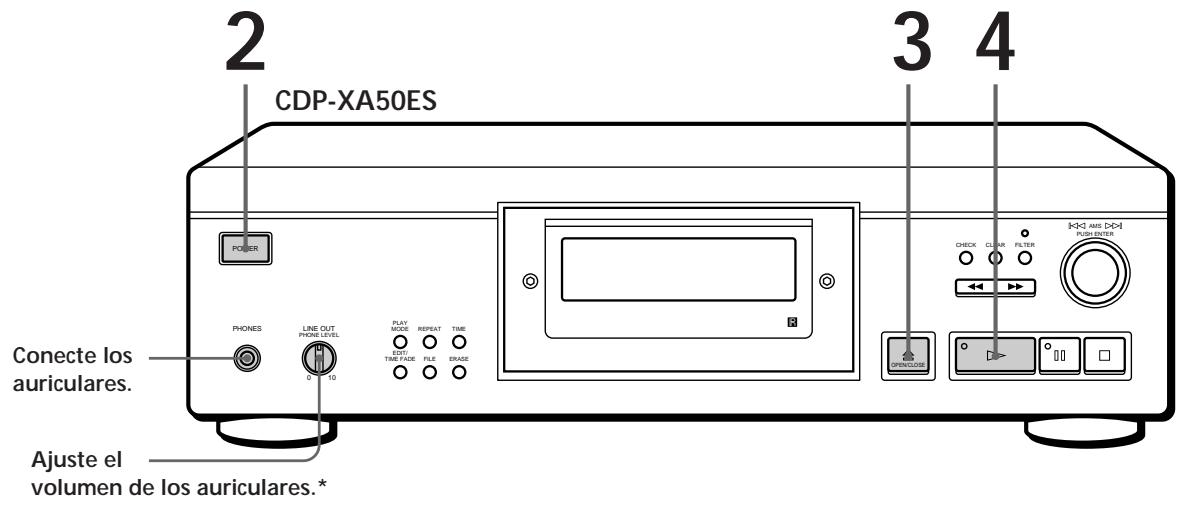
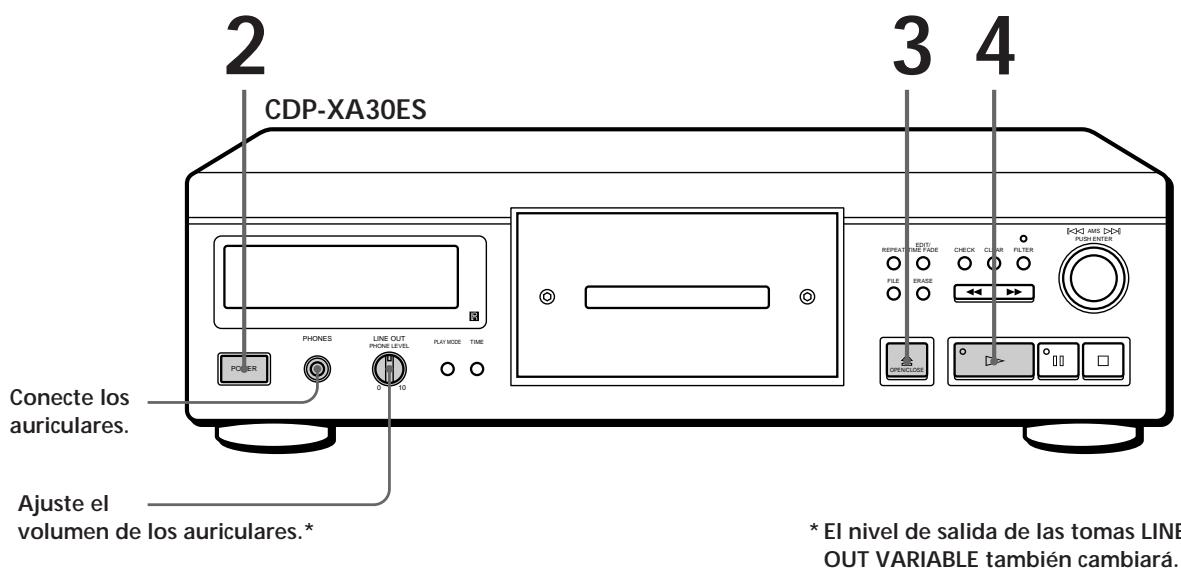
- Refer to pages 4 to 5 for connection information.

If you turn on the player with a CD in the tray You can start playback automatically from the beginning of the CD. If you connect a commercially available timer, you can start CD playback at the desired time.
1 Turn on the amplifier and select the CD player position. 2 Press POWER to turn on the player.

If “- - - - -” appears in the display
Place the supplied stabilizer on the CD.
Otherwise, this indication will appear.
Note
In step 3, do not place two or more compact discs at the same time. If you do, the discs and/or the player may be damaged.

If playback does not start from the first track, press PLAY MODE several times until “SHUFFLE”, “PROGRAM” and “CUSTOM INDEX” disappear from the display (or press CONTINUE on the remote control).
3
Press ≜ OPEN/CLOSE and place a CD on the tray.
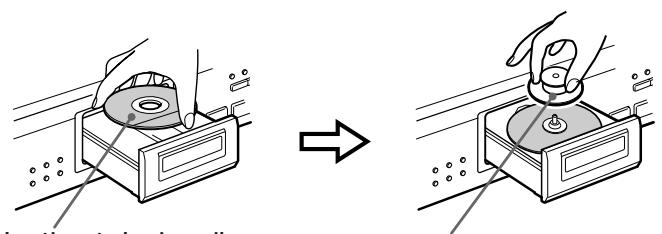
With the label side up
Place the supplied stabilizer on the CD. (The stabilizer supplied with the CDP-XA50ES model is different from the one supplied with the CDP-XA30ES model.)
4
Press ▷.
The disc tray closes and the player plays all tracks once (continuous play).
Adjust the volume of the amplifier.
To stop playback
Press □.
| Para | Es necesario |
| Realizar una pausa | Pulsar |
| Reanudar la reproducción después de la pausa | Pulsar o |
| Ir al siguiente tema | Girar AMS en el sentido de las agujas del reloj. (Si utiliza el mando a distancia, pulse .) |
| Volver al tema anterior | Girar AMS en el sentido contrario a las agujas del reloj. (Si utiliza el mando a distancia, pulse .) |
| Detener la reproducción y retirar el CD | Pulsar OPEN/CLOSE |
Customizing the sound of the music (Digital filter function)
This player has a variable coefficient digital filter (V.C.). Selecting the desired filter type allows you to adjust the sound to best suit the system, the room, the music source, etc.
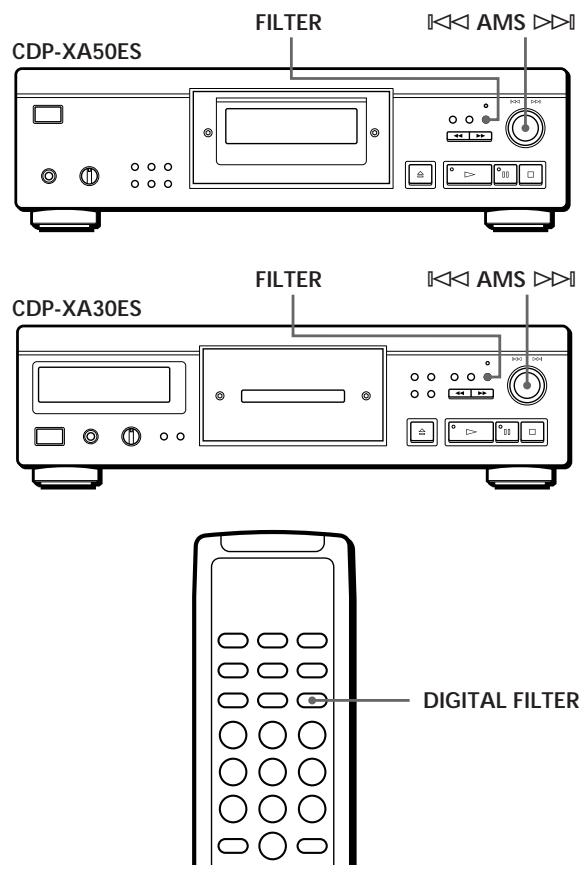
Selecting the filter directly on the player
1 Press FILTER.
The display shows the currently selected filter number, while the filter indicator flashes.
2 Turn ◀◀◀ AMS ▷▶▶ until the display shows the desired digital filter number.
When you turn the ◀◀ AMS ▷▶ control, the digital filter number changes cyclically as follows:

If a disc is playing, the sound will be interrupted momentarily.
3 Use ◀◀◀ AMS ▷▶▶ to select the filter. The original indication reappears.
The selected digital filter number is stored in memory even if you turn off the power.

You can also change the digital filter number by pressing the FILTER button while the indicator is flashing.
Selecting the filter with the remote control
1 Press DIGITAL FILTER.
The display shows the currently selected filter number, while the filter indicator flashes.
2 Press DIGITAL FILTER several times until the display shows the desired digital filter number. The digital filter number is stored and the original indication reappears.
Description of variable coefficient digital filter (V.C.)
CD players use digital filters to eliminate noise generated during sampling. It is possible to modify the tone of the music by changing the cutoff characteristics of the digital filter.
This player has five types of filters with different coefficient characteristics: “STD”, “1”, “2”, “3”, and “4”. In addition, digital filters “3” and “4” each have three coefficient patterns, A–C, for more precise adjustments.
The following explains the terms necessary to understand the characteristics of the digital filters used in this player.
Fast roll-off and slow roll-off
Digital filters can be classified into two types: fast roll-off and slow roll-off, depending on their cutoff characteristics.
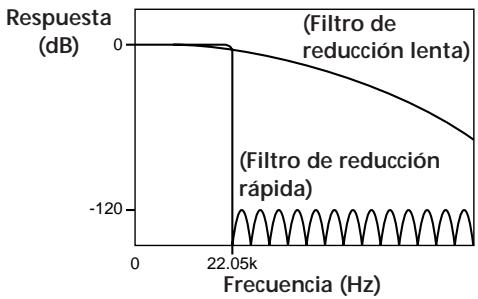
Comparison of cutoff characteristics of fast roll-off filter and slow roll-off filter
Fast roll-off filters quickly remove noise generated during sampling above 22.05 kHz. This method is ideal for fully reproducing signals below 20 kHz, the basic principle of digital audio.
On the other hand, slow roll-off filters gradually remove noise generated during sampling, and can keep pre-echo and post-echo (sound degradation) of the impulse response signal to a minimum.
Fast roll-off filter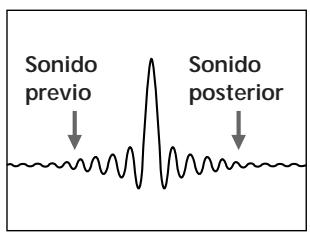
Slow roll-off filter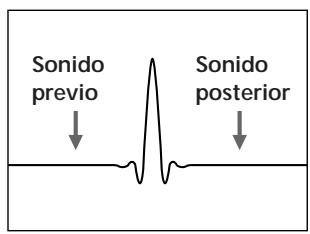
Comparison of impulse response of fast roll-off filter and slow roll-off filter
Cascade type and direct type
There are two methods of oversampling in digital filters: cascade type and direct type. The former multiplies the signal by eight in three steps, while the latter multiplies the signal by eight in one step. Cascade filters have high calculation efficiency and high-precision fast roll-off characteristics. In addition, the ICs in this player use the full feed-forward (FF) method between each step to improve the accuracy of information transfer.
On the other hand, it is possible to obtain eight-times oversampled data in one step with direct filters, and no loss occurs during transfer between calculation steps. However, since these circuits are extremely large, this player only supports slow roll-off filters.
![graph TD IN["IN"] --> A["×2"] A --> B["×2"] B --> C["×2"] C --> D["×8"] D --> OUT["OUT"] A -->|FF| B B -->|FF| C C -->|FF| D](/content/2020/04/50772/images/67ee8a2195167f09c2e380077d396f973ebe321793b731bde72ef3820eb200fb.jpg)
Characteristics of each digital filter
The settings and characteristics of the five digital filters are shown below. Use this information to select the filter you want.
STD: Standard
This filter is of the cascade type and has a fast roll-off. It has the same characteristics as the digital filters widely used in Sony's high-end units and features a fast cut-off characteristic reaching -120 dB at 24 kHz. This filter uses the full direct feed method between calculation steps and provides the sound with a wide range and spatial representation.
1: Slot
This filter is of the cascade type and has a slow roll-off.
It employs a cubic spline function for interpolation. The spline function provides smoother connections between points, while the cubic filter is the most direct among spline functions. The impulse response sound of this filter is much lower than that of the fast roll-off filter. With this filter, the sound image is clear and the sound reproduction is uniform.
2: Simple
This filter is of the direct type and has a slow roll-off. It has no quantization between the digital filter output and the D/A converter input.
The digital filter uses direct calculations, and the bit length of the digital filter output and the D/A converter input is the same; thus, no requantization noise is generated between the digital filter and the D/A converter. This means that, from the 16-bit information taken from the disc, elements up to 20 kHz are introduced as long as the D/A converter does not perform non-linear operations. In this way, the sound is reproduced with great clarity and power.
3: Analog type
This filter is of the direct type and has a slow roll-off, and simulates a seventh-order analog Butterworth filter. This filter completely avoids pre-echo in the impulse response. Also, since it simulates an analog filter, the phase in the high region outside the audible frequency rotates. Filters 3A to 3C vary in the degree of phase rotation. 3A is multiplied by one (main analog characteristic), 3B by 0.75, and 3C by 0.5. The impulse response changes as shown in the figures below. The degree of pre-echo and post-echo varies with the degree of phase change. In this way, the sound gains depth and warmth.
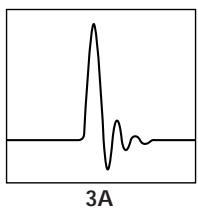
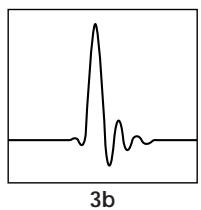
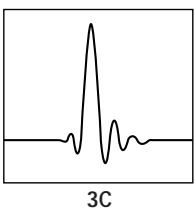
Comparison of impulse responses of filter 3
4: Butterworth
This filter is of the direct type and has a slow roll-off, and includes fifth to ninth order Butterworth filters. However, the phase is linear and does not include the phase change possibilities of filter 3 (analog type). As shown in the figure below, only the cut-off characteristics of the fifth order (4A), seventh (4B), and ninth (4C) can be changed. The impulse response sound increases from the fifth order filter to the ninth order filter. With this filter, the sound gains balance and smoothness.
Response (dB)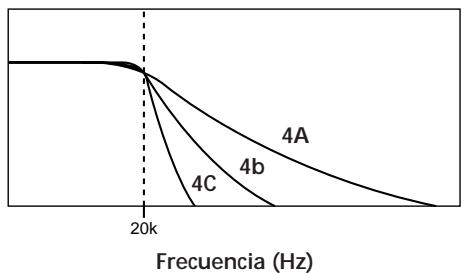
Comparison of cut-off characteristics of filter 4
Note
The digital filter function mainly changes characteristics that are outside the audible frequency range. Changes cannot be made in the audible frequency range, such as those obtained with the amplifier's tone controls. Therefore, with certain combinations of hardware and software, it may not be possible to obtain appreciable effects once the filter is changed.
Using the display
You can obtain information about the disc using the display.
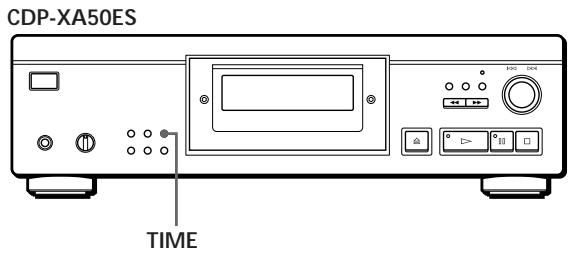
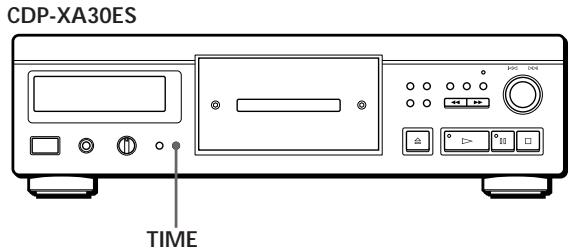
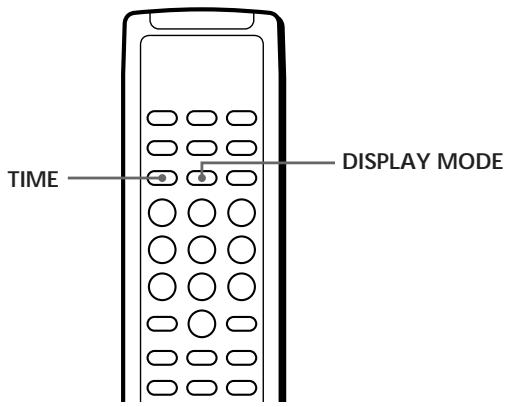
Checking the total number of tracks and their total playing time
Press TIME before starting playback.
The display shows the total number of tracks, as well as the total playing time and the music calendar.
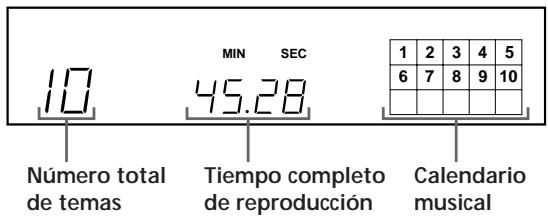
In random playback mode ("SHUFFLE" appears in the display; see page 13), a one-second interval is added between tracks. This increase is automatically added to the total playing time shown in the display.
If the disc has more than 15 tracks, the indication
▶ appears next to 15 in the music calendar.
The information also appears when you press
riangleq OPEN/CLOSE to close the disc tray.
Displaying information while playing a CD
While playing a disc, the display shows the current track number, index number, playing time, and the music calendar.
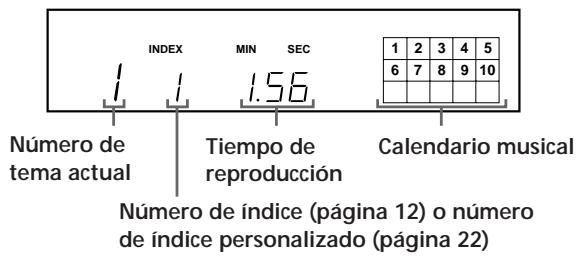
The track numbers in the music calendar disappear once they have been played.
Checking the remaining time
Each time you press TIME while playing a disc, the display changes as shown in the following diagram.
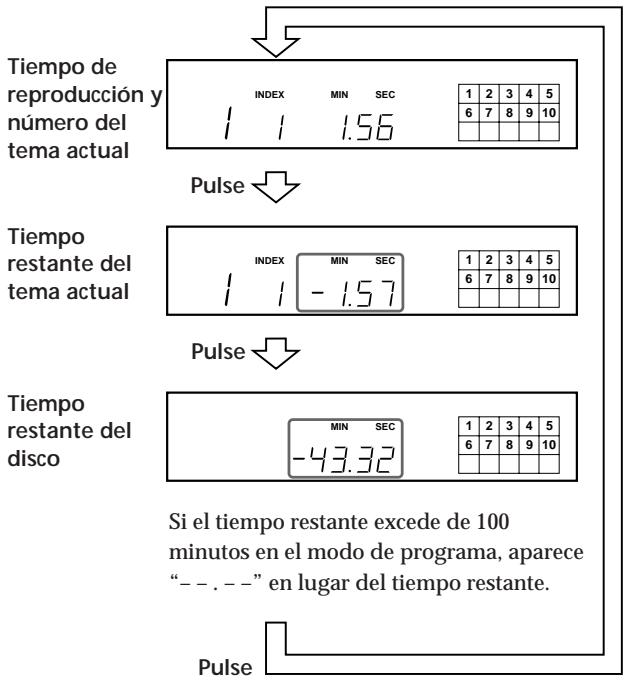
Turning off the music calendar in the display
Each time you press DISPLAY MODE on the remote control during disc playback, the music calendar is alternately turned off and on in the display.
Locating a specific track
You can quickly locate any track while playing a disc using the AMS (Automatic Music Sensor) function of the player or the numeric buttons on the remote control.
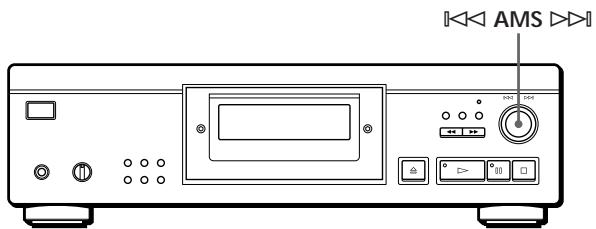
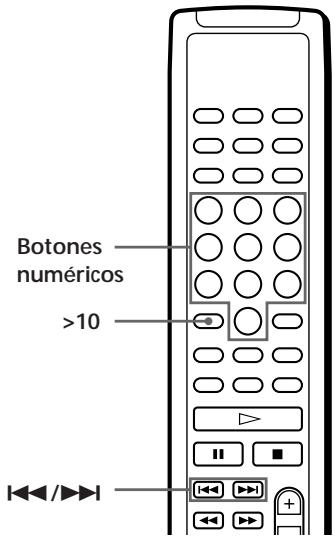
| Para localizar | Es necesario |
| Los temas siguiente o posteriores | Girar AMS en el sentido de las agujas del reloj hasta que encuentre el tema. Si utiliza el mando a distancia, pulse varias veces hasta que encuentre el tema. |
| Los temas actual o anteriores | Girar AMS en el sentido contrario a las agujas del reloj hasta que encuentre el tema. Si utiliza el mando a distancia, pulse varias veces hasta que encuentre el tema. |
| Un tema determinado directamente | Pulse en el mando a distancia el botón numérico del tema |

To directly locate a track with a number greater than 10
Press >10 first, then the corresponding numeric buttons on the remote control.
To enter “0”, use the 10 button.
Example: To play track number 30
Press >10 first, then 3 and 10.
Locating a specific point in a track
You can also locate a specific point in a track while playing a disc.
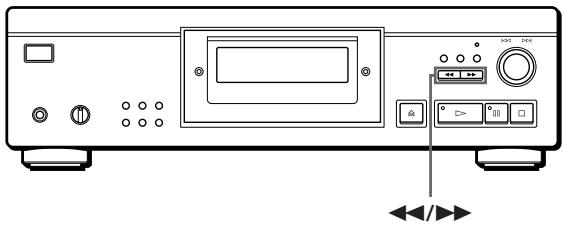
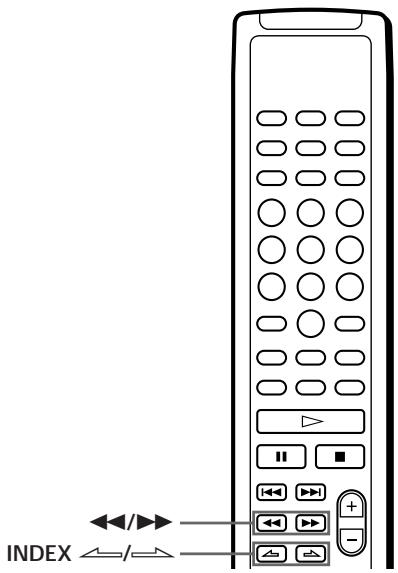
| Para localizar un punto | Pulse |
| Mientras controla el sonido | ▶▶ (hacia delante) o ◀◀ (hacia atrás) y manténgalo pulsado hasta que encuentre el punto |
| Rápidamente mientras observa el visor durante la pausa | ◀◀/▶▶ y manténgalo pulsado hasta que encuentre el punto. No se escuchará el sonido durante la operación. |
| Utilizando un índice (sólo para los discos indexados) [IMAGE] | INDEX ←/─ en el mando a distancia varias veces hasta que encuentre el punto |

What is an index?
It is a number that divides a track or a disc into sections and allows you to easily locate a specific point. You can determine whether a disc uses indexes because it is indicated on the case.
Note
If “▶” appears in the display, it means the disc has reached the end while you were pressing ▶▶. Press ◀◀ or turn ◀◀ AMS ▶◀ counterclockwise to go back.
Repeated playback of tracks
You can play tracks repeatedly in any playback mode.
CDP-XA50ES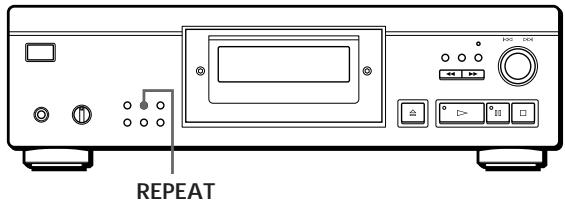
CDP-XA30ES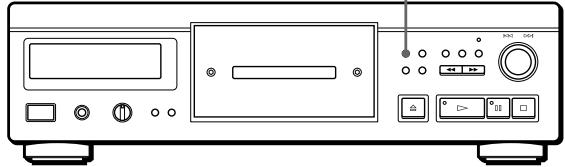
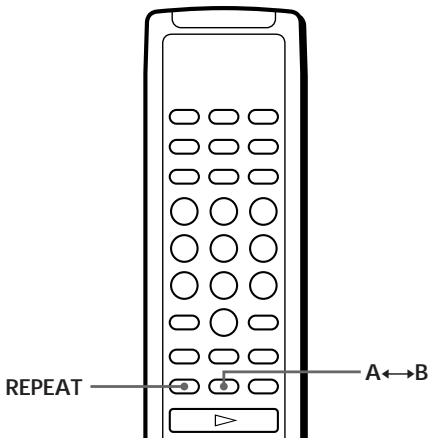
Press REPEAT while playing a disc.
“REPEAT” appears in the display. The player repeats the tracks as follows:
| Cuando se reproduce el disco en | El reproductor repite |
| Reproducción continua (página 6) | Todos los temas |
| Reproducción aleatoria (página 13) | Todos los temas en orden aleatorio |
| Reproducción de programa (página 14) | El mismo programa |
| Modo de supresión de reproducción (página 16) | Todos los temas restantes |
| Modo de supresión de reproducción aleatoria (página 14, 16) | Todos los temas restantes en orden aleatorio |
| Modo de reproducción de índice personalizado (página 23) | La parte entre dos índices |
To cancel repeated playback
Press REPEAT several times until “REPEAT” disappears from the display.
Repeating the current track
You can repeat only the current track.
While playing the track you want, press REPEAT several times until “REPEAT 1” appears in the display.
Note
You cannot repeat the current track while playing the disc in custom index playback mode (see page 23).
Repeating a specific part (Repeat A←→B)
You can repeatedly play a specific part of a track. This is useful for memorizing song lyrics.
Note that you cannot repeat a part that spans two tracks.
1 While playing a disc, press A↔B on the remote control when you locate the start point (point A) to be repeated.
"A-" of "REPEAT A-" flashes in the display.
2 When the end point (point B) is reached, press A↔B again.
"REPEAT A-B" appears. The player repeats this specific part.
To cancel Repeat A←→B
Press REPEAT.
Setting a new start point
You can shift the repeated part forward by changing the start point.
1 Press A↔B while the player is repeating the specific part.
The end point B becomes the new start point A. "A-" of "REPEAT A-" flashes in the display.
2 When the end point (point B) is reached, press A↔B again.
"REPEAT A-B" appears. The player repeats the part between the new start point and the end point.

To restart playback from point A
Press ▷ during A↔B repeat.
Playing tracks in random order (Shuffle Play)
You can set the player to play tracks in random order.
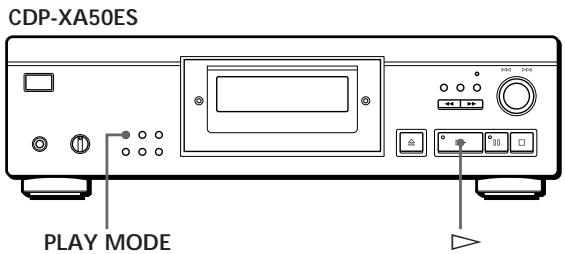
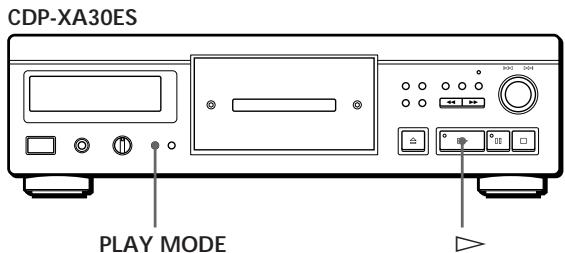
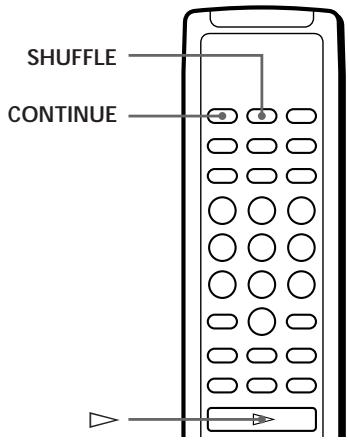
1 Press PLAY MODE repeatedly until "SHUFFLE" appears in the display.
When using the remote control, press SHUFFLE.
2 Press ▷ to start shuffle play.
The [ ] indicator appears while the player plays tracks in random order.
To cancel shuffle play
Press PLAY MODE four times (or CONTINUE on the remote control).

You can start shuffle play during playback.
Press PLAY MODE once (or SHUFFLE on the remote control) to start shuffle play from the current track.

You can skip tracks you do not want during shuffle play (shuffle play skip).
Press the numeric button on the remote control for the track you want to skip.
The track number and "OFF" appear in the display, and then the track number disappears from the music calendar.
To recall the track, press the numeric button again.
To recall all tracks, press □ in stop mode.
Creating your own program (Program Play)
You can set the order of tracks on a disc and create your own program. The program can contain up to 24 tracks.
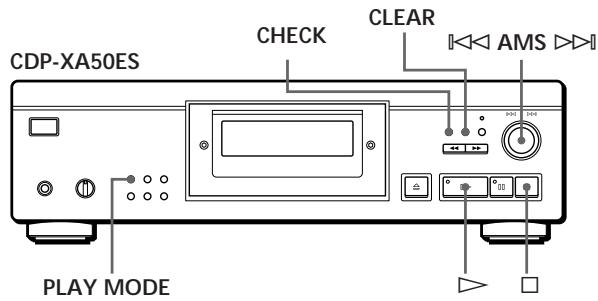
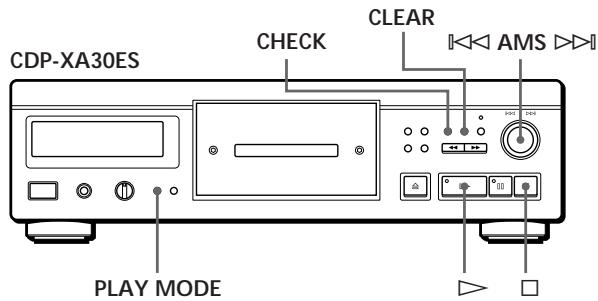
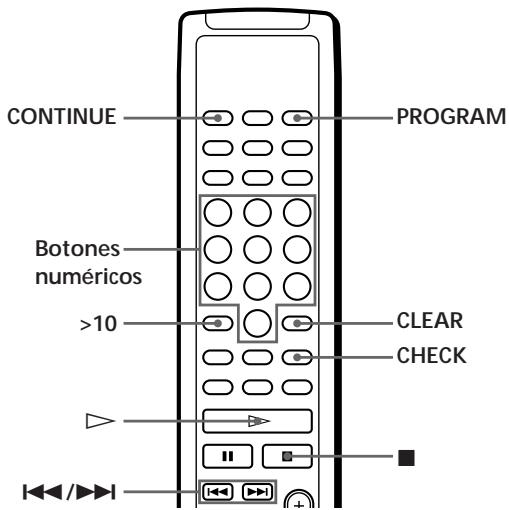
Creating a program on the player
1 Press PLAY MODE repeatedly until "PROGRAM" appears in the display before starting playback.
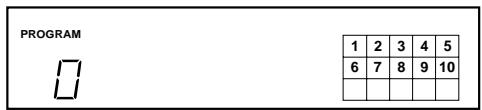
2 Turn ◀◀◀ AMS ▷▶▶ until the display shows the desired track number.
The playback order and the numbers of the tracks being programmed flash, and the total playback time including the track appears in the display.
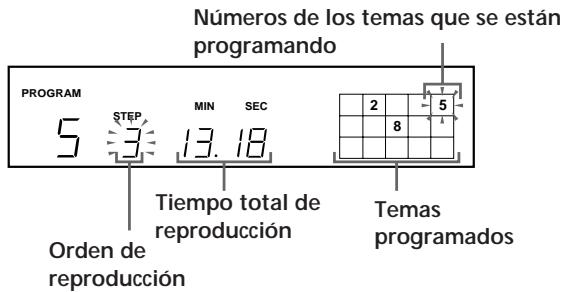
3 Press ◀◀◀ AMS ▷▶▶ to select the track.
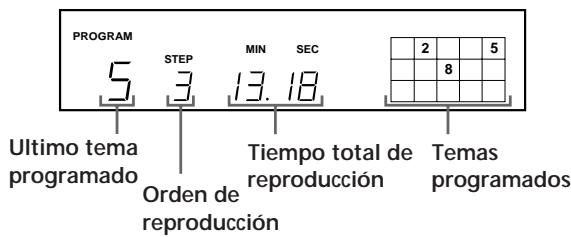
If you made a mistake
Press CLEAR, then repeat steps 2 and 3.
4 Repeat steps 2 and 3 to program the tracks in the desired order. 5 Press ▷ to start program playback.
To cancel program playback Press PLAY MODE three times.

When programming consecutive tracks that are not in numerical order on the disc (e.g., 1, 3, 5, etc.)
A one-second interval is added between tracks.

The program remains unchanged even after playback has finished.
If you press ▷, the same program will be played again.
Notes
- "--.---" appears in the display instead of the total playing time if it exceeds 100 minutes.
- "FULL" appears in the display when you try to add a track to a program that already contains 24 tracks.
Creating programs with the remote control
1 Press PROGRAM before starting playback. "PROGRAM" appears in the display. 2 Press the number buttons for the tracks you want to program in the desired order.
Example: To program tracks 2, 8, and 5 Press the number buttons in the order 2, 8, and 5.
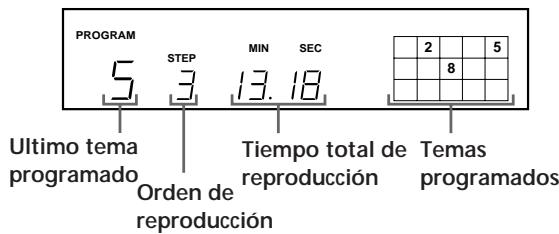
To select tracks with numbers greater than 10, use the >10 button (see page 12).
If you make a mistake
Press CLEAR and then enter the correct track number.
3 Press ▷ to start program playback.
To cancel program playback Press CONTINUE.

You can check the total playing time during programming using the remote control (Program editing).
To select a track, press ◀◀◀ or ▶▶▶ and check the total playing time. Then press PROGRAM to confirm the selection.

When programming consecutive tracks that are not in numerical order on the disc (e.g., 1, 3, 5, etc.)
A one-second interval is added between tracks.

The program remains unchanged even after playback has finished.
If you press ▷, the same program will be played again.
Notes
- "-- . --" appears in the display instead of the total playing time if it exceeds 100 minutes.
- "FULL" appears in the display when you try to add a track to a program that already contains 24 tracks.
Checking the order of tracks
You can check the program before or after starting playback.
Press CHECK.
Each time you press this button, the display shows the track number in the programmed order. After the last track of the program, the display shows "End" and returns to the original screen. If you check the order after starting playback, the display shows only the remaining track numbers.
Changing the order of tracks
You can change the program before starting playback.
| Para | Es necesario |
| Borrar un tema | Pulsar CHECK hasta que el tema que no desee aparezca en el visor; a continuación, pulse CLEAR. |
| Borrar el último tema del programa | Pulsar CLEAR. Cada vez que pulse el botón, se borrará el último tema. |
| Añadir temas al final del programa | Girar IK AMS I hasta que aparezca el número del tema que desee añadir; a continuación, pulse IK AMS I . Si utiliza el mando a distancia, pulse el botón numérico de los temas que desee añadir. |
| Cambiar todo el programa completamente | Mantenga pulsado CLEAR hasta que “ALL CLr” aparezca en el visor. Cree un programa nuevo siguiendo el procedimiento de programación. |
Playing specific tracks (Skip playback)
You can skip tracks you do not want and play only the remaining tracks.
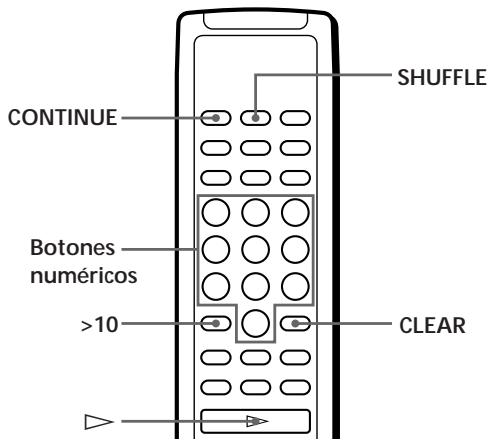
1 Press SHUFFLE.
“SHUFFLE” appears in the display.
2 Press the number buttons of the tracks you want to delete.
The track numbers disappear from the music calendar after “OFF” appears for a few seconds.
To delete a track number greater than 10, use the >10 button (see page 12).
If you make a mistake
Press the number button of the track. “On” appears in the display and the track will be restored.
3 Once you have deleted all the tracks you do not want, press CONTINUE.
“SHUFFLE” disappears from the display.
If you press PLAY MODE on the player instead of CONTINUE on the remote control
The deleted tracks will be restored. Be sure to perform this step with the remote control.
4 Press ▷ to start playback deletion.
To cancel playback deletion
Press ■ in stop mode.

The player retains the deleted tracks in memory even after playback deletion ends.
If you press ▷, you can play back only the remaining tracks.

You can play tracks in random order (shuffle play).
Simply omit step 3 of the previous procedure.

You can delete a track during playback. Press CLEAR while the track is playing. The player deletes the track and starts playing the next track.

You can store the deleted tracks for each disc. See "Storing specific tracks of a disc" on page 24.
Recording your own program
You can record the program you have created onto a tape, DAT, or MD. The program can contain up to 24 tracks.
If you insert a pause during programming, you can divide the program into two parts to record it on both sides of a tape.
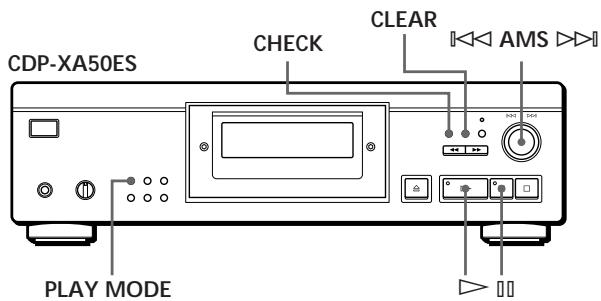
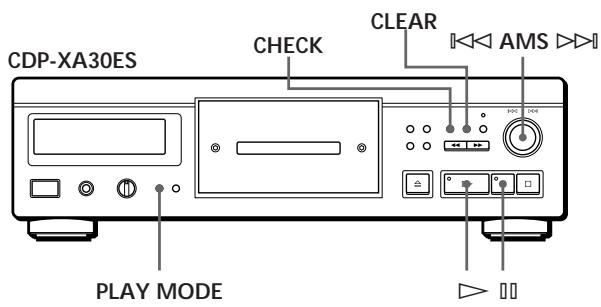
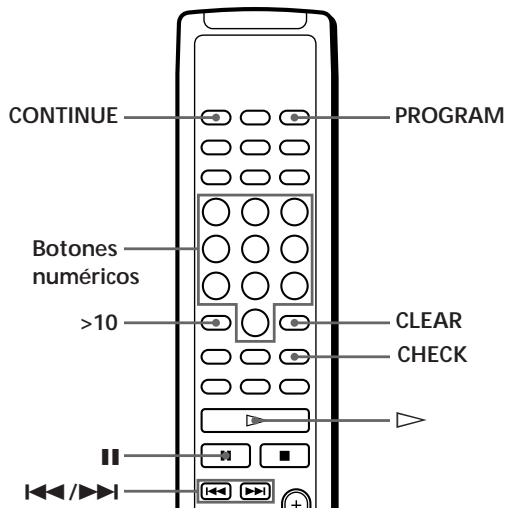
1 Create your program (for side A when recording on a tape) while checking the total playback time shown in the display.
See "Creating your own program" on page 14.
2 When recording on both sides of a tape, press to insert a pause.
The "P" indicator appears in the display and the playback time resets to "0.00".
If you are recording on one side of a tape, or on a DAT or MD, skip this step and continue with step 4.
A pause is counted as one track.
You can program up to 23 tracks when inserting a pause.
3 Repeat step 1 to create a program for side B.
4 Start recording on the tape deck, then press ▷ on the player.
When recording on both sides of a tape, the player pauses at the end of the side A program.
5 To record on side B, turn the tape over and press ▷ or □□ on the player to resume playback.
To check and change the program
Refer to pages 15 and 16.
“SIDE-A” appears while checking the side A program, and “SIDE-B” while checking the side B program.
It is possible to automatically insert a 3-second interval between each track.
Use the automatic space insertion function (see page 21).
Recording a CD specifying tape length (Synchronized editing / Fitted editing)
You can create a program with the player that fits the tape length. Select one of the following options:
- Synchronized editing: the player automatically creates a program maintaining the original disc order.
- Fitted editing: the player automatically arranges the track order to fit the tape length.
The program can contain a maximum of 24 tracks (a pause inserted between tracks counts as one track).
Note that tracks with numbers higher than 24 cannot be programmed.
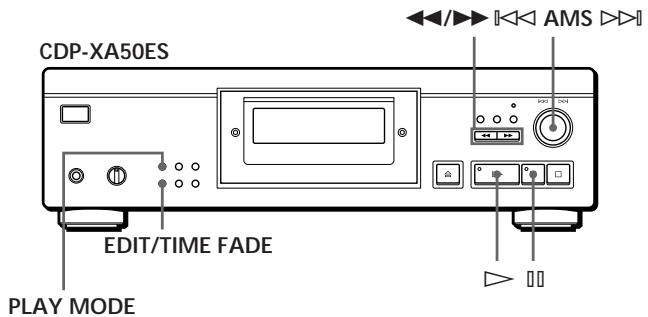
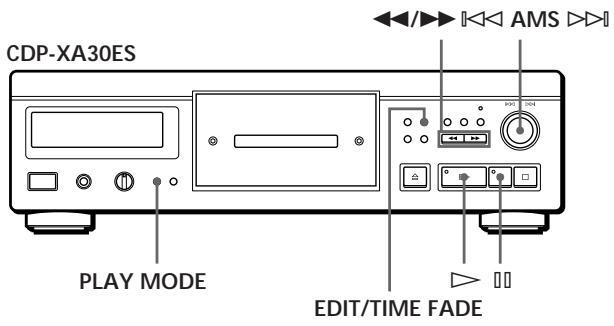
1 Press EDIT/TIME FADE before starting playback as described below:
- To select synchronized editing, press the button once. “EDIT” appears and “SIDE-A” flashes in the display.
- To select adjusted editing, press the button twice. “(JUST) EDIT)” appears and “SIDE-A” flashes in the display.
2 Press ◀◀ or ▶▶ to specify the tape length.
Each time these buttons are pressed, the display changes as shown below, with the tape length for one side after each indication.

When selecting "HALF"
The player assigns each side half of the total playing time of the disc. Note that it is not possible to select “HALF” when the disc contains more than 24 tracks.
3 Press EDIT/TIME FADE so that the player creates the program.
The display shows the tracks to be recorded. "SIDE-B" flashes in the display.
4 When recording on both sides of the tape, press EDIT/TIME FADE again.
The player inserts a pause and then creates the program for side B. The display shows the programmed tracks.
If you are recording on one side of the tape or onto a DAT or MD, skip this step.
5 Start recording on the deck and then press ▷ on the player.
When recording on both sides of the tape, the player pauses at the end of the side A program.
6 To record on side B, turn the tape over and press ▷ or □□ on the player to resume playback.
To cancel synchronized editing/edited editing Press PLAY MODE several times until "SHUFFLE",
"PROGRAM" and "CUSTOM INDEX" disappear from the display (or press CONTINUE on the remote control).

It is possible to program the tracks you want in advance
Select the tracks before performing the above procedure. The player creates a program with the remaining tracks. In this case, it is not possible to select "HALF" to specify the tape length.

It is possible to specify the tape length
Adjust the tape length with ◀◀◀ AMS ▷▶◀.
Example: If the tape length of one side is 30 minutes and 15 seconds
1 To adjust the minutes, turn ◀◀ AMS ▷▶ until "30" appears in the display, then press ◀◀ AMS ▷▶. 2 To adjust the seconds, turn ◀◀ AMS ▷▶ until "15" appears in the display, then press ◀◀ AMS ▷▶.

When programming consecutive tracks that do not follow a numerical order on the disc (e.g., 1, 3, 5, etc.)
A one-second interval is inserted between tracks.

It is possible to automatically insert a 3-second interval between each track
Use the automatic space insertion function (see page 21).

To check and change the program
See pages 15 and 16.
Fade-in and fade-out of sound
You can manually adjust the fade-in and fade-out of sound to prevent tracks from starting and ending abruptly.
Note that you cannot use this effect if you use the DIGITAL OUT connector.
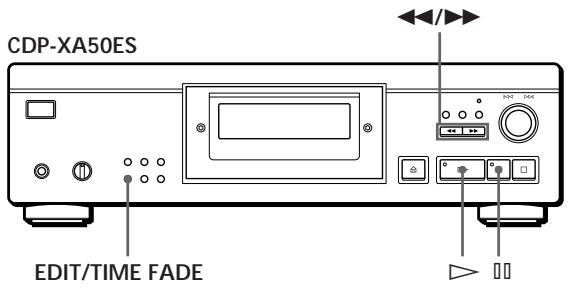
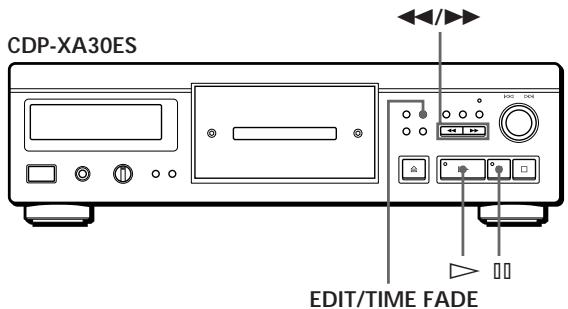
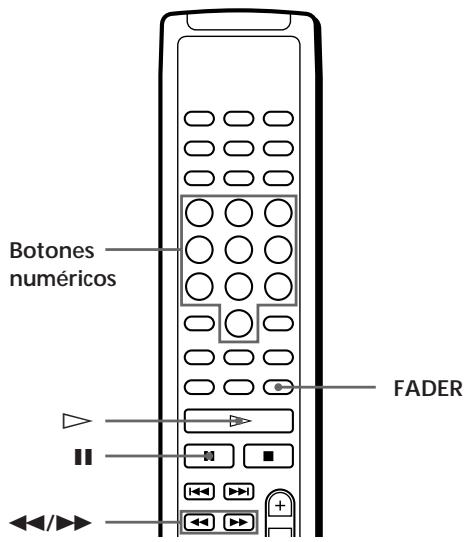
| Para | Pulse FADER |
| Iniciar la reproducción gradualmente | Durante la pausa. “FADE” parpadea y se inicia la reproducción gradual del sonido. |
| Finalizar la reproducción gradualmente | Para finalizar la reproducción del sonido gradualmente. “FADE” parpadea. La reproducción finaliza gradualmente y el reproductor realiza una pausa. |
Changing the fade-in and fade-out time
You can change the fade-in and fade-out time from 2 to 10 seconds before the action is performed. If you do not change it, the fade-in and fade-out is performed in 5 seconds.
1 Press FADER before starting playback. “5 SEC” appears and “FADE” flashes in the display.
2 Press the number button to specify the fade-in and fade-out time.
You can also specify the fade-in or fade-out time by pressing the ◀◀/▶▶ buttons until the display shows the desired time.
Fade-out at a specified time (Synchronized fade-out)
The player can automatically fade out the sound by specifying the playback time. Once the synchronized fade-out is set, this function is applied twice, that is, at the end of both sides of a tape.
1 Press EDIT/TIME FADE three times before starting playback.
“TIME FADE” and “SIDE-A” appear in the display.
2 Press ◀◀ or ▶▶ to specify the playback time.
Each time you press these buttons, the display changes as shown below, with the playback time of one side after each indication.

If you select "HALF"
The player sets the playback time to half of the total playback time.
3 Press ▷ to start playback. At the specified time, playback fades out, the “FADE” indicator flashes in the display, and the player enters pause mode. “SIDE-B” appears in the display.
4 To record on side B, turn the tape over and press ▷ or □ on the player to resume playback.
Again, playback fades out at the specified time.
To cancel synchronized fade-out Press EDIT/TIME FADE.

You can specify the playback time. See “You can specify the tape length” on page 19.

You can change discs during synchronized fade-out
If playback ends before the specified fade-out time (for example, when recording CD singles onto a tape), change the disc. The specified fade-out time is counted only during playback.

You can perform a fade-in to resume playback in step 4
After turning the tape over, press FADER.
Note
If you press ◀◀ or ▶▶ during synchronized fade-out playback, the synchronized fade-out function will be canceled.
Useful recording tips
Using these functions allows you to record compact discs more conveniently.
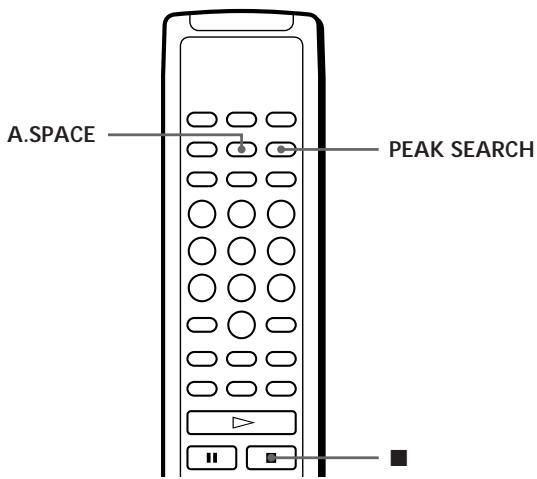
Adjusting the recording level (Peak level search)
The player locates the highest level of the tracks to be recorded so that you can adjust the recording level before recording starts.
Before starting playback, press PEAK SEARCH. “PEAK” flashes in the display and the player repeats the highest level part. 2 Adjust the recording level on the deck. 3 Press ■ on the player to stop the peak level search. “PEAK” disappears from the display.
Note
The highest level part may vary each time you attempt to adjust the same disc. However, the difference is so subtle that you will have no problem adjusting the recording level accurately.
Locating tracks on a tape using the AMS function (Automatic Music Sensor)
The Automatic Music Sensor function inserts a 3-second interval between tracks during playback, and allows you to locate each track using the AMS function on the deck.
Before starting playback, press A.SPACE. "AUTO SPACE" appears in the display.
To cancel the Automatic Music Sensor function
Press A.SPACE until “AUTO SPACE” disappears from the display.
Note
If you use the Automatic Music Sensor function to record a medley or a symphony, for example, the sound may be interrupted when the track number changes.
This occurs if track numbers are assigned in the middle of a musical piece.
Using Custom Files
The player can store 2 types of information called “Custom Files” for each disc. After storing the custom files for a disc, the player automatically retrieves the stored information each time you insert the disc. Note that the custom files will be erased if you do not use the player for about 1 month.
The following information can be stored:
| Si utiliza la función de | Es posible |
| Indice personalizado (página 22) | Indexar el disco hasta un máximo de 8 puntos (para un disco con 32 temas o menos) o hasta 5 puntos (para un disco con más de 32) |
| Supresión de banco (página 24) | Suprimir los temas que no desee y almacenar sólo los que desee |
The custom file indicator lights up when the corresponding information is stored.
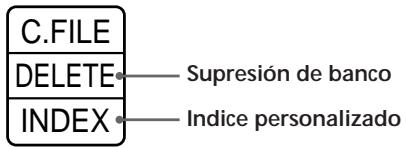
When storing a custom file for a disc, the player remembers how that disc was last played, even if you have removed the disc from the player (last mode memory). Thus, when you insert the same disc again, it will play in the same playback mode. The player also remembers the fade-in and fade-out time duration if you have changed that time.
Note that when you press ▷ to close the disc tray and start playback, the player operates in the currently selected playback mode, rather than the stored mode.
Where are custom files stored?
Custom files are not stored on the disc, but in the player's memory. This means that it is not possible to use the custom files if you play the disc on other players.
How many discs can you include in a file?
You can store a maximum of 224 discs in the custom file. The player counts a disc as one even if it simultaneously stores the custom index and the bank deletion.
You can check the number of discs that can be archived
1 Remove the disc from the player. 2 Press ≜ OPEN/CLOSE to close the disc tray. 3 Press TIME while the music calendar disappears from the display. The number of custom files that can be archived appears.
If "FULL" appears in the display
If the memory of the custom files becomes full, the player will show "FULL" when you press FILE to store the information, and it will not be possible to store more information about the discs. If necessary, delete unwanted custom files (see pages 24 and 25).
To erase all custom files from all discs
Hold down ERASE and FILE, and press POWER to turn on the player. "FILE CLr" appears in the display and all custom files will be erased.
Introduction of indexes on a disc (Custom Index)
You can introduce indexes on a disc up to a maximum of 8 points (for a disc with 32 tracks or less) or up to 5 points (for a disc with more than 32 tracks) so that you can easily locate a specific point. This can be useful when playing discs of symphonies or concertos that divide a musical piece into several tracks (see the following example).
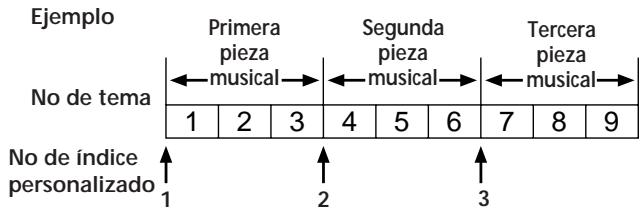
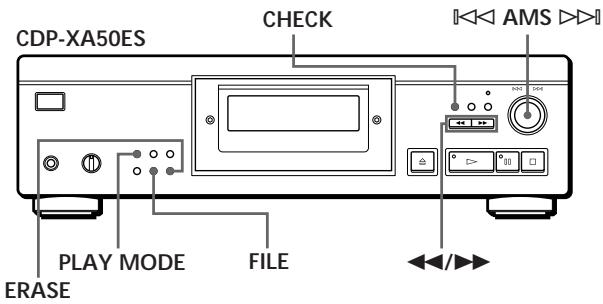
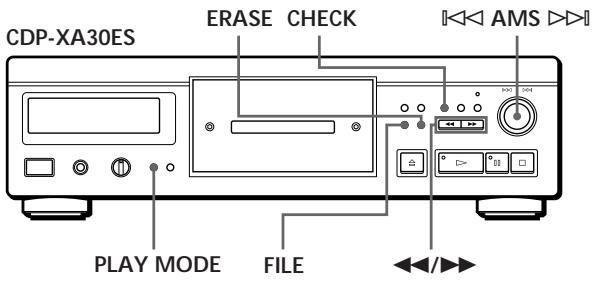
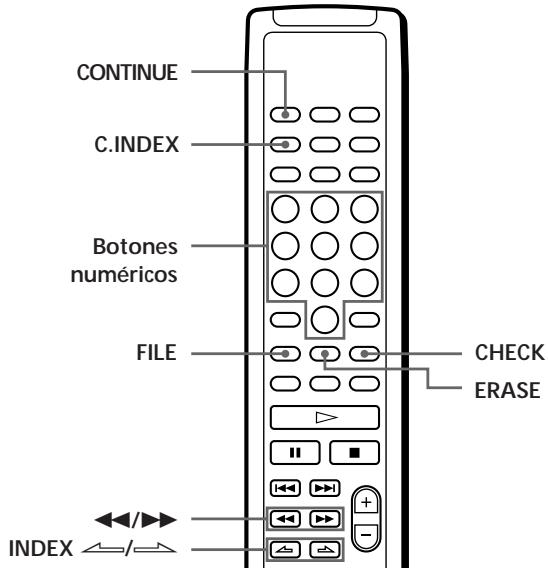
1 Insert the disc.
Press PLAY MODE repeatedly until "CUSTOM INDEX" appears in the display. If you are using the remote control, press C.INDEX. The music calendar disappears.
Press FILE at the point where you want to insert an index. The custom index number flashes in the display. The player repeats the section for 3 seconds from the point to be indexed.
Press ◀◀ or ▶▶ to adjust the point so that the player can repeat from the exact point you want to index. If you press these buttons 7 times, the point will move approximately 1 second forward or backward.
If you do not want to insert an index at the point, press CLEAR and search for another point to index.
Press FILE again to store the custom index. "INDEX" in the custom file indication lights up in the display.
To mark more custom indexes, repeat steps 3 to 5.
When you have decided where to insert an index, it is possible to mark an index directly without adjusting the point. When you find the point to be indexed, first press to pause playback, then press FILE to mark an index.
Playback from an indexed point (Custom index playback)
Press PLAY MODE repeatedly until "CUSTOM INDEX" appears in the display. If you are using the remote control, press C.INDEX.
Locate the desired custom index as follows:
| Para localizar | Pulse |
| El índice personalizado siguiente [IMAGE] | INDEX [IMAGE] |
| El índice personalizado actual [IMAGE] | INDEX [IMAGE] |
| Un índice personalizado específico directamente [IMAGE] | Botón numérico del índice personalizado |
Playback starts from the selected custom index and continues to the end of the disc.
To cancel custom index playback, press PLAY MODE twice (or CONTINUE on the remote control).
Notes
- The index search function cannot be used (see page 12).
- Use the INDEX 📁/≡ buttons instead of the ◀◀/▶▶ buttons on the remote control to locate the next or current custom indexes.
Playback from one index to the next (Playback of a single custom index)
1 Press PLAY MODE repeatedly until "CUSTOM INDEX (1)" appears in the display. If you use the remote control, press C.INDEX. 2 Press the numeric button on the remote control corresponding to the custom index you want. Playback starts from the selected custom index and stops at the beginning of the next index. To cancel playback of a single custom index, press PLAY MODE once (or CONTINUE on the remote control).
You can play the part between two indexes repeatedly. Press REPEAT.
Erasing the custom index
1 Insert the disc. 2 Press PLAY MODE repeatedly until "CUSTOM INDEX" appears in the display. If you use the remote control, press C.INDEX. 3 Press CHECK repeatedly until the custom index number you want to erase flashes. 4 Press ERASE while the number is flashing to erase the custom index. The subsequent custom index numbers decrease by one.
Storing specific tracks of a disc (Bank erase)
You can erase tracks you do not want and store only the ones you want. You can start playback of your favorite tracks without having to erase tracks each time.
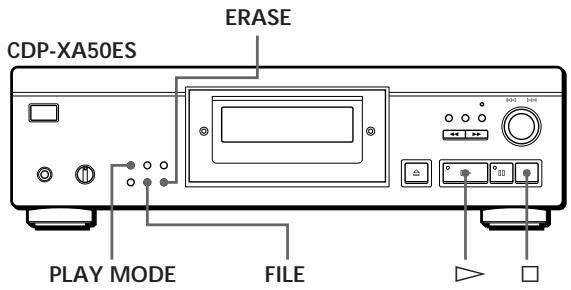
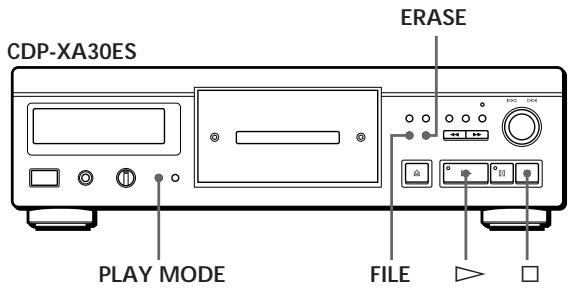
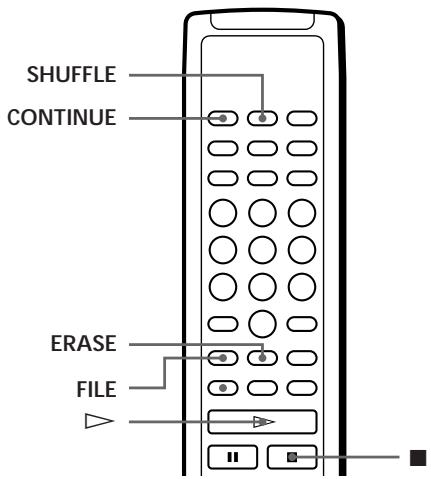
1 Insert the disc. 2 Erase the tracks you do not want. Perform steps 1 to 3 of "Playback of specific tracks" on page 16. 3 Press FILE to store the remaining tracks. "DELETE" in the custom file indication lights up in the display.
Playback using bank erase
1 Press PLAY MODE repeatedly until "SHUFFLE", "PROGRAM", and "CUSTOM INDEX" disappear from the display. If you use the remote control, press CONTINUE. The bank erase is recalled and the selected track numbers appear in the music calendar.
2 Press ▷ to start playback.
To cancel playback using bank erase
Press □.
To restart playback using bank erase
When "PROGRAM" or "CUSTOM INDEX" appears in the display, press PLAY MODE repeatedly until these indications disappear from the display or until "SHUFFLE" appears. The bank erase is recalled and you can start playback by pressing ▷.

Random playback with bank suppression is possible.
In step 1, press PLAY MODE several times until "SHUFFLE" appears in the display (or press SHUFFLE on the remote control).
Erasing the bank suppression
1 Insert the disc.
2 Press PLAY MODE several times until "PROGRAM" and "CUSTOM INDEX" disappear from the display. If you use the remote control, press CONTINUE or SHUFFLE. The display shows the stored bank suppression.
3 Press ERASE to erase the bank suppression. The "DELETE" indication of the custom file disappears.
Precautions
Safety
- Caution — The use of optical instruments with this product increases the risk to eyes.
- If any solid object or liquid falls into the unit, unplug the player and have it checked by qualified personnel before using it again.
Power sources
- Before using the player, check that the operating voltage is identical to the local power supply. The voltage is indicated on the nameplate located on the rear of the player.
- The player is not disconnected from the AC power source (wall outlet) while it is connected to the wall outlet, even if the player is turned off.
- If you are not going to use the player for several days, be sure to disconnect it from the wall outlet. To disconnect the AC power cord (mains lead), pull by the plug itself, never by the cord.
- The AC power cord (mains lead) should only be replaced at a qualified service shop.
Placement
- Place the player in a location with adequate ventilation to prevent heat buildup inside.
- Do not place the player on a soft surface, such as a carpet, that may block the ventilation holes on the bottom.
- Do not place the player near heat sources, nor expose it to direct sunlight, excessive dust, or mechanical vibrations.
To prevent deterioration of sound quality
- Do not touch the lenses inside.
Use of the stabilizer
- Use the supplied stabilizer. If you use another stabilizer, the player may be damaged.
Operation
- If the player is moved directly from a cold place to a warm one, or placed in a very humid room, moisture may condense on the lenses inside the player. If this occurs, the player may not function properly. In this case, remove the disc and leave the player turned on for about an hour until the moisture evaporates.
Volume adjustment
- Do not increase the volume while listening to a part with very low input levels or no audio signals. Otherwise, the speakers may be damaged when the part with the highest level is played.
Inserting discs
- The player may emit a whistling noise, which indicates that the internal mechanisms are automatically adjusting according to the inserted disc.
Cleaning
- Clean the unit, the panel, and the controls with a soft cloth moistened with a mild detergent solution. Do not use any abrasive scouring pads or powders, or solvents such as alcohol or benzine.
Transportation
- Be sure to remove the CD and the stabilizer.
If you have any questions or encounter any problems with the player, please contact your nearest Sony dealer.
Notes on compact discs
Handling compact discs
- To keep the disc clean, hold it by the edges. Do not touch the surface.
- Do not stick paper or adhesive tape on the disc.
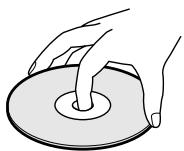
Incorrect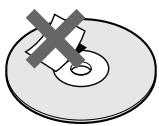
- Do not expose the disc to direct sunlight or leave it in a car parked in the sun, as the temperature inside may rise considerably.
- Do not use any stabilizer or disc protector available on the market. Otherwise, the disc and the player may be damaged.
- After playing the disc, store it in its case.
Cleaning
- Before playing the disc, clean it with a cloth from the center outward.
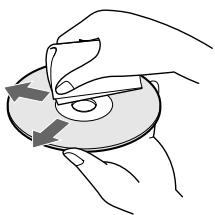
- Do not use solvents such as benzine, thinners, commercially available cleaners, or anti-static sprays for vinyl LPs.
Troubleshooting
If you encounter any of the following difficulties while using the player, use this troubleshooting guide to help remedy the problem. Should any problem persist, contact your nearest Sony dealer.
No sound.
→Check that the player is firmly connected. →Check that you are operating the amplifier correctly. →Adjust the playback level using the LINE OUT/PHONE LEVEL control.
The CD cannot be played.
→No CD has been inserted in the player. Insert one. →Use the stabilizer. →Place a CD correctly with the label side up on the disc tray. →Clean the CD (see page 26). →Moisture condensation has occurred inside the player. Remove the disc and leave the player turned on for about an hour (see page 26).
The recording level has been altered.
→If you connect the amplifier via the VARIABLE LINE OUT jacks, the recording level changes if you adjust the LINE OUT/PHONE LEVEL control on the player or press LINE OUT LEVEL on the remote control during recording.
The remote control does not work.
→Remove any obstacles between the remote control and the player. →Point the remote control at the remote sensor R on the player. →Replace all the batteries in the remote control with new ones if they are exhausted.
Specifications
Compact disc player
| Láser | Semiconductor ( λ = 780 nm)Duración de la emisión: continua |
| Salida de láser | Máx. 44,6 μW** Esta salida es el valor medido a una distancia de 200 mm de la superficie de la lente objetiva del bloque de recogida óptica con 7 mm de apertura. |
| Respuesta de frecuencia | De 2 Hz a 20 kHz ± 0,3 dB |
| Rango dinámico | Superior a 100 dB |
| Distorsión armónica | CDP-XA50ES: Inferior a 0,0017 %CDP-XA30ES: Inferior a 0,0018 % |
Outputs
| Tipo de toma | Nivel máximo de salida | Impedancia de carga | |
| LINE OUT (FIXED) | Tomas de fono | 2 V(a 50 kiloOhmios) | Superior a 10 kiloOhmios |
| LINE OUT (VARIABLE) | Tomas de fono | 2 V(a 50 kiloOhmios) | Superior a 50 kiloOhmios |
| DIGITAL OUT (OPTICAL) | Conector de salida óptico | -18 dBm | Longitud de onda: 660 nm |
| DIGITAL OUT (COAXIAL) | Conector de salida coaxial | 0,5 Vp-p(75 Ohmios) | 75 Ohmios |
| PHONES | Toma de fono estéreo | 28 mW | 32 Ohmios |
General
Power requirements
| Lugar de adquisición | Requisitos de alimentación |
| Europa | 220 V – 230 V CA, 50/60 Hz |
| Otros países | CDP-XA50ES 220 V – 230 V CA, 50/60 Hz |
| CDP-XA30ES 110 V – 120 V o 220 V – 240 V CA, ajustable, 50/60 Hz |
| Consumo de alimentación | CDP-XA50ES: 20 W |
| CDP-XA30ES: 20 W | |
| Dimensiones (aprox.) (an/al/prf) | CDP-XA50ES: 430 × 125 × 375 mm incluidas partes salientes |
| CDP-XA30ES: 430 × 125 × 350 mm incluidas partes salientes | |
| Masa (aprox.) | CDP-XA50ES: 15,2 kg |
| CDP-XA30ES: 9,0 kg |
Supplied accessories
Audio cable (2 phono plugs – 2 phono plugs) (1) Remote control (1) Sony SUM-3 (NS) batteries (2) Stabilizer (1)
Design and specifications are subject to change without notice.
Alphabetical index
A
Random playback 13
Storage
information about compact discs 22
specific topics 24
AMS 7,11
Gradual appearance and disappearance of sound 19
Custom files 22
Custom index 22
Bank deletion 24
utility of 22
B
Erased
Custom files 22
Custom index 24
Bank deletion 25
Peak level search 21
Search. See Locating
C, Ch
Connection 4
Connections 4
overview 4
Continuous, playback 6
D
Deactivating the calendar
musical 11
Synchronized disappearance 20
Unpacking 4
E
Editing. See Recording
Assemble editing 18
Program editing 15
Synchronized editing 18
Stabilizer 7
F
Digital filter with variable
coefficient 8
G, H
Recording 17
a program 17
use of assemble editing 18
edition use
synchronized 18
I, J, K
Index 12
custom 22
Custom index 22
Automatic insertion of
spaces 21
L, LI
Location
control 12
directly 11
viewfinder observation 12
use of AMS 11
use of index 12
use of the index
custom 23
M, N, O
Remote control 4
Last mode memory 22
Half disc (HALF) 18, 20
P, Q
Program 14
change 16
check 15
to record 17
R
Repeat
all 12
a specific part 13
A-B repeat 13
Playback
Shuffle 13
Shuffle, delete 14, 16
Continuous 6
Custom index 23
Program 14
Single index
custom 23
Repeat 12
Delete 16
Custom index playback 23
Single index playback
custom 23
custom 23
Automatic Music Sensor.
See AMS
Troubleshooting 27
Bank suppression 24
Playback suppression 16
Playback suppression
random 14, 16
T
Fade-in and
fade-out time
sound 20
Total playback
time 10
Remaining time 11
U, V, W, X, Y, Z
Using the compact discs
compact discs 26
Names of controls
Buttons
A↔B 13
A.SPACE 21
CHECK 15
C.INDEX 23
CLEAR 16
CONTINUE 6
DISPLAY MODE 11
EDIT/TIME FADE 18,20
ERASE 22
FADER 19
FILE 23,24
FILTER 8
INDEX ↩/ 12,23
LINE OUT LEVEL 5
△ OPEN/CLOSE 7
PEAK SEARCH 21
PLAY MODE 7
PROGRAM 14
REPEAT 12
SHUFFLE 13
TIME 10
7
□□ 7
□ 7

10 11
Numeric 11
Switch
POWER 6
Control
AMS 7,11
LINE OUT/PHONE LEVEL 5
Jack
PHONES 6
Others
Disc tray 7
Stabilizer 7
Display 10
R 4
WARNING
Do not expose the CD player to rain or moisture, as this may cause fire and/or electric shock. Do not open the casing. This may result in electric shock. Refer all maintenance and repair work to qualified technicians. Do not install the unit in a confined space, such as a bookshelf or built-in cabinet.
CLASS 1 LASER PRODUCT LUOKAN 1 LASERLAITE KLASS 1 LASERAPPARAT
This product is classified as a CLASS 1 LASER product. The CLASS 1 LASER marking is located on the rear of the unit.
The following warning text is located inside the unit.
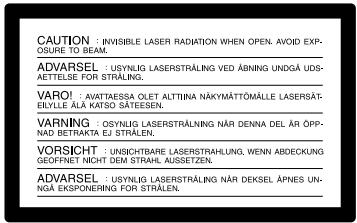
Welcome!
Congratulations on your purchase of the Sony CD player. Before using the CD player, please read this manual thoroughly and retain it for future reference.
About This Manual
The instructions in this manual apply to models CDP-XA50ES and CDP-XA30ES. The CDP-XA50ES is the model used as an example in this manual. Any differences between the models are clearly indicated in the text, e.g., "only CDP-XA50ES".
Conventions
- The instructions in this manual describe the controls on the CD player. You can also use the controls on the remote control if they have the same or similar names as those on the CD player.
- The following symbols are used in this manual:

Indicates that you can perform the task using the remote control.

Indicates tips and advice that make the task easier.
TABLE OF CONTENTS
Getting Started
Unpacking 4
Connecting the system 4
Playing a CD 6
Playing CDs
Adjusting the sound of the music (digital filter function) 8
The display window 10
Finding a specific track 11
Finding a specific point in a track 12
Playing tracks repeatedly 12
Playing in random order (Shuffle play) 13
Creating your own programs (Programmed play) 14
Playing only specific tracks (Play with skipped tracks) .. 16
Recording from CDs
Recording your own program....17
Recording a CD by specifying tape length (time/tape editing) ...... 18
Fade-in and fade-out....19
Useful recording tips 21
Storing information about CD discs (custom memory)
What you can do with the custom memory 22
Creating index marks on a disc (custom index marks) 22
Storing specific tracks on a disc (omitted tracks) 24
Additional information
Precautions 26
About CD discs 26
Troubleshooting 27
Technical data 27
Index
Index ...... Back cover
Unpacking
Check that you have received the following parts:
• Audio cable (1) - Remote control (1) - Sony SUM-3 (NS) batteries (2) - Stabilizer (1)
Inserting the batteries into the remote control
You can control the CD player with the supplied remote control.
Insert two R6 batteries (size AA) according to the polarity markings + and -. When using the remote control, point it at the remote sensor Ⓡ on the CD player.
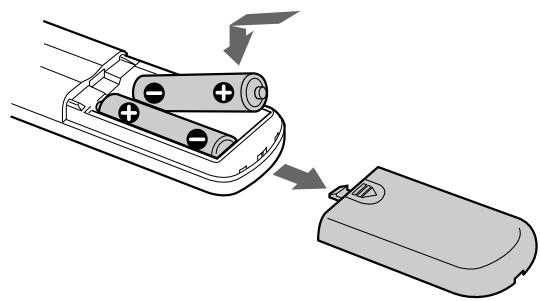

When do the batteries need to be replaced?
Under normal use, the batteries last about six months. Replace all batteries with new ones when the remote control no longer works.
Note
- Do not place the remote control in an extremely hot or humid place.
- Make sure you do not drop any foreign objects inside the remote control, especially when changing batteries.
- Do not expose the remote control sensor to direct sunlight or other strong light. This may cause the mechanism to malfunction.
- If you do not use the remote control for an extended period, you should remove the batteries to avoid battery leakage and corrosion.
Connecting the system
Overview
This section describes how to connect the CD player to an amplifier. Turn off all components before making any connections.
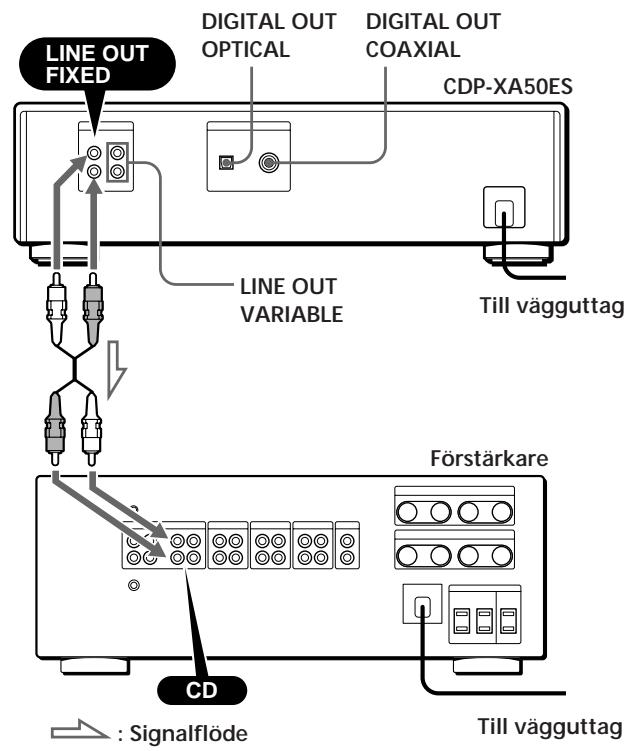
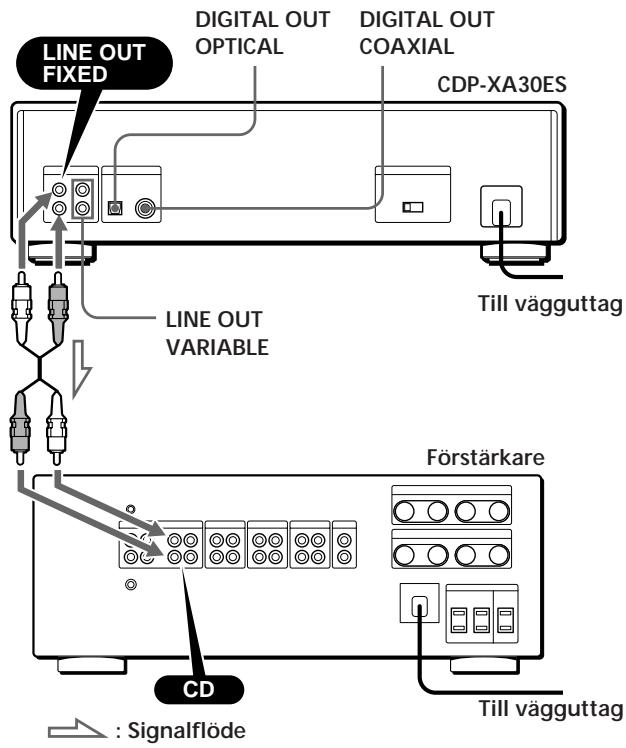
What cables are needed?
■When making analog connections
• Audio cable (supplied) (1)

■When making digital connections
- Optical cable POC-15 (not supplied)

• Coaxial cable (not supplied)

Connections
■When making analog connections
Connect the audio cable correctly according to the color markings: Red (right) to red and white (left) to white. Make sure the plugs are firmly inserted, otherwise noise and interference may occur.
![graph LR A["CD-spelare"] --> B["Förstärkare"] B --> C["INPUT"] A --> D["LINE OUT"] D --> E["FIXED VARIABLE"] E --> F["L"] E --> G["R"] F --> H["L"] G --> I["R"]](/content/2020/04/50772/images/67e9daac23f4d5f7f5b4262a97441cfb03c6db641cc4d794f1274a60f646258d.jpg)
- If you have an analog power amplifier
Connect it via the VARIABLE LINE OUT jacks using the supplied audio cable. You can adjust the output level with the LINE OUT/PHONE LEVEL control on the CD player or with the LINE OUT LEVEL buttons on the remote control.
![graph LR A["CD-spelare"] --> B["Förstärkare"] B --> C["INPUT"] A --> D["LINE"] A --> E["OUT"] D --> F["FIXED"] D --> G["VARIABLE"] E --> H["L"] E --> I["R"] F --> J["L"] F --> K["R"] G --> L["L"] G --> M["R"]](/content/2020/04/50772/images/e75c45079bf0c07d6e7eb550c73199be54eaeebc075bf6fa11075f2285bdb47c.jpg)
■When making digital connections
Since the music output is digital, you can get better sound when transmitting by connecting a digital component, such as a digital amplifier, D/A converter, DAT or MD recorder. If you connect a DAT or MD recorder, you can make digital recordings from CDs.
Note that you cannot use the fade-in and fade-out function (page 19) with this connection.
- If you have a digital component with an optical digital input
Connect the component via DIGITAL OUT (OPTICAL) using the optical cable (not supplied). Remove the cap and insert the optical cable.
![graph TD A["CD-spelare"] --> B["DIGITAL OUT"] B --> C["OPTICAL"] B --> D["COAXIAL"] E["Digital component"] --> F["DIGITAL IN"] F --> G["OPTICAL"]](/content/2020/04/50772/images/8bc22b64081ffd8bdb3e5f6d7a32697d6171b982903b9f6058ff3b5c2a913b6f.jpg)
- If you have a digital component with a digital coaxial input
Connect the component via the DIGITAL OUT (COAXIAL) connector using the coaxial cable (not supplied).
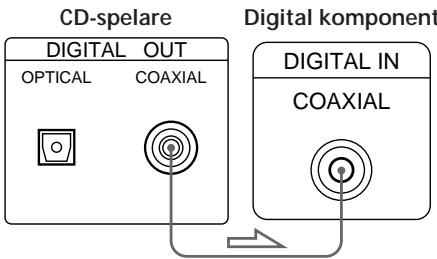
Note
When connecting to DIGITAL OUT, interference may occur when playing media other than music, such as a CD-ROM disc.
Setting the VOLTAGE SELECTOR (Applies only to models with a voltage selector)
Check that the voltage selector on the rear panel of the player is set to the local voltage. If not, set the selector to the correct position with a screwdriver before connecting the power cord to the wall outlet.
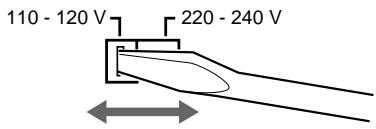
Connecting the power cord
Connect the power cord to the mains.
Removing the protective sheet
The protective sheet is placed on the CD player. Remove it before using the CD player.
Playing a CD
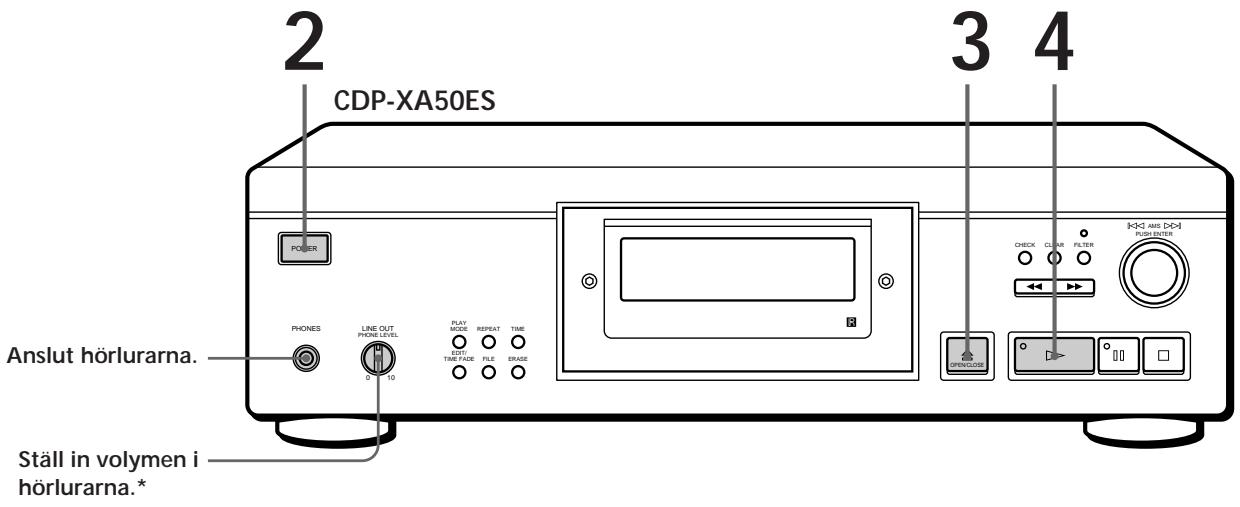
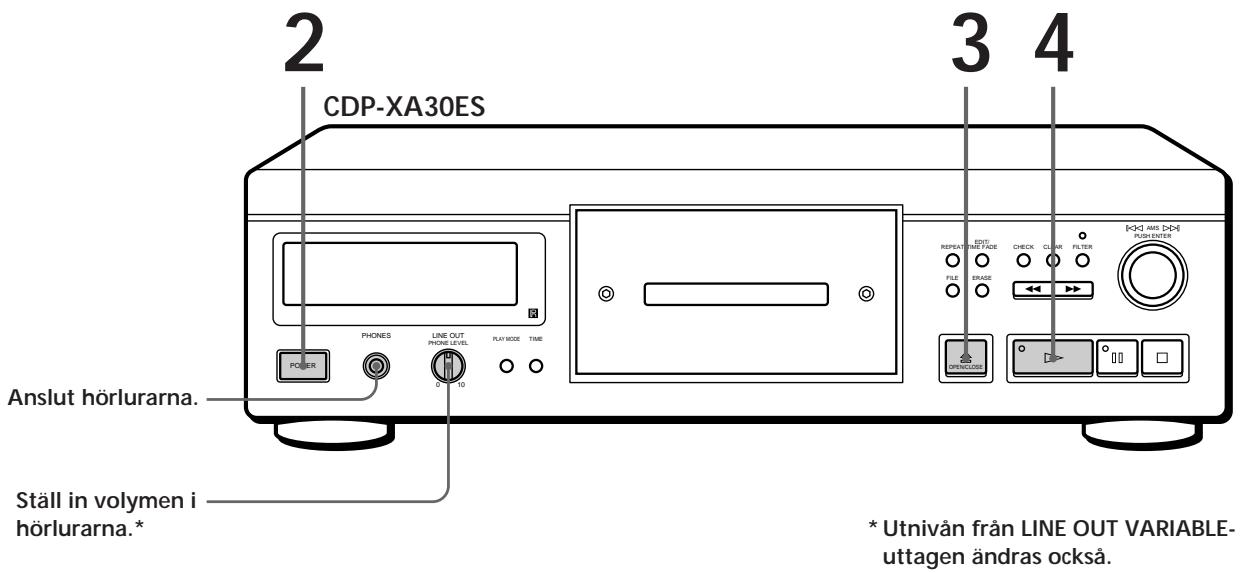
- See pages 4–5 for information on how to connect the system.

If you turn on the CD player when a CD is already loaded, you can start playback automatically from the beginning of the CD. If you connect a timer (purchased separately) to the CD player, you can have the CD player start playing the disc at a preset time.
1 Turn on the amplifier and set it to the CD player.
2 Turn on the CD player by pressing POWER.

If “- - - - -” appears in the display, place the supplied stabilizer on the CD disc. If you do not, this indicator will appear.
Note
In step 3, do not place more than one CD on the disc tray. If you do, both the discs and the player may be damaged.

If playback does not start from the first track Press PLAY MODE repeatedly until "SHUFFLE", "PROGRAM", and "CUSTOM INDEX" no longer appear in the display (or press CONTINUE on the remote control).
3
Press ≜ OPEN/CLOSE and place a disc on the disc tray.
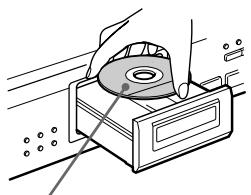
With the label side up

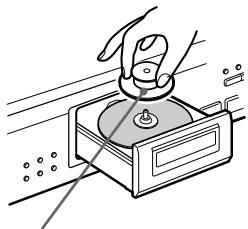
Place the supplied stabilizers on the CD. (Different stabilizers are supplied with the CDP-XA50ES and CDP-XA30ES models.)
4
Press ▷.
The disc tray closes and all tracks are played once (continuous playback).
Set the volume on the amplifier.
To stop playback
Press □.
| När du vill | Gör så här |
| Göra paus | Tryck på 📄 |
| Fortsätta spela efter paus | Tryck på 📄 eller ▷ |
| Gå till nästa spår | Vrid 🐵AMS ▷medsols. (Om du använder fjärrkontrollen trycker du på ▶▶). |
| Gå till föregående spår | Vrid 🐵AMS ▷motsols. (Om du använder fjärrkontrollen trycker du på 🐵◀.) |
| Stoppa uppspelningen och ta ur CD-skivan | Tryck på ≜ OPEN/CLOSE |
Adjusting the sound of the music (digital filter function)
This player has a digital filter with variable coefficient (V.C.). By selecting the desired filter, you can adjust the sound to match the system, the room, the music source, etc.
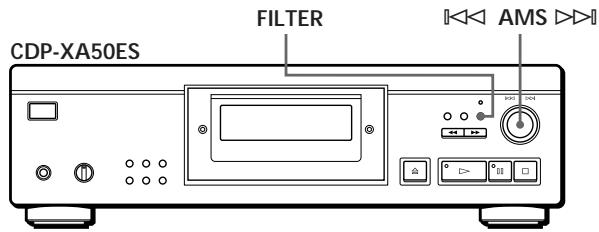
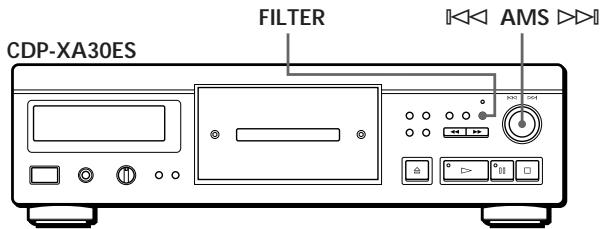
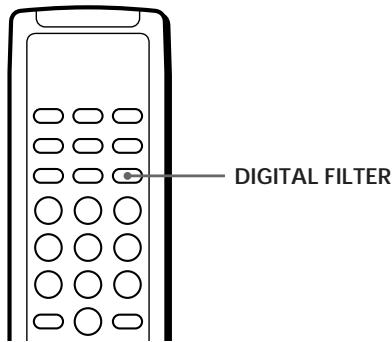
Select the filter directly on the player
1 Press FILTER.
The current filter is shown in the display and the filter indicator blinks.
2 Turn ◀◀◀ AMS ▷▶▶▶ until the number of the digital filter you want appears in the display.
When you turn the ◀◀◀ AMS ▷▶▶ control, the digital filter number changes as follows:

The sound is interrupted temporarily if you are playing a disc.
3 Press ◀◀◀ AMS ▷▶▶ to select the filter.
The original display appears again.
The selected digital filter number is stored in memory even if the power is turned off.

You can also change the digital filter number by pressing the FILTER button while the indicator is blinking.
Selecting the filter with the remote control
1 Press DIGITAL FILTER.
The current filter is shown in the display and the filter indicator blinks.
2 Press DIGITAL FILTER repeatedly until the desired digital filter number appears in the display.
The digital filter number is saved and the original display appears again.
What is a variable coefficient digital filter (V.C.)?
In CD players, the digital filter is used to eliminate the noise that occurs during sampling. You can change the character of the music by changing the cutoff characteristics of the digital filter.
This player has five different types of filters with different coefficient characteristics: "STD", "1", "2", "3", and "4". The digital filters "3" and "4" also have three coefficient patterns each, A–C, for further fine-tuning. Below are explanations of the terms you need to know to understand the different characteristics of the digital filters used in this CD player.
Steep attenuation curve and gentle attenuation curve Depending on the cutoff characteristics, digital filters can be roughly divided into two types: those with a steep attenuation curve and those with a gentle attenuation curve.
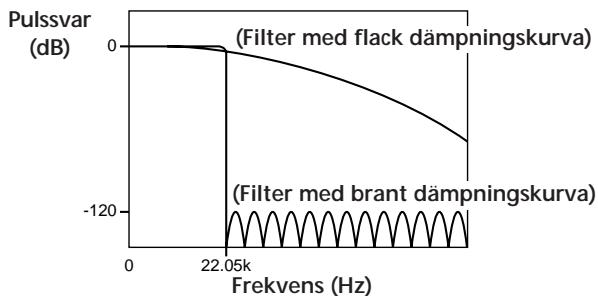
Comparison of cutoff characteristics for filters with steep and gentle attenuation curves
Filters with a steep attenuation curve sharply cut off the noise that occurs during sampling above 22.05 kHz. This is a superior method for complete reproduction of signals below 20 kHz; it is the basic principle behind digital audio reproduction.
Filters with a gentle attenuation curve, on the other hand, gradually cut off the noise that occurs during sampling and can therefore keep ringing below and above the cutoff frequency in the pulse response (a type of "sound smear") to a minimal level.
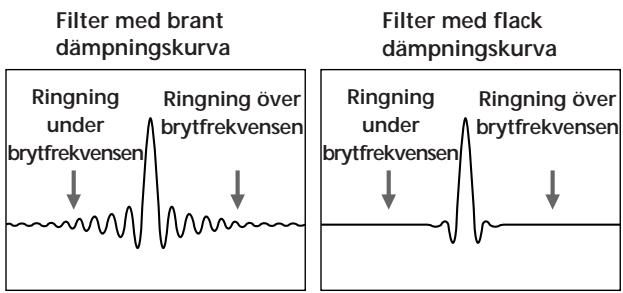
Comparison of pulse response for filters with steep and gentle attenuation curves
Cascade type and direct type
There are two methods for sampling with digital filters: cascade type and direct type. Cascade-connected filters multiply the signal by eight in three stages, while direct filters multiply the signal by eight in one stage. Cascade filters have high computational efficiency and provide a steep attenuation curve with high precision. In addition, the circuits in this player use the full feedforward (FF) method between each stage to provide increased accuracy in information transfer.
On the other hand, eight-times oversampled data with direct filters can be obtained in a single stage without transfer losses between calculation steps. However, because such circuits are extremely large, this player only supports filters with a gentle attenuation curve.
![graph TD IN --> A["×2"] A --> B["×2"] B --> C["×2"] C --> D["×8"] D --> OUT A -->|FF| B B -->|FF| C C -->|FF| D](/content/2020/04/50772/images/a2c7e8ca7a822afafd09df151a7fa103eaf564e17dfb98005e187b1dcfe4fded.jpg)
Characteristics of the digital filters
Below are described the settings and characteristics of each of the five digital filters. Use this information to select the desired filter.
STD: Standard
This is a cascade filter with a steep attenuation curve. It has the same characteristics as the digital filters that have long been used in Sony's advanced devices, and cuts sharply at -120 dB at 24 kHz. This filter uses the full feed-forward method between calculation steps, giving the sound a wide range and full spatial reproduction.
1: Spline
This is a cascade filter with a flat attenuation curve that uses a cubic spline function for interpolation. The spline function provides a smoother connection between points, and moreover, the cubic filter is the most straightforward of all spline functions. Ringing in the pulse response is much lower for this filter than for a filter with a steep attenuation curve. With this filter, the sound image is clear and the sound reproduction is even.
2: Simple
This is a direct filter with a flat attenuation curve. No quantization occurs between the filter's output signal and the D/A converter's input signal.
Calculations of the direct type are used in the digital filter, and the bit length of the digital filter's output signal and the D/A converter's input signal is the same, which means that no requantization noise is generated between the digital filter and the D/A converter. This means that of the CD's 16-bit information, elements up to 20 kHz are transferred to the D/A converter completely linearly. This gives a sound with great clarity and power.
3: Analog type
This is a direct filter with a flat attenuation curve that simulates an analog Butterworth filter of the seventh order. This filter completely eliminates ringing below the cutoff frequency in the pulse response. By simulating an analog filter, phase shift also occurs in the upper range outside the audible frequency range. The degree of phase shift for filters 3A–3C varies. 3A is multiplied by one (true analog characteristic), 3b is multiplied by 0.75, and 3C is multiplied by 0.5. The pulse response changes as shown in the figure below. The degree of ringing below and above the cutoff frequency varies with the phase shift. This gives warmth and depth to the sound.
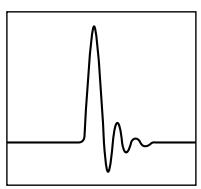
3A
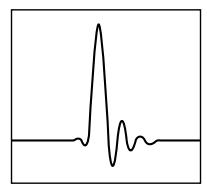
3b
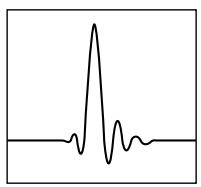
3C Comparison of pulse responses for filter 3
4: Butterworth
This is a direct filter with a flat attenuation curve and functions as a Butterworth filter of the fifth to ninth order. The phase, however, is linear and does not have the phase change possibilities as in filter 3 (analog type). As can be seen from the figure below, only the cutoff characteristics can be changed for the fifth order (4A), seventh order (4b), and ninth order (4C). Ringing in the pulse response increases from the fifth to the ninth order filter. With this filter, the sound is perceived as balanced and easy to listen to.
Pulse response (dB)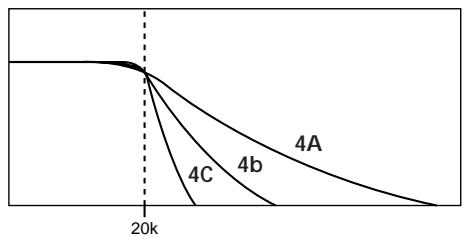
Frequency (Hz) Comparison of cutoff characteristics for filter 4
Note
These digital filters change the sound characteristics mainly outside the audible frequency range. They cannot affect the sound within the audible range as the tone controls on the amplifier do. With certain combinations of equipment and program material, there may be no noticeable difference when you switch filters.
The display window
In the display window, you can view information about the disc.
CDP-XA50ES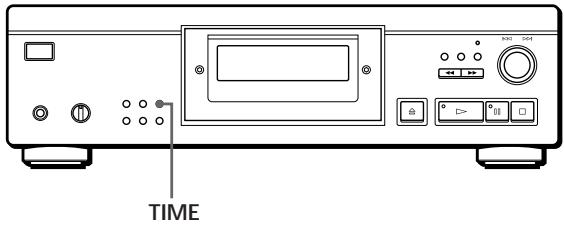
CDP-XA30ES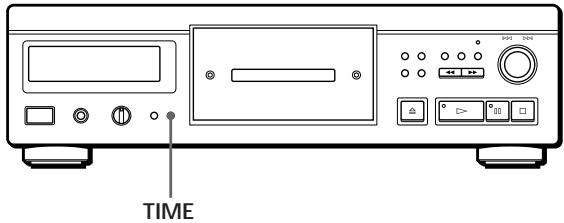
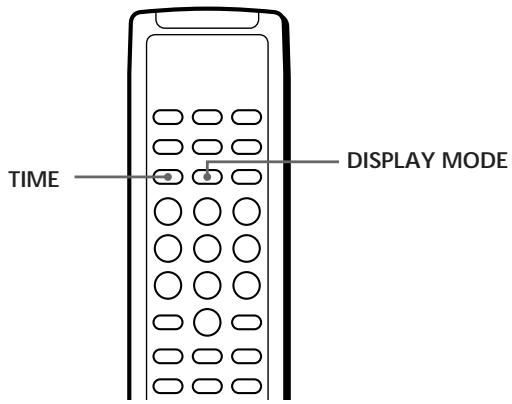
Display total number of tracks and total playing time
Press TIME before starting playback. The display window shows the total number of tracks, total playing time, and a music calendar.
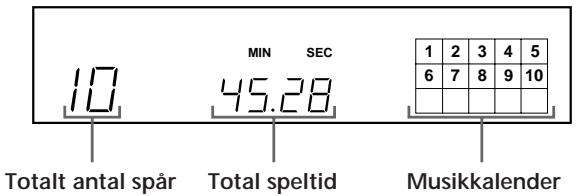
In random playback mode ("SHUFFLE" is shown in the display window, see page 13), a one-second gap (access time) is inserted between tracks. The extension of time is automatically added to the total playing time shown in the display window.
If the disc contains more than 15 tracks, ► appears next to 15 in the music calendar.
This information is also displayed when you press OPEN/CLOSE to load the disc tray.
Display information while a disc is playing
While a CD is playing, the display window shows the current track number, index number, playing time, and music calendar.
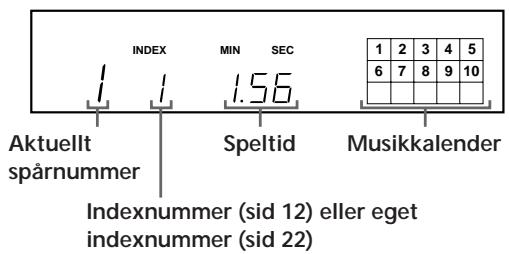
The track numbers in the music calendar disappear after they have been played.
Display remaining playing time information
Each time you press TIME while a disc is playing, the information in the display window changes according to the table below.
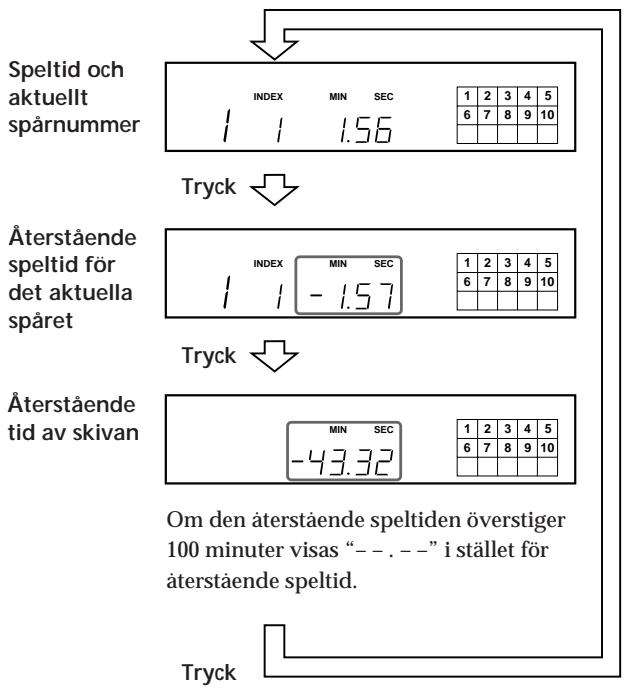
Turn off the music calendar in the display window

Each time you press DISPLAY MODE on the remote control while playing a disc, the music calendar is alternately shown or hidden in the display window.
Find a specific track
You can quickly find any track during playback using the AMS (Automatic Music Sensor) function on the CD player or with the number buttons on the remote control.
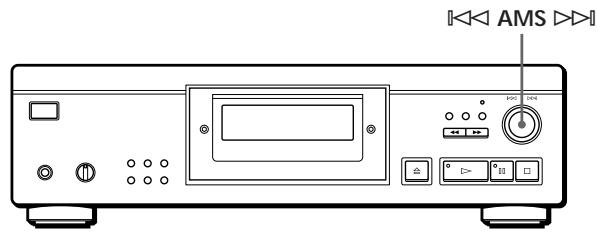
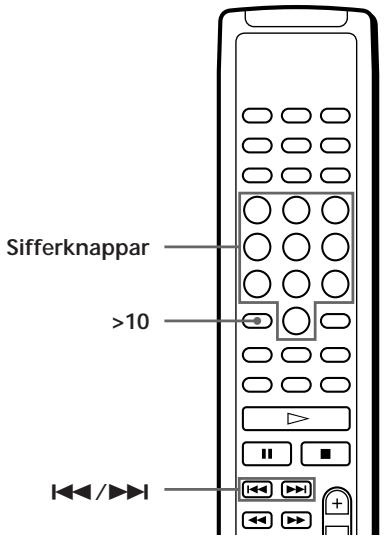
| Om du vill hitta | Gör så här |
| Nästa eller efter-följande spår | Vrid ◀◀◀ AMS ▶▶▶ medsols tills du hittar spåret. Om du använder fjärrkontrollen trycker du på ▶▶▶ flera gånger tills du hittar spåret. |
| Aktuellt eller föregående spår | Vrid ◀◀◀ AMS ▶▶▶ motsols tills du hittar spåret. Om du använder fjärrkontrollen trycker du på ◀◀◀ flera gånger tills du hittar spåret. |
| Ett bestämt spår direkt [IMAGE] | Ange spårets nummer genom att trycka på fjärrkontrollens sifferknappar |

Go directly to a track number higher than 10

First press >10, then press the corresponding number buttons. You enter “0” with the 10 button.
Example: You want to play track number 30
First press >10, then press 3 and 10.
Find a specific point in a track
You can search for a specific point in a track during playback.
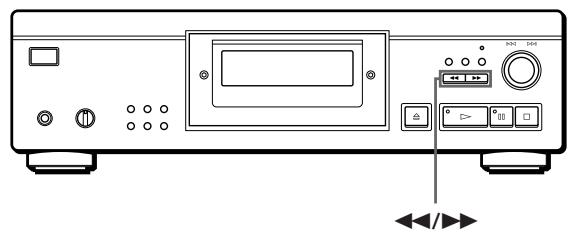
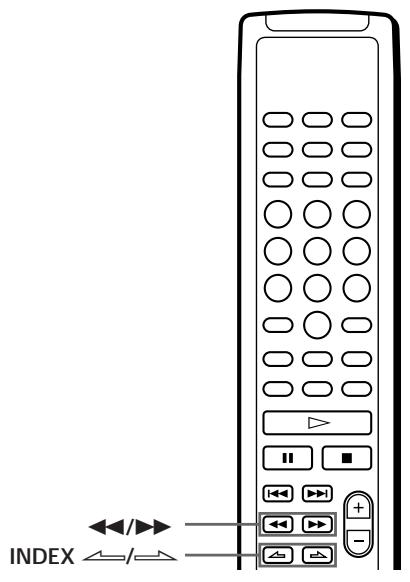
| Om du vill hitta en bestämd punkt | Trycker du på |
| Medan du lyssnar | ►► (framåt) eller ◀◀ (bakåt) och håll den nedtryckt tills du hittar rätt punkt |
| Snabbt under paus med hjälp av teckenfönstret | ◄◄/►► och håll den nedtryckt tills du hittar rätt punkt. Det hörs inget ljud under denna sökning. |
| Med hjälp av index (endast för index-markerade skivor) | INDEX └─/────── på fjärrkontrollen upprepade gånger tills du hittar önskad punkten |

What is an index mark?
It is a mark that divides a track or disc into different sections so you can easily find a specific point. The disc's packaging indicates whether index marks are used.
Note
If “ ” appears in the display window, the disc has reached the end while you were pressing ▶▶. Press ◀◀ or turn ◀◀ AMS ▶▶ to go backwards.
Play tracks repeatedly
You can play the tracks several times using any play mode.
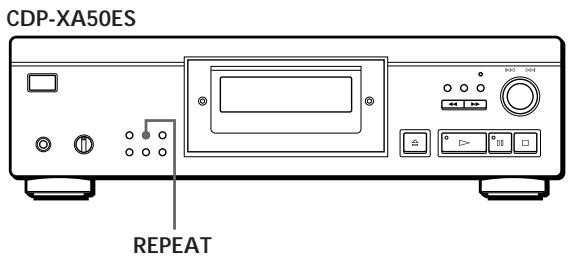
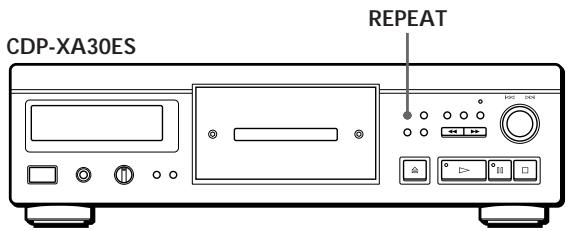
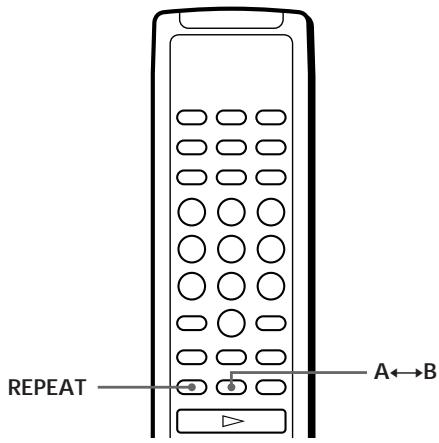
Press REPEAT while a disc is playing.
"REPEAT" appears in the display. The tracks are repeated in the following way:
| Vid detta spelsätt | Upprepar CD-spelaren |
| Kontinuerligt (sid 6) | Alla spår |
| Slumpmässigt (sid 13) | All spår i slumpmässig ordning |
| Programmerat (sid 14) | Samma program |
| Uppspelning med utelämnade spår (sid 16) | Alla återstäende spår |
| Slumpmässig upspelning med utelämnade spår (sid 14, 16) | Alla återstäende spår i slumpmässig ordning |
| Uppspelning med egna indexmarkeringar (sid 23) | Avsnittet mellan två indexmarkeringar |
To cancel repeat playback
Press REPEAT several times until "REPEAT" disappears from the display.
To repeat the current track
You can play only the current track repeatedly.
While the track you want to repeat is playing, press REPEAT several times until "REPEAT 1" appears in the display.
Note
You cannot repeat the current track when the disc is playing in the custom index play mode (see page 23).
To repeat a specific section (repeat A←→B)
You can play a specific section of a track several times. This can be useful when you want to memorize a melody, for example.
Note that you cannot repeat more than one track at a time.
1 While playing a CD, press A↔B on the remote control when you have found the start point (point A).
"A-" in "REPEAT A-" blinks in the display.
2 When you reach the end point (point B), press A↔B again.
"REPEAT A-B" is displayed. The CD player repeats this section.
To cancel repeat A↔B
Press REPEAT.
Setting a new start point
You can change to another section by changing the start point.
1 Press A↔B while the CD player is repeating a specific section. The end point B becomes the new start point A. "A-" in "REPEAT A-" flashes in the display.
2 When you reach the end point (point B), press A↔B again.
"REPEAT A-B" is displayed. The CD player repeats the section between the new start and end points.

To start over from start point A
Press ▷ during repeat A↔B.
Playing in random order (Shuffle Play)
The CD player can "shuffle" and play tracks in random order.
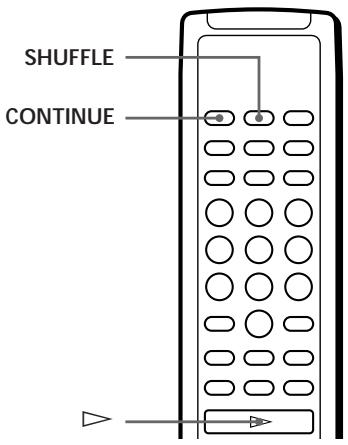
1 Press PLAY MODE until "SHUFFLE" appears in the display.
When using the remote control, press SHUFFLE.
2 Press ▷ to start random playback.
The [←] indicator appears while the CD player "shuffles" the tracks.
To cancel random playback
Press PLAY MODE four times (or CONTINUE on the remote control).

You can start random playback while the disc is playing.
Press PLAY MODE once (or SHUFFLE on the remote control) and random playback starts from the current track.

You can skip tracks during random playback (random playback with skipped tracks).
Use the remote control to press the track number you want to skip.
The track number and "OFF" appear in the display, and the track is then skipped in the music calendar.
To play the track again, press the number button again.
To play all tracks, press □ in stop mode.
Creating your own programs (Programmed playback)
You can create your own programs by arranging the tracks on a disc in any order. The program can contain up to 24 tracks.
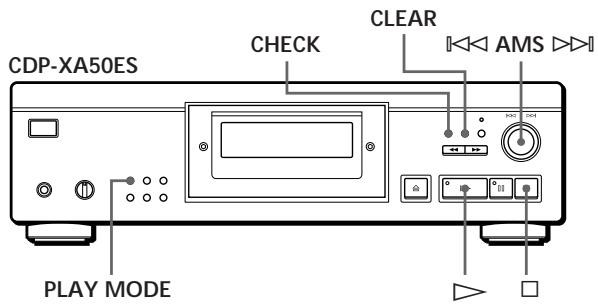
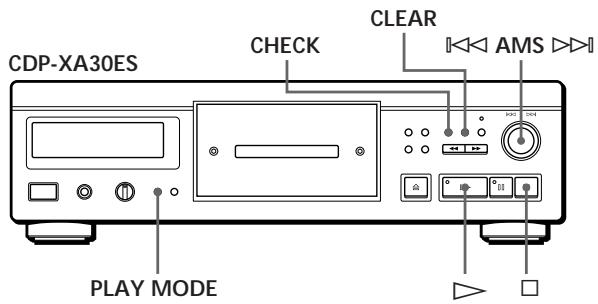
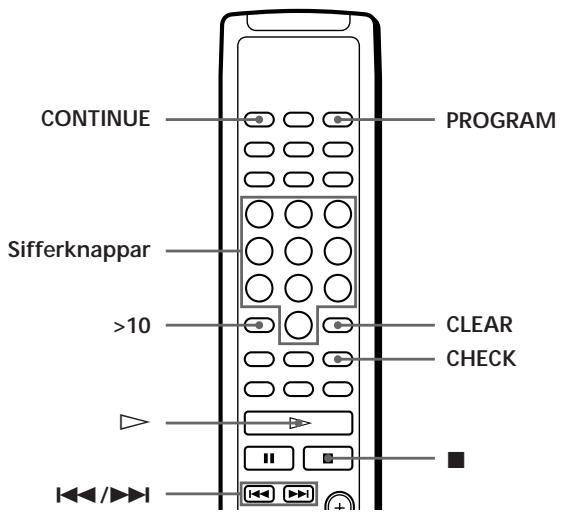
Create a program on the CD player
1 Press PLAY MODE until “PROGRAM” appears in the display before starting playback.
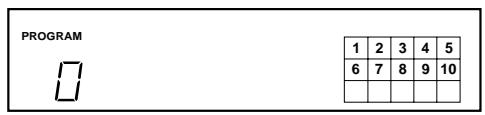
2 Turn ◀◀◀ AMS ▶▶▶ until the desired track number appears in the display.
The playback order and the programmed track numbers blink, and the total playing time, including the track, is shown in the display.
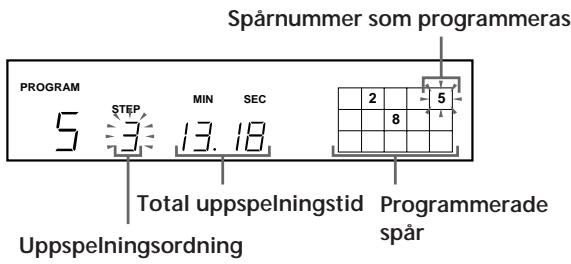
3 Select the track by pressing I◀◀ AMS ▷▶.
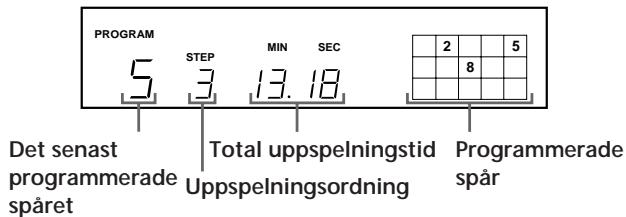
If you make a mistake
Press CLEAR and then repeat steps 2 and 3.
4 Repeat steps 2 and 3 to program the tracks in the desired order. 5 Start the programmed playback by pressing ▷.
Canceling program playback
Press PLAY MODE three times.

When tracks that are not adjacent on the disc are programmed consecutively (e.g., 1, 3, 5, etc.), a one-second pause (access time) is inserted between the tracks.

The program remains after program playback ends. If you press ▷, you can play the same program again.
Note
- “--.--” is displayed instead of the total playing time if it exceeds 100 minutes.
- “FULL” appears in the display if you try to add more tracks when the program already contains 24 tracks.
Create a program using the remote control
1 Press PROGRAM before starting playback.
"PROGRAM" appears in the display.
2 Press the number buttons for the tracks you want to program in the desired order.
Example: To program tracks 2, 8, and 5, press the number buttons in the order 2, 8, and 5.
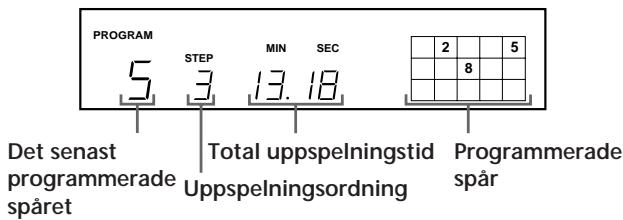
Selecting a track with a track number over 10
Use the >10 button (see page 11).
If you make a mistake
Press CLEAR, then enter the correct track number.
3 Start the programmed playback by pressing ▷.
Canceling the programmed playback
Press CONTINUE.

You can check the total playback time while programming using the remote control (program editing).
Select a track by pressing ◀◀ or ▶▶◆ and check the total playing time. Then press PROGRAM to confirm your selection.

When tracks that are not adjacent on the disc are programmed in sequence (e.g., 1, 3, 5, etc.), a one-second pause (access time) is inserted between tracks.

The program remains after program playback has finished.
If you press ▷, you can play the same program again.
Note
- “--.--” is displayed instead of the total playing time if it exceeds 100 minutes.
- “FULL” appears in the display if you try to add more tracks when the program already contains 24 tracks.
Viewing the track order
You can view the program before starting playback or during playback.
Press CHECK.
Each time you press this button, the track numbers are displayed in the programmed order in the display. After the last track, “End” appears and the display resets. During playback, only the tracks remaining to be played are shown.
Changing the program
You can change the program before starting playback.
| Funktion | Gör så här |
| Ta bort ett spår | Tryck på CHECK tills det oönskade spåret visas i teckenfönstret, och tryck sedan på CLEAR |
| Ta bort sista spåret i programmet | Tryck på CLEAR. Varje gång du trycker på knappen tas det sista spåret bort. |
| Lägga till spår i slutet av programmet | Vrid AMS tills det nummer du vill lägga till visas, och tryck sedan på AMS .När du använder fjärrkontrollen trycker du på sifferknapparna för de spår som ska läggas till. |
| Ändra programmet helt | Håll nere CLEAR tills “ALL CLr” visas i teckenfönstret. Skapa ett nytt program genom att följa anvisningarna. |
Playing only selected tracks (Playback with skipped tracks)
You can skip tracks and play only the remaining ones.
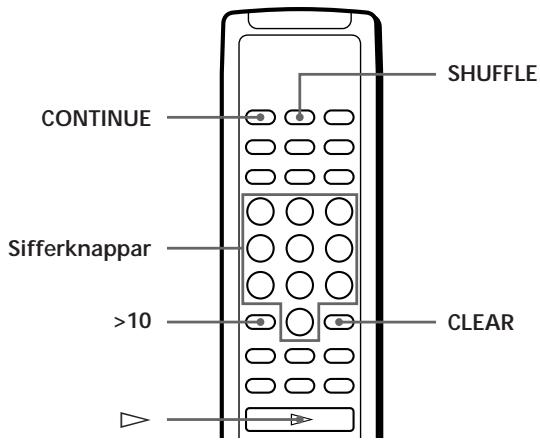
1 Press SHUFFLE.
“SHUFFLE” appears in the display.
2 Press the track numbers you want to omit.
The omitted track numbers are skipped in the music calendar when "OFF" appears after a short time.
To omit a track over 10, press >10 (see page 11).
If you make a mistake
Press the track number again. "On" appears in the display and the track is stored again.
3 When you have omitted all tracks, press CONTINUE.
"SHUFFLE" disappears from the display.
If you press PLAY MODE on the CD player instead of CONTINUE on the remote control
The omitted tracks are no longer omitted. Make sure you perform this step using the remote control.
4 Press ▷ to start playback with omitted tracks.
Canceling playback with omitted tracks
Press ■ in stop mode.

The CD player retains the omitted tracks in memory even when this type of playback ends. When you press ▷, you can only play the remaining tracks again.

You can play tracks in random order (random playback with omitted tracks). Just skip step 3 in the procedure above.

You can omit a track during playback. Press CLEAR while a track is playing. The CD player skips it and starts playing a new one.

You can store the omitted tracks of all discs. See "Storing specific tracks on a disc" on page 24.
Recording a custom program
You can record the program you have created on cassette tape, DAT tape, or MD disc. The program can contain up to 24 tracks.
By inserting a pause, you can divide the program into two parts for recording on both sides of a tape.
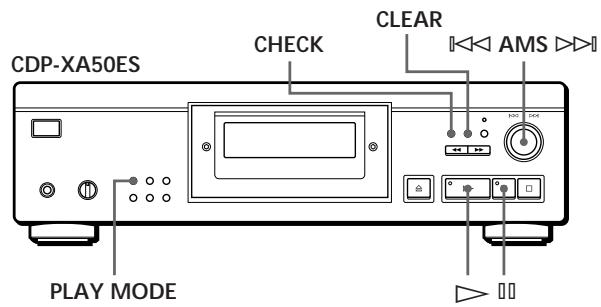
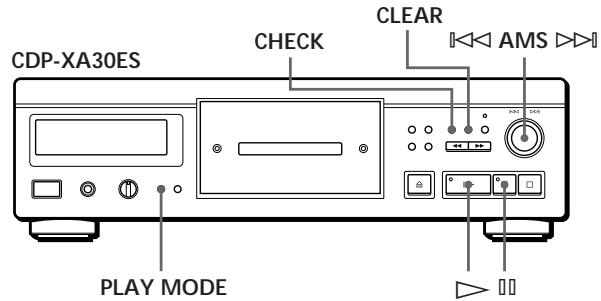
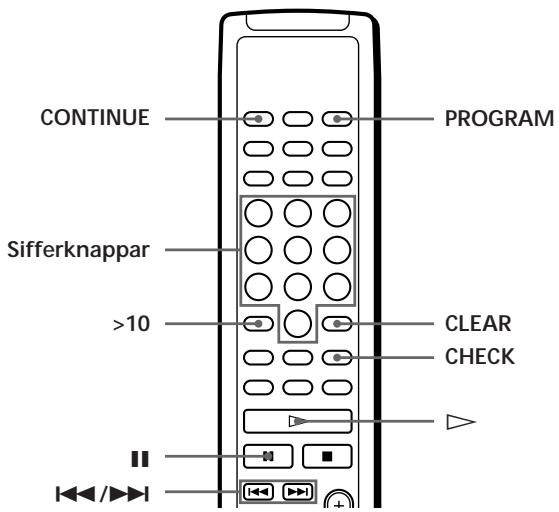
1 Create the program (for side A during recording) while checking the total playing time in the display.
See "Creating custom programs" on page 14.
2 When recording on both sides of a tape, you can insert a pause by pressing 📄. The "P" indicator appears in the display and the playing time resets to "0.00".
If you are recording on only one side of a cassette tape, DAT tape, or MD disc, skip this step and go to step 4.
A pause counts as a track
If you insert a pause, you can program up to 23 tracks.
3 Repeat step 1 and create the program for side B.
4 Start recording on the cassette deck and then press ▷ on the CD player.
When recording on both sides of a tape, a pause is made at the end of the program for side A.
5 When you want to record on side B, turn the tape over and start recording by pressing ▷ or Ⅲ on the CD player.
Checking and changing the program See pages 15 and 16.
"SIDE-A" is displayed while you check the program for side A, and "SIDE-B" while you check the program for side B.
You can automatically insert a three-second blank between each track.
Use the function that automatically inserts blanks between tracks (see page 21).
Record a CD by specifying the tape length (time/tape editing).
You can have the CD player create a program that fits the tape length. Choose one of the following options:
- Time editing: automatically creates a program and keeps the order of the CD.
- Tape editing: automatically determines the track order to fit the tape length.
The program can contain up to 24 tracks (an inserted pause between tracks counts as a track).
Note that tracks whose numbers exceed 24 cannot be programmed.
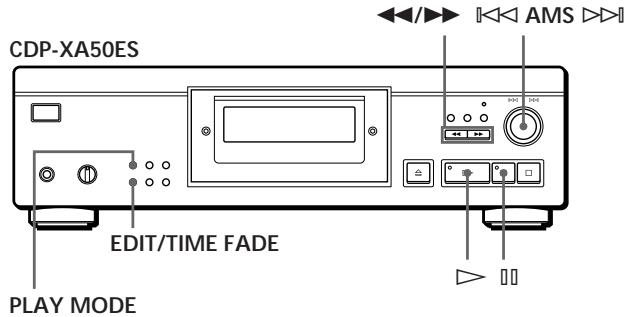
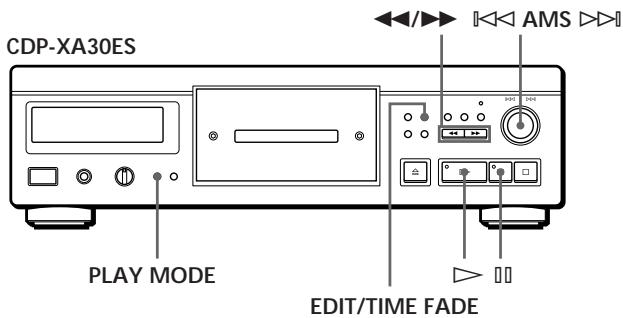
1 Press EDIT/TIME FADE before starting playback as follows:
- To select time editing, press the button once. "EDIT" is displayed and "SIDE-A" blinks in the display.
- To select tape editing, press the button twice.
"EDIT" is displayed and "SIDE-A" blinks in the display.
2 Press ◀◀ or ▶▶ to specify the tape length. Each time you press these buttons, the display changes as shown below, with the tape length for one side after each indicator.

When you select "HALF"
The CD player makes the program for each side half of the total playing time of the disc. Note that you cannot select "HALF" if the disc has more than 24 tracks.
3 Press EDIT/TIME FADE. The CD player creates the program.
The tracks to be recorded are shown in the display. "SIDE-B" flashes in the display.
4 If you are recording on both sides of the tape, press EDIT/TIME FADE again.
The CD player inserts a pause and then creates the program for side B. The display shows the programmed tracks.
If you are recording on only one side of the cassette tape, DAT tape, or MD, skip this step.
5 Start recording on the cassette deck and press ▷ on the CD player.
If you are recording on both sides of the tape, the CD player pauses at the end of the program for side A.
6 When you are ready to record on side B, turn the tape over and start recording by pressing ▷ or 📄 on the CD player.
To cancel time/tape editing
Press PLAY MODE repeatedly until "SHUFFLE", "PROGRAM", and "CUSTOM INDEX" are no longer shown in the display (or press CONTINUE on the remote control).

You can program the tracks in advance
Select tracks before performing the above procedure. The CD player creates a program based on the selected tracks. In this case, you cannot specify the tape length with "HALF".

You can specify any tape length
Set the tape length using ◀◀◀ AMS ▷▶▶.
Example: The tape length on one side is 30 minutes and 15 seconds.
1 Set the minutes by turning the dial. 2 Set the seconds by turning the dial until "15" appears in the display, then press the button.

When tracks that are not adjacent on the disc are programmed in sequence (e.g., 1, 3, 5, etc.), a one-second pause (access time) is inserted between tracks.

You can automatically insert a three-second blank between each track.
Use the function that automatically inserts blanks between tracks (see page 21).

Check and modify the program. See pages 15 and 16.
Fade-in and fade-out
You can manually fade in or out to prevent tracks from starting or ending abruptly.
Note that you cannot use this function if you are using the DIGITAL OUT connection.
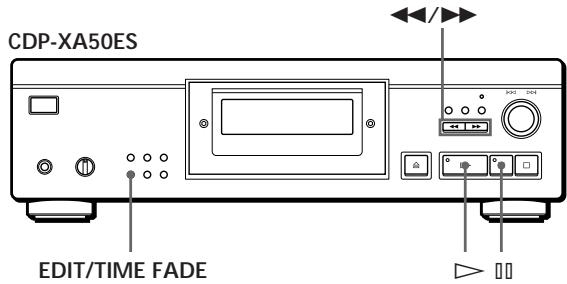
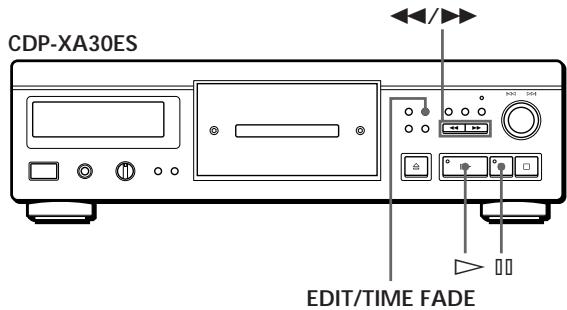
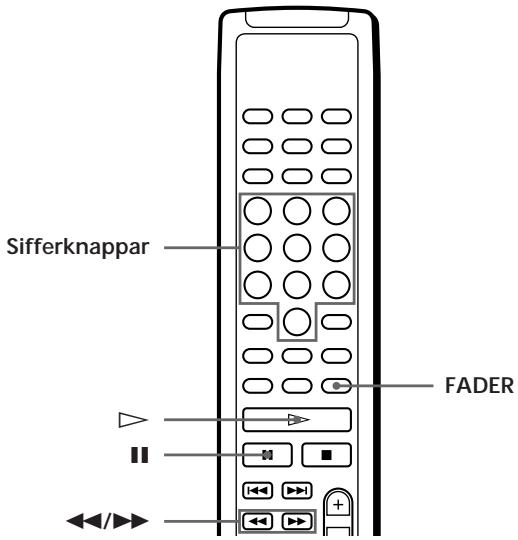
| Funktion | Tryck på FADER |
| Tona in [IMAGE] | I pausläge. “FADE” blinkar och musiken tonas in. |
| Tona ut [IMAGE] | När du vill börja tona ut. “FADE” blinkar. Musiken tonar ut och CDspelaren gör en paus. |
Changing the timed fade
You can change the timed fade from two to ten seconds. If you do not change the fade, it lasts for five seconds.
1 Press FADER before starting playback. "5 SEC" appears and "FADE" blinks in the display. 2 Press the number button to set the fade time. You can also set the fade time by pressing the ◀◀/▶▶ buttons until the desired time appears in the display.
Fade out at a specific time (timed fade)
You can have the CD player fade out automatically at a specific time. Once you have set the fade, it works twice, meaning the music fades out at the end of both sides of the tape.
1 Press EDIT/TIME FADE three times before starting playback. "(TIME)FADE" and "SIDE-A" appear in the display.
2 Press ◀◀ or ▶▶ to set the playing time. Each time you press these buttons, the display changes as shown below, with the playing time for one side after each indicator.

When you select "HALF"
The CD player sets the playing time to half of the total playing time.
3 Press ▷ to start playback. At the specified time, the music fades out while "FADE" blinks in the display and the CD player pauses. "SIDE-B" appears in the display.
4 When you want to record on side B, turn the tape over and start recording by pressing ▷ or 📄 on the CD player.
At the specified time, the music fades out again.
To cancel the timed fade Press EDIT/TIME FADE.
You can set any playing time See "You can set any tape length" on page 19.
You can change discs during the timed fade Change the disc if the music ends before the specified fade-out time (e.g., when recording CD singles onto tape). The specified fade-out time is counted only during playback.
You can fade in to resume playback in step 4 Press FADER after turning the tape over.
Note
If you press ◀◀ or ▶▶ during Time Fade Play, the fade-out is deactivated.
Useful recording tips
These functions simplify recording from CDs.
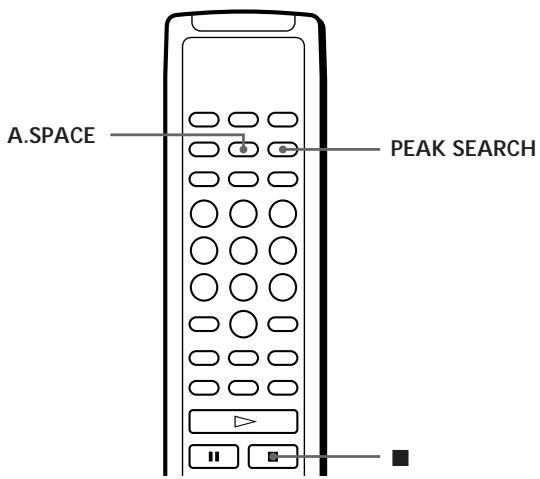
Setting the recording level (peak level search)
The CD player searches for the highest sound level among the tracks to be recorded, so that you can set the recording level in advance.
1 Press PEAK SEARCH before starting playback. “PEAK” flashes in the display and the CD player repeats the section with the highest level. 2 Set the recording level on the cassette deck. 3 Cancel the peak search by pressing ■ on the CD player. “PEAK” disappears from the display.
Note
If you search several times on the same disc, the function may locate different sections. However, the difference is so small that it should not be a problem to set the correct recording level.
Finding a track on the tape using the AMS function (AUTO SPACE)
The AUTO SPACE function inserts a three-second blank between each track during playback so that you can find a track using the AMS function on the deck.
Before starting playback, press A.SPACE.
"AUTO SPACE" appears in the display.
To cancel AUTO SPACE
Press A.SPACE until “AUTO SPACE” disappears from the display.
Note
If you use the AUTO SPACE function while recording, for example, a medley or a symphony, there may be an audio interruption when the track numbers change. This happens when the assigned track numbers are in the middle of the piece.
What you can do with the custom memory
The player can store two types of information, called “custom memory,” on each disc. Once you have stored this memory on a disc, the CD player automatically retrieves what you have stored each time you play the disc.
Note, however, that this memory is erased if you have not used the CD player for a month.
You can store the following information:
| När du använder | Kan du |
| Egna indexmarkeringar (sid 22) | Skapa högst 8 indexmarkeringar på en skiva (för en skiva med 32 spår eller mindre) eller högst 5 indexmarkeringar (för en skiva med över 32 spår) |
| Utelämnade spår (sid 24) | Utelämna spår och bara ta med de du vill ha |
The custom file indicator lights up when you store the corresponding information.
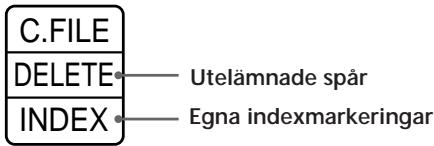
When you store a custom file on a disc, the CD player remembers the last playing condition even if you remove the disc from the player (last memory). When you insert the disc again, it will play in the same mode. The player also remembers the fade-in/out time if you have changed it.
Note that when you press ▷ to close the disc tray and start playback, the disc will play in the current play mode instead of the stored one.
Where is the custom file stored?
The custom file is not stored on the disc but in the CD player's memory. This means you cannot use this memory when playing the disc on other CD players.
How many discs can you store in the custom file?
You can store up to 224 discs in the custom file. Note that the CD player counts a disc as two when you store both a custom file and deleted tracks.
You can check how many discs are in the memory
1 Remove the disc from the CD player. 2 Press ≜ OPEN/CLOSE to close the disc tray. 3 Press TIME when the music calendar is not displayed in the display window.
The number of custom files you can store is displayed.
If "FULL" appears in the display window
If the custom file becomes full, "FULL" appears when you press FILE to store information, and you cannot store more disc information. If necessary, erase some custom files (see pages 24–25).
To erase all discs
While holding down ERASE and FILE, press POWER to turn on the CD player. "FILE CLr" appears in the display window and everything is deleted from the custom file.
Creating index marks on a disc (custom index marks)
You can create up to 8 index marks on a disc (for a disc with 32 tracks or less) or up to 5 index marks (for a disc with more than 32 tracks) so that you can easily find a specific point. This can be useful when playing discs with symphonies or concertos whose pieces are divided into multiple tracks (see the example below).
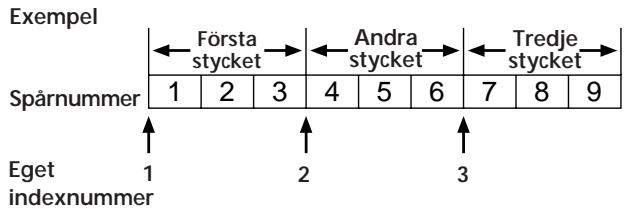
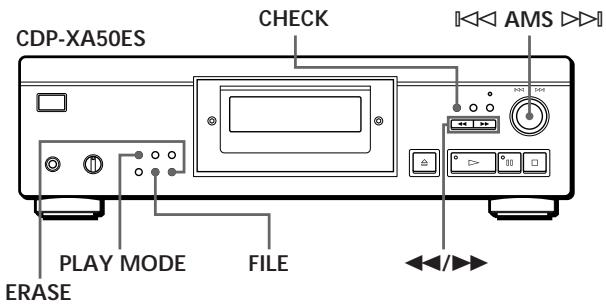
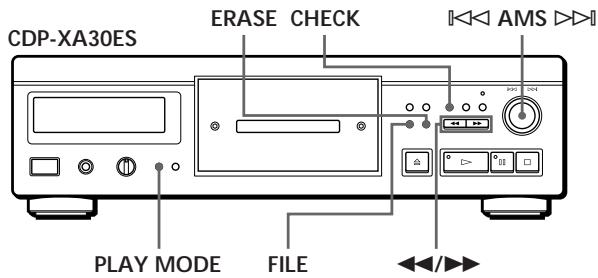
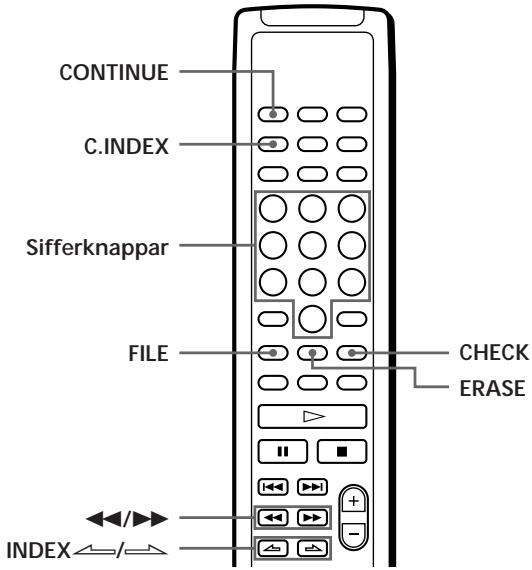
1 Insert the disc.
2 Press PLAY MODE repeatedly until "CUSTOM INDEX" appears in the display.
When using the remote control, press C.INDEX.
The music calendar is no longer displayed.
3 When you reach the point you want to mark, press FILE.
The index number blinks in the display. The player repeats the section for three seconds from the point where you want to make the index mark.
4 Adjust so that the CD player can repeat from exactly the point where you insert the index mark by pressing ◀◀ or ▶▶.
Press these buttons seven times to move the point approximately one second forward or backward.
If you do not want to mark the point
Press CLEAR and search for another point.
5 Press FILE again to store custom index marks.
"INDEX" appears in the custom memory indicator in the display.
"INDEX" is displayed in the own memory indicator in the character window.
6 To make additional index marks, repeat steps 3 to 5.
When you have already decided where to make the index mark
You can mark an index directly without setting the point. When you have found the point, press first to pause, then press FILE to index-mark.
Playback from an index-marked point (playback with custom index marks)
1 Press PLAY MODE repeatedly until "CUSTOM INDEX" appears in the display. When using the remote control, press C.INDEX.
2 Do the following to find the custom index mark:
| Funktion | Tryck på |
| Nästa indexmarkering | INDEX ➔ |
| Aktuell indexmarkering | INDEX ➔ |
| En bestämd index-markering direkt | Indexmarkeringens sifferknapp |
Playback starts from the selected index mark and continues to the end of the disc.
To cancel playback with custom index marks, press PLAY MODE twice (or CONTINUE on the remote control).
Note
- You cannot use the index search function (see page 12).
- Use INDEX ←/→ to find the next or current index mark instead of the ◀◀◀ /▶▶▶ buttons on the remote control.
Playback from an index mark to the next mark (playback with custom single index marks)
1 Press PLAY MODE repeatedly until
"CUSTOM INDEX (1)" appears in the display.
When using the remote control, press C.INDEX.
2 Press the corresponding number button on the remote control for the desired index mark.
Playback starts from the selected index mark and stops at the next mark.
To cancel the custom index playback, press PLAY MODE once (or CONTINUE on the remote control).
You can play the section between two index marks repeatedly. Press REPEAT.
Erasing custom index marks
1 Insert the disc. 2 Press PLAY MODE several times until "CUSTOM INDEX" appears in the display. When using the remote control, press C.INDEX. 3 Press CHECK repeatedly until the index number you want to delete blinks. 4 Press ERASE while the number is blinking. Subsequent index numbers decrease by one.
Storing specific tracks on a disc (omitted tracks)
You can omit tracks and store only the tracks you want. You can listen to your favorite songs without having to omit tracks each time.
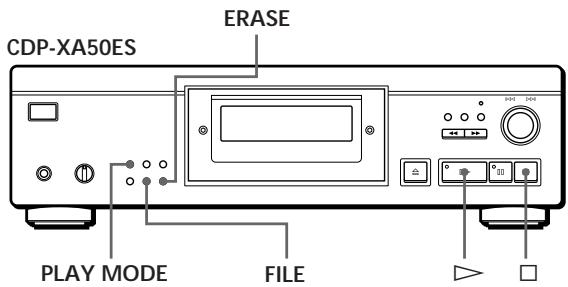
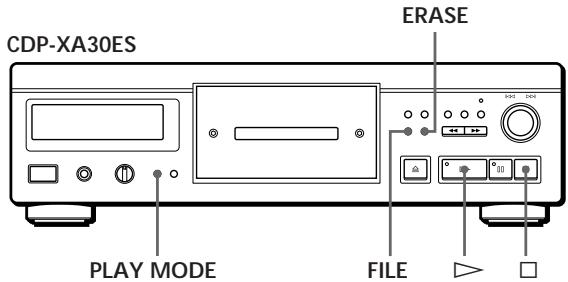
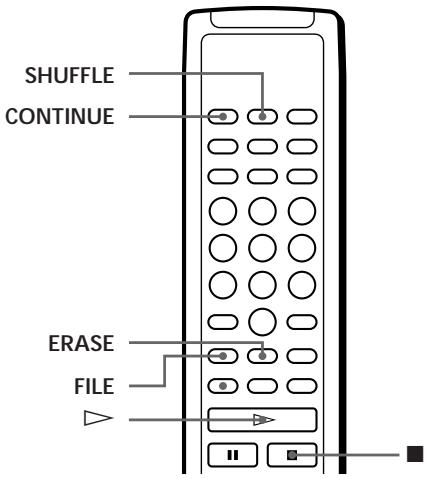
1 Insert the disc.
2 Omit the tracks you do not want. Follow steps 1 to 3 in "Playing only specific tracks" on page 16.
3 Press FILE to store the remaining tracks. "DELETE" appears in the custom memory indicator in the display.
Playing omitted tracks
1 Press PLAY MODE repeatedly until "SHUFFLE", "PROGRAM", and "CUSTOM INDEX" disappear from the display. When using the remote control, press CONTINUE. The omitted tracks can now be played again, and the selected track numbers appear in the music calendar.
2 Press ▷ to start playback.
To cancel playback of the omitted tracks, press □.
To start playback with skipped tracks again When "PROGRAM" or "CUSTOM INDEX" is displayed in the character window, press PLAY MODE repeatedly until these indicators are no longer displayed in the character window or until "SHUFFLE" is displayed in the character window. You can now start playback with skipped tracks by pressing ▷.
Play in random order with skipped tracks Press PLAY MODE in step 1 repeatedly until "SHUFFLE" is displayed in the character window (or press SHUFFLE on the remote control).
Erase skipped tracks
1 Insert the disc. 2 Press PLAY MODE repeatedly until "PROGRAM" and "CUSTOM INDEX" disappear from the character window. When using the remote control, press CONTINUE or SHUFFLE. The character window shows the skipped tracks. 3 Press ERASE to remove the skipped tracks. "DELETE" is no longer displayed in the custom memory indicator in the character window.
Precautions
Safety
- Warning — Use of optical instruments with this product can cause damage to the eyes.
- If any object or liquid falls inside the CD player's casing, unplug the power source immediately and have a qualified technician check the player before using it again.
Power supply units
- Before using the CD player, check that its operating voltage matches the voltage of the mains supply. The operating voltage is indicated on the nameplate on the back of the CD player.
- The CD player is not disconnected from the mains as long as the plug is in the wall outlet, even if it is turned off.
- If you do not intend to use the CD player for a long period of time, unplug it from the mains. Always pull the plug, not the cord.
- The power cord should only be replaced by qualified technicians.
Placement
- Avoid overheating by placing the CD player where there is good air circulation.
- Do not place the CD player on a soft surface, such as a carpet, as this may block the ventilation holes on the underside of the unit.
- Do not place the CD player near heat sources or in places where it is exposed to direct sunlight, dust, or mechanical vibrations and shocks.
Avoiding interference
- Do not touch the lens inside the CD player.
Using the stabilizer
- Use only the supplied stabilizer. If you use any other type of stabilizer, the CD player may be damaged.
Usage
- If the CD player is taken directly from a cold to a warm environment, or if it is placed in a humid room, condensation may form on the lens inside the CD player. The CD player will then stop working. Remove the disc and leave the CD player turned on for about one hour until the moisture has evaporated.
Adjusting the volume
- Do not turn up the volume while listening to passages with low volume or no sound at all. If you do, the speakers may be damaged when a loud passage occurs.
Inserting a CD
- A whistling sound may be heard from the CD player. This sound is heard when the CD player automatically adjusts the playback mechanism for the current disc.
Cleaning
- Clean the cabinet, panel, and controls with a soft cloth lightly moistened with water or a mild cleaning solution. Do not use abrasives, scouring powders, or solvents such as alcohol or gasoline.
Transport
Make sure to remove the CD and the stabilizer.
Contact your nearest Sony dealer if you have any questions or problems with your CD player.
About CDs
Handling CDs
- Always hold the CD by its edges. Do not touch the surface.
- Do not attach paper or labels to the disc.
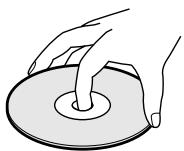
Do not do this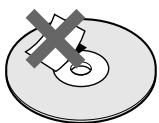
- Do not expose the disc to direct sunlight or other heat sources, such as heating ducts. Also, do not leave the CD player in a car parked in direct sunlight.
- Do not use any stabilizer and/or disc protector. The disc and the CD player may be damaged.
- Always store the disc in its case.
Cleaning
Wipe the disc with a cloth before playing it. Wipe from the center outward.
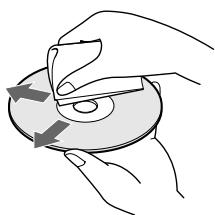
Do not use solvents such as benzine or thinner, or cleaning agents and antistatic sprays intended for vinyl records.
Troubleshooting
If you encounter problems while using the CD player, you can use the checklist below. Contact your nearest Sony dealer if you cannot resolve the problems on your own.
No sound.
→Check that the CD player's connections are securely inserted. →Check that the amplifier is set correctly. →Adjust the playback level with the LINE OUT/PHONE LEVEL control.
Playback does not start.
→There is no disc in the CD player. Insert a CD. →Use the stabilizer. →Insert the CD correctly with the label side up. →Clean the CD (see page 26). →Condensation has formed in the CD player. Remove the disc and leave the CD player on for about one hour (see page 26).
The recording level has changed.
→If you connect the amplifier via the VARIABLE LINE OUT jacks, the recording level changes when you adjust the LINE OUT/PHONE LEVEL control on the CD player or press LINE OUT LEVEL on the remote control during recording.
The remote control does not work.
→Remove any obstacles between the remote control and the CD player. →Point the remote control at the remote sensor Ⓗ on the CD player. →Replace all batteries in the remote control with new ones if they are weak.
Specifications
CD player
| Laser | Halvledarlaser ( λ = 780 nm)Emission: kontinuerlig |
| Laseruteffekt | max 44,6 µ W * * Detta uteffektvärde mättes på 200 mm avständ från linsens framsida på det optiska pickup-blocket med 7 mm bländaröppning. |
| Frekvensomfång | 2 Hz till 20 kHz ± 0,3 dB |
| Dynamikområde | Över 100 dB |
| Harmonisk distorsion | CDP-XA50ES: Under 0,0017 %CDP-XA30ES: Under 0,0018 % |
Outputs
| Uttagstyp | Maximal utnivå | Belastningsimpedans | |
| LINE OUT (FIXED) | Phonouttag | 2 V (vid 50 kiloohm) | Över 10 kiloohm |
| LINE OUT (VARIABLE) | Phonouttag | 2 V (vid 50 kiloohm) | Över 50 kiloohm |
| DIGITAL OUT (OPTICAL) | Optisk digital utgång | -18 dBm | Våglängd: 660 nm |
| DIGITAL OUT (COAXIAL) | Koaxial-utgång | 0,5Vt-t (75 ohm) | 75 ohm |
| PHONES | Phonouttag, stereo | 28 mW | 32 ohm |
General
Power supply
| Inköpsland | Strömförsörjning |
| Europa | 220 V – 230 V växelström, 50/60 Hz |
| Övriga länder | CDP-XA50ES 220 V – 230 V växelström, 50/60 Hz |
| CDP-XA30ES 110 V – 120 V eller 220 V – 240 V växelström, justerbar, 50/60 Hz | |
| Strömförbrukning | CDP-XA50ES: 20 WCDP-XA30ES: 20 W |
| Mätt (ca)(b/h/d) | CDP-XA50ES: 430 × 125 × 375 mminkl utskjutande delarCDP-XA30ES: 430 × 125 × 350 mminkl utskjutande delar |
| Vikt (ca) | CDP-XA50ES: 15,2 kgCDP-XA30ES: 9,0 kg |
Supplied accessories
Audio cable (2 phono plugs – 2 phono plugs) (1) Remote control (1) Sony SUM-3 (NS) batteries (2) Stabilizer (1)
We reserve the right to make changes.
Index
A
AMS 7,11
Connections 4 overview 4
Auto Space 21
Automatic music sensor. See AMS
B, C
Tape editing 18
D
Digital filter with variable coefficient 8
E
Own memory 22 own index markings 22 omitted tracks 24 what you can do with 22 Own index markings 22
F, G
Troubleshooting 27 Remote control 6
H
Half disc (HALF) 18, 20 Handling CDs 26 Finding using AMS 11 using own index marks 23 using index marks 12 directly 11 through monitoring 12 via the character display 12
I, J
Index marks 12 own 22
K
Continuous playback 6 Connections 4
L, M, N, O
Storing selected tracks 24 information about CDs 22
P
Unpacking 4
Programs 14 for recording 17 checking 15 changing 16
Program editing 15
R
Erasing own memory 22 own index marks 24 omitted tracks 25 Editing. See Recording Repeating all 12 a specific section 13 Repeat A-B 13
S
Latest memory mode 22 Turning off the music calendar 11 Random playback 13 Voltage selector 9 Recording 17 Using tape editing 18 Using time editing 18 A program 17 Stabilizer 7 Search. See Find
T
Time-set fade 20 Time editing 18 Fade 19 Peak Search 21 Total playing time 10
U, V, X, Y, Z
Playback continuous 6 with own single index marks 23 with own index marks 23 with omitted tracks 16 programmed 14 random 13 random with omitted tracks 14, 16 repeated 12
Playback in random order with omitted tracks 13, 14 Playback with own single index marks 23 Playback with own index marks 23 Playback with omitted tracks 14 Omitted tracks 25
Å, Ä, Ö
Remaining time 10
Names of controls
Buttons
A↔B 13 A.SPACE 21 CHECK 15 C.INDEX 23 CLEAR 16 CONTINUE 6 DISPLAY MODE 11 EDIT/TIME FADE 18, 20 ERASE 22 FADER 19 FILE 23, 24 FILTER 8 INDEX ↩/≡ 12, 23 LINE OUT LEVEL 5 ≡ OPEN/CLOSE 7 PEAK SEARCH 21 PLAY MODE 7 PROGRAM 14 REPEAT 12 SHUFFLE 13 TIME 10 ▷ 7 □ □ 7 □ 7 ◀◀/▶▶ 12
10 11 Number buttons 11
Switches
POWER 6
Control
AMS 7,11 LINE OUT/PHONE LEVEL 5
Outputs
PHONES 6
Other
Disc compartment 7 Stabilizer 7 Display window 10 R 4
- WELCOME
- ABOUT THIS MANUAL
- CONVENTIONS
- TABLE OF CONTENTS
- GETTING STARTED
- PLAYING A CD
- PLAYING CDS
- RECORDING FROM CDS
- STORING INFORMATION ABOUT CDS (CUSTOM FILES)
- ADDITIONAL INFORMATION
- INDEX
- UNPACKING
- INSERTING BATTERIES INTO THE REMOTE
- WHEN TO REPLACE BATTERIES
- NOTES
- HOOKING UP THE SYSTEM
- OVERVIEW
- WHEN MAKING ANALOG HOOKUPS
- WHEN MAKING DIGITAL HOOKUPS
- HOOKUPS
- IF YOU HAVE AN ANALOG POWER AMPLIFIER
- IF YOU HAVE A DIGITAL COMPONENT WITH A COAXIAL DIGITAL INPUT CONNECTOR
- NOTE
- SETTING THE VOLTAGE SELECTOR (VOLTAGE SELECTOR EQUIPPED MODELS ONLY)
- CONNECTING THE MAINS LEAD
- REMOVING THE NOTICE SHEET
- TO STOP PLAYBACK
- CUSTOMISING THE SOUND OF YOUR MUSIC (DIGITAL FILTER FUNCTION)
- SELECTING THE FILTER DIRECTLY ON THE PLAYER
- SELECTING THE FILTER USING THE REMOTE
- WHAT IS A VARIABLE COEFFICIENT (V.C.) DIGITAL FILTER
- CASCADE TYPE AND DIRECT TYPE
- CHARACTERISTICS OF EACH DIGITAL FILTER
- STD: STANDARD
- SPLINE
- PLAIN
- ANALOG TYPE
- BUTTERWORTH
- USING THE DISPLAY
- CHECKING THE TOTAL NUMBER AND PLAYING TIME OF THE TRACKS
- DISPLAY INFORMATION WHILE PLAYING A DISC
- CHECKING THE REMAINING TIME
- TURNING OFF THE MUSIC CALENDAR IN THE DISPLAY
- LOCATING A SPECIFIC TRACK
- LOCATING A PARTICULAR POINT IN A TRACK
- WHAT IS AN INDEX
- PLAYING TRACKS REPEATEDLY
- TO CANCEL REPEAT PLAY
- REPEATING THE CURRENT TRACK
- REPEATING A SPECIFIC PORTION (A↔B REPEAT)
- SETTING A NEW STARTING POINT
- PLAYING IN RANDOM ORDER (SHUFFLE PLAY)
- CREATING YOUR OWN PROGRAMME (PROGRAMME PLAY)
- CREATING A PROGRAMME ON THE PLAYER
- CREATING A PROGRAMME USING THE REMOTE
- CHECKING THE TRACK ORDER
- PRESS CHECK
- CHANGING THE TRACK ORDER
- PLAYING ONLY SPECIFIC TRACKS (DELETE PLAY)
- RECORDING YOUR OWN PROGRAMME
- RECORDING A CD BY SPECIFYING TAPE LENGTH (TIME EDIT/JUST EDIT)
- FADING IN OR OUT
- CHANGING THE FADING TIME
- FADING OUT AT THE SPECIFIED TIME (TIME FADE)
- USEFUL TIPS FOR RECORDING
- ADJUSTING THE RECORDING LEVEL (PEAK SEARCH)
- LOCATING EACH TRACK ON A TAPE USING THE AMS FUNCTION (AUTO SPACE)
- TO CANCEL AUTO SPACE
- WHAT YOU CAN DO WITH THE CUSTOM FILES
- WHERE ARE CUSTOM FILES STORED
- HOW MANY DISCS CAN YOU FILE
- YOU CAN CHECK HOW MANY DISCS YOU CAN FILE
- IF "FULL" APPEARS IN THE DISPLAY
- INDEXING A DISC (CUSTOM INDEX)
- PLAYING FROM AN INDEXED POINT (CUSTOM INDEX PLAY)
- PLAYING FROM ONE INDEX TO THE NEXT ONE (CUSTOM INDEX SINGLE PLAY)
- ERASING THE CUSTOM INDEX
- STORING SPECIFIC TRACKS OF A DISC (DELETE BANK)
- PLAYING USING THE DELETE BANK
- ERASING THE DELETE BANK
- PRECAUTIONS
- ON SAFETY
- ON POWER SOURCES
- ON PLACEMENT
- ON AVOIDING DETERIORATION OF SOUND QUALITY
- ON USING THE STABILISER
- ON OPERATION
- ON ADJUSTING VOLUME
- ON INSERTING A DISC
- ON CLEANING
- ON TRANSPORTATION
- NOTES ON CDS
- ON HANDLING CDS
- TROUBLESHOOTING
- THERE'S NO SOUND
- THE CD DOES NOT PLAY
- THE RECORDING LEVEL HAS CHANGED
- THE REMOTE DOES NOT FUNCTION
- SPECIFICATIONS
- GENERAL
- SUPPLIED ACCESSORIES
- A, B
- C
- D
- E
- F, G
- H
- J, K
- L, M, N, O
- P, Q
- R
- S
- T
- U
- V, W, X, Y, Z
- NAMES OF CONTROLS
- BUTTONS
- SWITCH
- CONTROL
- JACK
- OTHERS
- WARNING
- PREPARATION
- PLAYING A COMPACT DISC
- PLAYING COMPACT DISCS
- RECORDING COMPACT DISCS
- STORING INFORMATION ABOUT COMPACT DISCS (CUSTOM PLAYBACK FILES)
- INSERT THE BATTERIES INTO THE REMOTE CONTROL
- WHEN TO REPLACE THE BATTERIES
- SYSTEM CONNECTIONS
- REQUIRED CONNECTION CABLES
- ANALOG CONNECTIONS
- DIGITAL CONNECTIONS
- CONNECTION
- SETTING THE VOLTAGE SELECTOR (MODELS WITH A VOLTAGE SELECTOR ONLY)
- CONNECTING THE POWER CORD
- REMOVE THE WARNING SHEET
- CUSTOMIZING THE SOUND (DIGITAL FILTER FUNCTION)
- SELECTING THE FILTER USING THE REMOTE CONTROL
- DIGITAL FILTER CHARACTERISTICS
- USING THE DISPLAY WINDOW
- CHECKING THE NUMBER AND TOTAL PLAYING TIME OF TRACKS
- INFORMATION DISPLAYED DURING DISC PLAYBACK
- DISABLING THE MUSIC CALENDAR IN THE DISPLAY WINDOW
- LOCATING A SPECIFIC PASSAGE WITHIN A RANGE
- REPEATING RANGE PLAYBACK
- REPEATING A SPECIFIC MUSICAL PHRASE (A↔B REPEAT)
- PLAYBACK IN ANY ORDER (RANDOM PLAYBACK)
- CREATING MUSIC PROGRAMS (PROGRAMMED PLAYBACK)
- CREATING A PLAYBACK PROGRAM ON THE PLAYER
- CREATING A PLAY PROGRAM USING THE REMOTE CONTROL
- PLAYING SPECIFIC TRACKS (SELECTIVE PLAYBACK)
- RECORDING YOUR OWN PROGRAM
- RECORDING A COMPACT DISC BY SPECIFYING THE RECORDING TIME (TIME EDITING/ACCURATE EDITING)
- FADE-IN AND FADE-OUT
- CHANGING THE FADE TIME
- OUTPUT CROSSFADE AT THE SPECIFIED TIME (PROGRAMMED FADE)
- SOME USEFUL RECORDING TIPS 📤
- SETTING THE RECORDING LEVEL (PEAK SEARCH)
- LOCATING EACH TRACK ON A GIVEN TAPE USING THE AMS FUNCTION (AUTOMATIC MUSIC SENSOR)
- WHAT CAN YOU DO WITH CUSTOM PLAY FILES
- WHERE ARE CUSTOM PLAY FILES STORED
- HOW MANY DISCS CAN YOU CUSTOMIZE
- YOU CAN CHECK THE NUMBER OF DISCS YOU CAN CUSTOMIZE
- IF "FULL" APPEARS IN THE DISPLAY WINDOW
- PLAYING FROM AN INDEX (PLAYBACK BY CUSTOM INDEXES)
- DELETING CUSTOM INDEXES
- MEMORIZING SPECIFIED RANGES OF A DISC (BLOCK ERASE)
- PLAYING WITH THE BLOCK ERASE FUNCTION
- CANCELING THE BLOCK ERASE FUNCTION
- SAFETY
- POWER
- INSTALLATION
- TO AVOID DETERIORATION OF SOUND QUALITY
- USING THE STABILIZER
- OPERATION
- ADJUSTING THE VOLUME
- INSERTING A DISC
- MAINTENANCE
- ABOUT TRANSPORTATION
- NOTES ON COMPACT DISCS
- HANDLING COMPACT DISCS
- NO SOUND
- DISC PLAYBACK DOES NOT START
- THE REMOTE CONTROL DOES NOT WORK
- GENERAL CHARACTERISTICS
- F, G, H
- I, J, K
- L
- MEMORY OF LAST MODE
- T, U, V, W, X, Y, Z
- DESIGNATION OF CONTROLS
- KEYS
- COMMAND
- RECORDING FROM COMPACT DISCS
- STORING INFORMATION ABOUT COMPACT DISCS (CUSTOM FILES)
- ALPHABETICAL INDEX
- INSERTING BATTERIES INTO THE REMOTE CONTROL
- CONNECTING THE SYSTEM
- IF MAKING ANALOG CONNECTIONS
- IF MAKING DIGITAL CONNECTIONS
- CONNECTIONS
- IF YOU MAKE ANALOG CONNECTIONS
- IF YOU MAKE DIGITAL CONNECTIONS
- SETTING THE VOLTAGE SELECTOR (ONLY FOR MODELS THAT HAVE ONE)
- REMOVING THE WARNING INDICATION
- CUSTOMIZING THE SOUND OF THE MUSIC (DIGITAL FILTER FUNCTION)
- PRESS FILTER
- TURN ◀◀◀ AMS ▷▶▶ UNTIL THE DISPLAY SHOWS THE DESIRED DIGITAL FILTER NUMBER
- USE ◀◀◀ AMS ▷▶▶ TO SELECT THE FILTER. THE ORIGINAL INDICATION REAPPEARS
- SELECTING THE FILTER WITH THE REMOTE CONTROL
- PRESS DIGITAL FILTER
- PRESS DIGITAL FILTER SEVERAL TIMES UNTIL THE DISPLAY SHOWS THE DESIRED DIGITAL FILTER NUMBER. THE DIGITAL FILTER NUMBER IS STORED AND THE ORIGINAL INDICATION REAPPEARS
- DESCRIPTION OF VARIABLE COEFFICIENT DIGITAL FILTER (V.C.)
- FAST ROLL-OFF AND SLOW ROLL-OFF
- SLOT
- SIMPLE
- CHECKING THE TOTAL NUMBER OF TRACKS AND THEIR TOTAL PLAYING TIME
- DISPLAYING INFORMATION WHILE PLAYING A CD
- LOCATING A SPECIFIC POINT IN A TRACK
- REPEATED PLAYBACK OF TRACKS
- REPEATING A SPECIFIC PART (REPEAT A←→B)
- PLAYING TRACKS IN RANDOM ORDER (SHUFFLE PLAY)
- CREATING YOUR OWN PROGRAM (PROGRAM PLAY)
- CREATING A PROGRAM ON THE PLAYER
- CREATING PROGRAMS WITH THE REMOTE CONTROL
- CHECKING THE ORDER OF TRACKS
- CHANGING THE ORDER OF TRACKS
- PLAYING SPECIFIC TRACKS (SKIP PLAYBACK)
- RECORDING A CD SPECIFYING TAPE LENGTH (SYNCHRONIZED EDITING / FITTED EDITING)
- FADE-IN AND FADE-OUT OF SOUND
- CHANGING THE FADE-IN AND FADE-OUT TIME
- FADE-OUT AT A SPECIFIED TIME (SYNCHRONIZED FADE-OUT)
- USEFUL RECORDING TIPS
- ADJUSTING THE RECORDING LEVEL (PEAK LEVEL SEARCH)
- LOCATING TRACKS ON A TAPE USING THE AMS FUNCTION (AUTOMATIC MUSIC SENSOR)
- USING CUSTOM FILES
- HOW MANY DISCS CAN YOU INCLUDE IN A FILE
- YOU CAN CHECK THE NUMBER OF DISCS THAT CAN BE ARCHIVED
- INTRODUCTION OF INDEXES ON A DISC (CUSTOM INDEX)
- PLAYBACK FROM AN INDEXED POINT (CUSTOM INDEX PLAYBACK)
- PLAYBACK FROM ONE INDEX TO THE NEXT (PLAYBACK OF A SINGLE CUSTOM INDEX)
- STORING SPECIFIC TRACKS OF A DISC (BANK ERASE)
- PLAYBACK USING BANK ERASE
- ERASING THE BANK SUPPRESSION
- POWER SOURCES
- PLACEMENT
- TO PREVENT DETERIORATION OF SOUND QUALITY
- USE OF THE STABILIZER
- VOLUME ADJUSTMENT
- INSERTING DISCS
- CLEANING
- TRANSPORTATION
- THE CD CANNOT BE PLAYED
- THE RECORDING LEVEL HAS BEEN ALTERED
- A
- B
- C, CH
- F
- G, H
- L, LI
- M, N, O
- U, V, W, X, Y, Z
- STORING INFORMATION ABOUT CD DISCS (CUSTOM MEMORY)
- INSERTING THE BATTERIES INTO THE REMOTE CONTROL
- WHEN MAKING ANALOG CONNECTIONS
- WHEN MAKING DIGITAL CONNECTIONS
- IF YOU HAVE A DIGITAL COMPONENT WITH AN OPTICAL DIGITAL INPUT
- IF YOU HAVE A DIGITAL COMPONENT WITH A DIGITAL COAXIAL INPUT
- SETTING THE VOLTAGE SELECTOR (APPLIES ONLY TO MODELS WITH A VOLTAGE SELECTOR)
- REMOVING THE PROTECTIVE SHEET
- ADJUSTING THE SOUND OF THE MUSIC (DIGITAL FILTER FUNCTION)
- SELECT THE FILTER DIRECTLY ON THE PLAYER
- WHAT IS A VARIABLE COEFFICIENT DIGITAL FILTER (V.C.)
- CHARACTERISTICS OF THE DIGITAL FILTERS
- THE DISPLAY WINDOW
- DISPLAY TOTAL NUMBER OF TRACKS AND TOTAL PLAYING TIME
- DISPLAY INFORMATION WHILE A DISC IS PLAYING
- DISPLAY REMAINING PLAYING TIME INFORMATION
- TURN OFF THE MUSIC CALENDAR IN THE DISPLAY WINDOW
- FIND A SPECIFIC TRACK
- FIND A SPECIFIC POINT IN A TRACK
- WHAT IS AN INDEX MARK
- PLAY TRACKS REPEATEDLY
- TO CANCEL REPEAT PLAYBACK
- TO REPEAT THE CURRENT TRACK
- TO REPEAT A SPECIFIC SECTION (REPEAT A←→B)
- SETTING A NEW START POINT
- CREATING YOUR OWN PROGRAMS (PROGRAMMED PLAYBACK)
- CREATE A PROGRAM ON THE CD PLAYER
- CREATE A PROGRAM USING THE REMOTE CONTROL
- VIEWING THE TRACK ORDER
- CHANGING THE PROGRAM
- PLAYING ONLY SELECTED TRACKS (PLAYBACK WITH SKIPPED TRACKS)
- RECORDING A CUSTOM PROGRAM
- RECORD A CD BY SPECIFYING THE TAPE LENGTH (TIME/TAPE EDITING)
- YOU CAN PROGRAM THE TRACKS IN ADVANCE
- YOU CAN SPECIFY ANY TAPE LENGTH
- YOU CAN AUTOMATICALLY INSERT A THREE-SECOND BLANK BETWEEN EACH TRACK
- CHANGING THE TIMED FADE
- FADE OUT AT A SPECIFIC TIME (TIMED FADE)
- SETTING THE RECORDING LEVEL (PEAK LEVEL SEARCH)
- FINDING A TRACK ON THE TAPE USING THE AMS FUNCTION (AUTO SPACE)
- WHAT YOU CAN DO WITH THE CUSTOM MEMORY
- WHERE IS THE CUSTOM FILE STORED
- HOW MANY DISCS CAN YOU STORE IN THE CUSTOM FILE
- YOU CAN CHECK HOW MANY DISCS ARE IN THE MEMORY
- TO ERASE ALL DISCS
- CREATING INDEX MARKS ON A DISC (CUSTOM INDEX MARKS)
- PLAYBACK FROM AN INDEX-MARKED POINT (PLAYBACK WITH CUSTOM INDEX MARKS)
- PLAYBACK FROM AN INDEX MARK TO THE NEXT MARK (PLAYBACK WITH CUSTOM SINGLE INDEX MARKS)
- ERASING CUSTOM INDEX MARKS
- STORING SPECIFIC TRACKS ON A DISC (OMITTED TRACKS)
- PLAYING OMITTED TRACKS
- ERASE SKIPPED TRACKS
- POWER SUPPLY UNITS
- AVOIDING INTERFERENCE
- USAGE
- INSERTING A CD
- TRANSPORT
- ABOUT CDS
- HANDLING CDS
- PLAYBACK DOES NOT START
- B, C
- I, J
- K
- P
- U, V, X, Y, Z
- Å, Ä, Ö
- SWITCHES
- OUTPUTS
- OTHER
Brand : SONY
Model : CDP-XA30ES
Category : CD Player