
ZFI719A - Range hood ZANUSSI - Free user manual and instructions
Find the device manual for free ZFI719A ZANUSSI in PDF.
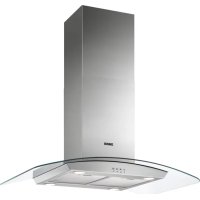



| Brand | Zanussi |
| Model | ZFI719A |
| Product type | Cooker hood |
| Controls | Electronic buttons (light, motor speeds 1, 2, 3) |
| Number of speeds | 3 + intensive speed (boost) |
| Lighting | Built-in LED |
| Grease filter | Washable metal (dishwasher or manual) |
| Charcoal filter | Not washable, replace every 4 months |
| Boost function | Maximum speed with automatic return after 8 minutes |
| Recommended use | Speed adjustment according to cooking type (see manual table) |
| Cleaning grease filter | At least once a month |
| Replacing charcoal filter | Every 4 months |
| Installation type | According to separate installation instructions |
| Operation | Recirculation possible with charcoal filter |
| Safety | Refer to the installation booklet for safety instructions |
| Repairability | LED bulb replaceable only by a technician |
| Spare parts | Grease filters, charcoal filter, LED bulb (via after-sales service) |
| Environmental protection | Recycle packaging and end-of-life appliances |
| User manual | Available in multiple languages on notice-facile.com |
Frequently Asked Questions - ZFI719A ZANUSSI
User questions about ZFI719A ZANUSSI
0 question about this device. Answer the ones you know or ask your own.
Ask a new question about this device
Download the instructions for your Range hood in PDF format for free! Find your manual ZFI719A - ZANUSSI and take your electronic device back in hand. On this page are published all the documents necessary for the use of your device. ZFI719A by ZANUSSI.
USER MANUAL ZFI719A ZANUSSI
PRODUCT DESCRIPTION
CONTROL PANEL OVERVIEW
DAILY USE
HOOD OPERATION
Check the recommended speed according to the table.

If the hood is not used for food, it can be operated with a duct.
www.zanussi.com/support
SAFETY INSTRUCTIONS AND INSTALLATION

WARNING! Refer to the safety booklet with installation instructions for safety and installation data. Carefully read the safety chapters before using or maintaining the appliance.
PRODUCT DESCRIPTION
CONTROL PANEL OVERVIEW
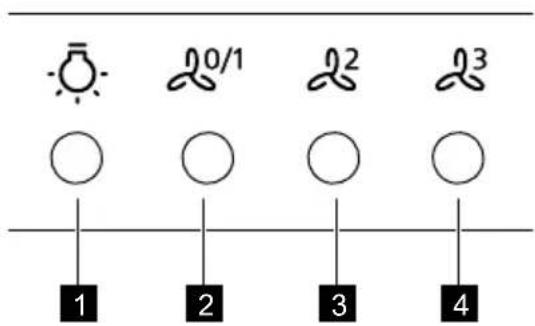
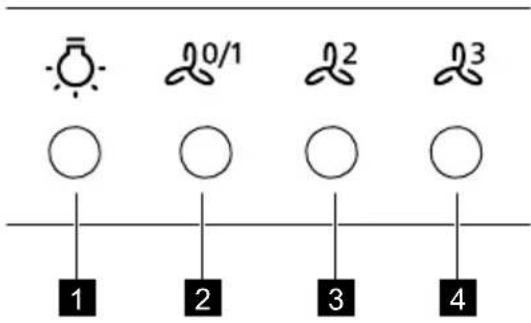
1 Lamp 2 Motor speed 1/Off 3 Motor speed 2
4 Motor speed 3
DAILY USE
USING THE HOOD
Check the recommended speed according to the table below.
| 20/1 | Prilikom zagrijavanja hrane, kuhanje sPokrivenim posudama. |
| 22 | Prilikom kuhanja sPokrivenim posudama na više zona kuhanja ili plamenika, blago prženje. |
| 23 | Prilikom ključanja, prženja velikih količina hrane bezPoklopca, kuhanja na više zona kuhanja ili plamenika. |
| 24 | Prilikom ključanja, prženja velikih količine hrane bezPoklopca, visoka vlažnost. Napa radi na maksimalnej brzini. Nakon 8 minuta urežaj se vracá na prethodnu postavku. |

It is recommended to leave the hood running for about 15 minutes after cooking.
To operate the hood:
www.zanussi.com/support

SAFETY INFORMATION AND INSTALLATION

WARNING! Refer to the separate Installation Instructions booklet for Safety Information and Installation. Read carefully the Safety chapters before any use or maintenance of the appliance.
PRODUCT DESCRIPTION
CONTROL PANEL OVERVIEW
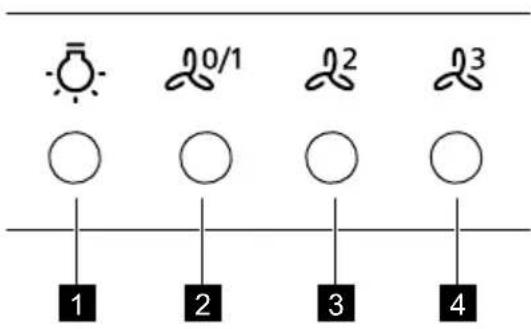
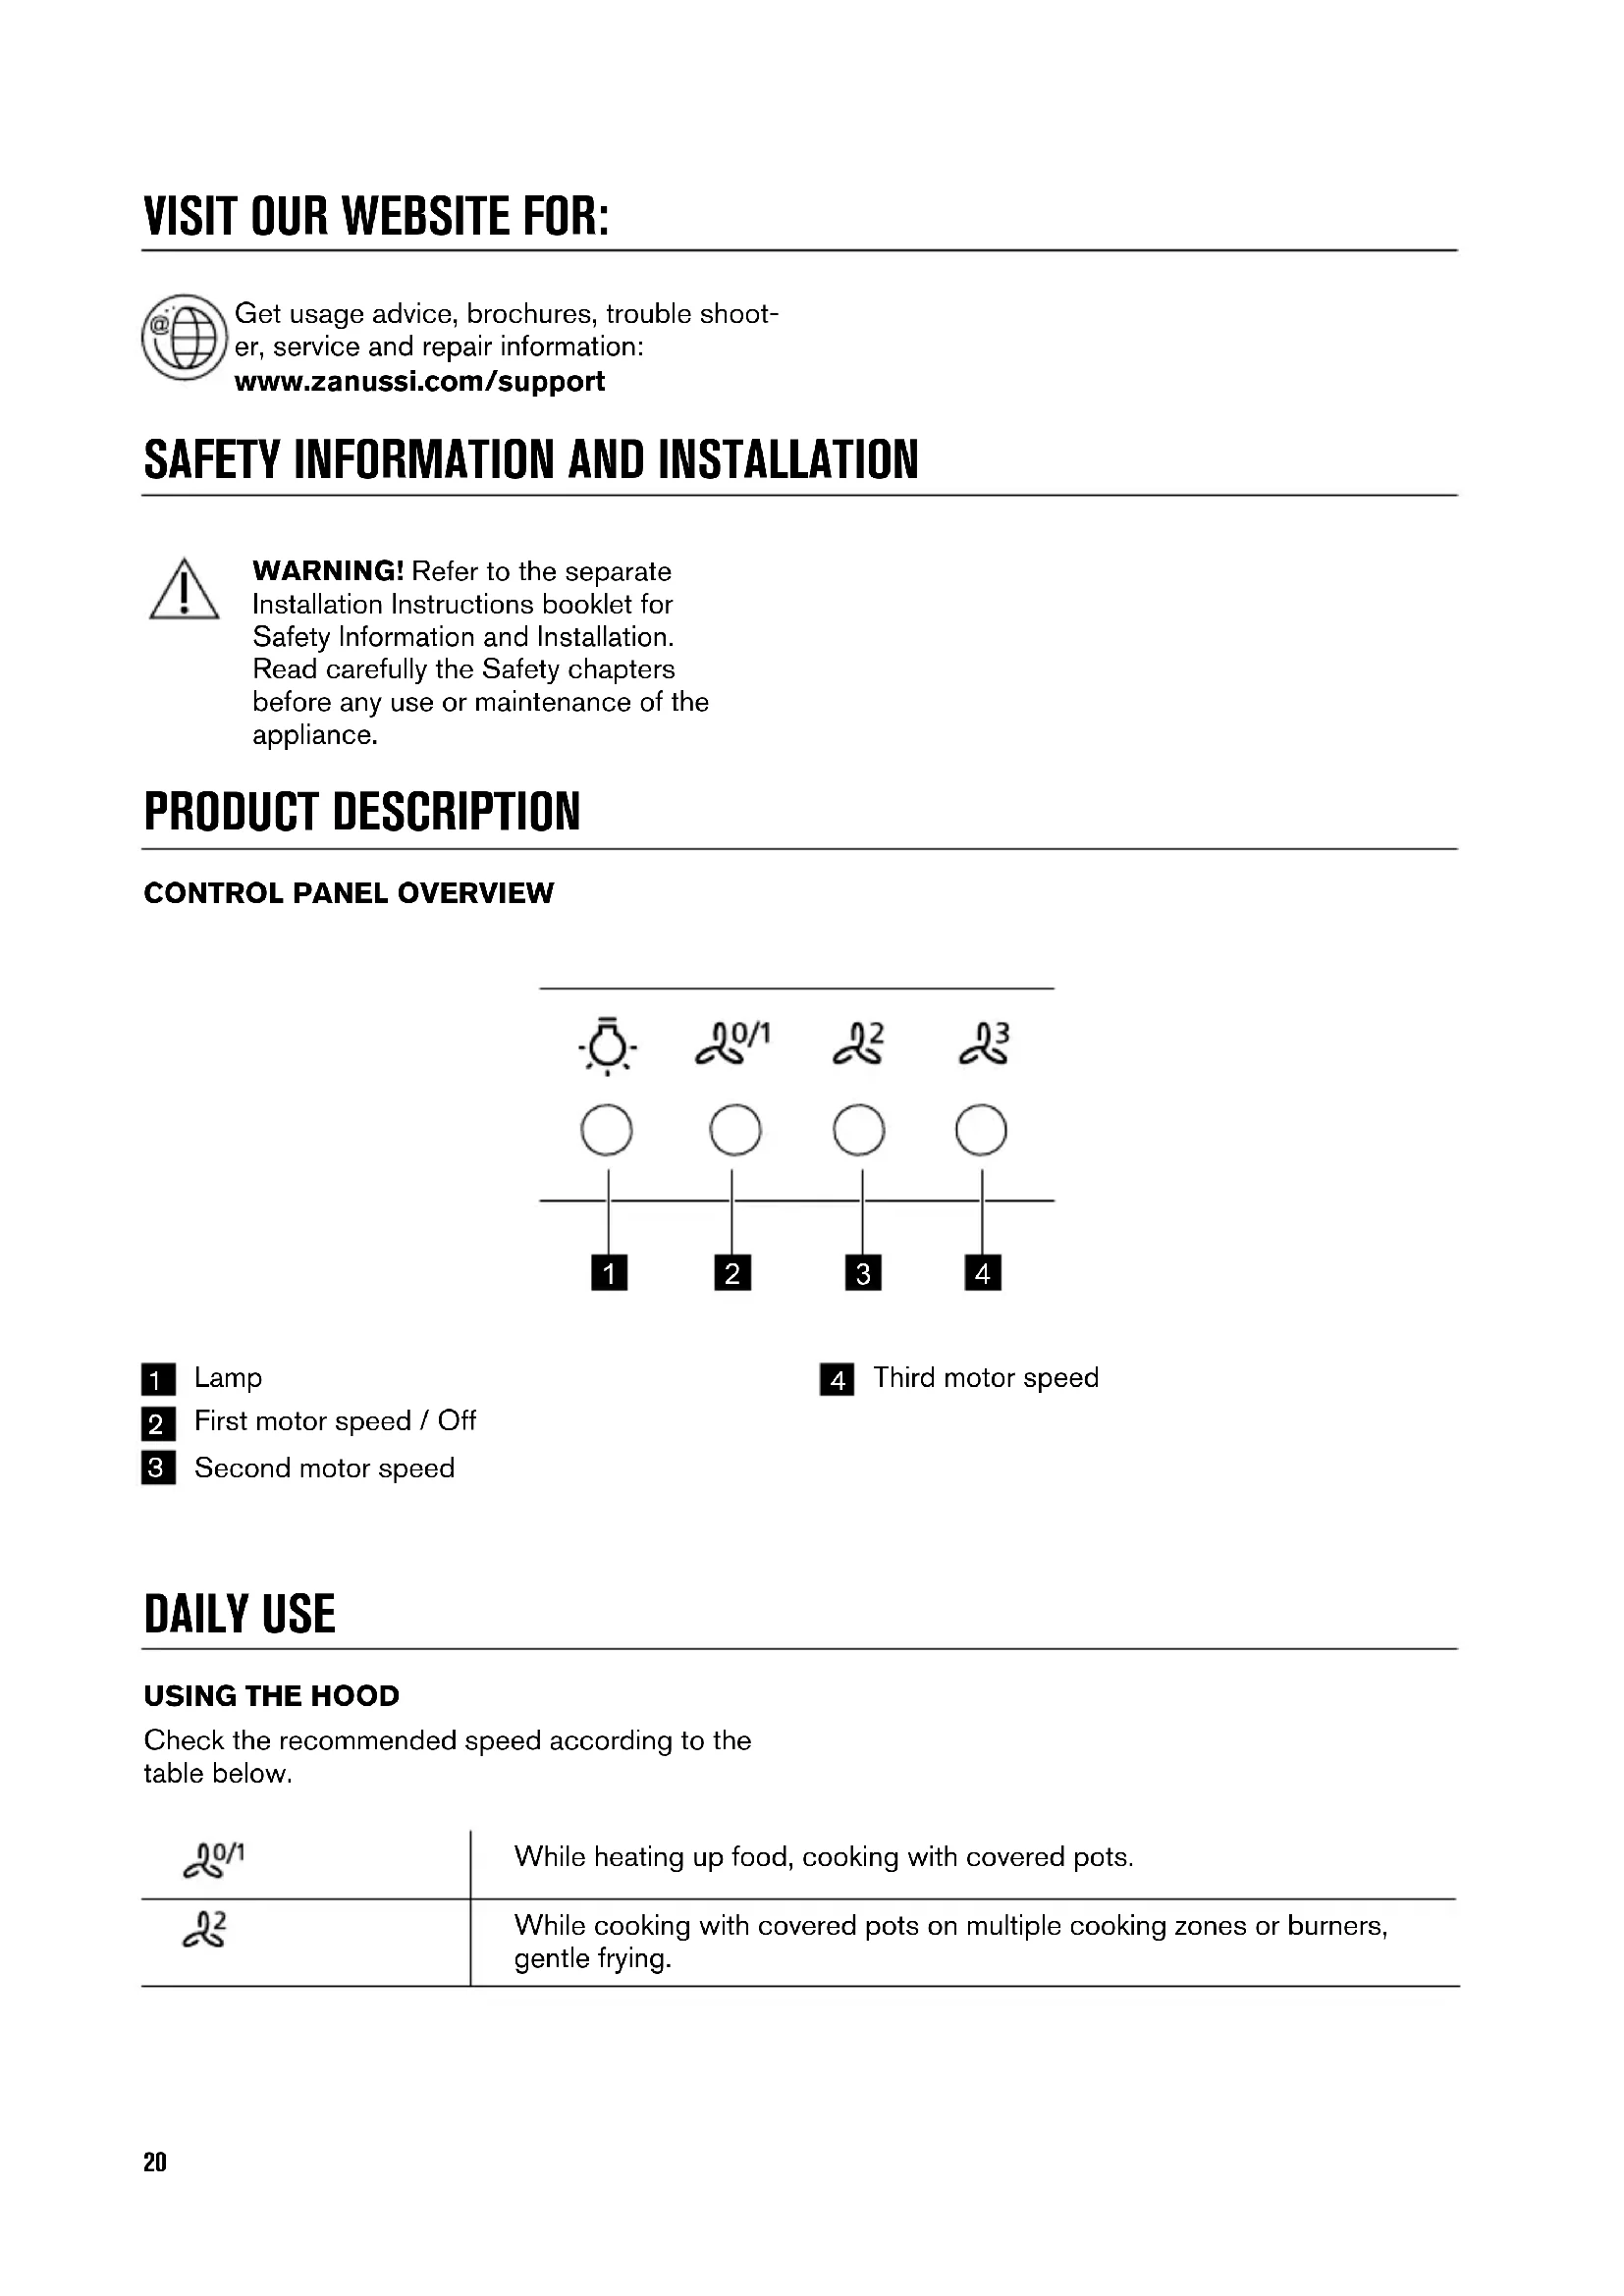
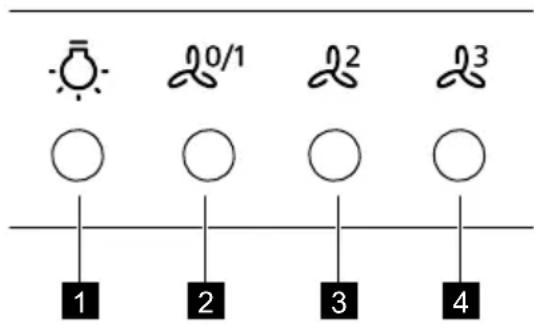
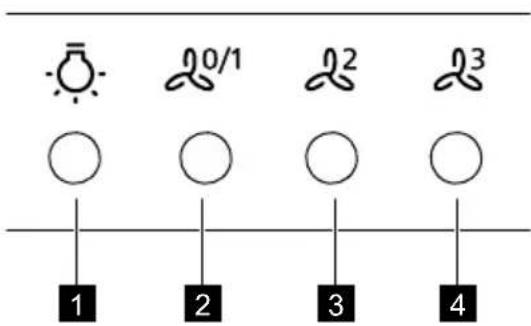
1 Lamp 2 First motor speed / Off 3 Second motor speed
4 Third motor speed
DAILY USE
USING THE HOOD
Check the recommended speed according to the table below.
| 20/1 | While heating up food, cooking with covered pots. |
| 22 | While cooking with covered pots on multiple cooking zones or burners, gentle frying. |
| 23 | While boiling, frying big quantities of food without a lid, cooking on multiple cooking zones or burners. |
| 24 | While boiling, frying big quantities of food without a lid, big humidity. The hood operates on maximum speed. After 8 minutes the appliance returns to previous setting. |

It is recommended to leave the hood operating for approximately 15 minutes after cooking.
To operate the hood:
- Press the first speed button to switch on the appliance.
- If needed, press the light button to illuminate the cooking surface.

- If needed, change the speed by pressing the desired button.
To turn off the appliance, press the first speed button again.
CARE AND CLEANING
CLEANING THE GREASE FILTER
Each filter must be cleaned at least once a month. Filters are mounted with the use of clips and pins on the opposite side.
To clean the filter:
- Press the handle of the mounting clip on the filter panel underneath the hood (1).
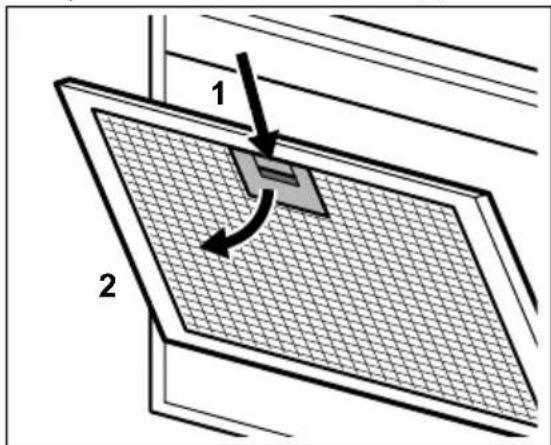
- Slightly tilt the front of the filter downwards (2), then pull.
Repeat the first two steps for all filters.
- Clean the filters using a sponge with non-abrasive detergents or in a dishwasher.

The dishwasher must be set to a low temperature and a short cycle. The grease filter may discolor, but this has no influence on the performance of the appliance.
- To mount the filters back, follow the first two steps in reverse order.
Repeat the steps for all filters if applicable.
REPLACING THE CHARCOAL FILTER

WARNING! The charcoal filter is non-washable!
The time of saturation of the charcoal filter varies depending on the type of cooking and the regularity of cleaning the grease filter.
To replace the filter:
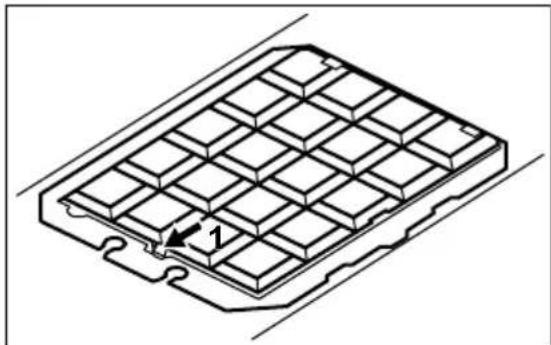
- Remove the grease filters from the appliance. Refer to "Cleaning the grease filter" in this chapter.
- Press the tab (1) and slightly tilt the front of the filter.
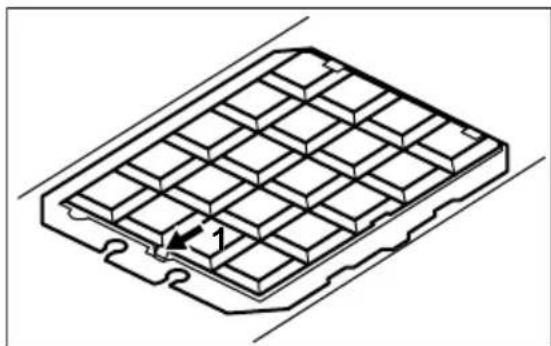
- To install a new filter, perform the same steps in reverse order.
In any case, it is necessary to replace the filters at least every four months.
REPLACING THE LAMP
This appliance is supplied with a LED lamp. This part can be replaced by a technician only. In case of any malfunction refer to "Service" in the "Safety Instructions" chapter.
Recycle materials with the symbol. Put the packaging in relevant containers to recycle it. Help protect the environment and human health by recycling waste of electrical and electronic appliances. Do not dispose of appliances marked
with the symbol with the household waste. Return the product to your local recycling facility or contact your municipal office.
SAFETY INFORMATION AND INSTALLATION

www.zanussi.com/support
SAFETY INFORMATION AND INSTALLATION

3 SAFETY INFORMATION AND INSTALLATION
4 SAFETY INFORMATION AND INSTALLATION
OPERATION
FIRST USE
Before first use, clean the appliance and its accessories.
| 201 | Тамакты жылты Канда, кakпak жабылfasн bIDbICMbКолданып Niciprene. niciprene. |
| 22 | Бірпше оттыктарда Неме nicіру ahanдарында кakпafы жабык bIDbICTa ТамакNICIPrene,балпен Кьырfaнда. |
| 23 | Кайhan жатkan KezeDE, кEN мeлшерderi TarfamdapdBi KaKnaKcsb3 bIDbICTa Кьырfaнда, bірпше nicіру ahandapbHDA He OTыктарда niciprene. |
| 24 | КайнатkanDA, унken Мeлшерderi TarfamdapdBi KaKnaKcsb3 KByIPFaHDA, сyныктук кEN БОпс. Aya TarpTbIsh KypaII en JxOFaPbIжБДмБИТа ЖуMbIC icTeиDi. 8 MINHTaH KeIN KByPbIFbI anDbIHFBI napaMeTpJIepre kaɪta opaladbl. |

After cleaning, let the appliance dry for 15 minutes before connecting it to the power supply.
To connect the appliance:
- To connect the appliance:
201 TvyMeuH 6acbHb3.
- KaKeT 6oNca, nicipy anaHbIH XapbIKTaHdbIpY yuIN WAM TYmMeWirin 6acbHb3. 3.KepeK 6oJca, KaKETTI TyImeWikTi 6acBIn, XblnAaMbIKbIe3reptiH3.
KypbIbIbHb ceHdpy ywiH 6ipHwI kbIaamdbk TyImeWirIH kaTaNacbHb3.
KYTY MEHEH TA3AJAY
MAI CY3ΓICIH TA3AJAY
Op cy3riHia aBbIHda KEMiHne 6ip peT Ta3anay KaKeT. Cy3riIepdi opHaty yuH Kapama-KapcbI XaKTapbIHda KbICbIHTap MeH KaDaayblITap NaIdanaHbINFaH.
Cy3riHi Ta3aJay yuH:
- Aya tapTkblk KypaIbIH actbHdaFbI cy3ri naHeJIHderi MOHTaxday KbICKblbIHyCTaFbIH 6acbIH3 (1).
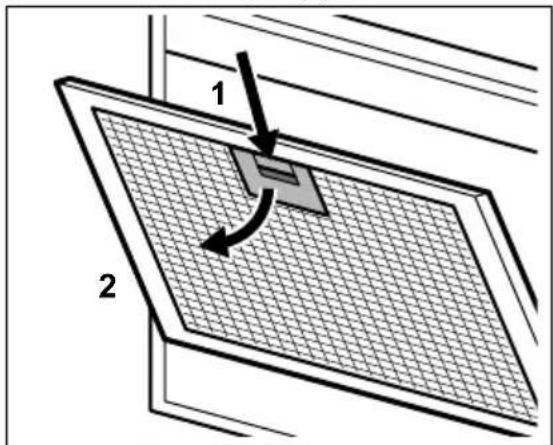
- Cy3riHHaJbHfKaFbIH TeMeH kapa a3dan eHKeTIHi3 (2), cOaH KeiH TapTbIHbI3.
Bapnbk cy3riep ywiH anFaWkbI eki Kaamdbi KaTanaHbI.
- Cy3rinepi jemipriu emec kYfblu 3aTapdbI KOJdaHbIn JekMeH HeMece bIDbc KyfbIIM MaHHaMeH Ta3anaHbi3.

blbc JyfbI MaunHaTa Temeh Temnepatypa XeHe KbicKa uKnOpHAty Kepek. Man cy3ricIH Tyci e3repyi MymKIn, 6yn KpybJfBHybH jMlbc icteyine acep etneNi.
- Cy3riHi KaIa OPHbHa KOIO YsiH anFaUkBi eki KaIaMdbI KepiciHwe OpIHdaHbI3.
KaKeT 6oJca, 6apJIbIK cy3rInep yuH KaJaMApDbI KaTaNahB13.
KOMIP CY3ΓICIH AYbICTbIPY

The water filter must be replaced periodically and the water filter cartridge must be replaced.
To replace the water filter:
- Remove the water filter cartridges.
See the "Replacing the Water Filters" section in this manual.
- Turn off the water supply (1), then remove the water filter cartridge.
- To install the new water filter, follow the steps in reverse order.
Replace the water filters at least every six months.
REPLACING THE FILTER
The filter is equipped with a bypass. This bypass is used only for technical replacement. In case of an emergency, see the "Service" section in the "Safety Instructions" chapter.
ENVIRONMENTAL CONCERNS
Dispose of the packaging materials properly. Recycle the packaging materials by placing them in the appropriate containers. By recycling the electrical and electronic appliances, you help protect the environment and human health.
Do not dispose of appliances marked with the symbol with household waste. Do not dispose of the appliance with the household waste. Return the product to your local recycling facility or contact your municipal office.

www.zanussi.com/support
SAFETY INFORMATION AND INSTALLATION

www.zanussi.com/support
SAFETY INFORMATION AND INSTALLATION

WARNING! Safety information and installation are in a separate installation instruction booklet. Before using the appliance or performing any maintenance work, carefully read the safety sections.
PRODUCT DESCRIPTION
CONTROL PANEL OVERVIEW
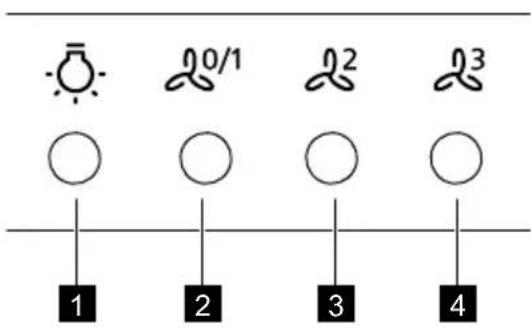
Recommended speed values are given in the table below.
It is recommended to let the extractor run for about 15 minutes after cooking is finished.
Switching on the extractor:
1. To switch on the appliance, press the first speed selection button.
- If necessary, press the light button to illuminate the cooking surface.
- If necessary, change the speed by pressing the required button. To switch off the appliance, press the first speed button again.
CARE AND CLEANING
The hood must be set to low temperature mode and short cycle. The filter may change color; this will not affect the performance of the device.
4. To install the filters in place, perform the two steps described above in reverse order.
Repeat these steps with all filters, if applicable.
REPLACING THE CARBON FILTER

WARNING! The carbon filter is not washable!
The service life of the carbon filter varies depending on the type of cooking and the frequency of cleaning of the grease filter.
To replace the filter:
- Remove the grease filters.
See the "Cleaning the Grease Filter" section in this chapter.
- Press the latch (1) and slightly tilt the front part of the filter.
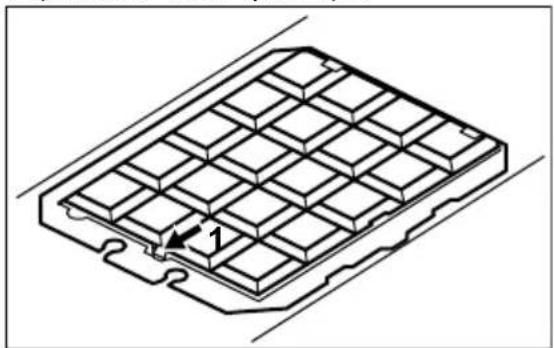
3. To install a new filter, perform the same steps in reverse order.
In any case, the filter must be replaced at least once every four months.
REPLACING THE LAMP
The appliance comes with a LED lamp. This part can only be replaced by a qualified technician. In case of any malfunctions, see the "Service" chapter in the "Safety Instructions".
ENVIRONMENTAL PROTECTION
Material that can be recycled should be sent for recycling. Place the packaging in the appropriate containers for collecting secondary raw materials. By taking part in the recycling of old electrical appliances, you help protect the environment and human health. Do not throw them away with household waste.
Household appliances marked with the symbol must be taken to a separate collection point for waste electrical and electronic equipment for subsequent recycling.
INFORMATION ON SAFETY AND INSTALLATION

WARNING! Read the safety booklet with instructions for installation and information on safety and installation. Carefully read the chapters on safety before using the appliance for the first time.
PRODUCT DESCRIPTION
CONTROL PANEL
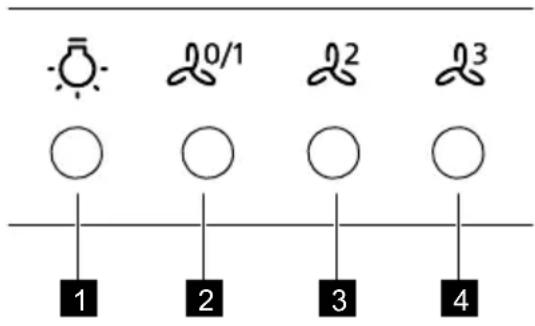
1 Lamp 2 First speed motor / Excluded 3 Second speed motor
4 Third speed motor
DAILY USE
CLEANING THE FILTER
Check the first speed against the table above.
www.zanussi.com/support
SAFETY INSTRUCTIONS AND INSTALLATION

www.zanussi.com/support
SAFETY INFORMATION AND INSTALLATION

WARNING! For safety
www.zanussi.com/support
INSTRUCTIONS FOR USE
FOR THE USER
Check the recommended quantity according to the table.
201
Heat the food, covered with a lid.
(2) JJJJJJJJJJJJJJJJJJJJJJJJJJJJJJ
JyIg JyIg JyIg JyIg JyIg JyIg JyIg JyIg JyIg JyIg JyIg JyIg JyIg JyIg JyIg JyIg JyIg JyIg JyIg JyIg JyIg JyIg JyIg JyIg JyIg JyIg
aJcJG2al all aIwC bio Jy Jg 29.00000000000000000000000000000000000000000000000000000000000000

JL 1
Jol jllg 00 gblal
aI I
00000000000000000000000000000000000000000000000000000000000
aIcIg 1 J aJl gall y dcl aIla> 2 cIw. ydl oSLy aywlia g OgeY I alo 0e 0slc, p9g aylwLg Jao j OjegyI 10 1 L

www.zanussi.com/support
All these settings are for the appliance. The manufacturer is not responsible for any damage caused by incorrect installation.


- PRODUCT DESCRIPTION
- DAILY USE
- HOOD OPERATION
- SAFETY INSTRUCTIONS AND INSTALLATION
- CONTROL PANEL OVERVIEW
- USING THE HOOD
- SAFETY INFORMATION AND INSTALLATION
- CARE AND CLEANING
- CLEANING THE GREASE FILTER
- TO CLEAN THE FILTER
- REPLACING THE CHARCOAL FILTER
- REPLACING THE LAMP
- OPERATION
- KYTY MEHEH TA3AJAY
- MAI CY3ΓICIH TA3AJAY
- CY3RIHI TA3AJAY YUH
- KOMIP CY3ΓICIH AYBICTBIPY
- REPLACING THE FILTER
- ENVIRONMENTAL CONCERNS
- REPLACING THE CARBON FILTER
- ENVIRONMENTAL PROTECTION
- INFORMATION ON SAFETY AND INSTALLATION
- INSTRUCTIONS FOR USE
- FOR THE USER
- AI I
Brand : ZANUSSI
Model : ZFI719A
Category : Range hood