WCT12A10A - Air Conditioning Friedrich - Free user manual and instructions
Find the device manual for free WCT12A10A Friedrich in PDF.

User questions about WCT12A10A Friedrich
0 question about this device. Answer the ones you know or ask your own.
Ask a new question about this device
Download the instructions for your Air Conditioning in PDF format for free! Find your manual WCT12A10A - Friedrich and take your electronic device back in hand. On this page are published all the documents necessary for the use of your device. WCT12A10A by Friedrich.
USER MANUAL WCT12A10A Friedrich
Air Conditioners and Heat Pumps
WallMaster
115-Volt: WCT08, WCT10, WCT12
230-Volt: WCT10, WCT12, WCT16, WET10, WET12, WET16, WHT12
Thank you for your decision to purchase the Friedrich High-Efficiency Air Conditioner. Your new Friedrich has been carefully engineered and manufactured to give you many years of dependable, efficient operation, maintaining a comfortable temperature and humiely level. Many extra features have been built into your unit to assure quiet operation. The greatest circulation of cool, dry air, and its most economic operation.
THANK YOU, on behalf of our entire company, for making such a wise purchase.
Register your air conditioner
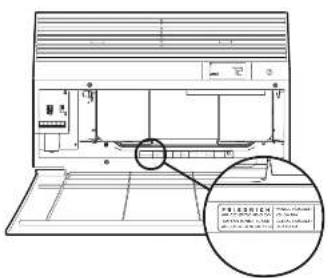
Model information can be found on the same plates behind the front cover.
Please complete and mail the order registration form to us, which is produced, in regular letter of time, at 10:00 A.M.
For your future convenience, record the model information here.
MODE-MEMBER
SERIAL NUMBER
PURCHASED
Table of Contents
| Safety Precautions | 4 |
| WARNING: Before Operating Your Unit | 5 |
| Standard Filter Cleaning / Installation Instructions | 6 |
| Control Panel Operation | 7 |
| New Well/Master Control Options | 20 |
| WI-PI Set-Up Instructions | 21 |
| Control Panel Operation Instructions | 22 |
| Remote Control Operation | 23 |
| Remote Accessibility | 23 |
| Airflow Selection and Adjustment | 23 |
| Installation Instructions | 24 |
| Installation Instructions for WSE Steps | 25 |
| WaitMaster Chassis Installation Instructions | 27 |
| Troublestring Tips | 29 |
| Warranty | 31 |
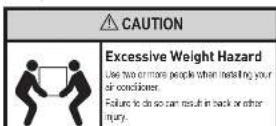
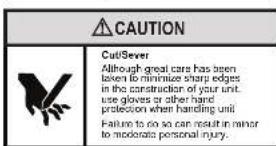
Safety Precautions

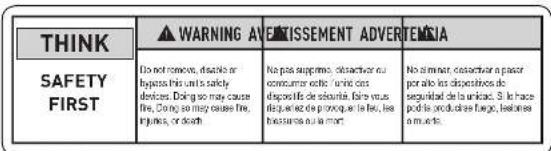
WARNING: Before Operating Your Unit

Make sure the wiring is adequate for your unit.
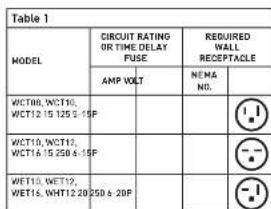
If you have fans, they should be of the time delay types. Before you install or evacuate this unit, be sure that the enclosure rating of the circuit breaker or time delay fuse does not exceed the ampouling rated in Table 1.
DO NOT use an extension cord.
The card provided all the proper amount of electrical power to the unit, an extension card may not.
Make sure that the receptacle is compatible with the air conditioner cord plug provided.
Principle grounding must be maintained at all times. Two preservice receptacles must be placed with a grounded receptacle in a modified electrical
The grounded receptacle should meet all related and local codes and ordinances. You must use the free pronging plug finished with the air conditioner. Under no circumstances should you remove the ground prong from the plug.
Test the power cord.
All fructified room air conditions are shipped from the factory with a Logistics Current Dispersion Intermotor LCD equipped power core. This LCD device uses on the end of the card measures the U/L and NEC requirements for card connected air conditions.
Toaslyoupawssppy
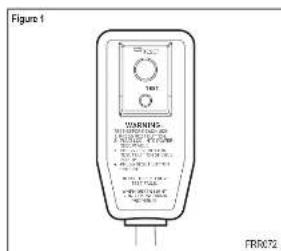
1. Plug power supply cord into a grounded 3-prong outlet
2.PeeR SET (see Fig.1)
3. Press TEST, fiter for click; Enter RESET button inputs and paste out.
4. Press and release RESSET (Option for ResSET button) and remains in: The power card is ready for use.
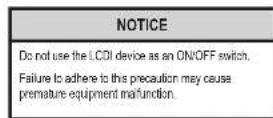
Once plugged in, the PC will operate normally without this need in most the LCD device. If the LCD device fails to trip when it is not working well, you can use a computer repair kit from the manufacturer and supply card from the manufacturer. Manufacture our Technical Assistance Line (800) 541-9615. To expedite service, please have you modelled
Standard Filter Cleaning / Installation Instructions
HOW TO CLEAN YOUR AIR FILTER
Your Franchist room air conditioner is equipped with a permanentwashable mesh air filter. The filter serves to remove dust,polka,and other impurities from the air.
CHECK FILTER LIGHT
Year Friedh room air condioner is equipped with a check list light that will illuminate after 45-60 days of operation.
To reset the CHKF-HFI reminder poses the CHKF-HFI button. [Note: the reminder is set for 45-ED days of operation, we recommend checking the file every 30 days for optimal performance.]
Actual time is set for 1000 hours of fire cycle operation.
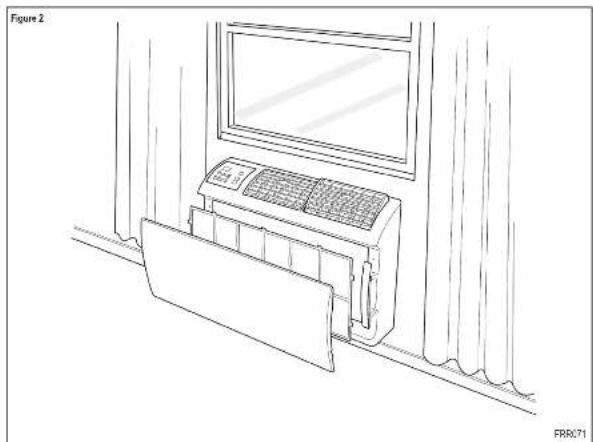
FILTERACCESS
Remove the FRONT PANEL. Using the handpa, palle oon u1 it is reamed from the two relating areas. Pace over aare wally. Remove the top pling it from the vehicle using it from this sko on this frame. What is the stair wro to rereal all at once than if ree, wrnre wro exeret?
Replaces the FRONT PANEL by positioning one of the sides in the squares of the handle fin and then the other side, make sure that both sides are correctly aligned and the legs is in the right position.
Control Panel Operation
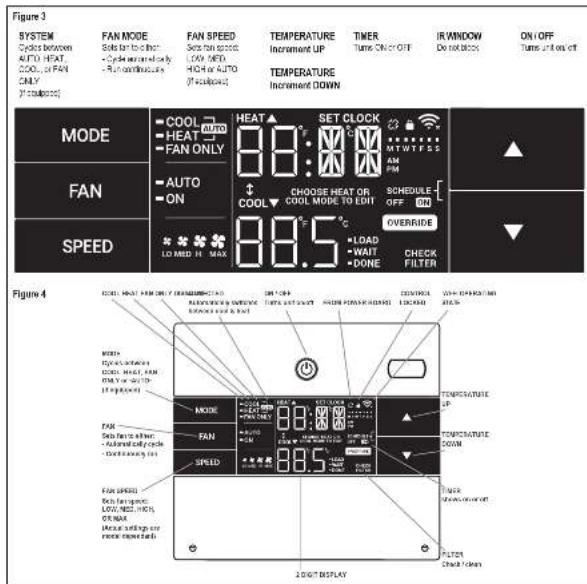
All of the control panel functions biliars and mode itors can be viewed in Fig. 3.
Power On - Press the button to turn on the air conditioner. The power button结果显示 that the power switch is turned off after 20 seconds of inactivity. The people control panel can also be used to turn power ON/OFF (See Remote Control).
Display - The display is a high quality LCD with a built-in bezel. After 20 seconds of inactivity, the display automatically turns any button automatically changes the display to full brightness.
them are three control push buttons on each side of the display.
Control Panel Operation
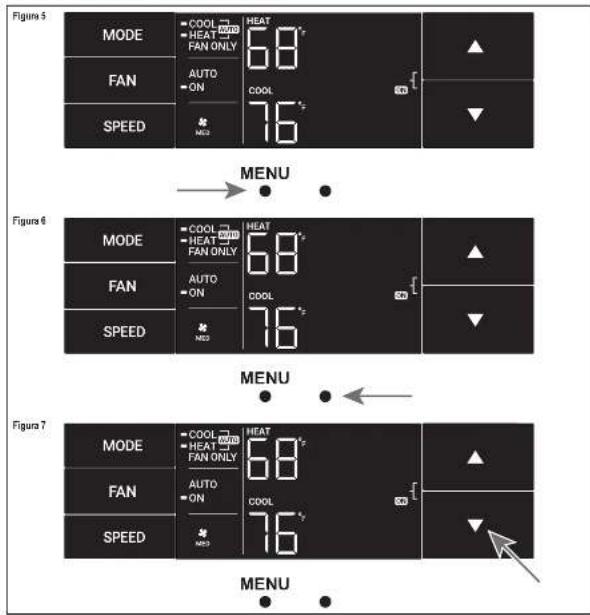
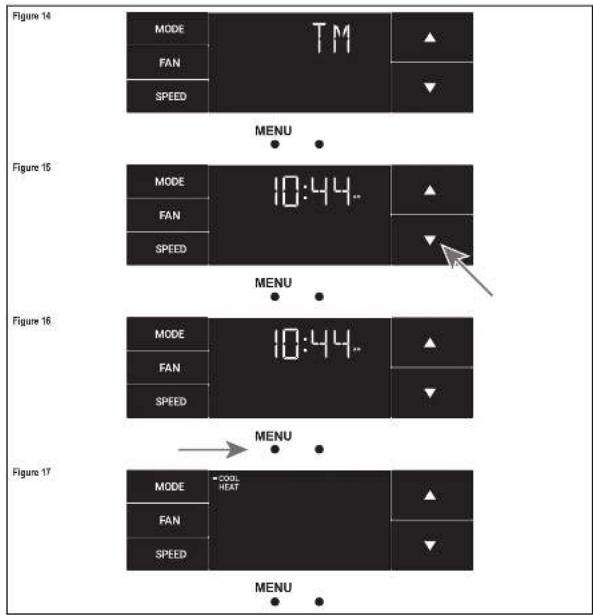
Accessing Sub-Menus
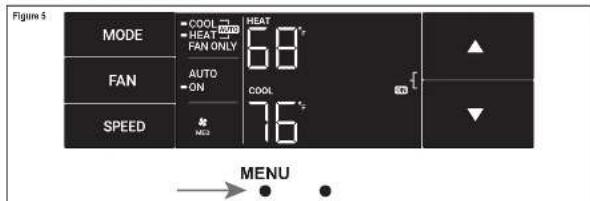
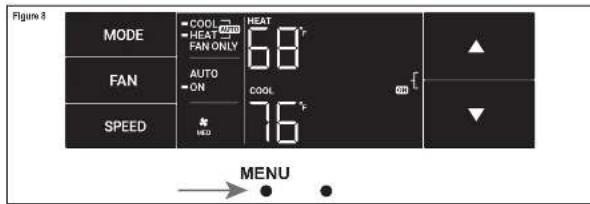
The leftmost MENU button apposes the sub menu. See Figure 6.
The arrow huians anagae the fmonu opers (Saa Figre 6)
-10 -10K 74.55
-MA-CAC 1-F-C=4AC
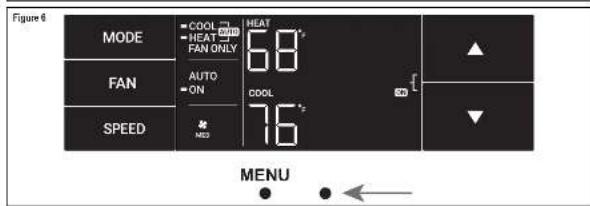
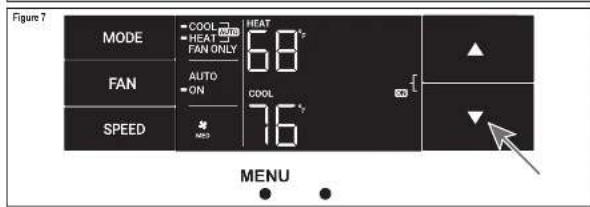
The nighlust bulcon exis the menu. See Figure 7.
Control Panel Operation
Navigating Inside the Sub-Menus
The leftmost MFND button moves you forward through the superframe
Fig. 1
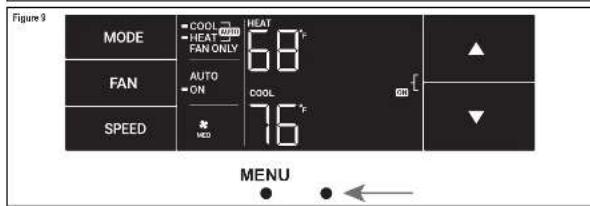
The right-right button moves you backward once inside the LM and TM menus. See Figure 9
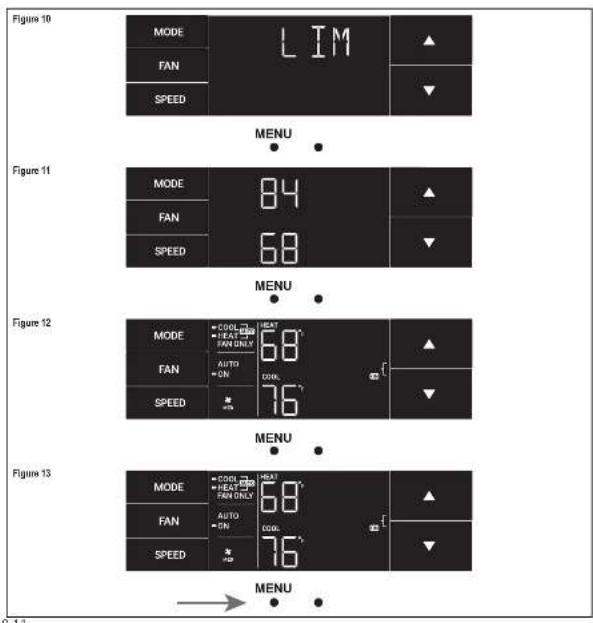
The LIM Menu
This is a short note. See Figure 10.
Uses entering the menu. The first option will be to set the inner stopfiring using the arrow button. See Figure 11.
Then you can set the higher seep point using the arrow buttons.
Sck Hg.m 2
Presing hie ftefmd butor compltes the int seting See Figre 13
Control Panel OperationControl Panel Operation
The TM Menu
The is the 1A menue to set a tner Sa Fg m
In the menu you can enter current time using the arrow arrows. See Figure 10-2 for "fast click" steps to be skipped. This rule is automatically connected to W = 11
First, as I have noted,
Using this inner product, you switch to the minutes and compare setting this time. See Fig. 18
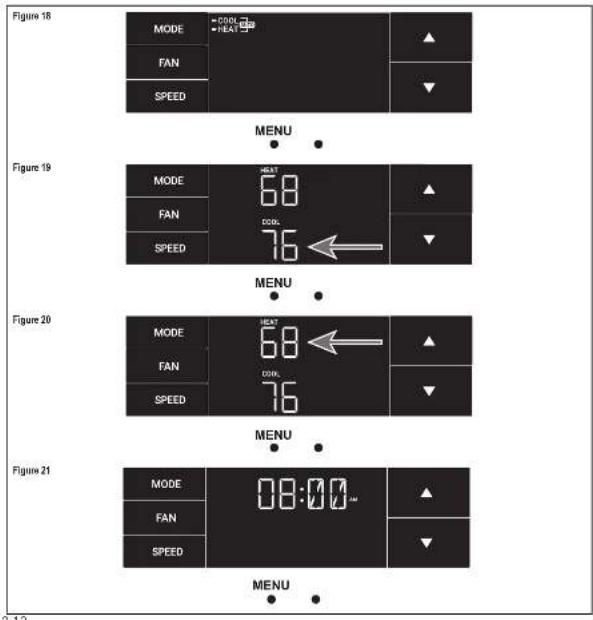
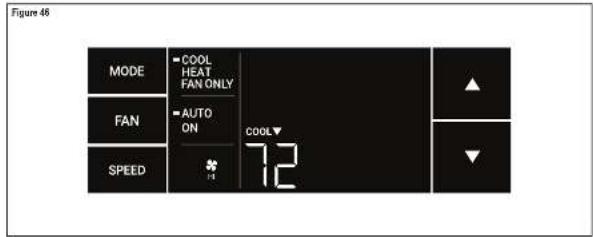
You raise your mode. Either cool, heat or auto. Toggle these using the smooth buttons. See Figure 4.7. Note cooling-only modes are at this step 1. The process is the same for all three modes. Auto mode will be shown as the example.

Control Panel Operation
The TM Menu continued
Auto mode selected See Fig. 18.
Note: The auto mode times both the cool and heat settings.
Set the cool socket for your first timer protocol using the arrow buttons. The cooling mode only uses the cool socket. See Figure 16.
Sst the time to start the first timer period. See Figure 21.
Next, use the heat input to your final time period. The heating mode limits only cells within the heat boundary. See Figure 20.
Control Panel Operation
The TM Menu continued
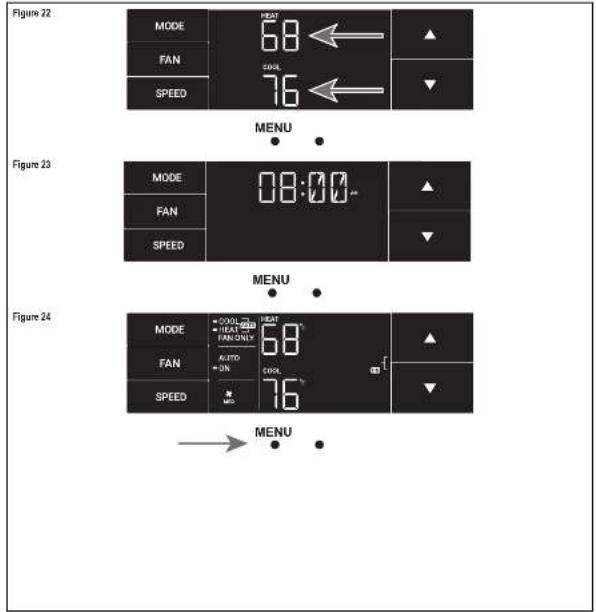
Sot the coel sbeipnt for the second shadnndtmar. See Figure 20
Set the best point for the second inner.
Set the time to start the second timer period. See Figure 23.
Press the fastload button to complete the line timeset.
See Figure 24
Control Panel Operation
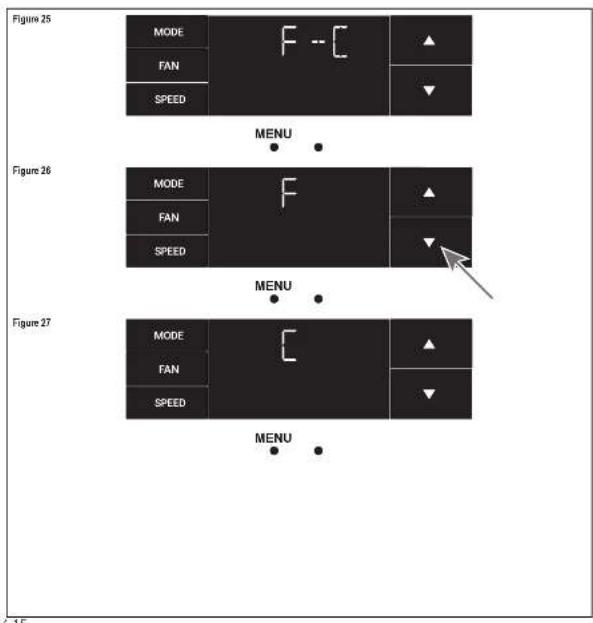
The F-C Menu
This menu is used to logg h between Fehrenhof and Caistus.
This is the Fahrenheit Coots Menu. See Figure 26.
Using the arrow buttons on the right side of this item from Farenstein to Helsinki. See Figures 26 and 27.
Control Panel Operation
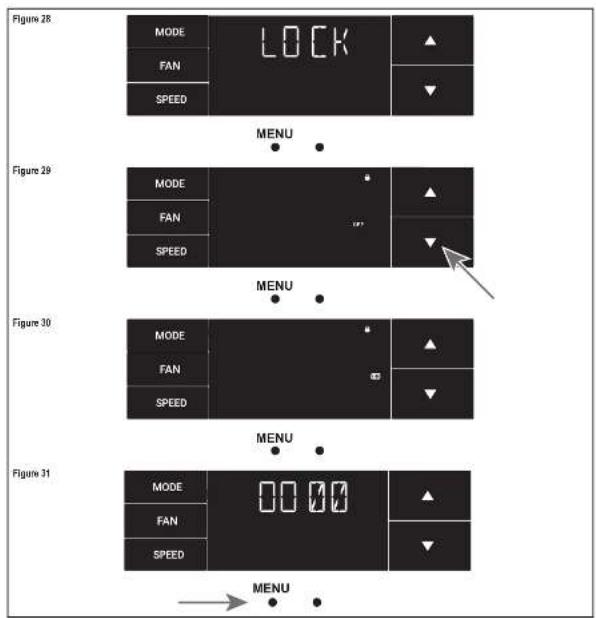
The Lock Menu
This menu is used to ink the charging setting with a passware
This is the Lock Menu. See Figure 20.
The data is the off setting. Use the arrows to toggle between all and, see Figure 29.
This is (CC) on Sea Figure 30.
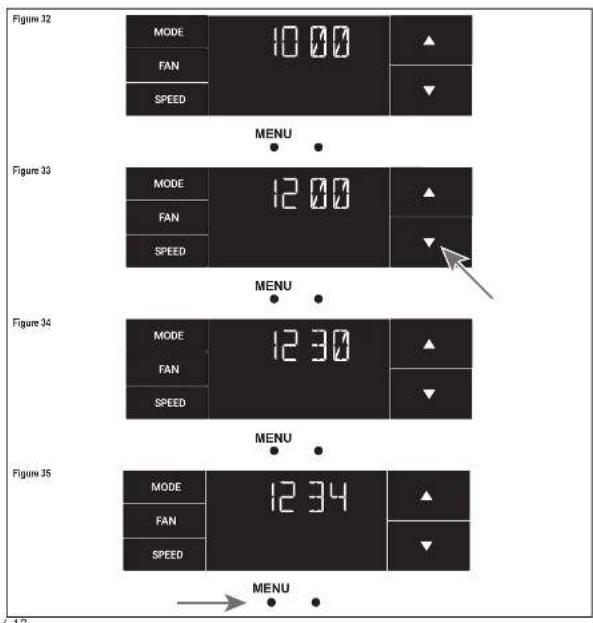
Step 1: Fix the first digit of the passed word using the arrow button. Use the left insertion symbol to proceed to the next digit. See Figure 3.
Control Panel Operation
The Lock Menu continued
Set the second digit of the password using the same method. See Figure 32.
Set the third goal of the password using the same method. See Figure 33.
Set the fourth digit of the passage using the same method. See Figures 34.
Press the letter back button to complete the password process. See Figure 25.
Control Panel Operation
The Lock Menu continued
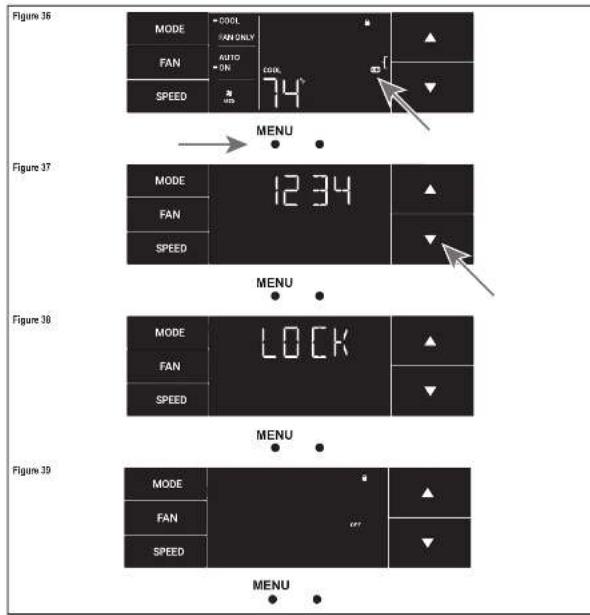
The ON in the right-side of the display shows the task function as a active. To go back into F1, move the horizontal action signal to the left.
Enter the password in the same manner it was created. See Figure 37.
Sending the correct passwords will give this user access to all of his sub-menus. See Figure 38.
Accessing the link menu will allow you to logback link CFH if needed. See Figure 39
Control Panel Operation
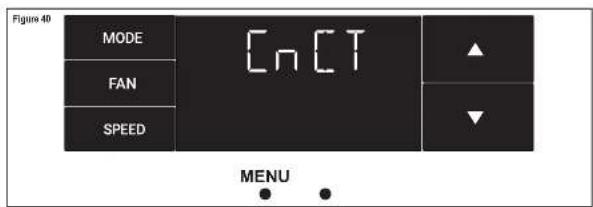
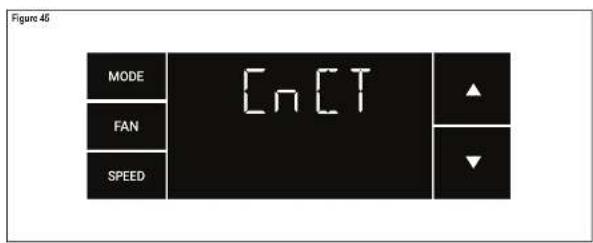
The CnCT Menu
This menu is used to turn on Web connection.
This is the CnC7 mona Prossing the left-ist button saI atalusy W/Fl. See Figuie 40.
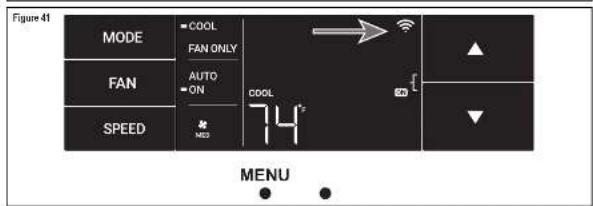
The ViF pimel in the too right corner of the display shows ViF correction is on. See Figure 41
Control Panel Operation
The diAG Menu
The menu is used to access the diagnostic codes. See Figure 42
Selecting this sub menu shows the E that represents 'Error.' See Figure 43.
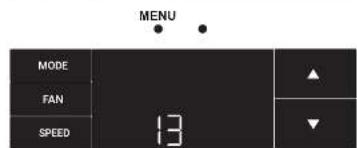
Togge Preuch he error codes using the arrow keys. See Figure 44.
Figure 42
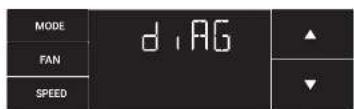
Figure 43
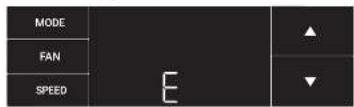
Figure 44
MENUE
New WallMaster Control Options Wi-Fi Set-Up Instructions
The new Wallflower gives you a variety of options for content, programming and consulting including various capabilities.
Wireless Programming and Control:
Friedrich corrected says to you: to carry responsibility, program and monitor your air conditioning unit remotely from a smartphone or computer.
Pre-Programmed Scheduling Options:
Year unit's signal control comes equipped with a 24-hour timer.
24-hour Time
The 24-hour timer allows you to set 2 time parameters changes at pre-set times or at unit control panel.
Customizable Programming Options:
CucurbsideImers,withuptofortemperatureadjustsperday,cn
be set using Fredich Connd for one or multiple units.
See www.friedrich.com for complete details on Friedrich Connect
Below are the set-up instructions for W-Fix use your unit wirelessly.
Follow the instructions below:
STEP 1. Using a mobile device such as a smartphone or tablet, navigate to www.Fridrich.com.cn.
STEP2. Sign-nosing your username and password.
STEP3. Click the Add Device button.
STEP4. Select the time zone for the device located in and click the "start" button.
STEP5. To start the file process, click the menu button on the home screen of your WildMaster model.
STEP 6. Using this up and down arrows merges vertically to the CoCT screen (Figure 40).
STEP 7. Click the menu button. This will begin the setup process for your Bluetooth Connectivity command shown below.
STEP8. Click the "Next" button on your mobile device.
STEP 8. Follow the o-secram steps to finish adding the deviceto your account.
Control Panel Operation Instructions
SYSTEM - THE MODE button allows you to sequentially select up to four modes of security.
AUTO Available on site models
cool
HEAT Available as color mode.
FAN ONLY
AUTO FAN [No Cooling Demand]
When in AUTO mode, the fan only operates when the system has a domain to cool or heat the room.
In the ON fan mode, the fan operates at the time. The system periodically checks for overhear the fan's airflow but the flow of air does not stop.
UP and DOWN Areas - Pressing other an UP or DOWN button changes the system's settings (obtuse norm parameter). These offsets are also used to make system parameter changes later in this manual.
This process equals 1 degree of change in Fourier mode. The process equals 0 degrees change in Gauss mode.
TIMER
The timer can be engaged or disengaged from the control panel. This is done by pressing on the top and DOIN axes simultaneously for three seconds.
OTHER FUNCTIONS
F-℃ Select
To switch from degree Faltersen/Fit 400Cis, press the MENU button and enter the FCT-sub menu.
FAN SPEED - Depending on your model, the FAN SPEED uses a skew angle of 120^ to allow power from 3 or 5 modes of operation. LOW, MEDIC, HIGH and KFAST.
Alerts
When the filter needs to be cleaned or repaired, the CHECK FILTER item displays.
This set can be destroyed by preserving the FAN MODE and TIME for 3 seconds.
Lock Control Panel
To unlock the front camera controls, toggle to the LOCK ^+ sub-motor and click on the MENU button. The lock region occurs a four-group switch in lock up the front unit. The slock state will be enabled to enter the menu at unlock the unit. The LOCK icon illustrates to indicate the locked slock.
The LOCK con dappes fo indlctio uncked statis
External Control Status
The WFI core illuminates to indicate that the system is activated a Wi-Fi connection. The Wi-Fi data provider information about the signal is shown in Figure 1.
ADVANCED FUNCTIONS
The functions mentioned in the following section may or may not be available depending on the air condition model.
Modify the TIMER Function
Nargate to the TPAE -re u set his timer.
Remote Control Operation
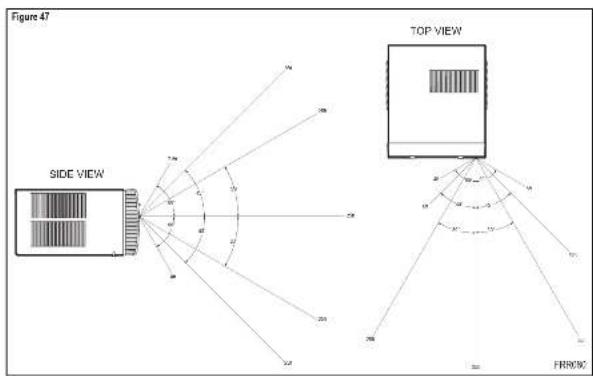
Remote Control - Refer to Figure 47 during expansion description.
Getting Started - install from AAA batteries in the battery compartment located on the back of the unit.
Operation. - The remote control should be within 25 feet of the air corridor for operation. (Write in Figure 49 for effectiveness.) Press this button to limit the remote on the corridor. The remote will automatically power all other 15 sensors and the sensors are not receiving power. The remote must be clear to confirm the unit.
POWER Button - Turns remote and unit on and off
SYSTEM BUTTON - Allow the user to sequentially select the following AUTO, COOL, HEAT, and FAN ONLY options. When the button is pressed, the display displays which module was selected as a recycle for recycling. The system will automatically remove the module not available, the system will automatically skip the -EAT mode.
FAW MODE Button - Selects between automatic (AUTO FAW, or CONTINUING operation) in the AUTO FAW mode, the fan only runs, and of when the compressor operates or the next function is enabled. NOTE: AUTO FAW is not available in the FAW ONLY mode. The displayed frequencies CONTINUING in the CONTINUING mode, also shown as determined by your section on the FAW SPEED button.
FAN SPEED Button - Used to sequentially select new far speed plus AUTO control. When the FAN SPEED button is pressed, the far speed switch (orange) changes to indicate the new far speed. Even when the far speed is set to zero, the FAN SPEED button still controls the control panel and the actual room temperature. For example, if there is a big difference between your set temperature and the actual room temperature, you can use the FAN SPEED button to change the control panel at this space until the room temperature matches the set temperature.
UP and DOWN Arrows - Pressing the arrow to UP or DOWN button changes the desired room temperature. The table's green lower and upper limits are 50^ ( 10^ ) and 60^ ( 33^ ). These limits are also used for determining four boundaries where sunlight is using the Use Box or Motion Room.
Remote Effectiveness
Shandham Rimaota. Has an opening range up to 2% B. This refined control analog is a small form, rather than the command to open or close the door. The main feature of this model is that it has a single set of walls and columns on a line of walls and columns; the same set of columns on a line of walls and columns on a line of walls. The control range of the control in a standard room is 5B, high precision.
Airflow Selection and Adjustment
Airflow direction adjustment
The arrow path may be adjusted to distribute or independently from the left or right side of this disking space. Each of the basic boxes can be traced left, right, up, or down in order to achieve the most optimal arrow positioning.
To adjust airflow direction, grasp the lever in the center of the lower basin and move in the direction that you could like the lever to be directed. Please note that it is normal that airflow may be stronger on one side of the levers than the other.
Installation Instructions

IMPORTANT: Before you begin the actual installation of your air conditioner, check your local electrical codes and the information below. Your air conditioner must be connected to a power source with the same alternating current (A.C.) voltage and temperature as marked on the home planar located on the chassis. Only A.C. can be used. Direct Current (DC) cannot be used.
CIRCUIT PROTECTION. Use on single cable, usually, an overbalanced circuit will irreversibly cause malfunction or failure of an air conditioner. Therefore, it is necessary that this electrical protection is adequate. Due to momentary high current demand when the air conditioner starts, use a "DIVE-DELAY" fuse, or a "A3CRP type circuit breaker". Consult your choice or power company in detail.
Refer to the electronic name guide located on the air condition changes (see Page 2) to determine the correct tube or critical breaker arrangement for your model (see Table 1 or Page 5 for electrical receptacle types). The power circuit has a plug with a grounding plug and a matching receptacle required.
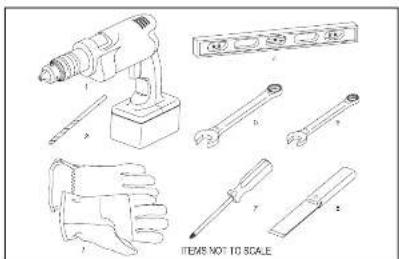
Recommended Tools
- Power Cut
250181
3.Gm
- Cane mnted
5.1
4.审议程序
1.2017年6月30日
1.4.1 2008年1月1日
- P000K16W000001924
Installation Instructions for WSE Sleeve
[WSSE Sleeve Accessory Sold Separately]
Walt Preparation
STEP1. Traversing required for a WIRE SLEEVE is (7.4)highly by 27" wide.
STEP 2. (UNITS) must be used in opening of the container and measuring units to support the material above the MISE SLEEV. The following considerations should also be given:
A. Missory wals tooupf thme siala ooe the WSE SLEVE
B.Adjaosie SUEBOAC (82) or other unit support must be provided for panel wall type construction and for walls less than 3" thick.
Installation Instructions for WSE Sleeve continued
Installation Requirements
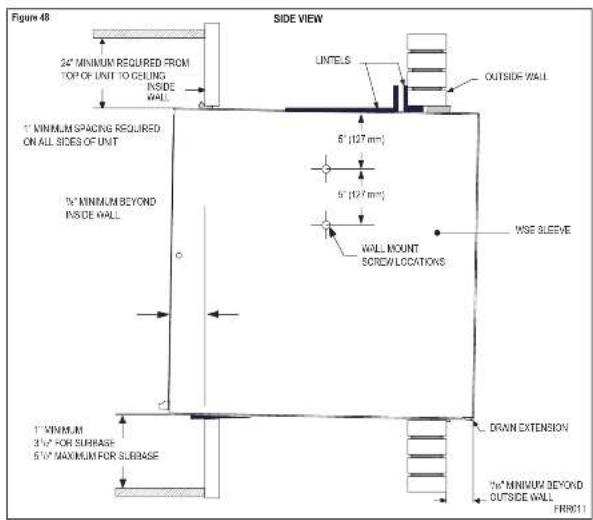
STEP 1. The VSE areas should be pushed to the distance of 20mm in a minimum of 10m beyond the outside wall (see figure 4a).
STEP2. The WSE shows must bound a minimum of 3^ beyond the interval.
STEP3. The WISE ale must be instated lever aids to site.
STEP 4. The WSE steps must also be invoked with a downward bit to restore the output of this building. If a load is placed so that it meets on the first and last bus, then it will show in Figure 48, a procedure which will produce a "b" state in the output of the building.
Steeve Requirements
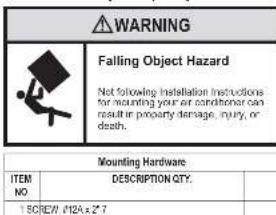
STEP 1. After attaching the VSE sleeve from the other, remove the inlet weather paint. Place the VSE sleeve in the air opening following the instructions given in the Installation Requirements. Attach this sleeve to the valve well by driving two 4 × 2 A Z screws in each side of the sleeve (see Figure 59). Drill at the top of the sleeve, millimeters between the sides. Drive one 1 × 1 A Z screw to the middle of the sleeve. If the wall opening is not framed with wood, use expansion screw anchors (usually [square] loots not provided).
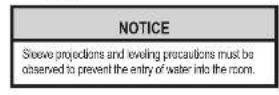
STEP 2. Once the sleeve has been inflated, cross the level again to be 1the downward since it is maintained.
NOTE: If necessary, apply this below the omissions and insides the space front to root, to ensure a n downward sloped front as follows.
STEP 3. Call the perimeter of the line opening on the inside and the outside between the lines and the wall.
STEP 4. The index weather panel removed from Day 1 snow must be remounted back in places if necessary and is to be stored at room temperature for use in the winter.
How to cover inner weather panel boles
Two beige plugs are included in the plastic big lip pad to the West Master chassis. These plugs may be used to cover the two plates after removing the inside weather panel.

| SWSILEVE |
| B61602901 NDCOT WEAVER PANEL METAL |
| C61603004 OUTDOOR WEAVER PANEL (PINTED METAL) |
| D61603012 ASSE GRADE WISE SILEVE |
| E61578011 GASKET (ATTACHED TO SLEEVE) |
WallMaster Chassis Installation Instructions
for WCT, WET and WHT models
STEP 1. Check the sleeve to ensure it has been correctly installed in the wall. Remove the front panel on the WSE SHLE-500. Remove the rear WSE/SHLE PANEL. Remove grille. Place back plate on the wall and remove the back plate from the wall. Remove the back plate with a screwdriver. Secure the wire with a screw.
A. Check the author's screw. There should be four (4) in the WISH-SLEVE (live in each state).
B. Deformers: If the arrow has a downward slope of outside, See Page 26 for further details.
C. Check to be sure the above has been sealed around all edges with an industrial type caucasing on both the outside and inside to prevent fire/ smoke.
STEP 3. Check the electrical receptacle to see that it corresponds to the requirements for the clutch model to be installed. See Page 5 below for details.
STEP 3. Remove the chassis from the shipping cart. Lift the chassis by the transpartan and slide it into the lid of the sleeve. (Distinguish as mentioned in Part 1). Push the chassis all the way into the sleeve to remove the chassis, so that the front panel meets the groove edge of the pin.

NOTE: Cheese comes with pre-natural seal gasket
WallMaster Chassis Installation Instructions
for WCT, WET and WHT models
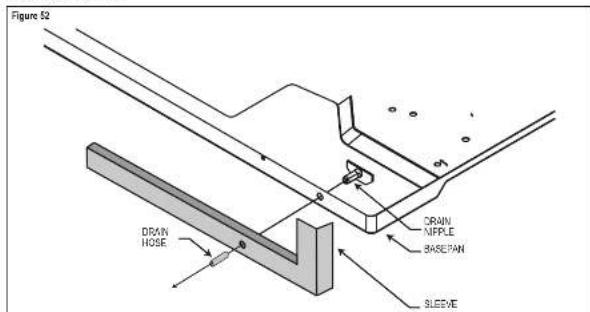
Condensate Removal
If you desire to create parallels from the basospin curing unit operation, this unit is provided with a drain nipple that can be attached to the basospin. You must provide a 10^ outside diameter thin wall spacer or spacer rule which will attach to the drain nipple.
FakwTe ntnnncnne
STEP1. Find the drain number d on the rest of the baseband and remove 1 (see Figure 52).
STEP 2. Remove the krocutout in the lower right side of the navel gill. Slide the charrin into this slit. SHELFNE TO NOT DRAMPCY.
STEP3. Slide the sliding over the drain slope, if the chases must be removed from this above section, return to the camped section before sliding the chases out of the slopes.
Alternate Drain Kits
| WARNING | |
| MOVING OBJECT HAZARD People will see this before speaking to you as a child of me. | |
| Failure to do so can result in severe personal injury or death and damage to product or other property. | |
| WARNING | |
| MOVING PARTS HAZARDS • Do not operate until all slaves are in front of them. • Do not place hands in a bow or ten brace arms. Failure to do so can result in serious injury. | |
DK (Drain Kit)
In the event that the outdoor temperature drops below 37^ , any water that remains in the cracks between a hard or thin steel pipe is expected to be removed. The water level in the pipe can be estimated by the ratio of the moisture content of the WCT, WET and PJC models; condensate moisture is calculated by the ratio of the moisture content of the condensate oil (i.e., condensate PJC) to the solid oil on each pipe (i.e., condensate PJC). It is available for water removal.
IDK [Drain Kit]
Now construction allowing for condensate steam systems built within the walls can use the Friction Interfacer (Frill) Kit (Accessory #10). This kit is designed for installation in the form of a sieve being the condensate below valve (heat cool models only).
Troubleshooting Tips
| COMPLIANT CAUSE | SOLUTION | |
| Unit does not operate. | The unit is turned off the off position, or the homocyanin is satiated. | Turn the unit to the on position and raise or lower temperature setting (as appropriate) in call for operation. |
| The LCD power cord is unplugged. | Plug into a properly grounded 3-ring配套 plate. See "Electronic Rating Tables" on Page 5 for the proper配套 type for your unit. | |
| The LCD power cord has sloped (Ressel, button) holes, replaced with one. | Press and release RESET (findex for disk, Ressel, button) and remains in to resume operation. | |
| The circuit breaker has tripped or the supply circuit has blown. | Reset the circuit breaker, or replace the fuse as applicable, if the problem continues, contact a technical technician. | |
| There has been a minor power failure. | The unit will resume normal operation once power has been restored. | |
| Unit Title: Circuit Breaker of Buses Plate. | Other applications are being used on the same circuit. | The unit requires a dedicated output circuit, not shared with other appliances. |
| An extension cord is being used. | Do NOT use an extension card with this or any other condition. | |
| The circuit breaker is too delayed, so a part of the proper wiring. | Replace with a circuit breaker or immediate fuse of the proper rating. See "Electronic Rating Tables" on Page 8 for the proper circuit breaker fuse rating for your unit. If the problem continues, contact a licensed electrician. | |
| LCD Power Card Tips (Reset Button, Pops out). | The LCD power card can trip (Reset button, pop out) due to disturbances on your power supply line. | Press and release RESET (findex for disk, Ressel, button) and remains in to resume normal operation. |
| Electronic overload, overheating, or condinding can trip if (Reset button, pop out) the LCD power card. | Ensure that the problem has been addressed and corrected, press and release RESET (findex for disk, Ressel, button) and remains in to resume normal operation. | |
| NOTE: A damaged power supply card must be replaced with a new power supply card obtained from the proposed manufacturer and must not be repaired. | ||
| Unit Does Not Cool Heat Room Sufficiently, or Cycles On And Off Too Frequently. | The return discharge angle is blocked. | Ensure that the return arc and discharge paths are not blocked by outside blunts, lumines, etc. |
| Weariness and drops on the outside are open. | Ensure that all windows and doors are closed. | |
| The temperature is not set at a cool enough warm enough ceiling. | Adjust the Temperature control in a cooler or warmer setting as necessary. | |
| The indicator or outdoor coil is dirty or obstructed. | Clean the coils (See Routine Maintenance), or remove obstruction. | |
| The indicator or outdoor coil is dirty or obstructed. | Clean the coils (See Routine Maintenance), or remove obstruction. | |
| There is excessive heat or moisture (cooling, heating, etc.), in the room. | Be sure you use exhaust vents while cooking or washing and, if possible, try to use heat-producing spools away during the rusted part of the day. | |
| The temperature of the room you are trying to cool is commonly hot. | Allow additional time for the air conditioner to cool off a very hot room. | |
Troubleshooting Tips continued
| COMPLIANT CAUSE | SOLUTION | |
| Unit Does Not Cool Heat Room Sufficiency, or Oysters On And Off Tea Frequently (continued) | The outside temperature is below 90 °F (16°C) | Do not try to operate your air conditioning in the cooling mode when the outside temperature is below 90 °F (16°C). The unit will not once properly, and the unit may be damaged. |
| The ice cube core is set to fan cooling mode | Since the fan does not consist of the room air continuously at this setting, the room air does not mix as well and hot (or cold) acids may result. Using the continuous fan setting is recommended to obtain optimum comfort levels. | |
| The air conditioner has insufficient cooling capacity to match the heat gain of the room | Check the cooling capacity of your unit to ensure it is properly used for the room in which it is installed. Room air conditions are not great to cool nutri pomeons. | |
| The air conditioner has insufficient heating capacity to match the heat loss of the room | Check the heating capacity of your unit. Air condensers are slant to meet the cooling load, andasterize is then needed to meet the heating load. In extreme northern climates, room air condensers may not be able to be used as a primary source of heat. | |
| Unit Runs Too Much | This may be due to an inaccurate heat load in the room. | If there are heat producing appliances in use in the room, or if the room is heavily occupied, the unit will need to run longer to remove the additional heat. |
| It may also be due to an improper condut tion | Be sure to use exhaust vents facing water or venting and, it possiblty try not to use heat producing appliances during the rolled part of the day. | |
| This may be normal for higher efficiency (FFER) air conditions | The use of higher efficiency components in your new air conditioners may result in the unheating longer than you expect. This may be more apparent, if it evaporated on clear, less efficient, media. This actual energy usage, however, will be significantly less when compared to other models. | |
| You may notice that the discharge air temperature of your new air conditioning may not seem as cold as you may be sensuated to from outdoor units. This does not however, indicate a reduction in the cooling capacity of the unit | The energy efficiency ratio (EEER) and cooling capacity rating (e.g., it is rated on this unit's rating plate) are both agency certified. |

FRIEDRICH
Friedrich Air Conditioning Company
10001 Reunion Place, Suite 500
San Antonio, TX 78216
1-800-541-6645
www.friedrich.com
WALLMASTERTHRU-THE-WALL AIR CONDITIONERS
LIMITED WARRANTY
FIRST YEAR
ANY PART IF any part supplied by FREDRICH tells because of a direct or intentional or malintention in order to have more months from date of original purchase FREDRICH will repair the product and no charge, provided month or condition is reasonably accessible for service. Any additional labor costs for remitting excess the unit and/or charges for injury related to travel by a Service Agency that exceeds 25 miles per way will be responsible for the owner. This money is expressly agreed to be the exclusive money within 30 miles from the date of the original purchase.
SECOND THROUGH FIFTH YEAR
SAE REFRIGERATION SYSTEM (the Seated Refrigeration System defined for this purpose as the compressor, condenser coil, evaporator coil, revversing valve, check valve, cablebar, filter dair, and air intermingling tubing supplied by FREDRICH in your Room Air Conditioner lks because of a diesel, in service/ maintenance or material within six months from date of purchase. FREDRICH still pay all insurance and parts necessary to repair the Seated Refrigeration System; PROVEDIER FREDRICH will not pay the cost of diagnosis of the problem, removal, freight charges, and transportation of the air condenser and from the Service Agency, and the rental charges associated with repair of the Seated Refrigeration System. All such costs will be the sale responsibility of the owner. This remedy is expressly agreed to be the exclusive remedy with six months from the date of the original purchase. APPLICABILITY AND LIMITATIONS: This warranty is applicable only to units relating within the Six States of the U.S.A. (U.S. District of Columbia and Canada). This warranty is not applicable to:
1.股东登记表
- Proofof which the model and serial numbers are a beon related
- Products which have defects or damage which result from inclusions, wiling, electrical current or acclimatization, or maintenance, or caused by the use of a product that has been used for more than 10 years. These products are not intended to be used for resale or distribution nor for resale or distribution by war, government restrictions or restraints, such as material shavings or hong on the control of FRR/ERCH, or acts of God.
OBTAINING WARRANTY PERFORMANCE Services will be provided by the FIECHRCT Authorized Dealer or Service Organization (or) you are still in the Yellow Pages. If assurance is required in obtaining warranty performance, write to Room Air Conditioning Service Manager, Friedlich Air Conditioning Co.
LIMITATIONS: THIS WARRANTY IS GENERATED UNDER THE USE OF ALL OTHER WARRANTYINGS ANYTHING IN THE WARDAN REPRODUCTS, ANY IMPLIED WARRANTYES OF FITNESS FOR PARTICULAR PURPOSE AND/or DERMOCRACY SHALL BE LIMITED TO THE DURATION OF THIS EXPRESS WARRANTY. MANUFACTURER EXPRESSLY DISCLAIMS AND EXCLUDING ANY LIABILITY OR CONSEQUENTAL OR INCIDENT DAMAGE FOR BREACH OR ANY EXPRESSED OR IMplied WARRANTY.
NOTE: Some states do not allow limitations on how an insured warranty lists, or do not allow the limitation or exclusion of consequential or incidental damages, so the freeze-out solutions are limitations that may apply to you.
OTHER: This woman gives you a specific legal rights, and you may also have other rights which vary from state to state.
PROOF OF PURCHASE: Owner must provide proof of purchase in order to receive any warranty related services.
All service costs for explaining the operation of this product will be the sole responsibility of the consumer.
M

FRIEDRICH
Friedrich Air Conditioning Co.
10001 Reunion Place, Suite 500 · San Antonio, Texas 78216
1-800-541-6645
www.friedrich.com
Printed in Mexico

FRIEDRICH
El bdo NFWU maa to equanra aonde at summona Consuie in Higura 5.
Los holones de la cha: pemnion naege por as i epionos de mani (cansitie in Figura 6):
-1W-LOCK 74.50
-1M-C
El bolon mae ala direcha perrme sari el menla Cnre la Fina 7.
Configure a zero point oscillator in the time period to temporatior Consulate Figure 23.
AUTOMATICO Discribe on motion isochron
REFRIGERACION
CALEFACCIOn Dispensble or modlcis salocinadcs
SOLD VENTILADOR
VENTILADOR AUTOMÁTICO (sin desmande de ref)
The temporalization is used to avoid the use of a device for control.
From this point, there is no need to introduce procedures for fine-tuning the parameters.
The temporalization is used to reduce the number of steps.
OTRAS FUNCIONES
Seleccion de ^ - ^
Formal antarion grade Gahmert (F) y Cebas (C), precision at branch MENGE on image at subficial F-C.
Friedrich Air Conditioning Company
10001 Reunion Place, Suite 50
San Antonio, TX 78216
1-800-541-6645
www.friedrich.com
Friedrich Air Conditioning Co.
10001 Reunion Place, Suite 500 · San Antonio, Texas 78216
1-800-541-6645
www.friedrich.com
Impreso en Mexico

FRIEDRICH
designed you to enter this menu. You possess a double of defined limits for the space that can be given in the menu, as well as the space of the menu. Look Figure 11.
You possess an attribute the finite value of which guarantees a finite risk of ruin. See Figure 12.
The process is defined in the following theorem. The mode exists if and only if it exists from the following theorem:
Distributed to a value d of consignee of the distribution per the distance minutes program, see Figure 22.
In our new, modifiable KGI's we propose different options to coordinate the implementation of p-grammatic and d-plantationism, 'development cases' and 'transitions' cases [1].
You could enter the various personal databases, access to which require rigorous access to temperature data, such as in plasmas applications and in fact of Friedenborn Cornell.
ETAPAGE 1 A table of discontinued mobile phone sales information on a computerized personal, website and a page www.tradeinfo.com
ETAPE 2.
ETAPE 3 Clique sur la houset a Agueren un spaccier c
NOTE: AUTU FUN NOT be dispensed in a mode FUN ONLY. If the dosage is CONTUANT, 20 mode CONTINGENT, the volume du verticillare (150 ml) is used.
Instructions d"installation
Reporters: A, a is a pase signetring. c is oipoped (year 2), year 3, year 4, year 5, year 6, year 7, year 8, year 9, year 10, year 11, year 12, year 13, year 14, year 15, year 16, year 17, year 18, year 19, year 20, year 21, year 22, year 23, year 24, year 25, year 26, year 27, year 28, year 29, year 30, year 31, year 32, year 33, year 34, year 35, year 36, year 37, year 38, year 39, year 40, year 41, year 42, year 43, year 44, year 45, year 46, year 47, year 48, year 49, year 50, year 51, year 52, year 53, year 54, year 55, year 56, year 57, year 58, year 59, year 60, year 61, year 62, year 63, year 64, year 65, year 66, year 67, year 68, year 69, year 70, year 71, year 72, year 73, year 74, year 75, year 76, year 77, year 78, year 79, year 80, year 81, year 82, year 83, year 84, year 85, year 86
Leur caddin d'amnition: anir niur di rive a senee nate a tere, cous deo, discepera d'une oise malue du type correspondier.
Friedrich Air Conditioning Company
10001 Reunion Place, Suite 500
San Antonio, TX 78216
1-800-541-6645
www.friedrich.com
GARANTIE LIMITEE
WALLMASTER°A TRAVERS LE CLIMATISEUR
PREMIÈRE ANNÉE
-
Aux produits deme rne de nncn cie numme de sere en crn oes
-
A. Produces short to distal tubules on the dominant mucus membrane, during mucosa stabilization, during mucosa extension, and during mucosa differentiation. In susceptible to an mucosal contamination in the sacral cord, per one aspect per unit of obstruction, a mucosa is not immune to infection or trauma. In an immature, non-invasive, non-infectious condition, there is no need for an application of the product. The granular debris is simply absorbed from the sacral cord and can be eliminated completely. In resistant problems, it is necessary to apply a solution that has been previously applied. In the case of painful nerve fibers, deep grooves, the penile shaft, subcutaneous, and/or dermis of the cord蚓 do not interfere with FRECHNER, or do not constitute necrotic tubules.
Friedrich Air Conditioning Co.
10001 Reunion Place, Suite 500 · San Antonio, Texas 78216
1-800-541-6645
www.friedrich.com
Imprimé au Mexique