
HTD 501 - TV SAGEM - Free user manual and instructions
Find the device manual for free HTD 501 SAGEM in PDF.
| Product type | DLP™ flat screen TV |
| Brand | SAGEM |
| Model | HTD 501 |
| Screen size | 127 cm (diagonal) |
| Display format | 16/9 |
| Resolution | 1280 x 720 pixels |
| Contrast | 2000:1 |
| Brightness | 500 cd/m² |
| Viewing angle | 60° horizontal / 20° vertical |
| Tuner reception | PAL B/G/H/I, SECAM B/G/L/L', 100 channels |
| Audio power | 2 x 15 W RMS |
| Number of speakers | 2 (2-way) |
| Main connections | 3 SCART, AV inputs, YPbPr, VGA, DVI-D, headphone output, Hifi output |
| Power supply | 220-240 V, 50 Hz AC |
| Maximum power consumption | 250 W (standby 5 W) |
| Dimensions (H x W x D) | 1166 x 904 x 375 mm |
| Weight | 42 kg |
| Packaged weight | 56 kg |
| Included accessories | TL50 remote control, AA batteries, power cord, RF cord, manual |
| Safety | Class I, mandatory grounding, do not open (except lamp unit) |
| Screen maintenance | Damp soft cloth and soapy product, avoid alcohol and solvents |
| Lamp replacement | Approved model RL1080A (ref. Sagem 251282989), wait 1 hour after switching off |
| Parental lock | Personal code (default 0000) |
| Special functions | PIP/PAP, teletext, freeze frame, sleep timer |
Frequently Asked Questions - HTD 501 SAGEM
User questions about HTD 501 SAGEM
0 question about this device. Answer the ones you know or ask your own.
Ask a new question about this device
Download the instructions for your TV in PDF format for free! Find your manual HTD 501 - SAGEM and take your electronic device back in hand. On this page are published all the documents necessary for the use of your device. HTD 501 by SAGEM.
USER MANUAL HTD 501 SAGEM
You have just bought a Flat Screen DLP™ SAGEM AXIUM™. Congratulations!
This product was manufactured with the greatest care and we hope that it will provide you joy and spectacular sensations for many years. This product is extremely complete and we recommend that you first refer to Chapter 2 " SET UP" and Chapter 3 "First Rapid Installation" before reading the whole user manual.
We recommend you to keep this document in a safe place in order to be able to refer to it afterwards.
We remind you that this device complies with the European norms.
If you happen to have any potential problem for which Chapter 10 does not provide solution, please contact your retailer or distributor.
© The SAGEM brand is a SAGEM SA brand.
DLPTM is a registered trademark of Texas Instrument.
Documentations can be subject to amendment.
| Pays | couleur | system | stéréo |
| France | SECAM | L | Nicam L |
| Allemagne | PAL | B,G | deux porteuses B/G |
| Autrique | PAL | B,G | Deux porteuses B/G |
| Italie | PAL | B,G | Deux porteuses B/G |
| Espagne | PAL | B,G | Nicam B/G |
| Hollande | PAL | B,G | Deux porteuses B/G |
| Danemark | PAL | B,G | Nicam B/G |
| Suède | PAL | B,G | Nicam B/G |
| Norvège | PAL | B,G | Nicam B/G |
| Finlande | PAL | B,G | Nicam B/G |
| Belgique | PAL | B,H | Nicam B/G |
| Suisse | PAL | B,G | Deux porteuses B/G |
| UK | PAL | I | Nicam I |
| Portugal | PAL | B,G |
FM 6,0 MHz / NICAM 6,55 MHz (I)
FM 6,5 MHz 6,258 MHz / NICAM 5,85 MHz (DKK')
Audio
Entree Audio In (2 x RCA)
AV6 (entrelace)
Entree Y, Cb, Cr In (3 x RCA)
Entrée Audio (2 x RCA)
AV7 (progressive)
Entree Y, Pb, Pr In (3 x RCA)
Entrée Audio (2 x RCA)
Hi-fi
Sortie Audio out (2 x RCA)
Caisson de basse
Sortie audio (1 x RCA)
PC2
Native/Upscale : SDTV/EDTV (480i/480P)(576i/576P)
HDTV (1080i/720P)
Signal PC :
Native/Upscale : VGA 640 x 480, SVGA 800 x 600,
XGA 1024 x 768, SXGA 1280 x 1024
Alimentation
AC 220-240 V ~50 Hz
2.1. Aerial connection 4
2.2. Mains connection 4
2.3. Switch on 4
2.4. Switching off the Flat Screen DLP™ 5
- FIRST RAPID INSTALLATION 5
-
FRONT PANEL FUNCTIONS 6
4.1. Front panel controls 6
4.2. Front panel light indicators and remote control receiver 6 -
REMOTE CONTROL 7
-
PERSONALISED SETTINGS 8
6.1. Changing the security code 8
6.2. Return to initial configuration 8
6.3. Searching TV programmes 8
6.31. Selecting norm for your country 9
6.3.2. Manual installation 9
6.3.3. Automatic installation 10
6.3.4. Modifying the programme list 10
6.4. Choose the MENU language 11
6.5. Double picture mode tuning 11
6.6 Exit standby mode tuning 11
- CONNECTING EQUIPMENT AND CONFIGURATIONS 12
7.1. Connection advice 12
7.2. Source configuration 13
7.3. Configuration of computer sources 14 - DAY-TO-DAY USE 15
8.1. Picture adjustment 15
8.2. Sound adjustment 15
8.3. Sleep timer 16
8.4. Locking the television set 16
8.5. Choice of sources 17
8.6. Choice of format 17
8.7. Programme information 18
8.8. Double picture mode selection 18
8.9. Choice of sound adjustment 19
8.10. Choosing a TV programme 19
8.11. Picture hold 19 - TELETEXT 20
- DIAGNOSTIC AND FAULTS 22
- CHANGING THE LAMP UNIT 23
- INDEX 25
- TECHNICAL CHARACTERISTICS 26
1. Precautions
1.1. Safety
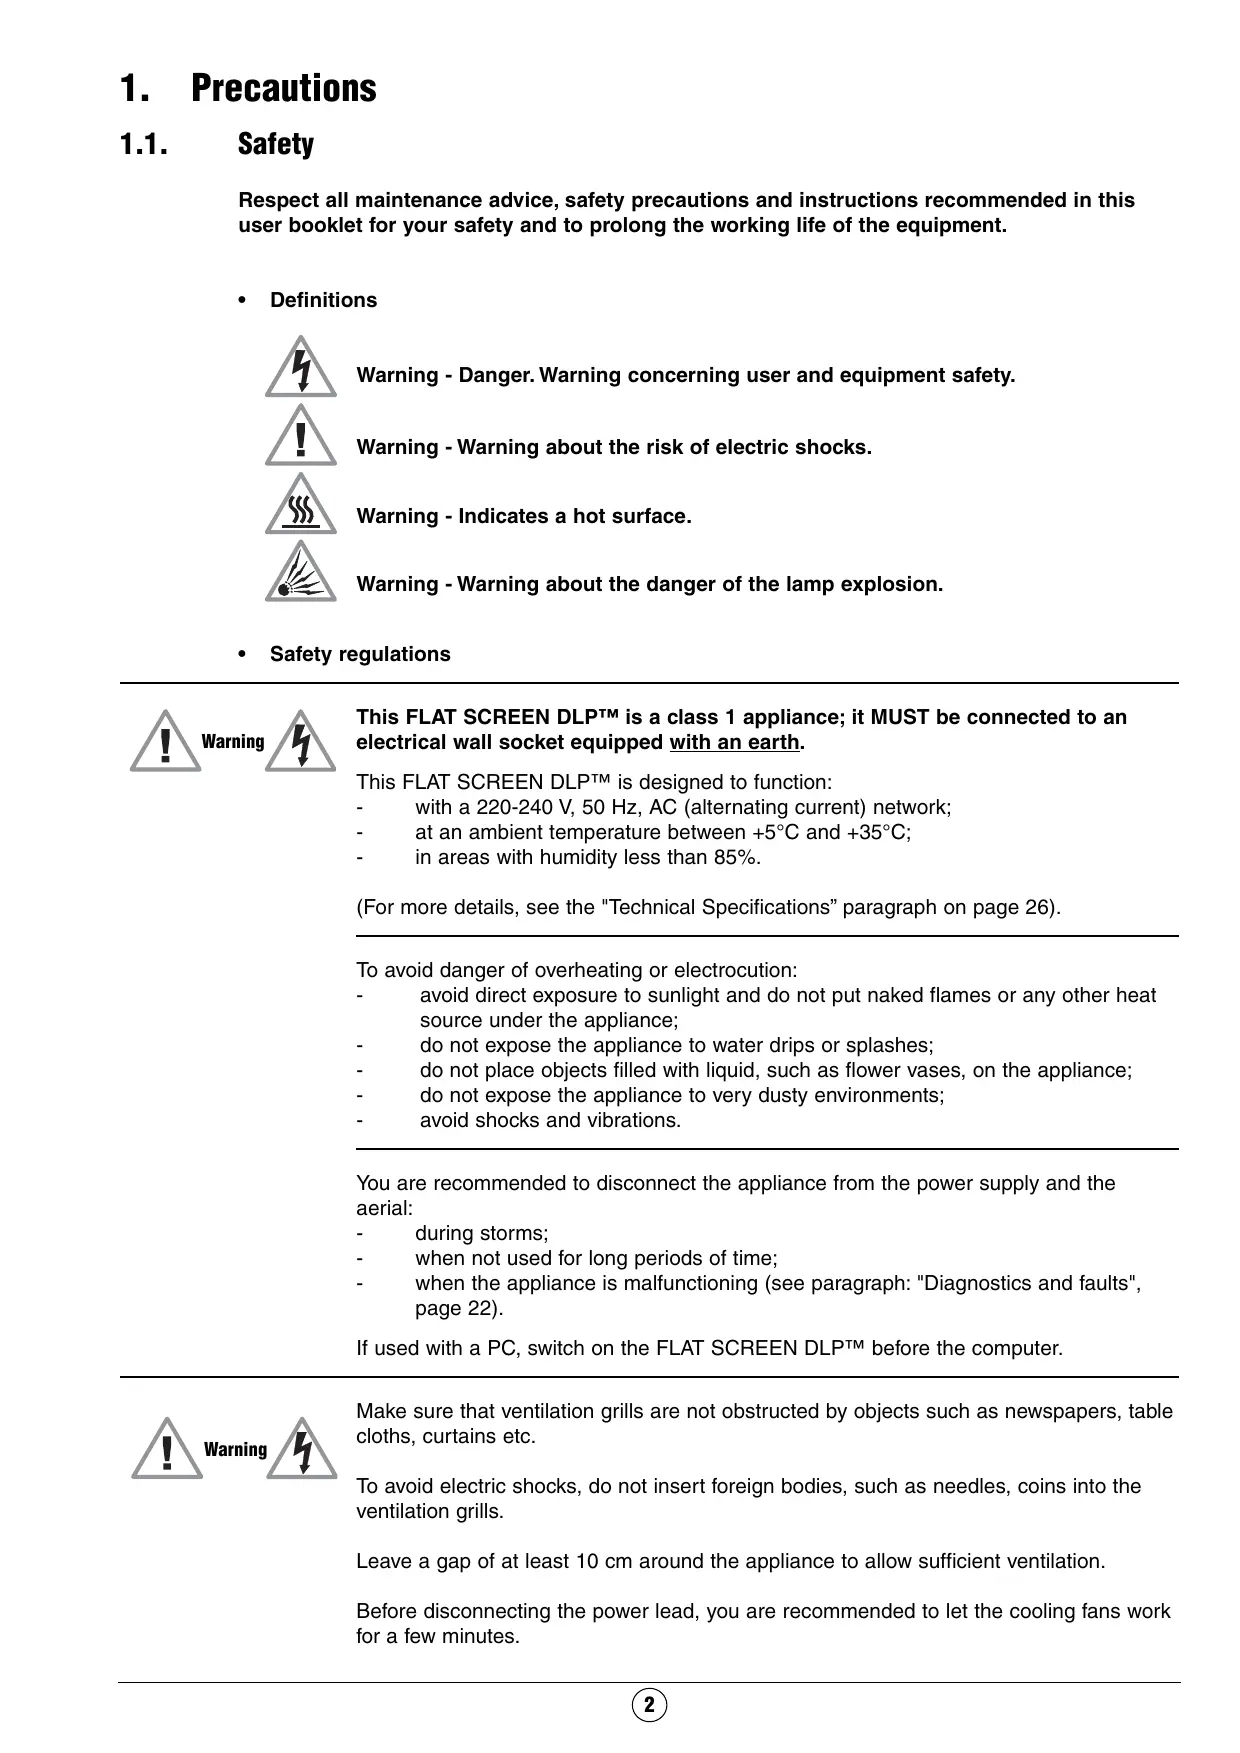
Respect all maintenance advice, safety precautions and instructions recommended in this user booklet for your safety and to prolong the working life of the equipment.
- Definitions

Warning - Danger. Warning concerning user and equipment safety.

Warning - Warning about the risk of electric shocks.

Warning - Indicates a hot surface.

Warning - Warning about the danger of the lamp explosion.
- Safety regulations

Warning

This FLAT SCREEN DLPTM is a class 1 appliance; it MUST be connected to an electrical wall socket equipped with an earth.
This FLAT SCREEN DLP™ is designed to function:
- with a 220-240 V, 50 Hz, AC (alternating current) network;
- at an ambient temperature between +5^ and +35^ ;
- in areas with humidity less than 85% .
(For more details, see the "Technical Specifications" paragraph on page 26).
To avoid danger of overheating or electrocution:
- avoid direct exposure to sunlight and do not put naked flames or any other heat source under the appliance;
- do not expose the appliance to water drips or splashes;
- do not place objects filled with liquid, such as flower vases, on the appliance;
- do not expose the appliance to very dusty environments;
- avoid shocks and vibrations.
You are recommended to disconnect the appliance from the power supply and the aerial:
- during storms;
- when not used for long periods of time;
- when the appliance is malfunctioning (see paragraph: "Diagnostics and faults", page 22).
If used with a PC, switch on the FLAT SCREEN DLP™ before the computer.

Warning

Make sure that ventilation grills are not obstructed by objects such as newspapers, table cloths, curtains etc.
To avoid electric shocks, do not insert foreign bodies, such as needles, coins into the ventilation grills.
Leave a gap of at least 10cm around the appliance to allow sufficient ventilation.
Before disconnecting the power lead, you are recommended to let the cooling fans work for a few minutes.

This appliance will auto-detect the end of the lamp's working life. Replace the lamp as soon as the "bulb" indicator lights up on the front panel.
When the FLAT SCREEN DLPTM's lamp reaches the end of its working life, there could be a loud, sharp sound when it stops working. The appliance will only work when you replace the bulb.
To avoid burns or the lamp unit exploding whilst it is being replaced, you must disconnect the mains lead from the wall socket.
Make sure that you follow the whole replacement procedure described in "Changing the lamp unit" on page 23 and 24.


Only use suitable batteries that comply with the maker's specifications (see "Technical Specifications" page 26):
- the batteries supplied are not rechargeable;
- pay particular attention to environmental matters;
- take the defective or used batteries to the places provided for this effect in accordance with current regulations; never throw them in the dustbin.
1.2. Maintenance
- Before doing anything, disconnect the mains lead from the wall socket.
- Clean the cabinet using a soft, slightly damp cloth and a non-abrasive and non-wax detergent.
- Never use Benzene, alcohol or petroleum-based cleaning products as these could damage the finish.
- Clean the screen carefully using a soft, damp cloth lightly impregnated with a soap solution.
2. SET UP
2.1. Aerial connection
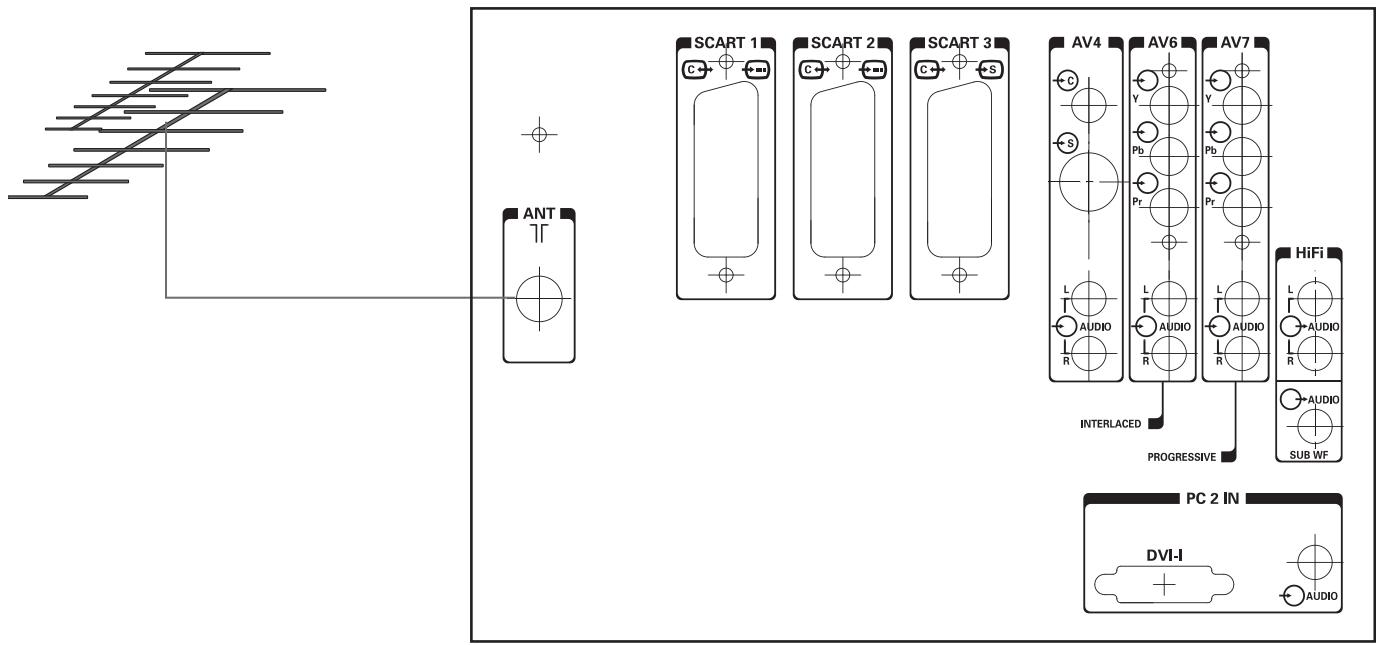
Insert the end of the coaxial cable leading from your aerial into the aerial input socket at the back of the Flat Screen DLP™.
Your Flat Screen DLP™ is fitted with 2 tuners, but only one cable is needed to supply both.
2.2. Mains connection
Insert the mains plug into a 220-240 V socket that is earthed (3 pin).
2.3. Switch on
Switch the appliance on by pressing the switch on the left of your appliance.
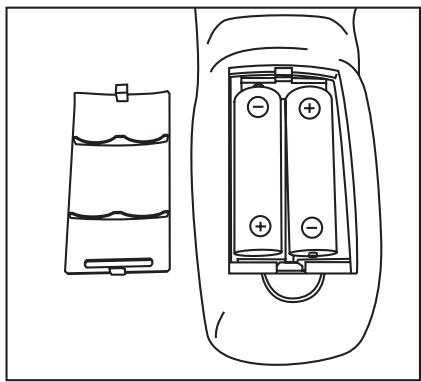
Setting up your remote control:
Open the battery compartment cover and insert the two R6-1.5V type batteries.
Make sure that the batteries are installed correctly.
Do not use batteries of different types or rechargeable batteries.
Setting up the Flat Screen DLPTM:
Press the stand-by button on your remote control or press the standby button on the front panel of your appliance.
NB: The on/off indicator light located on the front panel of your Flat Screen DLP^TM flashes orange whilst the lamp is warming up then changes to green when your Flat Screen DLP^TM is in use.
When you set up your Flat Screen DLP™ for the first time, you can take advantage of a rapid installation procedure after this warm-up phase (see next chapter). Connecting other audio/video or PC appliances is covered in chapter 7.1. Before looking at this, proceed to the rapid installation.
2.4. Switching off the Flat Screen DLP™
To switch off your Flat Screen DLP™, press the standby button on the front panel or the standby button on the remote control for at least 2 seconds.
During the standby phase, the light indicator on the front panel will flash orange. In order to prolong the lamp's working life, the actual standby phase only starts when the front panel indicator light is red. Wait 10s before switching back on.
During the standby procedure, your appliance will refuse to leave standby, if you request it to (see § 4.2).

WARNING
In order not to interrupt the standby procedure, NEVER switch off your appliance using the mains switch or disconnect the wall plug unless the front panel led is red.
3. First Rapid Installation
Your Flat Screen DLPTM is not preset to receive the wireless channels for your region. This rapid installation is automatically offered when you set up the appliance. It allows you to configure the basic elements of your product (menu languages, country, and channel reception).

Select the menu language using the and keys, validate using the OK key.
Select the country where you are or where you wish to receive channels, if you live by a frontier, using and keys and validate using OK button.
| Country | colour | system | stereo |
| France | SECAM | L | Nicam L |
| Germany | PAL | B,G | Two B/G carriers |
| Austria | PAL | B,G | Two B/G carriers |
| Italy | PAL | B,G | Two B/G carriers |
| Spain | PAL | B,G | Nicam B/G |
| Netherlands | PAL | B,G | Two B/G carriers |
| Denmark | PAL | B,G | Nicam B/G |
| Sweden | PAL | B,G | Nicam B/G |
| Norway | PAL | B,G | Nicam B/G |
| Finland | PAL | B,G | Nicam B/G |
| Belgium | PAL | B,H | Nicam B/G |
| Switzerland | PAL | B,G | Two B/G carriers |
| UK | PAL | I | Nicam I |
| Portugal | PAL | B,G |
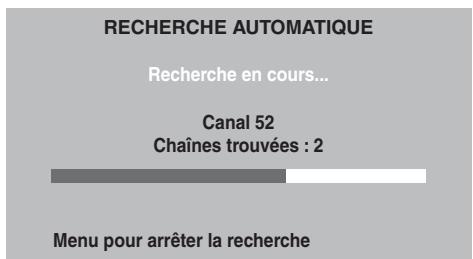
AUTO TUNING
SEARCHING
CHANNEL 52
CHANNELS FOUND : 2
MENUKEYTOSTOPSEARCHING
After validation using the OK button, the automatic search begins and the channels are identified and saved automatically.
You can interrupt the search at any time by pressing the MENU key. In this instance, the search result will not be saved.
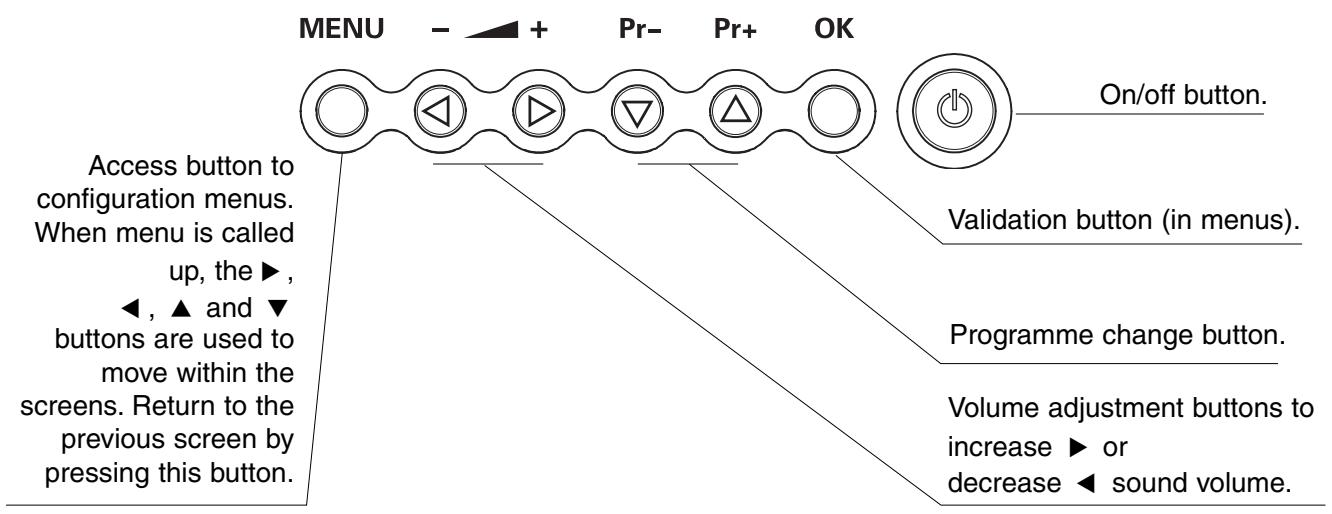
4. Front Panel Functions
4.1. Front panel controls
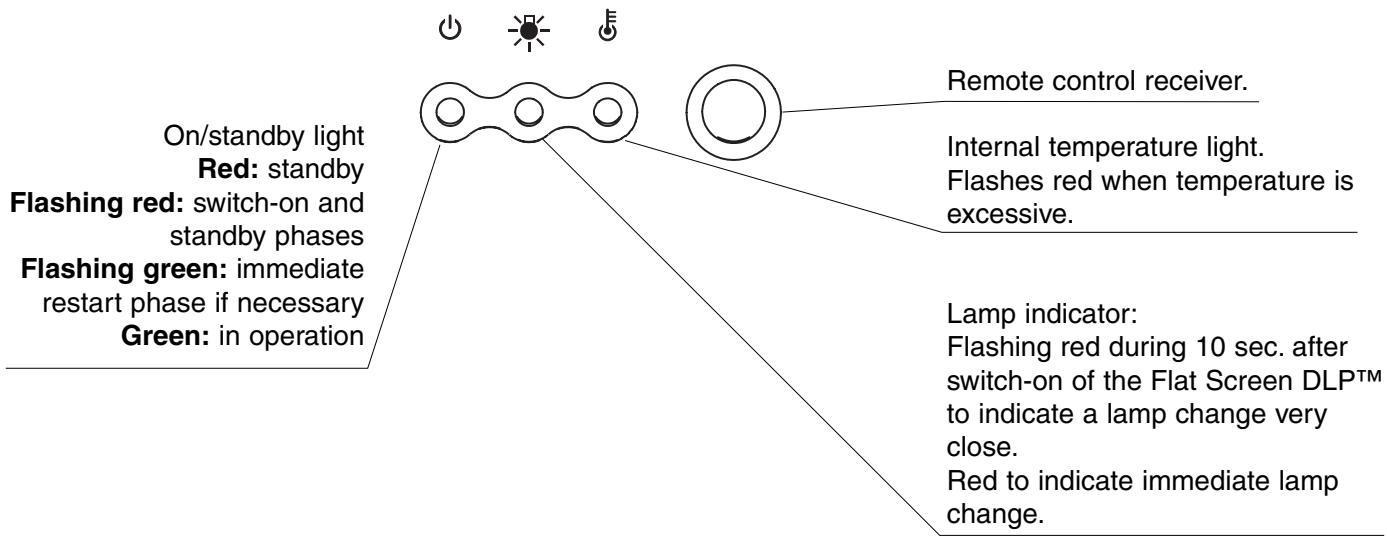
4.2. Front panel light indicators and remote control receiver
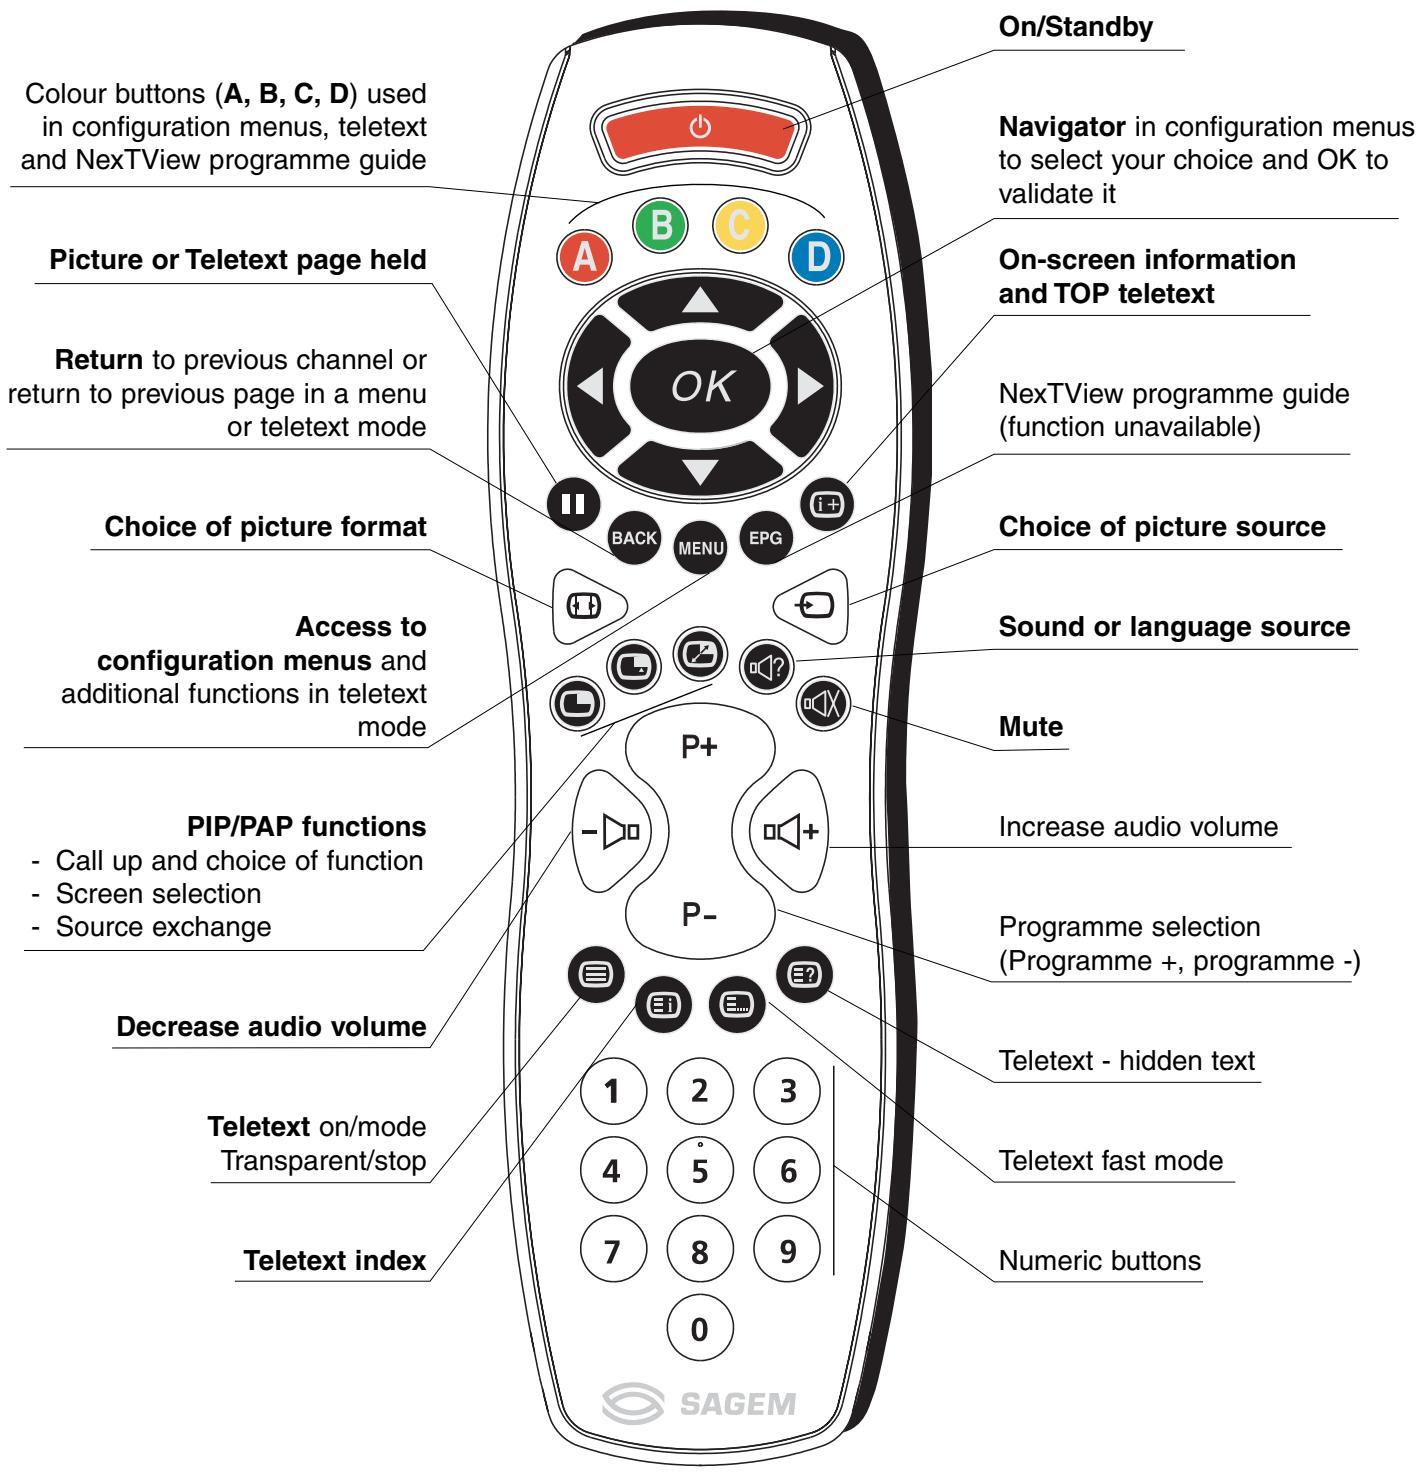
5. REMOTE CONTROL
6. Personalised settings
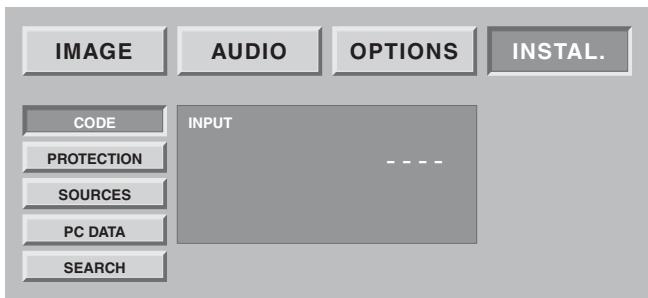
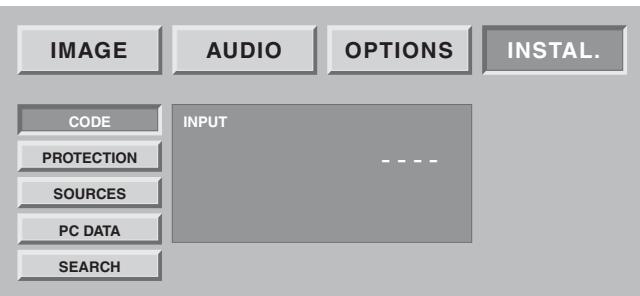
6.1. Changing the security code
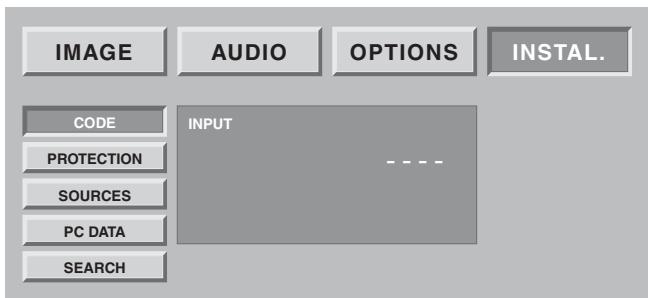
Press the MENU button, then choose INSTALL., using the button and validate with OK button.
All installation screens can be protected by a personal code.
The default code is 0000. This does not lock the installation screens.

Choose CHANGE CODE and validate using the OK button. Enter the new code then confirm the same code in the confirmation screen and validate by using OK button.
NB: To lock these screens, enter a different code than 0000. Always remember your new code.
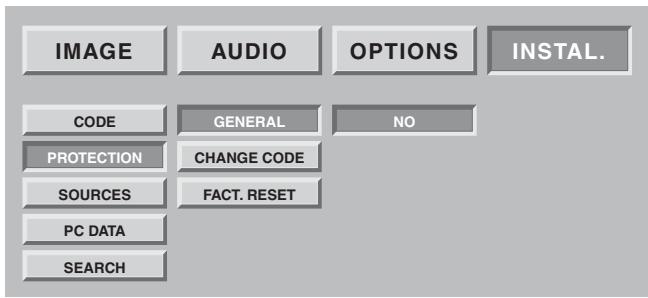
6.2. Return to initial configuration
Press the MENU button, then choose INSTALL., using the button and validate with OK button.
Enter your personal code then validate using the OK button (no code is requested for the initial 0000 code).
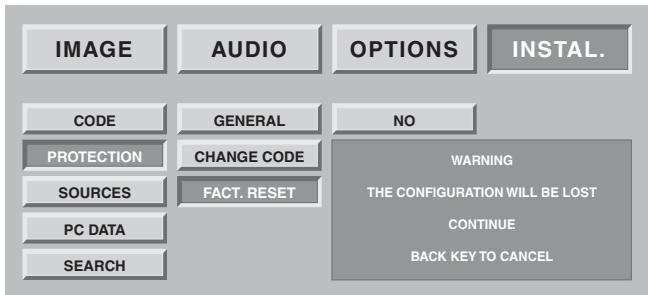
If necessary, you can automatically configure your Flat Screen DLP™ to the original settings. In this instance, all your personal settings will be lost (list of channels, country, languages...).
Choose FACT. RESET and validate using OK button. A confirmation screen invites you to continue by pressing the OK button and cancel by pressing the BACK button.
6.3. Searching TV programmes
The programmes are installed at the initial set-up. Nevertheless, the following functions are useful if you relocate to another region.
6.3.1. Selecting norm for your country

You must select the country that corresponds to the current broadcasting norm.
Press the MENU key.
Select the "INSTALL." chapter using OK button.
Select the "SEARCH" chapter using OK button.
Select the "COUNTRY" chapter using OK button.
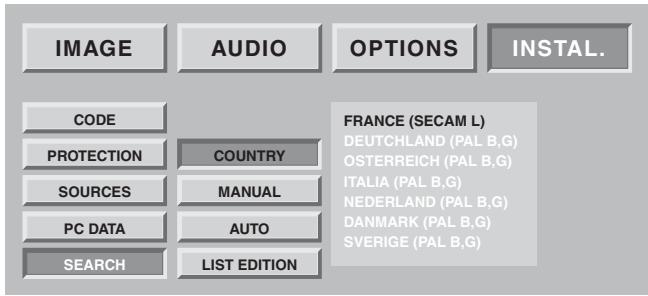
Select the chosen country using and buttons.
Your selection will be saved when you exit this menu using the BACK button.
6.3.2. Manual installation
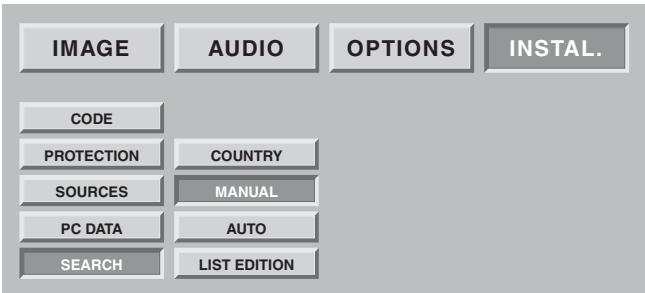
Select "MANUAL" then validate using OK button.
Only one search screen is then displayed which allows you to check the programme found.
Television programmes are searched and saved channel by channel.
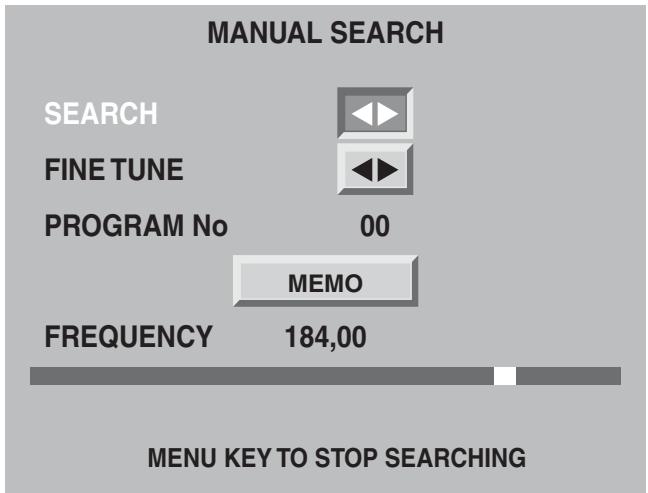
Select SEARCH and start the search using or .
When a picture is displayed on the screen,
- you can decide to save it:
Go to the PROGRAM No line and enter the position of the desired programme using 0 to 9 buttons.
Move the cursor to "MEMO" and validate using OK button. - You can obtain a better picture quality for the picture received:
Go to the FINE TUNE line and adjust the cursor using the and buttons.
Move the cursor to "MEMO" and validate using OK button. - You can decide not to save this picture:
In this instance, restart the search.
Restart this manual procedure for all the programmes you wish to memorise.
Press on the MENU button to exit.
6.3.3. Automatic installation

Select "AUTO" and validate using OK button.
Your previous search will be erased and replaced by the new one, confirm by pressing OK button.
All channels are searched and saved automatically.
If the broadcast signal is recognised by the transmission of a teletext page, programmes will be named and classified. You can decide to stop the search at any point in time, by using the MENU button.
Your search results will not then be saved.
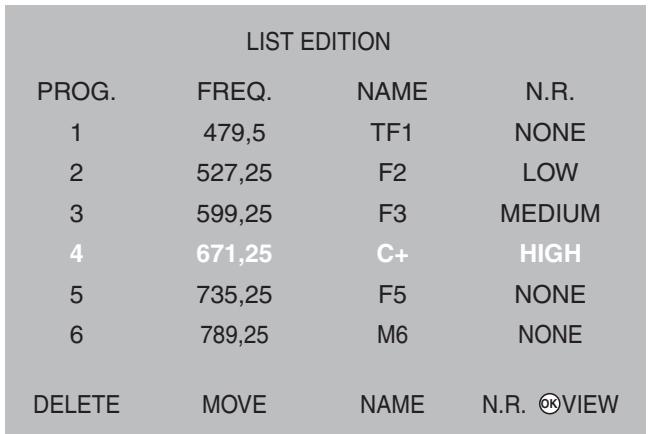
6.3.4. Modifying the programme list
You can modify the programme list that is a result of your search at any time.
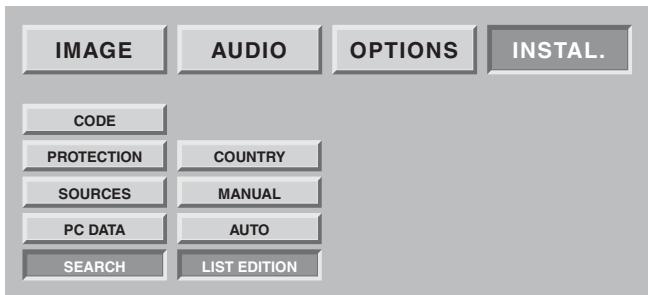
Press the MENU button.
Select the "INSTALL." chapter using the OK button.
Select the "LIST EDITION" chapter using the OK button.
From this screen, you can:
- Delete a programme
Go to the line of the programme to be deleted and press the red button to delete it. If you make a mistake, press the red button again and the deleted programme will be restored.
- Move a programme
Go to the line of the programme to be moved and press the green button to select it (a "D" will appear to the left to indicate the selection), move it using the or keys, then validate the location using the green button.
-
Change the programme name
-
Go to the line of the programme name to be modified and press the yellow button to select it.
- Enter the first characters. Move through the character using the and buttons.
Move forward one character using then enter the second etc. (Maximum 6 characters).
NB: You can display the selected screen at any time by pressing the OK button.
Press the MENU button to exit.
Validate using yellow button at end.
- Apply noise reduction filter to a programme
Go to the line of the programme name to be modified and press the blue button to change the filter.
Each press on the blue button applies the next filter. Apply a "weak", "medium" or "strong" filter according to your reception.
Choose "none" if no filter is necessary.
6.4. Choose the MENU language
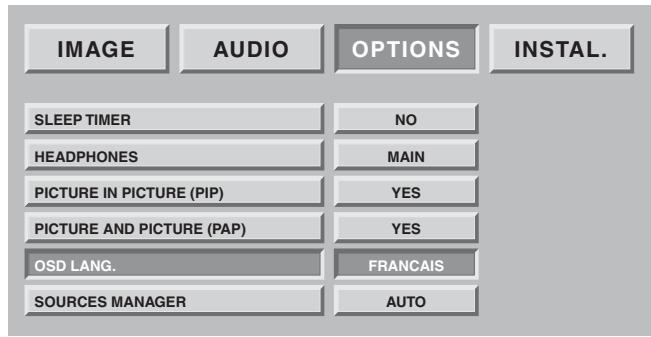
You can select the menu and information display language.
Press the MENU button.
Select the "OPTIONS" chapter using the OK button.
Select the "OSD LANG." chapter using the OK button.
Select the chosen language using the and buttons.
Press the MENU button or the BACK button to return to the previous screen.
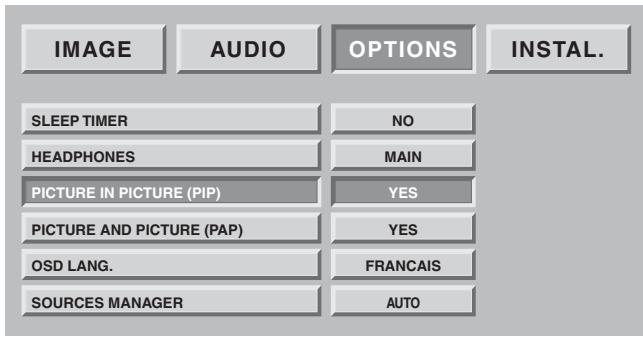
6.5. Double picture mode tuning
This tuning allows you to set your preferences in PIP ("picture in picture") and PAP ("picture and picture") mode. Refer to paragraph 8.9 for normal use.
The default setting of the direct access button will be determined by your PIP and PAP choice.
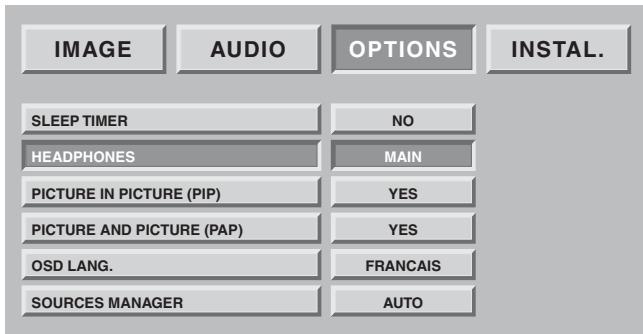
- Choice of audio source from headphones
"MAIN" will restore the sound of the full screen picture in PIP mode or the right-hand picture in PAP mode to the headphones.
"PIP/PAP" will restore the sound of the inset picture in PIP mode or the left-hand picture in PAP mode to the headphones.
- Choice of PIP and PAP preference
PIP yes and PAP yes
Pressing the l button more than once will take you to PIP, PAP and then the full screen in succession.
PIP yes and PAP no
Pressing the l button more than once will take you to PIP and then the full screen in succession.
PIP no and PAP yes
Pressing the button more than once will take you to PAP and then the full screen in succession.
PIP no and PAP no
Pressing the button more than once will have no effect. The permutation of source and selection of source will not work either).
6.6 Exit standby mode tuning
This preference allows you to choose alarm mode or to move to standby.
"Manual": exit from standby and move to standby by pressing standby button on the remote control or the front panel.
"Auto": exit from standby or move to automatic standby commanded by exit from standby or move to standby of the equipment connected to the "SCART" connectors at the rear.
7. Connecting equipment and configurations
7.1. Connection advice
Your Flat Screen DLP™ offers you a large selection of connectors to attach the equipment of your choice. You are advised to carry out the connections when the appliances are switched off.
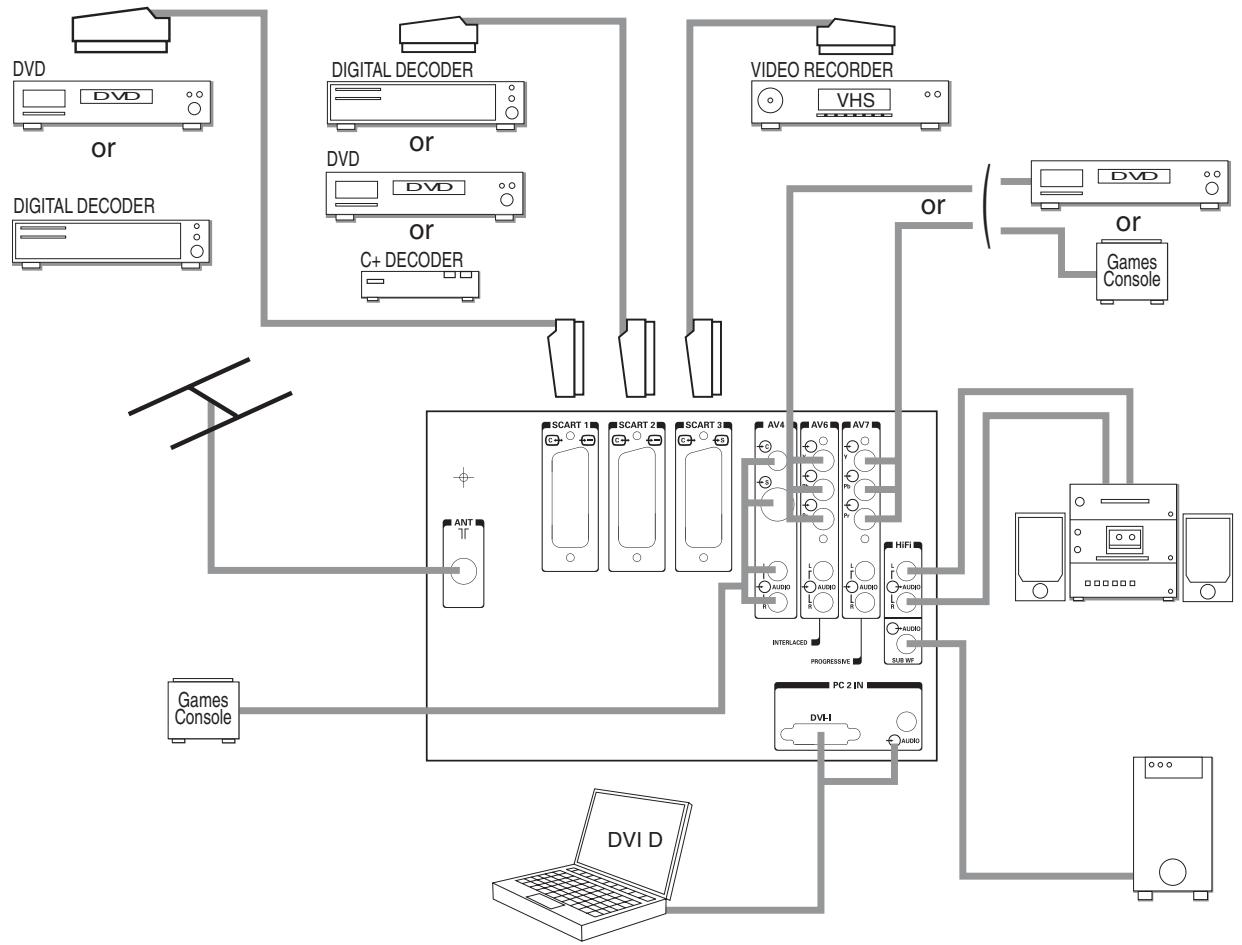
REAR PANEL
SCART 1 recommended for a DVD player, a DVDR player/ recorder, a digital decoder (cable, satellite or wireless).
SCART 2 recommended for a Canal+ analogue decoder, a digital decoder (cable, satellite or wireless).
SCART 3 recommended for a VHS or SVHS video player.
AV4 recommended for a games console.
AV 6 recommended for a DVD player with Y Pb Pr sockets in "progressive" mode. (This type of connection significantly improves picture quality).
HiFi allows a sound amplifier to be connected as well as its speakers.
Respect the colours for the left and right channels.
For ease of listening, mute the sound on your Flat Screen DLP™ (see chapter 8.2).
The audio volume will be regulated by your amplifier. The DLP™ technology causes a slight delay in picture processing, so connect your amplifier to these sockets and not to those of the source.
PC2 IN recommended for a PC equipped with "DVI D" socket. Only use a "DVI D" cable (graphics card).
Sub woofer allows a base woofer to be connected (option).
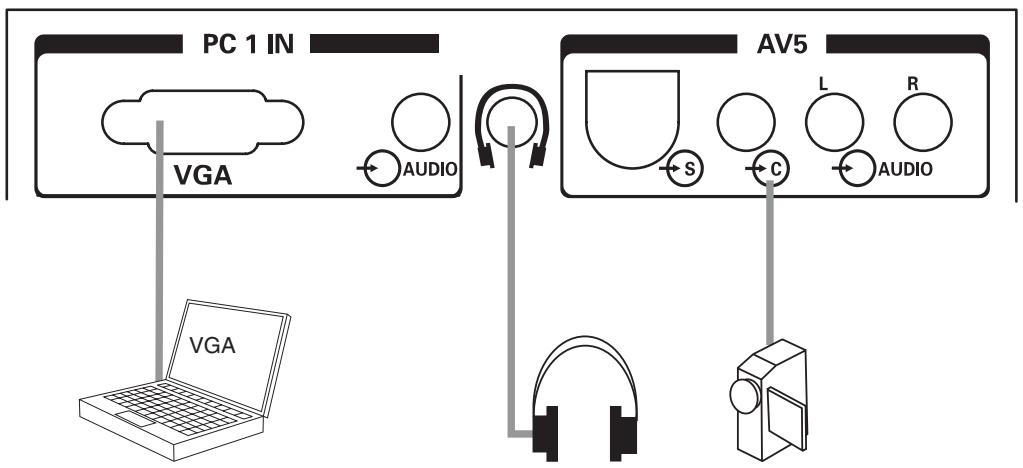
PC1 IN recommended for the connection of a PC fitted with a "VGA" socket.
A 3.5 mm audio jack socket allows you to connect sound.
HEADPHONES recommended for headphones.
Adjusting the headphones is covered in chapter 8.2.
AV 5 recommended when connecting a camcorder in VHS, S-VHS, 8 mm, Hi-8 or digital DVC format.
7.2. Source configuration

| INPUT | SOURCE | No | NAME | N.R. |
| SCART 1 | YES | DEC | NONE | |
| SCART 2 | C+ | :04 | C+ | NONE |
| SCART 3 | YES | MAG | MEDIUM | |
| AV4 | NO | JEUX | NONE | |
| AV5 | NO | -------- | NONE | |
| AV6 | NO | -------- | NONE | |
| AV7 | NO | -------- | NONE | |
| PC1 | NO | -------- | NONE | |
| PC2 | NO | -------- | NONE | |
| SOURCE | CHOOSE NAME | NAME | N.R. VIEW | |
NB: You can display the selected channel at any time by pressing the OK button.
Press the MENU button to exit.
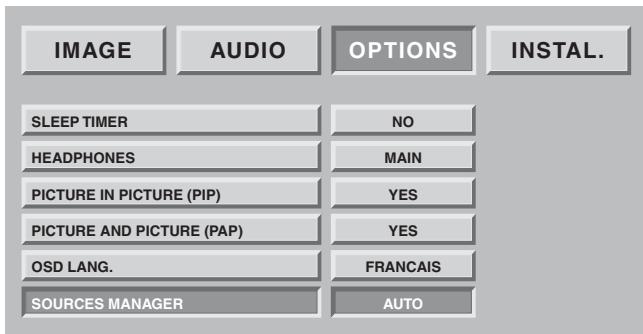
Press the MENU key then select "OPTIONS" using the button and validate using OK.
If your code is not 0000, this screen is protected and you must enter your code.
Choose "SOURCES" then validate using OK.
This option allows you to select the sources used but only displays them when you select sources in daily use.
Choose the connector to be configured ( /)
For each connector, you can:
-
Validate connected equipment by pressing the red key several times until "YES" (or "NO" for an unused connector) is displayed. Select "C+" if you have connected your C+ decoder to SCART 2. In this instance, enter the C+ programme number at once.
-
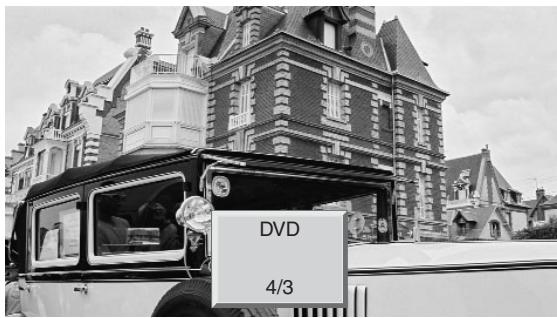
Choose a pre-programmed name by pressing the green button several times (DVD, DVDR, C+, DEC, MAG, GAMES).
- Choose a personalised name by pressing yellow button to move to edit mode. Scroll the characters using or . Next character using .
Press yellow button to validate.
- Choose noise reducer. You can apply a noise reducer to some sources such as a video player by scrolling through them by pressing the blue button more than once (none, weak, medium, strong).
7.3. Configuration of computer sources

Press the MENU button, then choose "INSTAL" using the button and validate with OK. Choose "PC DATA" then validate with OK.
This option allows you to adjust the source coming from your PC in VGA mode. (Entries in DVI D mode do not need this adjustment).
Horizontal position: press to move the picture to the left and to move it to the right.
Vertical position: Press or to move the picture to the top or bottom.
Frequency: modifies the data display frequency so that it corresponds to the frequency of your computer's graphics card. When a flashing vertical bar appears, use this function to adjust the frequency.
Phase: this enables finer synchronisation with your computer's graphics card. When an unstable or flashing page occurs, use this tuning.
Automatic mode: yes/no carries out automatic tuning.
Resolutions accepted (DVI-D and VGA entries)
To ensure that the projection display is operating correctly with your computer make sure that you configure the display mode of your graphics card to a resolution lower than 1024 x 768.
| Horizontal | Vertical | Hz | |
| 640 | x | 480 | 60 |
| 640 | x | 480 | 66 |
| 640 | x | 480 | 72 |
| 640 | x | 480 | 75 |
| 640 | x | 480 | 85 |
| 800 | x | 600 | 60 |
| 800 | x | 600 | 72 |
| 800 | x | 600 | 75 |
| 800 | x | 600 | 85 |
| 1024 | x | 768 | 60 |
| 1024 | x | 768 | 70 |
| 1024 | x | 768 | 75 |
| 1152 | x | 864 | 60 |
| 1152 | x | 864 | 70 |
| 1280 | x | 720 | 60 |
| 1280 | x | 1024 | 60 |
NB: Optimum stability is achieved with a frequency of 60 Hz (consult the documentation for your PC to configure it).
8. Day-to-day use
8.1. Picture adjustment
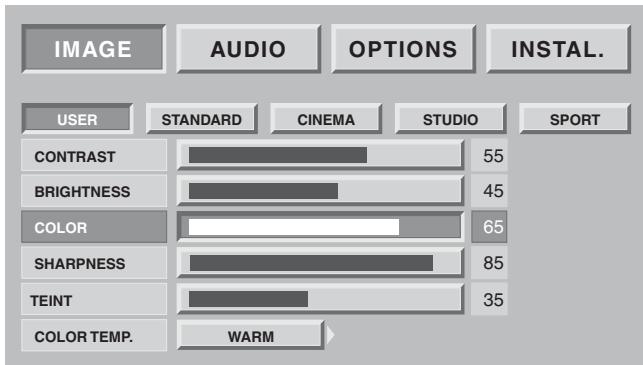
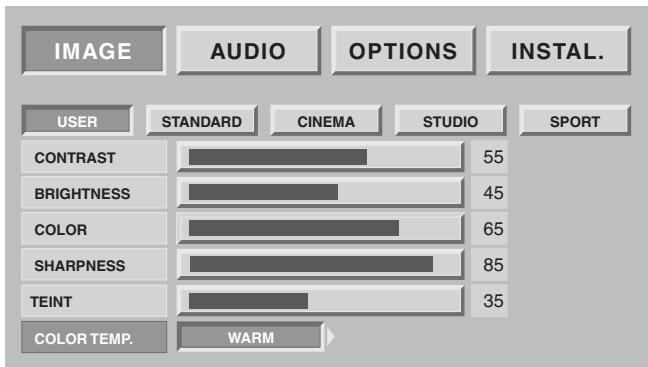
PERSONAL PICTURE TUNING
You can set and save your own parameters using the "USER" mode.
CONTRAST, BRIGHTNESS, COLOUR, SHARPNESS, TINT can be adjusted according to your preferences using the and buttons.
The tone adjustment only applies to an NTSC video source.
The colour balance adjustment allows you to set the main picture colour.
Adjust using or .
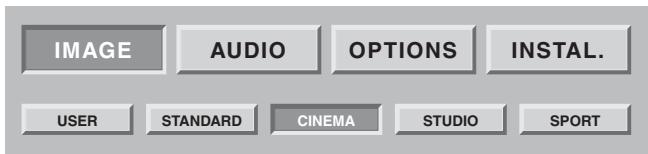
PRESET PICTURE SETTINGS
You can choose your picture preference from the settings offered using the and buttons STANDARD CINEMA STUDIO SPORT
Select the most suitable one for the programme you are viewing and validate using the OK button.
Press the MENU button to exit and the BACK button to return to the previous screen.
8.2. Sound adjustment
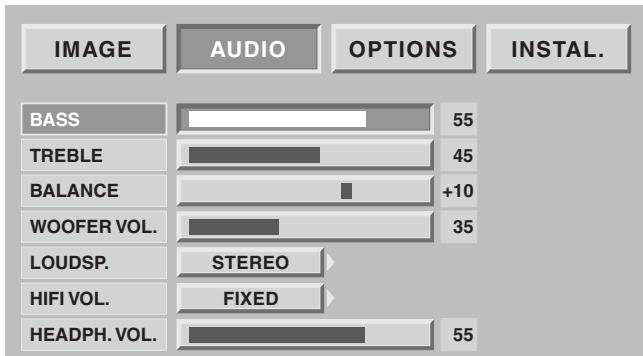
You can adjust and save your own parameters using:
BASS, TREBLE, BALANCE
Bass allows you to accentuate the lowest frequencies.
Treble allows you to accentuate the highest frequencies.
BALANCE
Adjusting the balance affects the levels of sound between the right and left speakers. This allows you to obtain a sound level that is suited to your listening position.
WOOFER VOLUME
This affects the sound volume in your woofer to allow you to balance the right and left channels.
HIFI OUTPUT VOLUME
This allows you to set an output level (fixed or adjustable by your flat screen DLP^TM remote control.)
LOUD SP.Mode
(internal speakers): the choice depends on the programme you are watching (stereo, mono). You can mute the speakers (stop) if you only wish to listen through the headphones.
The headphones volume can be adjusted independently of the speaker volume. When you have made your adjustments, press the MENU button to exit and the BACK button to return to the previous screen.
8.3. Sleep timer
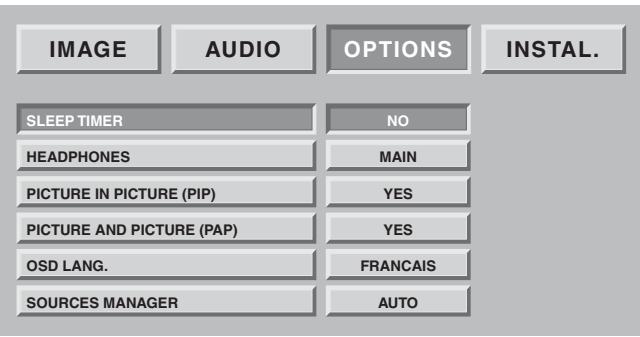
Press the MENU button then choose "OPTIONS" using the button and validate using OK.
Choose "SLEEP TIMER" then validate using OK.
This option allows you to programme a period of time, after which the television set will go to standby automatically.
You can set the sleep time at 15 mn intervals up to a maximum of 180 mn.
One minute before entering standby mode, the last minute counter will appear on the screen. This screen allows you to cancel the sleep timer, if you want to.
You can always stop the Flat Screen DLP™ before the programmed stop time or reprogram the stop time.
8.4. Locking the television set
Press the MENU button then choose "INSTALL." using the button and validate using OK.
Enter your personal code, then validate using OK button (no code is requested for default code 0000).
Choose YES or NO
If your Flat Screen DLP™ is locked, it can only be switched on when your code has been entered at the invitation screen.
8.5. Choice of sources
You can select sources in two different ways:
- By using the P + / P - buttons on the front panel only. Navigate through the valid wireless channels then the external sources (SCART 1, SCART 2, SCART 3, AV4, AV5, AV6, A7 etc...).
NB: A channel is valid if it has been found during an automatic search or if it has been saved during a manual search.
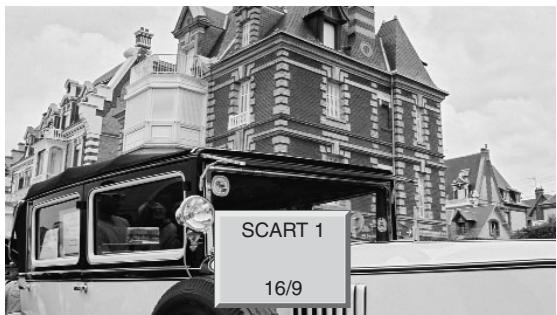
The zapping banner is displayed each time the channel is changed and the info banner when the source is changed.
- By using the direct access button on the remote control. Select the chosen source by pressing again until the correct source is obtained.
Nb: If you have previously configured and named your equipment entry in chapter 7.2, only the sources connected and configured at video standard level will be offered.
8.6. Choice of format

A simple access to this choice is by using the direct access button This function allows you to display the picture at the maximum size, including wide screen pictures.
Press the button of remote control.
Nb: At first press, the info banner displays the current status without any change of format.
4:3 FORMAT
Displays a 4:3 picture in its original format.
ENLARGED FORMAT
This format allows you to watch 4:3 pictures at the maximum size by applying a correction to the centre of the screen so that any distortion is only seen at the right and left edges. The size of the picture will depend on the original signal.
14:9 FORMAT
This format allows you to watch automatic programmes formatted in 14:9 format thanks to WSS signals.
FORMAT 16:9
This format allows you to watch automatic programmes formatted in 16:9 format thanks to 19/9 signal arriving at the SCART or to WSS signals.
CINEMA FORMAT
This format allows you to watch films in 1.85 (ACADEMY FLAT) format, broadcast in 4:3 in maximum screen format without distortion with black bands at the top and bottom.
It allows you to watch films in 2.0, 2.20, and 2.35 format.
SUBTITLE FORMAT
This format allows you to watch films in 1:85 (ACADEMY FLAT) format broadcast in 4:3 at maximum screen format without picture loss and without distortion by moving the picture to the top to enable any subtitles to be read.
SCOPE FORMAT
This format allows you to watch films in 2.35 (PANAVISION) format, broadcast in 4.3 in maximum screen format without distortion, at maximum height but with picture loss at the right and left edges.
8.7. Programme information
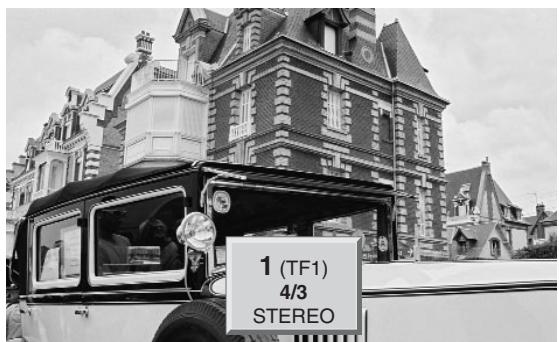
Press the i+ button at any time to obtain information on the TV channel.
When you are watching an external video source, the name of the source will be displayed.
8.8. Double picture mode selection
Switching on double picture mode
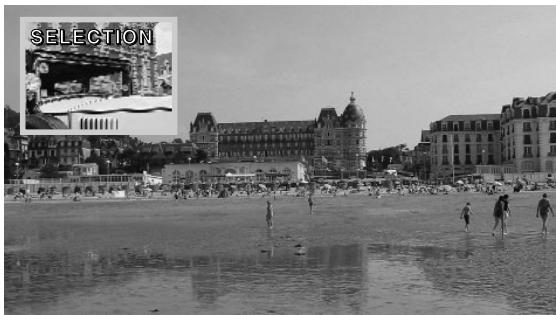
Choose the video insert mode (PIP) or two videos side-by-side (PAP) by pressing the button more than once.
When one of the two Modes - (PIP or PAP) is in use, you can:
Invert the sources by pressing the button.
Change the sources on the screen by pressing the button, then:
- Pr_+ ou Pr- to change the wireless channel,
- to change source then by selecting the relevant source from the screen displayed.
Change formats on the screen by pressing the button, then:
- to change source then by selecting the relevant source from the screen displayed.
NB:
The PIP mode video inset is only in 16/9 format.
The buttons change the position of the pip window if the pip mode is activated. You can navigate through 4 possible positions in the order top-left, top-right, bottom-left, bottom-right.
8.9. Choice of sound adjustment
Volume: On press + or - to adjust the volume.
Mute: Press to mute or to switch on the sound.
Bilingual broadcast or sound selection: Press ? to choose between MONO or STEREO sound if the channel transmits sound in NICAM stereo mode. Choose between DUAL A and DUAL B if there is a bilingual broadcast.
This adjustment is saved per channel.
8.10. Choosing a TV programme
Use the 0/9 buttons to choose your channel. For a two-digit number, enter the second within 2 seconds.
To watch a one-digit channel directly, press the number button for longer.
Use the BACK button to return to a previously viewed channel.
8.11. Picture hold
Use the button (pause) to freeze the picture or to activate it.
9. Teletext
Teletext functions vary according to television companies and are only available if the selected channel transmits teletext.

- Switching on teletext
Press the 三 button to switch on teletext without video.
Pressing the button again allows you to view teletext imposed on the current video.
Pressing it once more switches teletext off.
If there is no teletext on the channel you are watching, a message will inform you of this.
- Selecting the index page
Teletext pages include an introduction page (usually page 100) telling you how to use the service.
The 三 button allows you to select this introduction page directly.
LIST or FASTEXT mode
There are two teletext modes:
- LIST mode: in this mode, four pages numbers appear at the bottom of the screen, each in a different colour. Each of these numbers can be changed and saved in the memory.
- FASTEXT mode: in this mode, four subjects appear at the bottom of the screen, each in a different colour. To obtain more information on one of these subjects press the corresponding coloured button.
This function allows you to obtain information on the displayed subjects quickly.
The required mode is selected by pressing the _ button.
- Selecting a page
Enter the number of the required page using the 0-9 buttons (There are no pages starting with a 0 or 9.).
The page counter at the top of the screen searches for the page or the page appears immediately, if the page number has already been saved.
If the page does not exist, a message appears to tell you that you have entered a non-existent number.
You can quickly scroll through teletext pages by using the P+ P- or
buttons (by skipping non-existent pages).
To save another page in this mode, press the relevant coloured button and enter the page number.
When in FASTEXT mode, you can select a chosen subject using the colour buttons corresponding to the options at the bottom of the screen.
- Displaying hidden information
Press the 三? button to call up and delete hidden information, such as puzzle solutions and replies to questions.
- Holding a page
Press the button to hold a text page, whilst looking at information that is on several pages. Press again to return to automatic update.
- Expand
Press the MENU button then the green button. Pressing it more than once allows you to display the top half, the bottom half and then return to normal format.
- Navigation within sub-pages
When the selected pages contain one or more sub-pages, a help line listing the sub-pages appears at the bottom of the screen. Use the buttons to choose the next or the previous sub-page.
- Subtitles
TV channels with teletext often transmit certain programmes with subtitles.
Press the button and select the relevant subtitle page.
The subtitle page continuously appears on the screen if the current programme is transmitted with subtitles.
10. Diagnostic and faults
| Symptoms: | Recommended checks: |
| After initial set-up and after connecting your Flat Screen DLPTM, the on/off indicator light does not light up. | Check that the mains cable to Flat Screen DLPTM is connected to the appliance and the wall socket. Also check that the switch on the left of the appliance is pressed to position I. |
| The appliance does not switch on when the on/standby button on the front panel or the on/standby button on the remote control is pressed. | Check that the mains cable to Flat Screen DLPTM is connected to the apparatus and the mains socket. Also check that the switch on the left of the appliance is pressed to position I. |
| There is no picture. | The on/off switch is green and the Flat Screen DLPTM menus are available: Check that your video appliances are connected correctly and that you have selected the correct source for your Flat Screen DLPTM (Chapter 8.5: Choice of sources). Check that the aerial lead is correctly connected to the wall socket of your Flat Screen DLPTM. Also check that you have the channels saved by your Flat Screen DLPTM in the Options /search/edit list menu. If this is not the case, perform a manual or automatic search. Also check that the switch on the left side of the apparatus is pressed to position I. The internal temperature indicator light is flashing red: respect the user precautions to avoid an excessive increase of the internal temperature (chapter 1: precautions). The lamp condition indicator light is red: the lamp has gone past its standard working life and may no longer be functioning. It must be changed. |
| Black and white picture or picture interference. | Check that you have selected the correct video format: e.g. RGB video source from a DVD player displayed in S-video on your Flat Screen DLPTM: check by pressing the picture source selection button if the type of source selected is compatible with the source emitted. Check that the colour adjustment is not at minimum. |
| No sound. | Check that the volume is not set at minimum and that mute has not been activated. Check that your appliances are correctly connected to your Flat Screen DLPTM. |
| Sound weak or discordant during terrestrial reception. | Set sound to Mono. |
| Frozen picture. | Check that you have not held the picture: press the “PICTURE of TELETEXT PAGE HELD” button. |
| Your appliance does not start up when you exit standby by pressing the front panel button and the standby button on your remote control. | The ON/STANDBY indicator light flashes orange for 20s then turns to red or still flashes orange, switch off the appliance using the switch to the left of your Flat Screen DLPTM. Wait 30s and restart is using the normal procedure. |
| No picture on PIP mode. | Check that you have selected sources that is active in PIP mode (Chapter 8.8 Double picture mode selection). |
| The remote control is not working normally. | Change the batteries. |
11. CHANGING THE LAMP UNIT
Only replace the old lamp unit with authorised model RL 1080A, reference number Sagem 251282989. The old lamp unit must be recycled (contact your recycling agency to obtain the address of the nearest depot).

WARNING
- You must only change the lamp unit, when the appliance is switched off and mains cable disconnected from the wall socket.
- Never try to replace the lamp unit immediately after the Flat Screen DLP™ has been switched off. So that the lamp is completely cooled down, wait at least 1 hour before changing the lamp unit.
- Only use the tool provider to change the lamp unit. Never touch any wires or the bulb itself.
- Make sure that you tighten all the screws and do not leave any foreign bodies inside the appliance.
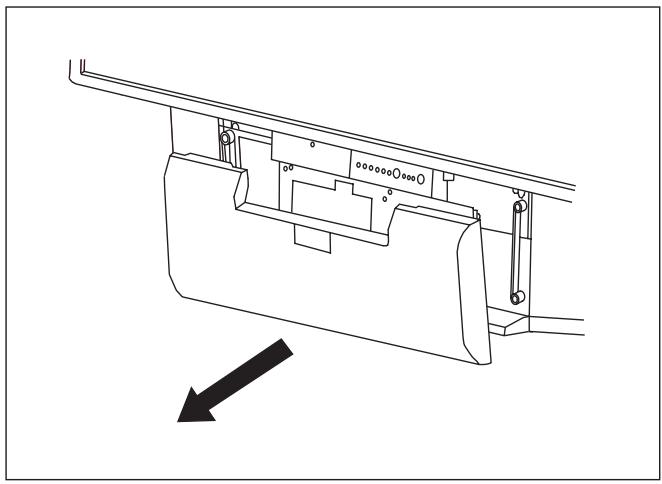

Remove the front panel by gripping it on each side and pull it towards you.
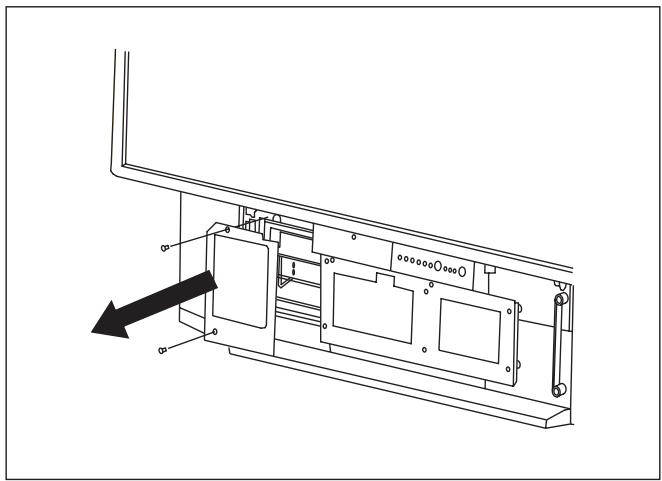

Unscrew the protection panel (use a Phillips screwdriver) and remove the panel, taking care to retain the screws.
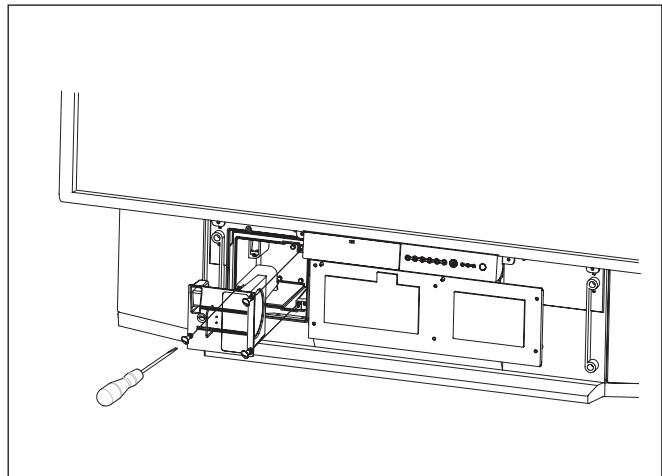
3 Unscrew the 3 fixing screws for the lamp unit and pull out the old lamp unit by its handle. (These 3 screws are called "unloseable" - i.e. once they are unscrewed they remain in the lamp unit.
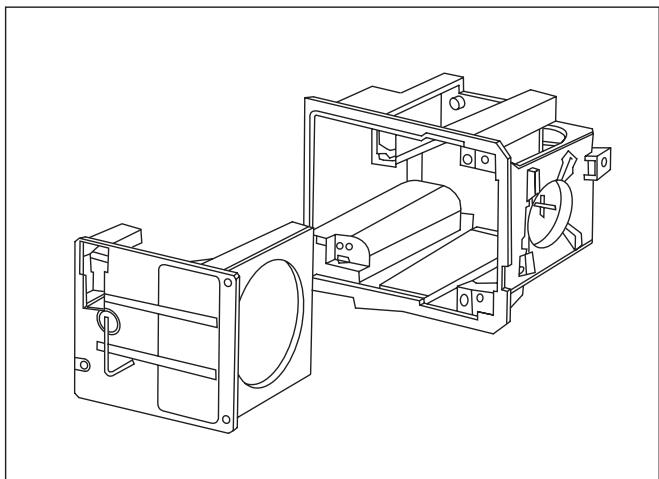
Take the new lamp unit by its handle and insert it in place of the previous lamp unit.
Rescrew the 3 fixing screws.
Do not forget to remove the handle) taking care not to touch the bulb).
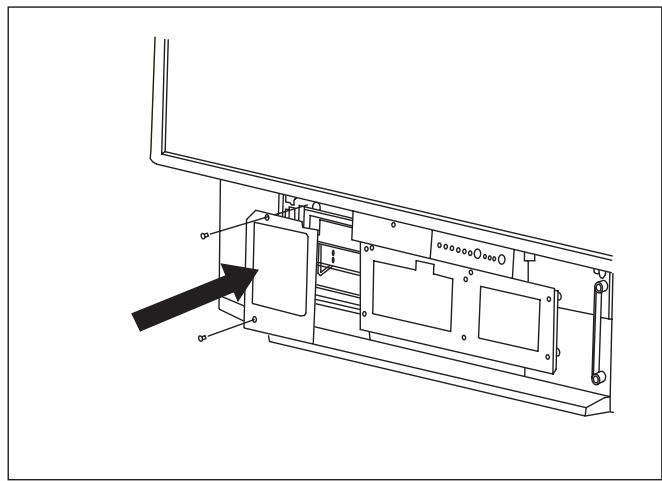
5 Reattach the protection panel using the 2 screws.
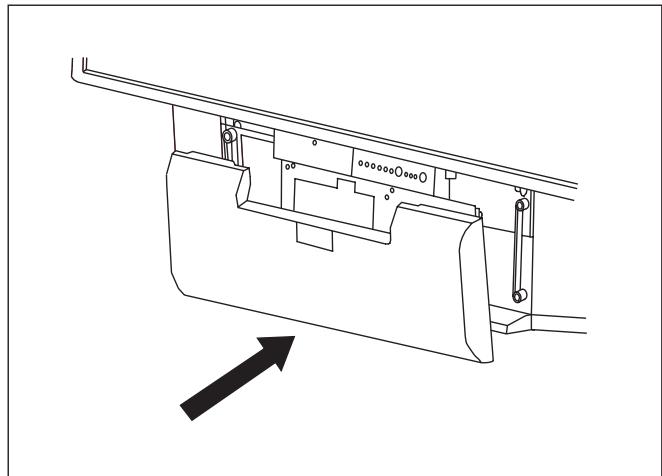
Replace the front panel by pressing it slightly until it goes back into place.
12. Index
A
Automatic installation, 10
B
Bass, 15
Bilingualprogrammes,19
C
Camcorder, 13
Country, 9
D
Data sources, 14
Decoder, 12, 13
Diagnostics and faults, 22
DVD, 12
E
External sources, 13
F
Factorypresets,8
First rapid installation, 5
Frequency, 9
Front panel, 6
G
Games console, 12
H
Headphones, 13, 16
1
Information on screen, 1
L
Lamp, 23
Language, 19
List of wireless programmes, 10
Locking, 16
M
Maintenance, 3
Manual installation, 9
Modify the programme number, 10
Mute, 19
N
NICAM,26
0
OSD language menu, 11
P
Picture adjustment, 15
Picture format, 17
Picture movement, 11
Precautions, 2
Programmed stop 16
Programme selection, 19
Protection code, 8
R
Remote control 7
S
Satellite receiver, 12
SCART cable, 12
Saving television channels, 8
Search wireless channels, 8
Setting up the Flat Screen
Sleep timer, 16
Sound adjustment, 15
Stereo, 18
Stop on picture, 19
Subtitles, 20
S-VHS, 13
T
Teletext, 20
Teletext sub-pages, 20
Treble, 15
Two screens, 11, 18
V
Video recorder/player, 12
Volume, 18
13. Technical characteristics
Video
Screen size: 50 inches
Aspect ratio: 16/9
Resolution: 1280 × 720
Contrast ratio: 2000: 1
Brightness: 500 cd/m2
Viewing angle: 60/20
Reception Tuner
Input frequencies: 45.5 - 862.25 MHz
Input sensitivity: 20 - 100 dB V
Number of programmes: 100
PAL, B, G, H, I, SECAM B, G, SECAM L/L'
VHF E2-E12
VHF A - H (Italy)
VHF H1 - H2 (Italy)
UHF e21 - e69
CATV (S01 - S02)
CATV S11 - S20 (U1 - U10)
CATV S1 - S10 (M1 - M10)
CATV S21 -S41 (hyperband)
PAL D, K, SECAM D, K
VHF R1 - R2
VHF R6 - R12
VHF R3 - R5
UHF E21 - E69
Audio demodulation
AM 6.5 MHz/NICAM 5.85 (L, L')
FM 5.5 MHz 5.74 MHz (BG)
FM 5.5 MHz/NICAM 5.85 MHz (B G)
FM 6.0 MHz/ NICAM 6.55 MHz (I)
FM 6.5 MHz 6.2578 MHz/ NICAM 5.85 MHz (DKK')
Audio outputs
Maximum power: 2 x 15 W RMS
Number of speakers: 2 × 2 channels
Front panel terminals
AV5
S-Video input (Mini Din 4-pin)
Composite video input (1 x RCA)
Audio input (2 x RCA)
PC1
VGA Computer input (SubD 15-pin)
Audio input (jack 3.5)
Headphones
Output (jack 3.5)
7 buttons (on/off, P+, P-, V+, V-, Menu, OK)
3 light indicators (on/off, lamp, temperature)
Rear panel terminals
SCART 1 (RGB/Comp/S-video, audio)
SCART 2 (RGB/Comp/S-video, audio)
SCART 3 (S-video, Comp, audio)
AV4
S-video input (Mini-Din 4-pin)
Composite video input (1 x RCA)
Audio-in input (2 x RCA)
AV6 (intertwined)
Y, Cb, Cr in input (3 x RCA)
Audio input (2 x RCA)
AV7 (progressive)
Y, Pb, Pr in input (3 x RCA)
Audio input (2 x RCA)
Hi-fi
Audio output (2 x RCA)
Base woofer
Audio output (1 x RCA)
PC2
DVI D Computer input
Audio input (1 x jack 3.5)
Input signals
Video signal:
Native/Upscale: SDTV/EDTV (480i/480P) (576i/576P)
HDTV (1080i/720P)
PC signal:
Native/Upscale: VA 640 x 480, SVGA 800 x 600,
XGA 1024 x 768, SXGA 1280 x 1024
Power supply
AC 220-240 V ~ 50Hz
Power consumption: 250W max
(Standby 5W)
Dimensions and weight
Dimensions (w x h x d): 1166 x 904 x 375 mm
Weight: 42 kg
Dimensions and weight (packaged)
Dimensions (w x h x d): 1312 x 1070 x 560 mm
Weight: 56 kg
Accessories
Remote control TL-50
Batteries: 2 × 1.5V (AA Type)
Power cord
User manual
RF cable
CE European norms
EMC (Electromagnetic Compatibility)
EN55013: 10.2001
EN55020: 2002
EN55022:1998+A1:2000
EN55024: 09.1998+A1: 10.2001
EB61000-3-2: 12.2000
EN61000-3-2: 01.95+A1: 06.2001
Electrical safety
EN60065.1998
NOTES
INHALTSVERZEICHNIS
FM 5.5 MHz 5.74 MHz (BG)
FM 5.5 MHz / NICAM 5.85 MHz (B G)
FM 6.0 MHz / NICAM 6.55 MHz (I)
FM 6.5 MHz 6.258 MHz / NICAM 5.85 MHz (DKK')
Audio Ausgabe
7 Tasten (on/off, P+, P-, V+, V-, Menu, OK)
3 Leuchtanzeigen (on/off, lampe, temperatur)
(480i/480P)(576i/576P)HDTV (1080i/720P)
Computersignal:
Dartsellungsformate: VGA 640 x 480, SVGA 800 x
600,XGA1024x768, SXGA 1280x1024
Stromversorgung
Ws 220-240 V ~50 Hz

- Audio
- AV6 (entrelace)
- AV7 (progressive)
- Hi-fi
- Caisson de basse
- PC2
- Alimentation
- Precautions
- Safety
- Maintenance
- SET UP
- Aerial connection
- Mains connection
- Switch on
- Setting up your remote control:
- Setting up the Flat Screen DLPTM:
- Switching off the Flat Screen DLP™
- WARNING
- First Rapid Installation
- Front Panel Functions
- Front panel controls
- Front panel light indicators and remote control receiver
- REMOTE CONTROL
- Personalised settings
- Changing the security code
- Return to initial configuration
- Searching TV programmes
- Selecting norm for your country
- Manual installation
- Automatic installation
- Modifying the programme list
- Choose the MENU language
- Double picture mode tuning
- Exit standby mode tuning
- Connecting equipment and configurations
- Connection advice
- Source configuration
- Configuration of computer sources
- Resolutions accepted (DVI-D and VGA entries)
- Day-to-day use
- Picture adjustment
- PERSONAL PICTURE TUNING
- PRESET PICTURE SETTINGS
- Sound adjustment
- BASS, TREBLE, BALANCE
- BALANCE
- WOOFER VOLUME
- HIFI OUTPUT VOLUME
- LOUD SP.Mode
- Sleep timer
- Locking the television set
- Choose YES or NO
- Choice of sources
- Choice of format
- 4:3 FORMAT
- ENLARGED FORMAT
- 14:9 FORMAT
- FORMAT 16:9
- CINEMA FORMAT
- SUBTITLE FORMAT
- SCOPE FORMAT
- Programme information
- Double picture mode selection
- Switching on double picture mode
- NB:
- Choice of sound adjustment
- Choosing a TV programme
- Picture hold
- Teletext
- - Switching on teletext
- - Selecting the index page
- LIST or FASTEXT mode
- - Selecting a page
- - Displaying hidden information
- - Holding a page
- - Expand
- - Navigation within sub-pages
- - Subtitles
- Diagnostic and faults
- CHANGING THE LAMP UNIT
- Index
- Technical characteristics
- Video
- Reception Tuner
- Audio demodulation
- Audio outputs
- Front panel terminals
- AV5
- PC1
- Headphones
- Rear panel terminals
- AV4
- AV6 (intertwined)
- Base woofer
- Input signals
- Power supply
- Dimensions and weight
- Dimensions and weight (packaged)
- Accessories
- CE European norms
- EMC (Electromagnetic Compatibility)
- Electrical safety
- NOTES
- INHALTSVERZEICHNIS
- Audio Ausgabe
- Stromversorgung
Brand : SAGEM
Model : HTD 501
Category : TV