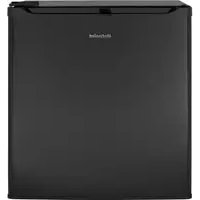
HME02GGMBB - Fridge GE - Free user manual and instructions
Find the device manual for free HME02GGMBB GE in PDF.


User questions about HME02GGMBB GE
0 question about this device. Answer the ones you know or ask your own.
Ask a new question about this device
Download the instructions for your Fridge in PDF format for free! Find your manual HME02GGMBB - GE and take your electronic device back in hand. On this page are published all the documents necessary for the use of your device. HME02GGMBB by GE.
USER MANUAL HME02GGMBB GE
SAFETY INFORMATION .... 3
USING THE REFRIGERATOR
Features 5
Operation 6
CARE AND CLEANING....7
INSTALLATION 8
TROUBLESHOOTING TIPS ..... 11
Normal Operating Characteristics ..... 11
WARRANTY....13
CONSUMER SUPPORT ....14
OWNER'S MANUAL AND INSTALLATION INSTRUCTIONS
Compact Refrigerator HME02GGM, HME03GGM
ENGLISH/FRANÇAIS/ ESPAÑOL
Write the model and serial numbers here:
Model # ____
Serial # ____
Find these numbers on a label inside the refrigerator on the side wall.
IMPORTANT SAFETY INFORMATION READ ALL INSTRUCTIONS BEFORE USING THE APPLIANCE
WARNING
To reduce the risk of fire, explosion, electric shock, or injury when using your appliance, follow these basic safety precautions:
■ Use this appliance only for its intended purpose as described in this user manual.
■ This appliance must be properly installed in accordance with the installation instructions before it is used. See grounding instructions in the installation section.
■ Plug into a grounded 3 prong outlet.
■ Do not remove ground prong.
■ Do not use an adapter or extension cord.
■ Do not repair or replace any part of the appliance unless specifically recommended in the manual. All other servicing should be referred to a qualified technician.
■ Disconnect power before servicing.
■ Replace all parts and panels before operating.
■ Use nonflammable cleaner.
■ Do not store or use gasoline or other flammable vapors and liquids in the vicinity of this or any other appliance.
■ Do not store explosive substances such as aerosol cans with a flammable propellant in this appliance.
■ Before discarding or removing from service, remove the door. This will reduce the possibility of danger to children.
■ To avoid serious injury or death, children should not stand on, or play in or with the appliance.
■ Children and persons with reduced physical, sensory or mental capabilities or lack of experience and knowledge can use this appliance only if they are supervised or have been given instructions on safe use and understand the hazards involved.
■ This appliance is intended to be used in household and similar applications such as: staff kitchen areas in shops, offices and other working environments; farm houses; by clients in hotels, motels, bed & breakfast and other residential environments; catering and similar non-retail applications.
CAUTION
To reduce the risk of injury when using your appliance, follow these basic safety precautions.
- Do not clean glass shelves or covers with warm water when they are cold. Glass shelves and covers may break if exposed to sudden temperature changes or impact, such as bumping or dropping. Tempered glass is designed to shatter into many small pieces if it breaks.
- Keep fingers out of the “pinch point” areas; clearances between the door and cabinet are necessarily small. Be careful closing door when children are in the area.
■ Do not refreeze frozen foods which have thawed completely.
■ Do not touch the cold surfaces in the freezer compartment when hands are damp or wet, skin may stick to these extremely cold surfaces.
STATE OF CALIFORNIA PROPOSITION 65 WARNINGS:
WARNING
This product contains one or more chemicals known to the State of California to cause cancer and birth defects or other reproductive harm.
READ AND SAVE THESE INSTRUCTIONS
IMPORTANT SAFETY INFORMATION READ ALL INSTRUCTIONS BEFORE USING THE APPLIANCE
WARNING

PLOSION HAZARD Flammable Refrigerant
This appliance contains isobutane refrigerant, R600a, a natural gas with high environmental compatibility. However, it is also combustible. Adhere to the warnings below to reduce the risk of injury or property damage.
1) When handling, installing and operating the appliance, care should be taken to avoid damage to the refrigerant tubing.
2) Service shall only be performed by authorized service personnel. Use only manufacturer-authorized service parts.
3) Dispose of refrigerator in accordance with Federal and Local Regulations. Flammable refrigerant and insulation material used require special disposal procedures. Contact your local authorities for the environmentally safe disposal of your refrigerator.
4) Keep ventilation openings in the appliance enclosures or in the built-in structure clear of obstruction.
5) Do not use mechanical devices or other means to accelerate the defrosting process.
6) Do not damage refrigerant circuit.
7) Do not use electrical appliances inside the food storage compartment of the appliance.
CONNECTING ELECTRICITY
WARNING

.ECTRICAL SHOCK HAZARD
Plug into a grounded 3-prong outlet.
Do not remove the ground prong.
Do not use an adapter.
Do not use an extension cord.
Failure to follow these instructions can result in death, fire, or electrical shock.
Do not, under any circumstances, cut or remove the third (ground) prong from the power cord. For personal safety, this appliance must be properly grounded.
The power cord of this appliance is equipped with a 3-prong (grounding) plug which mates with a standard 3-prong (grounding) wall outlet to minimize the possibility of electric shock hazard from this appliance.
Have the wall outlet and circuit checked by a qualified electrician to make sure the outlet is properly grounded.
Where a standard 2-prong wall outlet is encountered, it is your personal responsibility and obligation to have it replaced with a properly grounded 3-prong wall outlet.
The appliance should always be plugged into its own individual electrical outlet which has a voltage rating that matches the rating plate.
A 115 Volt AC, 60 Hz, 15- or 20-amp fused, grounded electrical supply is required. This provides the best performance and also prevents overloading house wiring circuits which could cause a fire hazard from overheated wires.
Never unplug your appliance by pulling on the power cord. Always grip plug firmly and pull straight out from the outlet.
Immediately discontinue use of a damaged supply cord. If the supply cord is damaged, it must be replaced by a qualified service professional with an authorized service part from the manufacturer.
When moving the appliance away from the wall, be careful not to roll over or damage the power cord.
READ AND SAVE THESE INSTRUCTIONS
IMPORTANT SAFETY INFORMATION READ ALL INSTRUCTIONS BEFORE USING THE APPLIANCE
PROPER DISPOSAL OF YOUR OLD APPLIANCE
WARNING
SUFFOCATION AND ENTRAPMENT HAZARD
Failure to follow these disposal instructions can result in death or serious injury
IMPORTANT: Child entrapment and suffocation are not problems of the past. Junked or abandoned appliances are still dangerous even if they will sit for “just a few days.” If you are getting rid of your old appliance, please follow the instructions below to help prevent accidents.
Before You Throw Away Your Old Appliance:
■ Take off the door.
■ Leave the shelves in place so that children may not easily climb inside.
Refrigerant and Foam Disposal:
Dispose of appliance in accordance with Federal and Local Regulations. Flammable refrigerant and insulation material used requires special disposal procedures. Contact your local authorities for the environmentally safe disposal of your appliance.
READ AND SAVE THESE INSTRUCTIONS
HME02GGM
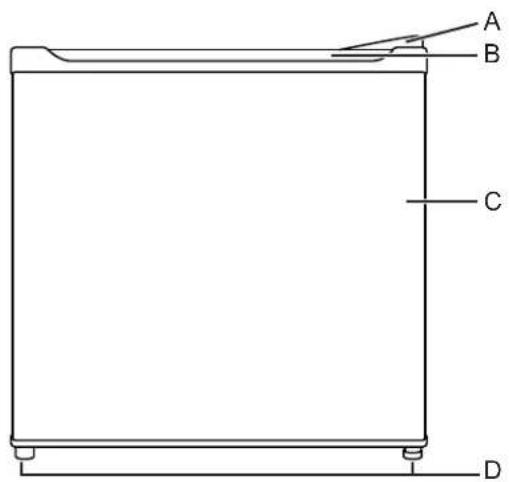
text_image
A B C DA. Top Hinge
B. Recessed Handle
C. Refrigerator Door
D. Leveling Legs
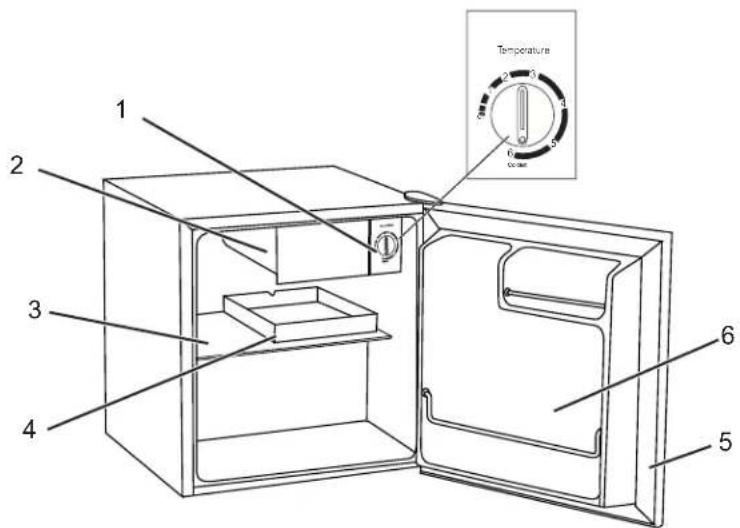
text_image
1 2 3 4 5 6 Temperature 6 8 9 10- Thermostat Control Knob
- Freezer Compartment
- Glass Shelf
- Drip Tray
- Door Gasket
6.2 Liter Bottle Storage
HME03GGM
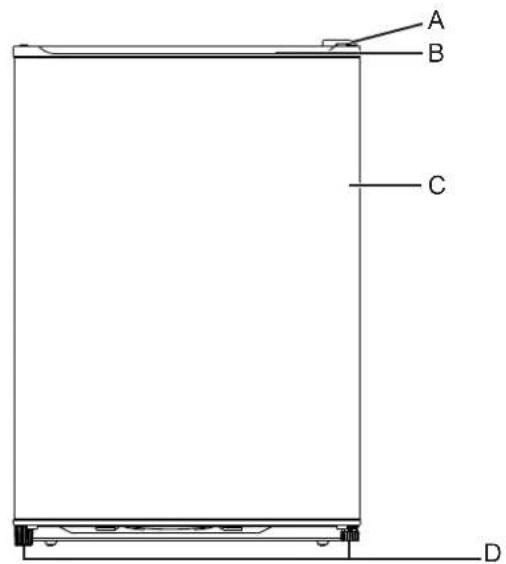
text_image
A B C DA. Top Hinge
B. Recessed Handle
C. Refrigerator Door
D. Leveling Legs
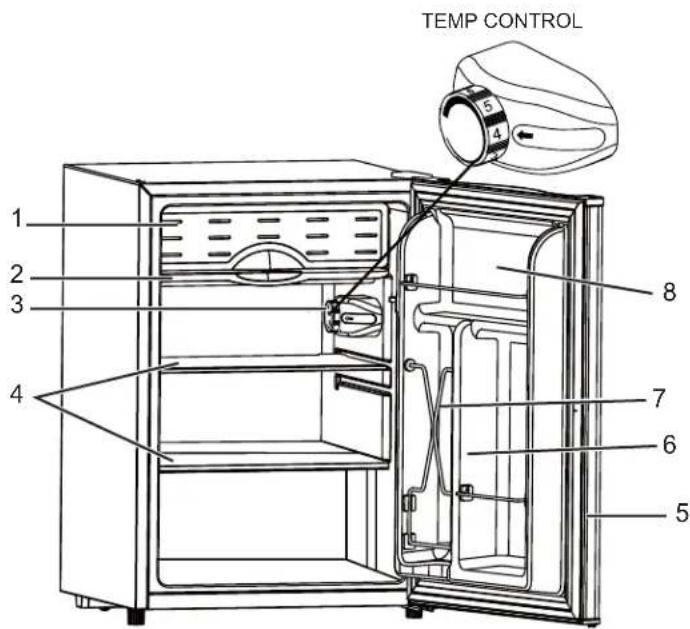
text_image
TEMP CONTROL 1 2 3 4 5 6 7 8- Freezer Compartment
- Drip Tray
-
Thermostat Control Knob
4.Glass Shelf -
Door Gasket
6.2 Liter Bottle Storage
- Can Dispenser
8.Full-width Door Shelf
Operation
NOTE: If the refrigerator has been placed in a horizontal or tilted position for any period of time, wait 30 minutes before plugging the unit in.
FREEZER COMPARTMENT / ICE CUBE TRAYS
This compartment is designed for making ice cubes and for short-term food storage (a few days at most).
If ice cube tray freezes to the bottom of the compartment, pour a little warm water around it to loosen it. Do not use boiling water, which can damage plastic parts, or sharp metal objects such as a knife or screwdriver, which can damage the cooling system tubing. Wash the ice cube tray in lukewarm water only. Do not wash in the dishwasher.
REFRIGERATOR INTERIOR SHELVES
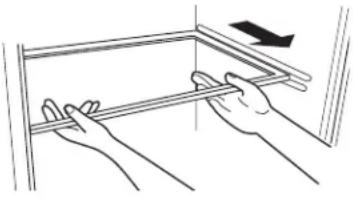
To remove or replace a full-width slide-out shelf:
-
Gently tilt the shelf up and slide forward until the shelf has been completely removed.
-
To replace the shelf, gently slide the shelf back.
natural_image
Illustration of hands holding a metal rod with a directional arrow indicating motion (no text or symbols)FOOD STORAGE INFORMATION
Fresh Food
- When storing fresh food that is not prepackaged, be sure to wrap or store food in airtight and moisture proof material unless otherwise noted. This will ensure proper shelf life and prevent the transfer of odors and tastes.
- Wipe containers before storing to avoid needless spills.
- Eggs should be stored in an upright position in their original carton to maximize shelf life.
- Fruit should be washed and dried, then stored in sealed plastic bags before storing in the refrigerator.
- Vegetables with skins should be stored in plastic bags or containers.
- Leafy vegetables should be washed and drained and then stored in plastic bags or containers.
- Hot food should be allowed to cool before storing in the refrigerator. This will prevent unnecessary energy use.
- Fresh seafood should be used the same day as purchased.
-
When storing meats in the fresh food section, keep in the original packaging or re-wrap as necessary. Follow the suggestions below for safe storage:
-
Chicken 1-2 Days
• Steaks/Roasts ..... 3-5 Days
• Ground Beef ..... 1-2 Days - Smoked/Cured Meats .....7-10 Days
• Cold Cuts 3-5 Days
• All others .... 1-2 Days
USING THE THERMOSTAT
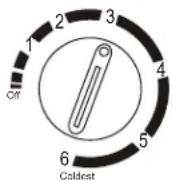
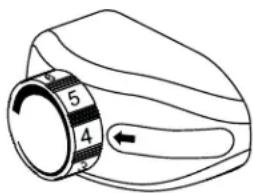
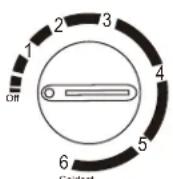
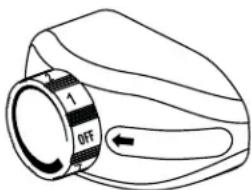
The thermostat control knob for the refrigerator and freezer is located beside the freezer compartment.
The first time you turn the unit on, adjust the thermostat control knob to "3" for HME02GGM or "4" for HME03GGM and give your refrigerator time to cool down completely before adding food; a full 24 hours is recommended.
After it is fully cooled, test it and adjust towards "1" to make less cool or towards "6" for QHE02GGM or "7" for QHE03GGM to cool more to best suit your needs. However, the setting of "3" for QHE02GGM or "4" for QHE03GGM should be appropriate for home or office refrigerator use.
NOTE: Turning the thermostat control knob to the "Off" position will stop the cooling cycle but does not shut off the power to the unit.
natural_image
Line drawing of a mechanical knob with numbered parts and an arrow indicating rotation (no text or symbols)HEM02GGM HEM03GGM
DEFROSTING
The defrosting process is manual.
- Turn the thermostat knob to the "Off" position and leave the refrigerator door open.
- Remove all food from the freezer and refrigerator compartment.
- Clean and wipe out the melted frost with a cloth.
- After defrosting, turn thermostat knob to original position.
NOTE: If the freezer has accumulated excessive frost/ice, please do the following:
- Remove all food from the freezer and refrigerator compartment.
- Turn the thermostat knob to the "Off" position and unplug from the outlet.
- Place towel under compact refrigerator or move refrigerator outdoors where no water damage can occur.
- Follow steps 3 & 4 from above section.
natural_image
Line drawing of a device with a circular button labeled '1 OFF' and an arrow indicating left motion (no text or symbols beyond the label)HEM02GGM HEM03GGM
CLEANING
WARNING
To avoid electric shock, always unplug your refrigerator before cleaning. Ignoring this warning may result in death or injury.
CAUTION
Before using cleaning products, always read and follow manufacturer's instructions and warnings to avoid personal injury or product damage.
General
- Prepare a cleaning solution of 3-4 tablespoons of baking soda mixed with warm water. Use sponge or soft cloth, dampened with the cleaning solution, to wipe down your refrigerator.
- Rinse with clean warm water and dry with a soft cloth.
- Do not use harsh chemicals, abrasives, ammonia, chlorine bleach, concentrated detergents, solvents or metal scouring pads. Some of these chemicals may dissolve, damage and/or discolor your refrigerator.
CAUTION
Do not clean glass shelves or covers with warm water when they are cold. Glass shelves and covers may break if exposed to sudden temperature changes or impact, such as bumping or dropping. Tempered glass is designed to shatter into many small pieces if it breaks.
Door Gaskets
- Clean door gaskets every three months according to general instructions. Gaskets must be kept clean and pliable to assure a proper seal.
- Petroleum jelly applied lightly on the hinge side of gaskets will keep the gasket pliable and ensure a good seal.
Defrost
Defrost whenever frost on the wall of the freezer compartment becomes 1/8" thick.
For defrosting instructions, see Defrosting on page 6.
⚠️ DANGER

PLOSION HAZARD
Risk of Fire or Explosion due to puncture refrigerant tubing. Flammable refrigerant used. Do not use metal instruments to defrost refrigerator. Do not puncture refrigerant tubing.
Make sure the drip tray is in place and unplug the unit. Defrosting usually takes a few hours. To defrost faster, keep the door open and place a bowl of warm water in the refrigerator. After defrosting, empty water from the drip tray and wash the drip tray in warm water.
MAINTENANCE
WARNING

KOSION OR FIRE
HAZARD Risk of Fire or Explosion. Flammable refrigerant used. Do not puncture refrigerant tubing. To be repaired only by trained authorized service personnel. Consult Repair Manual before attempting to service this product. All Safety Precautions Must be followed. Component parts shall be replaced with like components to minimize the risk of possible ignition due to incorrect parts or improper service.
Power Interruptions
- Occasionally there may be power interruptions due to thunderstorms or other causes. Remove the power cord from wall outlet when a power outage occurs.
When power has been restored, replug power cord to wall outlet. If outage is for a prolonged period, inspect and discard spoiled or thawed food in freezer and refrigerator. Clean refrigerator before reusing.
Vacation and Moving Care
- For long vacations or absences, empty food from refrigerator and freezer, move the temperature dial to the "Off" position and clean the refrigerator and door gaskets according to "General Cleaning" section. Prop doors open, so air can circulate inside. When moving, always move the refrigerator vertically. Do not move with the unit lying down. Possible damage to the sealed system could occur.
Energy Saving Tips
- The refrigerator should be located in the coolest area of the room, away from heat-producing appliances or heating ducts, and out of direct sunlight.
- Let hot foods cool to room temperature before placing in the refrigerator. Overloading the refrigerator forces the compressor to run longer and thus increases energy consumption. Foods that refrigerate too slowly may lose quality or spoil.
- Be sure to wrap foods properly, and wipe containers dry before placing in the refrigerator.
- The shelves should not be lined with aluminum foil, wax paper, or paper towels. Liners interfere with cold air circulation, making the refrigerator less efficient.
- Organize food to reduce door openings and extended searches. Remove as many items as needed at one time, and close the door as soon as possible.
Read these instructions completely and carefully.
INSTALLATION LIMITATIONS
- Do not install the refrigerator where the temperature will go below 55^ F ( 13^ C) because it will not run often enough to maintain proper temperatures.
- Do not install the refrigerator where the temperature will go above 110°F (43°C) because it will not perform properly.
- Select a suitable location for the refrigerator on a hard even surface away from direct sunlight or heat source, e.g. radiators, baseboard heaters, cooking appliances, etc. Any floor unevenness should be corrected with the leveling legs located on the front bottom corners of the refrigerator.
• Install it on a floor strong enough to support it fully loaded. - Do not install the refrigerator in a location exposed to water (rain, etc.) or direct sunlight.
NOTE: As the door gets pressed in during shipping, after reversing the door, the gasket may have to be reset. This is done to prevent the cool refrigerated air from escaping. If there is a gap between the door gasket and the cabinet, set the gasket by gently pulling it out to seal the gap.
IMPORTANT: This refrigerator is designed for freestanding installation only. It should not be recessed or built-in an enclosed cabinet. To ensure your refrigerator works at optimum efficiency, you should install it in a location where there is proper air circulation, and electrical connections.
UNPACKING YOUR REFRIGERATOR
- Remove all packaging material. This includes the foam base and all adhesive tape holding the refrigerator accessories inside and outside.
- Inspect and remove any remains of packing, tape or printed materials before powering on the refrigerator.
CAUTION

PLOSION HAZARD
Do not puncture refrigerant tubing. Flammable refrigerant used. Handle with care when moving refrigerator to avoid either damaging the refrigerant tubing or increasing the risk of a leak.
- Your refrigerator has two leveling legs which are located in the front bottom corners of your refrigerator. After properly placing your refrigerator in its final position, you can level your refrigerator.
- Leveling legs can be adjusted by turning them counterclockwise to raise your refrigerator or by turning them clockwise to lower your refrigerator. The refrigerator door will close easier when the leveling legs are extended.
PROPER AIR CIRCULATION
- To ensure your refrigerator works at the maximum efficiency it was designed for, you should install it in a location where there is proper air circulation, plumbing and electrical connections.
- The following are recommended clearances around the refrigerator:
Sides ..... 2" (51 mm)
Top 1/2" (13 mm)
Back 2" (51 mm)
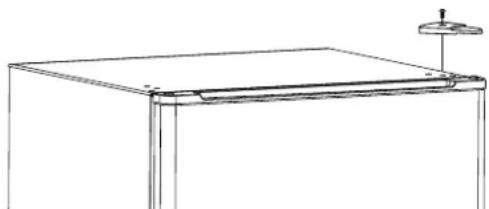
DOOR ALIGNMENT
- Unscrew the top hinge cover screw and remove cover.
- Loosen the top hinge screws using a 10 mm socket screwdriver.
- Adjust the door or put a spacer in between the hinge and the cabinet and then tighten the screws.
- Replace the top hinge cover and hinge cover screw.
natural_image
Line drawing of a simple wooden table with a small stand and top mount (no text or symbols)REVERSING THE DOOR POSITION: HME02GGM
WARNING
Follow all steps when reversing the door swing. Failure to follow these instructions, leaving off parts, or overtightening screws, can lead to the door falling off and result in injury and property damage.
- Ensure the appliance is unplugged and empty.
- Adjust the two leveling legs to their highest position.
• We recommend you have someone assist you.
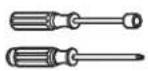
TOOLS REQUIRED

• 10 mm socket screw driver
• Phillips style screw driver
PARTS INCLUDED
- Upper Hinge Bracket
- Leveling Legs
- Machine Screw
- Bottom Hinge Bracket
NOTE: To take the door off, it is necessary to tilt the appliance backward. You should rest the appliance on something solid, e.g. a chair, just below the top panel.
DO NOT lay the appliance completely flat as this may damage the coolant system.
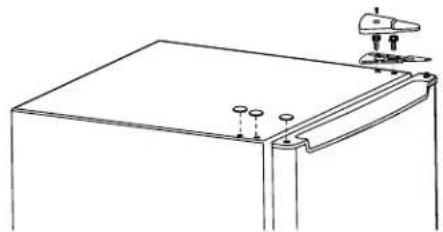
- Unscrew the top hinge cover screw and remove cover. Unscrew the upper hinge bracket screws and remove hinge. Take off the left side screw covers. Pull the appliance door upward to remove.
natural_image
Technical line drawing of a mechanical assembly with mounting holes and a clamp (no text or symbols)- Remove left leveling leg and bottom hinge bracket by unscrewing the mounting screws.
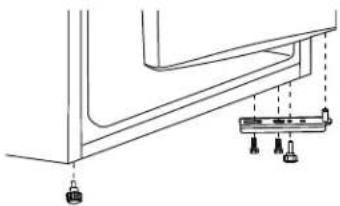
natural_image
Pure technical diagram of a structural beam with supports and load indicators (no text or symbols)- Install the leveling leg and bottom hinge bracket on the opposite side. Tighten the bottom hinge bracket screws.
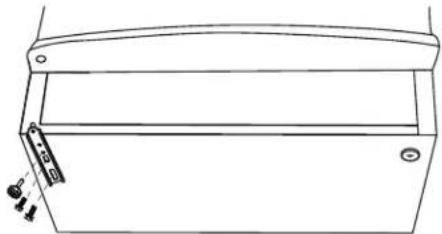
natural_image
Technical line drawing of a mechanical component with mounting holes and a handle (no text or symbols)- Slide the door onto the bottom hinge pin. Replace the upper hinge bracket on the opposite side and check to make sure the door/hinge is moving smoothly. Tighten the screws of the upper hinge bracket. Replace the hinge cover and right side screw covers. Tighten the hinge cover screw.
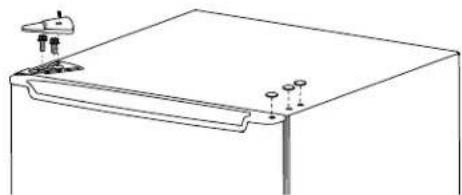
natural_image
Technical line drawing of a mechanical bracket or mounting plate with mounting holes (no text or symbols)- Check that the door is aligned, horizontally and vertically, and that the seals are closed on all sides before finally tightening the upper hinge screws and hinge cover screw. Readjust the leveling legs.
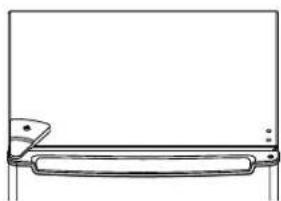
natural_image
Simple line drawing of a rectangular frame with a horizontal bar and two vertical supports (no text or symbols)Installation Instructions
REVERSING THE DOOR POSITION: HME03GGM
WARNING
Follow all steps when reversing the door swing. Failure to follow these instructions, leaving off parts, or overtightening screws, can lead to the door falling off and result in injury and property damage.
- Ensure the appliance is unplugged and empty.
- Adjust the two leveling legs to their highest position.
• We recommend you have someone assist you.
TOOLS REQUIRED
• 10 mm socket screw driver
• Phillips style screw driver
PARTS INCLUDED
- Upper Hinge Bracket
- Leveling Legs
- Machine Screw
- Bottom Hinge Bracket
- Door Stopper
NOTE: To take the door off, it is necessary to tilt the appliance backward. You should rest the appliance on something solid, e.g. a chair, just below the top panel.
DO NOT lay the appliance completely flat as this may damage the coolant system.
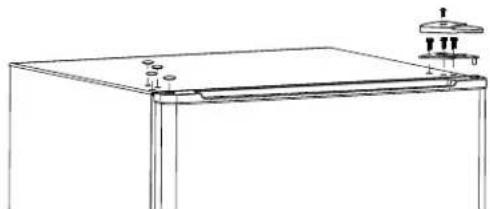
- Unscrew the top hinge cover screw and remove cover. Unscrew the upper hinge bracket screws and remove hinge. Take off the left side screw covers. Pull the appliance door upward to remove.
natural_image
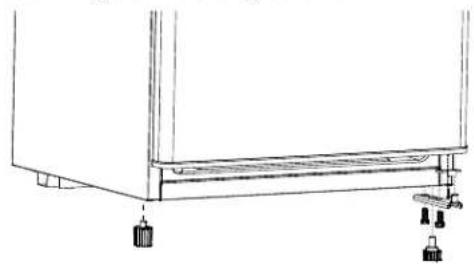
Line drawing of a table with a lid and two small circular components on top (no text or symbols)- Remove left leveling leg and door stopper by unscrewing the mounting screws.
natural_image
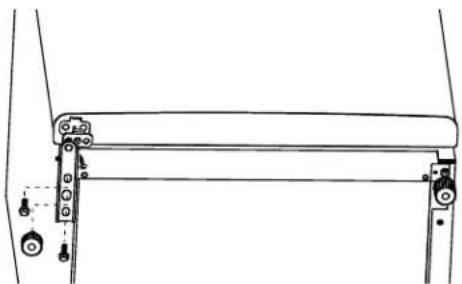
Technical line drawing of a mechanical assembly with mounting feet and clamps (no text or symbols)- Install the leveling leg, door stopper, and bottom hinge bracket on the opposite bottom side. Tighten the screws on the door stopper and bottom hinge bracket.
natural_image
Technical line drawing of a mechanical assembly with mounting brackets and bolts (no text or symbols)- Slide the door onto the bottom hinge pin. Replace the upper hinge bracket on the opposite side and check to make sure the door/hinge is moving smoothly. Tighten the screws of the upper hinge bracket. Replace the hinge cover and right side screw covers. Tighten the hinge cover screw.
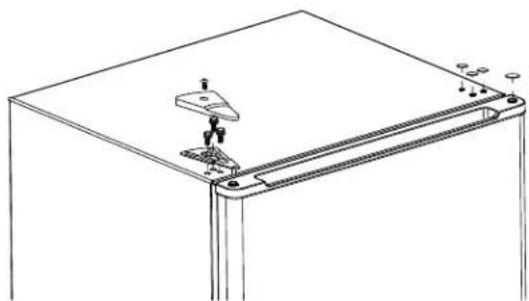
natural_image
Technical line drawing of a mechanical assembly with mounting brackets and a central component (no text or symbols)- Check that the door is aligned, horizontally and vertically, and that the seals are closed on all sides before finally tightening the upper hinge screws and hinge cover screw. Readjust the leveling legs.
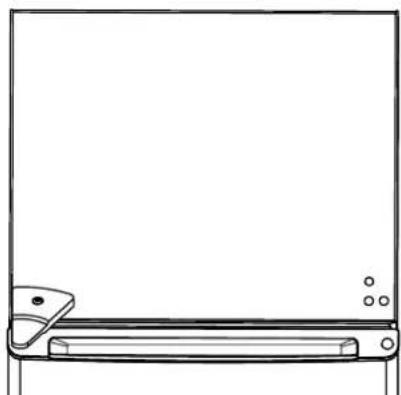
natural_image
Simple line drawing of a rectangular device with a handle and mounting feet, no text or symbols present.Troubleshooting Tips... Before you call for service
Save time and money! Review the charts on the following pages first and you may not need to call for service.
| Problem Possible Causes | What To Do | |
| Refrigerator does not run. | Refrigerator is unplugged. Plug refrigerator | ator into a grounded 3 prong outlet. |
| The circuit breaker is tripped/turned off or the fuse is blown. | Reset/Turn on circuit breaker or replace fuse. | |
| The temperature control is in the Off position. | Turn the temperature control to a setting between 1 and 7. | |
| Compressor runs too frequently | The room temperature is hot and/or humid. | This is normal to maintain constant temperature during high temperature, humid days. |
| Refrigerator door is ajar. Close the door | completely | |
| The door gasket is not sealing properly. | Clean the door gasket. See Cleaning. | |
| Frequent or prolonged door openings. | Limit door openings to maintain the internal temperature. | |
| Door is blocked open. Rearrange or re | move items that are keeping the door from closing completely. | |
| Door does not close properly | Refrigerator is not level or door is not aligned. | Level refrigerator or align the door. |
| Door is blocked open. Rearrange or re | move items that are keeping the door from closing completely. | |
| Food temperature is too warm | The door is opened frequently. Limit door openings. | |
| A large amount of food was recently added. | Allow time for recently added warm food to cool. | |
| The door is not sealing properly. Clean the door gasket. See Cleaning. | ||
| The control is not set to a cold enough temperature. | Adjust the temperature control to a colder setting. | |
| Food temperature is too cold | The control is set to a too cold setting. | Adjust the temperature to a less cold setting. |
| Refrigerator has an odor. | The refrigerator needs cleaning. Clean refrigerator. See Cleaning. | |
| Improperly wrapped food is giving off an odor. | Wrap and seal food tightly before storing in the refrigerator. | |
| Moisture build up on interior or exterior of the refrigerator | The room temperature is hot and/or humid. | This is normal during high humidity periods. |
| Frequent or prolonged door openings. | Limit door openings. | |
| The door gasket is not sealing properly. | Clean the door gasket. See Cleaning. | |
| Popping or cracking sound when compressor comes on | Refrigerator is not level. Level the refrigerator. See Leveling. If the floor is uneven, you may need to place metal or wood shims underpart of the refrigerator. | |
| The floor may be uneven or weak. Be | sure the floor can adequately support the refrigerator.Level the refrigerator by putting wood or metal shims under part of the refrigerator. | |
| The refrigerator is touching a wall. | Move the refrigerator away from the wall and re-level, if necessary. | |
NORMAL OPERATING SOUNDS YOU MAY HEAR
- Boiling water, gurgling sounds or slight vibrations that are the result of the refrigerant circulating through the cooling coils.
- The thermostat control will click when it cycles on and off.
Compact Refrigerator Warranty
Hotpoint.com
Hotpoint is backed by GE Appliances Service. All warranty service is provided by our Factory Service Centers, or an authorized Customer Care® technician. You can schedule service online at Hotpoint.com/service or call Hotpoint Service at 800.GE.CARES (800.432.2737). Please have your model number available when calling. In Canada, call 800.661.1616.
For the Period of: Hotpoint Appliances Will Replace
| One YearFrom the date of the original purchase | For 12 months from the date of original retail purchase, Hotpoint Appliances will choose, at its discretion, to replace or service the defective unit. Should Hotpoint Appliances decide to service the unit, Hotpoint Appliances will provide any part which fails due to a defect in materials or workmanship free of charge, along with any labor and related service costs to replace the defective part. During this period, should Hotpoint Appliances choose to replace the unit, it may do so by providing you with a certificate redeemable at a retailer for a replacement product. |
What Hotpoint Will Not Cover:
■ Service trips to your home to teach you how to use the product.
■ Improper installation, delivery or maintenance.
■ Failure of the product if it is abused, misused, or used for other than the intended purpose or used commercially.
■ Loss of food due to spoilage.
■ Damage caused after delivery.
■ Replacement of house fuses or resetting of circuit breakers.
■ Damage to the product caused by accident, fire, floods or acts of God.
■ Incidental or consequential damage caused by possible defects with this appliance.
■ Product not accessible to provide required service.
■ Associated costs when Hotpoint Appliances chooses to issue the consumer a certificate as a form of product replacement.
EXCLUSION OF IMPLIED WARRANTIES
Your sole and exclusive remedy is product repair as provided in this Limited Warranty. Any implied warranties, including the implied warranties of merchantability or fitness for a particular purpose, are limited to one year or the shortest period allowed by law.
For US Customers: This warranty is extended to the original purchaser and any succeeding owner for products purchased for home use within the USA. If the product is located in an area where service by a Hotpoint Appliances Authorized Servicer is not available, you may be responsible for a trip charge or you may be required to bring the product to an Authorized Hotpoint Appliances Service location for service. In Alaska, the warranty excludes the cost of shipping or service calls to your home.
Some states do not allow the exclusion or limitation of incidental or consequential damages. This warranty gives you specific legal rights, and you may also have other rights which vary from state to state. To know what your legal rights are, consult your local or state consumer affairs office or your state's Attorney General.
Warrantor: GE Appliances, a Haier company
For Customers in Canada: This warranty is extended to the original purchaser and any succeeding owner for products purchased in Canada for home use within Canada. In-home warrant service will be provided in areas where it is available and deemed reasonable by Mabe to provide.
Warrantor Canada: MC Commercial, Inc., Burlington, Ontario, L7R 5B6
Consumer Support
Hotpoint Appliances Website
Visit www.hotpoint.com for all of your product and support needs.
Register Your Appliance
Register your new appliance on-line at your convenience! Timely product registration will allow for enhanced communication and prompt service under the terms of your warranty, should the need arise. You may also mail in the pre-printed registration card included in the packing material.
In the US: Hotpoint.com/register
In Canada: geappliances.ca/en/support/register-your-appliance
Schedule Service
Expert GE Appliances repair service is only one step away from your door. Get on-line and schedule your service at your convenience any day of the year. In the US: Hotpoint.com/service or call 800.432.2737 during normal business hours.
In Canada: call 888.880.3030
Extended Warranties
You may purchase a Hotpoint Appliances extended warranty online at Hotpoint.com/extended-warranty.com or call 800-626-2224.
In Canada: call 888.880.3030
Parts and Accessories
Individuals qualified to service their own appliances can have parts or accessories sent directly to their homes (VISA, MasterCard and Discover cards are accepted). Order on-line today 24 hours every day.
In the US: GEApplianceparts.com or by phone at 877.959.8688 during normal business hours.
Instructions contained in this manual cover procedures to be performed by any user. Other servicing generally should be referred to qualified service personnel. Caution must be exercised, since improper servicing may cause unsafe operation.
Customers in Canada should consult the yellow pages for the nearest MC Commercial service center, visit our website at GEAppliances.ca/en/products/parts-filters-accessories or call 800.661.1616.
Contact Us
If you need to contact us for any reason, please visit Hotpoint.com/contact or call 800.626.2005.
You may also write to:
In the US: General Manager, Customer Relations | GE Appliances, Appliance Park | Louisville, KY 40225
GEAppliances.com/ge/service-and-support/contact.htm
In Canada: Director, Consumer Relations, Mabe Canada Inc. | Suite 310, 1 Factory Lane | Moncton, N.B. E1C 9M3
GEAppliances.ca/en/contact-us
RÉFRIGÉRATEUR COMPACT
MESURES DE SÉCURITÉ....2
UTILISATION DU RÉFRIGÉRATEUR
natural_image
Illustration of hands holding a ruler or rod, no text or symbols presentRENSEIGNEMENTS SUR LE STOCKAGE DE NOURRITURE
Aliments frais
natural_image
Diagram of a device with a circular knob and a directional arrow (no text or symbols)HEM02GGM HEM03GGM
DEGIVRAGE
natural_image
Line drawing of a device handle with a circular dial labeled '1 OFF' and an arrow indicating left motion (no text or symbols beyond labels)HEM02GGM HEM03GGM
natural_image
Line drawing of a simple wooden table with a small stand and top mount (no text or symbols)PERMUTATION DE PORTE HME02GGM
▲AVERTISSEMENT
natural_image
Technical line drawing of a mechanical assembly with mounting holes and a bracket (no text or symbols)natural_image
Pure technical diagram of a structural support system without any text, numbers, or symbolsnatural_image
Technical line drawing of a mechanical component with mounting holes and a small inset detail (no text or symbols)natural_image
Technical line drawing of a mechanical assembly with mounting holes and a flat plate (no text or symbols)natural_image
Simple line drawing of a rectangular frame with a side panel and handle (no text or symbols)natural_image
Illustration of various mechanical components including a triangular clamp, screw, and bracket (no text or symbols)natural_image
Line drawing of a simple table with a flat top and a small mechanical component on top (no text or symbols)natural_image
Line drawing of a simple electrical enclosure with base, legs, and support fixtures (no text or symbols)natural_image
Technical line drawing of a mechanical assembly with no visible text or symbolsnatural_image
Technical line drawing of a mechanical assembly with mounting bracket and clamping mechanism (no text or symbols)natural_image
Simple line drawing of a computer monitor with stand and scroll (no text or symbols)Save time and money! Review the charts on the following pages first and you may not need to call for service.
Garant : GE Appliances, a Haier company
Garant Canada: MC Commercial, Inc., Burlington, Ontario, L7R 5B6
Au Canada : geappliances.ca/en/support/register-your-appliance
GEAppliances.com/ge/service-and-support/contact.htm
Au Canada : Director, Consumer Relations, Mabe Canada Inc. | Suite 310, 1 Factory Lane | Moncton, N.B. E1C 9M3
GEAppliances.ca/en/contact-us
Normal Operating Characteristics ..... 11
GARANTÍA....15
SERVICIO
AL CONSUMIDOR ....16
MANUEL
D'UTILISATION
ET D'INSTALLATION
natural_image
Line drawing of two hands holding a ruler inside a frame (no text or symbols)natural_image
Illustration of a rotary knob with numbered segments and an arrow indicating clockwise motion (no text or symbols)HEM02GGM HEM03GGM
DESCONGELACIÓN
natural_image
Line drawing of a device with a circular button labeled '1 OFF' and an arrow indicating left motion (no text or symbols beyond the label)HEM02GGM HEM03GGM
LIMPIEZA
ADVERTENCIA
natural_image
Line drawing of a simple wooden table with a small stand and top mount (no text or symbols)INVERSION DE LA POSICION DE LA PUERTA: HME02GGM
ADVERTENCIA
natural_image
Technical line drawing of a mechanical assembly with mounting holes and a clip (no text or symbols)natural_image
Pure technical diagram of a structural beam with hanging weights and a support structure (no text or symbols)natural_image
Technical line drawing of a mechanical component with mounting holes and a handle (no text or symbols)natural_image
Line drawing of a mechanical component with mounting holes and a flat base (no text or symbols)natural_image
Simple line drawing of a rectangular frame with a horizontal bar and two vertical supports (no text or symbols)INVERSION DE LA POSICION DE LA PUERTA: HME03GGM
ADVERTENCIA
natural_image
Line drawing of a simple table with a lid and mounting base (no text or symbols)natural_image
Line drawing of a simple electrical enclosure with base, legs, and support feet (no text or symbols)natural_image
Technical line drawing of a mechanical assembly with no visible text or symbolsnatural_image
Technical line drawing of a mechanical assembly with mounting bracket and base plate (no text or symbols)natural_image
Simple line drawing of a computer monitor with stand and scroll (no text or symbols)Warrantor: GE Appliances, a Haier Company
GEAppliances.com/ge/service-and-support/contact.htm