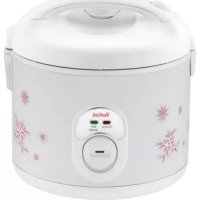
Easy Cook RK1018 - Rice cooker TEFAL - Free user manual and instructions
Find the device manual for free Easy Cook RK1018 TEFAL in PDF.


| Brand | Tefal |
| Model | Easy Cook RK1018 |
| Product type | Rice cooker |
| Maximum rice capacity | 10 cups (approximately 1.5 kg) |
| Maximum water capacity | Up to the 10-cup mark in the inner pot |
| Power | 600 W (estimation) |
| Voltage / Frequency | 220-240 V / 50-60 Hz |
| Inner pot material | Non-stick coating |
| Included accessories | Removable inner pot, steamer basket, measuring cup, spoon, spoon rest, condensation collector, micro-pressure valve |
| Functions | Rice cooking, steam cooking, automatic keep warm |
| Indicator lights | Cooking light (red), keep warm light (green) |
| Control selector | Cooking position (down) and keep warm position (up) |
| Lid opening | Opening button on the handle |
| Micro-pressure valve | Removable for cleaning |
| Condensation collector | Removable, to be emptied after each use |
| Spoon rest | Integrated on the side |
| Power cord | Removable |
| Cleaning the inner pot | With hot water and dishwashing liquid; dishwasher not recommended |
| Cleaning the body | Damp cloth; do not immerse |
| Safety | Automatic shut-off at end of cooking; do not open during cooking; do not touch the heating plate |
| Spare parts | Replacement inner pot available at authorized service center |
Frequently Asked Questions - Easy Cook RK1018 TEFAL
User questions about Easy Cook RK1018 TEFAL
0 question about this device. Answer the ones you know or ask your own.
Ask a new question about this device
Download the instructions for your Rice cooker in PDF format for free! Find your manual Easy Cook RK1018 - TEFAL and take your electronic device back in hand. On this page are published all the documents necessary for the use of your device. Easy Cook RK1018 by TEFAL.
USER MANUAL Easy Cook RK1018 TEFAL
natural_image
White rice cooker with floral pattern and control panel (no visible text or symbols)www.tefal.com
Ref. NC00120533 • 10/2013 • Subject to modifications
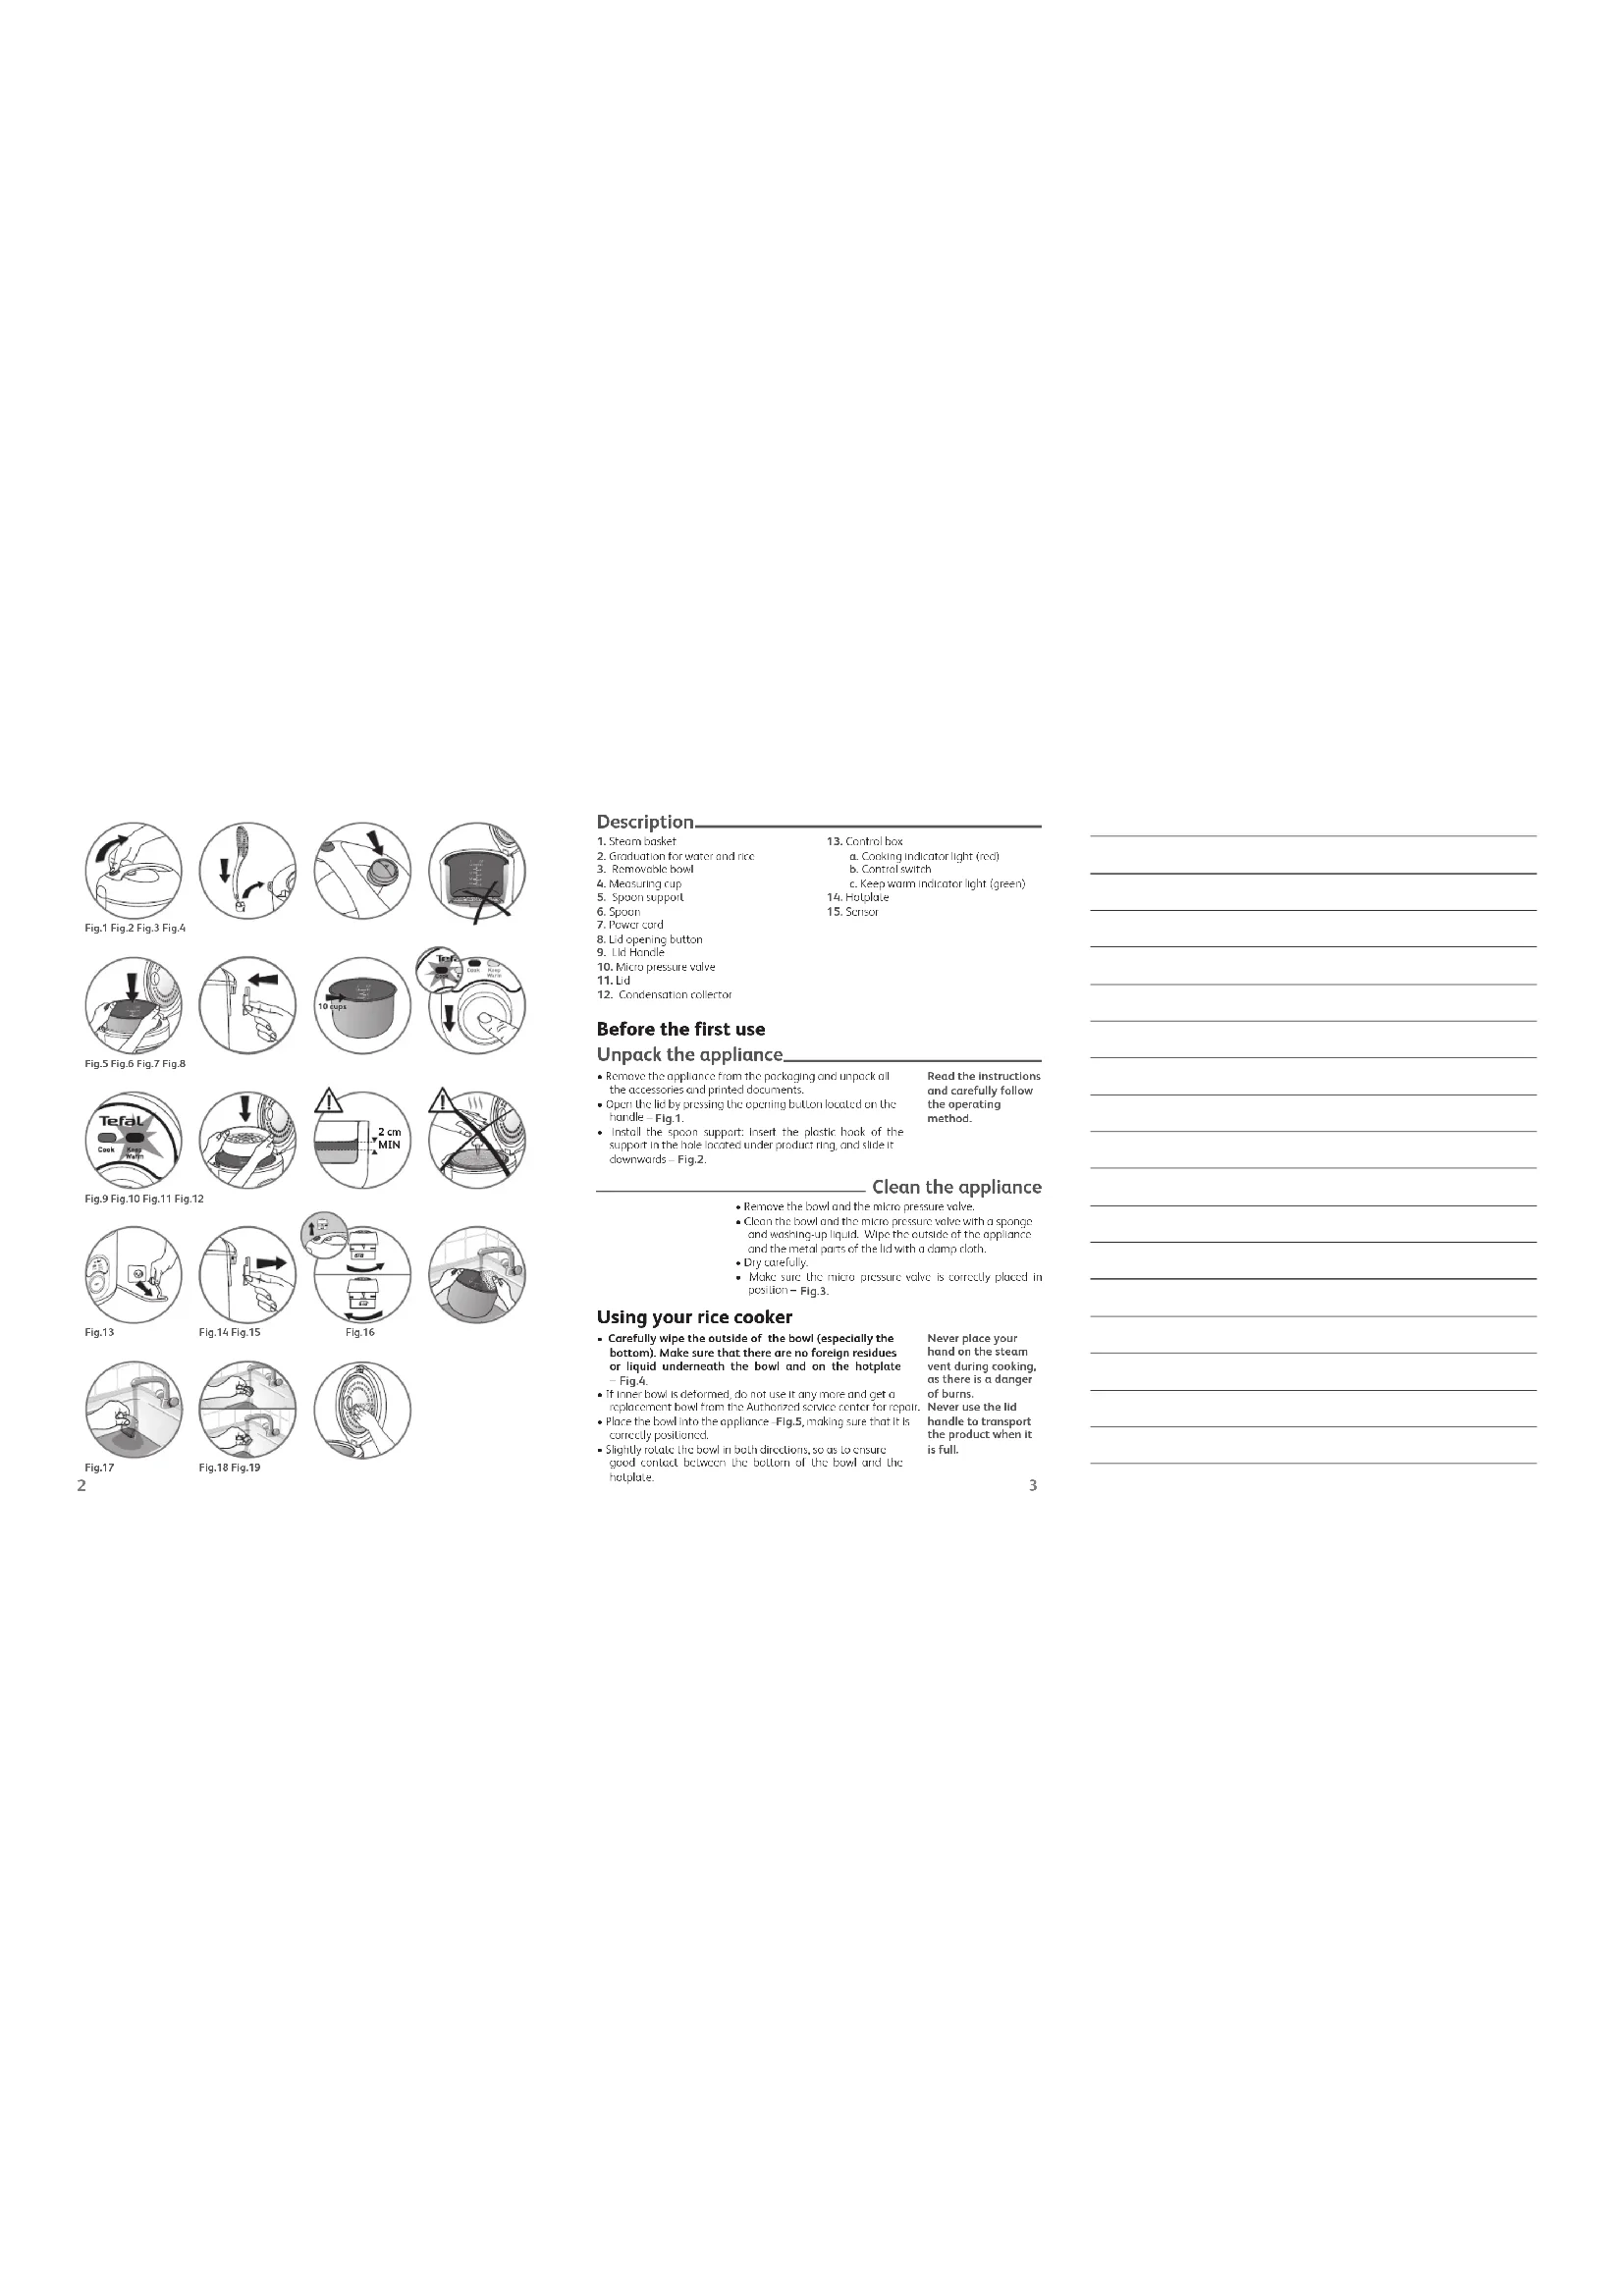
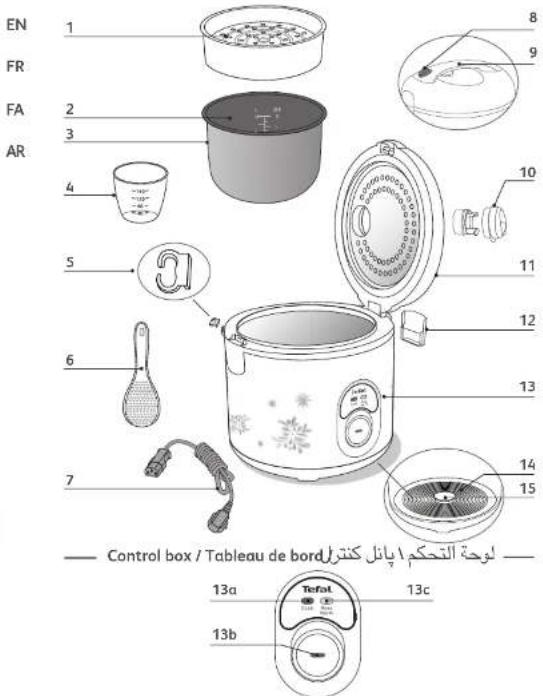
Description.
-
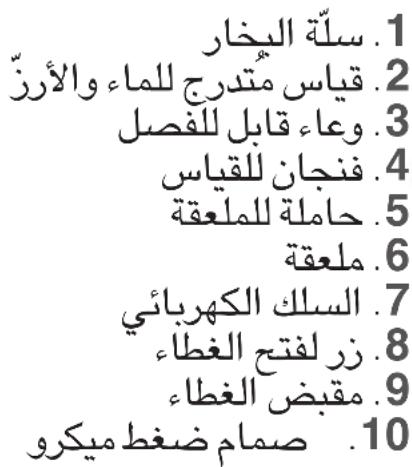
Steam basket
-
Graduation for water and ice
-
Removal
-
Measuring cup
-
Spoon support
-
Spoon
-
POWER cord
-
Lid openin
-
Lid Handle
-
Micro pressure valve
11.10
-
Condensation roller for
-
Control box
a. Cooking indicator light (red)
b. Control switch
c. Keep warm indicator light (green)
-
Hotplate
-
Sensor
(二)交易对方的介绍
Before the first use
Unpack the appliance
- Remove the appliance from the packaging and unpack all the accessories and printed documents.
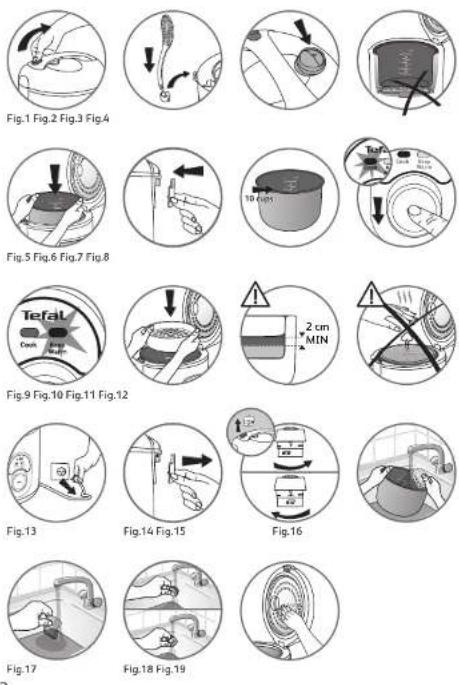
- Open the lid by pressing the opening button located on the handle - Fig.1.
- Install the spoon support: insert the plastic hook of the support in the hole located under product ring and slide it downwards - Fig.2.
Read the instructions and carefully follow the operating method.
Clean the appliance
- Remove the bowl and the micro pressure valve.
- Clean the bowl and the micro pressure valve with a sponge and washing-up liquid. Wipe the outside of the appliance and the metal parts of the lid with a damp cloth.
- Dry carefully.
- Make sure the micro pressure valve is correctly placed in position – Fig.3.
Using your rice cooker
- Carefully wipe the outside of the bowl (especially the bottom). Make sure that there are no foreign residues or liquid underneath the bowl and on the hotplate — Fig.4.
- If inner bowl is deformed, do not use it any more and get a replacement bowl from the Authorized service center for repair.
• Place the box into a correctly positioned.
- Slightly rotate the bowl in both directions, so as to ensure good contact between the bottom of the bowl and the hotplate.
Never place your hand on the steam vent during cooking, as there is a danger of burns. Never use the lid handle to transport the product when it is full.
- Check that the condensation collector is correctly placed in position, if not, please install it by pushing firmly into the groove – Fig.6.
- Pour your ingredients (see Rice Cooking chapter).
- Close and lock the lid.
- Plug in the appliance.
- Do not switch on the appliance until all of the above stages have been completed.
- Avoid to switch on the appliance with an empty cooking bowl.
- Do not touch the heating plate when the product is plugged.
Only use the inner pot provided with the appliance. Do not pour water or put ingredients in the appliance without the bowl inside.
Rice Cooking
\_ Measuring the ingredients - Max capacity of the bowl
- The graduated markings on the inside of the bowl are given in liters and cups, these are used for measuring the amount of water when cooking rice – Fig.7.
- The plastic cup provided with your appliance is for measuring rice (not water) and the table states the quantity of rice required for the number of servings. 1 level measuring cup of rice weighs about 150 g.
- The table below gives a guide to cooking different kinds of rice. For best results, we recommend using ordinary rice rather than ‘easy cook’ type of rice which tends to give a stickier rice and may adhere to the base. With other types of rice, such as brown or wild rice, the quantities of water need adjustment check the table below.
- To cook only 1 cup of white rice (serves 2 small or 1 large portion) because there isn't the mark of 1 cup in the cooking pot, you should use 1 measuring cup of white rice and then add 1 1/2 measuring cup of water. With some types of rice it is normal for a little rice to stick on the base when cooking 1 cup of rice. To cook other quantity of white rice, refer to cooking guide below.
-
The maximum quantity of water + rice should not exceed the 10 cup mark inside the bowl – Fig.7. Depending on the type of rice, quantities of water may need adjustment. See the table below.
-
Rinse the rice thoroughly before cooking.
| COOKING GUIDE FOR WHITE RICE | ||||
| Measuring cups of white rice | Weight of white rice | Water level in the bowl (+ the rice) | Serves | Approximative cooking time* |
| 2 | 300 g 2 cup | mark 3 per.-4 per. 15-20 min | ||
| 4 600 g 4 | cup mark 5 per.-6 | per. 20-25 | min | |
| 6 900 g 6 | cup mark 8 per.-1 | 0 per. 22-27 | min | |
| 8 | 1200 g | 8 cup mark | 13 per.-14 per. | 25-30 min |
| 10 | 1500 g | 10 cup mark | 16 per.-18 per. | 30-35 min |
- Rinse the rice thoroughly before cooking except for risotto rice.
| COOKING GUIDE FOR OTHER TYPES OF RICE | |||||
| Type of rice | Measuring cup of rice | Weight of white rice | Water level in the bowl (+ the rice) | Serves | Approximative cooking time* |
| Rice cooking | |||||
| 10 cups | |||||
| Round white rice (Italian rice - often a stickier rice) | 4 | 580 g | 4 cup mark | 5 per.-6 per. | 19 min |
| Whole grain Brown rice | 4 540 | g 4 cup mark | 5 per.-6 per. | 34 min | |
| Glutinous rice 4 | 640 g 4 cup | mark | 5 per.-6 per | 19 min | |
| Japanese rice | 4 620 | g 4 cup mark | 5 per.-6 per | 19 min | |
| Fragrant rice | 4 620 | g 4 cup mark | 5 per.-6 per | 21 min | |
* The rice cooker will automatically determine the exact cooking time depending on the quantity of water and rice placed in the bowl.
Rice cooking
The rice cooker itself determines the exact cooking time depending on the quantity of water and ingredients placed in the bowl (see cooking table above for a guide to timing). When all of the water has been absorbed by the rice, the appliance stops the cooking process automatically and enters into the “KEEP WARM” mode (the green “KEEP WARM” indicator light comes on).
The cooking time given in the tables above is a rice cooking time guide.
- Place the appliance on a flat, stable, heat-resistant work surface away from water splashes and any other sources of heat.
- Pour the required quantity of rice into the bowl using the measuring cup provided. Then fill with cold water up to the corresponding “CUP” mark printed in the bowl (See cooking guide above) – Fig.7.
Note: Always add the rice first otherwise you will have too much water.
- Close the lid.
- Check that the appliance is plugged in. Press downwards on the control switch, the red cooking indicator illuminates showing that cooking has begun – Fig.8.
- When cooking finished, it will turn to keep warm automatically, the “KEEP WARM” indicator light is on – Fig.9.
• After each use empty and clean the condensation collector.
Some recommendations for best results when cooking rice
- Measure the rice and rinse it thoroughly under running water in a sieve for a long time (except for risotto rice which should not be rinsed). Then place the rice in the bowl first and fill the corresponding quantity of water.
-
Make sure that the rice is well distributed in the bowl to allow even cooking.
-
Add salt to water: depending on personal taste.
- Water may be substituted with stock. If using stock, there is risk of rice browning in the bowl.
- Do not open the lid during cooking as steam will escape and this will affect the cooking time and the taste.
- On completion of cooking, the “KEEP WARM” indicator light is on, stir the rice and then leave it in the rice cooker for a few minutes longer in order to get perfect rice with separate grains.
Steam cooking (for vegetables, fish, etc.)
Measuring the ingredients
- The maximum quantity of water in the bowl should not exceed the maximum CUP mark shown in "CUP" on the bowl – Fig.7. Exceeding this level may cause overflow during use.
- The water level should be lower than the steam basket – Fig.11.
Preparation
- Pour water into the bowl.
- Place the steam basket in the bowl – Fig.10.
- Add the ingredients in the steam basket. Ensuring that they are not packed too thickly and that some steam holes are left clear otherwise the food may cook unevenly.
- Close the lid.
.To steam cook
- Press downwards on the control switch, the red cooking indicator illuminates showing that cooking has begun – Fig.8.
- You can end the steam cooking mode by turning the control switch to its top position. The green “KEEP WARM” indicator light comes on and the appliance turns to keep warm function.
- When there is no more water in the cooking pot, it will turn to keep warm automatically, the “KEEP WARM” indicator light is on – Fig.9.
Keep warm function
On completion of cooking, for rice or steam cooking, the appliance enters automatically to the “KEEP WARM” function. The control switch comes up to its top position and the green “KEEP WARM” indicator light comes on. The food is thus kept warm until ready to serve. Be careful that keep warm long hours would affect the quality of rice. To switch off this function, unplug the appliance – Fig.13.
On completion of cooking.
- Open the lid.
- Caution: Escaping steam is very hot – Fig.12.
- Serve the food using the plastic spoon supplied with the appliance and close the lid.
Never remove the bowl after cooking without protective - The food remaining in the bowl will keep warm for any next serving even gloves.
- Don't forget to unplug the appliance after keep warm.
- Leave to cool for at least one hour before cleaning.
Cleaning and Maintenance
Condensation collector
- The condensation collector should be emptied and cleaned after each use.
- To remove the collector, press on each side of the plastic cover and remove – Fig.14.
- To put the collector back, push firmly into the groove.
Bowl, basket, condensation collector, micro pressure valve and the steam basket.
- To clean the micro-pressure valve, remove it from the lid – Fig.15 and open it by rotating in the direction of “open”
- Fig.15.
After cleaning it, wipe dry. Allow the two triangle to next – Fig.15, and rotate it in the direction of “close” until you heard “ka”, then put it back to the lid of the rice cooker. - Use hot water, washing up liquid and a sponge to clean the bowl – Fig.16, the condensation collector – Fig.17, the micro pressure valve – Fig.18, the spoon and the cup. Scouring powders and metal sponges are not recommended.
- If food has stuck to the bottom, allow the bowl to soak for a while before washing it.
- Dry the bowl carefully.
- Do not immerse the appliance in water, nor pour water into it.
Taking care of the bowl
- To keep unchanged the cosmetic of the bowl, we do not recommend to clean this one in the diswasher.
- Use plastic or wooden ustensils and not metal ones when stirring or serving food to avoid damaging the bowl surface.
- To avoid any risk of corrosion, do not pour vinegar into the bowl.
- The colour of the bowl surface may change after using for the first time or after long period of use. This change in colour is due to the action of steam and water and does not have any effect on the use of the Rice Cooker, nor is it dangerous for your health. It is perfectly safe to continue using it.
Cleaning and care of the other parts of the appliance EN
- Unplug the appliance before cleaning.
- Clean the outside of the Rice Cooker, the inside of the lid – Fig.19 and the cord with a damp cloth and wipe dry. Do not use abrasive products.
- Do not use water to clean the interior of the appliance body as it could damage the heat sensor.
Technical troubleshooting guide
| Malfunction description Causes Solution | ||
| Any indicator lamp off and no heating. | Rice cooker not plugged. | Verify the main plug is well engaged in the product body. |
| Any Indicator lamp off and heating. | Problem of The connection of the indicator lamp or Indicator lamp is damaged. | Send to authorized service center for repair. |
| Cooking Indicator lamp off, keep warm indicator on. | Cook button is not in cooking position. | Put the cook button in low position (cooking). |
| Steam leakage during using. | Lid is badly closed. | Open and close again the lid. |
| Micropressure valve not well positioned or uncomplete. | Stop the cooking (unplug the product) and check the valve is complete (2 parts locked together) and well positioned. | |
| Lid or micropressure valve gasket is damaged. | Send to authorized service center for repair. | |
| Rice half cooked or overtime cooking. | Too much or not enough water compared to rice quantity. | Refer to IFU for water quantity. |
| Automatic warm-keeping fails (product stay in cooking position, or no heating). | Send to authorized service center for repair. | |
| Water leakage on the table. | Dew collector missing or dew collector overflow. | Empty the dew collector for each use verify good positioning of the dew collector. |
Remark: if inner bowl is deformed, do not use it anymore and get a replacement bowl from the authorized service center for repair.
Description

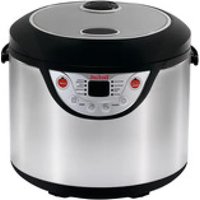


- Description.
- Before the first use
- Unpack the appliance
- Clean the appliance
- Using your rice cooker
- Rice Cooking
- \_ Measuring the ingredients - Max capacity of the bowl
- Note: Always add the rice first otherwise you will have too much water.
- Some recommendations for best results when cooking rice
- Steam cooking (for vegetables, fish, etc.)
- Measuring the ingredients
- Preparation
- .To steam cook
- Keep warm function
- On completion of cooking.
- Cleaning and Maintenance
- Condensation collector
- Bowl, basket, condensation collector, micro pressure valve and the steam basket.
- Taking care of the bowl
- Cleaning and care of the other parts of the appliance EN
- Description
Brand : TEFAL
Model : Easy Cook RK1018
Category : Rice cooker