Store'Inn DO250D - Food Processor TEFAL - Free user manual and instructions
Find the device manual for free Store'Inn DO250D TEFAL in PDF.
| Brand | Tefal |
| Model | Store'Inn DO250D |
| Category | Food processor |
| Product type | Multifunction kitchen robot |
| Number of speeds | 2 + Pulse |
| Mixing bowl capacity | 1 L (thick mixtures), 0.8 L (liquids) |
| Main functions | Knead, blend, chop, mix, grate, slice, emulsify, juice citrus (depending on model) |
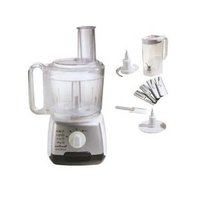
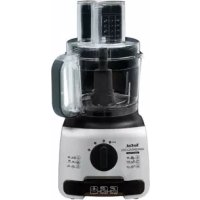
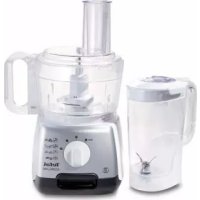
| Included accessories | Multifunction knife, emulsifier disc, vegetable cutting cartridges (A, C, D, H, G, E depending on model), cartridge support, citrus juicer (cone, driver, basket), mixing bowl, pestle, spatula, storage drawer |
| Main bowl material | Plastic (dishwasher safe) |
| Power supply | Mains (voltage varies by country) |
| Safety | Bowl and lid locking, automatic shut-off in case of overload (not specified) |
| Maintenance | Removable parts dishwasher safe, motor unit wipe with a damp sponge |
| Storage | Integrated storage drawer for knife and cartridges |
| Repairability | Authorized center only |
| Maximum kneading capacity | 600 g heavy dough, 500 g special bread dough |
| Maximum chopping capacity | 300 g food |
| Mixing capacity (main bowl) | 0.5 L |
| Pulse function | Yes, for better control |
| Optional accessories | Additional cartridges, grinder, mixing bowl, pestle, citrus juicer |
| Model number | DO250D |
Frequently Asked Questions - Store'Inn DO250D TEFAL
User questions about Store'Inn DO250D TEFAL
0 question about this device. Answer the ones you know or ask your own.
Ask a new question about this device
Download the instructions for your Food Processor in PDF format for free! Find your manual Store'Inn DO250D - TEFAL and take your electronic device back in hand. On this page are published all the documents necessary for the use of your device. Store'Inn DO250D by TEFAL.
USER MANUAL Store'Inn DO250D TEFAL
natural_image
Line drawing of a kitchen blender with handle and side panel (no text or symbols)F p. 5 - 12
NL p. 13 - 20
D p. 21 - 28
GB p. 29 - 36
I p. 37 - 44
AR p. 45 - 52
IR p. 53 - 60
text_image
j1 j3 j j2
text_image
i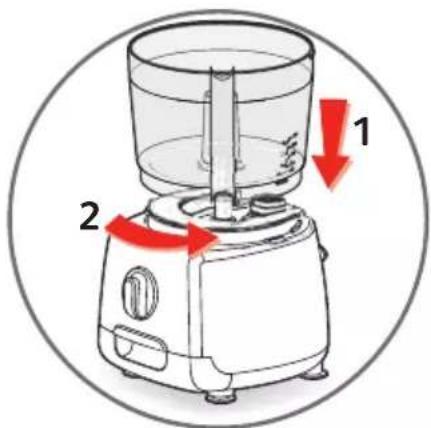
text_image
Diagram of a blender with labeled parts and red directional arrows indicating rotation or movement.fig.1a
text_image
3 4fig.1b
text_image
Diagram of a blender with labeled parts and red directional arrows indicating motion or flowfig.2afig.2c
text_image
3 4fig.2b

text_image
Diagram of a blender with red prohibition signs indicating opposing states, showing mechanical components and directional arrows.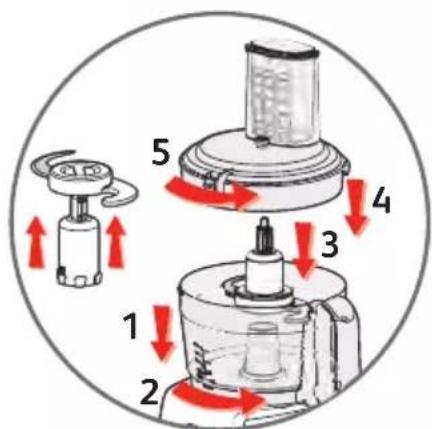
text_image
1 2 3 4 5fig.3fig.4a
text_image
1 2 3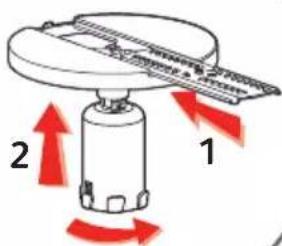
text_image
1 2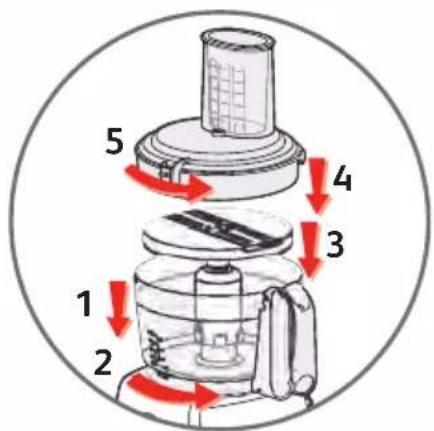
text_image
1 2 3 4 5fig.4b

text_image
Diagram illustrating mechanical gear assembly with red prohibition signs and upward arrows indicating motion or forcefig.5afig.6
text_image
1 2 3 4 5fig.5b

text_image
1 max 2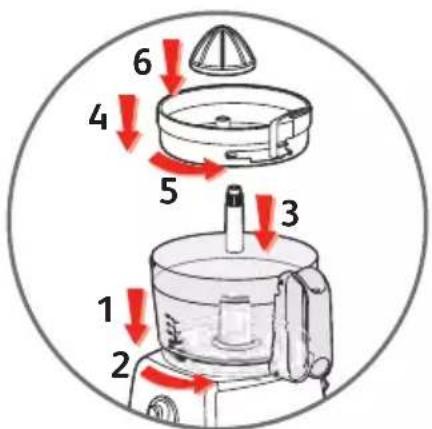
text_image
1 2 3 4 5 6fig.7
natural_image
Diagram of a washing machine with a red arrow indicating the process (no text or symbols present)fig.8
b Ensemble bol hachoir
g Support cartouches
h Bol mixer
- Ensemble presse-agrumes (j).
- Bol (b3).
The accessories contained in the model that you have purchased are shown on the label on the side of t packaging.
Safety guidelines
- Read carefully the instructions before using your appliance for the first time: the manufacturer may not hold responsible for any use that does not comply with the instructions.
- Check that the supply voltage of your appliance is the same as that of your electrical supply.
- This product has been designed for domestic use only. Any commercial use, inappropriate use or failure comply with the instructions, the manufacturer accepts no responsibility and the guarantee will not apply
- This appliance is not intended for use by persons (including children) with reduced physical, sensory or mental capabilities, or lack of experience and knowledge, unless they have been given supervision or instruction concerning use of the appliance by a person responsible for their safety. Children should be supervised to ensure that they do not play with the appliance.
- Unplug your appliance as soon as you have finished using it (even in the event of a power cut) and v you clean it.
- Do not use your appliance if it is not operating correctly or if it has been damaged. In this case, cont approved service centre (see list in the service manual).
- All work apart from the usual cleaning and maintenance by the owner must be carried out by an appr service centre (see list in the service manual).
- Do not immerse the appliance, the power cord or the plug in water or any other liquid.
- Do not leave the power cord within the reach of children.
- The power cord must not be left close to or in contact with the hot parts of your appliance, close to of heat or a sharp edge.
- If the power cord or the plug is damaged, do not use the appliance. In order to avoid any danger, there be replaced by an approved service centre (see list in the service manual).
- For your safety, only use accessories and spare parts adapted to your appliance, bought from an approv centre.
- Always use the food pushers to guide the food into the funnels, do not use your fingers, a fork, spoon or other objects.
- Handle the multi-purpose blade, the blender jug cutter, the mini chopper and the vegetable-cutter inserts vegetable-cutter with precaution: they are very sharp. You must remove the multi-purpose blade (d) by it drive pin (c) before emptying the contents from the bowl.
- Do not use your appliance empty.
• Always use your blender jug with its lid - Do not fill the blender jug with boiling liquid
- Do not touch moving parts; wait until they have stopped completely before removing the accessories.
- Do not use the accessories as recipients (freezing – cooking – hot sterilising).
- Do not use the accessories in a microwave oven.
- Do not allow long hair, scarves, ties, etc. to dangle over the bowl and accessories when in operation.
- Do not move your appliance by lifting or pulling the drawer.
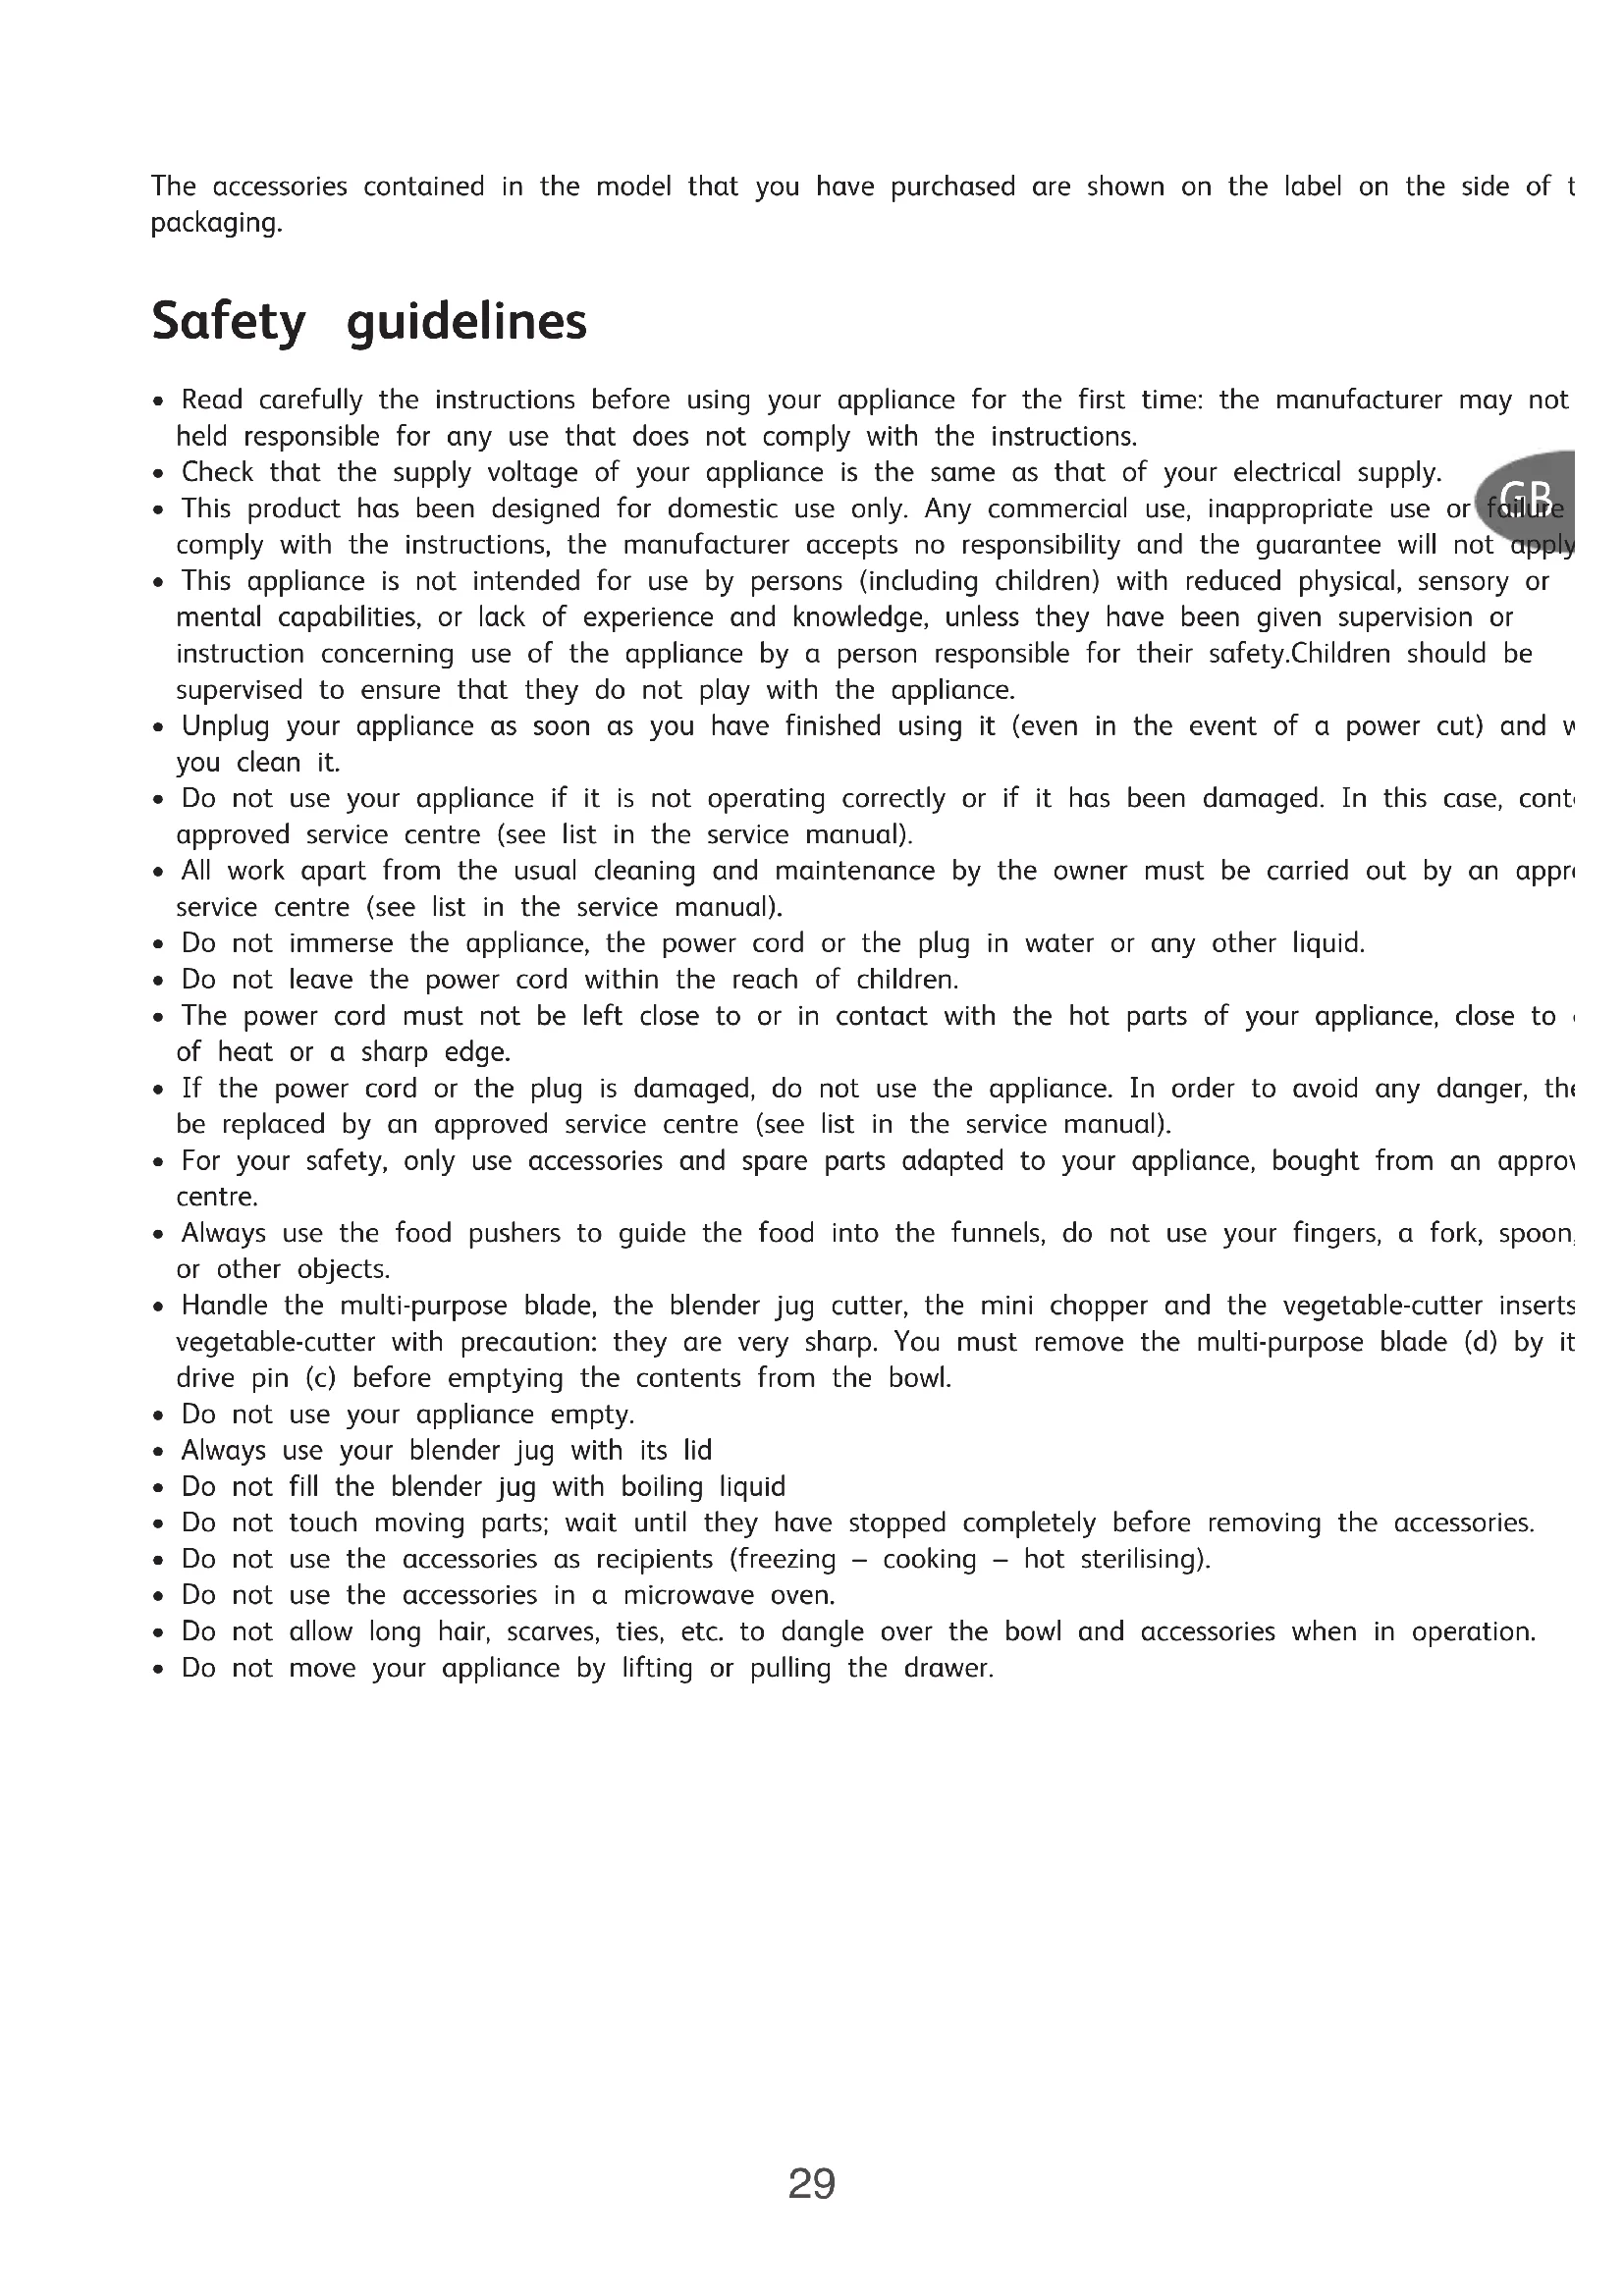
Description
a Motor unit
a1 : Motor unit slow speed
a2 : Motor unit fast speed
a3 : Speed selector: Pulse position (intermittent operation) -0-1-2
b Chopping bowl assembly
b1 : Food pusher with measuring guide
b2 : Funnel lid
b3 : Bowl
C Drive pin
ACCESSORIES DEPENDING ON MODEL:
d Multi-purpose blade
e Emulsifying disk
f Vegetable cutter inserts
g Insert supports for vegetable cutter inserts
h Blender jug
- Before using for the first time, wash all parts of the accessories in hot soapy water (see cleaning parag Rinse and dry.
- Place the motor unit (a) on a flat, clean and dry surface.
- Plug in your appliance.
- Pulse (intermittent operation): turn the knob (a3) to the pulse position, pressing successively for better control of certain preparations.
- Continuous operation: turn the knob (a3) to position 1 or 2.
- Stop: turn the knob (a3) to position 0.
The paragraphs are numbered to match the numbering of the illustrations.
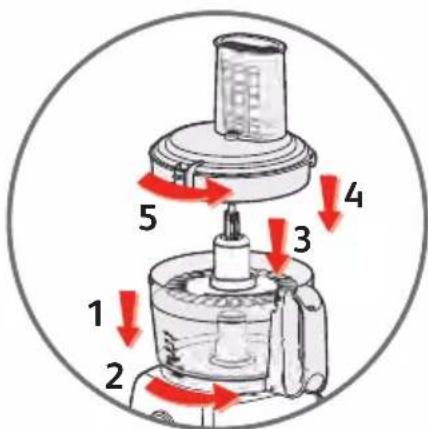
1 : Fitting the chopping bowl and the lid
ACCESSORIES USED:
- Bowl assembly (b).
FITTING THE ACCESSORIES:
- Fit the bow(b3) onto the motor unit (a), with the bowl handle positioned slightly to the right of the knob.
- Lock the bowl (b3) by turning it towards the right.
- Fit the lid (b2) onto the bowl (b3). Lock the lid in place by pushing it towards the right of the bowl handle. The bowl must be locked onto the motor unit (a) before locking the lid (b2) onto the bowl (b3).
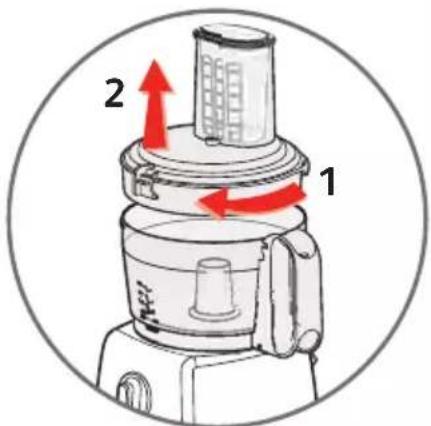
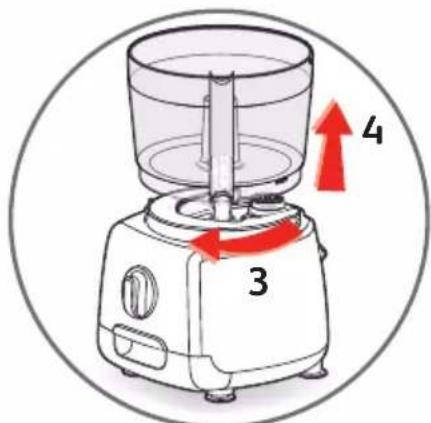
2 : Removing the chopping bowl and the
- Release the lid by turning it in a clockwise direction to free it from the bowl handle. You can then lift remove it.
- Release the bowl by turning it in a clockwise direction.
- It is only now that you can lift and remove the bowl from the motor unit.
3 : Mixing/chopping/kneading-
ACCESSORIES USED:
- Bowl assembly (b).
- Drive pin (c).
- Multi-purpose blade (d).
FITTING THE ACCESSORIES:
- Fit the bow(b3) onto the motor unit (a) and lock it in place.
- Slide the multi-purpose blade (d) onto the drive pin (c), and position this assembly on the motor unit drive (a1).
- Place the ingredients in the bowl.
- Fit the lid (b2) and lock it onto the bowl (b3).
- To remove the bowl-lid assembly: release the lid then release the bowl.
KNEADING/MIXING:
- Turn the speed selector(3) to position 2 to start.
You can knead up to:
- 600g of heavy pastry, such as: white bread dough, short crust pastry, etc. in 30 seconds.
- 500g of special bread dough such as: rye bread, wholemeal bread, multi-grain bread, etc. in 30 secor You can mix up to:
- 600g of light mixture, such as: biscuits, sponge cake, etc. in 1 min 30 sec.
You can also mix up to 0.5 litre of pancake or waffle batter etc. in 1 min to 1 min 30.
CHOPPING:
- Turn the speed selector3) to position 2 to start, or for better chopping control, choose the pulse positio. You can mince up to 300g of food such as:
. raw or cooked meat (boned, gristle removed and cut into cubes).
. raw and cooked fish (without skin or bones).
. hard foods: cheese, dried fruits, certain vegetables (carrots, celery, etc.).
. soft foods: certain vegetables (onions, spinach...).
BLENDING:
- Turn the speed selector(3) to position 2 to start.
You can mix up to 0.5 litre of broth, soup or stewed fruit in 20 seconds.
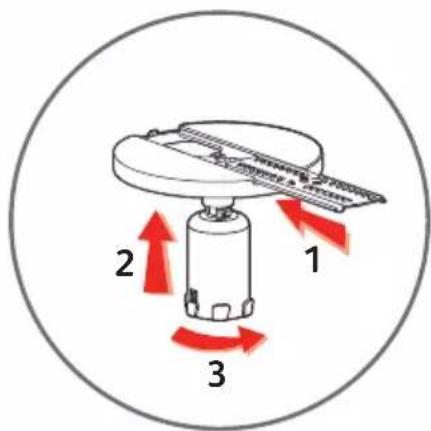
4 : Grating/slicing
ACCESSORIES USED:
- Bowl assembly (b).
- Drive pin (c).
- Appropriate insert (f) (depending on model).
- Insert support (g).
FITTING THE ACCESSORIES:
- Fit the bow(b3) onto the motor unit (a) and lock it in place.
- Fit the chosen insert (f) into the insert support (g), push the drive pin (c) as far as possible through the insert (f), and lock the assembly, then fit it onto motor unit drive (a1).
- Fit the lid (b2) and lock it onto the bowl (b3).
- To remove the bowl-lid assembly: release the lid, then release the bowl.
STARTING AND TIPS:
- Insert the food into the lid funnel and guide it with the food1pusher
- Turn the speed selector (a3) to position 1 to slice or position 2 to grate.
You can prepare with the inserts (depending on model):
. coarse grating (C)/fine grating (A): celeriac, potatoes, carrots, cheese...
. thick slicing (H)/fine slicing (D): potatoes, onions, cucumbers, beetroot, apples, carrots, cabbage...
. chip cutter (E): French fries...
. parmesan disk (G): parmesan, coconut...
5 : Emulsifying/beating/whisking-
ACCESSORIES USED:
- Bowl assembly (b).
- Drive pin (c).
- Emulsifying disk (e).
FITTING THE ACCESSORIES:
- Fit the bow(b3) onto the motor unit (a) and lock it in place.
- Slide and lock the emulsifying disk (e) the right way up onto the drive pin (c), and fit the assembly onto the motor unit drive (a1).
- Place the ingredients in the bowl.
- Fit the lid (b2) and lock it onto the bowl (b3).
- To remove the bowl-lid assembly: release the lid then release the bowl.
Fit the emulsifying disk the right way up: see illustration 5.
STARTING AND TIPS:
- Turn the speed selector(3) to position 2 to start.
- Do not use this accessory to knead heavy pastry or mix light pastry.
You can prepare: mayonnaise, aioli, sauces, egg whites (1 to 6), whipped cream, Chantilly cream (up to 0. litres).
— 6 : Homogenising/mixing/fine blending (depending on model)
ACCESSORIES USED:
- Assembled blender jug (h).
- Blender stick (l) (depending on model)
FITTING THE ACCESSORIES:
- Place the ingredients inside the blender(jug) below the maximum level line on the jug.
- Fit the lid (h2), equipped with the measuring cap (h1), and lock it in place on the jug.
- Place the jug assembly (h) onto the motor unit drive (a2), with the blender jug handle facing you.
- Wait until the food processor has stopped completely before removing the blender jug from the motor
STARTING AND TIPS:
- Turn the speed selector(3) to position 1 or 2 to start.
You can use the pulse position, for better control of the mixture. - Do not fill the blender jug with boiling liquid.
- Do not use the blender jug to grind dry foods (walnuts, almonds, peanuts...).
• Always use your mixer bowl with its lid. - Always pour liquid ingredients first into the jug before adding the solid ingredients, below the maximum capacity:
- 1 l for thick mixtures.
- 0.8 l for liquid mixtures.
- To add ingredients when blending, remove the measuring cap (h1) from the lid and pour the ingredients through the filling hole, and do not fill above the maximum filling line on the jug.
Maximum operating time: 3 min.
Tips:
- When blending, if some ingredients stick to the sides of the jug, stop the appliance and unplug it. Rem blender jug assembly from the appliance. Using the spatula, push the preparation onto the blade. Do no your hands or fingers inside the bowl or close to the blade.
- The blender stick allows you to homogenise and process your preparations (especially thicker ones) inside the blender jug. Insert the stick through the centre hole of the blender jug lid (h2). When operating, push the food towards the blades using the stick.
- Do not use the stick (l) without the lid otherwise it will touch the blades.
You can:
- prepare finely blended broths, veloutés, soups, stewed fruit, milk-shakes, smoothies, cocktails.
- mix all kinds of batters (pancakes, doughnuts, clafoutis).
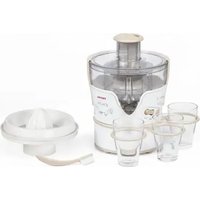
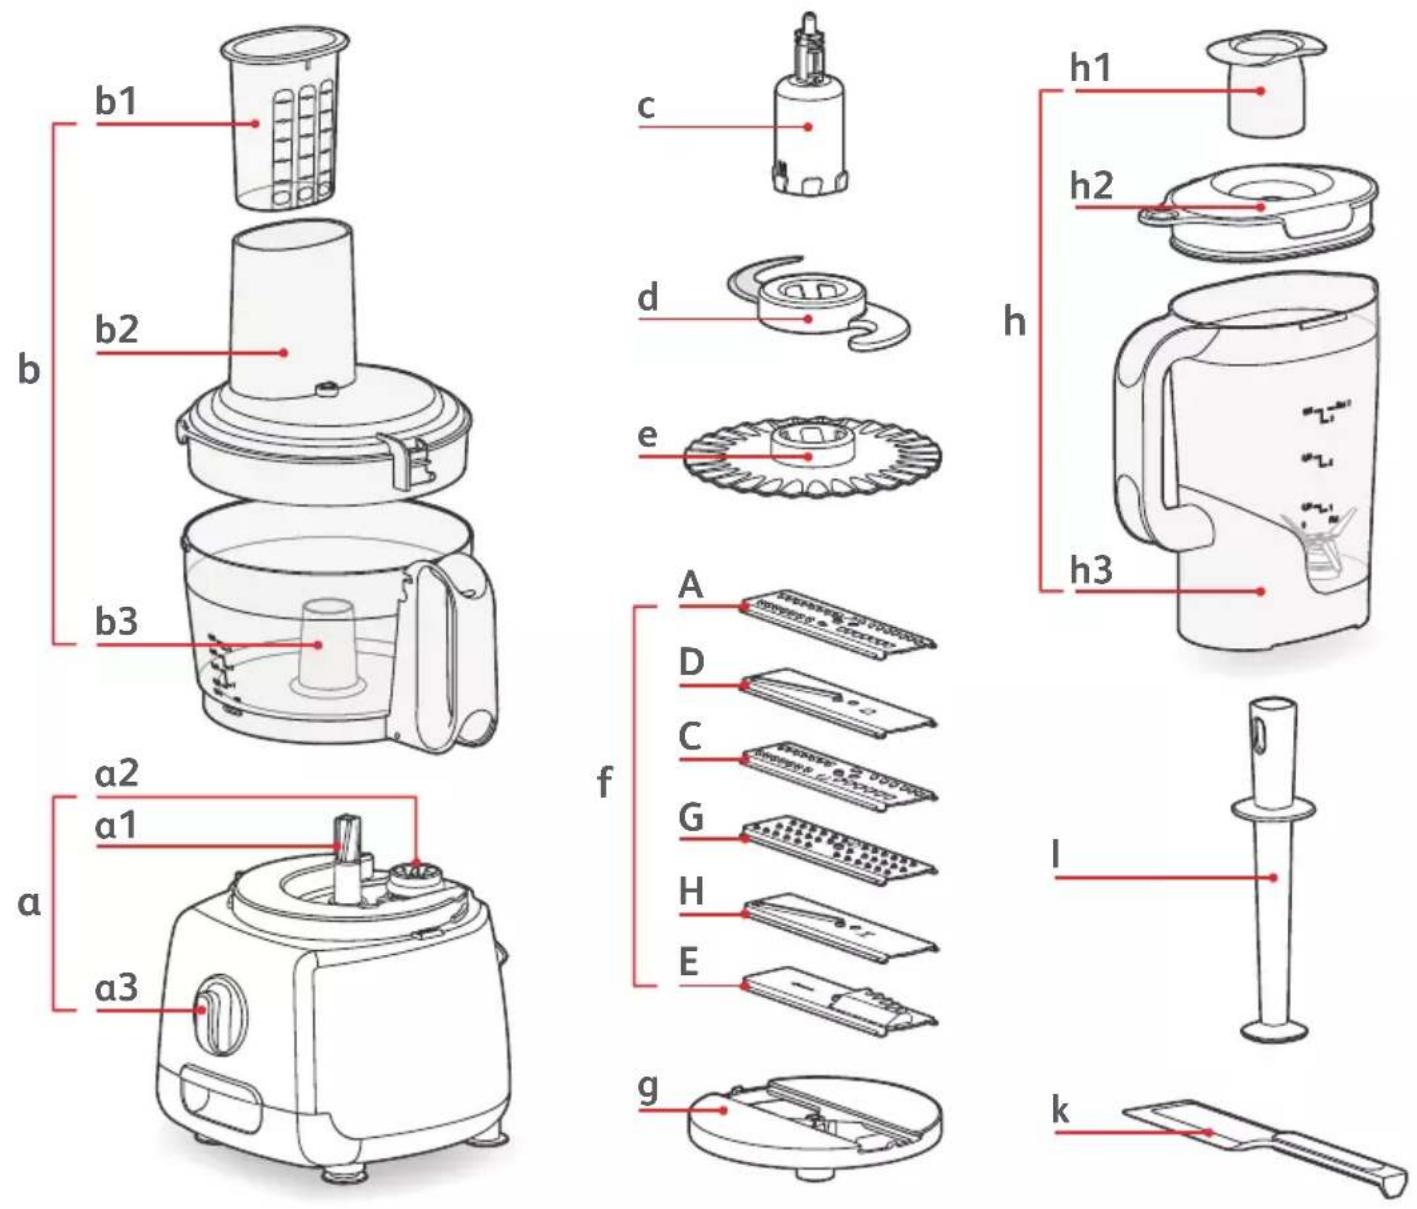
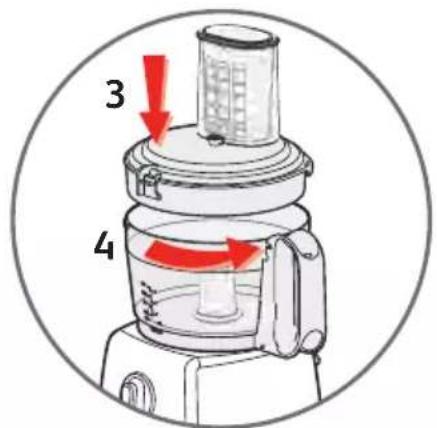
7 : Juice fruits (depending on mod
ACCESSORIES USED:
- Fruit juicer assembly (j).
- Bowl (b3).
FITTING THE ACCESSORIES:
- Fit the bow(b3) onto the motor unit (a) and lock it in place.
- Slide the drive pin (j2) onto the motor unit drive (a1).
- Place the basket (j3) onto the bowl and lock it in place.
- Fit the cone (j1) onto the basket funnel (j3).
- To remove the fruit juicer assembly: release the basket (j3) then the bowl and you can then remove the assembly from the motor unit.
STARTING AND TIPS:
- Cut the fruit in half and hold in place on the cone (j1).
- Turn the speed selector (a3) to position 1 to start.
You can get up to 0.6l of fruit juice without emptying the bowl. - Caution: you must rinse the basket every 0.2l.
GB
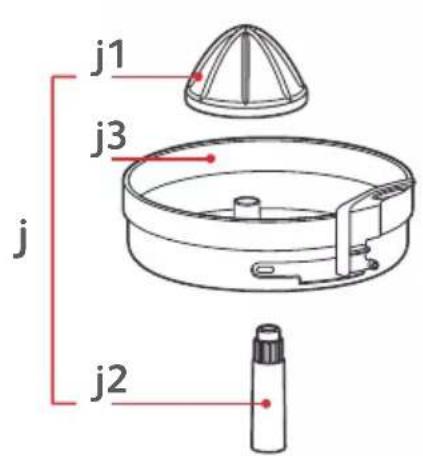
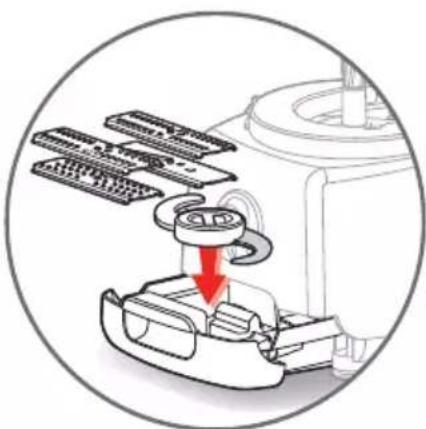
8 : Storage of the accessories
- Your food processor has a built-in storage drawer (i) where you can place the multi-purpose blade (d), and the 4 vegetable cutter inserts (f).
- After putting the accessories inside, slide the storage drawer (i) inside the motor unit (a).
9 : Finely chopping small quantities (depending—on model)
ACCESSORIES USED:
- Chopping assembly.
- Finely chop in seconds: dry apricots, dry figs, cored prunes: quantity/maximum time: 40g/6 seconds.
Cleaning
- Unplug the appliance.
- To make cleaning easier, rinse the accessories each time after use.
- Wash and dry the accessories: they are dishwasher proof.
- Pour hot water with a few drops of washing up liquid into the blender jug (h3). Close the lid (h2), with the measuring cap (h1) fitted. Press the pulse button a few times. Unplug the appliance. Rinse the jug.
- Do not immerse the motor unit (a) in water, or place it under running water. Wipe it with a damp sponge.
- The blades of the accessories are very sharp. Handle them with precaution.
Tip: If your accessories are stained by food (carrots, oranges...), wipe them with a cloth soaked with cook then clean as usual.
Storage
- Do not store your food processor in a damp place.
- Use the storage drawer (i) to store the multi-purpose blade (d) and up to 4 vegetable-cutter inserts (f).
If your appliance will not operate, what should you d
- If your appliance will not operate, check:
- that your appliance is plugged in correctly.
- that each accessory is locked in place correctly.
- If your appliance will still not operate, contact an approved centre service (see list in the Service manual)
Disposal of packaging materials and the appliance

- The packaging only contains materials that are harmless to the environment that may be disp of according to recycling standards.
To scrap off your appliance, contact the appropriate department of your local council.
Disposal of electronic or electrical products

Help protect the environment!
Your appliance contains many materials that may be recycled or recovered.
Take it to a local civic waste collection centre to be processed.
Accessories
- You can customise your appliance with the following accessories, which may be purchased from an appr service centre:
- Vegetable cutter inserts
A: fine grater
D: fine slicer
C: Coarse grater
H: Thick slicer
G: Reibekuchen/Parmesan grater
E: Chip cutter
- Mini chopper
- Blender jug
- Blender stick
- Fruit juicer
A few basic recipes
White bread dough
375g white bread making flour - 225ml warm water - 1 sachet of baker's yeast - 5g salt.
In the food processor bowl equipped with the multi-purpose blade, add the flour, salt and yeast. Operate at speed 2, and in the first few seconds, add the warm water through the lid funnel. As s the dough forms a ball (after about 30secs), stop the food processor. Leave the dough to rise in a place, until it has doubled in volume. Then work the dough to shape it, and then place it on your and floured baking tray. Leave it to rise again. Preheat French Electric oven to Th.8 (240°). As soon bread has doubled in volume, place it in the oven, and lower the temperature to Th.6 (180°). Leave for 30 min. At the same time, in the oven, add a glass of water to help form the crust on hr bre For the UK only
Use strong bread flour. Substitute 1 sachet of bakers yeast with 1 teaspoon of Easy Bake or Fast A dried yeast and add to the bowl with the flour, before adding the water. After processing, shape the dough into a ball and then leave to rise for about 1 hour in a warm place until doubled in size. S cook as directed above. Cook using UK gas mark 9 and then reduce to UK gas mark 4.
Pizza dough
150g white bread making flour - 90ml warm water - 2 tablespoons of olive oil - 12 sachet of bak salt.
In the food processor bowl equipped with the multi-purpose blade, add the flour, salt and yeast. Operate at speed 2, and in the first few seconds, add the warm water and olive oil through the lid. As soon as the dough forms a ball (after about 15 to 20secs), stop the food processor. Leave the to rise in a warm place, until it has doubled in volume. Preheat French Electric oven to Th.8 (240°), the dough and add the garnish: tomato purée and onions, mushrooms, ham, mozzarella, etc. Add a anchovies and black olives if you wish, sprinkle with a little oregano and grated cheese, and pour a drops of olive oil over it. Place the pizza on your buttered and floured baking tray. Put in the oven to 20 min, watching as it cooks.
For the UK only
Use strong bread flour. Substitute half sachet of bakers yeast with half teaspoon of Easy Bake or Fast Action dried yeast and add to the bowl with the flour, before adding the water. After processing, p and cook as directed above or using UK gas mark 9.
Short crust pastry
280g flour - 140g softened butter - 70 ml water - a pinch of salt
In the food processor bowl equipped with the multi-purpose blade add the flour, salt and the butter. Operate at speed 2 for a few seconds, then add the water through the lid funnel. Let it run until it has formed a ball (25 to 30 secs). Leave it to rest in a cool place for at least 1 hour, before rolling and cooking it with the ingredients of your choice.
Pancake batter
(in food processor bowl equipped with the multi-purpose blade, or in the blender) 160g flour - 1/3l milk - 2 eggs - 12 teaspoon fine salt - 2 tablespoons oil - 10g sugar (optional) (depending on your taste)
In the food processor bowl equipped with the multi-purpose blade, add all of the ingredients: flour, sugar and rum. Operate at speed 1 for 20 secs, then switch to speed 2 for 25 secs.
In the blender jug, add all of the ingredients except the flour. Operate at speed 2, and after a few progressively add the flour, through the centre hole of the blender jug lid, then mix for 45 secs.
Pound cake-
150g plain flour - 150g softened butter - 150g caster sugar - 3 whole eggs - 12 sachet or 112 ts powder - 1 pinch of salt
In the food processor bowl equipped with the multi-purpose blade, add all of the ingredients. Opera speed 2 for 1 min 30 secs. Preheat the oven to French Electric oven Th.6 (180°). Place the prepara a cake tin, then cook for about 40 min.
GB
Spice cake
150g plain flour - 70g softened butter - 70g caster sugar - 3 eggs - 50 ml milk - 2 teaspoons b powder - 1 teaspoon ground cinnamon - 1 teaspoon ground ginger - 1 teaspoon grated nutmeg - orange rind - 1 pinch of pepper.
In the food processor bowl equipped with the multi-purpose blade, add all of the ingredients. Select 2 and operate for 50 secs. Place in a buttered and floured baking tin, and cook for about 50 min Electric oven Th 6 (180°C).
Serve warm or cold with stewed fruit or marmalade.
Moist chocolate cake
5 eggs, 200g caster sugar, 3 tablespoons plain flour, 200g melted butter, 200g chocolate, 3 level tea baking powder, 100 ml milk.
Melt the chocolate in a bain-marie, or in a bowl over a pan of simmering water, with 2 tablespoon water. Add the butter and stir until the mixture is thoroughly mixed.
In the food processor bowl equipped with the multi-purpose blade, add the sugar and the eggs and operate at speed 2 for 45 secs so that the mixture becomes frothy. Without stopping the food pro through the funnel in the lid, add the melted chocolate, flour, baking powder and milk. Operate for Pour into a buttered tin and cook for around 1 hour, at French electric oven Th5/6 (160°C).
Chantilly Cream
200 ml of very cold, fresh liquid UHT cream, 30g icing sugar.
The bowl must be very cold, place it in the refrigerator for a few minutes.
In the bowl equipped with the emulsifying disk, add the fresh cream and the icing sugar. Select sp operate for 40 secs.
Mayonnaise
1 egg yolk, 1 tablespoon of mustard, 1 tablespoon of vinegar, 14 litre of oil, salt, pepper.
In the bowl equipped with the emulsifying disk, add all the ingredients except the oil. Select speed operate for 5 secs, then stop the food processor, pour the oil in very slowly through the lid funnel. the mayonnaise is stiff, it becomes pale in colour.
Attention: to make good mayonnaise, the ingredients must be at room temperature.
Note: keep in the refrigerator and eat within 24 hours.
بتق payable الخضار (f).