
CA05072 - Hand truck V7 - Free user manual and instructions
Find the device manual for free CA05072 V7 in PDF.
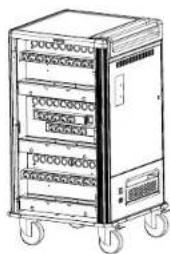
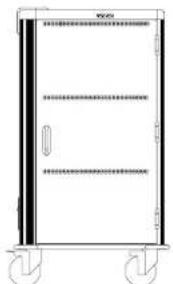
| Product Type | Charging Cart |
| Brand | V7 |
| Model | CA05072 |
| Device Capacity | 30 |
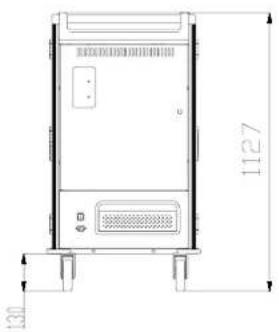
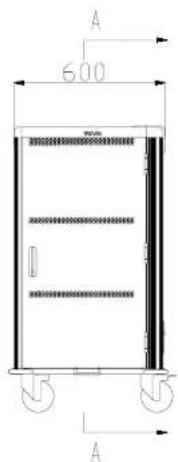
| Cart Dimensions (W x D x H) | 810 x 652 x 1080 mm |
| Net Weight | 91 kg |
| Gross Weight (packed) | 109 kg |
| Material | 18-gauge cold-rolled steel |
| Color | Black and dark gray |
| Input Voltage | 230 V AC, 15 A, 60 Hz |
| Output Voltage | 230 V AC, 15 A, 60 Hz |
| Charging System | Smart charging with anti-overload timer |
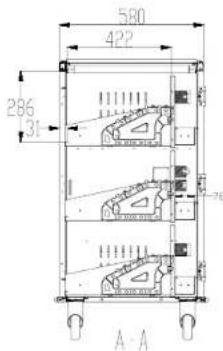
| Device Slot Dimensions | 422 x 35 x 286 mm |
| Adapter Slot Dimensions | 78 x 463 x 114 mm |
| Casters | Diameter 12.7 cm |
| Warranty | 5-year limited |
| Operating Temperature | -10 °C to 40 °C |
| Operating Humidity | 20 % to 80 % RH |
| Storage Temperature | -40 °C to 60 °C |
| Storage Humidity | 20 % to 90 % RH |
| Certifications | CL, RoHS |
| Safety | Lockable with padlock, ventilation, indoor use only |
| Maintenance | Clean with a dry cloth; do not use chemicals |
| Repairability | No user-replaceable parts; repair by manufacturer only |
| Package Contents | Charging cart, power cord (1.83 m), keys, manual |
Frequently Asked Questions - CA05072 V7
User questions about CA05072 V7
0 question about this device. Answer the ones you know or ask your own.
Ask a new question about this device
Download the instructions for your Hand truck in PDF format for free! Find your manual CA05072 - V7 and take your electronic device back in hand. On this page are published all the documents necessary for the use of your device. CA05072 by V7.
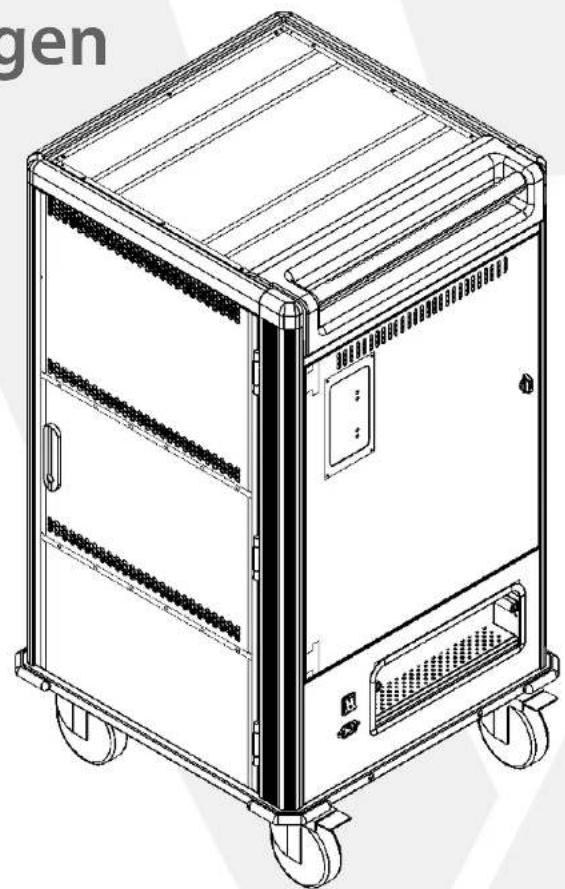
USER MANUAL CA05072 V7
To reduce risk of electric shock only use this product indoors.
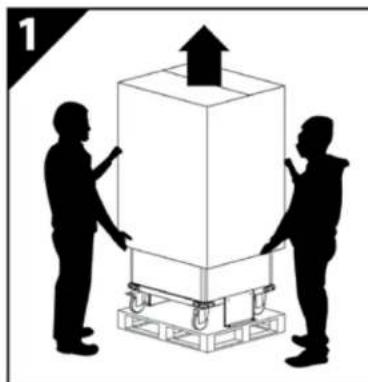
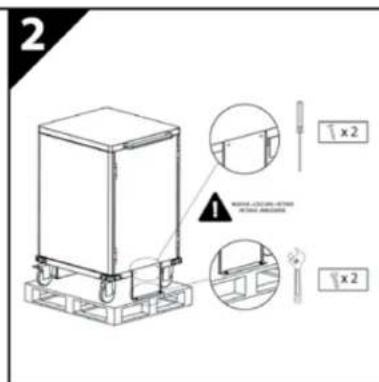
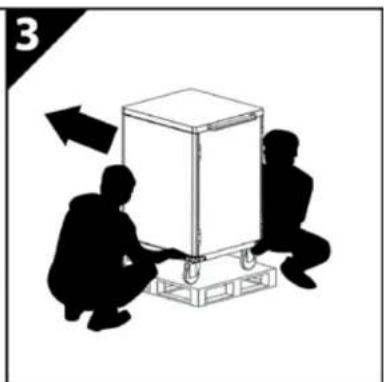
This product is heavy. Use caution handling and keep upright. Do not attempt to unpack or move it unassisted.
- Use caution when unpacking and save the packing material for later use. Scratches and other damage caused by mishandling is not covered by the warranty.
- Do not allow anyone to sit, stand, or climb on this product
- Do not block the ventilation holes used for air circulation.
- Do not overload heavy objects on or inside this product.
- Before moving this product, disconnect the power from the wall outlet.
While moving this product, make sure the power cord is secured.
- This product should always be used by adults or with adult supervision.
- Never unplug this product from the outlet when hands are wet or by pulling the power cord.
- Do not use an extension cord in conjunction with this product.
- Connection to any other type of receptacle other than a two-pole, three-wire grounded receptacle may result in shock hazard as well as violate local electrical codes.
- In the event of an emergency, disconnect the power cord from the AC power outlet.
- Do not plug the input of this product into its own output.
- Do not attach an additional extension cord, power strip, or surge protector to this product.
Do not attach non-computer-related items, such as medical equipment, life-support equipment, microwave ovens, or vacuum cleaners to this product.
- Place cables in such a way that they won't be pulled or snagged, and no one can step on or trip over them.
Do not attempt to disassemble this product. This product contains no user replaceable parts. Only factory service personnel may perform repairs.
If this product is misused, incorrectly operated or repaired, the warranty will be void.
- Do not remove plugs from outlets in use labeled "Do not remove" with a red sticker. These are required for the charging system and auxiliary outlets of the cart to function.
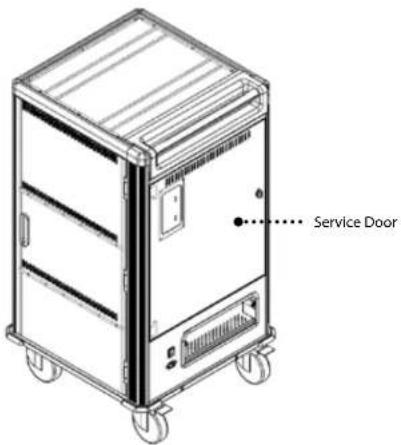
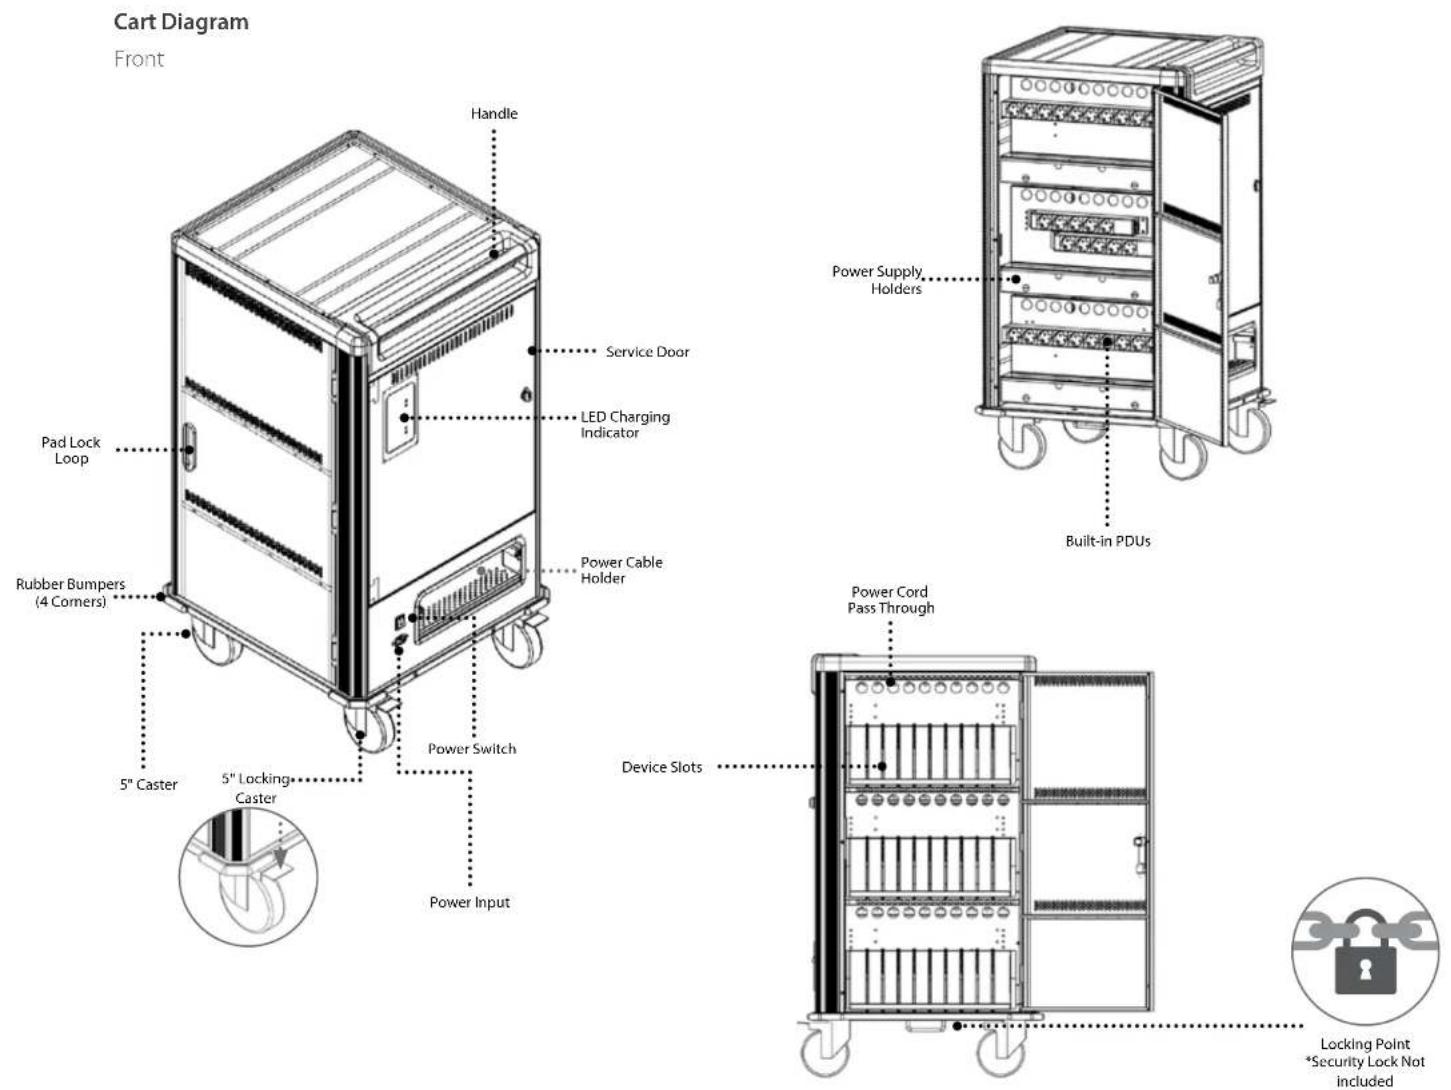
- Service Door - Please open only if requested by V7 Technical Support.
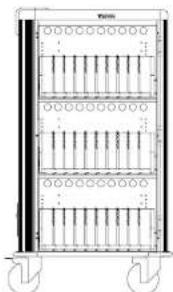
GETTING STARTED
Package includes
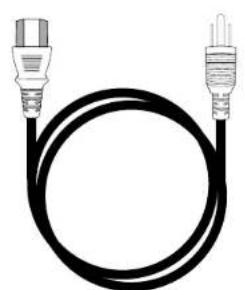
- AC Power Cord
- Keys
AC Power Cord Keys

Remove from pallet

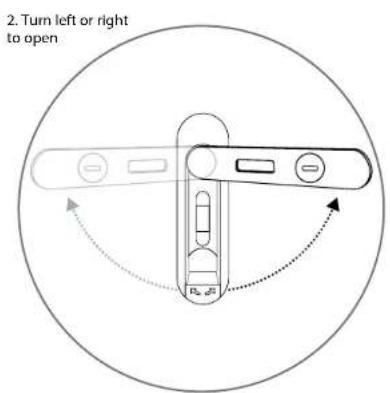

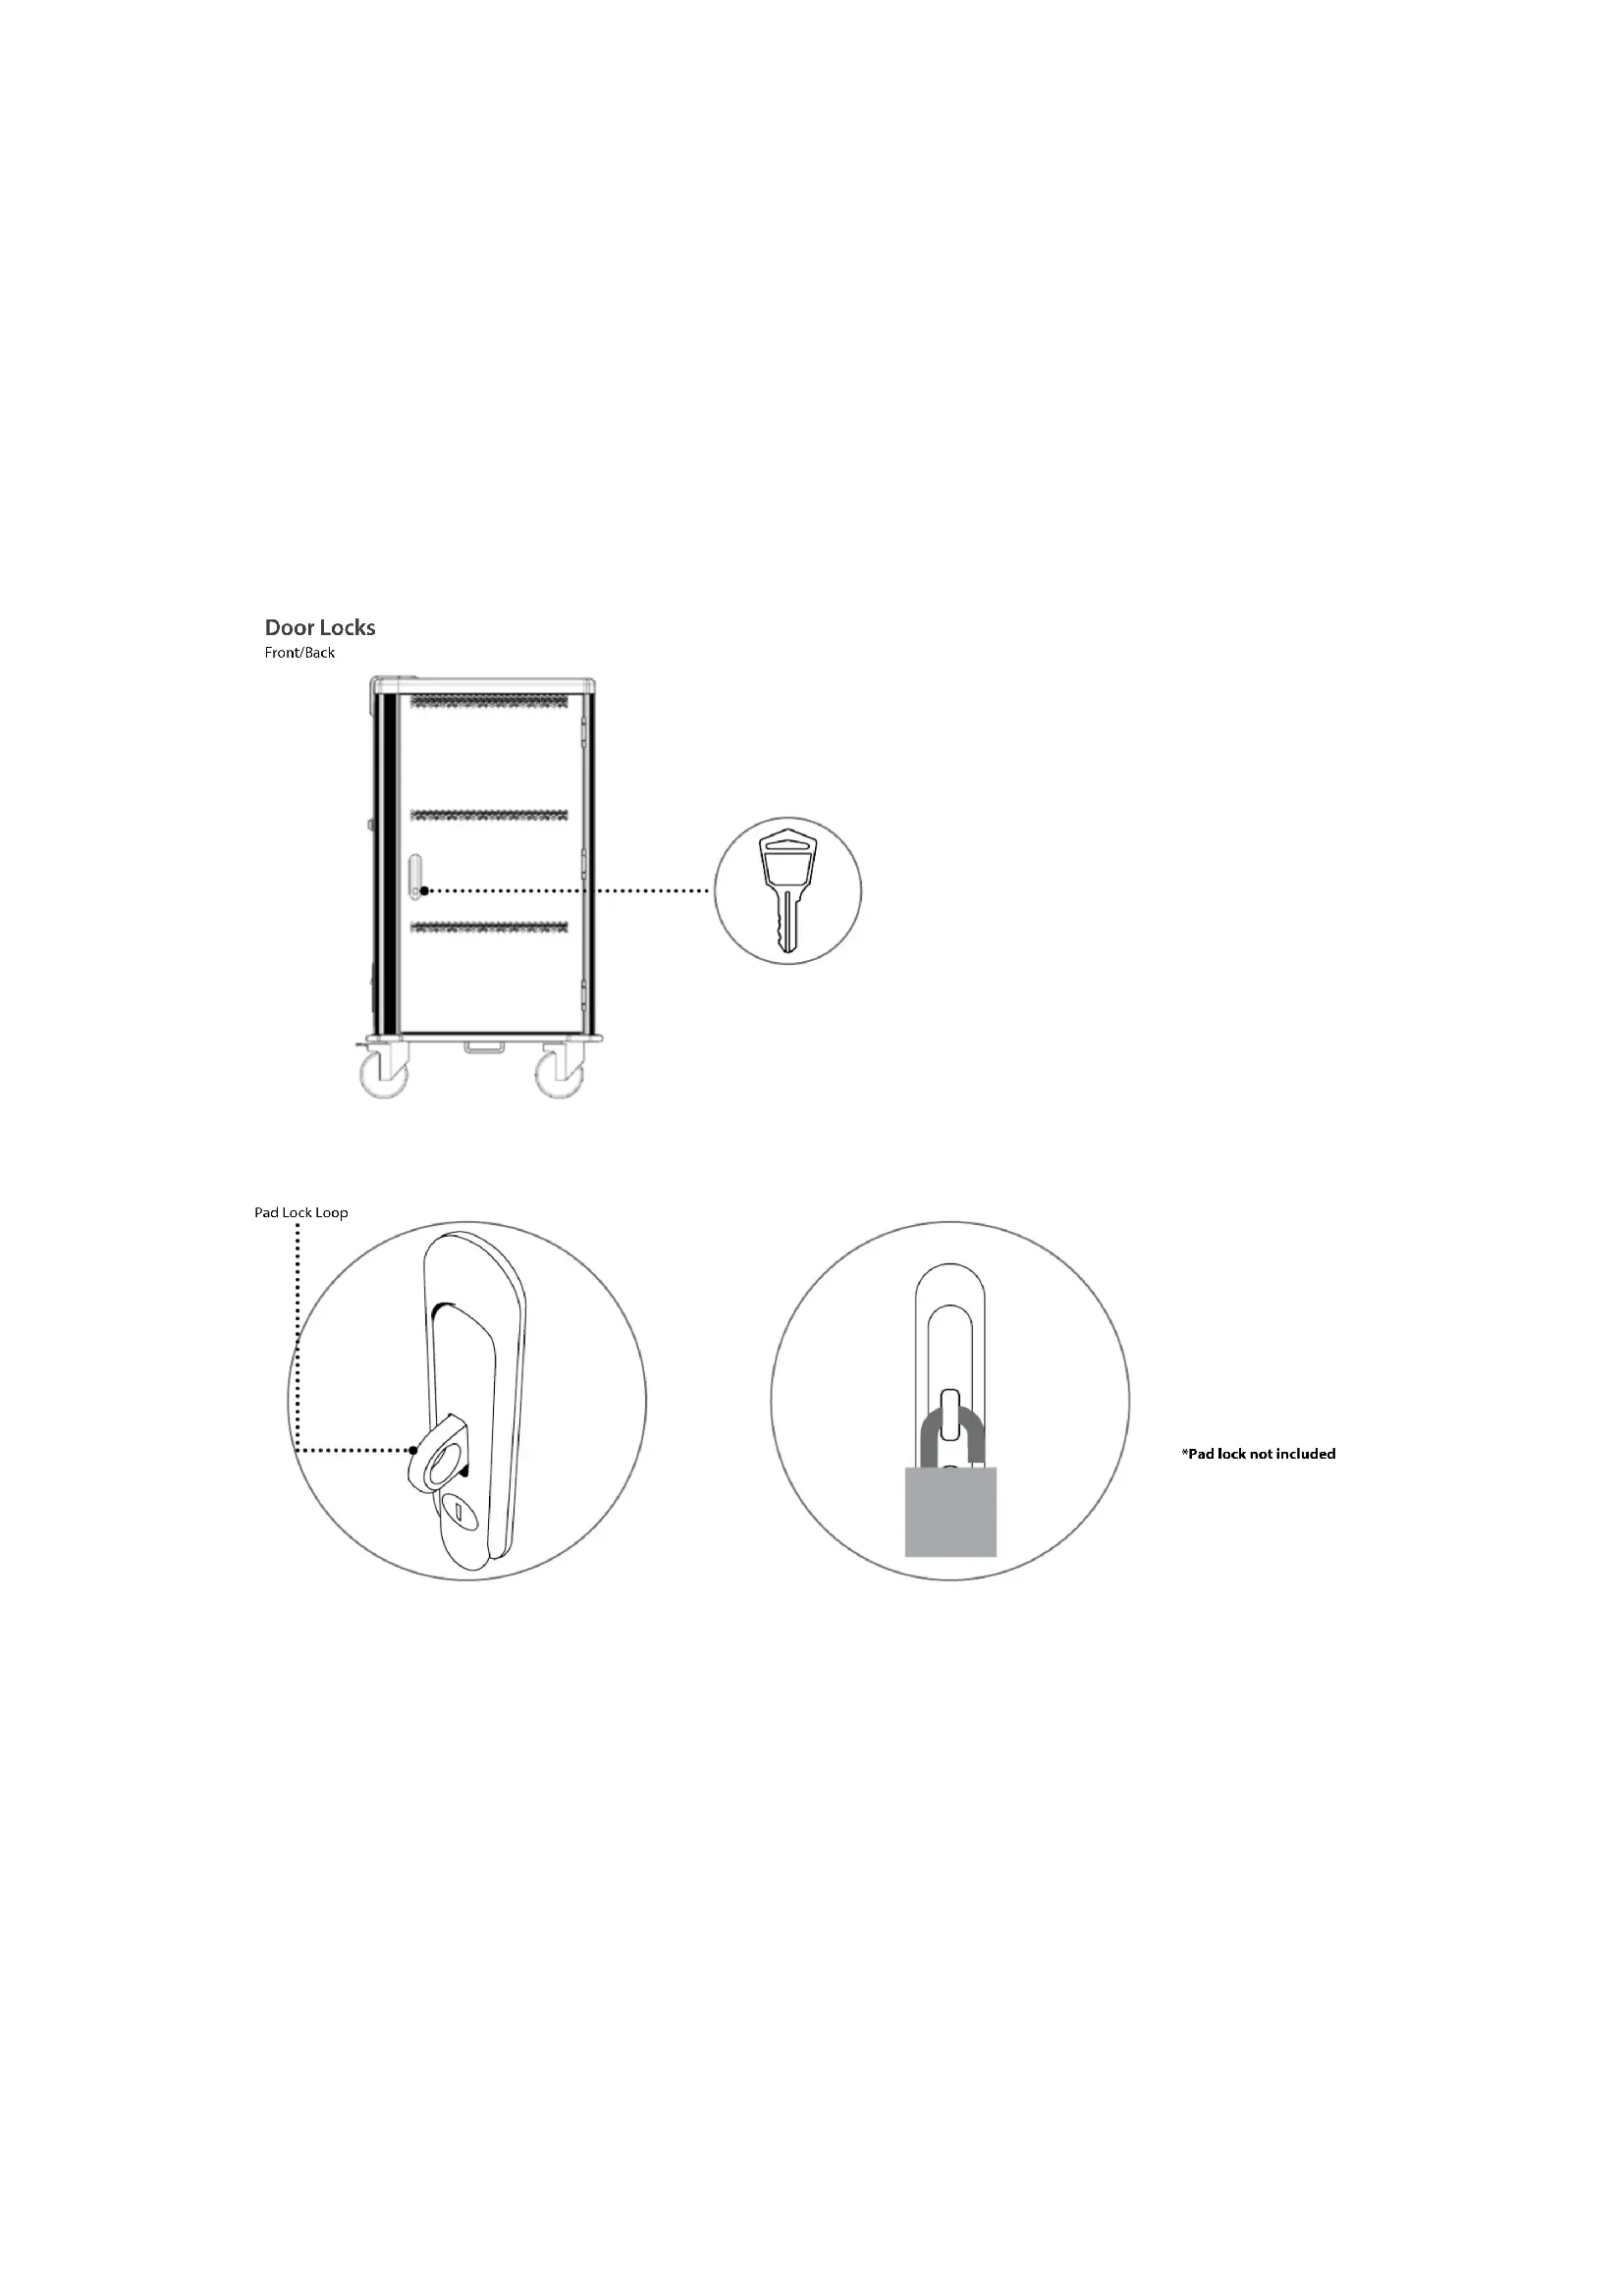
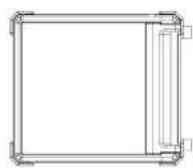
Door Locks Front/Back
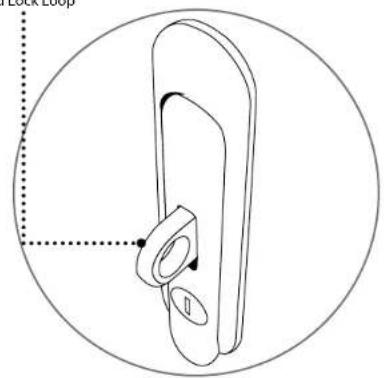
Pad Lock Loop
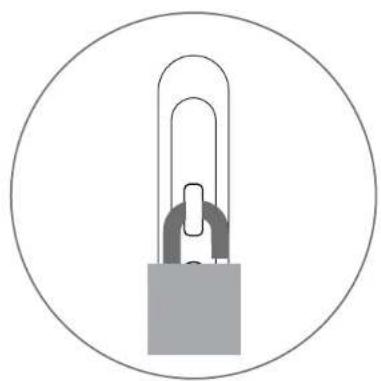
*Pad lock not included
- Plug cart into outlet
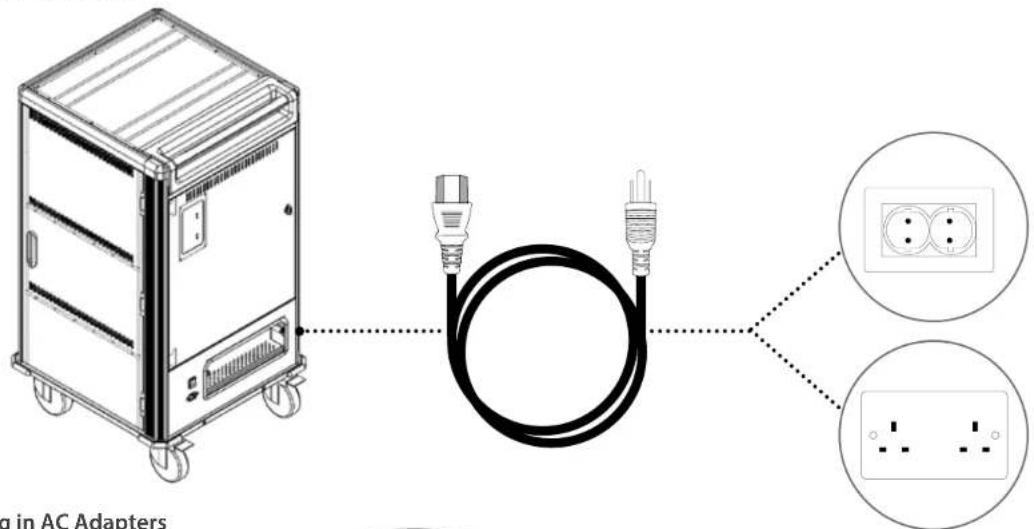
- Plug in AC Adapters
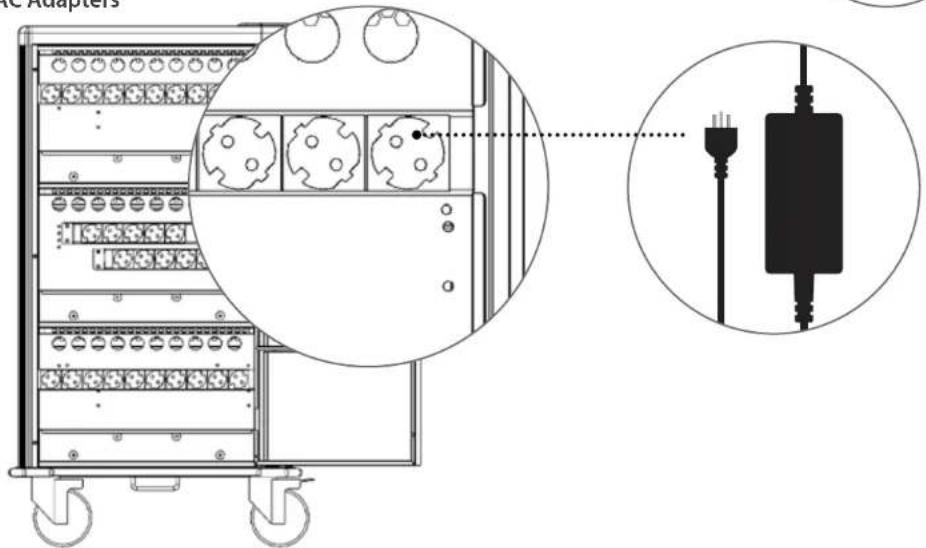
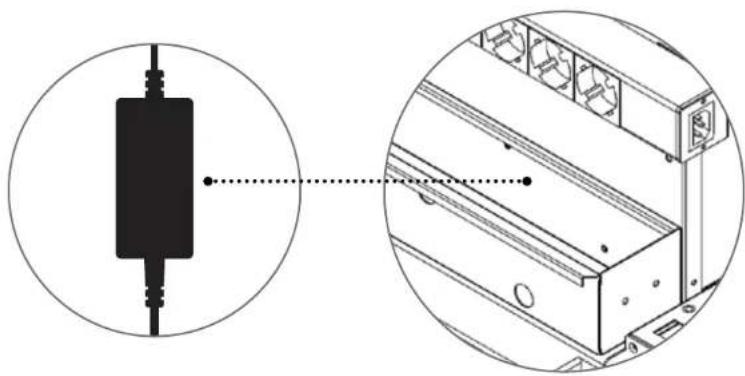
3. Place adapters into power supply holders

4. Insert the adapters through the pass through holes
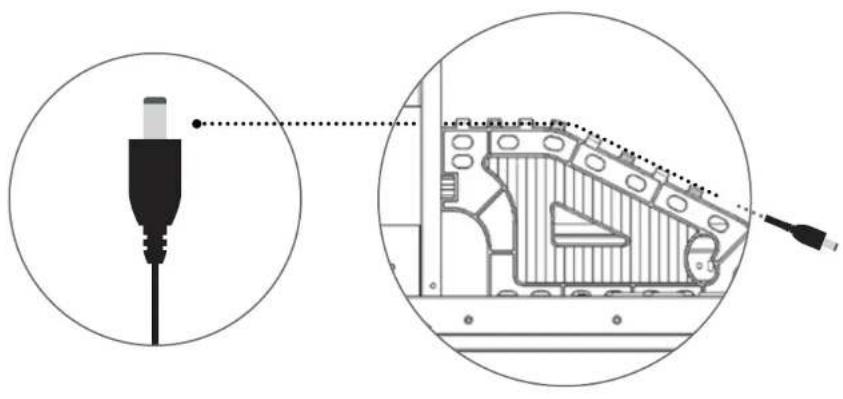
5. Place the adapter wires on the cable holder dividers
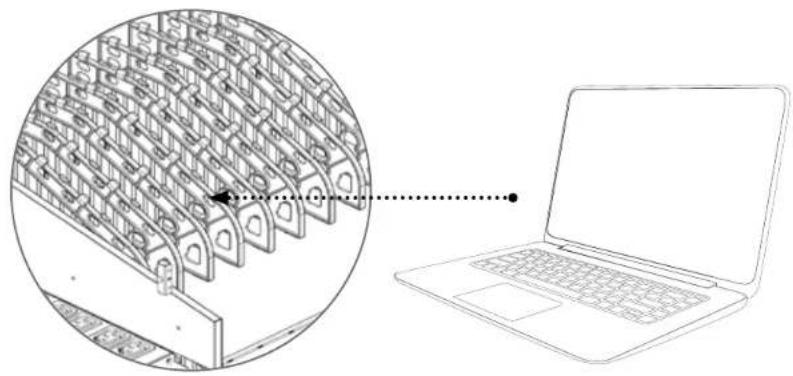
6. Place the devices in the dividers
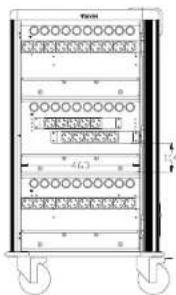
Charging System
Charging System
Charg all of your devices at one time can overload a typical circuit. V7 Charge Carts are equipped with an intelligent timing device that automatically switches the AC power supply from one half of the device outlets to the other to help protect against overload.
The charging system will provide power to the first half of the outlets for 15 minutes. When that time expires, the cart will change power to the other set, and continue to alternate sides. Once the total current is less than 14 amps, it will power all the outlets at once.
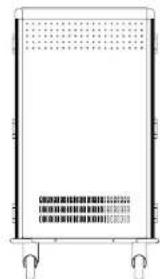
The LED indicator on the outside of the cart will show you which set is currently charging.
| Charging System Bank Sensor Intelligent | |
| How it Charges | Cycle charging between 2 groups. When total current is less than 14a, full charging starts |
| LED Indicator | Red (On): Charging Off: Not Charging |
| Time to Charge 36 Computers 4.5 hours | |
| Cart Switches to Full Charging After 6 cycles (~3 hours) | |

The LED indicator
will illuminate red
when charging
TECHNICAL SPECS
Cart Dimensions
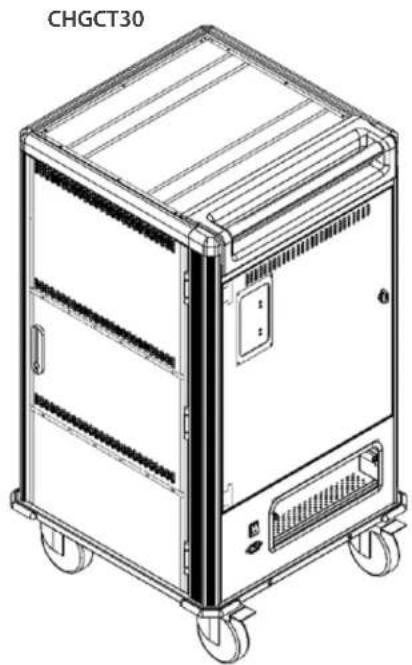
| CHGCT30 | |
| Color Black and Dark Gray | |
| Material High-grade 18 gauge cold rolled steel | |
| Numbered Device Spaces 30 | |
| Organization and convenience | flexible device dividers with cable channels and num- bered device slots, numbered power adapter slots with cable management, recessed push handle |
| Warranty 5 Year | |
| Package Contents Charging Cart, 6 ft (1.83 m) Power Cord, Manual | |
| Input Voltage 230VAC, 15A, 60HZ | |
| Output Voltage 230VAC, 15A, 60HZ | |
| Charging System Intelligent Charging | |
| Rolling Casters size 5 in (12.7 cm) | |
| Product Dimensions 31.89 x 25.6 x 42.52 in (810 x 652 x 1080 mm) | |
| Product Weight 200.62 lbs (91 kg) | |
| Package Size 33.27 x 29.61 x 50.08 in (845 x 752 x 1272 mm) | |
| Package Weight | 240.3 lbs (109 kg) |
| Device slot dimensions | 16.61 x 1.38 x 11.25 in (422 x 35 x 286 mm) |
| Power adapter slot dimensions | 3.07 x 18.22 x 4.48 in (78 x 463 x 114mm) |
| Safety & Compliance | ROHS, CF approved power distribution units |
| Environment* | "Operating: -10°C to 40°C Humidity: 20% to 80% RH Storage: -40°C to +60°C Humidity: 20% to 90% RH" |
*Note: For this charge cart only. Check the environment specifications of the devices you are storing.
Ladewagen
CHGCT30-1E
CHGCT30-1K
4 Specifications techniques
AVERTISSEMENT
English: 5 Year Limited Warranty
V7 Limited Manufacturer's Warranty covers this Product against defects in materials or workmanship from the date of purchase for a period of 60 months for parts and labor. Liability under this limited warranty shall in no event exceed the cost of replacement or the original cost of the product at the time of purchase. In the event of product discontinuance or unavailability wherein failure has occurred the product shall, at the sole discretion of Manufacturer, be replaced to the first purchaser with a substantially similar product of equal or lesser value or the first purchaser shall be provided with a refund equal to the original i.e. first purchaser purchase price. This limited warranty does not cover the repair of cracked, scratched, broken or modified plastic or other cosmetic damage; or parts that have been altered, defaced or removed. Also, it does not apply to repairs or replacement necessitated by any cause beyond the control of the Manufacturer or servant or agent of the Manufacturer including, but not limited to, any malfunction, defects or failures which in the opinion of Manufacturer were caused by or resulting from unauthorized service or parts, improper maintenance, operation contrary to furnished instructions, shipping or transit accidents, modification or repair by the user, abuse, misuse, neglect, accident fire, flood, or other acts of God, incorrect line voltage or normal wear and tear, or which did not exist at the time when the Product was purchased. This limited warranty does not apply to damage that occurs during unpacking, setup, or installation, removal of the product after repair, or shipping cost of the product for any purpose. There are no other expressed warranties, whether written or oral, other than this printed limited warranty. All implied warranties, including without limitation the implied warranties or merchantability or fitness for a particular purpose, are limited to the durations of this limited warranty. In no event shall V7 be liable for incidental or consequential damages of any nature whatsoever, including but not limited to lost profit or commercial loss, to the full extent those damages can be disclaimend by law. Some countries do not allow the exclusion or limitation of liability arising from implied warranties, so the preceding limitations or exclusions may not apply to all purchasers. This limited warranty is subject to the laws of the relevant jurisdiction, being the country where the product is originally purchased. This limited warranty shall only apply to the extent permitted by applicable national legislation governing the sale of consumer goods. The rights and remedies that consumers enjoy under such consumer protection laws shall not be limited. This warranty is valid only in the country where the product is originally purchased. Additional information can be found at www.V7.com/
You may execute this warranty where you purchased in accordance with the exchange policy of the establishment. At any time thereafter during the term of this warranty, please refer to the authorized distributor of your jurisdiction.
English: 5 Year Limited Warranty
Warranty provider. This warranty is provided by V7/Ingram Micro Pty Ltd, 61 Dunning Ave, Rossbery, NSW 2018, Australia.
V7 Limited Manufacturer's Warranty, V7 warrants that this Product shall be free from defects in material and workmanship from the date of purchase for a period of twenty four (24) months for parts and labor. This Product warranty is non-transferrable and is limited to the original purchases. This warranty is in addition to the guarantees that cannot be excluded under the Australian Consumer Law and besides such Australian Consumer Law guarantees, there are no other expressed warranties given by V7, whether written or oral, other than this printed Product warranty. How to Obtain Warranty Support. Before submitting a warranty claim, we recommend you visit the support section at www.v7-world.com for technical assistance. Valid warranty claims are generally processed through the point of purchase during the first thirty (30) days after purchase; however, this period of time may vary depending on where you purchased your product - please check with V7 or the retailer where you purchased your product for details. Warranty claims that cannot be processed through the point of purchase and any other product related questions should be addressed directly to V7, as follows:
V7/Ingram Micro Pty Ltd
61 Dunning Ave, Rosebery, NSW 2018, Australia
Email: customerservice@7-world.com
Telephonc:161293816000
UB-www.xy7-world.com
To make a claim under this warranty you should return the Product to the place of purchase or to V7 with proof of original purchase such as a copy of the sales receipt or dated itemized receipt. Any expense of claiming under this warranty will be borne by you.
Your consumer rights. The benefits V7 gives you in this Product warranty are in addition to and do not detract from any rights and remedies that you may have under Australian Consumer Law. Our goods come with guarantees that cannot be excluded under the Australian Consumer Law. You are entitled to a replacement or refund for a major failure and for compensation for any other loss or damage. You are also entitled to have the goods repaired or replaced if the goods fail to be of acceptable quality and the failure does not amount to a major failure. This Product warranty is not intended to: (1) change or exclude any statutory consumer rights that cannot be lawfully changed or excluded; or (2) limit or exclude any right you have against the person who sold the V7 product to you if that person has breached their sale contract with you. V7 provides no warranty against defects beyond the rights given to you under this Product warranty and which are available to you under the Australian Consumer Law.
Remedies, if you make a valid claim under this warranty during the warranty period, V7 will at its option: (1) repair or replace the product; or (2) refund the price paid. Goods presented for repair may be replaced by refurbished goods of the same type rather than being repaired. Refurbished parts may be used to repair the goods. Repair of the goods may result in loss of data contained in the goods and V7 takes no responsibility for the loss of such data. If V7 replaces your hardware product, this warranty will be extended to cover the replacement product for the remainder of the original warranty period or thirty days from the date of replacement, whichever is longer.
Exclusions. This warranty does not cover any defects, problems, damage or failures, which in the opinion of V7 resulted from: (1) accident, abuse, misuse, neglect, misapplication, fire, flood or other acts of God or any unauthorized repair, service, modification or disassembly; (2) improper operation or maintenance, usage not in accordance with product instructions or connection to improper voltage supply; (3) use of consumables, such as replacement batteries, not supplied by V7; (4) operation contrary to furnished instructions, (5) shipping or transit accidents, (6) normal wear and tear; (7) which did not exist at the time when the Product was purchased; or (8) scratched or modified plastic, or other cosmetic damage; or (9) parts that have been altered, defaced or removed. This Product warranty does not apply to: (1) damage that occurs during unpacking, setup, or installation; (2) removal of the product for repair; (3) reinstallation of the product after repair, or (4) shipping cost of the product for any purpose.
USA
Ingram Micro Inc.
3351 Michelson Dr. Suite 100
Irvine, CA 92612, USA
Canada
Ingram Micro, LP Canada
SS Standish Count
Mississauqa, ON, L5R 4A1, Canada
Mexico
Ingram Micro Mexico S.A. de C.V.
Cllc dc Josscillo 3, El Parouc, 53398
Naucalpan de Juarez, CDMX, Mexico
Europe
Ingram Micro Pan Europe GmbH
Heiscnbergbogen 3.
D-85609 Dornach/Munich
Germany
New Zealand
Ingram Micro NZ Ltd
78 Appis Drive, Albany
Auckland 0642, New Zealand
India
Ingram Micro India Limited
GordiIT Park, B. Block, Stn Floor
Pirolibanagar, U.S. Road
Vikhrolli (West), Mumbai-400 079, India
Australia
Insgarn MicroPix Ltd.
61 Dunning Avc, Roscbery
NSW 2018 Australia
NVP2016,AS368n
Brazil
Ingram Micro Brasil Ltda
Av. Francisco Matarazzo, 1500 - Torre NY
Sao Paulo, SP 05001-100, Brazil
Hong Kong
Ingram Micro (China) Limited
Room 1205-18-12/F Tower 1 Millipodium City
388 Kwun Tong Road, Kowloon, Hong Kong
Model/Modelo/Modelo/Modell/Modell/Modello/Modell/Modelo:
Date of purchase/ Fecha de compra/ Date d'achat/Kaufdatum/Data di acquisto/Aankoop datum/Data de compria:
C
| English | Hereby Ingram Micro Pan Europe GmbH, Munich, Germany declare under our sole responsibility that the Information Technology Equipment products are fully compliant with the essential requirements and other relative provisions set out in the Council Directive on the Approximation of the Laws of the Member States relating to EMC (2014/300/EU) and RoHS (2011/65/EU). |
| Espanol | Por la presente, Ingram Micro Pan Europe GmbH, Munich, Alemaía, declarar bajo nuestra sola responsabilidad que los produits equipo de technología de la información cumpleplenamente los requisidades españicas yolaspromas relacionales detalladas en la Directiva del Consejo relativa a laapproximación de las legislaciones de los Estados Unidos membrán en materia de EMC (2014/300/EU) y RoHS (2011/65/EU). |
| Francs | Por les presentos, Ingram Micro Pan Europe GmbH, Munich, Allemagne, Declare sous la seule responsabilité que les produits d'equispèments issues de la technologie d'information sont totallement conformés aux impôtats essentiels et aux autres conditions relatives définis dans laDirective du Conseil sur le rapprochement des Legitérations des pays membres si rapportant EMC (2014/300/EU) et RoHS (2011/65/EU). |
| Deutsch | Hemlmit erklämt Ingram Micro Pan Europe GmbH, München, Deutschland unter alleniger Verantwortung, dass die Informationstechnologiegeräst-Produkte mit den wesentlichen Voraussetzungen und sonstigen relativen Bestimmungen, die in der flichttlinde des Rates zur Angleichung derRechtsvorschriften der Mitgliedstanden in Bezug auf EMC (2014/300/EU) und RoHS (2011/65/EU), enthalten sind, vollständig konform sind. |
| Italiano | La Ingram Micro Pan Europe GmbH di Milano, Germania, con la presente dilecchiaURTso esclusive responsabilità che i prodotti di Tecnologia dell'informazione sono interamente conformi ai requisiti essenziali e alle altre dispositions relative definite nella Direcitiva consiliarisull'Appressionazionale delle leggi degli Stati Membrà che regolamente EMC (2014/300/EU) e RoHS (2011/65/EU). |
www.V7world.com
Brand : V7
Model : CA05072
Category : Hand truck