
Les Vauberts Automatic Date - Wristwatch Edox - Free user manual and instructions
Find the device manual for free Les Vauberts Automatic Date Edox in PDF.

| Product type | Automatic mechanical bracelet watch |
| Brand | Edox |
| Model | Les Vauberts Automatic Date |
| Movement | Automatic winding, Edox caliber (depending on reference) |
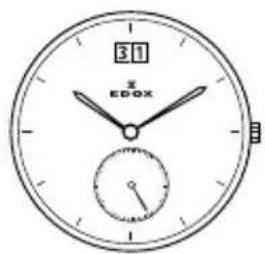
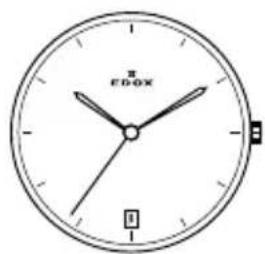
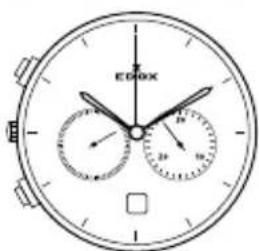
| Functions | Hours, minutes, seconds, date, GMT (depending on caliber), chronograph (depending on caliber), moon phase (depending on caliber) |
| Power reserve | Approximately 40 to 42 hours |
| Accuracy | Mechanical watch: +/- 30 seconds per day; COSC certified chronometer: -4/+6 seconds per day |
| Case | 316L stainless steel or titanium depending on model |
| Strap | Leather or stainless steel depending on version |
| Crystal | Sapphire or mineral depending on model |
| Water resistance | From 30 to 1500 meters depending on model (check case back) |
| Crown | Screwed or not depending on water resistance |
| Maintenance | Water resistance check every 2 years; complete overhaul every 5 years |
| Warranty | 2 years international, under conditions (certificate filled by authorized dealer) |
| Usage | Avoid date adjustment between 10pm and 3am; do not operate pushers underwater |
| Cleaning | Toothbrush with mild soap for case and metal bracelet; soft cloth |
| General information | Helium valve on certain models; tachymeter on chronographs; PVD coating possible |
Frequently Asked Questions - Les Vauberts Automatic Date Edox
User questions about Les Vauberts Automatic Date Edox
0 question about this device. Answer the ones you know or ask your own.
Ask a new question about this device
Download the instructions for your Wristwatch in PDF format for free! Find your manual Les Vauberts Automatic Date - Edox and take your electronic device back in hand. On this page are published all the documents necessary for the use of your device. Les Vauberts Automatic Date by Edox.
USER MANUAL Les Vauberts Automatic Date Edox
2.1 MECHANICAL WATCHES ACCURACY 3
2.2 CHRONOMETER WATCHES ACCURACY 3
3. GENERAL INFORMATION 3
3.1 HELIUM ESCAPE VALVE 3
3.2 TACHYMETER SCALE 3
3.3 WATER RESISTANCE 4
3.4 LEATHER STRAPS 4
3.5 SCREW-DOWN CROWN 4
3.6 PVD COATING 4
3.7 TITANIUM 4
3.8 STAINLESS STEEL 4
4. OPERATING INSTRUCTIONS 4
4.1 SELF WINDING (AUTOMATIC) CHRONOGRAPH 4
4.2 SELF WINDING (AUTOMATIC) WATCHES 5
4.3 HAND WINDING WATCHES 7
4.4 QUARTZ CHRONOGRAPH 7
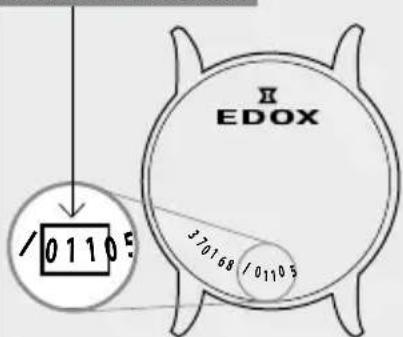
Movement number
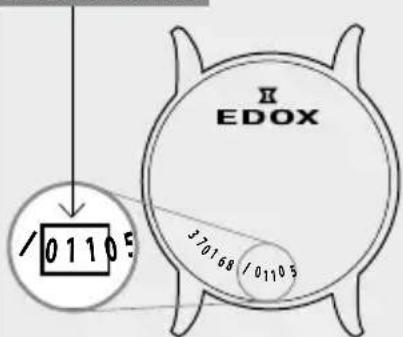
Movement
The first 2 or 3 digits of the reference represent the Edox movement code.
Movement number
| 07 | 4 | 38 | 10 | 80 | 5 | 96 | 5 |
| 08 | 5 | 40 | 10 | 82 | 5 | 101 | 9 |
| 09 | 7 | 45 | 5 | 83 | 5 | 102 | 9 |
| 011 | 5 | 47 | 6 | 84 | 12 | 103 | 9 |
| 012 | 5 | 56 | 11 | 85 | 6 | 104 | 9 |
| 015 | 7 | 57 | 11 | 87 | 6 | 105 | 9 |
| 016 | 8 | 62 | 12 | 88 | 5 | 345 | 12 |
| 0165 | 8 | 63 | 12 | 90 | 6 | 401 | 11 |
| 10 | 9 | 64 | 11 | 91 | 5 | 805 | 6 |
| 23 | 11 | 70 | 12 | 93 | 7 | 843 | 12 |
| 34 | 12 | 72 | 7 | 94 | 5 | 853 | 6 |
| 37 | 5 | 77 | 5 | 95 | 5 |
1. INTRODUCTION
1.1 International Edox Warranty
Congratulations on having chosen an Edox timepiece. To ensure your timepiece operates perfectly, we recommend that you follow the advice given in these instructions (All instruction manuals are also available on our website www.edox.ch).
The warranty of your Edox watch is valid for a period of 24 months effective from the date of purchase and under the terms and conditions of the present warranty. The international Edox warranty covers material and manufacturing defects existing at the time of delivery of the purchased Edox watch. The warranty only comes into force if the warranty certificate is dated, fully and correctly completed and stamped by an official Edox retailer.
During the warranty period and by presenting the valid warranty certificate, you will have the right to have any defect repaired free of charge. In the event that repairs are unable to restore the normal conditions of use of your Edox watch, Montres Edox & Vista SA guarantees its replacement by an Edox watch of identical or similar characteristics.
The warranty for the replacement watch ends 24 months after the date of purchase of the replaced watch.
The manufacturer's warranty does not cover:
- The battery
- The glass
- The leather strap
- Normal wear, and tear and ageing (for example scratched crystal, alteration of the colour and/or material of non metallic straps and chains, such as leather, rubber).
- Any damage on any part of the watch resulting from abnormal/abusive use, lack of care, negligence, accidents (knocks dents, crushing, broken crystal, etc.), incorrect use of the watch and
non-observance of the operating instructions provided by Edox.
- The Edox watch handled by non-authorized persons (for example for battery replacement, service or repair) or which has been altered in its original condition beyond Edox' control.
- Edox watches bought from non authorized retailers since Edox is not able to check if the watches were handled and stocked correctly.
Any further claim against Montres Edox & Vista SA, for example for damages additional to the above described warranty is expressly excluded, except mandatory statutory rights the purchaser may have against the manufacturer.
The above manufacturer's warranty:
- Is independent of any warranty that may be provided by the seller, for which he carries sole responsibility;
- Does neither affect the purchaser's rights against the seller nor any other mandatory statutory rights the purchaser may have against the seller.
- ALL APPLICABLE IMPLIED WARRANTIES, INCLUDING THE IMPLIED WARRANTY OF MERCHANTABILITY AND OF FITNESS FOR A PARTICULAR PURPOSE GIVEN TO YOU BY LAW ARE HEREBY LIMITED IN DURATION TO THE DURATION OF THIS WARRANTY. UNDER NO CIRCUMSTANCES WILL Edox & Vista SA BE LIABLE FOR ANY INDIRECT OR CONSEQUENTIAL DAMAGES OF ANY KIND.
If your watch needs attention, rely on an official Edox dealer: he can guarantee service according to Edox' standards.
1.2 Special recommendations
To avoid any errors, do not perform the date setting between 22h00 and 3h00 when the date mechanism is in action. Be careful not to confuse noon and midnight.
Never operate pushers or crown when your timepiece is under water or if it is wet and ensure that the crown and pushers are properly pushed back or screwed down after each use.
We recommend that you have the water resistance of your timepiece checked at an authorized Edox center every 24 months or whenever the timepiece case is opened.
1.3 Maintenance recommendations
Magnetic fields: avoid placing your watch on loudspeakers, or refrigerators, since they generate powerful magnetic fields.
Chemical products: avoid direct contact with solvents, detergents, perfumes, cosmetics etc., since they may damage the bracelet, case or gaskets.
Cleaning: for metal bracelets and water-resistant cases, use a toothbrush with soapy water to clean and a soft cloth for drying.
Shocks: avoid thermal and violent shocks.
1.4 What are the service intervals? Every 24 months
we advise you to do maintenance service (water resistance, movement accuracy test).
Every 5 years
we advise you to do a complete maintenance service (complete movement revision, water resistance, accuracy and functionality complete revision).
Who should I contact for a maintenance service or battery replacement?
We recommend that you contact an authorized Edox retailer, as they are the only certified specialists equipped with the tools and apparatus required carrying out the work and the necessary checks in a professional manner. Furthermore, only these certified specialists can guarantee that their work is carried out in accordance with Edox' strict quality standards. Make sure that right after each battery change the watch has been water-resistant tested.
1.5 Environmental protection
Collection and treatment of end of life Quartz watches*
This product should not be disposed of with household waste. It has to be returned to a local authorized collection system. By following this procedure you will contribute to the protection of the environment and human health. The recycling of the materials will help to conserve natural resources.
*valid in EU member states and in any countries with corresponding legislation.
2. PRECISION TOLERANCES
Mechanical watches
The mechanical Edox watch with an automatic movement does not need to be wound by hand.
The motion of your wrist makes the rotor (oscillating weight or mass) turn, thereby winding up the mainspring of the watch movement.
The everyday activity of life is sufficient in itself to wind up an automatic Edox watch and it will run continually, even if it is removed at night. However, if not worn for approximately 40 hours, it will stop. To make the watch work again, turn the crown clockwise about 20 times. Now set the time and if possible the date, etc.
2.1 Mechanical watches accuracy
Depending on the movement, the daily tolerance of a mechanical watch can be of 30 seconds. If you notice a bigger tolerance rate, you can have your watch adjusted at a service center in your country, free of charge within the guarantee period.
2.2 Chronometer watches accuracy
Every Edox Chronometer comes with a rating certificate issued after an official test by the Swiss Official Chronometer Testing Institute (COSC). The accuracy of the watch movement is tested electronically at the COSC during 15 days in different positions and at different temperatures. The average daily rating must not exceed -4/+6 seconds per day.
Only Edox watches which have successfully undergone the official COSC rating procedure qualify as chronometers.
3. GENERAL INFORMATIONS
3.1 Helium escape valve
Decompression system which allows helium to escape from inside the watch when the watch is worn for professional use in pressure chambers. (Long-term underwater work, crude oil exploration, etc.)
Important: The Edox helium valve opens and closes automatically (for the models wearing the new automatic Helium escape valve). The models wearing a non-automatic Helium escape valve must have the valve screw down in order to guarantee the water resistance of the watch. Unscrew the Helium escape valve only to release the gas from the watch. Do not unscrew it under water in order to prevent water entering the mechanism.
3.2 Tachymeter scale
Some Edox Chronograph watches have a tachymeter scale. With this scale it is possible to measure the speed. The distance is 1 km. To measure the elapsed time press the start/stop button when the vehicle (power-boat) passes the starting and the final point or target. The figure shown by the hand on the tachymeter scale indicates the average speed in kilometers. If for instance a car covers a 1 km distance in 30 seconds, you can consider it to an average speed of 120 km per hour.
3.3 Water resistance
All Edox timepieces are water-resistant from 30 to 1500 meters. Check the details on the back of your Edox timepiece and read the following instruction carefully.
| Meters Feet ATM | |||
 | 30 100 3 | ||
 | 50 165 5 | ||
 | 100 330 10 | ||
 | 200 650 20 | ||
 | 300 990 30 | ||
 | 500 1650 50 | ||
 | 1000 3000 100 | ||
 | 1500 4900 150 | ||
The water resistance of your timepiece cannot be guaranteed indefinitely, considering that joints may age, crowns or pushers may sustain knocks and climate or temperature may vary. We therefore recommend that you have the water resistance of your timepiece checked every 2 years or whenever the timepiece case is opened.
3.4 Leather straps
Original Edox leather straps are clearly marked on the buckle and on the reverse side. Edox uses a large variety of calfskin leather straps with imprinted patterns of different animals. Leather straps should not be used by individuals with strong perspiration or by those who stay for long periods in a humid climate. Leather straps are not covered by the international Edox warranty.
3.5 Screw-down crown
Screw down the crown carefully to prevent water from penetrating the mechanism.
3.6 PVD (Physical Vapour Deposition)
The advantage of PVD is that it is a thin but hard layer, resistant to corrosion, has a strong adherence, offers many choices of colours and is hypoallergenic.
3.7 Titanium
The titanium is a light metal of a metallic white aspect. Lighter than the steel, it possesses the main characteristics: corrosion resistance, dilation, etc. Its properties make titanium a material determinedly adapted to the modern technologies and intended for fields of application such as the aeronautics, the automobile, the surgery, the electronics.
3.8 Stainless steel 316L
The stainless steel used for Edox cases and bracelets appears among the best alloys at the moment (316L. It is obtained by a special cast iron which guarantees an extreme robustness and excellent anti-magnetic properties. Its low content in carbon makes it particularly resistant to the corrosion.
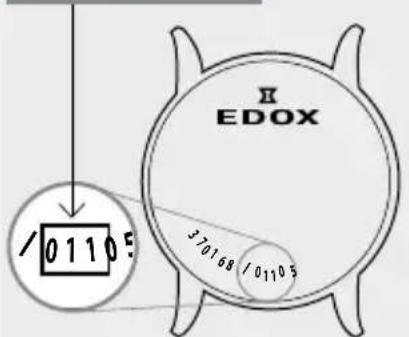
4. OPERATING INSTRUCTIONS, HOW TO USE YOUR MANUAL:
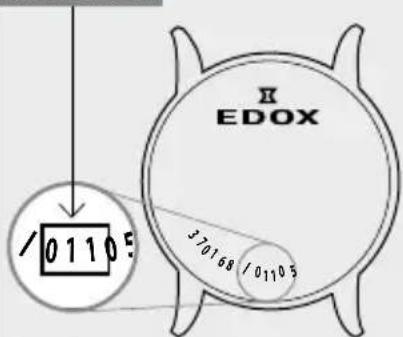
The operating instructions are related to the reference of the movement (calibre) in your watch. Please check first of all which movement is in your watch. You are able to find the reference on the case back of your watch.
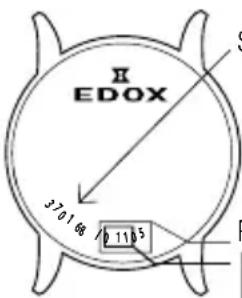
Serial number
Reference number
Movement number
Movement
The first 2 or 3 digits of the reference represent the Edox movement code.
Find the reference in the following pages.
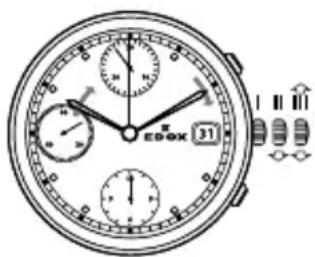
4.1 Self winding (automatic) chronograph
Movement 07
Calibre specifications:
GMT / Time zones:
Time display:
Hour and Minute hands (2 and 3). 24 hour display in the centre (4). Second hand (5).
Time zones:
12 hour hand (2) indexable (local time) in 1/-1 hour increments.
24 hour hand (4) (GMT or time standard).
Calendar:
Calendar hand (6) (local date) at 6 o'clock, in step with the 12 hour hand.
Important: first, manually rewind the watch by putting the crown (1) into position (a) (fully push the crown into the rewind position). Turn the crown about 30 times in the tightening direction, after which the watch will, by wrist movements, automatically reset itself.
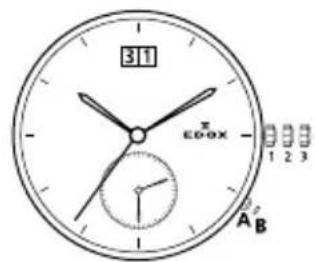
Setting the time and date:
Pull the crown (1) out into position (b) (crown fully pulled out into the time setting position); turn the hands clockwise so as to position the hand (4) on the 02.00 hrs (24.00 hrs scale).
Press the pusher knob (A) until the (31 days) date changes (hand (6)), the watch will then display midnight. Press the pusher knob (A) 2 more times so as to position the hand (2) to 02.00 a.m. (12 hours scale).
Press the pusher knob (C) until the desired date is displayed (hand (6)).
Use the crown to turn the hands clockwise (1) to position (b) until the desired time is displayed.
Push the crown (1) in to position (a) (the watch will start when the crown (1) has been fully pushed in).
Only one calendar day will be corrected if the pusher (C) is pressed between 23 hours and midnight. There is no risk of breakage.
Setting the time zones.
Press pusher knob (A) to display a positive time difference (one push signifies a shift of an hour).
Press pusher knob (B) to display a negative time difference (one push signifies a shift of an hour).
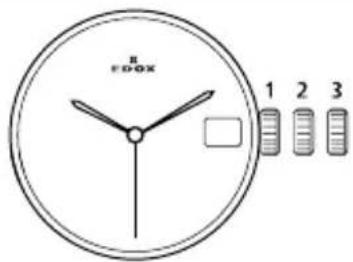
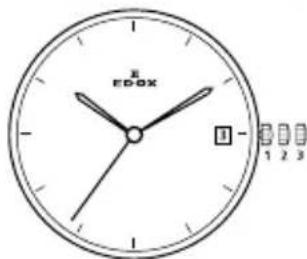
Movement 08
Watch functions:
The crown has 3 positions:
-
Normal position (wearing position): when the crown is positioned against the case, the crown ensures that the watch is water-resistant. Occasional winding: if the watch has not been worn for more than 40 hours or more, wind it up with the crown in position 1.
-
Correcting the date: pull the crown out to position 2, turn the crown forwards, then push the crown back to position 1.
-
Correcting the day: for the references 011: pull the crown out to position 2, turn the crown backwards, then push the crown to position 1. Push the crown back in.
NB: For all references: do not correct the date between 22h00 and 02h00.
4.Time setting: hours, minutes and seconds. Pull the crown out to position 3. The seconds hand will stop. Turn the crown forwards or backwards.
Chronograph functions:
Pusher A: start – stop, start – stop, etc.
Pushers B: reset (after a stop)
Movements 011, 012, 45, 91, 95
Watch functions:
The crown has 3 positions:
- Normal position (wearing position): when the crown is positioned against the case, the crown ensures that the watch is water-resistant.
Occasional winding: if the watch has not been worn for more than 40 hours or more, wind it up with the crown in position 1.
- Correcting the date: pull the crown out to position 2, turn the crown forwards (backwards for references 30 and 45), then push the crown back to position 1.
Correcting the day for the references
011: pull the crown out to position 2, turn the crown backwards, then push the crown to position 1. Push the crown back in.
NB: For all references: do not correct the date between 22h00 and 02h00.
- Time setting: hours, minutes and seconds. Pull the crown out to position 3. The seconds hand will stop. Turn the crown forwards or backwards. Synchronise the seconds by pushing the crown back to position 1 to coincide with a given time signal.
Chronograph functions:
Pusher A: start - stop, start - stop, etc.
Pusher B: reset (after a stop)
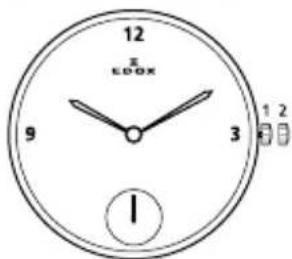
4.2 Self-winding (automatic) watches
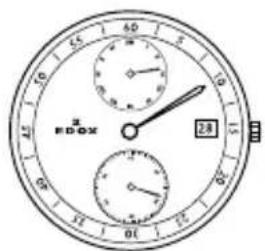
Movements 37, 77, 80, 82, 83, 88, 94, 96
Watch functions:
The crown has 3 positions:
- Normal position (wearing position): when the crown is positioned against the case, the crown ensures that the watch is water-resistant.
Occasional winding: if the watch has not been worn for more than 42 hours or more, wind it up with the crown in position 1.
- Correcting the date: pull the crown out to position 2, turn the crown backwards (forwards for references 83) and push it back to position 1.
Correcting the day for the references
83: pull the crown out to position 2, turn the crown backwards, then push the crown to position 1.
- Time setting: hours, minutes and seconds. Pull the crown out to position 3. The seconds hand will stop. Turn the crown forwards or backwards. Synchronise the seconds by pushing the crown back to position 1 to coincide with a given time signal.
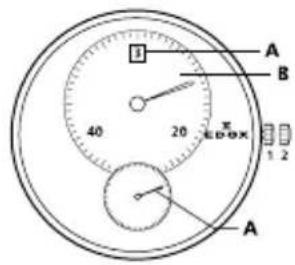
Power reserve: for references 94: The small hand places in the counter at 6 o'clock indicates the power reserve. If the automatic mechanical watch is not worn, the power reserve lasts for approximate 42 hours. The power reserve can be increased by winding up the crown manually in position 1 or while wearing the watch on the wrist by the rotation of the oscillation mass.
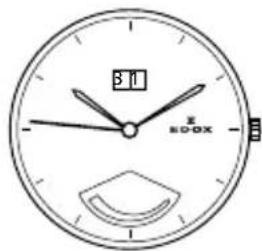
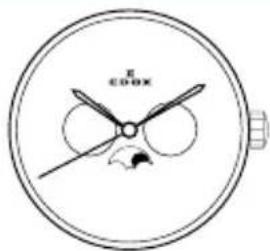
Movement 805
Watch functions:
The crown has 3 positions:
- Time setting: pull the crown in position 3 (the watch stops), turn the crown forwards until correct time appears. Push the crown in position 1.
- Date setting: pull the crown in position 2 and turn the crown forward until correct date appears. Push the crown in position 1.
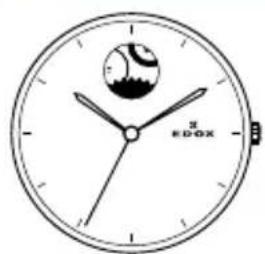
- Moon setting: pull the crown in postion 2 and turn it backwards until the
full moon appears in the center of the moon phase window. Determine the date of the last full moon with a calendar. Turn the crown backwards as many moon phases and days since the last full moon. This is valid also for the new moon timing. Push the crown in position 1.
Movement 47, 85, 853
Watch functions:
The crown has 2 positions:
- Normal position (wearing position): when the crown is positioned against the case, the crown ensures that the watch is water-resistant.
Occasional winding: if the watch has not been worn for more than 42 hours or more, wind it up with the crown in position 1. - Time setting: hours, minutes and onds. Pull the crown out to position 3. The seconds hand will stop. Turn the crown forwards or backwards. Synchronise the seconds by pushing the crown back to position 1 to coincide with a given time signal.
Movement 87
Watch functions:
The crown has 2 positions:
- Normal position (wearing position): when the crown is positioned against the case, the crown ensures that the watch is water-resistant.
Occasional winding: if the watch has not been worn for more than 42 hours or more, wind it up with the crown in position 1. - Time setting: hours and minutes. Pull the crown out to position 2. Turn the crown forwards or backwards. Push the crown back to position 1.
Hand-operating repeater: by pushing the pusher-button, you start the 5 minutes repeater mechanism: the first series of blows strikes the hours (one tone) – the second series of blows strikes every five minutes (two tones). For example: 11:43 minutes: first 11 single tones – the hours – the 8 double tones – the minutes as 8 x 5 = 40 minutes.
Attention: let the mechanism ring entirely before activating it again in order to prevent damages. Do not set the time when the ring is activated. Edox declines all responsibilities of misuse.
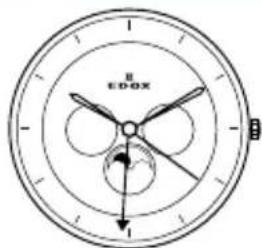
Movement 90
Watch functions:
The crown has 2 positions:
- Normal position (wearing position): when the crown is positioned against the case, the crown ensures that the watch is water-resistant.
Occasional winding: if the watch has not been worn for more than 42 hours or more, wind it up with the crown in position 1. - Time setting: hours and minutes. Pull the crown out to position 2. Turn the crown forwards or backwards. Push the crown back to position 1.
Moon phase adjustment: press the push-button C until the full moon appears in the centre of the moon aperture.
Determine the date of the last full moon by using a calendar. Press the push-button C as often as the number of days which have passed since the last full moon.
Date setting (31 days): press the push-button D until the centre hand points the desired day.
Month setting (12 months): press the push-button A until the desired month is reached.
Day of the week (7 days): press the push-button B to set the day of the week.
Attention: do not make setting by 22h00 and 02h00 and do not alter the moon phase between 15h00 and 17h00, to prevent damage to the watch mechanism.
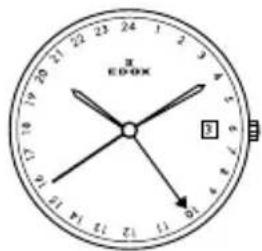
Movement 93
Watch functions:
The crown has 3 positions:
- Normal position (wearing position): when the crown is positioned against the case, the crown ensures that the watch is water-resistant.
Occasional winding: if the watch has not been worn for more than 42 hours or more, wind it up with the crown in position 1.
- Correcting the date: pull the crown out to position 2, turn the crown backwards and push it back to position 1.
Correcting the 24 hours hand (GMT): pull the crown out to position 2, turn the crown forwards, only the hour hand moves without affecting the precision of the minutes or seconds. If the hand moves past midnight, the date changes automatically. Push the crown back to position 1. This hand shows at a glance a second time zone on a 24 h scale.
- Time setting: hours, minutes and seconds. Pull the crown out to position 3. The seconds hand will stop. Turn the crown forwards or backwards. Synchronise the seconds by pushing the crown back to position 1 to coincide with a given time signal.
4.3 Hand winding watches
Movement 72
Watch functions:
The crown has 2 positions:
Normal position (wearing position): when the crown is positioned against the case, the crown ensures that the watch is water-resistant.
- Time setting: hours and minutes. Pull the crown out to position 2. Turn the crown forwards or backwards. Push the crown back to position 1.
NB: these watches should be wound daily, preferably in the morning. To do this, turn the crown forward until you feel resistance. After this operation, the watch will work approximately 35 hours after being fully wound up.
4.4 Quartz chronograph
Movement 09
Operation of the watch:
The crown has three positions.
Button A: start/stop
Button B: split/reset
Adjusting the time: pull the crown into position III. Adjust the hours and minutes by rotating the crown in a clockwise or anticlockwise direction. Return the crown to position I.
Adjusting the date: do not adjust the date between 21.00 and 02.00 hours. Pull the crown into position II. Adjust the date by rotating the crown in a clockwise direction. Return the crown to position I.
Measurement of cumulative time:
Good to know: once it has run for 2 hours, the chronograph automatically stops and resets to zero in order to extend battery life.
Press button A to start or stop the chronograph.
Press button B to reset to zero.
Measurement of lap time:
Press button A to start the chronograph.
Press button B to stop the chronograph and display the lap time.
Press button B to resume timing.
Press button A to stop the chronograph.
Press button B to reset to zero.
Initialization of the chronograph, minute and second chronograph
functions (only after changing the battery or incorrect handling):
Pull the crown into position II. Press button A, wait for two seconds, then press button A again. The 9-hour timer hand completes a full revolution. Press button B to adjust the minute timer hand. Press button A and the second hand completes a full revolution. Press button B to adjust the chronograph second hand.
Press the crown into position I.
Movement 015
Watch functions:
The crown has 3 positions:
-
Normal position (wearing position): when the crown is positioned against the case, the crown ensures that the watch is water-resistant.
-
Correcting the date: pull the crown out to position 2, turn the crown backwards and push it back to position 1.
-
Time setting: hours, minutes and seconds. Pull the crown out to position 3. The seconds hand will stop. Turn the crown forwards or backwards. Synchronise the seconds by pushing the crown back to position 1 to coincide with a given time signal.
Chronograph functions:
Pusher A: start – stop, start – stop, etc.
Timing to 1 second for up to 60 minutes
Pusher B: reset (after a stop)
Split Time function
Pusher A: start
Pusher B: stop to read the split time.
The chronograph continues to operate.
Pusher B: restart
The chronograph hands catch up with the elapsed time.
Pusher A: for the last stop and to display the total time.
Pusher B: reset.
NB: the hands should be reset to their original position before the chronograph is used:
Resetting of the 60 minutes hand to zero: crown in position 2 and pusher B.
Resetting of the 30 seconds hand to zero: crown in position 3 and pusher A.
Resetting of the 5 minutes hand to zero: crown in position 3 and pusher B.
After setting the hands to their original positions, return to crown position 1.
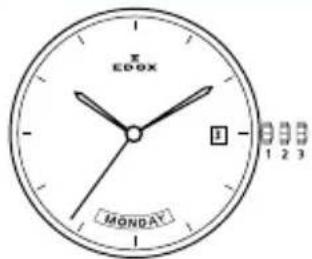
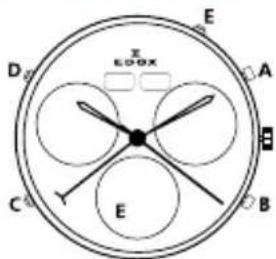
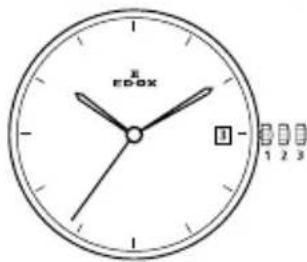
Movement 016
Setting the perpetual calendar Step 1
Start by pulling the crown into position 2
Select the counter to be adjusted by pressing the 2 o'clock pusher. The selected counter hand makes full turn.
Reset the selected counter by pressing the 4 o'clock pusher. The selected counter hand advances (single push = 1 step, ongoing push = rotation). Manipulations (Crown must always be in position 2)
Press the 2 o'clock pusher to select the « date » counter. The « date » counter hand makes a full turn. Then press the 4 o'clock pusher and adjust the date counter to « 1 ».
Press the 2 o'clock pusher to select the « day » counter. The « day » counter hand makes a full turn. Then press the 4 o'clock pusher and adjust the day counter to « Monday ».
Press the 2 o'clock pusher to select the « month » counter. The « month » counter hand makes a full turn. Then press the 4 o'clock pusher and adjust the month counter to « January ».
ATTENTION
The setting of the perpetual calendar is realized when the hands are positioned at Monday, January 1.
Step 2
Date and Hour Adjustment
Start by pulling the crown into position 3.
Press the 2 o'clock pusher to activate the « date » adjuster. For the year adjustment, the hand makes a back and forth movement between 1 and 4. Then press the 4 o'clock pusher to adjust for the current year and/or leap year:
Index 1 Index 2 Index 3 Index 4
| = leap year | ||||
| 2013 | 2014 | 2015 | 2016 | |
| 2017 | 2018 | 2019 | 2020 | |
| 2021 | 2022 | 2023 | 2024 |
Select the « month » indicator by pressing the 2 o'clock pusher. The hand makes a back and forth movement between January and December. Then adjust the months by pressing the 4 o'clock pusher.
Select the « date » indicator by pressing the 2 o'clock pusher. The hand makes a back and forth movement between 1 and 31. Then adjust the date by pressing the 4 o'clock pusher.
Select the «day» indicator by pressing the 2 o'clock pusher. The hand makes a back and forth movement between Monday and Sunday. Then adjust the day by pressing the 4 o'clock pusher.
When finished, press the crown into position 1.
Step 3
Final Control « perpetual calendar » is set correctly.
Pull the crown into position 2.
Verify the date hands and the small hands align with Monday, January 1. Push the crown into position 1. All hands must return to the selections made under Step 2. If this is not the case, you need to go back to Step 1 and 2.
Movement 0165
Watch functions:
Display of hours, minutes, seconds, date, moon phase counter, 60 minutes and 12 hours counter, second counter.
The crown has 3 positions: I, II and III, there is two pushers, A and B.
Zero setting for the counters:
Pull the crown in position II, press the pusher A (to select the hand), the big second hand makes one full turn. Press the pusher B (short pressure: step by step, long pressure: rapid continuous rotation).
Date setting: Pull the crown in position II, correct the date, press the crown back in position I.
Time and moonphase setting:
Turn the crown in position III, turn the crown, adjust the time. To correct the moon phase, press the pusher B (short pressure: step by step, long pressure: rapid continuous rotation). Press the crown back in initial position.
Chronograph functions:
Press pusher A: start of timing
Press pusher A. stop of timing
Press pusher A: re-start of timing
Press pusher B: setting back the hands to zero
Split timing functions:
Press pusher A: start of timing
Press pusher B: stop of timing, split timing
Press pusher B: re-start of timing
Press pusher A: stop of timing
Press pusher B: setting back the hands to zero
Movements 10, 101, 102, 103, 104
Watch functions:
The crown has 3 positions:
-
Normal position (wearing position): when the crown is positioned against the case, the crown ensures that the watch is water-resistant.
-
Correcting the date: pull the crown out to position 2, turn the crown forwards and push it back to position 1.
-
Time setting: hours, minutes and seconds. Pull the crown out to position 3. The seconds hand will stop.
Turn the crown forwards or backwards. Synchronise the seconds by pushing the crown back to position 1 to coincide with a given time signal.
Chronograph functions:
Pusher A: start - stop, start - stop, etc.
Timing to 1/10 of a second for up to 30 minutes.
Pusher B: reset (after a stop)
Accumulated timing chronograph:
Press button A to start. Press button B after arrival of the first "sprinter" – The time will be indicated. Press button A after arrival of the second "sprinter" – The time is memorized. Read the time of the first "sprinter". Press button B to read the time of the second "sprinter" (the chronograph hands will turn at a faster speed until indication of the time). Press button B to reset hands to zero.
NB: the hands should be reset to their original position before the chronograph is used:
Hand adjusting:
Pull out the crown to position 3.
Press the button A and B at the same time for at least 2 seconds.
Press (1 x short for single or 1 x long for continuous) button A to adjust the centre stop second.
Press button B to adjust the next hand.
Press (1 x short for single or 1 x long for continuous) button A to adjust the hand of the small sub counters.
Press button B to adjust the next hand.
Press (1 x short for single or 1 x long for continuous) button A to adjust the minute hand.
Return to crown position 1.
Movement 105
Watch functions:
The crown has two positions. There are two pushers A and B. There are three correctors C D and E.
Time setting:
Pull the crown in position II. Turn the crown until the correct time is reached. Push the crown back in position I.
Date setting (changes from 31 to 1):
Press the corrector C once to adjust the date 1 day forward.
(Do not operating the date setting between 21.00 and 01.00h).
Date, day of week and month setting:
Press the corrector C: the date hand advances gradually.
Press the corrector D: the day of the week advances gradually.
Press the corrector E: the month advances gradually.
Chronograph (Start- Stop - Reset):
Start: press pusher A
Stop: press pusher A
Intermediate or split-timing:
Start: press pusher A
Display interval: press pusher B
Making up the measured time: press pusher B
Stop: press pusher A
Adjusting the chronograph hands to zero position:
Pull out the crown to position II (all chronograph hands are in the correct or incorrect zero position).
Press pushers A and B simultaneously for at least 2 seconds (the second counter hand rotates by 360 degrees, the corrective mode is activated).
Adjusting the second counter hand: press pusher A
Adjusting the next hand: press pusher B
Adjusting the 1/10 second counter hand (at 6h): press pusher A
Adjusting the next hand: press pusher B
Adjusting the minute counter (at 9h): press pusher A
Returning the crown to position I (termination of the chronograph hands adjustment, can be carried out at any time).
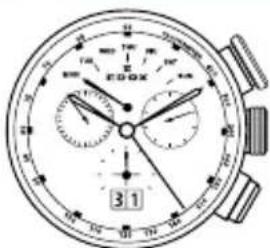
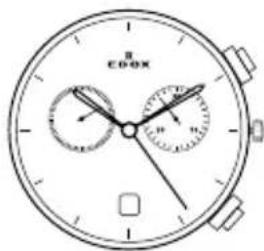
Movement 38
Chronograph: Basic functions (start/stop/reset to zero)
Start: Press Button A
Stop: To stop the timekeeping, press Button A.
Reset to zero: Press Button B.
Chronograph: Keeping totals with the chronograph
Start: Press Button A - Stop: Press Button A - Restart: Press Button A - Stop: Press Button A
Reset to zero: Press Button B
Time keeping: Timing lap times
Start: Press Button A - Display the lap time: Press Button B
Catching up on the time lapsed: Start: Press Button B - Stop: Press Button A
Reset to zero: Press Button B
Adjusting the chronograph hands to the zero position
(When one or more of the chronograph hands are not in the correct zero position and must be adjusted)
Pull the crown into position III
At the same time press Buttons A and B for at least 2 seconds.
Use Button A to adjust the first hand (press lightly for a phased adjustment, keep pressing for a continuous adjustment).
To adjust the following hand: Press Button B
Repeat the adjustments for each hand on the chronograph.
Push the crown back to position I
Setting the time
Pull the crown into position III
Turn the crown until the correct time is shown.
Push the crown back to position I
Quickly setting the date
Pull the crown into position II (the watch keeps working)
Turn the crown counter clockwise until the current date appears
Push the crown back to position I
Setting the date, the day of the week and the time
Pull the crown into position III
Turn the crown until the day before the correct day of the week appears.
Push the crown back to position II.
Turn the crown counter clockwise until the date before the current date appears.
Pull the crown into position III
Turn the crown until the correct date and day of the week appear.
Keep on turning the crown until the correct time is shown.
Push the crown back to position I
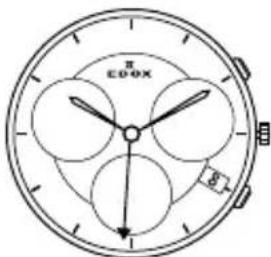
Movement 40
Watch functions:
The crown has two positions: I and II. Pusher A at 5 o'clock, pusher B at 8 o'clock
Crow in position I: the watch is running (position of rest)
Crown in position II: during the blocking time from approx. 11.30pm-5.30am, no day dates can be changed using the pusher, as automatic changes are in progress. Pressing the pusher during the blocking time may damage the movement.
Setting sequence for: moonphase display, day of the week, day and time:
-
Pull the crown out to position II (watch stops)
-
Set the moon phase display: turn the hands forward by turning the crown, until the full moonphase position appears.
- Set the day of the week and date: turn the crown until the time of 6:00 appears. Using the quick-change correction, set the date with pusher A, and the day of the week of the last full moon with pusher B. Then using the crown, move the hands forwards until the current date appears.
- Set the time: turn the crown until the current time is displayed.
- Push the crown back into position I.
Quick-change correction for the date: press pusher A until the current date is displayed.
Quick-change correction for the day of the week: press pusher B until the current day of the week is displayed.
| Full moon dates | |||
| 2017 20 | 18 2019 | ||
| JAN 12 2 | -31 21 | ||
| FEB 11 19 | |||
| MAR 12 2 | -31 21 | ||
| APR 11 30 | 19 | ||
| MAY | 10 29 | 18 | |
| JUN | 9 28 | 7 | |
| JUL | 9 27 | 6 | |
| AUG | 7 26 | 5 | |
| SEP | 6 25 | 4 | |
| OCT | 5 24 | 3 | |
| NOV | 4 | 23 12 | |
| DEC | 3 22 | 2 | |
Movement 401
Watch functions:
The crown has 2 positions 1 and 2. Pusher A at 2 o'clock, pusher B at 5 o'clock.
Position 1: the watch is running
Position 2: during the blocking time mentioned below, automatic changes are in progress. Pressing the pusher during the blocking time may damage the movement.
Pusher A (quick-change correction for the date) must not be pressed during the block time from 11.30pm – 5.30am.
Pusher B (quick change correction for the calendar week) must not be pressed during the blocking time Sunday-Monday.
Setting sequence for moon phase display, date, day of the week and time:
Pull the crown in position 2, the watch stops.
Moon phase display setting: turn the crown clockwise past midnight, until the full moon position appears.
Day of the week setting: chance the time display by turning the crown backwards and forwards until the day of the week of the last full moon is displayed.
Date setting: turn the crown until 6.00am appears in the time display. Set the date of the last full moon with pusher A. then with the crown move the hands forwards until the current date is displayed.
Time setting: turn the crown until the current time is displayed (NB remember the 24-hours cycle).
Week calendar setting: using pusher B, set the current calendar week.
Push the crown back into position 1.
Quick-change correction for date: press pusher A until the current date is displayed.
Quick-chance correction for the calendar week: press pusher B until the current calendar week is displayed.
Movement 64
Watch functions:
The crown has 2 positions:
-
Normal position (wearing position): when the crown is positioned against the case, the crown ensures that the watch is water-resistant.
-
Time setting: hours and minutes. Pull the crown out to position 2.
Turn the crown forwards or backwards. Push the crown back to position 1.
Movement 23
Watch functions:
The crown has 2 positions:
-
Normal position (wearing position): when the crown is positioned against the case, the crown ensures that the watch is water-resistant.
-
Time setting: hours, minutes and seconds. Pull the crown out to position 3. The seconds hand will stop.
Turn the crown forwards or backwards. Synchronise the seconds by pushing the crown back to position 1 to coincide with a given time signal.
Movements 56, 57
Watch functions:
The crown has 3 positions:
- Normal position (wearing position): when the crown is positioned against the case, the crown ensures that the watch is water-resistant.
- Correcting the date: pull the crown out to position 2, turn the crown backwards and push it back to position 1.
- Time setting: hours and minutes. Pull the crown out to position 3. Turn the crown forwards or backwards. Push the crown back to position 1.
Movements 34, 345
Watch functions:
The crown has 4 positions:
- Normal position (wearing position): when the crown is positioned against the case, the crown ensures that the watch is water-resistant.
- Correcting the date: pull the crown out to position 2, turn the crown backwards and push it back to position 1.
- Time setting: hours, minutes and seconds. Pull the crown out to position 3. The seconds hand will stop. Turn the crown forwards or backwards. Synchronise the seconds by pushing the crown back to position 1 to coincide with a given time signal.
- Correcting the day: pull the crown out to position 3. Turn the crown forwards until the hands pass midnight. Repeat this operation until the desired day is reached.
Movements 63, 70
Watch functions:
The crown has 3 positions:
-
Normal position (wearing position): when the crown is positioned against the case, the crown ensures that the watch is water-resistant.
-
Correcting the date: pull the crown out to position 2, turn the crown forwards (backwards for references 86) and push it back to position 1.
- Time setting: hours, minutes and seconds. Pull the crown out to position 3. The seconds hand will stop.
Turn the crown forwards or backwards. Synchronise the seconds by pushing the crown back to position 1 to coincide with a given time signal.
Movement 62
Watch functions:
The crown has 4 positions:
- Normal position (wearing position): when the crown is positioned against the case, the crown ensures that the watch is water-resistant.
- Correcting the date: pull the crown out to position 2, turn the crown forwards and push it back to position 1.
- Time setting: hours, minutes and seconds. Pull the crown out to position 3. The seconds hand will stop. Turn the crown forwards or backwards. Synchronise the seconds by pushing the crown back to position 1 to coincide with a given time signal.
- Correcting the dual time (GMT): pull the crown A out to position B. Turn the crown forwards or backwards to reach the requested time and push it back to position A.
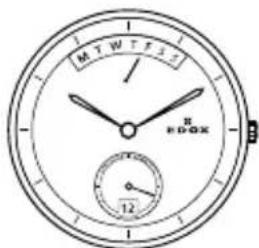
Movement 84
Watch functions:
The crown has 4 positions:
- Normal position (wearing position): when the crown is positioned
against the case, the crown ensures that the watch is water-resistant.
- Correcting the date: pull the crown out to position 2, turn the crown forwards and push it back to position 1.
- Correcting the day: pull the crown out to position 2, turn the crown backwards and push it back to position 1.
- Time setting: hours, minutes and seconds. pull the crown out to position 3. The seconds hand will stop. Turn the crown forwards or backwards. Synchronise the seconds by pushing the crown back to position 1 to coincide with a given time signal.
Movement 843
Watch functions:
The crown has 3 positions.
Position 1: the watch is running.
Position 2: date setting: pull the crown out to position 2 (the date can also be corrected during the day-changing phase between 10pm and midnight. The date of the following day has to be set, because no automatic date change takes place at midnight). Turn the crown forwards until the required date appears. Push the crown back into position 1.
Quick-chance correction for day of the week: the second language always appears around 12h00 for about 2 hours, until the display changes to the required language. Pull the crown out to position 2 (watch is still running). Turn the crown anti clockwise until the required day of the week appears in the requested language. Push the crown back into position 1.
Time setting: pull the crown in position 3 (the watch stops). Turn the crown until the current time is displayed (remember the 24-hour cycle). Push the crown back into position 1.
Edox 07 Edox 08 Edox 011
Edox 012 Edox 015 Edox 016
Edox 0165 Edox 095 Edox 10
Edox 23 Edox 34 Edox 37

Edox 38 Edox 40 Edox 45


Edox 47 Edox 56 Edox 57

Edox 62 Edox 63 Edox 64


Edox 70 Edox 72 Edox 77


Edox 80 Edox 82 Edox 83


Edox 84 Edox 85 Edox 87


natural_image
Simple analog clock face with no visible text or symbols on the dial (pure technical drawing)Edox 88 Edox 90 Edox 91

Edox 93 Edox 94 Edox 95


Edox 96 Edox 101 Edox 102


natural_image
Line drawing of a round analog clock face with no visible text or symbols on the dial face (pure technical diagram)
Edox 103 Edox 104 Edox 105


Edox 401 Edox 805 Edox 853


INHALTSVERZEICHNIS
1. EINLEITUNG 2
1.1 INTERNATIONALE EDOX GARANTIE 2
1.2 SPEZIELLE EMPFEHLUNGEN 2
1.3 UNTERHALTSEMPFEHLUNGEN 2
1.4 WANN BENÖTIGT DIE UHR EINEN SERVICE? 3
1.5 UMWELTSCHUTZ 3
2. PRÄZISIONSTOLERANZEN 3
2.1 GANGGENAUGKEIT VON MECHANISCHEN UHREN 3
2.2 CHRONOMETER GANGGENAUIGKEIT 3
3. ALLGEMEINE INFORMATIONEN 3
3.1 HELIUM AUSLASSVENTIL 3
3.2 TACHYMETER SKALA 3
3.3 WASSERDICHTIGKEIT 4
3.4 LEDERBÄNDER 4
3.5 SICHERHEITS-SCHRAUBKRONE 4
3.6 PVD (PHYSICAL VAPOUR DEPOSITION) BESCHICHTUNG 4
3.7 TITANIUM 4
3.8 EDELSTAHL 296 L 4
4.4 Quartz Chronograph
Werk 09
Bedienung der Uhr:
1. Normale Position (Trageposition):
1. Normale Position (Trageposition):
1. Normale Position (Trageposition):


Edox 47 Edox 56 Edox 57

Edox 62 Edox 63 Edox 64


Edox 70 Edox 72 Edox 77

Edox 80 Edox 82 Edox 83


Edox 84 Edox 85 Edox 87


natural_image
Simple analog clock face with no visible text or symbols on the dial (pure technical drawing)Edox 88 Edox 90 Edox 91

Edox 93 Edox 94 Edox 95


Edox 96 Edox 101 Edox 102


natural_image
Line drawing of a round analog clock face with no visible text or symbols on the dial itself
Edox 103 Edox 104 Edox 105


Edox 401 Edox 805 Edox 853


TABLE DES MATIÈRES
1. INTRODUCTION 2
1.1 GARANTIE INTERNATIONALE EDOX 2
1.2 RECOMMANDATIONS SPÉCIALES 2
1.3 RECOMMANDATIONS D'ENTRETIEN 2
1.4 INTERVALLES POUR LES SERVICES 3
1.5 PROTECTION DE L'ENVIRONNEMENT 3
2. TOLÉRANCES DE PRÉCISION 3
2.1 PRÉCISION D'UNE MONTRE MÉCANIQUE 3
2.2 PRÉCISION D'UN CHRONOMÈTRE 3
3. INFORMATIONS GÉNÉRALES 3
3.1 VALVE À HÉLIUM 3
3.2 TACHYMÈTRE 3
3.3 ETANCHÉITÉ 4
3.4 BRACELETS EN CUIR 4
3.5 COURONNES VISSÉES 4
3.6 REVÊTEMENT PVD 4
3.7 TITANE 4
3.8 ACIER 4
4. INSTRUCTIONS D'UTILISATION 4
4.1 CHRONOGRAPHES À REMONTAGE AUTOMATIQUE 4
4.2 MOUVEMENTS À REMONTAGE AUTOMATIQUE 5
4.3 MONTRES À REMONTAGE MANUEL 7
4.4 MOUVEMENTS QUARTZ 7
Numéro du mouvement
Mouvement


Edox 47 Edox 56 Edox 57

Edox 62 Edox 63 Edox 64


Edox 70 Edox 72 Edox 77


Edox 80 Edox 82 Edox 83


Edox 84 Edox 85 Edox 87


natural_image
Simple analog clock face with no visible text or symbols on the face itselfEdox 88 Edox 90 Edox 91

Edox 93 Edox 94 Edox 95


Edox 96 Edox 101 Edox 102


natural_image
Line drawing of a round analog clock face with no visible text or symbols on the dial face (pure technical diagram)
Edox 103 Edox 104 Edox 105


Edox 401 Edox 805 Edox 853


INHOUDSOPGAVE
1. INTRODUCTIE 2
1.1 EDOX INTERNATIONALE GARANTIE 2
1.2 SPECIALE AANBEVELINGEN 2
1.3 ONDERHOUDS AANBEVELINGEN 2
1.4 ONDERHOUD 3
1.5 MILIEUBESCHERMING 3
2. PRECISIE EN SPELINGBEREIK 3
2.1 MECHANISCHE HOROLOGES NAUWKEURIGHEID 3
2.2 CHRONOMETER HORLOGES NAUWKEURIGHEID 3
3. ALGEMENE INFORMATIE 3
3.1 HELIUM ONTSNAPPINGS VENTIEL 3
3.2 TACHYMETER SCHAAL 3
3.3 WATERBESTENDIGHEID 4
3.4 LEDEREN BANDEN 4
3.5 GESCHROEFDE KROON 4
3.6 PVD COATING
3.7 TITANIUM
3.8 ROESTVRIJ STAAL 316L 4
4. GEBRUIKERS INSTRUCTIES 4
4.1 ZELFOPWINDENDE (AUTOMATISCHE) CHRONOGRAAF 5
4.2 ZELFOPWINDENDE (AUTOMATISCHE) HORLOGES 6
4.3 HANDMATIGE OPWIND HORLOGES 7
4.4 QUARTZ CHRONOGRAAF 7
Uurwerk nummer

Uurwerk
Kaliber specificaties:
GMT / Tijd zones:
Tijdsweergave:
Drukknop A: start/stop
Drukknop B: splits/reset
Edox 38 Edox 40 Edox 45


Edox 47 Edox 56 Edox 57

Edox 62 Edox 63 Edox 64


Edox 70 Edox 72 Edox 77


Edox 80 Edox 82 Edox 83


Edox 84 Edox 85 Edox 87


natural_image
Simple analog clock face with no visible text or symbols on the dial (pure technical drawing)Edox 88 Edox 90 Edox 91

Edox 93 Edox 94 Edox 95


Edox 96 Edox 101 Edox 102


natural_image
Line drawing of a round analog clock face with no visible text or symbols on the dial itself
Edox 103 Edox 104 Edox 105


Edox 401 Edox 805 Edox 853


INDICE
1. INTRODUCCIÓN 2


Edox 47 Edox 56 Edox 57

Edox 62 Edox 63 Edox 64


Edox 70 Edox 72 Edox 77


Edox 80 Edox 82 Edox 83


Edox 84 Edox 85 Edox 87


natural_image
Simple analog clock face with no visible text or symbols on the dial (pure technical drawing)Edox 88 Edox 90 Edox 91

Edox 93 Edox 94 Edox 95


Edox 96 Edox 101 Edox 102


natural_image
Line drawing of a round analog clock face with no visible text or symbols on the dial face (pure technical diagram)
Edox 103 Edox 104 Edox 105

Edox 401 Edox 805 Edox 853


SPIS TREŚCI
1. WPROWADZENIE 2
1.1 MIEDZYNARODOWA GWARANCJA EDOX 2
1.2 ZALECENIA SPECIALNE 2
1.3 ZALECENIA DOTYCZĄCE KONSERWACJI 2
1.4 SERWISOWANIE 3
1.5 OCHRONA ŚRODOWISKA 3
2. TOLERANCJE DOKŁADNOŚCI 3
2.1 DOKŁADNOŚĆ ZEGARKÓW MECHANICZNYCH 3
2.2 DOKŁADNOŚĆ CHRONOMETRÓW 3
3. INFORMACJE OGÓLNE 4
3.1 ZAWÓR HELOWY 4
3.2 SKALA TACHOMETRU 4
3.3 WODOSZCZELNOŚĆ 4
3.4 SKÓRZANE PASKI 4
3.5 ZAKREÇANA KORONKA 5
3.6 POWŁOKA PVD 5
3.7 TYTAN 5
3.8 STAL SZLACHETNA 5
4. INSTRUKCJA OBSŁUGI 5
4.1 CHRONOGRAF AUTOMATYCZNY 5
4.2 ZEGARKI AUTOMATYCZNE 6
4.3 ZEGARKI Z NACIAGIEM REÇZNYM 8
4.4 CHRONOGRAF KWARCOWY 8
Numer mechanizmu
Mechanizm
Przycisk B: split/reset


Edox 47 Edox 56 Edox 57

Edox 62 Edox 63 Edox 64


Edox 70 Edox 72 Edox 77


Edox 80 Edox 82 Edox 83


Edox 84 Edox 85 Edox 87


natural_image
Simple analog clock face with hands and minute hand (no numbers or text beyond 'RDOX' and 'π')Edox 88 Edox 90 Edox 91

Edox 93 Edox 94 Edox 95


Edox 96 Edox 101 Edox 102

natural_image
Line drawing of a round analog clock face with no visible text or symbols on the dial face (pure technical diagram)
Edox 103 Edox 104 Edox 105


Edox 401 Edox 805 Edox 853


CUPRINS
1. INTRODUCERE 2
1.1 GARANTIE INTERNATIONALA EDOX 2
1.2 RECOMANDARI SPECIALE 2
1.3 RECOMANDARI DE INTRETINERE 2
1.4 SERVICE 3
1.5 PROTECTIA MEDIULUI 3
2. ACURATETE 3
2.1 ACURATETE CEASURI MECANICE 3
2.2 ACURATETE CEASURI CRONOMETRE 3
3. INFORMATII GENERALE 3
3.1 VALVA HELIU 3
3.2 SCALA TAHIMETRICA 3
3.3 REZISTENTA LA APA 4
3.4 CUREAUA DIN PIELE 4
3.5 REMONTOAR INFILETABIL 4
3.6 PLACARE PVD 4
3.7 TITAN 4
3.8 OTEL INOXIDABIL 4
4. INSTRUCTIUNI DE UTILIZARE 4
4.1 CRONOGRAF AUTOMATIC 4
4.2 CEASURI AUTOMATICE 5
4.3 CEASURI MECANICE 7
4.4 CRONOGRAF QUARTZ 7
Numar calibru
Mecanism
Buton A: start-stop, start-stop etc.

Edox 38 Edox 40 Edox 45


Edox 47 Edox 56 Edox 57

Edox 62 Edox 63 Edox 64


Edox 70 Edox 72 Edox 77


Edox 80 Edox 82 Edox 83


Edox 84 Edox 85 Edox 87


natural_image
Simple analog clock face with no visible text or symbols on the dial (pure technical drawing)Edox 88 Edox 90 Edox 91

Edox 93 Edox 94 Edox 95


Edox 96 Edox 101 Edox 102

natural_image
Line drawing of a round analog clock face with no visible text or symbols on the dial face (pure technical diagram)
Edox 103 Edox 104 Edox 105


Edox 401 Edox 805 Edox 853


СОДЕРЖАНИЕ
- ВВЕДЕНИЕ 2


Edox 47 Edox 56 Edox 57

Edox 62 Edox 63 Edox 64


Edox 70 Edox 72 Edox 77


Edox 80 Edox 82 Edox 83


Edox 84 Edox 85 Edox 87


natural_image
Simple analog clock face with no visible text or symbols on the dial (pure technical drawing)Edox 88 Edox 90 Edox 91

Edox 93 Edox 94 Edox 95


Edox 96 Edox 101 Edox 102


natural_image
Line drawing of a round analog clock face with no visible text or symbols on the dial (pure technical diagram)
Edox 103 Edox 104 Edox 105


Edox 401 Edox 805 Edox 853

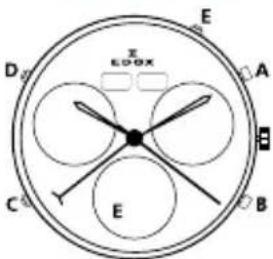


TABLE OF CONTENTS
1. 前言 2


Edox 47 Edox 56 Edox 57

Edox 62 Edox 63 Edox 64


Edox 70 Edox 72 Edox 77


Edox 80 Edox 82 Edox 83


Edox 84 Edox 85 Edox 87


natural_image
Simple analog clock face with no visible text or symbols on the dial (pure technical drawing)Edox 88 Edox 90 Edox 91
Edox 93 Edox 94 Edox 95


Edox 96 Edox 101 Edox 102


natural_image
Line drawing of a round analog clock face with no visible text or symbols on the dial (pure technical diagram)
Edox 103 Edox 104 Edox 105


Edox 401 Edox 805 Edox 853


目次
1. はじめに 2


Edox 47 Edox 56 Edox 57
Edox 62 Edox 63 Edox 64


Edox 70 Edox 72 Edox 77


Edox 80 Edox 82 Edox 83


Edox 84 Edox 85 Edox 87


natural_image
Simple analog clock face with no visible text or symbols on the dial (pure technical drawing)Edox 88 Edox 90 Edox 91

Edox 93 Edox 94 Edox 95


Edox 96 Edox 101 Edox 102


natural_image
Line drawing of a round analog clock face with no visible text or symbols on the dial (pure technical diagram)
Edox 103 Edox 104 Edox 105


Edox 401 Edox 805 Edox 853


- GENERAL INFORMATION 3
- OPERATING INSTRUCTIONS 4
- Movement
- INTRODUCTION
- International Edox Warranty
- Special recommendations
- Maintenance recommendations
- What are the service intervals? Every 24 months
- Every 5 years
- Who should I contact for a maintenance service or battery replacement?
- Environmental protection
- PRECISION TOLERANCES
- Mechanical watches
- Mechanical watches accuracy
- Chronometer watches accuracy
- GENERAL INFORMATIONS
- Helium escape valve
- Water resistance
- Leather straps
- Screw-down crown
- PVD (Physical Vapour Deposition)
- Titanium
- Stainless steel 316L
- OPERATING INSTRUCTIONS, HOW TO USE YOUR MANUAL:
- Self winding (automatic) chronograph
- Movement 07
- Calibre specifications:
- Time display:
- Time zones:
- Calendar:
- Setting the time and date:
- Setting the time zones.
- Movement 08
- Watch functions:
- NB: For all references: do not correct the date between 22h00 and 02h00.
- Chronograph functions:
- Movements 011, 012, 45, 91, 95
- Correcting the day for the references
- Self-winding (automatic) watches
- Movement 805
- Movement 47, 85, 853
- Movement 87
- Movement 90
- Movement 93
- Hand winding watches
- Movement 72
- Quartz chronograph
- Movement 09
- Operation of the watch:
- Measurement of cumulative time:
- Measurement of lap time:
- Initialization of the chronograph, minute and second chronograph
- Movement 015
- Split Time function
- Movement 016
- Setting the perpetual calendar Step 1
- ATTENTION
- Step 2
- Date and Hour Adjustment
- Step 3
- Final Control « perpetual calendar » is set correctly.
- Movement 0165
- Zero setting for the counters:
- Time and moonphase setting:
- Split timing functions:
- Movements 10, 101, 102, 103, 104
- Accumulated timing chronograph:
- Movement 105
- Time setting:
- Date setting (changes from 31 to 1):
- Date, day of week and month setting:
- Chronograph (Start- Stop - Reset):
- Intermediate or split-timing:
- Adjusting the chronograph hands to zero position:
- Movement 38
- Chronograph: Basic functions (start/stop/reset to zero)
- Chronograph: Keeping totals with the chronograph
- Time keeping: Timing lap times
- Adjusting the chronograph hands to the zero position
- Setting the time
- Quickly setting the date
- Setting the date, the day of the week and the time
- Movement 40
- Movement 401
- Setting sequence for moon phase display, date, day of the week and time:
- Movement 64
- Movement 23
- Movements 56, 57
- Movements 34, 345
- Movements 63, 70
- Movement 62
- Movement 84
- Movement 843
- INHALTSVERZEICHNIS
- EINLEITUNG 2
- PRÄZISIONSTOLERANZEN 3
- ALLGEMEINE INFORMATIONEN 3
- Werk 09
- Bedienung der Uhr:
- Normale Position (Trageposition):
- TABLE DES MATIÈRES
- INTRODUCTION 2
- TOLÉRANCES DE PRÉCISION 3
- INFORMATIONS GÉNÉRALES 3
- INSTRUCTIONS D'UTILISATION 4
- Mouvement
- INHOUDSOPGAVE
- INTRODUCTIE 2
- PRECISIE EN SPELINGBEREIK 3
- ALGEMENE INFORMATIE 3
- GEBRUIKERS INSTRUCTIES 4
- Uurwerk
- Kaliber specificaties:
- Tijdsweergave:
- INDICE
- INTRODUCCIÓN 2
- SPIS TREŚCI
- WPROWADZENIE 2
- TOLERANCJE DOKŁADNOŚCI 3
- INFORMACJE OGÓLNE 4
- INSTRUKCJA OBSŁUGI 5
- Mechanizm
- CUPRINS
- INTRODUCERE 2
- ACURATETE 3
- INFORMATII GENERALE 3
- INSTRUCTIUNI DE UTILIZARE 4
- Mecanism
- СОДЕРЖАНИЕ
- TABLE OF CONTENTS
- 前言 2
- 目次
- はじめに 2
Brand : Edox
Model : Les Vauberts Automatic Date
Category : Wristwatch