
C70FW - Freezer AMANA - Free user manual and instructions
Find the device manual for free C70FW AMANA in PDF.

| Product Type | Freezer |
| Brand | Amana |
| Model | C70FW |
| Power Supply | 103-126 V, 15 A, 60 Hz, independent circuit |
| Freezer Type | Upright or chest depending on model |
| Thermostat Setting | From 1 (highest temperature) to 7 (lowest temperature) |
| Recommended Storage Temperature | 0°F (-18°C) to -2°F (-19°C) |
| Defrosting | Manual (defrost when frost layer exceeds 1/4 inch) |
| Interior Lighting | 15 W bulb, part number R0662001 |
| Door Lock | With key (keep key out of reach of children) |
| Operation Indicator | "RUN" light on chest models |
| Included Accessories | Reversible bin, divider, basket (depending on model) |
| Recommended Cleaning | Baking soda (4 tbsp per liter of warm water) |
| Seal Maintenance | Apply a thin coat of petroleum jelly every 3 months |
| Electrical Safety | Three-prong outlet with mandatory grounding |
| Warranty | Manufacturer's warranty, repairs by Amana authorized technician |
| Customer Service | 1-800-843-0304 (United States), 1-319-622-5511 (outside United States) |
Frequently Asked Questions - C70FW AMANA
User questions about C70FW AMANA
0 question about this device. Answer the ones you know or ask your own.
Ask a new question about this device
Download the instructions for your Freezer in PDF format for free! Find your manual C70FW - AMANA and take your electronic device back in hand. On this page are published all the documents necessary for the use of your device. C70FW by AMANA.
USER MANUAL C70FW AMANA
Keep these instructions for future reference. Be sure this manual stays with freezer.
Contents
Electrical Requirements 2
Model Identification 3
Model Diagrams
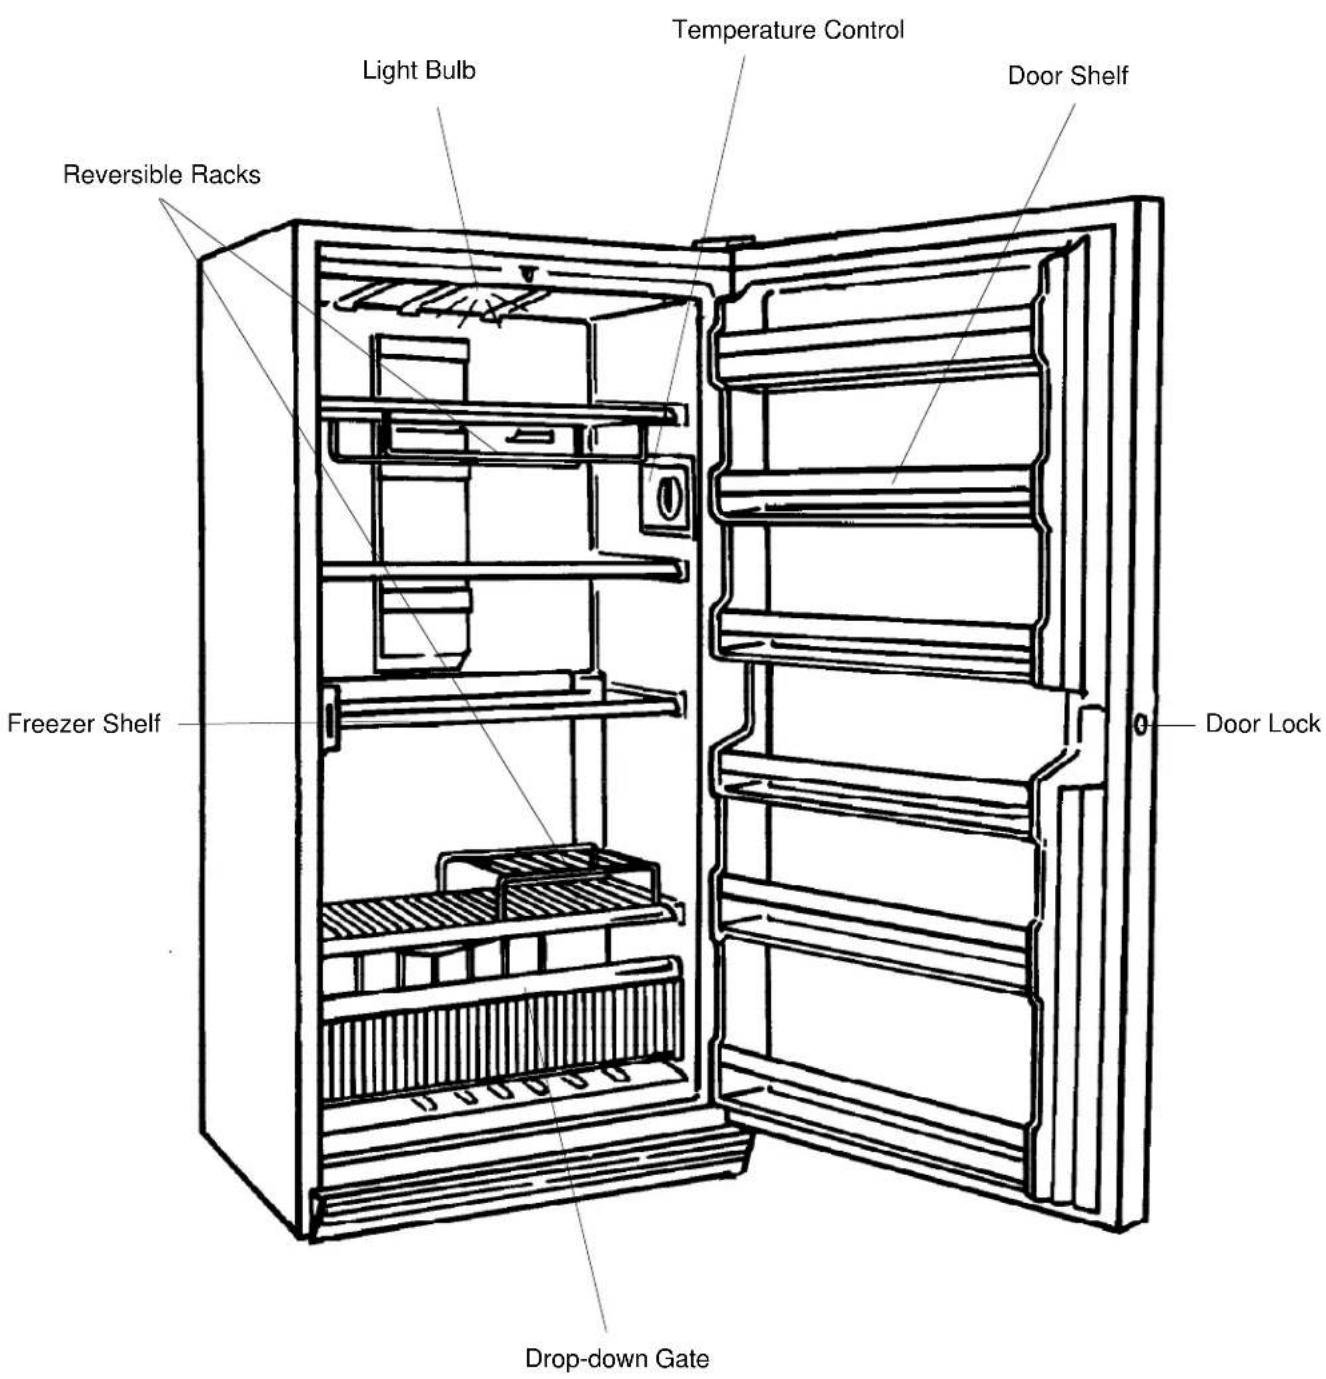
Free-O-Frost™ Upright Freezer 4
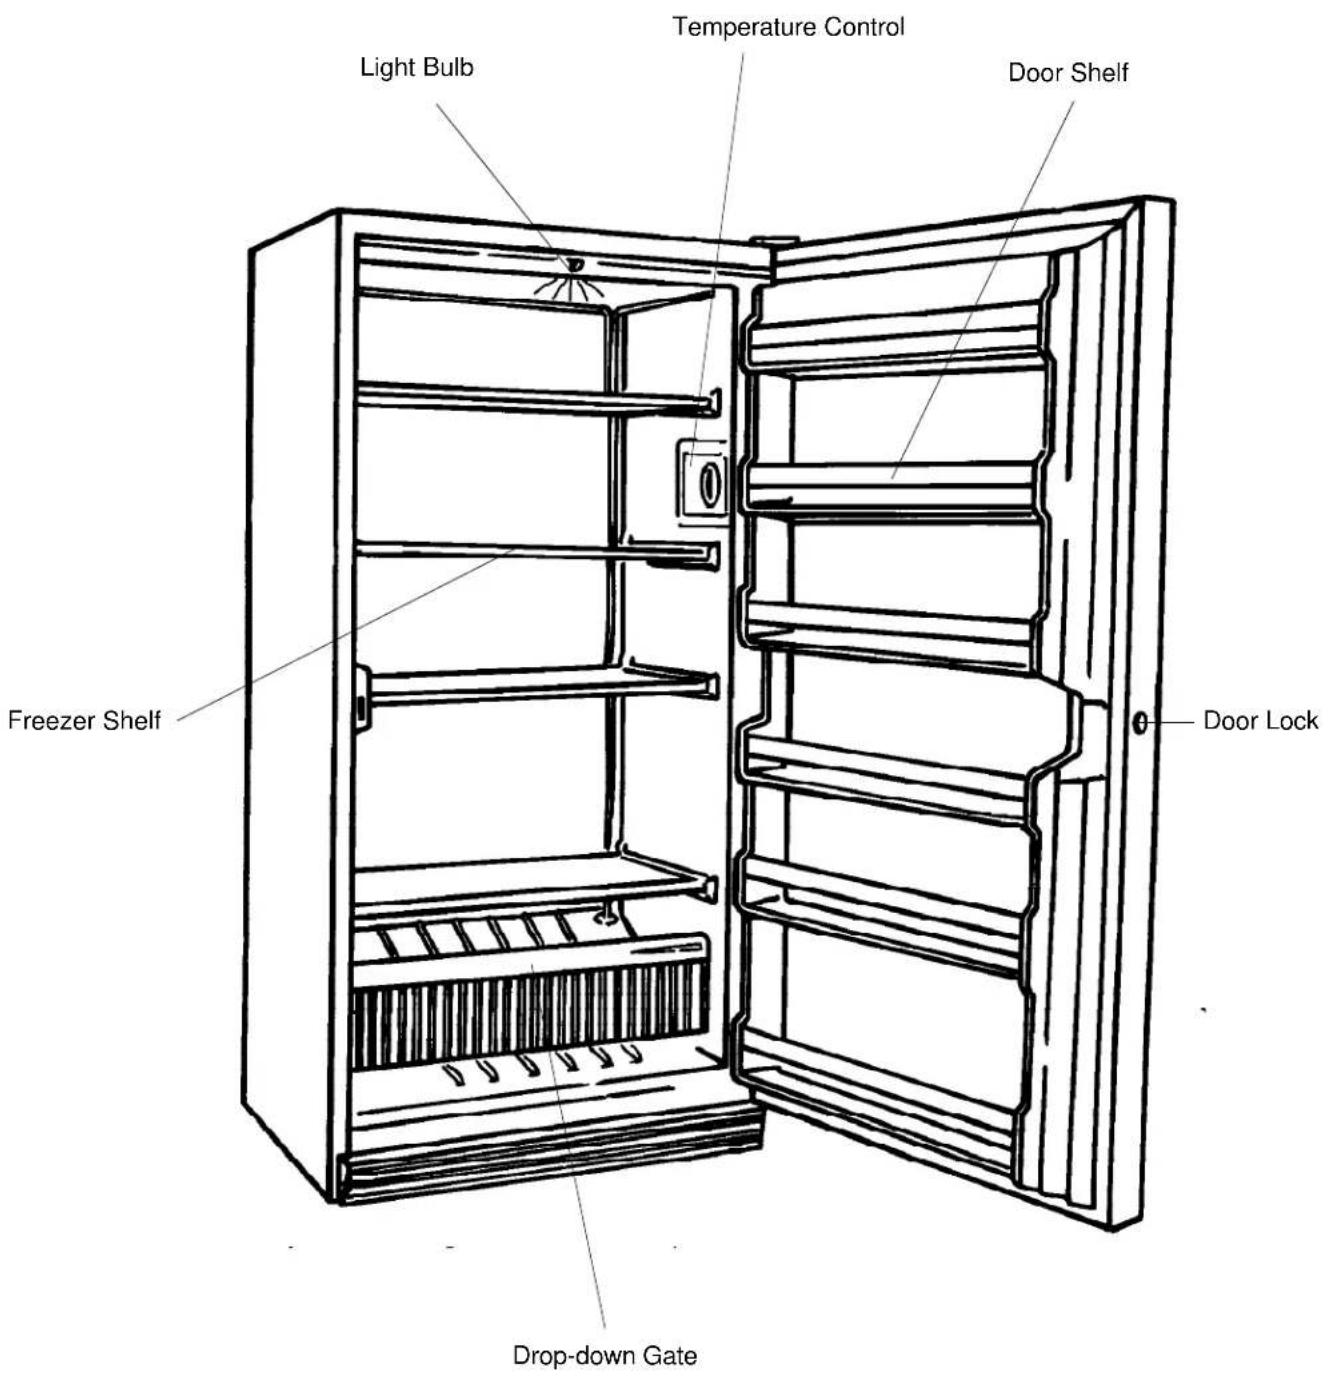
Standard Upright Freezer 5
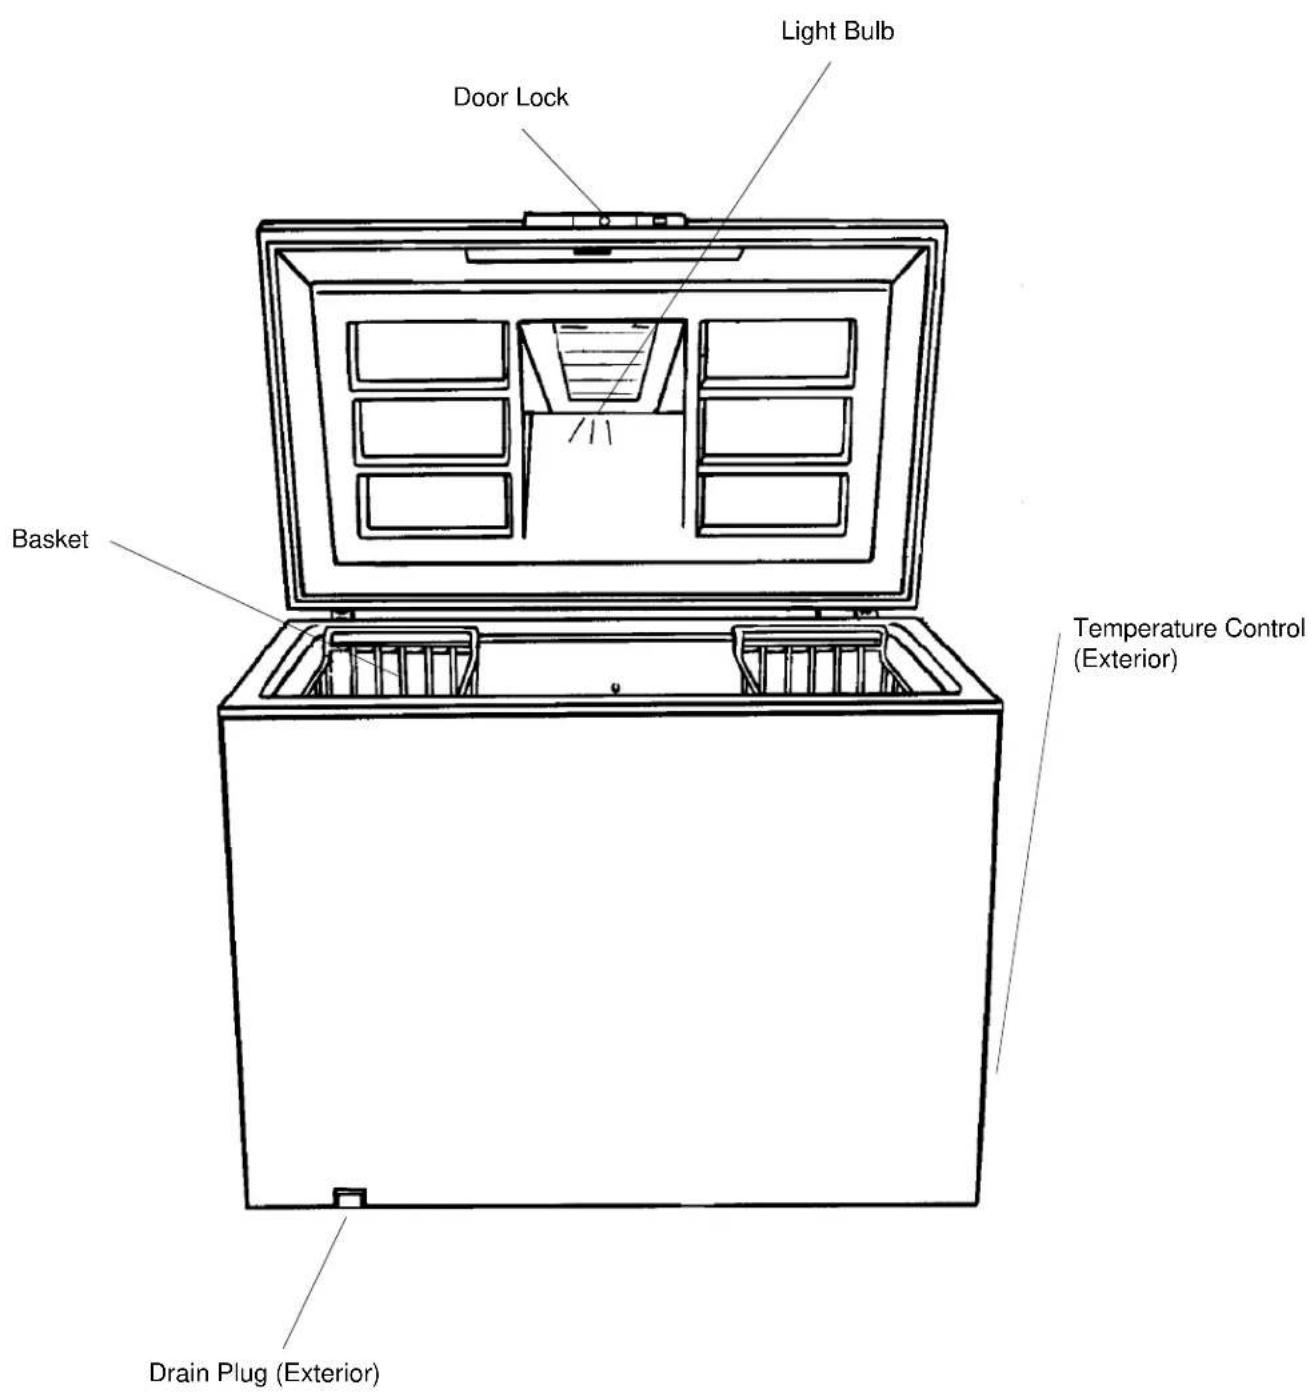
Chest Freezer 6
Installation Information
General 7
Placement 7
Door Handle (upright freezer models) 7
Leveling (upright freezer models) 8
Setting Controls
Temperature Control 9
Temperature Monitor (C22 freezer model).... 10
Features
Door Lock 10
Power On Light (chest freezer models) 10
Reversible Rack
(some upright freezer models) 11
Divider (some chest freezer models) 11
Basket (some chest freezer models) 11
Freezing Guide
Wrapping 12
Freezing Guidelines 12
Care and Cleaning
General. 13
Adhesives 13
Door Gaskets 13
Odor Removal 13
Defrosting 14
Light Bulb. 16
Energy Tips 17
Vacation Tips 17
Normal Operating Sounds 17
Before Calling for Service 17
Factory Service Centers. 18
Asure™ Extended Service Plan. 18
Electrical Requirements

RECOGNIZE THIS SYMBOL AS A SAFETY PRECAUTION

WARNING
Electrical Grounding Instructions--This appliance is equipped with a three-prong (grounding) plug for protection against possible shock hazards. If a two-prong wall receptacle is encountered, contact a qualified electrician and have the two-prong wall receptacle replaced with a properly grounded three-prong wall receptacle in accordance with the National Electrical Code.
Freezer is designed to operate on a separate 103 to 126 volt, 15 amp., 60 cycle line.
DO NOT UNDER ANY CIRCUMSTANCES CUT OR REMOVE THE ROUND GROUNDING PRONG FROM THE PLUG. REFRIGERATOR MUST BE GROUNDED AT ALL TIMES. DO NOT REMOVE WARNING TAG FROM THE SERVICE CORD.

WARNING
DO NOT USE A TWO-PRONG ADAPTER.
DO NOT USE AN EXTENSION CORD.
Model Identification
Please read this Owner's Manual thoroughly. This manual provides proper maintenance information. Any questions, call the Consumer Affairs Department at 1-800-843-0304 inside U.S.A. and 1-319-622-5511 outside U.S.A.
Complete enclosed registration card and promptly return. If registration card is missing, call the Consumer Affairs Department.
When contacting Amana Refrigeration, Inc., provide product information. Locate product information on the serial plate. Upright freezer serial plate is located on upper left wall. Chest freezer serial plate is located on upper right wall. Record the following information:
Model Number:
Manufacturing Number:
S/N or Serial Number:
Date of purchase:
Dealer's name and address:
Keep a copy of sales receipt for future reference.
Locate an authorized servicer by calling 1-800-NATLSVC (628-5782) inside U.S.A. and 319-622-5511 outside U.S.A. Warranty service must be performed by an authorized servicer. Amana Refrigeration, Inc. also recommends contacting an authorized servicer if service is required after warranty expires.
Amana Refrigeration, Inc. offers a complete line of appliances...refrigerators, ranges, cooktops, wall ovens, microwave ovens, dishwashers, washers and dryers. Amana Refrigeration, Inc. also manufactures a complete selection of high efficiency gas furnaces plus both central and room air conditioners.
Enjoy this new Amana® freezer.
Free-O-Frost™ Upright Freezer
Standard Upright Freezer
Chest Freezer

Caution
To avoid personal injury, wear gloves when installing freezer.

Caution
To avoid property damage, protect soft vinyl or other flooring with cardboard, rugs or other protective material.
General
- Secure door before moving freezer. Do not use door or handle to lift or push freezer. Hinges on lid of chest freezer are under tension. If hinges must be removed, check instruction label on rear of freezer cabinet.
- Amana® upright and chest freezers are commercially rated for home use. Not designed for commercial application.
-
Confirm the following items are installed.
-
Free-O-Frost™ Upright Freezer Models
Defrost drain pan behind toe grille.
- Standard Upright Freezer Models
Drain plug in bottom front of freezer liner.
- Chest Freezer Models
Interior drain plug in bottom left front corner and exterior drain plug in lower left front corner are installed.
Placement
Place freezer a minimum of three inches from surrounding walls or cabinets.
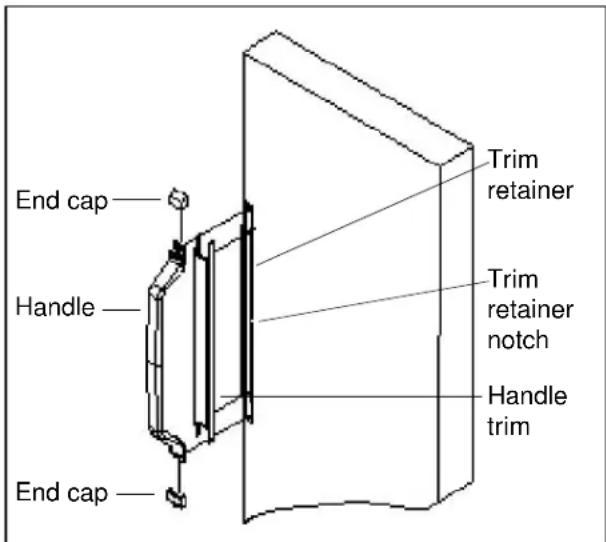
Door Handle
(upright freezer models)
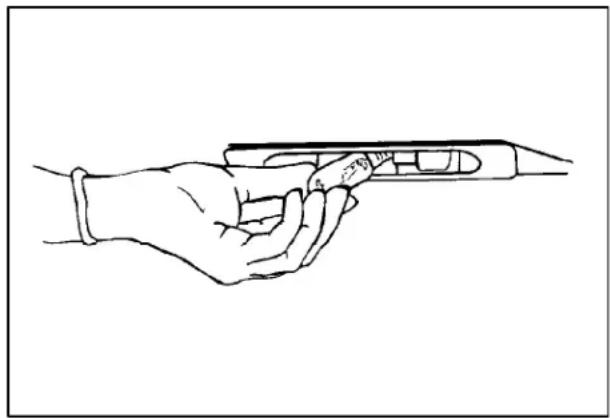
- If handle trim has not been factory installed, slide right edge of handle trim under right edge of trim retainer. Verify rib on right inside edge of handle trim fits into trim retainer notch. Snap outside edge of handle trim over outside edge of trim retainer.
- Install handle on freezer door as shown. Verify freezer handle is angled inward towards door. Secure handle to freezer door with screws provided. Verify screws are secure.
- Slide end caps over ends of handle until end caps snap in place. End cap marked L goes on top end of handle. End cap marked R goes on bottom end of handle.
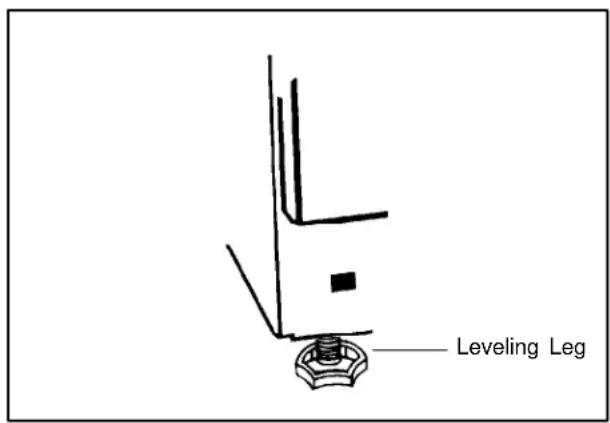
Leveling
(upright freezer models)
- Install leveling legs under front corners behind toe grille.
-
Level freezer side to side and tilt freezer 1/4 inch from front to back. Turn legs clockwise to raise freezer and counterclockwise to lower freezer. If freezer cannot be level due to flooring, use shims under rear of freezer cabinet to level freezer.
-
Check freezer 2 or 3 weeks after loading with food and confirm freezer is level.
This freezer operates most efficiently in normal household temperatures of 65^ to 90^ .
Temperature Control
On upright freezer models, locate temperature control on right wall.
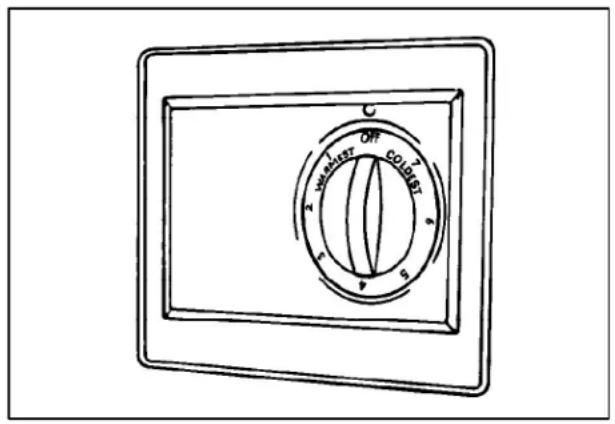
On chest freezer models, locate temperature control on right side of freezer cabinet near lower right back corner.
When control is set to 0, freezer will not cool. Initially, set control to 4. Wait 3 hours after connecting power for freezer to reach desired temperatures, then add food. After 24 hours, adjust control as desired. 1 is warmest setting and 7 is coldest.
Set temperatures precisely using a household thermometer that includes temperatures between -5^ to 50^ . Put thermometer snugly between frozen packages in freezer. Wait 5-8 hours. If freezer temperature is not 0^ to 2^ , adjust control, one number at a time. Check again after 5-8 hours.

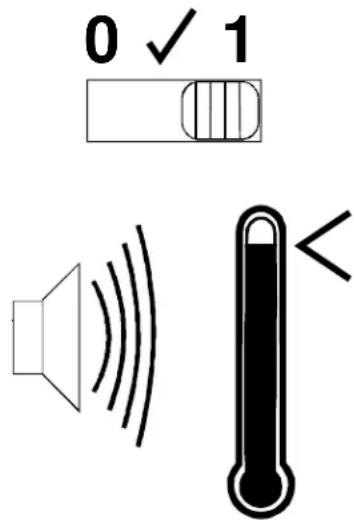
Temperature Monitor
(C22 freezer model)
Locate temperature monitor on right side of freezer cabinet near bottom right corner.
Alarm sounds if temperature in freezer rises 10^ or more above normal for selected setting. Alarm may sound if temperature control dial is turned to a much lower colder setting or if a large amount of unfrozen food is added at one time.
Alarm is controlled by a three-position switch.
- 0 prevents alarm from sounding when freezer is warm, such as during initial start-up or defrosting.
- sounds alarm regardless of temperature. Alarm system should be tested at least once a month.
- 1 is proper setting for normal freezer use.
Return switch to 1 after defrosting.
Features
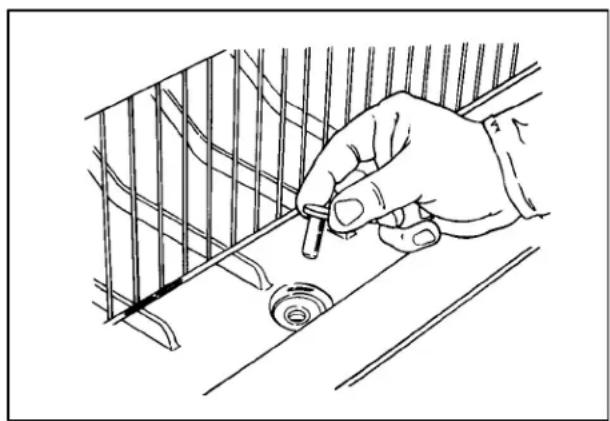
Door Lock
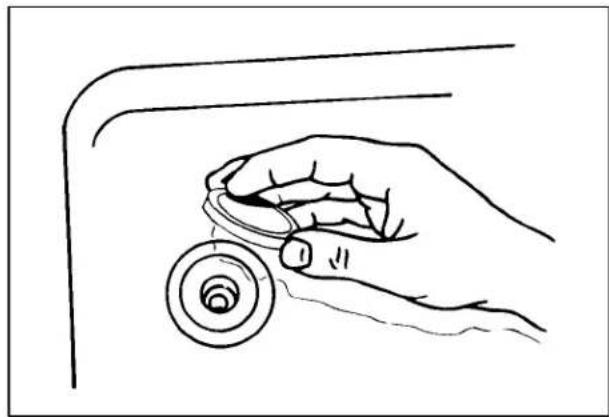
Lock freezer door by completing the following:
- Insert key into lock approximately 1/4".
- Turn key clockwise to lock door and counterclockwise to unlock door.

WARNING
TO HELP PREVENT CHILD ENTRAPMENT KEEP KEY OUT OF REACH OF CHILDREN AND AWAY FROM CABINET.
Power On Light
(chest freezer models)
Locate power on light near door lock keyhole. Light is on when freezer is connected to power source. Light is off when power source is interrupted or when bulb needs replacing. Flickering light indicates faulty bulb.
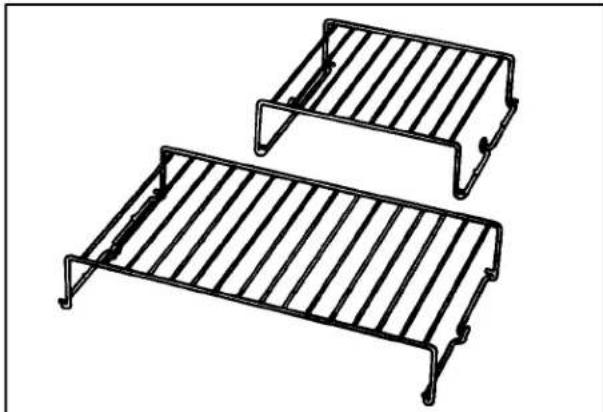
Reversible Rack
(some upright freezer models)
Rack separates food for more storage space.
- Remove rack by releasing rack from shelf wires. Pull down if located under shelf or lift up if located above shelf.
- Replace rack by positioning on top or underneath shelf wires. Slide rack until rack locks in place.
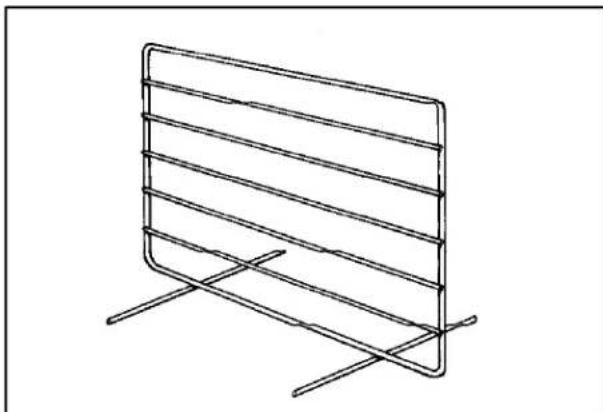
Divider
(some chest freezer models)
Divider keeps items in place. Divider sets on freezer floor.
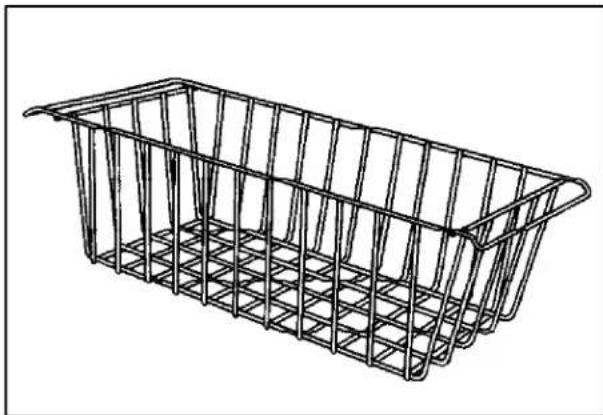
Basket
(some chest freezer models)
Basket separates food to organize storage space and removes for easier access of smaller items. Baskets rest on freezer liner.
Wrapping
- Use moisture-vapor-proof materials and seal tightly. When lids are furnished, follow manufacturer's directions for best results.
- Choose materials which are labeled for freezer use. Ordinary waxed paper or butcher paper does not provide proper protection for frozen food. Materials not designed for freezer use may give off odors.
Freezing Guidelines
| Item Recommended Storage Times at 0°F. (Months) | |
| Meat | |
| Beef Roast or Steak (fresh) 9-12 | |
| Meat Casserole (cooked) 3-6 | |
| Hamburger 3-4 | |
| Pork (cured) 1-3 | |
| Pork Chop or Roast (fresh) 4-8 | |
| Roast (fresh) 4-8 | |
| Sausage 1-3 | |
| Veal 8-9 | |
| Lamb | 9-12 |
| Poultry | |
| Chicken (fresh) 9-12 | |
| Chicken (cooked) 1-3 | |
| Duck 6 | |
| Goose 6 | |
| Turkey (fresh) 6-12 | |
| Turkey (cooked) 1-3 | |
| Fish | 3-6 |
| Vegetables | 8 |
| Fruits | 12 |
| Breads and Pastries | |
| Bread | 1-3 |
| Yeast Rolls | 1-3 |
| Layer Cake | 2-4 |
| Fruit Pie (unbaked) | 8 |
| Ice Cream, Sherbert | 1-2 |

WARNING
To avoid electrical shock which can cause severe personal injury or death, disconnect power to freezer before cleaning. After cleaning, restore power.

Caution
To avoid personal injury or property damage, read and follow all cleaning product manufacturer's directions.
General
- Wash surfaces with four tablespoons baking soda dissolved in one quart warm water and a soft, clean cloth.
- Rinse surfaces with warm water. Dry surfaces with a soft, clean cloth.
Important
-
Do not use the following items:
-
abrasive or harsh cleaners, ammonia, chlorine bleach, etc.
- concentrated detergents or solvents
- metal scouring pads
These items can scratch, crack and discolor surfaces.
- Do not place shelves or accessories in dishwasher.
Adhesives
Remove glue residue by dabbing toothpaste over adhesive. Rub toothpaste into adhesive with fingers until adhesive loosens. Rinse surface with warm water. Dry surface with a soft, clean cloth.
Door Gaskets
- Clean door gaskets every three months or more frequently if necessary.
- Rinse and dry gaskets thoroughly.
- Apply a light film of petroleum jelly to keep gaskets pliable.
Odor Removal
- Remove all food.
-
Wash all interior surfaces including door, floor and walls according to "General" instructions. Pay special attention to corners, crevices and grooves. Include all accessories, shelves and gaskets.
-
Rinse and dry thoroughly.
- Wrap foods in tightly sealed wrap or containers to prevent further odor. After 24 hours, check if odor was eliminated.
- Clean defrost drain pan in Free-O-Frost models by removing toe grille. Pull drain pan forward. Wash surface according to "General" instructions. When replacing drain pan verify that drain pan clips rest in slots on both sides of drain pan.
If odor was not eliminated, do the following:
- Complete procedures in steps 1-3 above.
- Pack freezer with crumpled sheets of black and white newspaper.
- Place charcoal briquettes randomly throughout newspaper.
- Close door and let stand 24-48 hours.
- Remove charcoal briquettes and newspapers. Wash all interior surfaces including door, floor and walls according to "General" instructions. Pay special attention to corners, crevices and grooves. Include all accessories, shelves and gaskets.
- Wrap foods in tightly sealed wrap or containers to prevent further odor. After 24 hours, check if odor was eliminated.
If odor was still not eliminated, contact Consumer Affairs Department.
Defrosting

WARNING
To avoid electrical shock which can cause severe personal injury or death, disconnect power to freezer before defrosting. After defrosting, restore power.
Defrost freezer when frost has accumulated to 1/4 . Upper section of freezer will normally have more frost than lower section.
Upright Models
- Transfer food to an alternate cooling source.
- Remove toe grille by pulling forward.
- Locate defrost drain tube and place tube in a shallow pan.
-
Remove defrost drain plug on bottom front of freezer liner so defrost water will flow into drain tube. Empty pan as needed during defrosting.
-
Open freezer door and place pans of hot water on shelves. Allow ice to melt before removing shelves.

Caution
To avoid property damage, do not use sharp or pointed instruments to scrape frost from shelves or interior surfaces.
- Wash all interior surfaces including door, floor and walls according to "General" instructions.
- Clean defrost drain using a bottle brush. Flush drain with clear water before replacing drain tube and drain plug. Drain plug must be properly installed for efficient operation.
Chest Freezer
- Transfer food to an alternate cooling source.
- Place pans of hot water in freezer.
- Remove interior drain plug from bottom left front corner of freezer.
- Remove exterior drain plug from lower left front corner of freezer.
- Place shallow pan beneath drain opening to catch defrost water or attach a garden hose to outside drain hole, using supplied hose fitting (some models). Press hose fitting into outside drain opening.
- Wash all interior surfaces including door, floor and walls according to "General" instructions.
- Remove hose fitting if used. Replace both inside and outside drain plugs. Drain plug must be properly installed for efficient operation.
Light Bulb

WARNING
To avoid electrical shock which can cause severe personal injury or death, disconnect power to freezer before replacing light bulb. After replacing light bulb, restore power.

Caution
To avoid personal injury or property damage, observe the following:
- Allow light bulb to cool.
- Wear gloves when replacing light bulb.
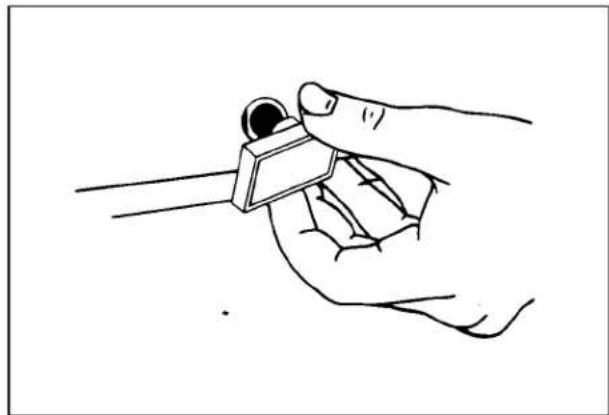
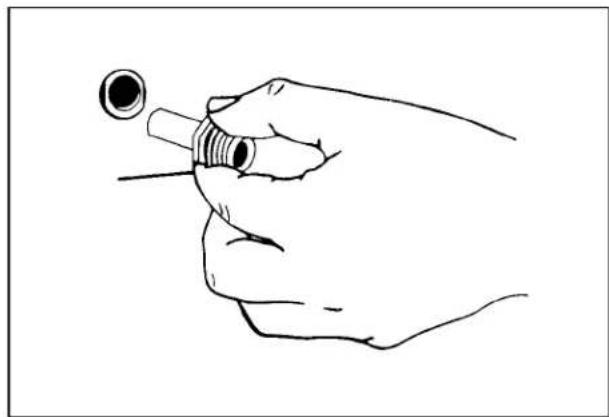
Remove light bulb cover by pressing front and back of light bulb cover together. Replace light bulb with 15-watt appliance bulb part #R0662001.
Energy Tips
Before Calling For Service
This freezer is designed to be one of the most energy efficient freezers available. Reduce energy use by doing the following:
- Operate in normal room temperatures away from heat sources and direct sunlight.
- Set controls no colder than necessary.
- Keep freezer full.
- Keep door gaskets clean and pliable. Replace gaskets if worn.
Vacation Tips
For long vacations, do the following:
- Empty freezer.
- Unplug freezer.
- Clean freezer including door gaskets.
- Prop doors open, so air can circulate inside.
Normal Operating Sounds
Today's freezers have new features and are more energy efficient. As a result, certain sounds may be unfamiliar. These sounds are normal and will soon become familiar. These sounds also indicate freezer is operating and performing as designed.
1. Temperature Control
Temperature control clicks when starting or stopping compressor.
2. Freezer Fan
(Free-O-Frost™ Upright Freezer Models) Freezer fan air rushes and whirs.
3. Evaporator
Evaporator refrigerant flow gurgles, pops or sounds like boiling water.
4. Compressor
Compressor has a high pitched hum or pulsating sound.
5. Insulation
Foam insulation is very energy efficient and has excellent insulating capabilities. However, foam insulation is not as sound absorbent as previously used fiberglass insulation.
Freezer does not operate.
- Confirm temperature control is on.
- Confirm freezer is plugged in.
- Check fuse or circuit breaker. Plug in another item at that wall outlet.
- Wait 20 minutes to see if freezer restarts. If freezer control is on, freezer may be in defrost cycle.
Freezer still won't operate.
- Unplug freezer. Transfer food to another unit or place dry ice in freezer to preserve food.
- Call 1-800-NATLSVC (628-5782) inside U.S.A. and 319-622-5511 outside U.S.A. to locate an authorized servicer.
Food temperature appears too warm.
See above sections.
- Allow time for recently added food to reach freezer temperature.
- Check gasket for proper seal.
- Adjust temperature control.
Freezer runs too frequently.
It may be normal to maintain an even temperature.
- Doors may have been opened frequently or for an extended period of time.
- Adjust temperature control.
- Check gaskets for proper seal.
- Confirm freezer has proper clearance on each side.
Water droplets form on outside of freezer.
- Check door gaskets for proper seal.
Water is on floor beneath freezer.
- Confirm drain plugs are properly positioned.
- On upright models, confirm defrost drain pan is properly positioned.
Freezer has an odor.
- See "Odor Removal" instructions in "Care and Cleaning" section.
Freezer makes unfamiliar sounds or seems too loud. - It may be normal. See "Normal Operating Sounds" section.
Factory Service Centers
Listed below are Factory Service Centers which service most metropolitan and surrounding areas. Amana Refrigeration, Inc. also has a network of independent authorized servicers. Locate a Factory Service Center or independent servicer by calling 1-800-NATLSVC (628-5782) inside U.S.A. and 319-622-5511 outside U.S.A. When contacting Amana Refrigeration, Inc., provide product information. Locate product information on the nameplate. Upright freezer nameplate is on the upper left wall. Chest freezer nameplate is on the upper left corner. Warranty service must be performed by an authorized servicer. Amana Refrigeration, Inc. also recommends contacting an authorized servicer if service is required after warranty expires.
Amana Factory Service Center Arizona
Also dispatches service in areas of Nevada
Amana Factory Service Center California
Amana Factory Service Center Colorado
Also dispatches service in areas of Utah
Amana Factory Service Center Florida
Amana Factory Service Center Georgia
Also dispatches service in areas of Alabama, North Carolina, South Carolina and Tennessee
Amana Factory Service Center Iowa
Also dispatches service in areas of Kansas, Minnesota, Missouri and Wisconsin
Amana Factory Service Center Illinois
Also dispatches service in areas of Indiana and Kentucky
Amana Factory Service Center Massachusetts
Also dispatches service in areas of New Hampshire and Rhode Island
Amana Factory Service Center Maryland
Also dispatches service in areas of Pennsylvania, Virginia and Washington D.C.
Amana Factory Service Center New York
Also dispatches service in areas of Connecticut and New Jersey
Amana Factory Service Center Ohio
Also dispatches service in areas of Michigan and Pennsylvania
Amana Factory Service Center Texas
Asure™ Extended Service Plan
Amana Refrigeration, Inc. is pleased to offer long-term service protection on this new freezer. Azure™ Extended Service Plan is specially designed to supplement Amana's strong warranty. Azure™ provides budget-protecting coverage on freezer for up to five full years and includes parts, labor and travel charges. A participating Amana® dealer has details.
Table des matieres
Amana Factory Service Center Arizona
Amana Factory Service Center California
Amana Factory Service Center Colorado
Amana Factory Service Center Florida
Amana Factory Service Center Georgia
Amana Factory Service Center Iowa
Amana Factory Service Center Illinois
Amana Factory Service Center Massachusetts
Amana Factory Service Center Maryland
Amana Factory Service Center New York
Amana Factory Service Center Ohio
Amana Factory Service Center Texas


- Contents
- Electrical Requirements
- RECOGNIZE THIS SYMBOL AS A SAFETY PRECAUTION
- WARNING
- Model Identification
- Free-O-Frost™ Upright Freezer
- Standard Upright Freezer
- Chest Freezer
- Caution
- General
- Placement
- Door Handle
- Leveling
- Temperature Control
- Temperature Monitor
- Features
- Door Lock
- Power On Light
- Reversible Rack
- Divider
- Basket
- Wrapping
- Important
- Adhesives
- Door Gaskets
- Odor Removal
- Defrosting
- Upright Models
- Light Bulb
- Energy Tips
- Before Calling For Service
- Vacation Tips
- Normal Operating Sounds
- Temperature Control
- Freezer Fan
- Evaporator
- Compressor
- Insulation
- Factory Service Centers
- Amana Factory Service Center Arizona
- Amana Factory Service Center California
- Amana Factory Service Center Colorado
- Amana Factory Service Center Florida
- Amana Factory Service Center Georgia
- Amana Factory Service Center Iowa
- Amana Factory Service Center Illinois
- Amana Factory Service Center Massachusetts
- Amana Factory Service Center Maryland
- Amana Factory Service Center New York
- Amana Factory Service Center Ohio
- Asure™ Extended Service Plan
- Table des matieres
- Amana Factory Service Center Texas
Brand : AMANA
Model : C70FW
Category : Freezer