2 — Oven — Mode d'emploi PDF")
HIM 506 EK.A (WH)2 - Oven INDESIT - Free user manual and instructions
Find the device manual for free HIM 506 EK.A (WH)2 INDESIT in PDF.
| Product type | Built-in oven with ceramic hob |
| Brand | Indesit |
| Model | HIM 506 EK.A (WH)2 |
| Dimensions (W x H x D) | 43.5 x 32 x 40 cm |
| Oven volume | 56 L |
| Electrical supply | 230V/400V ~ 3N 50/60 Hz |
| Maximum power consumption | 9450 W |
| Cooking functions | Conventional, Multifunction (convection), Top heat, Grill, Gratin |
| Hob type | Ceramic hob with radiant elements (standard and extensible) |
| Electronic timer | Timer, cooking duration, delayed end of cooking |
| Interior lighting | Yes, 25 W bulb (E14 base) |
| Removable door | Yes, for easy cleaning |
| Residual heat indicators | On some models (ceramic hob) |
| Cleaning | Interior and exterior with non-abrasive products; removable door |
| Safety | Automatic shut-off at end of cooking, child lock not specified |
| Supplied accessories | Rack, drip tray |
| Electrical connection | Adaptable terminal block (single or three-phase); cable supplied |
| Country of origin | Not specified |
| Repairability | User-replaceable bulb; other parts via approved service |
Frequently Asked Questions - HIM 506 EK.A (WH)2 INDESIT
User questions about HIM 506 EK.A (WH)2 INDESIT
0 question about this device. Answer the ones you know or ask your own.
Ask a new question about this device
Download the instructions for your Oven in PDF format for free! Find your manual HIM 506 EK.A (WH)2 - INDESIT and take your electronic device back in hand. On this page are published all the documents necessary for the use of your device. HIM 506 EK.A (WH)2 by INDESIT.
USER MANUAL HIM 506 EK.A (WH)2 INDESIT
Operating Instructions
COOKER AND OVEN
Contents
Operating Instructions, 1
Description of the appliance-Overall view, 2
Description of the appliance-Control Panel, 3 Installation,4
Start-up and use,7
Cooking modes, 7
Using the hob,9
Precautions and tips, 11
Care and maintenance, 12
DE
Deutsch
TexHueckoe 06cIyKuBaHne59
GB
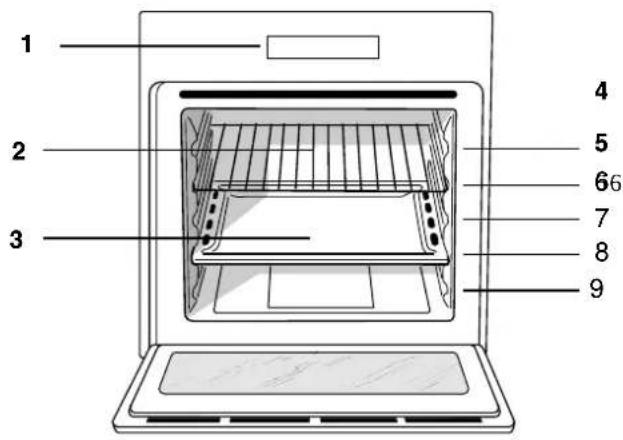
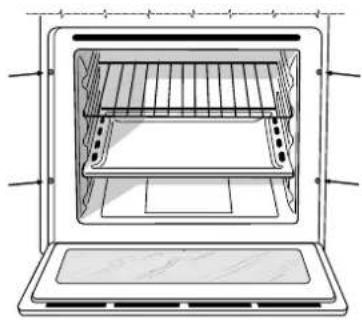
Description of the appliance
Overall view
- Control panel
2.Sliding grill rack
3.DRIPPING pan
4.GUIDE RAILS for the sliding racks
5.position 5
6.position 4
7.position 3
8.position 2
9.position 1
DE
Description of the appliance Control panel
- Electric HOTPLATE control knob
- Electric DOUBLE HOTPLATE control knob
- ELECTRIC HOTPLATE indicator light
- OVEN CONTROL knob
- Electronic cooking programmer *
6.THERMOSTAT knob
7 THERMOSTAT indicator light - Only on certain models
NL
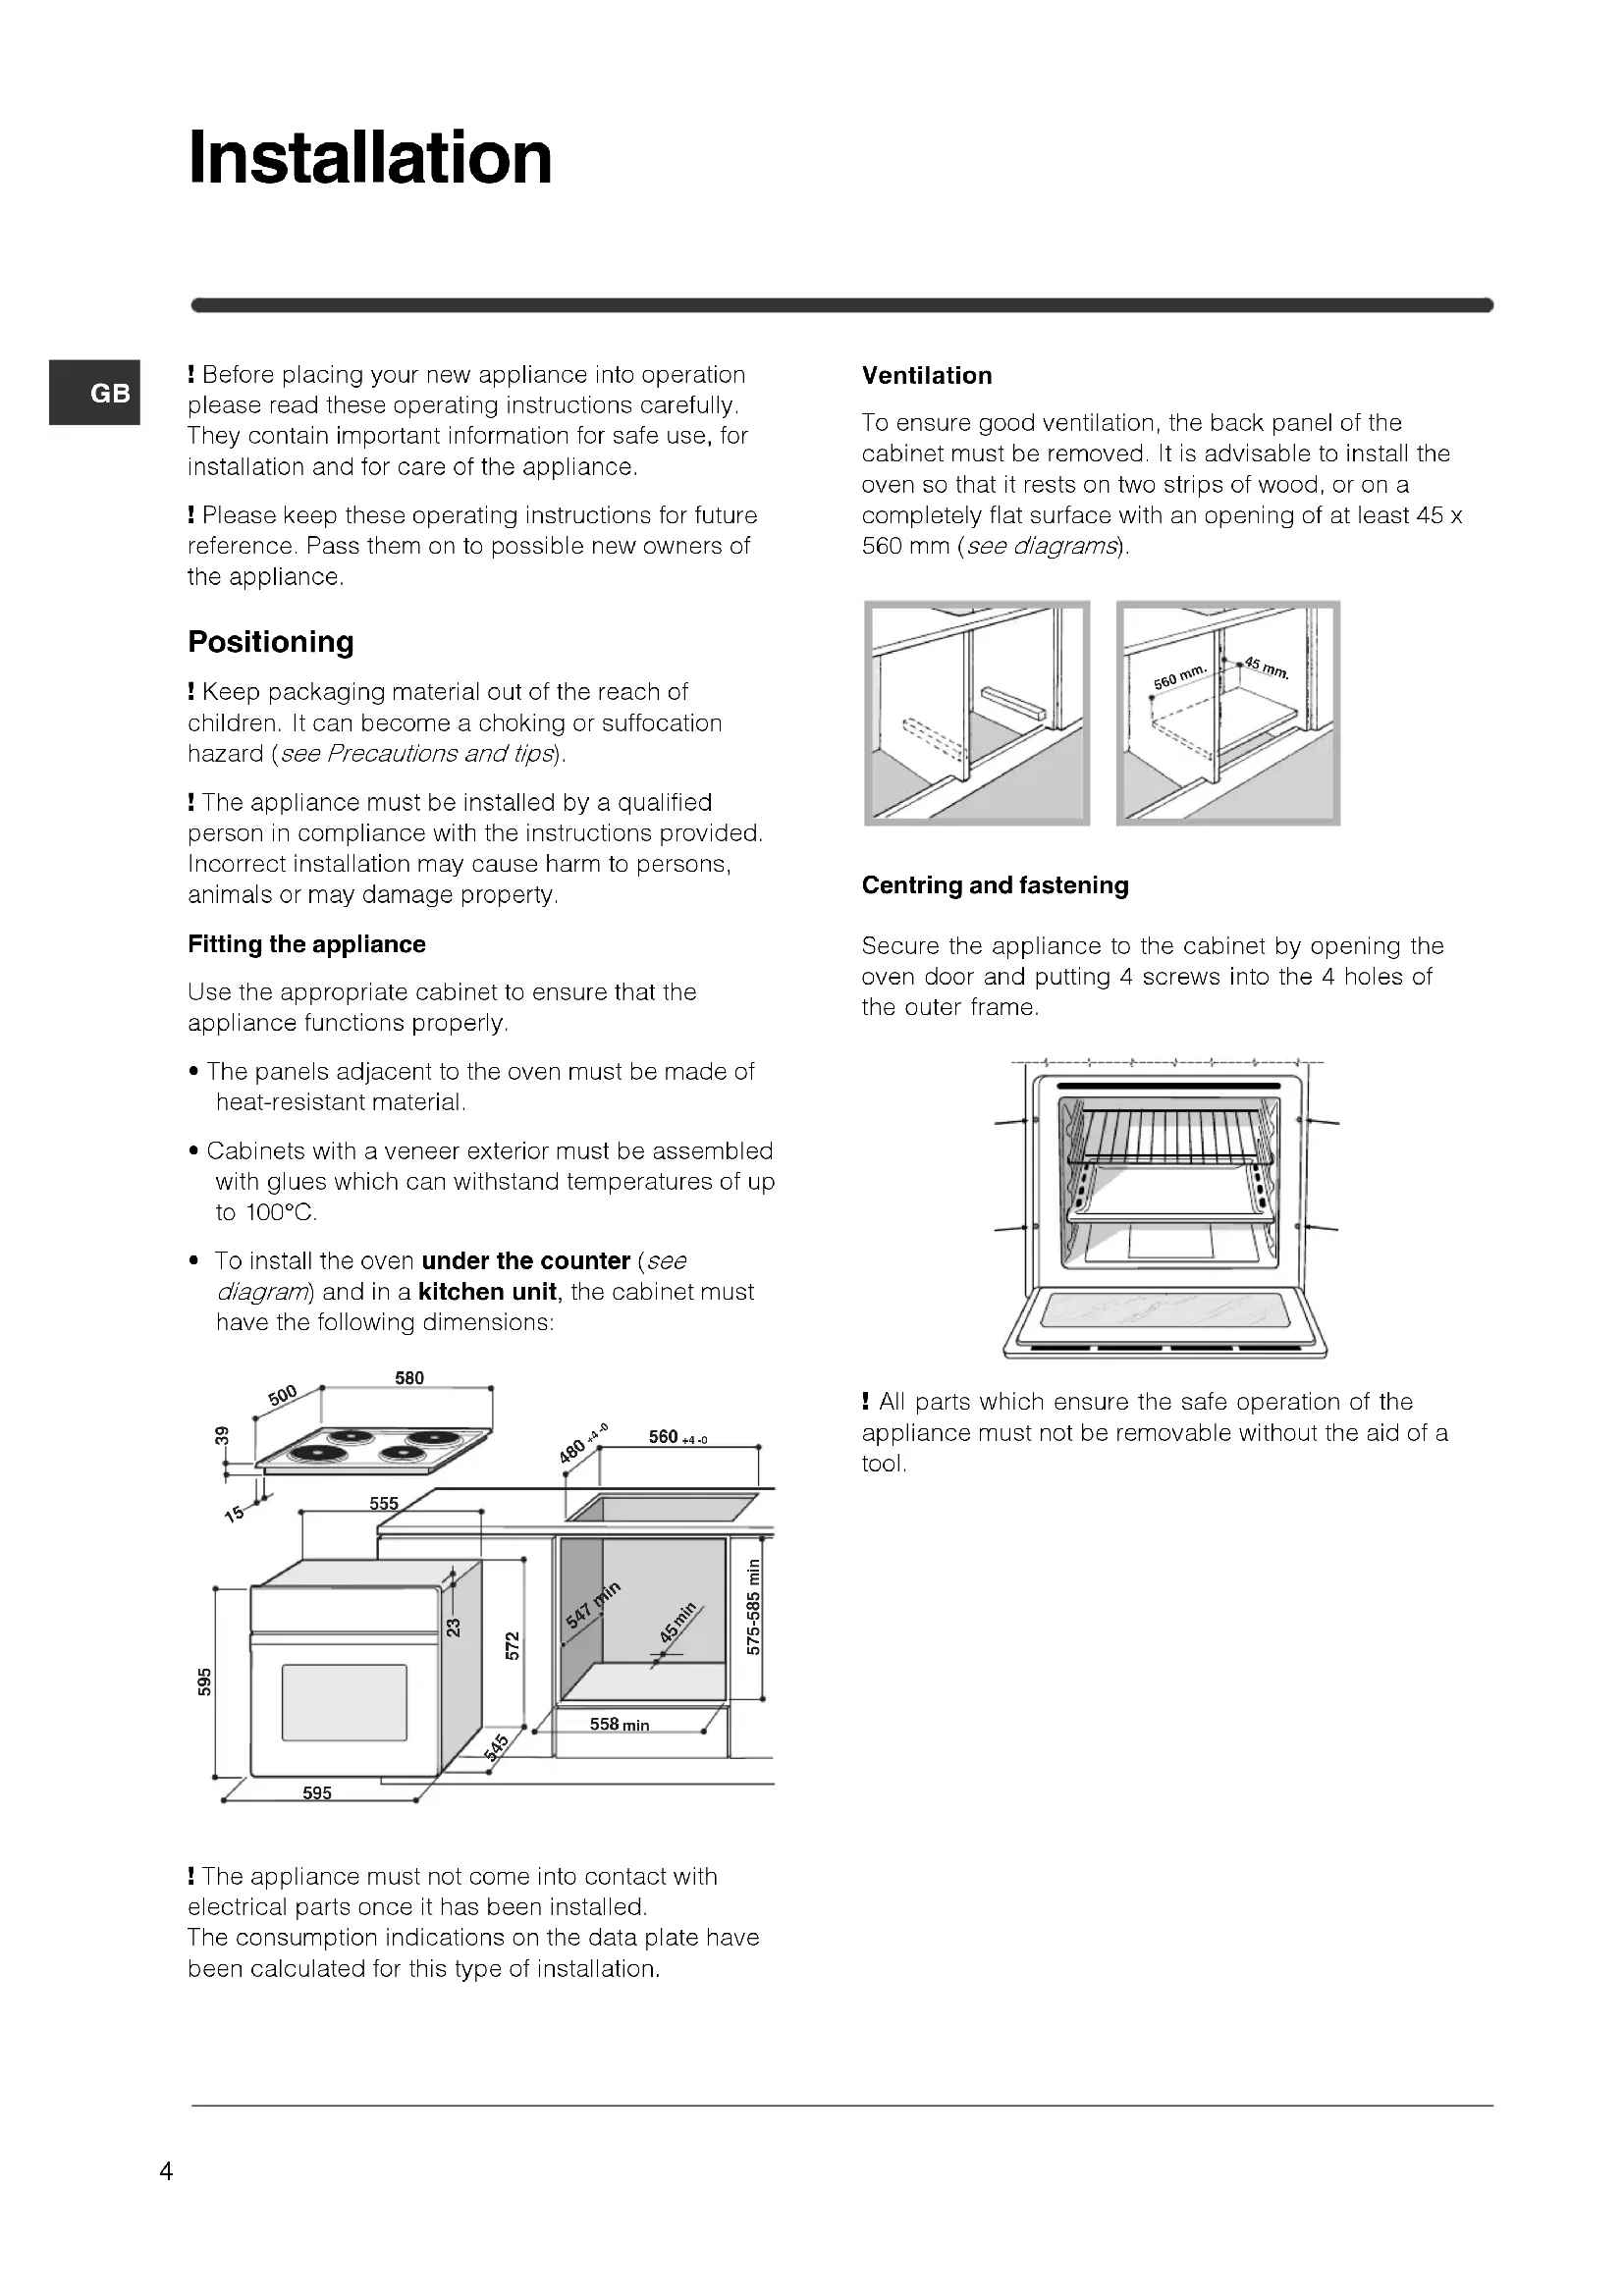
Before placing your new appliance into operation please read these operating instructions carefully. They contain important information for safe use, for installation and for care of the appliance.
Please keep these operating instructions for future reference. Pass them on to possible new owners of the appliance.
Positioning
! Keep packaging material out of the reach of children. It can become a choking or suffocation hazard (see Precautions and tips).
The appliance must be installed by a qualified person in compliance with the instructions provided. Incorrect installation may cause harm to persons, animals or may damage property.
Fitting the appliance
Use the appropriate cabinet to ensure that the appliance functions properly.
The panels adjacent to the oven must be made of heat-resistant material.
Cabinets with a veneer exterior must be assembled with glues which can withstand temperatures of up to 100^ .
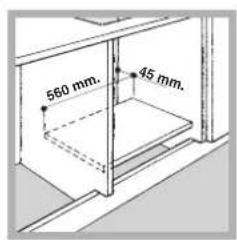
- To install the oven under the counter (see diagram) and in a kitchen unit, the cabinet must have the following dimensions:
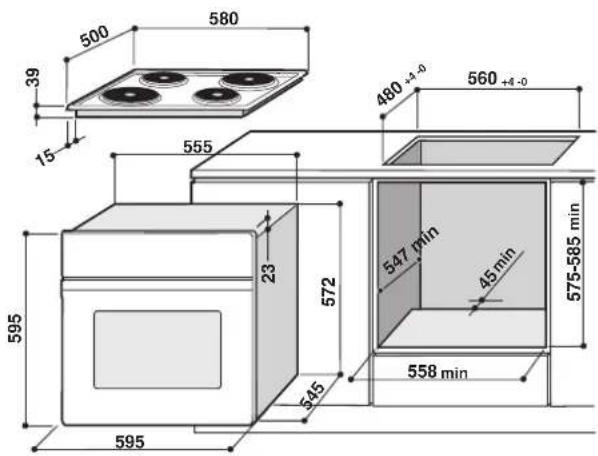
The appliance must not come into contact with electrical parts once it has been installed. The consumption indications on the data plate have been calculated for this type of installation.
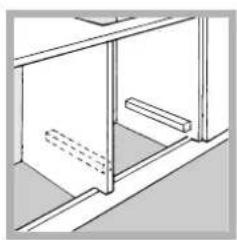
Ventilation
To ensure good ventilation, the back panel of the cabinet must be removed. It is advisable to install the oven so that it rests on two strips of wood, or on a completely flat surface with an opening of at least 45 × 560 mm (see diagrams).
Centring and fastening
Secure the appliance to the cabinet by opening the oven door and putting 4 screws into the 4 holes of the outer frame.
All parts which ensure the safe operation of the appliance must not be removable without the aid of a tool.
Electrical connections
The cooker must be connected to the mains electricity supply. It is designed to operate with alternating current at the voltage and frequency indicated on the data plate (see the following page). The hob is connected to the cooker using a special connector.
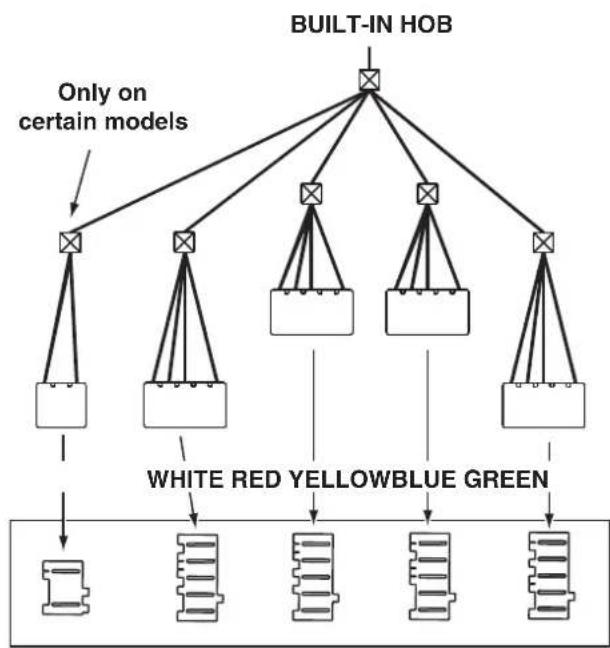
BUILT-IN COOKER
Replace the metal protection after performing all the necessary hob connections. If the hob is removed from its position, the red cap which was originally protecting the red connector must be replaced.
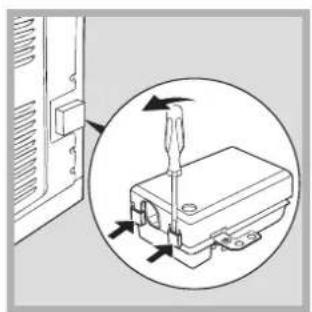
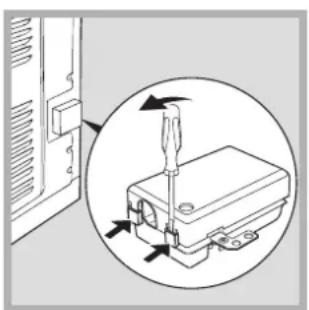
Fitting the power supply cable
-
Open the terminal board by inserting a screwdriver into the side tabs of the cover. Use the screwdriver as a lever by pushing it down to open the cover (see diagram).
-
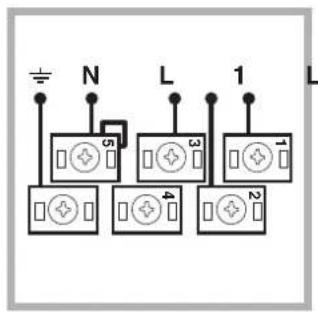
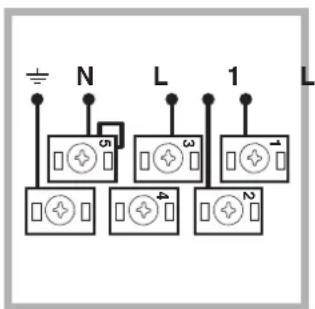
Install the power supply cable by loosening the cable clamp screw and the wire contact screws L-N- 1± . Connect the wires to the corresponding terminals: the Blue wire to the terminal marked (N), the Brown wire to the terminal marked (L) and the Yellow Green wire to the terminal marked 1±
The terminal board is designed for a 400V three-phase connection (see diagrams below).
400V 3N~H05RR-F
5x2.5 CEI-UNEL 35363
3 L 2
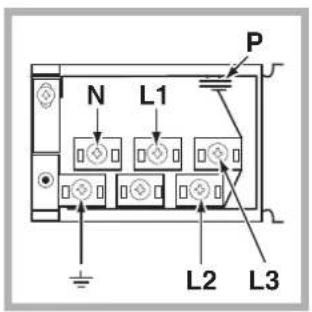
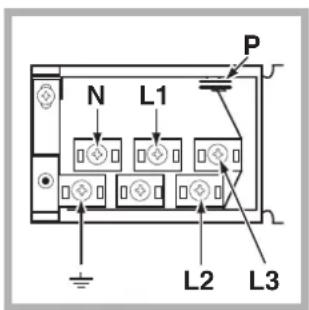
If the electrical system has other characteristics (see diagrams below), carry out the electrical connection using the connection supports provided in the box P.
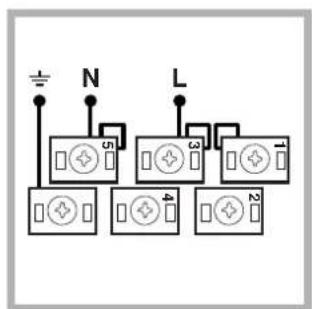
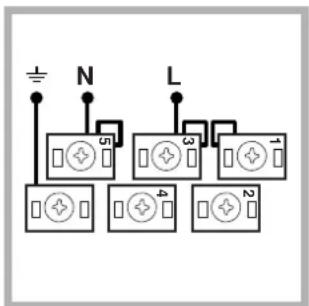
230V ~H05RR-F 3x4 CEI-UNEL 35363
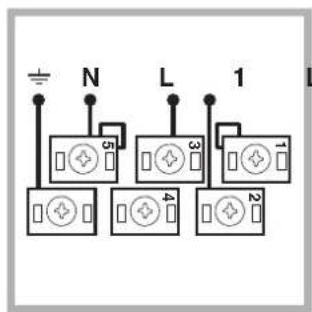
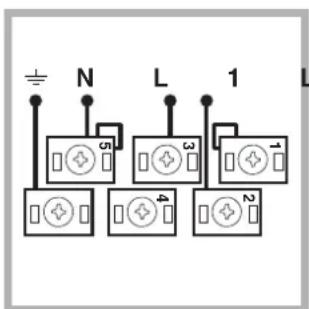
400V 2N~H05RR-F 4x4 CEI-UNEL 35363 2
- Secure the power supply cable by fastening the clamp screw.
- Close the cover of the terminal board.
Connecting the supply cable to the mains
Install a standardised plug corresponding to the load indicated on the data plate (see side).
The appliance must be directly connected to the mains using an omnipolar circuit-breaker with a minimum contact opening of 3mm installed between the appliance and the mains, suitable for the load indicated and complying with current electrical regulations (the earthing wire must not be interrupted by the circuit-breaker). The supply cable must not come into contact with surfaces with temperatures higher than 50^ .
The installer must ensure that the correct electrical connection has been made and that it is compliant with safety regulations.
Before connecting to the power supply, make sure that:
The appliance is earthed and the plug is compliant with the law.
The socket can withstand the maximum power of the appliance, which is indicated on the data plate (see below).
The voltage must be in the range between the values indicated on the data plate (see below).
- The socket is compatible with the plug of the appliance. If the socket is incompatible with the plug, ask an authorised technician to replace it. Do not use extension cords or multiple sockets.
! Once the appliance has been installed, the power supply cable and the electrical socket must be easily accessible.
The cable must not be bent or compressed.
The cable must be checked regularly and replaced by authorised technicians only (see Assistance).
! The manufacturer declines any liability should these safety measures not be observed.
| DATA PLATE | |
| Dimensions | width 43.5 cm height 32 cm depth 40 cm |
| Volume lt. 56 | |
| Electrical connections | voltage: 230V/400V~ 3N 50/60Hz maximum power absorbed 9450W |
| ENERGY LABEL | Directive 2002/40/EC on the label of electric ovens. Standard EN 50304 Energy consumption for Forced convection heating mode: Multi-cooking Declared energy consumption for Natural convection Class heating mode: Convection |
| CE | This appliance conforms to the following European Economic Community directives: - 2006/95/EEC of 12/12/06 (Low Voltage) and subsequent amendments; - 2004/108/EEC of 15/12/04 (Electromagnetic Compatibility) and subsequent amendments; - 93/68/EEC of 22/07/93 and subsequent amendments. - 2002/96/EC and subsequent amendments. |
GB
! The first time you use your appliance, heat the empty oven with its door closed at its maximum temperature for at least half an hour. Ensure that the room is well ventilated before switching the oven off and opening the oven door. The appliance may produce a slightly unpleasant odour caused by the burning away of protective substances used during the manufacturing process.
Starting the oven
- Select the desired cooking mode by turning the SELECTOR knob.
- Select the desired temperature with the THERMOSTAT knob. See the Cooking advice table for cooking modes and the suggested cooking temperatures (see Cooking Modes).
- When preheating is finished, the THERMOSTAT indicator light will stay on: place the food in the oven.
-
You may do the following during cooking:
-
change the cooking mode by turning the SELECTOR knob.
-
change the temperature by turning the THERMOSTAT knob.
- stop cooking by turning the SELECTOR knob to the "0" position.
! Never put objects directly on the oven bottom to avoid damaging the enamel coating.
! Always place cookware on the rack(s) provided.
Cooling ventilation
In order to cool down the external temperature of the oven, some models are fitted with a cooling fan that blows out air between the control panel and the oven door.
Once the cooking has been completed, the cooling fan remains on until the oven has cooled down sufficiently.
Oven light
It goes on when selecting with the SELECTOR knob. It stays on when a cooking mode is selected.
Cooking modes
! A temperature value can be set for all cooking modes between 60^ and Max, except for
- GRILL (recommended: set only to MAX power level);
- GRATIN (recommended: do not exceed 200^ ).

CONVECTION OVEN mode
Both the top and bottom heating elements will come on. With this traditional cooking mode, it is best to use one cooking rack only; if more than one rack is used, the heat will be distributed unevenly.

MULTI-COOKING mode
All the heating elements (top and bottom), as well as the fan, will come on. Since the heat remains constant throughout the oven, the air cooks and browns food uniformly. A maximum of two racks may be used at the same time.

TOP OVEN mode
The top heating element comes on. This mode can be used to brown food at the end of cooking.

GRILL mode
The top heating element comes on. The extremely high and direct temperature of the grill makes it possible to brown the surface of meats and roasts while locking in the juices to keep them tender. The grill is also highly recommended for dishes that require a high temperature on the surface: such as beef steaks, veal, rib steak, filets, hamburgers etc... Some grilling examples are included in the "Practical Cooking Advice" paragraph. Always cook in this mode with the oven door closed.

GRATIN mode
The top heating element, as well as the fan, will come on. This combination of features increases the effectiveness of the unidirectional thermal radiation of the heating elements through forced circulation of the air throughout the oven. This helps prevent food from burning on the surface, allowing the heat to penetrate right into the food. Always cook in this mode with the oven door closed.
Practical cooking advice
! Do not place racks in position 1 and 5 during fan-assisted cooking. Excessive direct heat can burn temperature sensitive foods.
! In the GRILL and GRATIN cooking modes, place the dripping pan in position 1 to collect cooking residues (fat and/or grease).
MULTI-COOKING
- Use position 2 and 4, placing the food that requires more heat on 2.
- Place the dripping pan on the bottom and the rack on top.
GRILL
- Insert the rack in position 3 or 4. Place the food in the centre of the rack.
- We recommend that you set the maximum power level. The top heating element is regulated by a thermostat and may not always be on.
PIZZA
- For best results when cooking pizza, use the MULTI-COOKING mode.
- Use a light aluminium pizza pan. Place it on the rack provided. For a crispy crust, do not use the dripping pan (prevents crust from forming by extending cooking time).
- If the pizza has a lot of toppings, we recommend adding the mozzarella cheese on top of the pizza halfway through the cooking process.
Cooking advice table
| Cooking modes | Foods | Weight (in kg) | Rack position | Pre-heating time (min) | Recommended temperature | Cooking time (minutes) |
| Convection Oven | Duck | 1 | 3 | 15 | 200 | 65-75 |
| Roast veal or beef | 1 | 3 | 15 | 200 | 70-75 | |
| Pork roast | 1 | 3 | 15 | 200 | 70-80 | |
| Biscuits (short pastry) | - | 3 | 15 | 180 | 15-20 | |
| Tarts | 1 | 3 | 15 | 180 | 30-35 | |
| Multi-cooking | Pizza (on 2 racks) | 1 | 2 and 4 | 15 | 230 | 15-20 |
| Lasagne | 1 | 3 | 10 | 180 | 30-35 | |
| Lamb | 1 | 2 | 10 | 180 | 40-45 | |
| Roast chicken + potatoes | 1+1 | 2 and 4 | 15 | 200 | 60-70 | |
| Mackerel | 1 | 2 | 10 | 180 | 30-35 | |
| Plum cake | 1 | 2 | 10 | 170 | 40-50 | |
| Cream puffs (on 2 racks) | 0.5 | 2 and 4 | 10 | 190 | 20-25 | |
| Biscuits (on 2 racks) | 0.5 | 2 and 4 | 10 | 180 | 10-15 | |
| Sponge cake (on 1 rack) | 0.5 | 2 | 10 | 170 | 15-20 | |
| Sponge cake (on 2 racks) | 1 | 2 and 4 | 10 | 170 | 20-25 | |
| Savoury pies | 1.5 | 3 | 15 | 200 | 25-30 | |
| Top oven | Browning food to perfect cooking | -3/4 15 220 - | ||||
| Grill | Soles and cuttlefish | 1 | 4 | 5 | Max | 8-10 |
| Squid and prawn kebabs | 1 | 4 | 5 | Max | 6-8 | |
| Cod filet | 1 | 4 | 5 | Max | 10 | |
| Grilled vegetables | 1 | 3 or 4 | 5 | Max | 10-15 | |
| Veal steak | 1 | 4 | 5 | Max | 15-20 | |
| Cutlets | 1 | 4 | 5 | Max | 15-20 | |
| Hamburgers | 1 | 4 | 5 | Max | 7-10 | |
| Mackerels | 1 | 4 | 5 | Max | 15-20 | |
| Toasts | 4 | 4 | 5 | Max | 2-3 | |
| Gratin | Grilled chicken | 1.5 | 2 | 5 | 200 | 55-60 |
| Cuttlefish | 1.5 | 2 | 5 | 200 | 30-35 | |
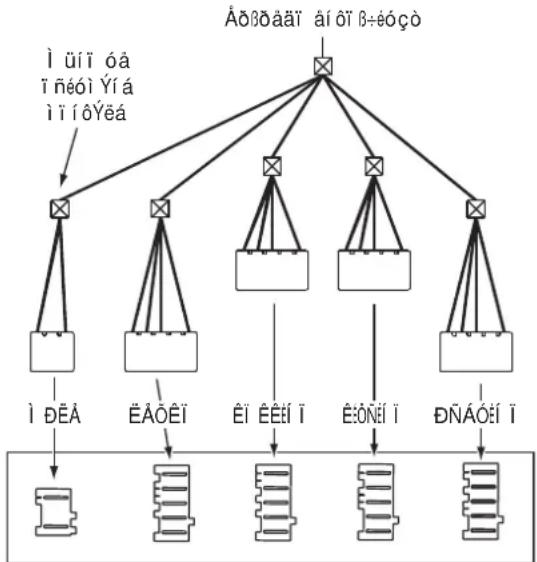
Type of hob
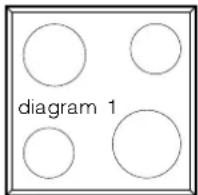
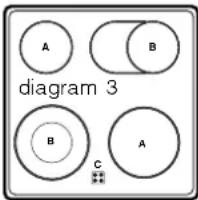
The oven is combined with a hob that can be made up of two types of heating elements: cast-iron electric plates (see diagram 1) or glass ceramic hobs, which may be traditional (see diagram 2) or with extendable cooking zones (see diagram 3).

Switching on the glass ceramic hob
Traditional cooking zones
Traditional cooking zones are made up of circular heating elements. They turn red approximately ten seconds after they have been turned on.
Each cooking zone is fitted with a control knob allowing you to select from 12 different temperature settings from a minimum of 1 to a maximum of 12.
Extendable cooking zones
The extendable radiant elements (B) are recognisable by the fact that they have a double heating zone. You can turn on only the smaller internal cooking zone or both the external and internal zones.
The control knob allows you to choose between two power levels, which are both adjustable between a minimum value of 1 to a maximum of 12:
The lowest power level can be set by turning the knob clockwise from 1 to 12.
- Turn the knob to completely (●) until you hear a slight click, to enable the maximum power level, which in turn can be adjusted between 12 and 1 by turning the knob anticlockwise. To restore the minimum power level, turn the knob and set it back to position 0.
For double cooking zones, the first part of the knob movement activates the smaller cooking zone (internal). To activate both (internal and external), it is necessary to turn the knob completely () and then select the desired power level between 12 and 1.
Residual heat indicator lights (only available on certain models)
The indicator lights (C) indicate that the temperature of the corresponding cooking zones have exceeded 60^ , even after the heating element has been switched off.
Recommended power levels for various types of cooking:
| Set. | Radiant Burner |
| 0 | Off |
| 1 | To melt butter and chocolate. |
| 2 | To heat liquids. |
| 3 | |
| 4 | For creams and sauces. |
| 5 | |
| 6 | For cooking at the boiling point. |
| 7 | |
| 8 | For roasts. |
| 9 | |
| 10 | For boiling large pieces of meat. |
| 11 | |
| 12 | For frying. |
| ◎ | For utilising both cooking areas. |
Practical advice on using the glass ceramic hob
! The glue that is applied on the gaskets leaves some traces of grease on the glass. Before using the appliance, we recommend you eliminate these with a special non-abrasive cleaning product. During the first few hours of use there may be a smell of rubber which will disappear very quickly.
To obtain the best results with your hobs:
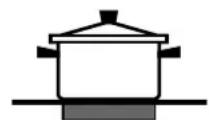
- Use flat-bottomed pans to ensure that they adhere to the cooking zone perfectly.
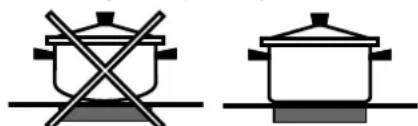
Always use pans with a diameter that is large enough to cover the hotplate fully, in order to use all the available heat.

- Make sure that the bottom of the cookware is always dry and clean to guarantee correct adherence and long life, not only for the cooking zones but also for the cookware itself.
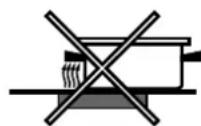
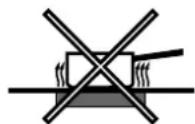
- Avoid using the same cookware that is used on gas burners: the heat concentration on gas burners may deform the base of the pan, causing it not to adhere correctly.
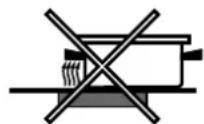
- Never leave a cooking zone on without cookware on it because as it heats up and rapidly reaches the maximum level, it could damage the heating elements.
GB
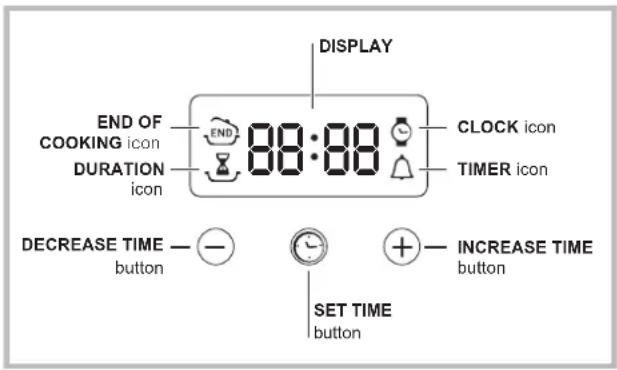
Setting the clock
The clock may be set when the oven is switched off or when it is switched on, provided that a the end time of a cooking cycle has not been programmed previously.
After the appliance has been connected to the
mains, or after a blackout, the icon and the four numerical digits on the DISPLAY will begin to flash.
- Press the button several times until the icon and the four digits on the display begin to flash.
- Use the "+" and "-" buttons to adjust the time; if you press and hold either button, the display will scroll through the values more quickly, making it quicker and easier to set the desired value.
- Wait for 10 seconds or press the button again to finalise the setting.
Setting the timer
This function does not interrupt cooking and does not affect the oven; it is simply used to activate the buzzer when the set amount of time has elapsed.
- Press the button several times until the icon and the three digits on the display begin to flash.
- Use the "+" and "-" buttons to set the desired time; if you press and hold either button, the display will scroll through the values more quickly, making it quicker and easier to set the value.
- Wait for 10 seconds or press the button again to finalise the setting.
The display will then show the time as it counts down. When this period of time has elapsed the buzzer will be activated.
Programming cooking
! A cooking mode must be selected before programming can take place.
Programming the cooking duration
- Press the button several times until the icon and the three digits on the DISPLAY begin to flash.
- Use the "+" and "-" buttons to set the desired duration; if you press and hold either button, the display will scroll through the values more quickly, making it quicker and easier to set the value.
- Wait for 10 seconds or press the button again to finalise the setting.
- When the set time has elapsed, the text END appears on the DISPLAY, the oven will stop cooking and a buzzer sounds.
- For example: it is 9:00 a.m. and a time of 1 hour and 15 minutes is programmed. The programme will stop automatically at 10:15 a.m.
Setting the end time for a cooking mode
! A cooking duration must be set before the cooking end time can be scheduled.
- Follow steps 1 to 3 to set the duration as detailed above.
- Next, press the button until the icon and the four digits on the DISPLAY begin to flash.
- use the "+" and "-" buttons to adjust the cooking end time; if you press and hold either button, the display will scroll through the values more quickly, making it quicker and easier to set the desired value.
- Wait for 10 seconds or press the button again to finalise the setting.
- When the set time has elapsed, the text END appears on the DISPLAY, the oven will stop cooking and a buzzer sounds.
Programming has been set when the and buttons are illuminated. The DISPLAY shows the cooking end time and the cooking duration alternately.
Cancelling a programme
To cancel a programme:
- press the button until the icon corresponding to the setting you wish to cancel and the digits on the display are no longer flashing. Press the "-" button until the digits 00:00 appear on the display.
- Press and hold the "+" and "-" buttons; this will cancel all the settings selected previously, including timer settings.
The appliance was designed and manufactured in compliance with international safety standards. The following warnings are provided for safety reasons and must be read carefully.
General safety
- The appliance was designed for domestic use inside the home and is not intended for commercial or industrial use.
- The appliance must not be installed outdoors, even in covered areas. It is extremely dangerous to leave the appliance exposed to rain and storms.
- When handling the appliance, always use the handles provided on the sides of the oven.
- Do not touch the appliance with bare feet or with wet or moist hands and feet.
- The appliance must be used by adults only for the preparation of food, in accordance with the instructions outlined in this booklet. Any other use of the appliance (e.g. for heating the room) constitutes improper use and is dangerous. The manufacturer may not be held liable for any damage resulting from improper, incorrect and unreasonable use of the appliance.
- When the appliance is in use, the heating elements and some parts of the oven door become extremely hot. Make sure you don't touch them and keep children well away.
- Ensure that the power supply cable of other electrical appliances does not come into contact with the hot parts of the oven.
- The openings used for ventilation and dispersion of heat must never be covered.
- Always grip the oven door handle in the centre: the ends may be hot.
Always use oven gloves to place cookware in the oven or when removing it. - Do not use aluminium foil to line the bottom of the oven.
- Do not place flammable materials in the oven: if the appliance is switched on by mistake, it could catch fire.
Always make sure the knobs are in the "●"/"○" position when the appliance is not in use. - When unplugging the appliance always pull the plug from the mains socket, do not pull on the cable.
- Never carry out any cleaning or maintenance work without having unplugged the plug from the mains.
- In the case of a malfunction, under no circumstances should you attempt to repair the appliance yourself. Repairs carried out by inexperienced persons may cause injury or further malfunctioning of the appliance. Contact a Service Centre (see Assistance).
-
Do not rest heavy objects on the open oven door.
-
The glass ceramic hob is resistant to mechanical shocks, but it may crack (or even break) if hit with a sharp object such as a tool. If this happens, disconnect the appliance from the electricity mains immediately and contact a Service Centre.
- Remember that the temperature of the cooking zones remains relatively high for at least thirty minutes after they have been switched off.
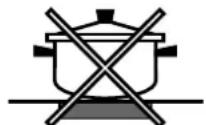
- Keep any object that could melt away from the hob, for example plastic and aluminium objects, or products with a high sugar content. Keep plastic or aluminium objects away from the hob: if you forget them on surfaces that are still hot, they may cause serious damage to the hob.
- The appliance should not be operated by people (including children) with reduced physical, sensory or mental capacities, by inexperienced individuals or by anyone who is not familiar with the product. These individuals should, at the very least, be supervised by someone who assumes responsibility for their safety or receive preliminary instructions relating to the operation of the appliance.
- Do not let children play with the appliance.
Disposal
- Observe local environmental standards when disposing packaging material for recycling purposes. Observe existing legislation when disposing of the old appliance.
- The European Directive 2002/96/EC on Waste Electrical and Electronic Equipment (WEEE), requires that old household electrical appliances must not be disposed of in the normal unsorted municipal waste stream. Old appliances must be collected separately in order to optimise the recovery and recycling of the materials they contain and reduce the impact on human health and the environment. The crossed out "wheeled bin" symbol on the product reminds you of your obligation, that when you dispose of the appliance it must be separately collected.
Consumers should contact their local authority or retailer for information concerning the correct disposal of their old appliance.
Respecting and conserving the environment
- By using the appliance in the hours between late afternoon and early morning, you can help reduce the work load placed on electrical companies.
Always keep the oven door closed when using the GRILL mode to attain best results and to save energy (approximately 10% ). - Regularly check the door seals and wipe clean to ensure they are free of debris so that they stick properly to the door and do not allow heat to disperse.
GB
Switching the appliance off
Disconnect your appliance from the electricity supply before carrying out any work on it.
Cleaning the appliance
- The stainless-steel or enamel-coated external parts as well as the rubber seals may be cleaned using a sponge that has been soaked in lukewarm water and neutral soap. If these stains are difficult to remove, use only specialised products. After cleaning, rinse and dry thoroughly. Do not use abrasive powders or corrosive substances.
- Ideally, the inside of the oven should be cleaned after each use, when it is still lukewarm. Use hot water and detergent, rinse and dry with a soft cloth. Do not use abrasive products.
- The accessories can be washed like everyday crockery (even in your dishwasher).
! Never use steam cleaners or pressure cleaners on the appliance.
Cleaning the oven door
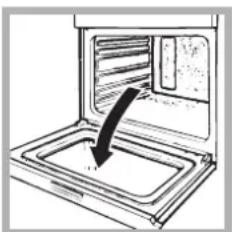
Clean the glass part of the oven door using a sponge and a non-abrasive cleaning product, then dry thoroughly with a soft cloth. Do not use rough abrasive material or sharp metal scrapers as these could scratch the surface and cause the glass to crack. To clean more thoroughly, you can remove the oven door.
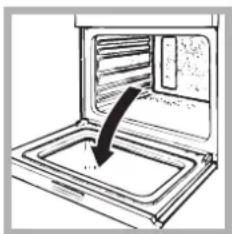
- Open the oven door fully (see diagram).
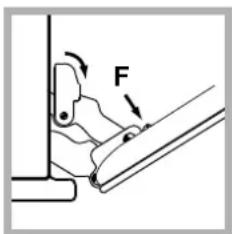
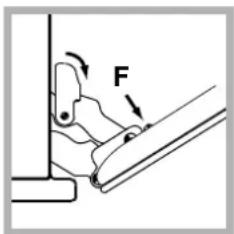
- lift up and turn the small levers situated on the two hinges; (see diagram).
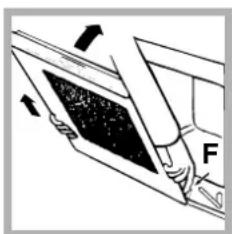
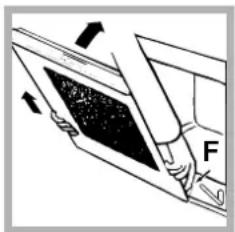
- Grip the door on the two external sides and close it approximately half way. Unlock the door by pressing on the clamps F, then pull the door towards you lifting it out of its seat (see diagram).
To replace the door, reverse this sequence.
Inspecting the seals
Check the door seals around the oven periodically. If the seals are damaged, please contact your nearest After-sales Service Centre (see Assistance). We recommend not using the oven until the seals have been replaced.
Replacing the light bulb
To replace the oven light bulb:
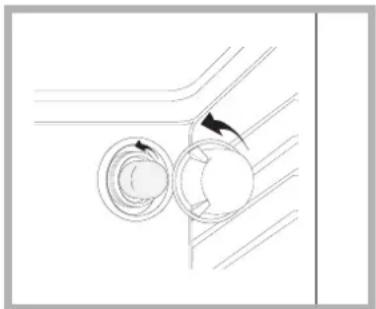
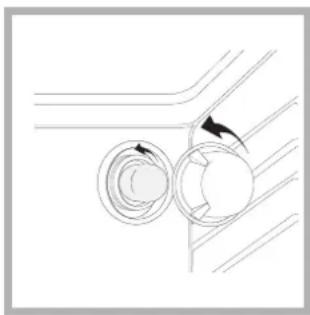
- Remove the glass cover of the lamp-holder.
- Remove the light bulb and replace it with a similar one: Wattage 25 W, cap E 14.
- Replace the glass cover (see diagram).
Assistance
Communicating:
- appliance model (Mod.)
- serial number (S/N)
This information is found on the data plate located on the appliance and/or on the packaging.
EI OEEI AAI OEET I AI C
EiavatoTOnToeTnTv eAik npootaia eTa Tn ouvdoon Tou Paiou. ZepiTTw an apaipoeong tou Paioiou a TpETe va EaVabale To KOKKIO wma oyn apx n avw aoTov Kokkivo SuVdoo.
Euvaopoloynonkawdiou Tpopofoia
1.AvoIeToKouti
akpoEKTow
xpnoIooTovTacw
moXoEvaKaTaOaBIOOTIC
TTAEupikeYAwositoEc
tou KATTAKIO: TpaBnTe
kai avoIeTo KaTAKI
(βAETE EIKOVA).
- XpnoioToiIOte To kaiwio Tpoopodooiac:
EbiowTe Tn Bida aovapaiionc kai wiou KAI TIC BiEc
Tuv Etnaipwv L-N- kai katotiv OTEpeWOTe ta
kaiwioia Katw anTo TIC KEpaIe C Twv BiWv ME Baon Ta
XpomegaT MIIe (N) Kae (L) KITpivo-npaoVo (1一)
To kouti akpoδekTuV TPOOΦεpTaI yia ouvδeσ Ε 400 V tpiapoiKa (βλεπε EIKOVες πapakatw).
400V 3N~H05RR-F
5x2.5 CEI-UNEL 35363
3 L 2
Av n nAekptpiK nykataaon avtioiexi o aaaa
Xapakntpiotika (BETTE EIKOVEc TAPAKATW),
dievepynote nV nAekptpiK ouvdeon xpooiotoiwvtac
TIC atoanxiocuvdeonnc Tou BiokovtaI eoa sto kouti P.
230V 1N-H07RN-F 3x4 CEI-UNEL 35364
400V 2N~H05RR-F
4x2.5 CEI-UNEL 35363
B npocece npiroTOBHeN B IIO60 MmEHT MoXHO: -n3MeHnTb nporpaMMy npiroTOBHeH N pN NOMOuPykoTkn PPOrPAMMbI;
PporpaMMbI npuroTOBJIeHnA
!Bcex nporpaMM MoKHO 3aTaTb Tempeatpy OTO 60^ do MAKC Kpome:
- ΓΡΙЛь (pekOMeHnyeTcY yCTaHaBJIbBaTb TOJIbKO MAKC. TemnepaTyPy);
- PONDPUMHUNBAHNE (pekomeHyetyc HnpBbIaTb TemnepaTy p 200°C).

Поррамma TPAДИЦИОHAЛьНАДУХOBKA
BknHouTcBHaHarpeBaTeIbHbIX3JeMeHTa: HnKHNuBepxHn.BpeKIme TpaAnuHaIbHoro npriTOBLeHnpeKOMeHdyetcNcNoJb3OBA TbIOkOOnuYpOBHeB: npu NcNoJb3oBaHm HeckOJIbKnXypOBHe paCnpdeJeHne TempePaTypbl 6yET HeONTMaJIbHbIM.

Поррамma OДНOBPEMEHHOE TOTOBJIEHNE
BkIOuOHTcBce HArpeBaTeIbHbIe 3JeMeHTbI (BepxHn,HxKnHn KpyrIbI) n BeHTNJrTOp. TaK KaK Jap ABJAETCa NocToAHbIM BO BCEm DyXOBOM uKafty Bo3dyx oecneuHaet OndopoHoe npiroTOBHeHne n noDpymHbAHe npOdykTa.
OndOBpeMeHHo MoXHO NcNoB30BaTb He 6oJee DByx ypoBHe dYxoBOrO uKaΦa.

Harpma HAHPB CBEPXY
Bknoyaetc BepxHn HArpeBaTeNbHbN 3neMeHT.3Ta cyHKmro MoKeT 6bITb NcNoIb3ObaHa dIra DOBOdkn roTOBbIX 6JIHOJ.

IporpaMa IPRJIb
BkHouaetc BepxHn HarpeBaTehBbIeJMeHT. 3HaunTeHbHa TeMnpaTypa npMoro DeiCTBn rpnIIO3BOJnEIT NOyUHTb 6blcTpoe 06pa3OBaHne KopoKn Ha nobepxHocTN npOdyKTa, KOtopa npenrTCTByET BbIXoY COKOB n COxpanReT npOdyKT HexHbIM n CoHybIM BHyTpN. NcNoJIb3OBAHne FyHKmI rpnIb B OOC6EHNOCTn peKoMeHdyTeC nIa 6JIoD, dI npiroTOBHeHn KOToPbIX Tpe6yeTc BbcOkaar NobepxHOCTHn TaMnpaTypa: TeJIyBuNX I ROBjXbNX 6nΦWtEKCOB, aHTpeKOTOB, BbiPe3Kn, ram6yprepobu T.D. B naparpafe «IpaKaTNUeCKNe COBeTbI no npiroTOBHeHIO» npINBoJrTCn HEKOtopbIe npIMepbl INcNoJIb3OBAHn DyXOBOrO ShKaFa. IOTOBTe 6JIoDa c 3AkpbItoN DBepce DxyOBOrO ShKaFa.

PeryIaTOp no3BONaTe Bb6paTb OINH IN3 DByx ypOBHe MoUHOCTN, 06a n3 KOToPbIX HAcTpAnBaOTcR OT MNHMmaJIbHOrO 3HaueHnra 1do MaKcMmaJIbHoro 12.
- noBopauHbA peryIaTOp no yacobO CTpeIKN c 1 Ha 12, 3aadaTc8oJee Hn3Kn ypoBeHb MoUHocTn.
NoBepHyb peryIaTOp do ynpa (),TO 3aMeTHo NO IerKOMy
UeJky,NOKnIOuHaTeCMAKcIMMaJIbHAR MoUHOCb,KOTopA
MOKeT 6bITb CBHO OuepeDb OTperyIuPoBaHa oT 12 Do 1,
NoBopaHbA peryIaTOp npOTNB YacOBn CTpeKN.ДЯ
BO3BpATA K MINHMaNbHO MOUHOCn Heo6xOdmo NoBepHyTb
peryIaTOp B noOnKeHne 0.
B cnyae IBOHbIX KOHΦOpOK nepBa YacTB NOBOPota
peryIaTopa BkHouaET MehBsyHO 3OHy (BHyTpEHIO).ДЯ
BKNoeHnRA OBeHX 3OH (BHyTpEHn N BHeUHe) Heo6xOIMO
noBepHyb peryIaTOp Do yNopa () N Bbl6paTb HyXhBi ypoBeHb
MoUHocTNOT 12 Do 1.
HnKaTopbOCTaToHOro Tenna (MHeIOTCr TOJIbKO B HEKOTOpBIX MOJeIAX)
HdkaTopb(C) noka3bBAOT, YoTe TmnpaTypa cooTBeCTbYooe konHOpKn Bblwe 60^ daKe nocne otKIOUHeHn HarpeBaTeIbHorO 3JeMeHTa. PekomeHdyemble ypOBH moUHOCTn dJa pa3NHybIX TINOB npiroTOBJIeHn
IpaKTHueckne peKOMeHdaunn no NCNoJIb3OBaHHO CTeKIOKePaMNUeCKoB BapOCHo NaHeN
!Ha cTeKJIHHHO NOBepXHOCTBa BApOHOI naHEn MOrYb6bltB BnHbIcAblbHbIe CneblOT KNe, HAnecEHORo Ha nPOKnAdKn Ipeep NaaHOM 3KnCnpyatauN u3dennr CneyetyaNt b Cnebl KNe npi NmOuN CneuaNBHorO Hea6pa3NBHorO MoUero CpeCTBa. B nepBbIe Yacbl pa60bl Bbl MoKeTe NouyBCTBOBatb 3anax XKeHo Pe3HbI, KOtopbl 6bICTpo nponaadaet.
IrrnontmabHoh 3cknnyatauBapOH no naHenn cneyET.
CNoJIb3OBA Tb NocyD C NIOCKM HOM, IeaeJIbHO npnneraoUcM K 3OHe HaPeBaHna.
- INCINb3OBAbT KaCTPojIN C DHom TaKOrO DnAmEePa, YTO6bl
- NOHOCtBIO 3aKpbITb 3OHy HArpeBaHnIg ONTMaMbHO
- INCINb3OBAHnI BcERo BbIDeJIeMero Tenna.

- npOBepntb, TTo6bl DHO NcNoIb3yEmoN Nocydb6bl NO Bcerda COBepuHNO cyxIM uNCTbIM dIra NdeaIbHOrO pInnerHaHnK KOHΦopKe nDnIaONrO cpoKa cnYk6bl KaK BaOpHoN naHEni, TaK n CamoN NocydbI.
He cneJeYeT McNoIb3OBAbTyKe NocyHy, McNoJIb3OBAHHyHO Ha ra3OBbIX KOHΦopKax: KOHcHTpaunr TepIIHa Ra3OBbIX KOHΦopKax MOKeT DeΦopMnPOBaTb DnO NocyDIn HApUJNTb npINerAHne K HarpeBaTeBHoN 3OHe;
HnKoIa He ocTabra Kakyo-Ni6o 3Ony HarpeBaHHB KIOUHeHHo, He NOMEcTb Ha Hee NocuY, TaK KaO hOa 6bICTpDOCTHaet MAKCmAlbHoro HarpeBa, YTO MOKeT NOBpeNTbHarpeBaTeJIbHbIe 3JNeMeHTbl.
HaxMAtb Ha KHONky Do Tex nop, noka Ha DCNJIe He HauHET MIRaTb CMBOJ yCTaHOBKN, KOtOpBI HxKHO OTMeHNrB, nUΦpbl. HaxMAtb Ha KNONKY -" Do Tex nop, noka Ha DCNJIe He NOBRTcR UΦpbl 00:00.
- ODHOBpeMeHHo HaKaTb N yDepeKuBaTb KHOPIK " ^+ " -" TAKIM 6pa30M OTMeHJOTc Bce 3aDaHHbIe yCTaHOBKn, BKJIIOUyAra TaIMep.
!N3dJIne cnpoekTnpoBaHO nI3roToBnEHO B COOTBeTCTBm C MExdyHapOHyBMHN HOpMaTNBaMn IIO 6e3OnacHocTn. Heo6xoIMMo BHMaTeJbHo npouHTaTb NaCTOaUe npdeynpeKDeHnA, CoCTaBNeHHbIe BcJIax BaWei 6e3OnacHocTn.
06uhe npabnla 6e3onacnoctn
JaHHe n3dJeIne npedHa3HaayaeTc JnHepnoeccnOHaIbHOro IcNoIb30BaHnB DOMaHnxycIOBnX.
3anpeaaetc yctaHaBnBaTb n3JeIne Ha yNue, daKe noi HabecOM, TAK KaK Bo3eICTBHe Ha Hero DoxkJr Ipo3bl ABnEeTCra Ype3BbUaHNo ONaChbIM.
Дпяпесиняздяьсвсгдабрпетсьа cneцильные руки,pacnoохенье c6okob dyxOBOro wkaф.
He npikacatbcK n3deJIOBnAkhbIMn pykam, 6ocNKOMnnCmOKpbIMnHoramn.
-3dJIHe npEHa3HauYeHO IINpIroTOBJeHnI HsBbIX PPOyKTOB,MOXeT6bITbHCNoJIb3OBAHO TObKO B3PocJIbIMN JIuCaMNB CooTBeTCTBmC INCTpyKUJnMI,IPuBEdeHHbIMN B DaHHOM TexHueckOM pykoBoDcTBe.JIIObe OpyRo ero NcNoJIb3OBAHne (HaNPmep:OTOnJIeHnE NOMEeHnE) CHTaETcRe HeHaNDexKaUIM N CLeDoBaTeJIbHO ONaChbIM.PoIN3BOInTeJIb He HeCet OTBETCTBeHHOCTH 3a BO3MOxHbI yUep6,Bb13BaHHbI HeHaNDexKaUIM, HEPpaBnIbHBiM IN Hepa3ymHbIM NCNoJIb3OBAHnEM N3dJIInr.
Bnpocecce 3Kcnnyataunn H3deJnnaHarpBeBaTeJbHbIe 3JeMeHTbI HKeOTopbIe YacTn DBePcUdyXOBKn NODbepraIoTc CnblHomy HarpeBy. Heo6xOIMO npoRbJIbTb OCTpOxHOCTb BO n36ExKaHne KOHTaKTOB C 3TNm Yactamn H he pa3peuTaT DeTm npn6JnxKaTbc K dyXOBKe.
-ИЗбетаиткakаняпpoBoOДOB3нeКТрОПТАнHЯДpyrnx 6bITOBbIX3нeKТрОПРБОВКROрЯUMчacTЯmДуXOBOro шkaфa.
He 3akpbBaTe BeHTnJIaIOHbIe peWetKn IOBepCTNa paccenBaHnTennla.
- Bepntecb 3a pyky DBepuB B UeHTpe: C 60KOB OHa MOKeT 6blrTopyue.
BcerdaHaedeBaTe KxOHHbIe BapeKKn, KOrDa cTaNTE nnBbIHMaete 6nOda n3DyXOBKn.
-He noKpbBaIe IHO duXOBoro uKaΦaΦoJbRoI.
-He xpaHnTe B dyXOBom uKaΦy Bo3ropaEmbIX npedMeTOB. npi CnyaHOM BKIOueHm N3deJIINr TaKne MaTePnAbI MOrY T 3arOpetbcra.
Bcerda npoBepaIte, yTo6bl pyKoTkn HaxOdnbc B noJIOKeHH " 一 ^ 一 / 一 ^ 一 , KOrda n3dJIne He NcNoJIb3yETcra.
- He TaHnTe 3a CeTeBOI uHyp IJN OTOCoEInHeHH BUNIK N3dJIINr H3 CeTeBOI PO3eTKU, BO3bMUTecb 3a BUNKy pyKoI.
- Npeq nauon uNTKn nn TExHueckoro 06cnyKBaHnN u3dennBcerDa BbHMaTe wTeNCeNBHyO BuNKy u3 CeTeBOu po3eTKn.
Bcnyae HncnpabHocn KaTeOpnueckn 3anpeaaeTc0TKpbIBaTB BHYtpEHnE MexAHN3MbI N3dennC cJeIbIOx camoCTOReIbHoro pemOnTa.ObpaauTecb LcHTp
TexnueckoorOobnykubHnA (cm.TexobcyxueaHue).
He cTabe Te TaKeIbe IpeMeTbHa OTKpbTyIO DBepuy LyXOBORO uKaΦa
CTeKIOkepAMuecka BapOHaY naHeJIy yCTOnuBa K MExAHueCKIM yIapAM,TeM He MeHee OHa MoKeT TpeCHyTB (NJIN DaJKe pa36ntbC) npU yIape ocTpblm npEMeTOM NnN HcTpymeHTOM. B 3tOM cnyae He3ameJInTeJIbHOOTcoEINHITe N3deJIne OT cETN 3JIekTpONHTAHn I o6paNTteCb B LcHTp texHnueckoro 06cIpyKIBAHn.
- TomHHTe, yTo TemnepaTpa KOHΦopOK OCTaETcOueHb BbICOKoB TteEHe TpuUcaTN MmHyT NocJe Hx BbIKJIOUeHn.
-ДеркиTe Ha 6e3oNaChOMpacToHmOT BapOuHoi naHEnIIO6bIe npEdMeTbI, KOtOpBie MOryT pacNnABnTbcR, HApnPmEp, PnAcTMacca, AnOMHmHn Nn N3dEInr n3 caxapa. O6paaIte oco6oe BHMaHne Ha yNaKOBouHbIe MaTePnaJIbI, NOJIN3TNHeHOByIO nn aJIOMMHNEByIO INeHKy: ecnOCTaBnTb 3TN MaTePnaJIbI Ha eIe ropayen IIN TeNNo NobepxHoCTN, OH MoTy CepBe3HO IOBepDnTB BapOuyIO NaHeJIb.
YTNn3aun
- YHnTuKeHne yNaKOBouhBix MaTePnaIaOB: co6nIOdaIte MeCTHbIe HopMaTnBbI NO yTNJIu3aUu yNaKOBouhBix MaTePnaIaOB.
CorgnacHo EbponeckoI NipeKtne 2002/96/CE KacaTeNbHO yTNJIN3aunn 3JIeKtpOnHbIX n 3JIeKTPnuecknx 3JIeKTPonpnpOBoB 3JIeKTPonpnp6Opbl He DOJIJKHbI BbI6paCbBaTbcB MecTe C 06bUHbIM rOpOcKIM MycopOM. BbIBeDEHHbIe n3 CTPOr np6Opbl DOJIJKHbI CO6nPaTbcr OTDJeNBHO IIN OINTMN3aunn IN x yTNJIN3aunn IN peKynepaunn COCTABNIAUx IN MaTePnaNoB, a TaKke IJN 6e3ONacHocTn OKpyKaIOuSei CpeDbI 3DopOBb. CmBOJ 3aUePKHytaR MyCopHaj KOp3NHKA, IMeOUnncsHa BCex np6Opax, CnykNT HAnOMnHaHHeM 0b IN OTDeJbHOyTNJIN3aunn. 3a 6Oone NoDPo6HOH INΦOpMaqune O npabINbHOY TINJIN3aunn 5bITobbX 3JIeKTPonpnpOBoB NOlb3OBaTeHN MOyT 6OpATnTBcRI B CNEuaNbHyIO roCydApCTBeHHyO opraHn3aunIO INB MAra3HN.
3KoHOMn 3JekTpo3Heprn n OxpaHa OKpykaOuien Cpebl
- EcIn Bbl 6ydeTe NoJIb3OBAbTcRd yXOBbIM WkaΦom BeuepOM Ndo paHrero Ytpa, 3To NOMoKET COKpaNTb Harpy3Ky Notpe6JIeHnI 3NeKTpO3HeprnN 3NeKTpOCTAHUAMN.
- PekomeHnyetcBcerda roTOBtB BpeKmme TPNb c 3akpyTo nDBepuee: 3TO Heo6xOdmo dna 3HaHTeJbHOn 3KOHOOMN 3NeKtpo3Heprn (npMepHo 10%), a TaKke IyUnx pe3yIbTaTob npiroTOBneHn.
CoepKTe yIIOHTHeHn B NcnpabHOM nYCTOM COCTOHN, npOBepaIte, YTObI OHN IIOTHo pPJIeRaN K DBepe H He npOnyckaIy Yeuek TeIIa.
OTKnIOUeHne 3JeKtpoNTaHHa
Ipeed hauanom kakoi-nio onepaun no 06cnykmbaHIO nnu cTke oTcoeHNHTe n3deJne OT ceTN 3JIeKTPoNTAHn.
UncTkau3dennia
!He nCnoB3yIe npoBbIe YnCTTne arperaTbI nn arperaTbI NOB BbICOKIM DaBnEHNEM DnY NcCTKn 13dJIIN.
HapyKbIe 3MaJInpoBaHbIe 3JIeMeHTbI JIN DeTAln H3 HEPKaBeOJeu CTAJN, a TAKKe pe3HOBBle yNJIOtHeHm MOXHO IPOITpA Tb Y6KOJ, CMOeHHoB B TeNIO BoJe Nn B PaCTBope HeNTpaNBHOro MOUcero cpeCTBa. Jn ydaJIeHm OOC60 TpyNbIX PAnEOJB3yIte CneuHaNbHbIe YIcTAAUe cpeCTBa, IMeOuIeCeB IpoDAxe. Iocne YNCtKn peKOMeHNyETc TuaTeNbHO ydaJIuTB ocTaTKI MOUcero cpeCTBa BNaxHo TprIKoN B bICyWHTb DxyOBky. He nCNOJb3yIte abpa3INBHbIe npoUKN nn Koppo3nHbIe BeIecTBA.
CneDyeT npOn3BODITb BHyTpEHHIO YnCTky DxyoBOrO uKaΦa NocNe KaKDoR oero NCNoJIb3OBaHnR, He DoXnDaRC b erO nONHO oxJaXeHnR. IcNoJIb3yIte TEnNyBOy n MOIouee cpeCDTO, ONoIOChNTE n IpOtpNTe MmKoTpIKNoJ. N36eraTe NCNoJIb3OBaHnA 6pa3NBbIX CpeCTB.
CbeMHbIe DeTaII M0XHO JIeKO BbIMbITb KaK IIO6yIO dpuyIO Nocdy, TaKe B NocyDoMOeHOn MaWInHe.
!HkoTa He nCnoB3yTe npoBbIe uCTaue arperaTbI INn arperaTbI NOd BbICOKIM daBJIeHHeM dJa YnCTKn N3JeJIA.
YnctkaDbepzbl
ДлчNTK nCTeKna DBepuH nCnONb3yHTe Hea6pa3NBhIe ry6Kn n UcTcTnue CpeAcTBa, 3aTeM BblTpIne HacyxO mRKO TpRkn. He nCNoJIb3yITe TBepdbie abpa3NBHbIE MaTePnaJIb IINN OCTpbie MeTaIIINueckne CKpe6Kn, KOToPbe MOrY nOcapanaTb NOBepXHOCTb n pa36nTb CTeKNO. Dlner 6oJee TuaTeJIbHOu NcCTKn MoKHO CHrTb DBepUy dYxOBKn.
- NonHocTbIO OTKpoIe TBepuy DxyOBKn (CM.CxEmY);
- npn nmoos OTBepTKN NOHMNTe N nobepHnte WNoHNKn F Ha DByx wapHnpax (CM. cxEmy);
3.Bo3bMntecb 3a DBepy pyKaMM C DByX CTOpOH, PnabH0 3akpoTte ee, Ho He NOnHOCTbIO. 3aTeM NotAHTE DBepy Ha Ce6ra, ChImar ee c neTeB (CM.Cxemy).Dna YcTaHOBKn DBePbI Ha MeCTo BblONHHTe BblweOncaHHbIe OepaUM B o6paTHOM
nopAke.
PpOBepka yNnOThHn
Perynphno npOBepnTe coCToHne yNIOtheHnBOKpyr DBepbI dYxOBO rkaFa. B cnlycae NobpeXDeHn yNIOtheHn O6paaNTecb B 6nKaiWn LcHTp TexHuueckoro ObcnykBaHn (cm.TexHuueckoe o6cnyKueaHue).He peKOMeHdyETcNoJIb3OBAtbcra dYxOBko n NobpeXDeHHbIM yNIOtheHnEM.
3aMeHa JAmNoUcKn
3aMeHa JAmNoUKN B DxyxOBOM uKafoy:
1.OTBnHTnTe
CTeKnHHyo KpbIiKy nlafoHa JAmNoUkN;
2. BbIKpyTnTe NaMNoKy n 3aMeHnTe ee Ha HOByo TaKOrO Je Tnna: MoUHocTb 25 BT, pe3b6a E 14.
3. BoccaTaHOBUTe KpbIkwYHa MeCTO (CM
cxemy).
CepBnchoe 6cbnyxmbaHne
!HnkOrda He oBaTecb K HeynoJIHOmoeHHbIM TexHKaM.
Pn 6paueHn B CHTp CepBnchoro OcbnykBaHH Heo6xOaMo coo6uNTb:
TIN HENCnpaBHOCTN;
- MoeJIb n3dennr (MoI.)
- HomepTex.nacnopTa (cepHbI Ng)
3Tn daHHbIe Bbl HaJeTe Ha nacnopTHoN Ta6mUKe, pacnoJIOXKeHHoH Ha 3dEJIIN.