VINTAGE 1945 25860D11A1A1CK6A - Watch Girard-Perregaux - Free user manual and instructions
Find the device manual for free VINTAGE 1945 25860D11A1A1CK6A Girard-Perregaux in PDF.

| Brand | Girard-Perregaux |
| Model | VINTAGE 1945 25860D11A1A1CK6A |
| Product Type | Watch |
| Movement | Automatic Self-Winding Mechanical |
| Main Functions | Hours, minutes, date |
| Case Material | Stainless Steel |
| Strap Material | Leather |
| Case Diameter | 32 mm |
| Case Thickness | 10 mm |
| Weight | 80 g |
| Water Resistance | 30 m (3 ATM) |
| Crystal | Sapphire |
| Power Reserve | Approximately 46 hours |
| Warranty | 2 years (international warranty) |
| Service | Every 2 to 3 years at an authorized Girard-Perregaux service center |
| Usage Precautions | Avoid shocks, magnetic fields, extreme temperatures, chemicals |
| Cleaning | Soft, dry cloth; rinse with clear water after contact with seawater |
| Origin | Switzerland |
Frequently Asked Questions - VINTAGE 1945 25860D11A1A1CK6A Girard-Perregaux
User questions about VINTAGE 1945 25860D11A1A1CK6A Girard-Perregaux
0 question about this device. Answer the ones you know or ask your own.
Ask a new question about this device
Download the instructions for your Watch in PDF format for free! Find your manual VINTAGE 1945 25860D11A1A1CK6A - Girard-Perregaux and take your electronic device back in hand. On this page are published all the documents necessary for the use of your device. VINTAGE 1945 25860D11A1A1CK6A by Girard-Perregaux.
USER MANUAL VINTAGE 1945 25860D11A1A1CK6A Girard-Perregaux
INDICATEUR JOUR NUIT
INDICATEUR DES PHASES DE LUNE 27
BI-RETRO 29
CALENDRIER COMPLET 32
CALENDRIER ANNUEL ET ÉQUATION DU TEMPS 35
CALENDRIER PERPÉTUEL 38
INDICATEUR JOUR NUIT
Introduction
WATER-RESISTANCE PRECAUTIONS 50
USERGUIDE 52
SETTINGS 52
CROWN 52
WINDING 53
PRACTICAL FUNCTIONS 55
HOUR AND MINUTE 55
DATE 59
POWER RESERVE INDICATOR 61
SECOND TIME ZONE 62
TACHOMETRIC SCALE 64
CHRONOGRAPH 65
English
ASTRONOMIC FUNCTIONS 66
DAY/NIGHT INDICATOR
MOON PHASES INDICATOR 67
BI-RETRO 69
FULLCALENDAR 72
ANNUALCALENDAR AND EQUATION OF TIME 75
PERPETUALCALENDAR 78
You are now the proud owner of a Girard-Perregaux watch, and we would like to thank you for your choice.
Our expert watchmakers and craftsmen have mastered all the expertise required to create exceptional pieces, from traditional watchmaking to the latest cutting-edge technologies.
Our uninterrupted history spanning more than two centuries, our dozens of watch patents and our never-ending quest for innovation make our Brand one of the most prestigious names in Swiss Haute Horlogerie.
Our heritage is our most precious asset, and we are proud to count you as one of its guardians.
We invite you to consult the user guide and hope you enjoy your Girard-Perregaux watch.
INTERNATIONAL WARRANTY
The international warranty below is applicable to all Girard-Perregaux watches sold by Girard-Perregaux brand authorized dealers and submitted for repair or inspection under warranty in all countries.
Only Girard-Perregaux authorized Repair Centers are authorized to provide the service set out by the international warranty, in accordance with Girard-Perregaux's instructions. Any service, repairs or other operations on your watch not performed by a Girard-Perregaux authorized Repair Center shall render the international warranty void.
We guarantee your watch against any lack of conformity and against any defect due to the materials used for a period of two years from the purchase date. If during this period your timepiece were to exhibit one of these defects, we are committed to repairing it free of charge. Once the warranty period has expired, repairs will be invoiced for parts and labor.
To be entitled to this warranty, you must submit a copy of the warranty certificate, properly completed, dated, stamped and signed by an authorized dealer or distributor. You are therefore advised to keep the Girard-Perregaux international warranty certificate safe, as it is the only document validating the warranty.
If need be, we recommend giving the watch to be inspected or repaired to one of our exclusive distributors or authorized dealers, who will send it to our nearest authorized Repair Center. You can also send your watch directly to one of our authorized Repair Centers.
If posting your watch, we recommend packaging it very carefully and sending by secure mail, to prevent any incident in transit.
Girard-Perregaux can under no circumstances guarantee the authenticity of Girard-Perregaux products acquired outside its official distribution and authorized dealer network.
This warranty entitles you to specific aforementioned rights, which may be supplemented by other rights varying between countries.
The warranty does not cover:
Leather, rubber and fabric straps;
The consequences of wear and normal aging of the watch (in particular scratches, scoring, etc.);
Damage caused deliberately, or resulting from incorrect handling, negligence or an accident;
Damage resulting from abnormal use or misuse (in particular impacts or crushing);
Watches with the identification number or any other identification mark deliberately removed or altered;
Loss and theft;
Damage caused by natural events such as fire, natural catastrophes and acts of war;
Any defect resulting from the addition of one or more accessories not issued from the manufacture Girard-Perregaux will automatically lead to the end of the warranty.
PRECAUTIONS FOR USE AND CARE
Your watch has been manufactured with the greatest care, and will provide years of service if you take the following precautions:
1. Precautions for use and care
- Never activate the crown or push buttons of your watch in water. If your watch has a screw-down crown, make sure that it never comes into contact with water when its crown is unscrewed;
Avoid thermal shocks and exposing your watch to extreme temperatures, below 0^ or above 60^ (sauna, baths, etc.);
Never use corrosive or chemical products to clean your watch; - Avoid contact with certain chemical substances (petrol, thinners, perfumes, cleaning products, glues, paints, etc.), to prevent any damage to your watch and its leather strap;
- Avoid exposing your watch to a powerful magnetic field (magnets, loudspeaker, etc.);
Avoid violent impacts;
Avoid leaving your watch immobile for long periods of time. Only regular wear prevents the oils contained in the movement from congealing;
Never attempt to open the case of your watch yourself; - Rinse your watch with fresh water after bathing in the sea; avoid bathing with a leather strap to prevent accelerated wear.
2. Maintenance service
Therefore, to ensure that your watch continues, after years of use, to provide the accuracy you can rightly expect, Girard-Perregaux recommends entrusting your watch to one of its authorized Repair Centers every 2 to 3 years for the necessary inspections.
WATER-RESISTANCE PRECAUTIONS
Your watch has undergone numerous water-resistance tests in our workshops, depending on the required protection level, to ensure you can enjoy the following activities:
| ACTIVITIES / DEGREE OF WATER-RESISTANCE | 3 atm - 3 bar 30 m - 100 ft | 5 atm - 5 bar 50 m - 165 ft | 10 atm - 10 bar 100 m - 330 ft | 50 atm - 50 bar 500 m - 1650 ft |
| Rain, splashing | yes | yes | yes | yes |
| Shower, bath, surface water sports | no | yes | yes | yes |
| Swimming, snorkeling | no | no | yes | yes |
| Scuba diving | no | no | no | yes |
1. Water-resistance precautions
Your watch has been rigorously checked and will retain its water-resistance if you take the following precautions:
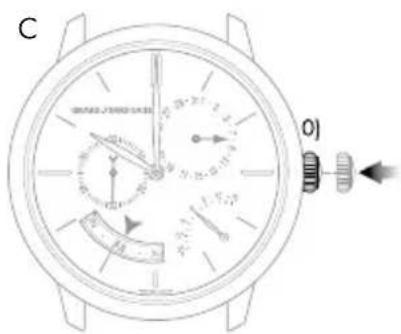
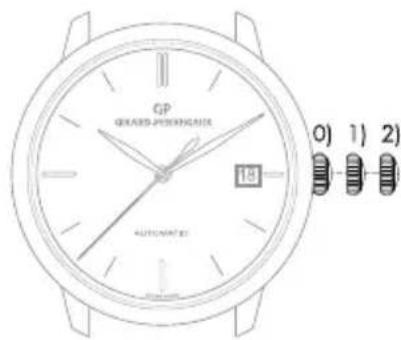
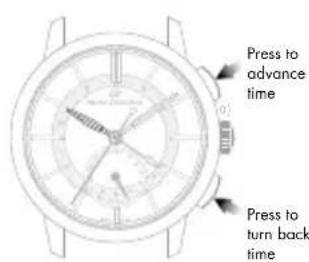
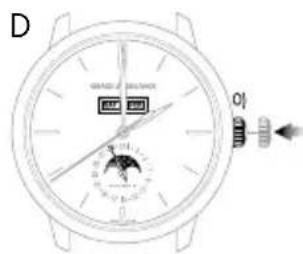
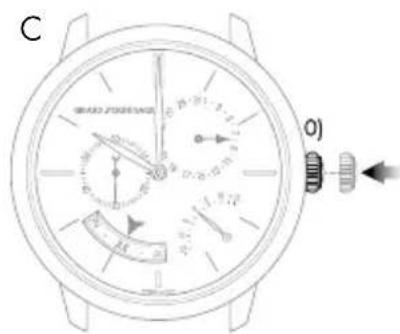
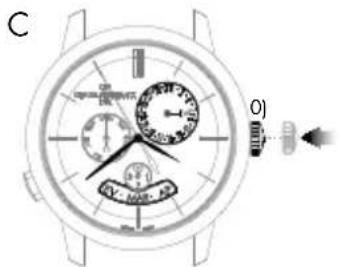
- Ensure that the crown and the push buttons on your watch are in their initial position - position 0 - to prevent any damage to the mechanism. To do this, press the crown against the case.
If your watch is equipped with a screw-down crown, ensure that it is locked after any adjustment and before use in an aquatic environment. To do this, screw the crown in a clockwise direction, whilst keeping it pressed against the case of your watch. - Never activate the crown or push buttons of your watch under water, if the watch is in contact with water or when it is wet.
2. Water-resistance test
The water-resistance of your watch is ensured by a sophisticated system of seals. These are subject to the damaging effects of a range of external factors (perspiration, changes in temperature, ultraviolet rays, salt or chlorinated water, dust, etc.). For this reason, and to ensure the seals can carry out their role perfectly, Girard-Perregaux recommends entrusting your watch to one of its authorized Girard-Perregaux Repair Centers every 2 to 3 years for the necessary water-resistance inspections.
USERGUIDE
SETTINGS
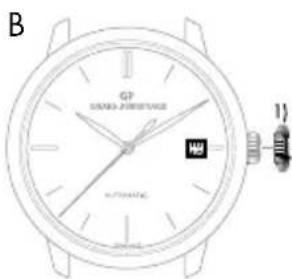
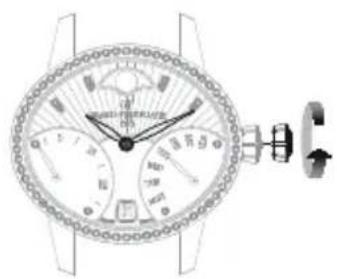
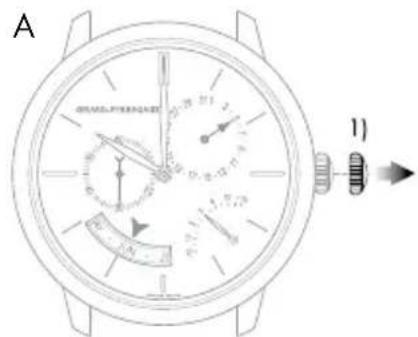
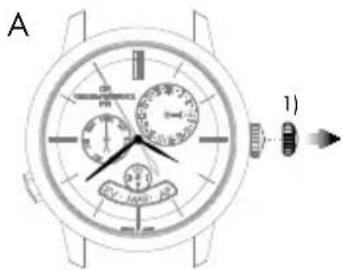
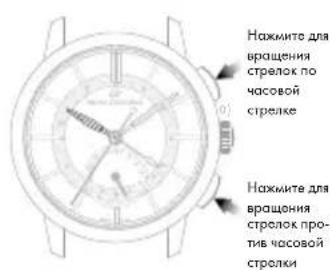
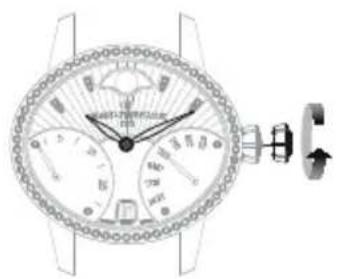
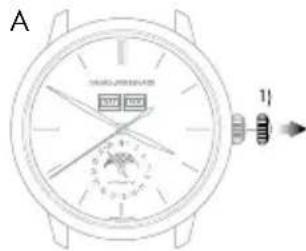
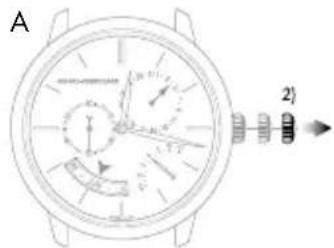
CROWN
Introduction
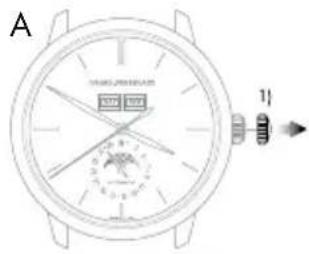
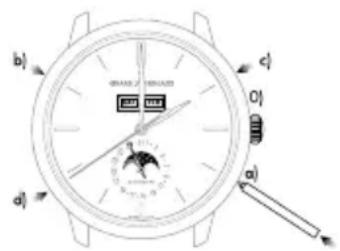
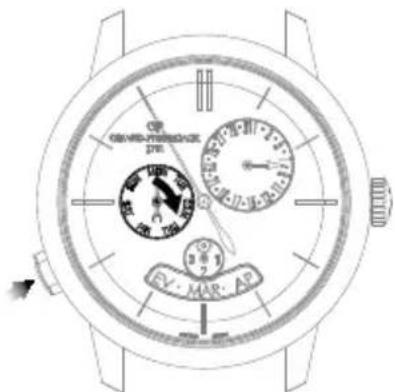
The crown is a component allowing the adjustment of different functions, such as setting the time, manual winding and on certain models, setting the day or the date.
Simple crown
Setting
A. Pull out the crown to go on to different settings.
B. To assure its water-resistance, it is important that the crown is pushed back into position O) once you have finished using it. To do this, press the crown against the case as illustrated below.

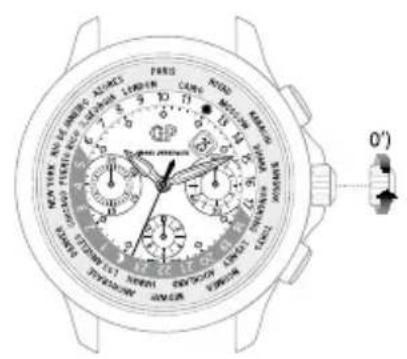
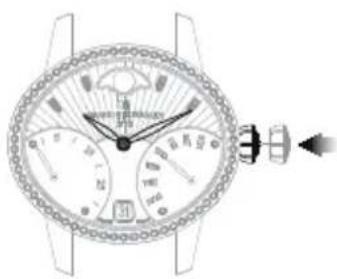
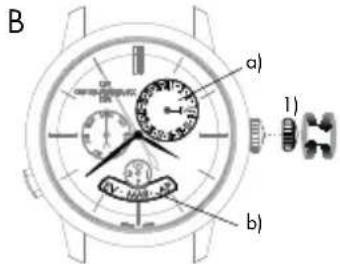
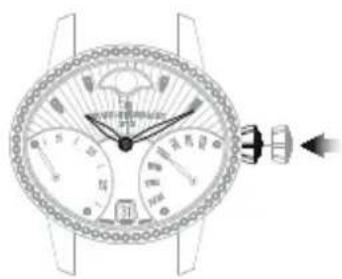
Screw-down crown
The screw-down crown ensures perfect water-resistance to the depth for which the model was designed.
Setting
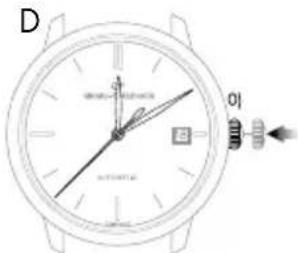
A. Unscrew the crown to go on to different settings. To do this, turn the crown counterclockwise.
B. To assure its water-resistance, it is important that the crown is pushed back into position 0) once you have finished using it. To do this, screw the crown in clockwise while pressing it against the case, as illustrated on the right.

WINDING
Introduction
Winding allows the movement to store up the energy necessary for your watch to function well.
Mechanical movements manufactured and produced at the manufacture Girard-Perregaux can be manual or automatic depending on the model of your watch.
Manual winding mechanical movement
This type of movement means that to function normally, your watch needs to be regularly wound. Depending on the model and the power reserve of your watch, it can go between 30 to 60 hours between two windings.
Setting
To wind your watch, turn the crown clockwise when it is in position O) or O') when it is a screw-down crown. As soon as it starts to resist, it means the mechanism is sufficiently wound.
Warning: Do not force if the resistance increases, the movement mechanism could be damaged.
Automatic mechanical movement
This term means that your watch automatically stores up energy as you wear it on your wrist. Indeed, your daily movement allows the oscillating mass to carry out rotating movements which, thanks to a clockwork system, reproduce an energy to the movement and allows it to automatically wind itself. Daily wear is enough to assure the power reserve necessary for your watch to function well without it being necessary to wind it.
If your watch has not been worn for several consecutive days, it has to be manually wound. To do this, please refer to the paragraph above 'Manual winding mechanical movement'.
English
PRACTICAL FUNCTIONS
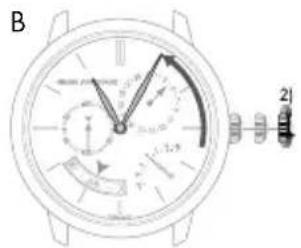
HOUR AND MINUTE
Introduction
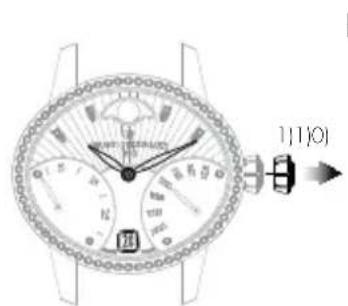
Setting the time of your watch is completed via the crown. This could be in two or three positions, depending on the model of your watch.
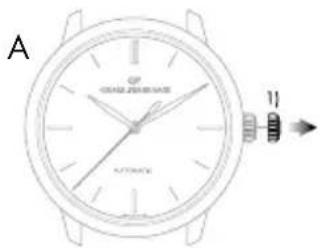
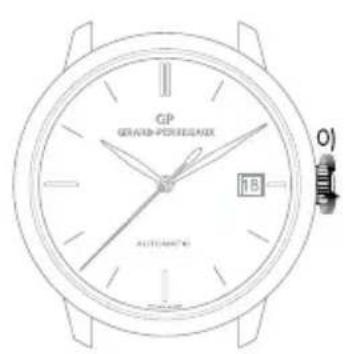
2 position crown
3 position crown
0) Movement manual winding position (crown not pulled out).
1) Time setting position (crown pulled out).
0) Movement manual winding position (crown not pulled out).
1) Date setting position (crown half pulled out).
2) Time setting position (crown fully pulled out).
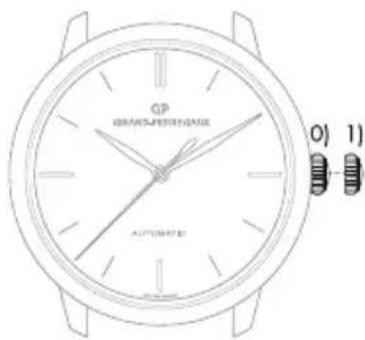
If your watch has a date indicator, make sure that the hands are in the date change position, i.e. at midnight rather than midday. Use midnight as a reference for the date and day change to ensure you are positioned at the right time of day.
Setting
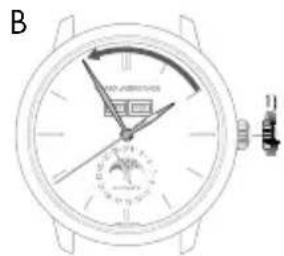
A. Pull your crown out to the time setting position. On watches with a seconds indicator, the seconds hand will stop.
B. Turn your crown clockwise so as to indicate the selected time minus 5 minutes.
C. Slowly move the minute hand forward clockwise, stopping it exactly at the selected minute.
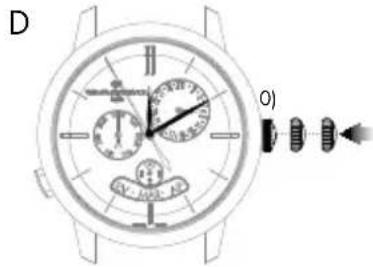
D. At the desired time, push the crown back against the case, in position O). The watch will restart immediately.

Warning: After making any setting, always return the crown to its original position against the case, position 0), to preserve the water-resistance of your watch and prevent any damage to the mechanism. To do so, refer to the chapter "Crown".

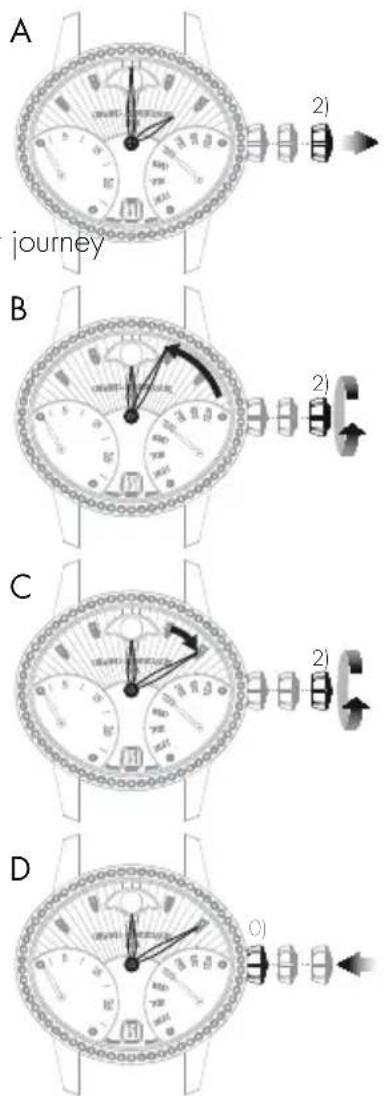
Retrograde display
The retrograde hour and minute hands move from 6 to 6 o'clock (left to right) and from 0 to 60 minutes (left to right) respectively, before returning immediately to their starting point and beginning their journey once more.
Hour hand Minute hand
Setting
A. Pull your crown out to the time setting position.
B. Rotate the crown until the required time, less 5 minutes, is displayed.
C. Slowly move the minute hand forward clockwise, stopping it exactly at the selected minute.
D. At the desired time, push the crown back against the case, in position 0). The watch will restart immediately.
Warning: After making any setting, always return the crown to its original position against the case, position 0), to preserve the water-resistance of your watch and prevent any damage to the mechanism. To do so, refer to the chapter "Crown".
English
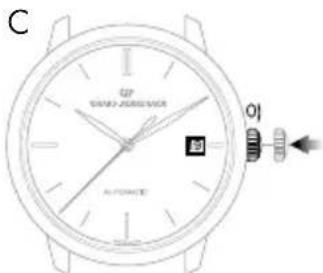
DATE
Introduction
The date indication shows the number of the day in the month.
This function enables rapid date setting for your watch without altering the time. The indication of the date is synchronized with the hour and minute hands. In any case, you need to correct the date display for any month not lasting 31 days, for a single date.
Warning: Do not perform this operation between 8 PM and 8 AM as the date change mechanism is engaged, and the mechanism could become damaged.
Setting
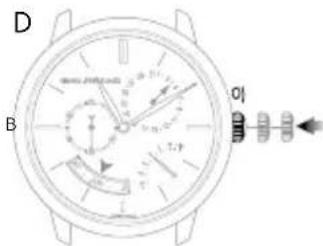
Window display date
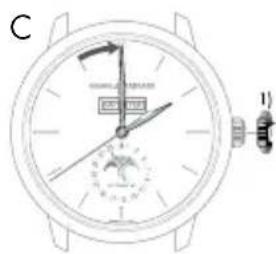
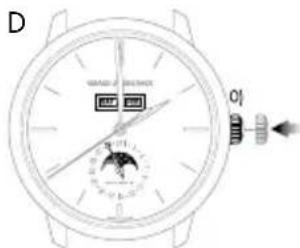
A. Pull out the crown of your watch into the date setting position, in position 1).
B. Turn the crown clockwise until the desired date appears in the window. According to the model, the crown may be turned in the opposite direction.
C. At the desired date, push the crown back against the case, in position 0).
Warning: After making any setting, always return the crown to its original position against the case, position 0), to preserve the water-resistance of your watch and prevent any damage to the mechanism. To do so, refer to chapter "Crown".
Hand display date
If your watch has a hand display date, you can correct it via the corrector, found on the case of your watch.
Press on the corrector, with the help of the little tool delivered with your watch, until the date hand indicates the desired date. One press on the corrector corresponds to one day forward.
English
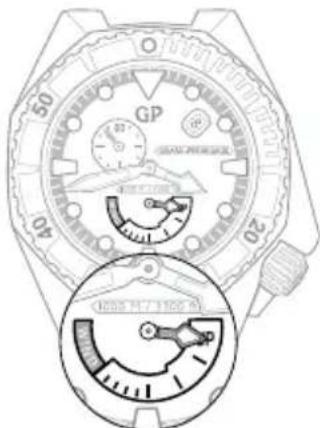
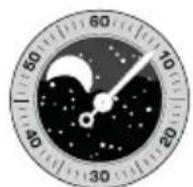
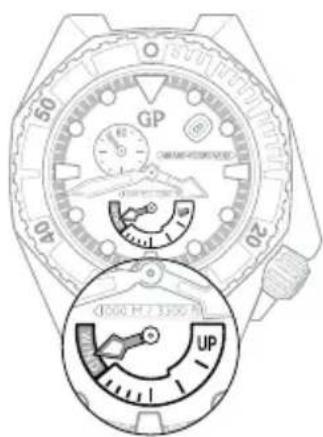
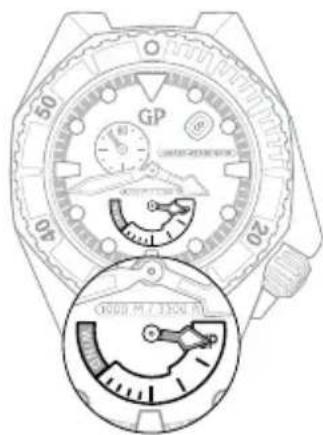
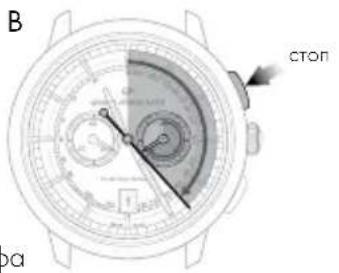
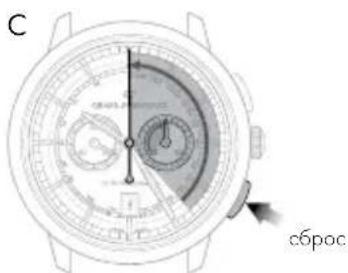
POWER RESERVE INDICATOR
Introduction
This indicator allows you to know the status of your watch power in real time, or how long your watch can work for before it will need to be wound again.
Reading
The power reserve status of your watch is indicated by a little hand moving along a graded arc.
Setting
The power reserve indicator is synchronized with the movement, so it does not need to be set.
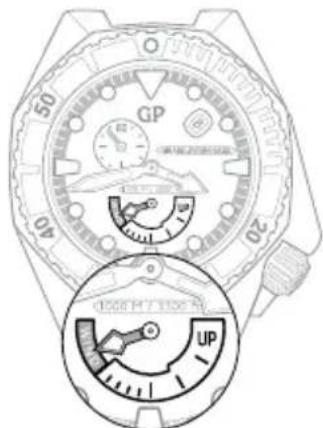
Stop soon Full
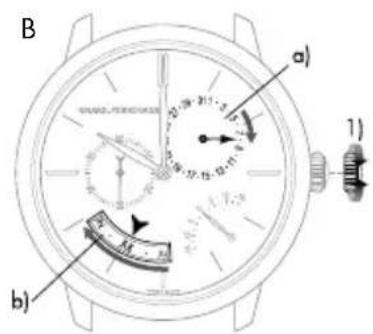
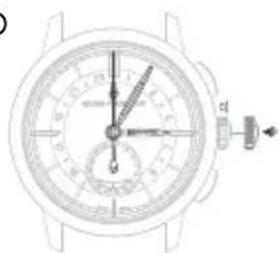
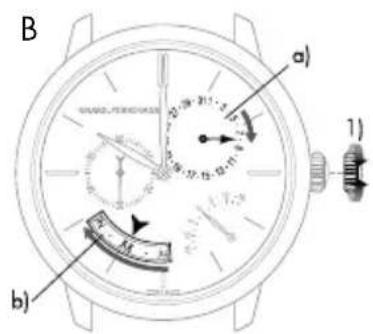
SECOND TIME ZONE
Introduction
This function, which is highly valued by travellers, is used to display two time zones simultaneously: The reference time or ‘home time’, and the local time.
Reading
The reference time («home time») is displayed on the central 24-hour graduated disc. As usual, the local time is read on the external graduated scale.
Setting
Reference time («home time») hours and minutes
Before every setting, make sure the position of the hands corresponds to the date changing at midnight and not at midday. Use midnight as an approximate reference for the date jump to ensure you are positioned at the right time of day.
Warning: The date hand only follows the local hour hand (set using the push Buttons at 2 o'clock and 4 o'clock).
A. Pull the crown of your watch out to the time setting position, in position 1). The seconds hand will stop.
B. Turn the crown clockwise so as to indicate the selected time minus 5 minutes. This setting simultaneously moves the reference (‘home time’) hour and minute hands and the local hour hand.
English
C. Slowly move the minute hand forward in a clockwise direction, stopping it exactly at the selected minute.
D. At the desired time, push the crown back against the case, in position O); the watch will restart immediately.
Warning: After making any setting, always return the crown to its original position against the case, position 0), to preserve the water-resistance of your watch and prevent any damage to the mechanism. To do so, refer to chapter "Crown".
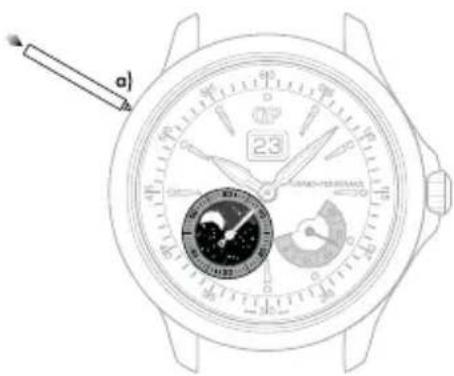
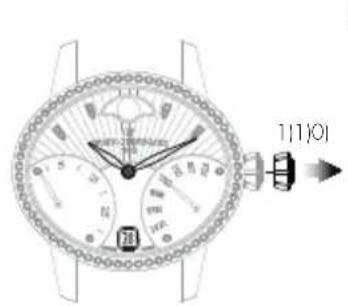
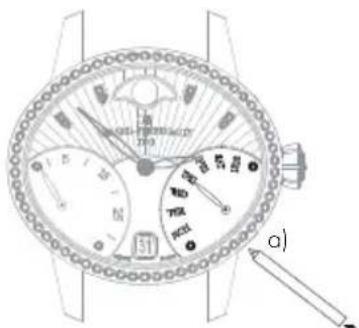
Date change by hand
Press on the corrector a) located at 8 o'clock using the small tool supplied with your watch, until the date hand indicates the desired date. One press on the corrector corresponds to one day forward.
Warning: Between 11PM and midnight, a date correction using corrector a) will only enable the date to be moved forward by one day. However, this action will not damage your mechanism.
Second time zone (local time)
The push Buttons located at 2 o'clock and 4 o'clock can be used to move the second time zone hour hand forwards or backwards (local time). Press once to move the time forwards or backwards one hour.
C
D

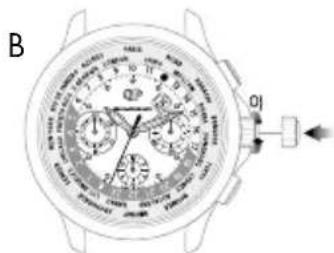
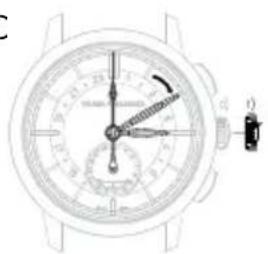
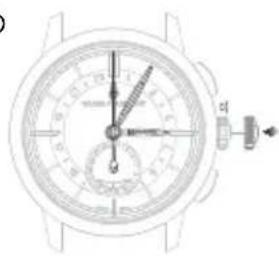
TACHOMETRIC SCALE
Introduction
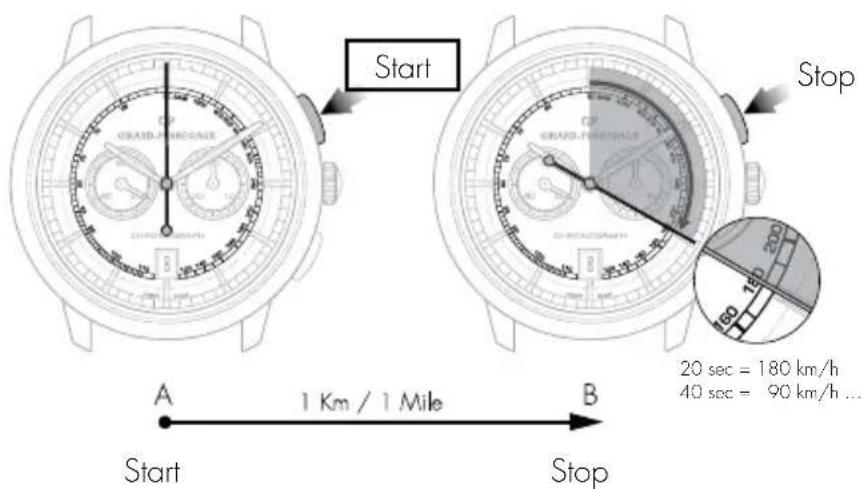
This function measures an average speed over a given distance.
Reading
Let us take a road with 2 markers A and B set one kilometer (or mile) apart. Start your chronograph as your car passes marker A, then stop it as it passes marker B. Then read the average speed in kilometers/hour or miles/hour on the tachometer scale at the tip of the chronograph center seconds hand.
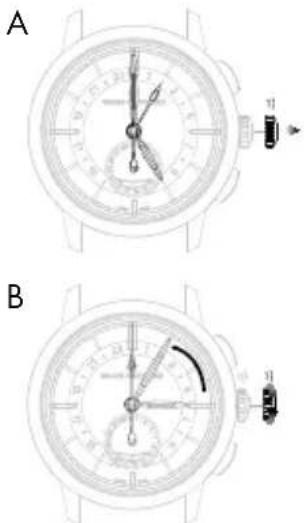
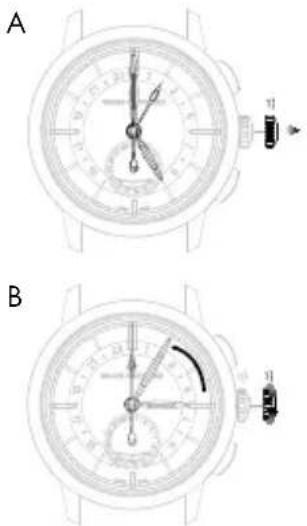
CHRONOGRAPH
Introduction
The chronograph seconds are displayed by a large center hand. The minute, and possibly the hour, are generally displayed by 1 or 2 small counters.
The seconds hand and the counters are interconnected.
On certain models, minute timing may also be indicated by a center hand pointing to the dial's graduated rim.
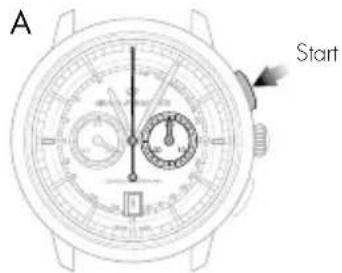
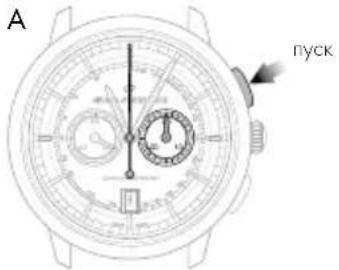
Setting
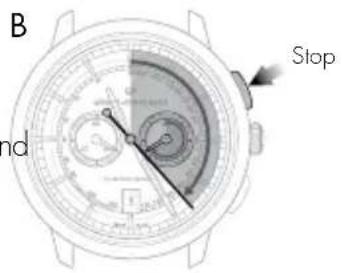
A. Press your watch's push button at 2 o'clock: The center seconds hand will start.
B. Press the same push button at 2 o'clock again: the center seconds hand will stop.
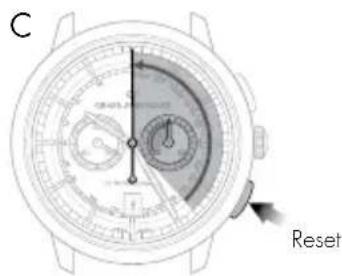
C. Press your watch's push-button at 4 o'clock: The center seconds and the counter hands will return to zero.
Warning: While the second hand is working, never reset to zero to prevent damage to the mechanism. Always check the second hand has stopped before resetting to zero.
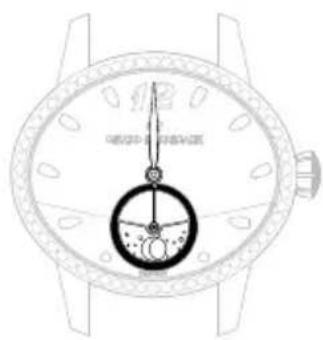
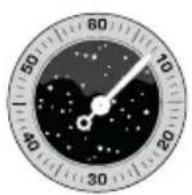
ASTRONOMIC FUNCTIONS
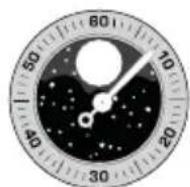
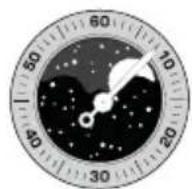
DAY/NIGHT INDICATOR
Introduction
The day/night indicator uses a system of discs representing the sun and moon to indicate whether it is day or night. The special window depicts the night sky, in which the shape of the moon and sun changes as the day advances.
Reading
When setting the time, take into account the day/night indication, as this is synchronised with the hour and minute indications. For example, at midnight, the moon should appear at 6 o'clock, while at midday the sun should appear at 6 o'clock.
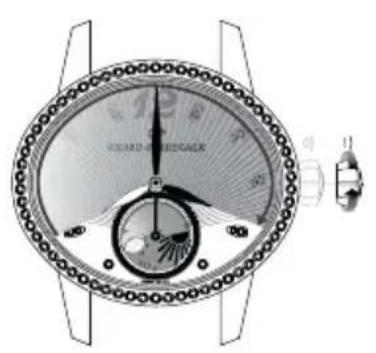
Midday Midnight

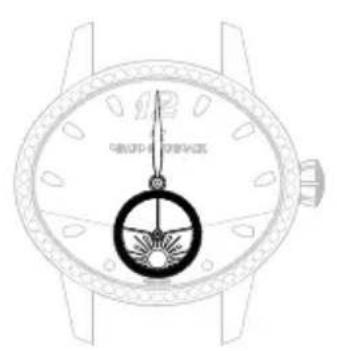
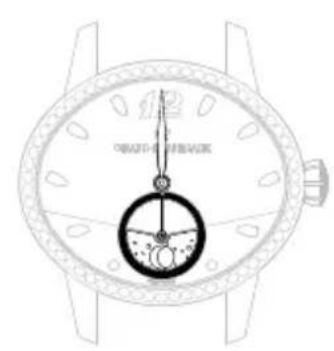
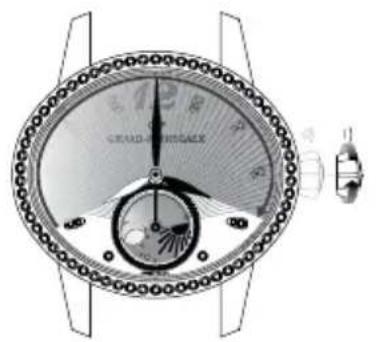
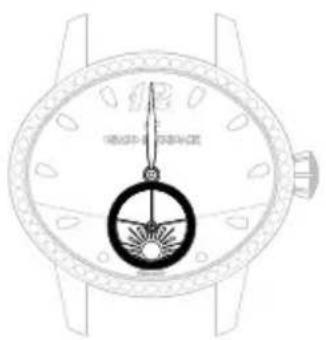
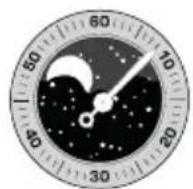
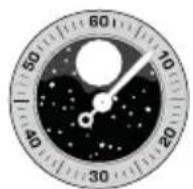
MOON PHASES INDICATOR
Introduction
Moon phases indication allows the reproduction of the moon cycle (new moon, first quarter, full morn, final quarter) by means of a disc or a window. The moon phases indicator offers a representation of the sky in which the form of the moon is shown at its different stages throughout the lunar month.
Reading
A disc, with two moons placed in a starry sky, turns in a window.
At the start of each moon phase, one of the two moons appears in the left-hand section of the window; it initially appears as a slim crescent, emerging from behind the rounded edge, then gradually grows over the course of the days.
In the middle of the lunar month, the moon appears in the middle of the window in its full form. It then starts to gradually disappear behind the second rounded cover on the right.

New moon First quarter Last quarter Full moon
Setting
Press on the corrector a), using the little tool received with your watch, until the desired moon phase is displayed. One press on the corrector corresponds to one day forward.
Warning: Do not correct the moon phases indicator when the mechanism changing the date is engaged, between 3 PM and 3 AM, as this could damage the mechanism. To be sure, use midnight as a reference for the date and day change to ensure you are positioned at the right time of day.

*Corrector with variable position according to the model
English
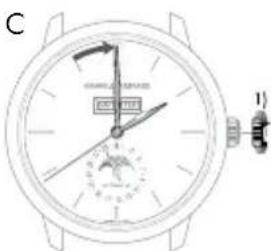
BI-RETRO
Introduction
The retrograde seconds and day of the week hands move from 0 to 30 (up to down) and from MON to SUN (down to up) respectively before returning immediately to their starting point and beginning their once more.
Setting
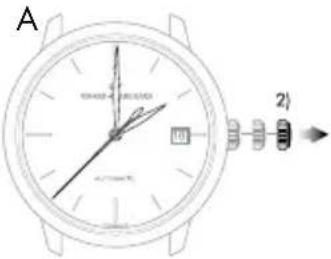
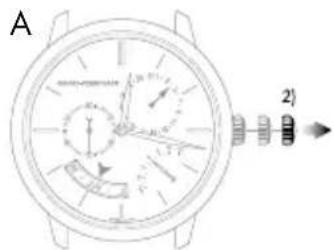
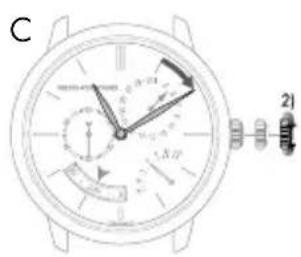
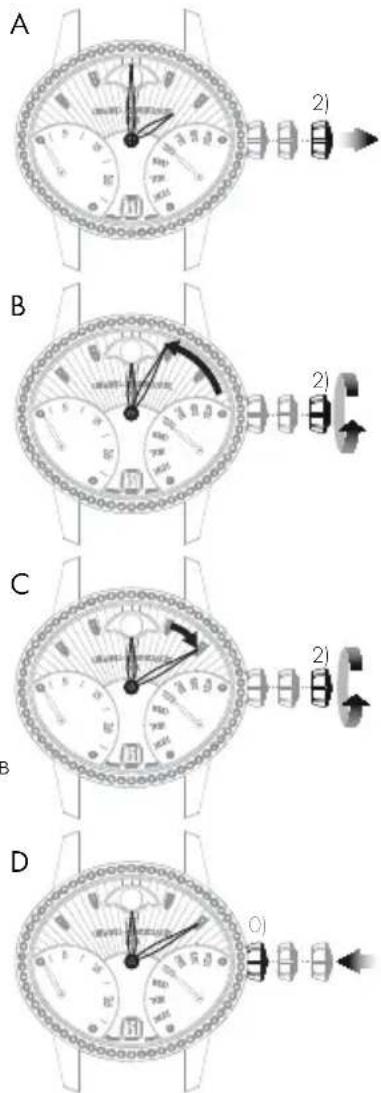
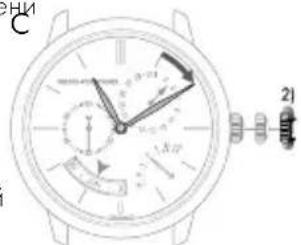
Hour and minute
A. Pull out the crown of your watch into the hour setting position, in position 2).
B. Rotate the crown until the required time, less 5 minutes, is displayed.
C. Slowly move the minute hand forward clockwise, stopping it exactly at the selected minute.
D. At the desired time, push the crown back against the case, in position 0). The watch will restart immediately.
Warning: After making any setting, always return the crown to its original position against the case, position 0), to preserve the water-resistance of your watch and prevent any damage to the mechanism. To do so, refer to the chapter "Crown".
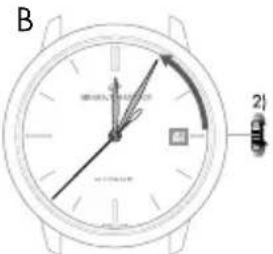
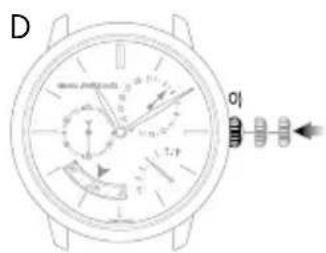
Date
A. Pull out the crown of your watch into the date setting position, in position 1).
B. Turn the crown clockwise until the desired date appears in the window.
C. At the desired date, push the crown back against the case, in position 0).
Warning: After making any setting, always return the crown to its original position against the case, position O), to preserve the water-resistance of your watch and prevent any damage to the mechanism. To do so, refer to chapter "Crown".
A
B
C

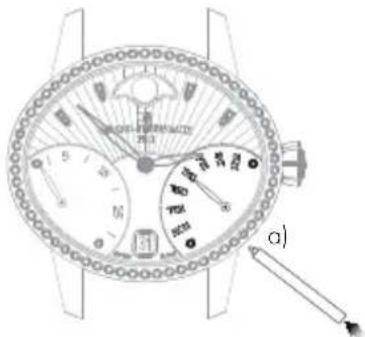
Day of the week
The day can be corrected by pressing on the corrector a), positioned at 4.30, using a small tool delivered with your watch. One press on the corrector corresponds to one day forward.
Warning: Do not change the day of the week between 19:00 and 1:00, when the date-change mechanism is being activated, as this could damage the movement.
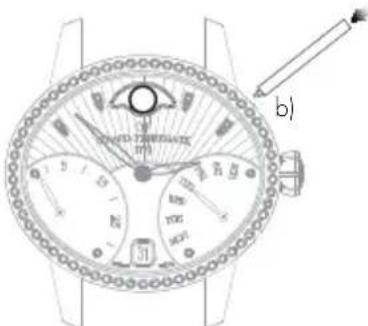
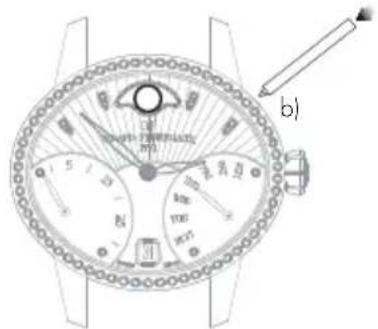
Moon phases
Press corrector b), positioned at 14.30, using the small tool supplied with your watch, until the desired moon phase is displayed. One press on the corrector corresponds to one day forward.
Warning: Do not correct the moon phase indicator between 7:00 PM and 1:00 AM, when the date-change mechanism is being activated, as this could damage the movement. To be sure, use midnight as a reference for the date and day change to ensure you are positioned at the right time of day.
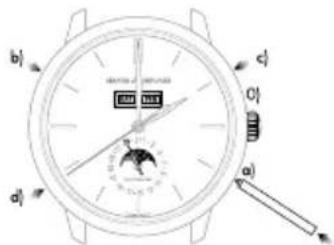
FULLCALENDAR
Introduction
As well as showing the hours and the minutes, the watchmaking complication "Full calendar" also clearly displays the date, the day of the week, the month and indicates moon phases.
Warning: Do not correct the calendar or the moon phases indicator when the mechanism changing the date is engaged, between 3 PM and 8 PM, as this could damage the mechanism. To be sure, use midnight as a reference for the date and day change to ensure you are positioned at the right time of day.
Setting
Hour and minute
Before every setting, make sure the position of the hands corresponds to the date changing at midnight and not at midday. To be sure, use midnight as a reference for the date and day change to ensure you are positioned at the right time of day.
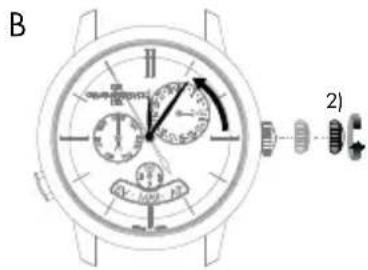
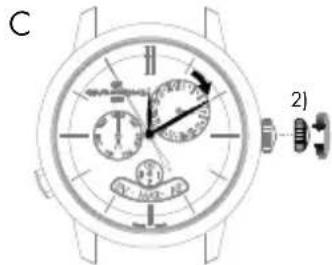
A. Pull your crown out to the time setting position, in position 1). The seconds hand will stop.
B. Turn your crown clockwise so as to indicate the selected time minus 5 minutes.
C. Slowly move the minute hand forward clockwise, stopping it exactly at the selected minute.
D. At the desired time, push the crown back against the case, in position 0). The watch will restart immediately.
Warning: After making any setting, always return the crown to its original position against the case, position 0), to preserve the water-resistance of your watch and prevent any damage to the mechanism. To do so, refer to the chapter "Crown".
Date change by hand
Press on the corrector a) located at 4 o'clock using the small tool supplied with your watch, until the date hand indicates the desired date. One press on the corrector corresponds to one day forward.
Warning: Going from the 31^st to the 1^st leads to a change in the month indicated (continuing to the next month).
Day of the week
Press on the corrector b) (located at 10 o'clock) using a small tool delivered with your watch, until the desired day of the week appears in the window.
Month
Press on the corrector c) (located at 2 o'clock) using a small tool delivered with your watch, until the desired month appears in the window.
Warning: Do not perform this operation if the date or calendar display is between the 30^th and the 2^nd , as the month change mechanism is engaged, as you risk damaging the mechanism.
Moon phases
Press on the corrector d) (located at 8 o'clock) using a small tool delivered with your watch, until the desired moon phase appears. One press on the corrector corresponds to one day forward.
ANNUALCALENDAR AND EQUATION OF TIME
Introduction
Unlike a conventional calendar mechanism, your annual calendar only requires date correction for February in non-leap years, i.e. 3 corrections in total in a 4-year cycle.
Setting
Hour and minute
Before every setting, make sure the position of the hands corresponds to the date changing at midnight and not at midday. Use midnight as an approximate reference for the date jump to ensure you are positioned at the right time of day.
A. Pull out the crown of your watch into the hour setting position, in position 2). The seconds hand will stop.
B. Turn your crown clockwise so as to indicate the selected time minus 5 minutes.
C. Slowly move the minute hand forward, stopping it exactly at the selected minute.
D. At the desired time, push the crown back against the case, in position 0); the watch will restart immediately.
Warning: After making any setting, always return the crown to its original position against the case, position 0), to preserve the water-resistance of your watch and prevent any damage to the mechanism. To do so, refer to the chapter "Crown".

Date and month
Warning: Before making any correction, ensure that the time display is between 9:30 AM and 8:30 PM. Outside this range, any rotation of the stem in position 1) will have no effect. Use midnight as a reference for the date and day change to ensure you are positioned at the right time of day.
A. Turn the crown of your watch into the date setting position, position 1).
B. Turn the crown until the day hand a) indicates the desired date. The crown can be turned in both directions. The month disc b) is synchronized with the date hand, so it does not need to be changed.
C. At the desired date, push the crown back against the case, in position 0); the watch will restart immediately.
Warning: After making any setting, always return the crown to its original position against the case, position 0), to preserve the water-resistance of your watch and prevent any damage to the mechanism. To do so, refer to chapter "Crown".
Warning: For months with 30 days, the date takes approximately 4 hours 30 minutes to jump to the first day of the next month, passing through the 3^st . For February, the date takes approximately 7 hours 30 minutes to jump to the March 1^st , passing through the 30^th and 31^st .

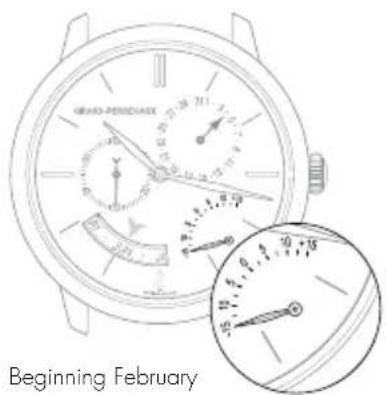
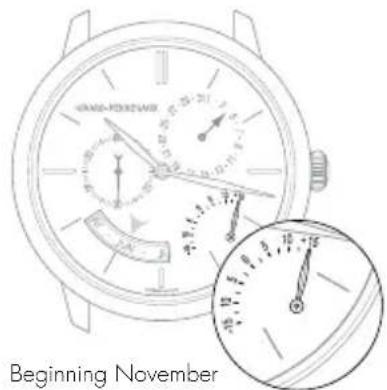
Equation of time
Introduction
The Earth's orbit around the sun is not perfectly circular. As with most of the celestial bodies in our solar system, its trajectory is elliptical. In addition, the Earth's axis is tilted in relation to the orbit's plane. A consequence of this irregular trajectory is that the length of the solar day – the interval between the times at which the sun twice passes the meridian at a given location – varies according to the season. The 24-hour day used for civil time is calculated using the average duration of the solar day.
Reading
The equation of time function indicates the difference between the mean time and the solar time. This difference is indicated by a little hand which moves along a graduated arc. It can extend to between approximately +14 and -16 minutes for certain dates at the start of February and November respectively.
Setting
The equation of time indicator is synchronized with the calendar readings, and therefore does not require adjustment.
PERPETUALCALENDAR
Introduction
The perpetual calendar indicates the date, day and month, taking into account the different lengths of the months in the Gregorian calendar, including leap years. Its "mechanical memory" therefore counts 1461 days, or four years.
Please note that this type of mechanism cannot take non-standard common years into account (years which are not leap years as they can be divided by 100 but not by 400, such as 2100).
Setting
Before making any correction, ensure that the time display is between 1:00 PM and 8:30 PM. Outside this range, any rotation of the stem in position 1) will have no effect. Use midnight as an approximate reference for the date jump to ensure you are positioned at the right time of day.
Adjustment outside the hours of 1:00 PM and 8:30 PM will not cause any mechanism.
English
Hour and minute
Before every setting, make sure the position of the hands corresponds to the date changing at midnight and not at midday. Use midnight as an approximate reference for the date jump to ensure you are positioned at the right time of day.
A. Pull out the crown of your watch into the hour setting position, in position 2). The seconds hand will stop.
B. Rotate the crown until the required time, less 5 minutes, is displayed.
C. Slowly move the minute hand forward clockwise, stopping it exactly at the selected minute.
D. At the desired time, push the crown back against the case, in position 0); the watch will restart immediately.
Warning: After making any setting, always return the crown to its original position against the case, position 0), to preserve the water-resistance of your watch and prevent any damage to the mechanism. To do so, refer to chapter "Crown".

Date and month
A. Pull out the crown of your watch into the date setting position, in position 1).
B. Turn the crown until the day hand a) indicates the desired date. The crown can be turned in both directions. The month disc b) is synchronized with the date hand, so it does not need to be changed.
C. At the desired date, push the crown back against the case, in position 0); the watch will restart immediately.
Warning: After making any setting, always return the crown to its original position against the case, position 0), to preserve the water-resistance of your watch and prevent any damage to the mechanism. To do so, refer to chapter "Crown".
Warning: For months with 30 days, the date takes approximately 4 hours 30 minutes to jump to the first day of the next month, passing through the 31^st . For the month of February, the date takes approximately 7 hours 30 minutes to jump to the first of March in a leap year, passing through the 30^th and 31^st , and approximately 12 hours in a common year, passing through the 29^th , 30^th and 31^st .

Day of the week
The day of the week is corrected by pressing the push-button at 8 o'clock. One press on the push-button corresponds to one day forward.
Please note that the push-button can be activated at any time of day without any risk of damage.
Leap year indicator
The leap year indicator is synchronised with the month disc, which is in turn synchronised with the date hand. It does not need to be set.
DEUTSCH
INHALT
INTERNATIONALE GARANTIE 87
HaKImaIte Ha KhoNky-KoppeKTOp npn NOMOUI npnIOKeHHoro K qacam HnCTpyMeHTa Do Tex nop, noka CTpeNka KaJIeHdApA He 6yDet YKa3bIBaTb HyXHyO dAty. Ondo Haxatne Ha KhoNky-KoppeKTOp COOTBETCTByet nepexOdy Bneped Ha OOnH LyHHb IeHb.

INHДИКATOP 3АПACA XОДA
BVeJeHne
3TOT INHINKATOP NO3BOJRAET BIO6OIMOMeHT BpeMeHN ONpeJeNITb COCToRHe 3aB0da MExAHn3Ma BaIINX YacOB HIN BpEM, OCTAOUeecr DO CNEyUoero 3aB0da.
CHTbIBAHHe NOKa3AHN
3anac xoda yacob yka3b1Baetcra c nomoou Maenehko CTpeKN, DnKyuueNc no KpyroBoi uKane c deHnMn.
HactpoKa
HnDkaa 3anaca XoJa CnHxpoHn3npObaHa C MExaHn3MOM, NO3Tomy OHa He Tpe6yeT HAcToPouKn.
KOHe3OBoDA nonHHH 3BOD
BTOPOH YACOBOI IORC
BBeJeHne
3Ta cyHKnIy IMeET Oco6oe 3HaueHne IINyTeWecTBeHHNKOB, TAK KAK OHa NO3BONrE OJHOBpeMeHNO OTO6paKAtb Dba Yacobix Norca; 3TanoHHe (DOMaHHeE) IN MecTHOE Bpem.
CHTbIBaHHe NOKa3AHN
3TanoHoe (DOMaWHee) BpemyaKa3bBaetcna Ha ceHTpaIbHOM uΦep6nate c 24-uaCoboi shKanoy To Kacaetc MeCTHO BpemeH, To OHO yKa3bBaETcRa HApauuioHHo12-uaCoboi Wkane, KOtopa HAneceha no BHeHemy Kpaio uΦep6nata.
HactpoKa
Taalohhie yacbi MNHytbi (DOMaHHeB Bpemra)
Ipepe npoBeHnem HactpOieny6eHntecb, yTo nnoXeHne cTpeNOK COOTBETCTBYET N3MeHEnIO DaTb B nonHOy, a He B nonJeHb. YTo6bl y6eHTbcB I npabINbHom BbIbope BpeMeHN cyTOK, onpeDenTe nonHOhy, Bpaaar cTpeKNI NOKa He npOn3OJET CmHa DaTb.
BHHMaHHe! Ctpenka yka3aTeNa DaTb CneNyET TOnbKO 3a Ctpenko MeCTHO BpemeHN (HAcTpOJa OcyuEcTBnEeTc npn NOMoU KHOJOK, paCNOJoxeHHbIX y OTMeTOK «2 Yaca» n «4 Yaca»).
A. BbIaHnTe rOIOBky yacOB B noIOXeHne dny yCTaHOBKn BpeMeHN (noIOXeHne 1). CekyHdHa cTpeJIka OCTaHOBNTcR.
B. Bpaaute roNoBky no yacoboy cTpeKe do tex nop, noka cTpeNka He OKaXETcB NOLOXeHn 3a 5 MInyT do Tpe6yEmoTO qaca. Pn BbIOnHeHH NactpoKn cTpeKN 3aTAnOHnHO («Domaushero») n MeCTHOrO BpeMeHH NepemeuaOTcR OndHOBpeMeHHO.

C. Tenepb MeIeHNO BpaaTe 3abOHyIO rONOBky No yacobOy CTpeKe, UTO6bl TOUHO YCTAHOBtB MHyTHyIO CTpeKy Ha BB6paHHo MNHyTe.
D. Посné установки Вьбран Horо Уа с пжмite Гловку К корпсу, Бер hyB ee B noLoxKeHne 0; уасы Totac Bo3o6HOBaT CBOI xOД.
BHHMaHHe! Nocne BbInOnHeHHaIO6bIX HAcTpoek BCerda BO3BpaaJte 3ABoNDHyO roNoBky B nCxOAnHOe noLoXeHne (0) nIIOTHo npixKmAJte ee K KopnyCy yacOB, TTO6bl oEcxNeHTb BOHOENpOHnuaeMOCTb N He DOnyCTNtB NOBpeXDeHHaMEXAHn3Ma. Boone NoDpo6Ho CMOTpnte B pa3dene «3abODHaR rONoBka>.
CtpenoyHnHnKaunDaTbI
HaKImaIte Ha KhoNky-KoppeKTOp (a), pacnoNoKeHHyO y OTMeTKn «8 acOB>, nCNoIb3yra CneuJIbHbI INCTpyMeHT, npnaRaIOUnncR K YacAM, Noka CTpeNka KaHeIapr He yKaXeT Ha TeKyuU O datY. OdHO Haxatne Ha KhoNky-KoppeKTOp COOTBETCTByET nepExoIy CTpeKN dAtb HA OOnH DeH BnepeI.
BHHMaHHe! B HInTePbane Mexy 23.00 n 00.00 HactpoKa DaTbI npn NOMOuN KhoKn-KoppeKTopa (a) MoXeT BblOnHrTbCra TOnbKO Ha OOnn DeHb BnepeJ, OHaKo, 3To DeiCTBHe HIKoMm 6pa3om He BpeNT YacOBOMy MexAHn3My.
BtopoYacobOIOAC(MecTHoe Bpem)
KhoNk, pacnoNoxkeHHbIe y OTMeTOK 2 qaca> n 4 qaca>, no3BOJnOT nepeBoOntBnepei nn H3ad YacOByIO CTpeIKy BTOPO rACOBORO NOCA (MeCTHOBpeMeH). Ondo Haxatne Ha KhoNky COOTBeTCTByET nepexOdy Ha oINH aCBepei nn HA3ad.
C
D
TAXIMETPNUECKA JUKAJIA
BVeJeHne
AnHHa yHKnna No3BONraT n3MePHTcpeHIO CKOpOCTb Ha OTe3Ke Nt, paBHOM OOhomy KINOMeTpY.
CHTbIBaHHe NOKa3AHN
PaccmOTpIM OTpe3OK NyTH, HA KOtOpOM IBA DApOxHbIX CTOn6Nka, A N B, paCnoJoxHeB b OndHom KInomETpe npyOr ot npya. B MOMENT, KOrda BaAaBTOMo6nIb npoe3XaET cTOn6Nk A, 3anyCTnte xpoHorpaΦ n octAHOBITE erO B MOMENT npoe3Da cTOn6Nka B. Ha TaxImetprueckoi wkane, paCnoJoxeHHo Bokpyr OKOheHOCHT CEkyHNHO CTpeKNxPOHorpaΦa, Bby yBnITte cpeHIO CKOpocTB KM/ucnnn B MnJx/Qac.


XPOHOPTPAΦ
BVeJeHne
HnDkaunn n3mepeHHbIX cekyH,OCyueCTBnreTc npn NOMOuN CEHTpaNBHO CekyHIO CTpeJIKN XPOHOpa. HnDKaUN MHyT N, B HeKOTOpbX CnyHax, YacOB ObyuHO OcyueCTBnreTc npn NOMOuN ODHORo INI DByx MaIbX ChETNUKOB.
Nyck, OCTaHOBka N O6HyIeHne NOKa3AHN CHTUKNOB HENOCpeDCTBEHNHO CBra3AHbC NyCKOM, OCTaHOBko N O6HyIeHnEM NOKa3AHN CEHTpaJIbHOI CeKYHNOI CTpeJIKN XPOHorpaΦa.
B HeKOTOpbIX MoeJnx OTCHET MmHyT MoXe TAKXe OcyuEcTBnYbCpN NOMOu paCnoIoxeHHo B CHTpe CTpeKN, Yka3bBaIOUe H a Kany Ha BHeHem o6oKe uΦep6nata.
HactpoKa
A. Haxmte Ha KhoNky, HaxoJyIOcB NonoXeHn «2 yaca': cekyHnHa CTpeKa xpoHorpaΦ npNXOHT B DnXeHne.
B. Eue pa3 Haxmte Ha ty Xe KhoNky: cekyHnHa Ctpenka xpoHorpaΦa octaHabnBaETcra.
C. HaxMnte Ha KNONky, HaxOaIyIOcB NonoXeHN «4 yaca»: cekyHnHa CTpeNka N CTpeNkn ChETuNKOB XPOHOpaΦa BO3BpaAoiTcR K HynEBoi OTMeTke.
BnHmAHne! HkoIgda He 6hynyIte nokazHnaXpoHOrpafo, ecnn cekyHdHa CTpeIka HaxoIITcB DvIXeHIn, NCKOJIbky 3TO MOxET npINBeCTN K NOBpeXJdeHIO mexAHn3Ma. Bcerda CneIte 3a Tem, YTObI nepeD o6HyIeHNEM nOKa3AHn CEkyHdHa CTpeKka 6bla octahOBHeHa.
ACTPOHOMNueCKNE YHKUIN YKA3ATEJIb BPEMEHN CYTOK (DEHb/HOUb)
BVeJeHne
IINHnKaun BpeMeH cyTOK nCnoB3yeTcNCKOBb yka3aTeNb c n3o6paXeHNem CoHHua N Lyhbl. Ha fOHe He6a B OKoUke yka3aTeJI B COOTBETCTBUN CO BpeMeHem cyTOK nOraBnIOTcN dNcKn JyHb nn CoHHua.
CHTbIBaHHe NOKa3AHN
BoBpeMaYCTAHOBKnTOHOroBpeMeHN, yHTbBAIte Yka3aHnJeHb/HOHy, TAK KAK OHN CINXPOHn3nPOBaHbC yKa3aHnEM qacOB mHyT. HanpImeP, TOHO B NOHOb JyHa DOnJHa NOBJIbCBy OTMeTKU 06:00, B ToBpeMaK CoIHue DOJNXO OKa3aTbCBy 3ToJ Xe OTMeTKU TOHO B NOJIeHb.
NonnHbNnHoB

INIKATOPΦA3blIYHbI
BVeJeHne
HnHKatop f3bI NyhI NO3BOJAE T BOCpON3BcCTN 3TOrO CNYTHKa 3emn (HOBONYHne, nepBaYetBepTb, NIOHONYHne, NocJeHNRA YETBePb) npn NOMoU CNCTeMb C OTO6paXeHNEM NOKa3AHn HaDnCKe Hn B OKoWKe. B cneunabHom OKoWKe BOCpON3BeDeH φpaMeHT He6a, Ha KOTOpOM LyHHb DnCK npHnMaet pa3nnHyO oPMy no Mepe TeueHn LyHHOro Mecra.
CHTbIBaHHe NOKa3aHn
BOKoUke BpauaetcnaCK, yKpaueHHbI nByMa n3O6paXeHnMn lyHbHa 3Be3nHOM He6e.
B hauane kaxdoro lyHHoro ouno n3 DByx n3OpaxeHn OTKpbBaetc B3rny B Jebon yactno OKoSKa; B cAmom hauane oHO cKpbBaetc 3a Okpytno 3acNOHkON IMeET BND TOHKOrO cepna, a 3aTeM pactet no Mepe DNVXeHn BpemEn.
B cepenHe lyHHoro zHKna nonHocTbO oKpbItoe n3o6paxEne JyHb HaxOnITcB C cepenHe OKoSHA. 3aTeM OHO HAuHaet NOCTeNEHNO yMeHbWATbcR, CKpbBaRcB 3a pacNoJoxEHnCnpaba BTOPOkpyrno 3acNoHko.
HOBONYHNE NEPBAAHTBnOncnHnAHTBpTbNONHOYHNE
Hactpoika
HaxmaTe Ha Khonky-KoppeKTop (a) npinaraembIM K yacam HnCTpyMeHTOM Do Tex nop, noka B Okouke He noBntc Hxhna 43a JyHb. OndHO Haxatne Ha Khonky-KoppeKTop COOTBeTCTByet nepexOdy CTpeKNI DaTb HA OIN DeH Bneped.
BnHmAHne! 4To6bI n36exaTb NOBpeXeHnMexAHn3Ma, He yCTaHABnBaIte fo3y IyHb B npomexkyTke ot 15.00 do 03.00. 4To6bI HAcTpOnb Hacb Ha npabInbHyIO NOOBHy cyTOK, CneINTe 3a CMeHOJ DaTbI INHr HeDenB OKoWKe: OHa npOxCODIT OKONO NONYOHU.
*pacnoonxeHneKoppeKTopaMOxET N3MeHbTcB 63BNCMnOCTN OT MOnEN

BI-RETRO
BVeJeHne
PetporpaHaa cekyHnHaa cTePka DnHaaretc O TometKn «O MNHyT» Do OTMeTKn 30 MInHyT (Cbepx Bn3), a petporpaHaa cTePka, yKa3bBaIOuaa deHb Heenn,-OT PH (MON) K BC (SUN) (Chn3y BBePx), NOKA KaxdA MRHOBeHHo He BO3BpauaetcBA CBOIO HxCOnHyTOky, C KOtOpoi BO3O6HOBJIaET CBOI XOD.
Hactpoika
YacbIMMHHyTbi
A. BbyTnHte rnoBky yacOB B noNoXeHne dny yCTaHOBKn BpeMeHN (noNoXeHne 2).
B. C nOmoIbIO 3aOboHoi rOIOBKn yCTaHOBInTe cTpeJIKN TAKIM o6pa3OM, yTO6bl OHI NOKa3bIaII Ha 5 MInHyT MeHbIe ToCHoro BpeMeHN.
C. MeiHnHO BpaaIte MNHyTHyO CTpeKBy HnnpabHeHH No YacOBoB CTpeJIke N OCTaHOBHTe ee TOHO Ha Bb6paHHo MNHYTe.
D. Iocne yctaHOBKn Bb6paHHoro Yaca npKMMTe rONOBky K Kopnycy, BepHyB ee B nOIOXeHne 0).Yacbl TOTHAC BO3O6HOBRT CBOI XoJ.
BHHMaHHe! KaXbI pa3 nocne HactpoKn Bcerda Bo3Bpaaate roOBky B nepBOHaHbHoe noLoXeHne, npxab ee K KopnyCy B noLoXeHne 0, rTO6bl COXPaHHT bOdoCToKoCTb Baunx yacob N36exatb NobpeJeHn MexAHn3Ma. IyAToRO O3NaKOMbTEcB c pa3dJlOM 3aBoHNa KOpOHKa.
Data
A. BbIyHInTe rONOBky aCoB b NOnOxHeHne dny yCTaHOBKn DaTbI (nNoJoxHeHne 1).
B. BpaaIte e no yacobon cTpeNke, noka B OKoWKe He NOBNTcRA TeKyuadata.
C.Пocne yctahOBKn Heo6xoDmOДatb npKmTe rONOBky K Kopnycy, BepHyB ee B nOnoxeHne 0).
BHHMaHHe! KaKdbi pa3 nocHe hactpoKn Bcerda Bo3Bpaaate roNobky B nepBOHaJbHoe noIoxeHne, npixab ee K Kopnyc B noIoxeHne 0, yTo6bl coxpanhTb BOIOCTOKoCTb Baunx qacOB n 36exatb NOBpeXdHn MExAHn3Ma. Ira 3TOrO O3HaKOMbTeCb c pa3JeIOM 3aBOHaJrOIBKa).
A
B
C

Hb Hedei
YCTAHOBKa DnH HeJeIi BbIOnHReTc HaxaTeM Ha paCnoJoxeHHyO y OTMeKn «04:30» KhoNky-KoppeKTop (a) c NOMoUIO IHCTpymeHTa, npunaraoUeroC K BaUM Yacam. ONo Haxatne Ha KhoNky-KoppeKTop COOTBETCTByet nepexOy CTpenKn DaTb HA OIN IeHb BnepeI.
BHHMaHHe! 3anpeaetc BbnoJnHrtyCtAHOBky Hn Heeenn B npomexyToK BpeMeHc 19:00 do 01:00, TAK KAK B ETO BpeMpaobTaet MexAHN3M CMeHbI NOKa3AHn DaTb, INMOXHO NOBpeNTb YacOBoMEXAHN3M.
Φa3aJyHbI
Haximai Te KhoNky-KoppeKTop b) B noJoxeHH 14 yacob 30 MInHyT npinaraembIM K hacam HnCTpyMeHTOM do tex nop, noka B OKoUke He NoaBntc Tekuza a3a JyHb.. Odno Haxatne Ha KhoNky-KoppeKTop COOTBeTCTByET nepexOdy CTpeJIKN DaTb Ha OdIN DeHb Bneped.
BHHMaHHe! 3anpeaaetc BbINONHbKoppeKtnpOBky fa3bl Nyhbl B npomexytoK BpeMeHN c 19:00 do 01:00, TAK KAK B 3TO BpeMpa6oTaET MexAHm3M CMeHb NOKa3AHn DaTb, IN MOXHO NOBpeNtBu cacoBoMexAHm3M. UTo6bHaCTponb Yacb Ha npabunbHyIO NOOBHy CYTOK, CneDITE 3a CMeHOJ DaTb IN DnH HeEeN B OKouke: OHa npOxCoJNT OKOIO NOyHOn.
ПОЛный KАLEНДAPь
BVeJeHne
Cnoxha yacobaa yHKnna, H3bBaemar KaneHapem, no3BONaT oecneuHt b nKo CHTbBaemyIO INdkauNIO He TOnbKO YACOB MNHyT, HO N DaTb, DnH HeDenn, Mecua n a 0a3bl Nyhbl.
BHHMaHHe! 4To6b n36ExaTb NOBpeXdeHn MexAHn3Ma, He KoppeKtpyIte Noka3aHn KaneHapra B npomexytke ot 15.00 do 08.00, nockoIbky B aTO Bpem MexAHn3M CMeHb IaTb I a3bl Nybl npHXoNTB DeiCTBne. 4To6b HAcTpoNTb Hacb Ha npabNtHyIO NoOBnHy CYTOK, CJeDInTe 3a CMeHOJ DaTb I dHr HeJeIN B OKoUKe: OHa npOxCxOHT OkOIO nOlyHouH.

HactpoKa
YacbIMMHHyTbi
Ipeed npoBeHnem HactpoKn ybeHntecb, 7TO nnoXeHne cTpeNOK COOTBETCTBYET N3MeHEnIO dAtb B nOHOy, a He B nOJeHb. 7To6bHaCtponTb Ha npabINbHyIO NOOBHy CYTOK, CNEHTe 3a CMeHOJ DaTb I dHr HeDeHN B OKoUke: OHa npocxOJNT OKOIO NOYHOuN.
A. BbIaHInTe rOIOBky yAcOB B NOIOXeHne IyCTaHOBKn BpeMeBn (noIOxHeHne 1).CekyHdHa CTpeKa OCTaHOBHTcR.
B. BpaaTe rnoBky no yacobOn cTpeKe Do tex np, noka cTpeKa He OKaKetcB NnOKeHnn 3a 5 MInHyT Do Tpe6yEmoro Yaca.
C. MeIeHNO BpaaTe MNHyTHyIO CTpeKv B HAppaBneHn No yacobOcTpeKe n OCTaHOBHTe ee TOHNo Ha Bb6paHHo MNHyTe.
D. Iocne yctahOBKn Bbi6paHHoro haca npnxMITE rONOBky K KopnyCy, BepHyBee B noJoxHe 0; Yacb totyac BO3o6HOBJ CBOI XOJ.

BHHMaHHe! KaJbI pa3 nocne HactpoKn BO3BpaaAnTe rONOBky B nepBOHaHbHoe noLoXeHne, npKab ee K KopnyC y NoLoXeHne 0,HTo6b coxpanHb BOOCTOkoCTb Baunx Yacob N36exaTb NOpeXeHnMexAHn3Ma. Ira 3TOrO O3HaKombTec c pa3dENoM 3aBoHnKopoHka
CtpenoyHnHnKaaNa DaTbI
Haxmaite Ha KhoKy-KoppeKtop (a) B noJoxehn 4 yaca> npnilaraembIM K qacam nHCTpyMeHTOM do Tex nop, noka cTpeNk DaTb He yKaxet HxHoe 3HaueHne. Odno haxatne Ha KhoKy-KoppeKtop COOTBETCTByet nepexOdy cTpeNk DaTb HA OdnI DeHb BnepeI.
BnmaHne! NepexoI OT 3NaueHnRA 三 1 K 3NaueHnIO 工 O3Nauaet cMeHy MecaHa Ha HndkaTope Mecaa (npexoK cnEduOeMy Mecau).
IeHb HeJeenn
HaximaiTe Ha KhoNky-KoppeKTop (b) B noLoXeHHn 10 yacob" npnilaraemblm K yacam nHcTpymentom do tex nop, noka B OKoUke He NoRbITcra HxKhbl DeHb HeDeJI.
Mecra
Haxmante Ha KhoNky-KoppeKtop (c) B noLoXeHn 2 haca> npJnaeMbIM K hacam nHCTpyMeHtOM do Tex nop, NOKa B OKoUke He NoBHTcR HxKnBu MeCra.
BnmaHne! To6bI n36exaTb NobpeXeHn MexAHn3Ma, He HactpaBaIte NOKa3aHn Meca, ecn INOKa3AHn DaTb IIN KANEHpAra HaxoJrTa Mexy 3HaueHnMn «30» n «2», NOckOJIbky B aTo BpeM MEXAHN3M CMeHbI MeCzua npNXoDNT B DeCTBVE.
Φa3aJyHbI
Hakma Te Ha KhoKy-KoppeTOp (d) B noLoXeHHn 8 yacOB npinaraembM K qacam HcTpymeHTOM Do Tex nop, noka B oKoUke He noBntc HxHna f3a3a lyhbl. OndHO Haxatne Ha KhoKy-KoppeTOp COOTBETCTByet nepexOdy Bneped HA OIN NynHbI DeHb.

IODOBOI KALEHIDAPb N FYHKUry YPABHEHN BPEMEHNI
BVeJeHne
B OTNIHNE OTE KNAACCNUeCKORo MEXAHIN3Ma KANEHApRA, RODOBON KANEHApb Tpe6yET HAcTPOIKI DaTb TOJIbKO B KOHcE ΦEBpAra NHeBnCOKOCHO rOa, T. e., BCero Tpr pa3a B TeueHne 4-NetHERo BNcoKOCHO uNKna.
Hactpoika
YacbIMMHHyTbi
Ipeed npoBeHnem HactpOieny6eHntecb, 4TO noJIOXHeNE CTpeNOK COOTBcTByET N3MeHnIO DaTb B NOHOb, a He B NoJeHb. 4To6bl y6eHtbcB npaBnBHom BboOpE BpeMeHH cyToK, ONpeDenTe NOHOb, BpaaJra CTrpenKn Ooka He npOn3oJET CMeHa DaTb.
A. BbIyHInTe rONOBky yAcob B nONoXeHne Iyra YCTaHOBKn BpeMeHN (noNoXeHne 2).CekyHdHa cTpeNk a OCTaHOBnTCr.
B. BpaaTe rnoBky no yacobOn cTpeKe do tex nop, noka cTpeKa He OKaKetcB nIonoKeHH 3a 5 MInHyT do Tpe6yEmoro haca.
C. MeIeHNO BpaaTe MNHyTHyO CTpeNky B HAnpabNeHN No YacOBoI CTpeNke N OCTAHOBnTE ee TOUHO HA BbIbpaHHo MNHyTe.
D. Iocne yctahOBKn Bb6paHHoro haca npKMTe rONOBky K KopnyCy, BepHyB ee B noJoxHe 0; Yacb totuac BO3o6HOBrt CBOI xOJ.
BHHMaHHe! KaXbI pa3 nocHe HAcTpoKn Bo3BpaaJte rOOBky nepBOHaayabHoe noLoXeHne, npxKAB ee K KopnyCy B noLoXeHne 0, yTo6bI coxpanHb BOocToKoCTb Baunx hacob N36ExaTb NobpeJeHn MexAHn3Ma. IyAToR O3NaKOMbTEcB c pa3dENoM 3aBoHNa KOpOHka>.
Data Meca
BHHMaHHe! Npei npoBeHnem HactpOieny ybeInTecb, yTO qacOBa CTpeJIka HaxOnITcB INpOMexytke MExny OTMeKoN 9 uacOB 30 MNHTN OTMeKoN 20 uacOB 30 MNHT. BHe YKa3aHnOrO nNoXeHN BpaSeHne WToKA B NoIOXeHN I He ByET NMeTb HnKaKOrO 3ΦΦeKtA. TTo6bl HAcPToNTb YacBi Ha npabINbHyIO NOOBHy CYtOK, CneIte 3a CmEOH DaTb B OKoUKe; OHa PPONCxOJNT OKOLO NONYHOuN.
A. BbTnHte rONOBKY aocob b noIOXeHne nry cTahOBKn dAtb (nonoXeHne 1).
B. BpaaTe roOBky Do tex nop, noka cTpeKka KaneHapra (a) He yKaXeT HxKHyIO DaTy. TOnOBky MoXHO Bpaatb B dByx HanpabNeHnax. Ncck MecaeB (b) CnHxpoHn3nPoBaH CO cTpeNoHbIM HnDKATOpOM DAtb, NOtomy OH He Tpe6yET HAcToKn.
C. Iocne yctAHOBKn Heo6xOIMMO DaTb npXMMTe rONOBky K Kopnycy, BepHyB ee B nonoxeHne 0),
BnmaHne! KaXbI pa3 nocne HactpoKn BO3Bpaaate roNobky B nepBOHaanbHOe noOxHe, npixab ee K KopnyCy B noOxHe 0, TOb6I coXpAHIT BoIOCToIKoCTb Baunx hacOB n 36ExaT nobpeJdeHn MEXAHN3Ma. Ira 3TOrO O3HakOMbTEcB C pa3JeIOM 3aBOHAR roNobka>.
BnmaHne! B meaax, hacntbbaiox 30 dnei, nepexoI daTb K nepbomy nucny cneyioero mecaqa npocxoIIT B teueHne np6n3ntelbHO 4 acob 30 mHyT, mHyra nCNO 31].B febpane nepexoI daTb K nepbomy mapTa npocxoIIT B teueHne np6n3ntelbHO 7 acoB 30 mHyT, mHyra nCna 30]n 31].