
Vitacuisine VS400132 - Electric food cooker TEFAL - Free user manual and instructions
Find the device manual for free Vitacuisine VS400132 TEFAL in PDF.

User questions about Vitacuisine VS400132 TEFAL
0 question about this device. Answer the ones you know or ask your own.
Ask a new question about this device
Download the instructions for your Electric food cooker in PDF format for free! Find your manual Vitacuisine VS400132 - TEFAL and take your electronic device back in hand. On this page are published all the documents necessary for the use of your device. Vitacuisine VS400132 by TEFAL.
USER MANUAL Vitacuisine VS400132 TEFAL
text_image
1 2 3 4 5 6 7 8 9 10 11 12 13 14 15 16 A B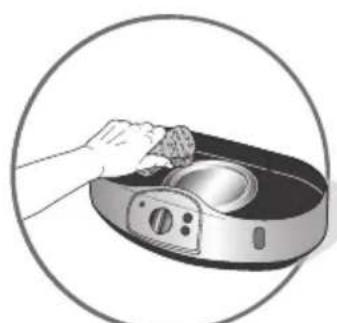
natural_image
Illustration of a hand using a circular tool to clean or adjust a kitchen appliance (no text or symbols visible)fig. 1 fig. 2 fig. 3 fig. 4
natural_image
Illustration of a kitchen appliance with a container and lid pouring liquid into it (no text or symbols)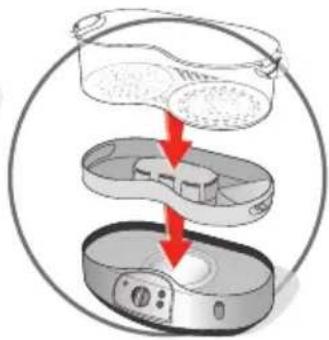
natural_image
Diagram showing three stages of a device with red arrows indicating process flow (no text or symbols)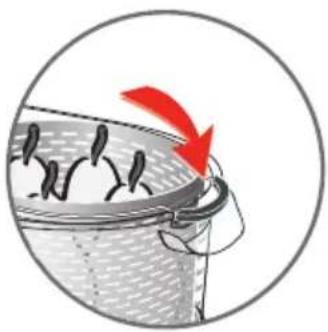
natural_image
Illustration of a container with fish inside, showing a red arrow indicating flow or movement (no text or symbols)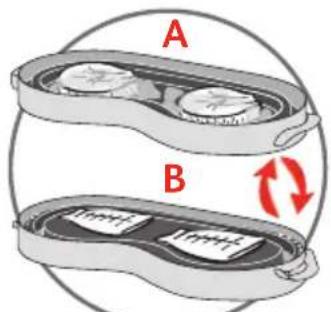
text_image
A Bfig. 5 fig. 6 fig. 7 fig. 8
natural_image
Illustration of a cooking process showing a lid being lifted into a two-tiered steamer (no text or symbols present)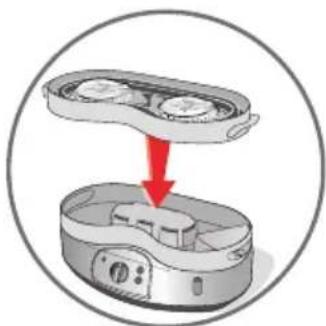
natural_image
Diagram showing a device being processed into a microwave oven, with no visible text or symbols.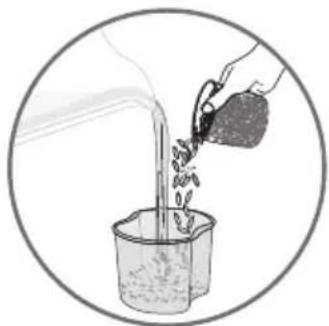
natural_image
Illustration of a hand pouring liquid into a beaker in a circular frame (no text or symbols)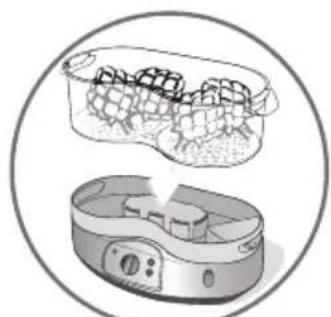
natural_image
Illustration of two food containers with food items inside, enclosed in a circular frame (no text or symbols)fig. 9 fig. 10 fig. 11 fig. 12
natural_image
Diagram of a food preparation setup showing a steamer with two cups and a lid, no text or symbols present.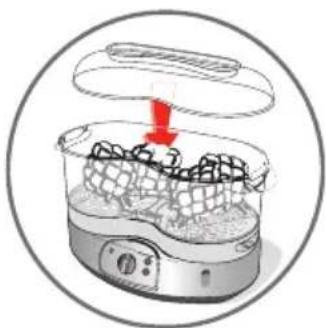
natural_image
Illustration of a steamer with a red arrow indicating heating process (no text or symbols)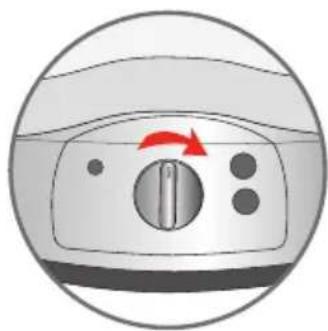
natural_image
Circular diagram showing a device control panel with arrows indicating rotation (no text or symbols)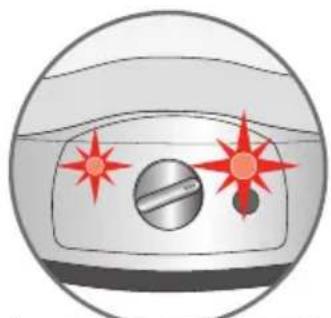
natural_image
Illustration of a car's seat with red star patterns and a metallic wheel (no text or symbols)fig. 13 fig. 14 fig. 15 fig. 16
natural_image
Illustration of a hand pressing a button with red starburst effects (no text or symbols)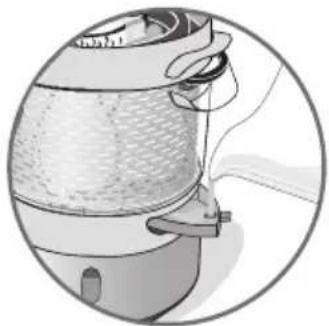
natural_image
Illustration of a kitchen appliance with a mesh fan and handle, enclosed in a circular frame (no text or symbols)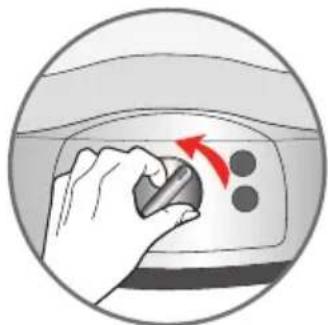
natural_image
Hand holding a knob inside a microwave oven with a red arrow indicating rotation (no text or symbols)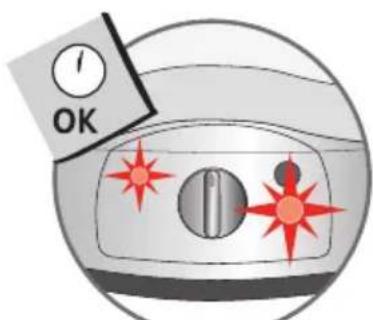
natural_image
Illustration of a kitchen appliance with red starburst patterns and a 'OK' button (no text or symbols on the appliance itself)fig. 17 fig. 18 fig. 19 fig. 20
natural_image
Diagram showing a biological process with a red arrow pointing to a cell structure (no text or symbols present)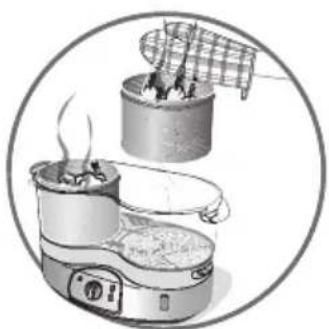
natural_image
Illustration of a cooking process showing a steaming pot and a steaming stove (no text or symbols)
natural_image
Illustration of a hand pouring food from a container into a bowl (no text or symbols)T-fal®
VITACUISINE
steamer 3 in 1
natural_image
Exterior view of a T-fal vitacienne cooking appliance with clear glass and meshed evaporators (no text or symbols visible on the device itself)Important recommendations
Read and follow the instructions for use. Keep them for future use.
Safety instructions
- This appliance is not intended to be operated using an external timer or separate remote control system.
- For your safety, this appliance conforms with applicable standards and regulations (Directives on low voltage, electromagnetic compatibility, materials in contact with foodstuffs, environment, etc.)
- This appliance complies with the safety regulations and directives in effect at the time of manufacture.
- Check that the power supply voltage corresponds to that shown on the appliance (alternating current).
- Given the diverse standards in effect, if the appliance is used in a country other than that in which it is purchased, have it checked by an approved service centre.
- This appliance is designed for domestic use only. In case of professional use, inappropriate use or failure to comply with the instructions, the manufacturer accepts no responsibility and the guarantee does not apply.
Connecting to the power supply
- Do not use the appliance if the appliance or the cord is damaged, if the appliance has fallen or shows visible damage or does not work properly. In the event of the above, the appliance must be sent to an approved Service Centre. Do not take the appliance apart yourself.
• Always plug the appliance into an earthed socket. - Do not use an extension lead. If you accept liability for doing so, only use an extension lead which is in good condition, has an earthed plug and is suited to the power of the appliance.
- If the power supply cord is damaged, it must be replaced by the manufacturer, an authorised service centre or a similarly qualified person in order to avoid any danger.
- Do not leave the cord hanging.
- Do not unplug the appliance by pulling on the cord.
• Always plug the appliance into an earthed socket. - Always unplug the appliance immediately after use; when moving it; prior to any cleaning or maintenance.
Using
- Use a flat and stable, heat resistant work surface, away from any water splashes.
- Never leave the appliance in operation unattended. Keep away from children.
- Burns can occur by touching the hot surface of the appliance, the hot water, the steam or the food.
- Do not touch the appliance while it is producing steam and use a cloth or oven glove to remove the lid, rice bowl and steam bowl.
- Do not move the appliance when it is full of liquids or hot food.
- Do not place the appliance near a heat source or in a hot oven, as serious damage could result.
- Never immerse the appliance in water!
- Do not place the appliance near a wall or a cupboard - the steam produced by the appliance can cause damage.
- This appliance should not be used by persons (including children) with physical, mental or sensorial disabilities, or person without knowledge of the appliance, unless they are supervised by a responsible adult who is familiar with these instructions.
- Do not let children play with the appliance.
Benefits of steam cooking
Welcome to the world of T-fal steam cooking!
Healthier, more nutritious dishes may easily be prepared by steaming and the results are colourful and naturally flavoursome. The true versatility and benefits of steaming can now be explored.
Your T-fal steamer is suitable for most foods and a surprising variety of recipes.

BALANCED NUTRITION
The VitaCuisine steamer allows you to prepare a tasty and well balanced meal in one easy step. Thanks to the individual baskets and cooking tray, vegetables, rice, fish, meat, fruits and desserts can be cooked simultaneously.

PRESERVING VITAMINS
The steamer's gentle yet quick cooking system retains more vitamins and micronutrients.

LESS FAT
Steam cooking is ideal for fish, chicken and lean meat. The specific cooking tray helps retain the essential fat, Omega 3. in oil-rich fish like salmon, sardines, mackerel, trout, herring, and fresh tuna.

MORE FRUITS AND VEGETABLES
The steaming process is easy and efficient. Steaming can help to increase your daily consumption of fruit and vegetables.
Now you are ready to create a delicious and well-balanced meal on the go!
Get steaming!
Description
- Lid
- Reversible cooking plate *
a. side for cooking with sauce or juice
b. side for steam cooking - Rice bowl *
- Stainless steel baskets
- Maxi capacity bowl
- Juice collector
-
Exterior water refill inlet during cooking
-
Interior maximum water level
- Water tank
- Heating element
- Exterior water level gauge
- Power base
- On / off light
- 60-minute timer
- Turbo Boost touchpad
- Keep warm touchpad *
Using your Vitacuisine
Before first use
- Clean the water tank with a damp soft cloth - fig.1.
- Wash all the removable parts using a sponge, warm water and washing up liquid, rinse and dry carefully.
All parts are removable and dishwasher safe; except for the power base/water tank.
Do not immerse the water tank in water when cleaning.
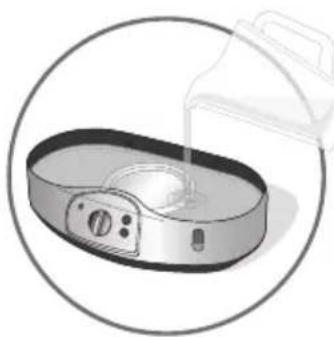
Filling the water tank
Do not use seasoning or any other liquid other than water in the water tank.
Check that there is water in the water tank before using the appliance.
- Pour the water directly into the water tank, up to the maximum level - fig.2.
- Place the juice collector on the tank until firmly in place.
- Place the maxi capacity bowl on the juice collector - fig.3.
- Use fresh cold water with each use and check the water is up to the maximum level.
Positioning the steam basket(s)
- Place the food in the basket(s).
- Place the basket(s) in the maxi capacity bowl and fold the handle(s) in the notches - fig.4.
- Put the lid on.
So as not to scald yourself with the steam from the lid, preferably place the steam holes towards the back.
Positioning the reversible cooking plate\*
The cooking plate (using side A only) can be used without the maxi capacity bowl. Place it directly on the juice collector - fig.7.
- Use face A of the cooking plate for meals with sauce or food that releases a lot of cooking juices, and face B for cooking without sauce or cooking juices - fig.5.
- Place the cooking plate on the maxi capacity bowl - fig.6.
- Put the lid on.
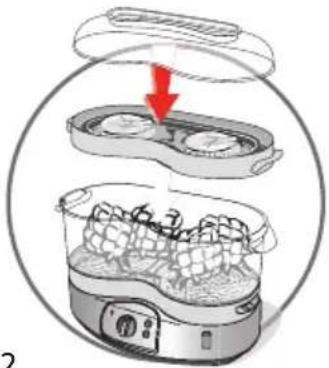
To cook rice
You can cook rice.
- Put the rice and the water in the rice bowl (see the table of cooking times) - fig.8.
- Place the rice bowl in a steam basket or in the maxi capacity bowl.
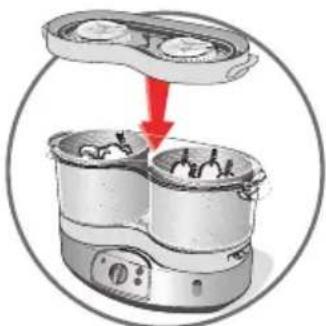
Cooking without baskets
For a maxi capacity, you can cook without the baskets.
- Remove the baskets.
- Place food in the maxi capacity bowl.
- Put the maxi capacity bowl on the juice collector - fig.9.
- Put on either the cooking plate and the lid - fig.10 or just the lid - fig.11.
Cooking
Choose the cooking time
- Plug the appliance in.
- Set the timer for the recommended cooking times (see table of cooking times) - fig.12.
- The on / off light and the TURBO BOOST touchpad light comes on and the steam cooking begins.
Do not touch the appliance or foods during cooking as they will be hot.
Using the TURBO BOOST touchpad
You can manually stop the Turbo Boost program if you press on the illuminated touchpad. Use oven gloves when handling the baskets during cooking time.
- Exclusive: your appliance is fitted with a TURBO BOOST touchpad which reduces cooking time for a better vitamin retention.
- At the start of cooking, the light comes on automatically - fig.13. This allows a faster start to cooking, thanks to a bigger steam output.
- The TURBO BOOST touchpad light goes out automatically as soon as the quantity of steam is sufficient for cooking.
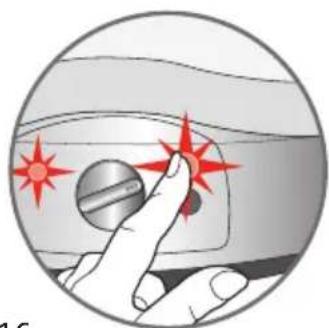
- If you open the lid (e.g.: if adding more food) you can press the TURBO BOOST touchpad again to quickly return the steamer to the ideal temperature - fig.14.
During cooking
- Check the water level during cooking using the external water level indicator.
- If necessary, slowly add more cold water through the exterior water inlet - fig.15.
- To stop the appliance ahead of time, turn the timer to the O position - fig.16.
When there is no more water in the water tank the appliance stops cooking.
Keep Warm\*
Check that there is always water in the water tank during keep warm.
- At the end of cooking, a signal sounds: food is ready.
• The keep warm function starts automatically - fig.17. - The appliance keeps food warm for up to 60 minutes without overcooking your meals
- Press the keep warm touchpad to stop the appliance.
Removing food from the steam baskets
- Lift the lid by the handle.
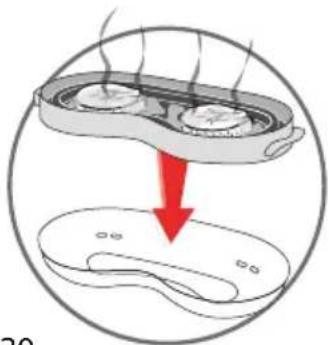
- Put the cooking plate on the turned over lid - fig.18.
- Remove the steam baskets using the handles - fig.19.
- Serve the food - fig.20.
Use oven gloves when handling the baskets.
Table of cooking times
Cooking times are approximate and may vary depending on the size of the food, the space between the food, the amount of food, individual preferences, and the wattage.
Use oven gloves when handling the baskets during the cooking time.
Meat – Poultry
| Food Type | Amount | Cooking Time | Recommendations | |
| Chicken breast (boneless) | Strips | 500 g 15 | min | |
| Whole 450 g 17 min | ||||
| Chicken drumsticks | Fresh 4 36 min | |||
| Turkey escalope | Fresh 600 g 24 min | |||
| Pork fillet | Fresh 700 g 38 min 1 cm thick | |||
| Lamb steak | Fresh 500 g 14 min | |||
| Sausages Fresh | 10 | 6 - 8 min | ||
Fish - shellfish
| Food Type | Amount | Cooking Time | Recommendations | |
| Thin fillet of fish | Fresh 450 g 10 min | |||
| Frozen 450 g 18 min | ||||
| Thick fillets or steaks | Fresh 400 g 15 min | |||
| Whole fish | Fresh | 600 g | 25 min | |
| Mussels | Fresh | 1 kg | 15 - 20 min | |
| Prawns | Fresh | 200 g | 5 min | |
| Scallops | Fresh | 100 g | 5 min | |
| Artichoke Fresh 3 43 | min | |||
| Asparagus Fresh 600 | g 17 min | |||
| Broccoli | Fresh | 400 g | 18 min | Cut into florets |
| Frozen | 400 g | 12 min | ||
| Celeriac Fresh 350 g | 22 min In cubes or slices | |||
| Mushrooms | Fresh | 500 g | 12 min | Small whole or cut in quarters |
| Cauliflower Fresh 1 | moyen | 19 min Cut into florets | ||
| Cabbage(red - green) | Fresh 600 g 22 min Sliced | |||
| Courgette | Fresh 600 g 12 min | |||
| Spinach | Fresh | 300 g | 13 min | Toss halfway through cooking |
| Frozen | 300 g | 15 min | ||
| Fine green beans | Fresh | 500 g | 30 min | |
| Frozen | 500 g | 25 min | ||
| Carrots | Fresh | 500 g | 15 min | Thinly sliced |
| Corn on the cob | Fresh | 500 g | 40 min | |
| Beans | Fresh | 500 g | 15 min | |
| Leeks | Fresh | 500 g | 30 min | Thinly sliced |
| Sweet peppers | Fresh | 300 g | 15 min | |
| Peas | Fresh | 400 g | 20 min | |
| Frozen | 400 g | 20 min | ||
| New potatoes (whole) | Fresh 600 g 40 – 45 min | |||
| Potatoes | Fresh | 600 g | 20 min | Sliced or cubed |
| Food Amount | Water quantity | Cooking Time | Recommendations | |
| White Rice American Long Grain | 150 g 300 ml | 30 - 35 min | ||
| White Basmati Rice | 150 g 300 ml | 30 - 35 min | ||
| Easy cook white rice | 150 g 300 ml | 28 - 33 min | ||
| Wholemeal rice 150 g | 300 ml 33 - 38 min | |||
| Couscous | 200 g | 350 ml | 23 min | Soak for 5 min in boiling water before cooking. |
| Pasta (spaghetti) | 200 g | 400 ml | 20 – 25 min | Use boiling water & stir halfway through cooking. |
Fruits
| Food Type | Amount | Cooking Time | Recommendations | |
| Bananas Fresh 3 10 | min Whole | |||
| Apples | Fresh | 4 | 12 min | Quartered |
| Pears | Fresh | 5 | 20 min | Whole or halved |
Other food
| Food Type | Amount | Cooking Time | Recommendations | |
| Eggs | Hard-boiled | 6 | 12 min | |
| Soft-boiled | 6 | 8 min |
Cleaning and maintenance
Cleaning the appliance
Do not immerse the water tank / power base in water.
Do not use abrasive cleaning products.
• After each use, unplug the appliance.
- Leave it to cool completely before cleaning.
- Check that the appliance has completely cooled down before emtying the juice collector and the water tank. Wipe the water tank with a damp cloth.
- Wash all the removable parts using a sponge, warm water and washing up liquid, rinse and dry carefully.
All parts are removable and dishwasher safe; except for the power base/water tank.
Removing scale build-up from the appliance
- For best results, descale the appliance after approximately 8 uses.
• Take out the juice collector. - Fill the hollow of the heating element with 3 tablespoons of white vinegar.
- Leave overnight to descale.
- Rinse out the inside of the water tank with warm water several times.
Always descale your appliance when cold to avoid any decaling odour. Do not use other scale-removing products.

Environment protection first!
① Your appliance contains valuable materials which can be recovered or recycled.
Leave it at a local civic waste collection point.