
JE2060GY - Blender BLACK & DECKER - Free user manual and instructions
Find the device manual for free JE2060GY BLACK & DECKER in PDF.
| Product Type | Juice Extractor (Blender) |
| Brand | Black & Decker |
| Model | JE2060GY |
| Color | Gray |
| Power Supply | 120 V, 60 Hz (polarized) |
| Estimated Power | Approximately 600 W |
| Motor | Induction, off/low/high (OFF/LOW/HIGH) |
| Material | Plastic and stainless steel (strainer knife) |
| Pulp Container Capacity | Approximately 1.5 L |
| Juice Container Capacity | Approximately 1 L |
| Hopper Diameter | Suitable for whole fruits |
| Power Cord Length | Approximately 0.8 m |
| Estimated Weight | Approximately 3.5 kg |
| Dimensions (L x W x H) | Approximately 30 x 25 x 40 cm |
| Main Functions | Juice extraction, pulp separation |
| Safety | Safety locks (both sides), auto shut-off if disassembled |
| Care and Cleaning | Removable parts dishwasher safe (top rack) |
| Spare Parts | Feeding device, tray, lid, strainer knife, pulp separator, spout, juice container, locks, base, pulp container |
| Warranty | 1 year (manufacturing defects) |
| Use | Household use only |
Frequently Asked Questions - JE2060GY BLACK & DECKER
User questions about JE2060GY BLACK & DECKER
0 question about this device. Answer the ones you know or ask your own.
Ask a new question about this device
Download the instructions for your Blender in PDF format for free! Find your manual JE2060GY - BLACK & DECKER and take your electronic device back in hand. On this page are published all the documents necessary for the use of your device. JE2060GY by BLACK & DECKER.
USER MANUAL JE2060GY BLACK & DECKER
Please Read and Save this Use and Care Book
Fruit & Vegetable Juice Extractor
Register your product online at www.prodprotect.com/applica, for a chance to WIN $100,000!
For US residents only
Accessories/Parts (USA/Canada)
When using any electrical appliance, basic safety precautions should always be followed, including the following:
Read all instructions.
To protect against risk of electrical shock, do not immerse cord, plug or base unit in water or other liquid.
- Close supervision is necessary when any appliance is used by or near children.
Unplug from the outlet when not in use, before putting on or taking off parts and before cleaning.
Avoid contact with moving parts.
Do not operate any appliance with a damaged cord or plug or after the appliance malfunctions, or has been damaged in any manner. Return the appliance to the nearest authorized service facility for examination, repair or adjustment. Or, call the appropriate toll-free number on the cover of this manual.
The use of accessories or attachments not recommended or sold by the manufacturer may cause fire, electric shock or injury.
Do not use outdoors.
Do not let cord hang over edge of the table or counter.
Always make sure juicer cover is clamped securely in place before motor is turned on. Do not unfasten clamps while juicer is in operation.
- Be sure to turn switch to OFF position after each use of your juicer. Make sure the motor stops completely before disassembling.
- Do not put your fingers or other objects into juicer opening while it is in operation. If food becomes lodged in opening, use food pusher or other piece of fruit or vegetable to push it down. When this method is not possible, turn the motor off and disassemble juicer to remove the remaining food.
Do not use this appliance if the rotating sieve is damaged.
SAVE THESE INSTRUCTIONS.
This product is for household use only.
POLARIZED PLUG (120V Models Only)
This appliance has a polarized plug (one blade is wider than the other). To reduce the risk of electric shock, this plug is intended to fit into a polarized outlet only one way. If the plug does not fit fully into the outlet, reverse the plug. If it still does not fit, contact a qualified electrician. Do not attempt to modify the plug in any way.
TAMPER-RESISTANT SCREW
Warning: This appliance is equipped with a tamper-resistant screw to prevent removal of the outer cover. To reduce the risk of fire or electric shock, do not attempt to remove the outer cover. There are no user-serviceable parts inside. Repair should be done only by authorized service personnel.
ELECTRICAL CORD
The cord of this appliance was selected to reduce the possibility of tangling in or tripping over a longer cord. If more length is needed, use an extension cord rated no less than 15-amperes. (For 220 volts rated products, use an extension cord rated no less than 6-amperes). When using an extension cord, do not let it drape over the working area or dangle where someone could accidentally trip over it. Handle cord carefully for longer life; avoid jerking or straining it at outlet and appliance connections.
Note: If the power supply cord is damaged, it should be replaced by qualified personnel. In Latin America, by an authorized service center.
Product may vary slightly from what is illustrated.
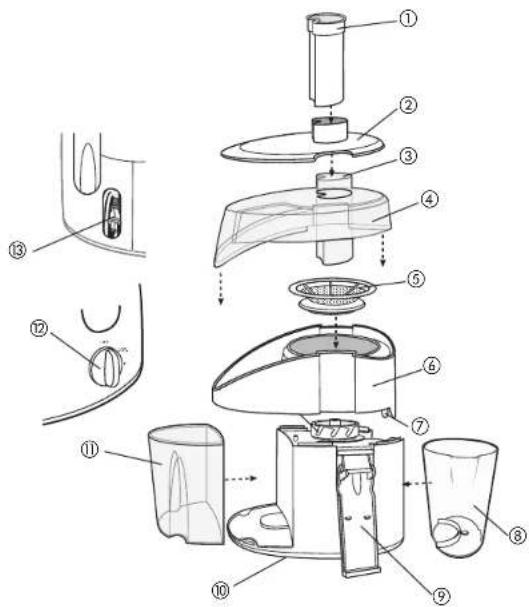
† 1. Fruit and vegetable feeder
Model JE2050 (Part# SJE051060900, Model JE2060 (Part#SJE051061000)
Model JE2060BL (Part# JE2060BL-01), Model JE2060GY (Part# JE2060GY-01)
†2. Food tray (Part# SJE081030100), Model JE2050 (Part# SJE081030200)
3. Food Chute
† 4. Clear cover (Part# SJE081040100)
+ 5. Stainless steel cutter/strainer (Part# CJEK0051)
† 6. Pulp separator (Part# SJE081050100)
7. Continuous flow juice spout
† 8. Juice container (Part# SJE081110100)
9. Safely locking latch (on each side) Model JE2050 (Part# SJF081080200)
Model JE2060 (Part# SJF081080400), Model JE2060BL (Part# JE2060BL-02)
Model JE2060GY (Part# JE2060GY-02)
10. Non-slip rubber feet
†11. Removable pulp container (Part# SJE08110100)
12. OFF/LOW/HIGH control
13. Cord storage compartment
† Consumer replaceable/removable parts
How to Disassemble
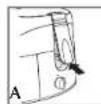
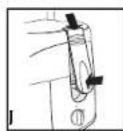
- To unlock the locking latches, pull open at the bottom of each latch to disengage from the groove on the cover (A).

- To remove the cover, take out the feeder and food tray; grasp the chute and pull up the cover (B).
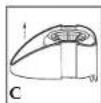
- To remove the pulp separator, grip the juice spout with one hand and the back edge of the pulp separator with the other hand. Pull it up with the cutter/strainer in place (C).
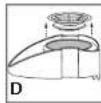
- To remove the cutter/strainer, hold the juice spout with one hand and grasp the cutter/strainer rim with the other hand; pull it out (D).
Caution: The cutter/strainer teeth are very sharp. Handle it carefully.
- To remove the pulp container, grasp the sides firmly and slide it out.
How to Use
This appliance is for household use only.
Important: Before you use it for the first time, disassemble the unit (see How to Disassemble section); wash all parts as instructed in the CARE AND CLEANING section.
HOW TO ASSEMBLE AND USE
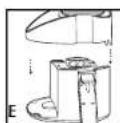
- Place the pulp separator on the base with the juice spout facing you (E).
-
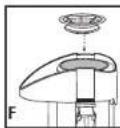
Insert the cutter/stainer in the center of the pulp separator. Turn it left and right a few times until it fits into place (F).
-
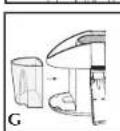
Grip the pulp container and slide it in until it snaps into place (G).
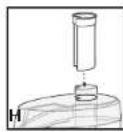
- Place the cover on top of the pulp separator with feeder in place (H).
- Lock the locking latches by pressing down the cover as you fit the tab at the top of each latch into the groove on each side of the cover. Press the bottom of each latch until you hear it click into place (J).
Important: The unit will not operate until the locking latches are locked.
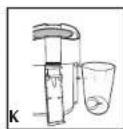
- Place the juice cup under the juice spout (K).
- Cut food into pieces to fit the food chute.
- Plug unit into an AC outlet. Turn the unit on by turning the control to the LOW or HIGH speed position.
-
Place food in the food chute and press lightly with feeder.
-
Every time the pulp container is almost full, turn OFF and unplug the unit, empty the pulp container and clean the cutter/strainer before you start juicing again.
Caution: The cutter/strainer teeth are very sharp. Handle carefully.
- When juicing is completed, turn off unit and unplug from outlet.
FOOD TRAY
- Follow steps 1-3 in the HOW TO ASSEMBLE AND USE section.
- Place the cover on top of the pulp separator.
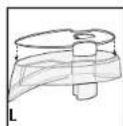
- Insert food tray through the food chute and place on top of the cover (L).

- Insert feeder through the food chute on the food tray (M).
Note: Use the food tray to hold small fruits, such as berries, grapes, mixed fruit pieces or mixed vegetable pieces as you process them through the food chute.
5. Follow steps 5-11 in the HOW TO ASSEMBLE AND USE section.
JUCING TIPS

When juicing carrots, do not overfill the food chute. Place carrots one by one and use gentle pressure.

Juicing avocados or bananas will produce a puree rather than a juice.

When juicing large quantities of fruits and vegetables, stop and empty the pulp container as it begins to get full and clean the cutter/strainer before you start juicing again.
Care and Cleaning
This product contains no user serviceable parts. Refer service to qualified service personnel.
TO CLEAN THE UNIT
Always clean all parts after every use to prolong the life of the unit.
- Turn unit OFF and unplug from electric outlet.
- Disassemble all parts. See HOW TO DISASSEMBLE section.
- Wash the feeder, food chute, cover, cutter/strainer, pulp separator, juice spout, juice cup and pulp container in warm sudsy water or in the dishwasher (top rack only).
Caution: The cutter/strainer teeth are very sharp. Handle carefully.
4. Wipe the base with a damp cloth or sponge. Never immerse the unit in water. Note: Over time, parts may change color (especially from juicing carrots or beets)
TO STORE THE UNIT
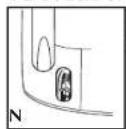
Fold the cable into the cord storage compartment on the side of the unit (N).
Fold the cable into the cord storage compartment on the side of the unit (N).
IMPORTANT MISES EN GARDE
For service, repair or any questions regarding your appliance, call the appropriate "800" number on the cover of this book. Do not return the product to the place of purchase. Do not mail the product back to the manufacturer nor bring it to a service center. You may also want to consult the website listed on the cover of this manual.
One-Year Limited Warranty
(Appplies only in the United States and Canada)
What does it cover?
- Any defect in material or workmanship; provided; however, Applica's liability will not exceed the purchase price of the product.
For how long?
One year after the date of original purchase.
What will we do to help you?
- Provide you with a reasonably similar replacement product that is either new or factory refurbished.
How do you get service?
- Save your receipt as proof of the date of sale.
- Check our on-line service site at www.prodprotect.com/applica, or call our toll-free number, 1-800-231-9786, for general warranty service.
If you need parts or accessories, please call 1-800-738-0245.
What does your warranty not cover?
- Damage from commercial use
- Damage from misuse, abuse or neglect
- Products that have been modified in any way
- Products used or serviced outside the country of purchase
Glass parts and other accessory items that are packed with the unit - Shipping and handling costs associated with the replacement of the unit
- Consequential or incidental damages (Please note, however, that some states do not allow the exclusion or limitation of consequential or incidental damages, so this limitation may not apply to you.)
How does state law relate to this warranty?
- This warranty gives you specific legal rights, and you may also have other rights that vary from state to state or province to province.
JNECESITA AYUDA?

- Fruit & Vegetable Juice Extractor
- SAVE THESE INSTRUCTIONS.
- POLARIZED PLUG (120V Models Only)
- TAMPER-RESISTANT SCREW
- ELECTRICAL CORD
- How to Disassemble
- How to Use
- HOW TO ASSEMBLE AND USE
- FOOD TRAY
- JUCING TIPS
- Care and Cleaning
- TO CLEAN THE UNIT
- TO STORE THE UNIT
- IMPORTANT MISES EN GARDE
- One-Year Limited Warranty
- (Appplies only in the United States and Canada)
- What does it cover?
- For how long?
- What will we do to help you?
- How do you get service?
- What does your warranty not cover?
- How does state law relate to this warranty?
- JNECESITA AYUDA?
Brand : BLACK & DECKER
Model : JE2060GY
Category : Blender