LFHD40S - TV Luxor - Free user manual and instructions
Find the device manual for free LFHD40S Luxor in PDF.

User questions about LFHD40S Luxor
0 question about this device. Answer the ones you know or ask your own.
Ask a new question about this device
Download the instructions for your TV in PDF format for free! Find your manual LFHD40S - Luxor and take your electronic device back in hand. On this page are published all the documents necessary for the use of your device. LFHD40S by Luxor.
USER MANUAL LFHD40S Luxor
Foljende symboler: another character for being a person
an saker under forutsagbar digest.

CLASS 1 LASER PRODUCT
| Safety Information | 2 |
| Markings on the Product | 2 |
| Environmental Information | 3 |
| Features | 4 |
| Accessories Included | 4 |
| Standby Notifications | 4 |
| TV Control Button & Operation | 4 |
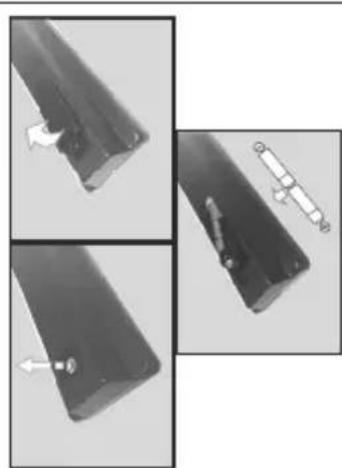
| Inserting the Batteries into the Remote | 5 |
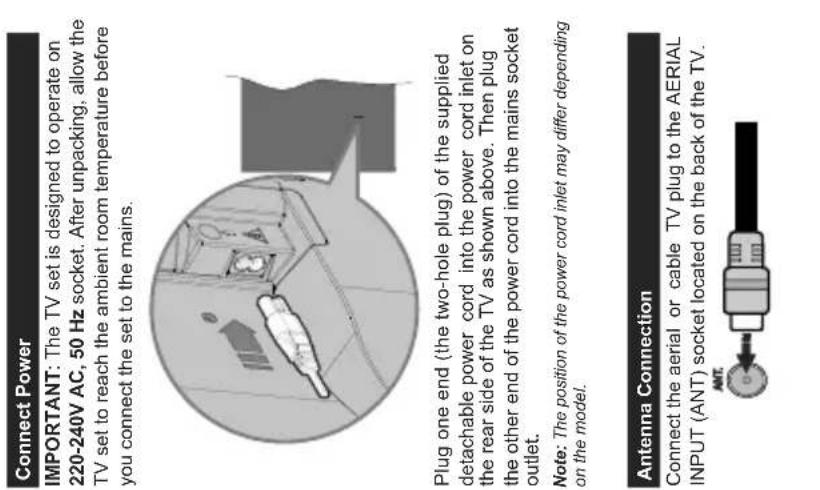
| Connect Power | 5 |
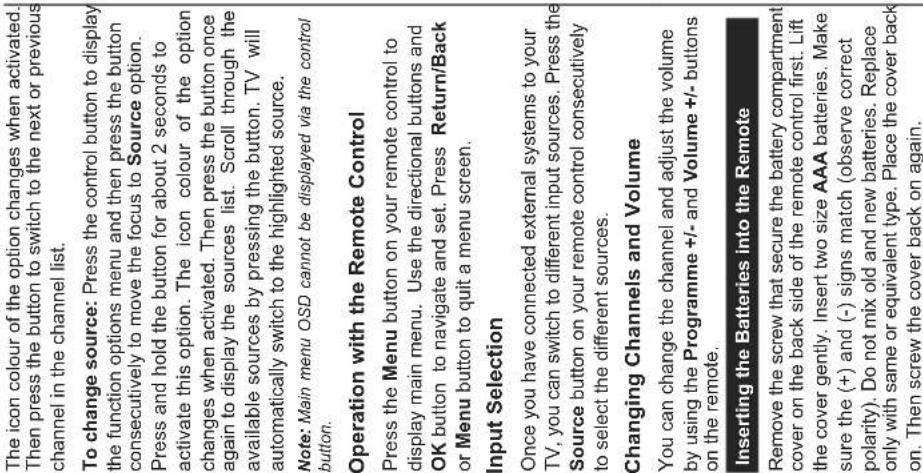
| Antenna Connection | 5 |
| License Notification | 6 |
| Specification | 6 |
| Remote Control | 7 |
| Connections | 8 |
| Switching On/Off | 9 |
| First Time Installation | 9 |
| Media Browser Menu | 10 |
| CEC | 10 |
| TV Menu Contents | 11 |
| General TV Operation | 15 |
| Using the Channel List | 15 |
| Configuring Parental Settings | 15 |
| Electronic Programme Guide (EPG) | 15 |
| Teletext Services | 16 |
| Software Upgrade | 16 |
| Troubleshooting & Tips | 16 |
| AV and HDMI Signal Compatibility | 17 |
| Supported File Formats for USB Mode | 18 |
| Supported DVI Resolutions | 19 |
Safety Information

English -2-
CAUTION: TO REDUCE THE RISK OF ELECTRIC SHOCK DO NOT REMOVE COVER (OR BACK). NO USER-SERVICEABLE PARTS INSIDE. REFER SERVICING TO QUALIFIED SERVICE PERSONNEL.
in extreme weather (storms, lightning) and long inactivity periods (going on holiday) disconnect the TV set from the mains.
The mains plug is used to disconnect TV set from the mains and therefore it must remain readily operable. If the TV set is not disconnected electrically from the mains, the device will still draw power for all situations even if the TV is in standby mode or switched off. Note: Follow the on screen instructions for operating the related features.
IMPORTANT - Please read these instructions fully before installing or operating
WARNING
children) with reduced physical, sensory or mental capabilities or lack of experience and / or knowledge use electrical devices unsupervised. Use this TV set at an altitude of less than 5000 meters above the sea level, in dry locations and in regions
with moderate or tropical climates.
The TV set is intended for household and similar
indoor use but may also be used in public places. For ventilation purposes, leave at least 5cm of free space around the TV. The ventilation should not be impeded by covering
or blocking the ventilation openings with items, such as newspapers, table-cloths, curtains, etc. The power cord plug should be easily accessible. Do not place the TV, furniture, etc., on the power cord.
A damaged power cord/plug can cause fire or give you an electric shock. Handle the power cord by the plug, do not unplug the TV by pulling the power cord. Never touch the power cord/plug with wet hands as
Never touch the power cord/rod with wet hands as this could cause a short circuit or electric shock. Never make a knot in the power cord or tie it with other cords. When damaged it must be replaced, this should only be done by qualified personnel.
- Do not expose the TV to dripping or splashing of liquids and do not place objects filled with liquids,
such as vases, cups, etc. on or over the TV (e.g., on shelves above the unit).
- Do not expose the TV to direct sunlight or do no place open flames such as lit candles on the top of
or near the TV.
- Do not place any heat sources such as electric heaters, radiators, etc. near the TV set.
- Do not place the TV on the floor and inclined
To avoid danger of suffocation, keep plastic bags
out of the reach of the babies, children and domestic animals.
Carefully attach the stand to the TV. If the stand is provided with screws, tighten the screws firmly prevent the TV from tilting. Do not over-tighten the screws and mount the stand rubbers properly.
- Do not dispose of the batteries in fire or with hazardous or flammable materials.
Warning: Batteries must not be exposed to excessive heat such as sunshine, fire or the like.
Markings on the Product
| Caution | Serious injury or death risk |
| Risk of electric shock | Dangerous voltage risk |
| Maintenance | Important maintenance component |
The following symbols are used on the product as a marker for restrictions and precautions and safety instructions. Each explanation shall be considered
where the product bears related marking only. Note such information for security reasons.
Class II Equipment: This appliance is designed in such a way that it does not require a safety connection to electrical earth.
Class II Equipment With Functional Earthing: This appliance is designed in such a way that it does not require a safety connection to electrical earth, the earth connection is used for functional purposes.
Connection is used for functional purposes. Protective Earth Connection: The marked terminal is intended for connection of the
protective earthing conductor associated with the supply wiring. Hazardous Live Terminal: The marked terminal(s) is/are hazardous live under normal operating conditions.
Caution, See Operating Instructions: The marked area(s) contain(s) user replaceable coin or button cell batteries.
Class 1 Laser Product: This product contains Class 1 laser source that is safe under reasonably foreseeable conditions of operation.
| WARNING Do not ingest the battery, Chemical Burn Hazard This product or the accessories supplied with the product may contain a coin/burner cell battery. If the coin/burner cell battery is swallowed, it can cause severe internal burns in just 2 hours and can lead to death. Keep new and used batteries away from children. If the battery compartment does not close securely, stop using the product and keep it away from children. If you think batteries might have been swallowed or placed inside any part of the body, seek immediate medical attention. | WALL MOUNTING WARNING · Read the instructions before mounting your TV on the wall. · The wall mount kit is optional. You can obtain from your local dealer, if not supplied with your TV. · Do not install the TV on a ceiling or on an inclined wall. · Use the specified wall mounting screws and other accessories. · Tighten the wall mounting screws firmly to prevent the TV from fall. Do not over-tighten the screws. | Press any button on the remote or on the TV to turn the screen on again. Note: Screen Off option is not available if the Mode is set to Game. When the TV is not in use, please switch off or disconnect the TV from the mains plug. This will also reduce energy consumption. Features · Remote controlled colour TV · Fully integrated digital terrestrial/cable TV (DVB- T-T2/C) · HDMI inputs to connect other devices with HDMI sockets · USB input · OSD menu system · Stereo sound system · Teletext · Headphone connection · Automatic programming system · Manual tuning · Automatic power down after up to eight hours. · Sleep timer · Child lock · Automatic sound mute when no transmission. · NTSC playback · AVL (Automatic Volume Limiting) · PLL (Frequency Search) · Game Mode (Optional) · Picture off function Accessories Included · Remote Control · Batteries: 2 x AAA · Instruction Book · Quick Start Guide · Power Cord Standby Notifications If the TV does not receive any input signal (e.g. from an aerial or HDMI source) for 3 minutes, it will go into standby. When you next switch-on, the following message will be displayed: TV switched to stand-by mode automatically because there was no signal for a long time." Press OK to continue. If the TV is on and it isn't being operated for a while it will go into standby. When you next switch-on, the following message will be displayed. TV switched to stand-by mode automatically because no operation was made for a long time." Press OK to continue. |
| WARNING A television may fall, causing serious personal injury or death. Many injuries, particularly to children, can be avoided by taking simple precautions such as: · ALWAYS use cabinets or stands or mounting methods recommended by the manufacturer of the television set. · ALWAYS use furniture that can safely support the television set. · ALWAYS ensure the television set is overhanging the edge of the supporting furniture. · ALWAYS educate children about the dangers of climbing on furniture to reach the television set or its controls. · ALWAYS route cords and cables connected your television so they cannot be tripped over, pulled or grabbed. · NEVER place a television set in an unstable location. · NEVER place the television set on tall furniture (for example, cupboards or bookcases) without anchoring both the furniture and the television set to a suitable support. · NEVER place the television set on cloth or other materials that may be located between the television set and supporting furniture. · NEVER place items that might tempt children to climb, such as toys and remote controls, on the top of the television or furniture on which the television is placed. · The equipment is only suitable for mounting heights ≤2 m. If the existing television set is going to be retained and relocated, the same considerations as above should be applied. | WARNING Apparatus connected to the protective earthing of the building installation through the MAINS connection or through other apparatus with a connection to protective earthing - and to a television distribution system using coaxial cable, may in some circumstances create a fire hazard. Connection to a television distribution system has therefore to be provided through a device providing electrical isolation below a certain frequency range (galvanic isolator, see EN 60728-11) |
| Specification | |
| TV Broadcasting PAL B/G | D/K K I/I' |
| Receiving Channels | VHF (BAND I/III) - UHF (BAND U) - HYPERBAND |
| Digital Reception | Fully integrated digital terrestrial-cable TV (DVB-T-C) (DVB-T2 compliant) |
| Number of Preset Channels | 1 000 |
| Channel Indicator On Screen Display | |
| RF Aerial Input 75 Ohm (unbalanced) | |
| Operating Voltage 220-240V AC, 50Hz. | |
| Audio German+Nicam Stereo | |
| Audio Output Power (WRMS.) (10% THD) | 2x8 |
| Power Consumption (W) | 75W |
| TV Dimensions DxLxH (with foot) (mm) | 235 x 902 x 570 |
| TV Dimensions DxLxH (without foot) (mm) | 87 x 902 x 517 |
| Display | 40" |
| Operation temperature and operation humidity | 0°C up to 40°C, 85% humidity max |

-
Standby: Switches On / Off the TV
-
Numeric buttons: Switches the channel, enters a
number or a letter in the text box on the scree 2. The Crlters to The Course
-
IV. Sentences to TV course 1
-
Volume of:
-
Menu: Displays TV menu
-
Directional buttons: Helps navigate menus, content
etc.and displays the subpages in TXT mode when
- OK: Confirm user selections, holds the page (in TXT)
mode).views channel list (DTV mode)
- Back/Return: Returns to previous screen, opens index
page (in TXT mode)
- Media browser: Opens the media browsing screen 41. See 'Display information about an open control
11.10: Displays information about on-screen content, shows hidden information (reveal - in TXT mode).
-
My button 1 (*)
-
Coloured Buttons: Follow the on-screen instructions for coloured button functions
-
Language: Switches between sound modes (analogue
TV), displays and changes audio/subtitle language (including TV, radio, and music).
15 Subtiies: Tums subtiess on and off (where available)
- Rapid reverse: Moves frames backwards in media
such as movies
-
No function
-
Play: Starts to play selected media 19. Play: starts to play selected media
-
Rapid advance: Moves frames forward
as movies
-
Pause: Pauses the media being played
-
Screen: Changes the aspect ratio of the screen
-
Text: Displays teletext (where available), press aga
to superimpose the teletext over a normal broadcast picture (mix).
-
My button 3 (t)
-
EPG (Electro
electronic programme guide
26.Exit: Closes and exits from displayed menus or return
to previous screen
-
Quick Menu: Displays a list of menus for quick access. 28. No fucture
-
Programme +1
30.Swap:Quickly cycles between previous and current
channels or sources
- Source: Shows all available broadcast and content
sources

(*) MY BUTTON 1 & MY BUTTON 2:
These buttons may have default functions depending on the
model. However you can set a special function to these buttons:
or channel . A confirm
screen. Now the sele
the selected function.
Note that if you perform First Time Installation, MY BUTTON
1&2 will return to their default function.
| Switching On/Off To Switch the TV On Connect the power cord to a power source such as a wall socket (220-240V AC, 50 Hz). To switch on the TV from standby mode either: • Press the Standby button, Programme +/- or a numeric button on the remote control. • Press the control button on the TV. To Switch the TV Off • Press the Standby button on the remote control. • Press the control button on the TV, the function options menu will be displayed. The focus will be on the Standby option. Press and hold the button for about 2 seconds to activate this option. The icon colour of the option will change. Then press the button once again, the TV will switch into standby mode. To power down the TV completely, unplug the power cord from the mains socket. Note: When the TV is switched into standby mode, the standby LED can blink to indicate that features such as Standby Mode Search or Over Air Download is active. The LED can also blink when you switch on the TV from standby mode. First Time Installation When turned on for the first time, the language selection screen is displayed. Select the desired language and press OK. On the next screen, set your preferences using the directional buttons. Note: Depending on the Country selection you may be asked to set and confirm a PIN at this point. The selected PIN cannot be 0000. You have to enter it if you are asked to enter a PIN for any menu operation later. About Selecting Broadcast Type Digital Aerial: If Digital Aerial broadcast search option is turned on, the TV will search for digital terrestrial broadcasts after other initial settings are completed. Digital Cable: If Digital Cable broadcast search option is turned on, the TV will search for digital cable broadcasts after other initial settings are completed. According to your other preferences a confirmation message may be displayed before starting to search. Select YES and press OK to proceed. To cancel operation, select NO and press OK. You can select Network or set values such as Frequency, Network ID and Search Step. When finished, press OK button. Note: Searching duration will change depending on the selected Search Step. Analogue: If Analogue broadcast search option is turned on, the TV will search for analogue broadcasts after other initial settings are completed. | Additionally you can set a broadcast type as your favourite one. Priority will be given to the selected broadcast type during the search process and the channels of it will be listed on the top of the Channel List. When finished, press OK to continue. You can activate Store Mode option at this point. This option will configure your TV's settings for store environment and depending on the TV model being used, the supported features of it may be displayed on the top of the screen as an info banner. This option is intended only for store use. It is recommended to select Home Mode for home use. This option will be available in System>Settings>More menu and can be turned off/on later. Press OK button on the remote control to continue. After the initial settings are completed TV will start to search for available broadcasts of the selected broadcast types. After all the available stations are stored, scan results will be displayed. Press OK to continue. The Edit Channel List menu will be displayed next. You can edit the channel list according to your preferences or press the Menu button to quit and watch TV. While the search continues a message may appear, asking whether you want to sort channels according to the LCN(*). Select Yes and press OK to confirm. (*) LCN is the Logical Channel Number system that organizes available broadcasts in accordance with a recognizable channel number sequence (if available). Note: Do not turn off the TV while initializing first time installation. Note that some options may not be available depending on the country selection. Media Playback via USB Input You can connect 2.5" and 3.5" inch (hdd with external power supply) external hard disk drives or USB memory stick to your TV by using the USB inputs of the TV. IMPORTANT! Back up the files on your storage devices before connecting them to the TV. Manufacturer will not be responsible for any file damage or data loss. Certain types of USB devices (e.g. MP3 Players) or USB hard disk drives/memory sticks may not be compatible with this TV. The TV supports FAT32 and NTFS disk formatting. Wait a little while before each plugging and unplugging as the player may still be reading files. Failure to do may cause physical damage to the USB player and the USB device itself. Do not pull out your drive while playing a file. You can use USB hubs with your TV's USB inputs. External power supplied USB hubs are recommended in such a case. It is recommended to use the TV's USB input(s) directly, if you are going to connect a USB hard disk. Note: When viewing image files the Media Browser menu can only display 1000 image files stored on the connected USB device. | Media Browser Menu You can play photo, music, and movie files stored on a USB disk by connecting it to your TV. Connect a USB disk to one of the USB inputs located on the side of the TV. Pressing the Menu button while in the Media Browser mode will access the Picture, Sound and Settings menu options. Pressing the Menu button again will exit from this screen. You can set your Media Browser preferences by using the Settings Menu. |
| Loop/Shuffle Mode Operation Start playback with the Play button and activate | All files in the list will be continuously played in original order | |
| Start playback with the OK button and activate | The same file will be played continuously (repeat) | |
| Start playback with the Play button and activate | All files in the list will be played once in random order | |
| Start playback with the Play button and activate | All files in the list will be continuously played in the same random order. | |
| CEC This function allows to control the CEC-enabled devices, that are connected through HDMI ports by using the remote control of the TV. The CEC option in the System>Settings>More menu should be set as Enabled at first. Press the Source button and select the HDMI input of the connected HDMI port name (such as DVD Player, Recorder 1 etc.). The TV remote is automatically able to perform the main functions after the connected HDMI source has been selected. To terminate this operation and control the TV via the remote again, press and hold the "0-Zero" button on the remote control for 3 seconds. This feature can also be enabled or disabled under the System>Settings>More menu. The TV supports also ARC(Audio Return Channel) feature. This feature is an audio link meant to replace other cables between the TV and the audio system (AV receiver or speaker system). When ARC is active, TV does not mute its other audio outputs automatically. So you need to decrease TV volume to zero manually, if you want to hear audio from connected audio device only (same as other optical or co-axial digital audio outputs). If you want to change connected device's volume level, you should select that device from the source list. In that case volume control keys are directed to connected audio device. When using the ARC connection, some |
| System - Sound Menu Contents | |
| Volume Adjusts the volume | level. |
| Equalizer | Selects the equalizer mode. Custom settings can be made only when in User mode. |
| Balance Adjusts whether the sound comes from the left or right speaker. | |
| Headphone | Sets headphone volume.Pleasesure ensure before using headphones that the headphone volume is set to a low level, to prevent damage to your hearing. |
| Sound Mode You can select a sound mode (If the viewed channel supports). | |
| AVL (Automatic Volume Limiting) | Sets the sound to obtain fixed output level between programmes. |
| Headphone/Lineout | When you connect an external amplifier to your TV using the headphone jack, you can select this option as Lineout. If you have connected headphones to the TV, set this option as Headphone.Please ensure before using headphones that this menu item is set to Headphone. If it is set to Lineout, the output from the headphone socket will be set to maximum which could damage your hearing. |
| Dynamic Bass Enables or disables the Dynamic Bass. | |
| Digital Out | Sets digital out audio type. |
TV Menu Contents
| System - Picture Menu Contents | |
| Mode | You can change the picture mode to suit your preference or requirements. Picture mode can be set to one of these options: Cinema, Game(optional), Sports, Dynamic and Natural. |
| Contrast Adjusts the light and dark values on the screen. | |
| Brightness Adjusts the brightness values on the screen. | |
| Sharpness | Sets the sharpness value for the objects displayed on the screen. |
| Colour Sets the colour value, adjusting the colors. | |
| Energy Saving | For setting the Energy Saving to Custom, Minimum, Medium, Maximum, Auto, Screen Off or Off. Note: Available options may differ depending on the selected Mode. |
| Backlight | This setting controls the backlight level. The backlight function will be inactive if the Energy Saving is set to an option other than Custom. |
| Advanced Settings | |
| Dynamic Contrast You can change the dynamic contrast ratio to desired value. | |
| Noise Reduction | If the signal is weak and the picture is noisy, use the Noise Reduction setting to reduce the amount of noise. |
| Colour Temp | Sets the desired colour temperature value. Cool, Normal, Warm and Custom options are available. |
| White Point | If the Colour Temp option is set as Custom, this setting will be available. Increase the 'warmth' or 'coolness' of the picture by pressing Left or Right buttons. |
| Picture Zoom Sets the desired image size format. | |
| Film Mode | Films are recorded at a different number of frames per second to normal television programmes. Turn this feature on when you are watching films to see the fast motion scenes clearly. |
| Skin Tone Skin tone can be changed between -5 and 5. | |
| Colour Shift Adjust the desired colour tone. | |
| HDMI Full Range | While watching from a HDMI source, this feature will be visible. You can use this feature to enhance blackness in the picture. |
| Reset | Reset the picture settings to factory default settings (except Game Mode). |
| Installation Menu Contents | |
| Automatic channel scan (Retune) | Displays automatic tuning options. Digital Aerial: Searches and stores aerial DVB stations. Digital Cable: Searches and stores cable DVB stations. Analogue: Searches and stores analogue stations. |
| Manual Channel Scan | This feature can be used for direct broadcast entry. |
| Network Channel Scan | Searches for the linked channels in the broadcast system. Digital Aerial: Searches for aerial network channels. Digital Cable: Searches for cable network channels. |
| Analogue Fine Tune | You can use this setting for fine tuning analogue channels. This feature is not available if no analogue channels are stored. |
| Installation Settings (Optional) | Displays installation settings menu. Standby Mode Search(*) : Your TV will search for new or missing channels while in standby. Any new found broadcasts will be shown. Dynamic Channel Update(*) : If this option is set as Enabled, the changes on the broadcasts such as frequency, channel name, subtitle language etc., will be applied automatically while watching. (*) Availability depends on model. |
| Clear Service List | Use this setting to clear channels stored. This setting is visible only when the Country option is set to Denmark, Sweden, Norway or Finland. |
| Select Active Network | This setting allows you to select only the broadcasts within the selected network to be listed in the channel list. This feature is available only for the country option of Norway. |
| Signal Information | You can use this menu item to monitor signal related informations such as signal level/quality, network name etc for available frequencies. |
| First Time Installation | Deletes all stored channels and settings, resets TV to factory settings. |
| System - Settings Menu Contents | |
| Conditional Access Controls conditional access modules when available. | |
| Language | You may set a different language depending on the broadcaster and the country. |
| Parental | Enter correct password to change parental settings. You can easily adjust Menu Lock, Maturity Lock, Child Lock or Guidance in this menu. You can also set a new PIN or change the Default CICAM PIN using the related options.Note: Some menu options may not be available depending on the country selection in the First Time Installation. Default PIN can be set to 0000 or 1234. If you have defined the PIN (is requested depending on the country selection) during the First Time Installation use the PIN that you have defined. |
| Timers | Sets sleep timer to turn off the TV after a certain time. Sets timers for selected programmes. |
| Date/Time Sets date and time. | |
| Sources Enables or disables selected source options. | |
| Accessibility Displays accessibility options of the TV. | |
| Hard of Hearing Enables any special feature sent from the broadcaster. | |
| Audio Description | A norration track will be played for the blind or visually impaired audience. Press OK to see all available Audio Description menu options. This feature is available only if the broadcaster supports it. |
| More Displays other setting options of the TV. | |
| Menu Timeout Changes timeout duration for menu screens. | |
| Standby Mode LED | If set as Off the standby mode LED will not light up when the TV is in standby mode. |
| Software Upgrade | Ensures that your TV has the latest firmware. Press OK to see the menu options. |
| Application Version Displays current software version. | |
| Subtitle Mode | This option is used to select which subtitle mode will be on the screen (DVB subtitle / Teletext subtitle) if both is available. Default value is DVB subtitle. This feature is available only for the country option of Norway. |
| Auto TV OFF | Sets the desired time for the TV to automatically go into standby mode when not being operated. |
| Store Mode | Select this mode for store display purposes. Whilst Store Mode is enabled, some items in the TV menu may not be available. |
| Power Up Mode | This setting configures the power up mode preference. Last State and Standby Mode options are available. |
| CEC | With this setting you can enable and disable CEC functionality completely. Press Left or Right button to enable or disable the feature. |
| CEC Auto Power On | This function allows the connected HDMI-CEC compatible device to turn on the TV and switch to its input source automatically. Press Left or Right button to enable or disable the feature. |
| Speakers | To hear the TV audio from the connected compatible audio device set as Amplifier. You can use the remote control of the TV to control the volume of the audio device. |
| OSS Displays Open Source Software license information. | |
| Note: Some options may not be available depending on the model of your TV, its features and the selected country in the First Time Installation. | |
| General TV Operation Using the Channel List The TV sorts all stored stations in the Channel List. You can edit this channel list, set favourites or set active stations to be listed by using the Channel List options. Press the OK button to open the Channel List. You can filter the listed channels by pressing the Blue button or open the Edit Channel List menu by pressing the Green button in order to make advanced changes in the current list. | Child Lock: If this option is set to ON, the TV can only be controlled by the remote control. In this case the control buttons on the TV will not work. Set PIN: Defines a new PIN number. Default CIFAM PIN: This option will appear as greyed out if no CI module is inserted into the CI slot of the TV. You can change the default PIN of the CI CAM using this option. Note: Default PIN can be set to 0000 or 1234. If you have defined the PIN (is requested depending on the selection) during the First Time Installation use the PIN that you have defined. Some options may not be available depending on the country selection in the First Time Installation. Electronic Programme Guide (EPG) Some channels send information about their broadcast schedules. Press the Epg button to view the Programme Guide menu. There are 3 different types of schedule layouts available, Timeline Schedule, List Schedule and Now/Next Schedule. To switch between them follow the instructions on the bottom of the screen. Timeline Schedule Zoom (Yellow button): Press the Yellow button to see events in a wider time interval. Filter (Blue button): Views filtering options. Highlight Genre (Subtitles button): Displays Highlight Genre menu. Using this feature, you can search the programme guide database in accordance with the genre. Info available in the programme guide will be searched and results matching your criteria will be highlighted. Options (OK button): Displays event options. Event Details (Info button): Displays detailed information about selected events. Next/Prev Day (Programme +/- buttons): Displays the events of previous or next day. Search (Text button): Displays Guide Search menu. Now (Source button): Displays current event of the highlighted channel. List Schedule(*) (*) In this layout option, only the events of the channel will be listed. Prev. Time Slice (Red button): Displays the events of previous time slice. Next/Prev Day (Programme +/- buttons): Displays the events of previous or next day. Event Details (Info button): Views filtering options. Next Time Slice (Green button): Displays the events of next time slice. Options (OK button): Displays event options. Now/Next Schedule Options (OK button): Displays event options. | Child Lock: If this option is set to ON, the TV can only be controlled by the remote control. In this case the control buttons on the TV will not work. Set PIN: Defines a new PIN number. Default CIFAM PIN: This option will appear as greyed out if no CI module is inserted into the CI slot of the TV. You can change the default PIN of the CI CAM using this option. Note: Default PIN can be set to 0001 or 1234. If you have defined the PIN (is requested depending on the selection) during the First Time Installation use the PIN that you have defined. Some options may not be available depending on the country selection in the First Time Installation. Electronic Programme Guide (EPG) Some channels send information about their broadcast schedules. Press the Epg button to view the Programme Guide menu. There are 3 different types of schedule layouts available, Timeline Schedule, List Schedule and Now/NextSchedule. To switch between them follow the instructions on the bottom of the screen. Timeline Schedule Zoom (Yellow button): Press the Yellow button to see events in a wider time interval. Filter (Blue button): Views filtering options. Highlight Genre (Subtitles button): Displays Highlight Genre menu. Using this feature, you can search the programme guide database in accordance with the genre. Info available in the programme guide will be searched and results matching your criteria will be highlighted. Options (OK button): Displays event option. Event Details (Info button): Displays detailed information about selected events. Next/Prev Day (Programme +/- buttons): Displays the events of previous or next day. Search (Text button): Displays guide Search menu. Now (Source button): Displays detailed information about selected events. Event Details (Info button): Views filtering options. Next Time Slice (Green button): Displays the events of next time slice. Options (OK button): Displays event options. Now/Next Schedule Options (OK button): Displays event options. | Child Lock: If this option is set to ON, the TV can only be controlled by the remote control. In this case the control buttons on the TV will not work. Set PIN: Defines a new PIN number. Default CIFAM PIN:This option will appear as greyed out if no CI module is inserted into the CI slot of the TV. You can change the default PIN of the CI CAM using this option. Note: Default PIN can be set to 0000 or 1234. If you have defined the PIN (is requested depending on the selection) during the First Time Installation use the PIN that you have defined. Some options may not be available depending on the country selection in the First Time Installation. Event Details (Info button): Displays detailed information about selected events. Filter (Blue button): Views filtering options. Highlight Genre (Subtitles button): Displays Highlight Genre menu. Using this feature, you can search the programme guide database in accordance with the genre. Info available in the programme guide will be searched and results matching your criteria will be highlighted. Options (OK button): Displays event option. Event Details (Info button): Displays detailed information about selected events. Filter (Blue button): Views filtering options. Next/Prev Day (Programme +/- buttons): Displays the events of previous or next day. Search (Text button): Displays guide Search menu. Next/Prev Day (Programme +/- buttons): Displays the events of previous or next day. Event Details (Info button): Views filtering options. Next Time Slice (Green button): Displays the events of next time slice. Options (OK button): Displays event options. Now/Next Schedule Options (OK button): Displays event options. | Child Lock: If this option is set to ON, the TV can only be controlled by the remote control. In this case the control buttons on theTV will not work. Set PIN: Defines a new PIN number. Default CIFAM PIN:This option will appear as greyed out if no CI module is inserted into the CI slot of the TV. You can change the default PIN of the CI CAM using this option. Note: Default PIN can be set to 0001 or 1234. If you have defined the PIN (is requested depending on the selection) during the First Time Installation use the PIN that you have defined. Some options may not be available depending on the country selection in the First Time Installation. Event Details (Info button): Displays detailed information about selected events. Filter (Blue button): Views filtering options. Highlight Genre (Subtitles button): Displays Highlight Genre menu. Using this feature, you can search the programme guide database in accordance withthe genre. Info available in the programme guide will be searched and results matching your criteria will be highlighted. Options (OK button): Displays event option. Event Details (Info button): Displays detailed information about selected events. Filter (Blue button): Views filtering options. Next/Prev Day (Programme +/- buttons): Displays the events of previous or next day. Search (Text button): Displays guide Search menu. Next/Prev Day (Programme +/- buttons): Displays the events of previous or next day. Options (OK button): Displays event options. Now/Next Schedule Options (OK button): Displays event options. | Child Lock: If this option is set to ON, the TV can only be controlled by the remote control. In this case the control buttons on the TV will not work. Set PIN: Defines a new PIN number. Default CIFAM PIN:This option will appear as greyed out if no CI module is inserted into the CI slot of the TV. You can change these options are available. Select Channel: Using this option, you can switch to the selected channel. Set Timer on Event / Delete Timer on Event: After you have selected an event in the EPG menu, press the OK button. Select Set Timer on Event option and press the OK button. You can set a timer for future to cancel an already set timer, highlight that event and press the OK button. Then select Delete Timer on Event option. The timer will be cancelled. Notes: You cannot switch to any other channel or source while there is an active timer on the current channel. It is not possible to set timer for two or more individual events at the same time interval. Teletext Services Press the Text button to enter. Press again to activate mix mode, which allows you to see the teletext page and the TV broadcast at the same time. Press once more to exit. If available, sections in the teletext pages will become colour-coded and can be selected by pressing the coloured buttons. Follow the instructions displayed on the screen. Digital Teletext Press the Text button to view digital teletext information. Operate it with the coloured buttons, cursor buttons and the OK button. The operation method may differ depending on the contents of the digital teletext. Follow the instructions displayed on the digital teletext screen. When the Text button is pressed again, the TV returns to television broadcast. Software Upgrade Your TV is capable of finding and updating the firmware automatically via the broadcast signal. Your TV is capable of finding and updating the firmware automatically via the broadcast signal. Software upgrade search via user interface On the main menu select System>Settings and then More. Navigate to Software upgrade and press the OK button. In Upgrade options menu select Scan for upgrade and press OK button to check for a new software upgrade. If a new upgrade is found, it starts to download the upgrade. After the download is completed confirm the question asking about rebooting the TV by pressing the OK to continue with the reboot operation. 3 AM search and upgrade mode Your TV will search for new upgrades at 3:00 o'clock Automatic scanning option in the Upgrade options menu is set to Enabled and if the TV is connected |
| Configuring Parental Settings The Parental Settings menu options can be used to prohibit users from viewing of certain programmes, channels and using of menus. These settings are located in the System>Settings>Parental menu. To display parental lock menu options, a PIN number should be entered. After coding the correct PIN number, Parental Settings menu will be displayed. Menu Lock: This setting enables or disables access to all menus or installation menus of the TV. Maturity Lock: If this option is set, TV gets the maturity information from the broadcast and if this maturity level is disabled, disables access to the broadcast. Note: If the country option in the First Time Installation is set as France, Italy or Austria, Maturity Lock's value will be set to 18 as default. | Child Lock: If this option is set to ON, the TV can only be controlled by the remote control. In this case the control buttons on the TV will not work. Set PIN: Defines a new PIN number. Default CIFAM PIN:This option will appear as greyed out if no CI module is inserted into the CI slot of the TV. You can change these options are available. Note: Default PIN can be set to 0001 or 1234. If you have defined the PIN (is requested depending on the selection) during the First Time Installation use the PIN that you have defined. Some options may not be available depending on the country selection in the First Time Installation. Event Details (Info button): Displays detailed information about selected events. Next/Prev Day (Programme +/- buttons): Displays the events of previous or next day. Event Details (Info button): Views filtering options. Next Time Slice (Green button): Displays the events of next time slice. Options (OK button): Displays event options. Now/Next Schedule Options (OK button): Displays event options. | Child Lock: If this option is set to ON, the TV can only be controlled by the remote control. In this case the control buttons on the T'will not work. Set PIN: Defines a new PIN number. Default CIFAM PIN:This option will appear as greyed out if no CI module is inserted into the CI slot of the TV. You can change these options are available. Note: Default PIN can be set to 0001 or 1234. If you have defined the PIN (is requested depending on the selection) during the First Time Installation use the PIN that you have defined. Some options may not be applied, sections in the teletext page will be added to the list. If applicable, sections in the teletext page will be added to the list. If applicable, sections in the teletext page will be added to the list. If applicable, sections in the teletext page will be added to the list. If applicable, sections in the teletext page will be added to the list. If applicable, sections in the teletext page will be added to the list. If applicable, sections in the teletext page will be added to the list. Event Details (Info button): Displays detailed information about selected events. Filter (Blue button): Views filtering options. Next/Prev Day (Programme +/- buttons): Displays the events of previous or next day. Options (OK button): Displays event options. Now/Next Schedule Options (OK button): Displays event options. | Child Lock: If this option is set to ON, the TV can only be controlled by the remote control. In this case the control buttons on the TV will not work. Set PIN: Defines a new PIN number. Default CIFAM PIN:This option will appear as greyer Use the Pin to select the pin number Use the Pin to select the pin number Use the Pin to select the pin number Use the Pin to select the pin number Use the Pin to select the pin number Use the Pin to select the pin number Use the Pin to select the pin number Use the Pin to select the pin number Use the Pin to select the pin number Use the Pin to select the pin number Use the Pin to select the pin number Use the Pin to select the pin number |
| Supported File Formats for USB Mode | |||
| Media Extension Form | at Notes | ||
| Video | .mpg, .mpeg | MPEG1-2 MPEG1: | 768x576 @ 30P, MPEG2:1920x1080 @ 30P |
| .vob | MPEG2 | 1920x1080 @ 30P | |
| .mp4 | MPEG4, Xvid, H.264 | ||
| .mkv | H.264, MPEG4,VC-1 | ||
| .avi MPEG2 | MPEG4, Xvid, H.264 | ||
| .flv | H.264/VP6/ Sorenson | H.264/VP6: 1920x1080 @ 30P Sorenson: 352x288 @ 30P | |
| .mp4, .mov, .3bpp, .3gp, MPEG transport stream, .ts.,trp, .lp, .mkv | HEVC/H.265 | 1080P@60fps - 50Mbps | |
| .3gp | MPEG4 , H.264 | 1920x1080 @ 30P | |
| Audio | 3 MPEG1 Layer 2/3 | Layer2: 32Kbps ~ 448Kbps (Bit rate) / 32kHz, 44.1kHz, 48kHz, 16kHz, 22.05kHz, 24kHz (Sampling rate) Layer3: 32Kbps ~ 320Kbps (Bit rate) / 32kHz, 44.1kHz, 48kHz, 16kHz, 22.05kHz, 24kHz, 8kHz, 11.025kHz, 12kHz (Sampling rate) | |
| works only with video files) | AC3 | 32Kbps ~ 640Kbps (Bit rate) / 32kHz, 44.1kHz, 48kHz (Sampling rate) | |
| AAC | 16Kbps ~ 576Kbps (Bit rate) / 48kHz, 44.1kHz, 32kHz, 24kHz, 22.05kHz, 16kHz, 12kHz, 11.025kHz, 8kHz (Sampling rate) | ||
| EAC3 | 32Kbps ~ 6Kbps (Bit rate) / 32kHz, 44.1kHz, 48kHz (Sampling rate) | ||
| LPCM | Unsigned 8bit PCM, Signed/Unsigned 16bit PCM (big / little endian), 24bit PCM (big endian), DVD LPCM 16/20/24bit (Bit rate) / 6kHz, 8kHz, 11.025kHz, 12kHz, 16kHz, 22.05kHz, 24kHz, 32kHz, 44.1kHz, 48kHz, 88.2kHz, 96kHz, 176.4kHz, 192kHz (Sampling rate) | ||
| IMA-ADPCM/MS-ADPCM | 384Kbps (Bit rate) / 8KHz ~ 48Khz (Sampling rate) | ||
| LBR | 32Kbps ~ 96Kbps (Bit rate) / 32kHz, 44.1kHz, 48kHz (Sampling rate) | ||
| Picture | .jpeg | Baseline | Resolution(WxH): 17000x10000 |
| Progressive | Resolution(WxH): 4000x4000 | ||
| .bmp | - | Resolution(WxH): 5760x4096 | |
| Subtitle | .sub, .srt - | - | |
English -18-
English - 17 -
AV and HDMI Signal Compatibility
| Source Supported Signals Available | |||
| Side AV | PAL 50/60 O | ||
| NTSC 60 O | |||
| HDMI | 480I 60Hz O | ||
| 480P 60Hz O | |||
| 576I, 576P 50Hz O | |||
| 720P 50Hz,60Hz O | |||
| 1080I 50Hz,60Hz O | |||
| 1080P | 24Hz, 25Hz30Hz, 50Hz,60Hz | O | |
(X: Not Available, O: Available)
In some cases a signal on the TV may not be displayed
properly. The problem may be an inconsistency with
standards from the source equipment (DVD, Set-top
box, etc.). If you do experience such a problem please
contact your dealer and also the manufacturer of the
source equipment.
Supported DVI Resolutions
When connecting devices to your TV's connectors by using DVI converter cable(DVI to HDMI cable - not supplied), you can refer to the following resolution information.
| 56Hz 60Hz 66Hz 70Hz 72Hz 75Hz | ||||||
| 640x400 | ☑ | |||||
| 640x480 | ☑ | ☑ | ☑ | ☑ | ||
| 800x600 | ☑ | ☑ | ☑ | ☑ | ☑ | |
| 832x624 | ☑ | |||||
| 1024x768 | ☑ | ☑ | ☑ | ☑ | ☑ | |
| 1152x864 | ☑ | ☑ | ☑ | |||
| 1152x870 | ☑ | |||||
| 1280x768 | ☑ | ☑ | ||||
| 1360x768 | ☑ | |||||
| 1280x960 | ☑ | ☑ | ||||
| 1280x1024 | ☑ | ☑ | ||||
| 1400x1050 | ☑ | ☑ | ||||
| 1440x900 | ☑ | ☑ | ||||
| 1600x1200 | ☑ | |||||
| 1680x1050 | ☑ | |||||
| 1920x1080 | ☑ | |||||
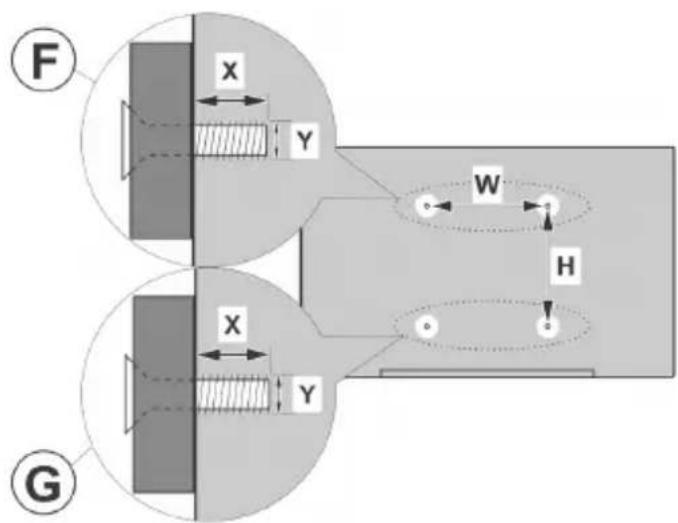
| A | VESA WALL MOUNT MEASUREMENTS | |||
| B | Hole Pattern Sizes (mm) | W | H | |
| 100 | 100 | |||
| C | Screw Sizes | |||
| F | G | |||
| D | Length (X) | min. (mm) | 7 | 5 |
| max. (mm) | 10 | 6 | ||
| E | Thread (Y) | M4 | ||
| ABCDE | ||||||
| English | VESA WALL MOUNT MEASUREMENTS | Hole Pattern Sizes (mm) Screw Sizes Length (X) Thread (Y) | ||||
| Deutsch | MASSANGABEN FÜR VESA-WANDMONTAGE | Lochmustergroßen (mm) | Schraubengrößen | Länge (X) | Gewinde (Y) | |
| Français | DIMENSIONS DU SUPPORT DE FIXATION MURALE VESA | Dimensions des modèles de trous de montage (mm) | Dimensions des vis | Longueur (X) | Filetage (Y) | |
| Italieno | Misurazioni installazione a parete VESA | Dimensioni schema foro (mm) | Dimensioni vite | Lunghezza (X) | Filettatura (Y) | |
| Portugués | MEDIÇOES DE MONTAGEM MURAL VESA | Dimensões do molde de furação (mm) | Tamanhos do parafuso | Comprimento (X) | Rosca (Y) | |
| Espanol | MEDIDAS DEL MONTAJE DE PARED VESA | Tamaños de patrón para agujero (mm) | Tamaños de tornillo | Longitud (X) | Rosca (Y) | |
| Türkce | VESA DUVARA MONTAJ APARATI ÖLÇULERİ | Açilacak Delik Üçüleri (mm) | Vida Üçüleri | Juzunluk (X) | Yüzey (Y) | |
| Ελλυκ | ΔΙΑΣΤΑΕΙ ΒΑΗΝ ΤΟΙΧΟΥ VESA | Мένεθη συματος onιών (mm) | Мένεθη ΒΙδύν | Μίκος (X) | Επερωμα (Y) | |
| Polski | WYMIARY DO MONTAZU NASCIENNEGO VESA | Rozmiary szablonu otworów (mm) | Rozmiary wkrętów | Dlugość (X) | Swint (Y) | |
| čěstina | ROZMÉRY DRŽÁKU NA ZED VESA | Rozměry velikosti dér (mm) | Rozměry sroubú | Délya (X) | Závit (Y) | |
| Magyar | VESA FALI TARTÖ MÉRETEK | Lyukak mèretetének nagysága(mm) | Csavar méré | Hossz (X) | Menet (Y) | |
| Română | MÁSURÁTORI SUPORT PERETE VESA | Dimensiani tipar gaură (mm) | Dimensiani Šuruburi | Lungime (X) | Filet (Y) | |
| Svenska | VESA VAGGMONTERINGSMÄTT | Hålmönsterstorlear (mm) | Skruvstorekar | Längd (X) | Träd (Y) | |
| Nederlands | VESA WANDMONTAGE METINGEN | Grotte booropening (mm) | Schroefgroote | Lente (X) | Draad (Y) | |
| Suomi | VESA-SEINÄASENNUKSEN MITAT | Reikäkuvion koot (mm) | Ruuvinkoot | Pituus (x) | Kierre (Y) | |
| Norsk | VESA VEGGMONTERINGSMÄL | Hullmønster størrelser (mm) | Skruestørrelser | Lente (x) | Träd (Y) | |
| Dansk | VESA VEGMONTERINGS-MÄL | Hulmønster-størrelser (mm) | Skruestørrelser | Lente (X) | Träd (Y) | |
| Pуssкь | РАЗМЕРБИ HACTEHHOTO KPEЛLEHIN RA VESA | Разменихстемы отberстий | Размених винов | Длима(X) | Рezьб(a) | |
| Беларczяй | ПАМЕРБИ HACIZHEHATA MAJIABAHA NÉ VESA | Памерь сістемы щетунін | Памерь виноту | Далжьн(a) | Разьб(a) | |
| maşedeонски | МЕКИ 3A MOHTIMPAHÉ HA SIVI 3A „BECA" | Шема на roлемпни дулкова (mm) | Толемпни на урафот | Долемпни (X) | Haboj (Y) | |
| украïncьka | РОЗМIPи HACTIHHOTO KPIЛLEHIN RA VESA | Вidостав各项工作 | Розмених винов | Довожини (X) | Дiamетр piэльд (Y) | |
| Srpski | DIMENZUE VESA ZIDNOG NOSAÇA | Dimenzije šablona za buşenje | Dimenzije zavrtnejva | Düzina (X) | Navoj (Y) | |
| Slovenčina | ROZMÉRY DRŽIAKA NA STENU VESA | Rozmery velkosti dioer (mm) | Rozmery skrutiek | Džika (X) | Závit (Y) | |
| Slovenščina | MERE STENSKEGA NOSILCA VESA | Velikosti vizora lukeni (mm) | Velikosti vijakov | Dolžina (X) | Navoj (Y) | |
| Hrvatski | VESA MIERE ZIDNOG DRŽAÇA | Veličine uzorka otvora (mm) | Veličine vijka | Düzina (X) | Navoji (Y) | |
| Bosanski | DIMENZUE VESA ZIDNOG NOSAÇA | Dimenzije šablona za buşenje | Dimenzije vijaka | Düzina (X) | Navoj (Y) | |
| Бъларсяngs | РАЗМЕРБИ 3A KOMПЛКТ 3A MOHTAXH HA CTEA HESA VESA | Размених на овога (mm) | Размених на овога | Дылених (X) | Рezьб(a) | |
| Lietuviç | VESA TVIRTINIIMO PRIÉ SIENOS MATAVIMAII | Angos šablono dydis (mm) | Varžtu dydis | Igisi (X) | Sriegis (Y) | |
| Latviešu | VESA SIENAS STIPRINAJUMA IZMÈRI | Caurumu šablono izměrs (mm) | Skrūvju izměri | Garums (X) | Vitne (Y) | |
| Eesti | VESA SEINALE KININITAMISE MÖÖDUD | Kruvi suuruse mòt (mm) | Kruvi suurus | Körgus(x) | Keere (Y) | |
| Shqip | PERMASAT ENJÉSISE SÉ MONIMIT NÉ MUR VESA | Madhésitë modele tê vrimave (mm) | Madhésitë evidhave | Giatësia (X) | Filetimi (Y) | |
| şövii | şövii cosmossi L'ELLIUS GOLJAN | (оо) cosmossi cosmossi cosmossi cosmossi cosmossi cosmossi cosmossi cosmossi cosmossi cosmossi cosmossi cosmossi cosmossi cosmossi cosmossi cosmossi cosmossi cosmossi cosmossi cosmossi cosmossi cosmossi cosmossi cosmossi cosmossi cosmoss i cosmossi cosmossi cosmossi cosmossi cosmossi cosmossi cosmossi cosmossi cosmossi cosmossi cosmossi cosmossi cosmossi cosmossi cosmossi cosmossi cosmossi cosmossi cosmossi cosmossi cosmossi cosmossi cosmossi cosmossi cosmossis cosmossi cosmossi cosmossi cosmossi cosmossi cosmossi cosmossi cosmossi cosmossi cosmossi cosmossi cosmossi cosmossi cosmossi cosmossi cosmossi cosmossi cosmossi cosmossi cosmossi cosmossi cosmossi cosmossi cosmossi cosmossI cosmossi cosmossi cosmossi cosmossi cosmossi cosmossi cosmossi cosmossi cosmossi cosmossi cosmossi cosmossi cosmossi cosmossi cosmossi cosmossi cosmossi cosmossi cosmossi cosmossi cosmossi cosmossi cosmossi cosmossi cosmossl cosmossl cosmossl cosmossl cosmossl cosmossl cosmossl cosmossl cosmossl cosmossl cosmossl cosmossl cosmossl cosmossl cosmossl cosmossl cosmossl cosmossl cosmossl cosmossl cosmossl cosmossl cosmossl cosmossl cosmossl cosmossI cosmossI cosmossI cosmossI cosmossI cosmossI cosmossI cosmossI cosmossI cosmossI cosmossI cosmossI cosmossI cosmossI cosmossI cosmossI cosmossI cosmossI cosmossI cosmossI cosmossI cosmossI cosmossI cosmossI cosmossI cosmossl cosmossl cosmossl cosmossl cosmossl cosmossl cosmossl cosmossl cosmossl cosmossl cosmossl cosmossl cosmossl cosmossl cosmossl cosmossl cosmossl cosmossl cosmossl cosmossl cosmossl cosmossl cosmossl cosmossl cosmoss1 cosmoss1 cosmoss1 cosmoss1 cosmoss1 cosmoss1 cosmoss1 cosmoss1 cosmoss1 cosmoss1 cosmoss1 cosmoss1 cosmoss1 cosmoss1 cosmoss1 cosmoss1 cosmoss1 cosmoss1 cosmoss1 cosmoss1 cosmoss1 cosmoss1 cosmoss1 cosmoss1 cosmoss1 cosmossI cosmossI cosmossI cosmossI cosmossI cosmossI cosmossI cosmossI cosmossI cosmossI cosmossI cosmossI cosmossI cosmossI cosmossI cosmossI cosmossI cosmossI cosmossI cosmossI cosmossI cosmossI cosmossI cosmossI cosmoss1 cosmoss1 cosmoss1 cosmoss1 cosmoss1 cosmoss1 cosmoss1 cosmoss1 cosmoss1 cosmoss1 cosmoss1 cosmoss1 cosmoss1 cosmoss1 cosmoss1 cosmoss1 cosmoss1 cosmoss1 cosmoss1 cosmoss1 cosmoss1 cosmoss1 cosmoss1 cosmoss1 cosmossl cosmoss1 cosmoss1 cosmoss1 cosmoss1 cosmoss1 cosmoss1 cosmoss1 cosmoss1 cosmoss1 cosmoss1 cosmoss1 cosmoss1 cosmoss1 cosmoss1 cosmoss1 cosmoss1 cosmoss1 cosmoss1 cosmoss1 cosmoss1 cosmoss1 cosmoss1 cosmoss1 cosmossI cosmoss1 cosmoss1 cosmoss1 cosmoss1 cosmoss1 cosmoss1 cosmoss1 cosmoss1 cosmoss1 cosmoss1 cosmoss1 cosmoss1 cosmoss1 cosmoss1 cosmoss1 cosmoss1 cosmoss1 cosmoss1 cosmoss1 cosmoss1 cosmoss1 cosmoss1 cosmoss1 cosmossI cosmossl cosmoss1 cosmoss1 cosmoss1 cosmoss1 cosmoss1 cosmoss1 cosmoss1 cosmoss1 cosmoss1 cosmoss1 cosmoss1 cosmoss1 cosmoss1 cosmoss1 cosmoss1 cosmoss1 cosmoss1 cosmoss1 cosmoss1 cosmoss1 cosmoss1 cosmoss1 cosmoss1 cosmossl cosmossI cosmoss1 cosmoss1 cosmoss1 cosmoss1 cosmoss1 cosmoss1 cosmoss1 cosmoss1 cosmoss1 cosmoss1 cosmoss1 cosmoss1 cosmoss1 cosmoss1 cosmoss1 cosmoss1 cosmoss1 cosmoss1 cosmoss1 cosmoss1 cosmoss1 cosmoss1 cosmoss1 cosmossl cosmoss2 cosmoss2 cosmoss2 cosmoss2 cosmoss2 cosmoss2 cosmoss2 cosmoss2 cosmoss2 cosmoss2 cosmoss2 cosmoss2 cosmoss2 cosmoss2 cosmoss2 cosmoss2 cosmoss2 cosmoss2 cosmoss2 cosmoss2 cosmoss2 cosmoss2 cosmoss2 cosmoss2 cosmoss2 cosmoss | ||||
TR: Isbu belgede; VESTEL Elektronik Sanayi ve Ticaret A.S., H telsiz ekipmani tipi TFT IDTV 'nin 2014/53/AB sayili direktife uygun oldugunu beman eder. AB uygunluk bemanin tam metni internet adresinde mevcuttur: doc.vosshub.com
EN: Hereby, VESTEL Elektronik Sanayi ve Ticaret declares that the radio equipment type TFT ID in compliance with Directive 2014/53/EU. The full text of the EU declaration of conformity is available at the following internet address: doc.vosshub.com
BG: C hactoioVEsTEL Elektronik Sanayi ve Ticaret A.S., DeKnapipa, Ye To3n TnnpaDIOscBOpbTFT IDTV e B cBOTBeTCTBne c DnpeKTnBa 201 EC. LIOCTHnT TeKCT Ha EC DeKnapauCnBcBOTBeTCTBne MoKe Da Ce HAmepn Ha CNeHNn INTEpHET aDpec: doc.vosshub.com
CZ: Timto VESTEL Elektronik Sanayi ve Ticaret prohlasuje, ze typ radiosvho zaifizen TFT IDTV v souladu se smernici 2014/53/EU. Üplne zneni EU prohlaseni o shodje je k dispozici na teto internetové adrese: doc.vosshub.com
DA: Hermed erklærer VESTEL Elektronik Sanayi Ticaret A.S., at radioudstyristypen TFT IDTV er overensstemmelse med direktiv 2014/53/EU. EU-overensstemmelseserklæringens fulde tekst kan findes på følgende internetadresse: doc.vosshub.com
DE: Hiermit erklart VESTEL Elektronik Sanayi ve Ticaret A.S., dass der Funkanlageotyp TFT IDTV der Richtlinie 2014/53/EU entspricht. Der vollständige Text der EU-Konformitätserklärung ist unter der folgenden Internetadresse verfügbar: doc.vosshub.com
EL: Me tny napouo o/η VESTEL Elektronik Sa Ticaret A.S., δηλωνει οτιο ραδioεξοπλισμός TFT IDTV πληροι tny obnyia 2014/53/EE. To πλήρες κείμενο της δηλωσης συμόρφωσης EE διατιθεται στην ακόλουθη Ατοσελίδα στο διαδικτuo: doc.vosshub.com
ES: Por la presente, VESTEL Elektronik Sanayi ve Ticaret A.S., declar que el tipo de equipo radioeléctrico TFT IDTV es conforme con la Directiva 2014/53/UE. Textoplete do la declaracion UE de conformidad está disponible en la direccion Internet siguier doc.vosshub.com
ET: Käesolevaga deklareerib VESTEL Elektronik Sa ve Ticaret A.S., et käesolev raadoseadme tuup TFT IDTV vastab direktiivi 2014/53/EL nõutele. ELi vastavusdeklaratsiooni täielik tekst on kättesaadaj jargmisel internetiaadressil: doc.vosshub.com
FI: VESTEL Elektronik Sanayi ve Ticaret A.S., vakuuttaa, etta radiolaitetyppi TFT IDTV on direktiivin 2014/53/EU mukainen. EU-vaatimustemmukaisuusvakuutuksen tāysimittainen teksti on saatavilla seuraavassa internetosoitteessa: doc.vosshub.com
FR: Le sousigné, VESTEL Elektronik Sanayi ve Ticaret A.S., déclare que l'équipment radioélectrique du type TFT IDTV est conforme à la directive 2014/53/UE. Le texte complet de la déclaration UE de conformité est disponible à l'adresse internet suivante: http://vosshub.com
HR: VESTEL Elektronik Sanayi ve Ticaret A.S., ovime izjavljuje da je radija oprema tipa TFT IDTV u skladu s Direktivom 2014/53/EU. Cjeloviti tekst EU izjave o sukladnosti dostupan je na sljedećoj internetskoj adresi: doc.vosshub.com
HU: VESTEL Elektronik Sanayi ve Ticaret A.Ş., igazolja, hogy a TFT IDTV típusu radioberendezs megfelel a 2014/53/ EU irányelvnek. Az EU-megfeleloségi nyilatkozat teljes szövege elerhető a következő internetes címen: doc.vosshub.com
AIS: Il fabbricante, VESTEL Elektronik Sanayi ve Ticaret A.S., TV isdichiara che il tipo di apparecchiatura radio TFT IDTV è conforme alla direttiva 2014/53/UE. Il testo Completo della dichiarazione di conformità UE è disponibile al seguente indirizzo Internet: doc.vosshub.com
LT: A§, VESTEL Elektronik Sanayi ve Ticaret A.§., patvirtinu, Kehe ne kad radijo jrenginiu tipas TFT IDTV atitinka Direktyva 2014/53/ 2014/53/ES. Visas ES atitikties deklaracijos tekstasi Ta 3aprieinamas siuo interneto adresu: doc.vosshub.com
LV: Ar šo VESTEL Elektronik Sanayi ve Ticaret A.Ş., deklare, ka radioiekarta TFT IDTV atbilst Direktivai 2014/53/ES. A.Ş., Pilns ES atbilstibas deklarácijas teksts ir pieejams šadā je interneta vietne: doc.vosshub.com
MT: B'dan, VESTEL Elektronik Sanayi ve Ticaret A.Ş., niddikjara li dan it-tip ta' taghmir tar-radju TFT IDTV huwa konformi mad-Direttiva 2014/53/UE. It-test kolu ve tad-dikjarazzjoni ta' konformita tal-UE huwa disponibbl i f'dan l-indirizz tal-Internet li gej: doc.vosshub.com
NL: Hierbij verklaar ik, VESTEL Elektronik Sanayi ve Ticaret A.Ş., dat het type radioapparatuur TFT IDTV conform is met Richtlijn 2014/53/EU. De volledige tekst van de EU-conformiteitsverklaring kan worden geraadpleegd op het volgende internetadres: doc.vosshub.com
er PL: VESTEL Elektronik Sanayi ve Ticaret A.Ş., ninejszym oswiadcza, ze typ urzadzenia radiowego TFT IDTV jest zgodny z dyrektywa 2014/53/UE. Pelny tekst deklaraci yayi godnosci UE jest dostepny pod nastepujacym adresem internetwym: doc.vosshub.com
PT: O(a) abaixo assinado(a) VESTEL Elektronik Sanay ve Ticaret A.S., declara que o presente tipo de equipamento de radio TFT IDTV está em conformidade com a Diretiva 2014/53/UE. O texto integral da declaração de conformidade está disponível no EI seguito endereço de Internet: doc.vosshub.com
RO: Prin prezenta, VESTEL Elektronik Sanayi ve Ticaret
te: A.S., declară că tipul de echipamente radio TFT IDTV
esté in conformitate cu Direactiva 2014/53/UE. Textul
anayi integral al declaratiei UE de conformitate este disponibil
lo la urmatóarea adresă internet: doc.vosshub.com
V SK: VESTEL Elektronik Sanayi ve Ticaret A.S., tymto vyhlasuje, ze radiove zariadenie typu TFT IDTV je v sulade so smernicou 2014/53/EU. Üplné EU vyhlasenie o zhode je k dispozicii na tejto internetovej adrese: doc.vosshub.com
SL: VESTEL Elektronik Sanayi ve Ticaret A.S., potruje,
da je tip radijske opreme TFT IDTV skladen 2014/53/EU. Direktivo 2014/53/EU. Celotno besedilo izjave EU o
skladnosti je na voljo na naslednjem splletnem naslovu: doc.vosshub.com
Esv: Harmed forsakrar VESTEL Elektronik Sanayi v Ticaret A.Ş., att denna typ av radioutrustning TFT Doc. IDTV overensstammer med direktiv 2014/53/EU. Den fullstandiga texten till EU-forsakran om Doc. overensstammelse finns på foljande webbadress: doc.vosshub.com
LUXOR